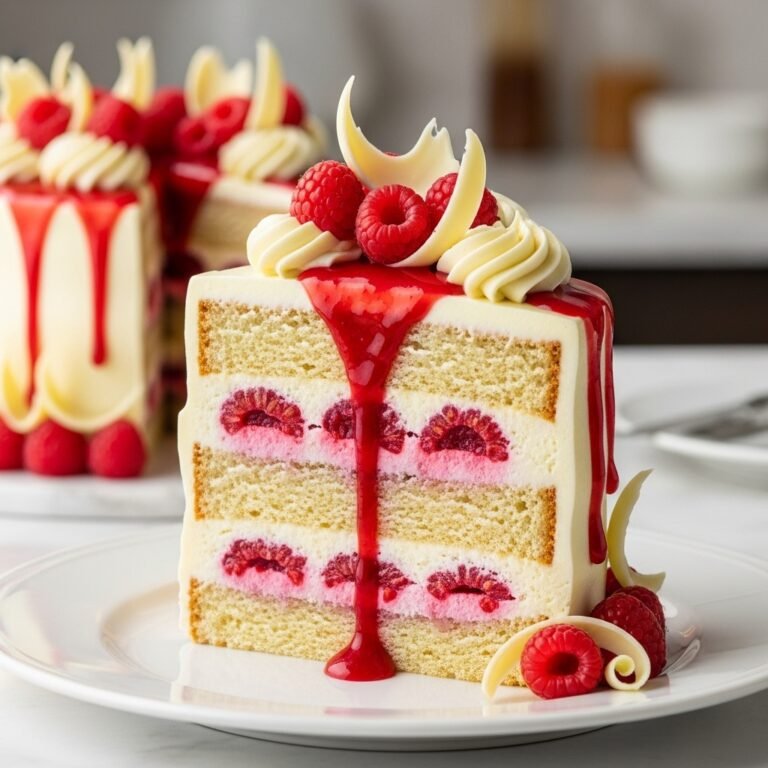
White Chocolate Raspberry Cake Recipe – Elegant, Moist Absolutely Stunning
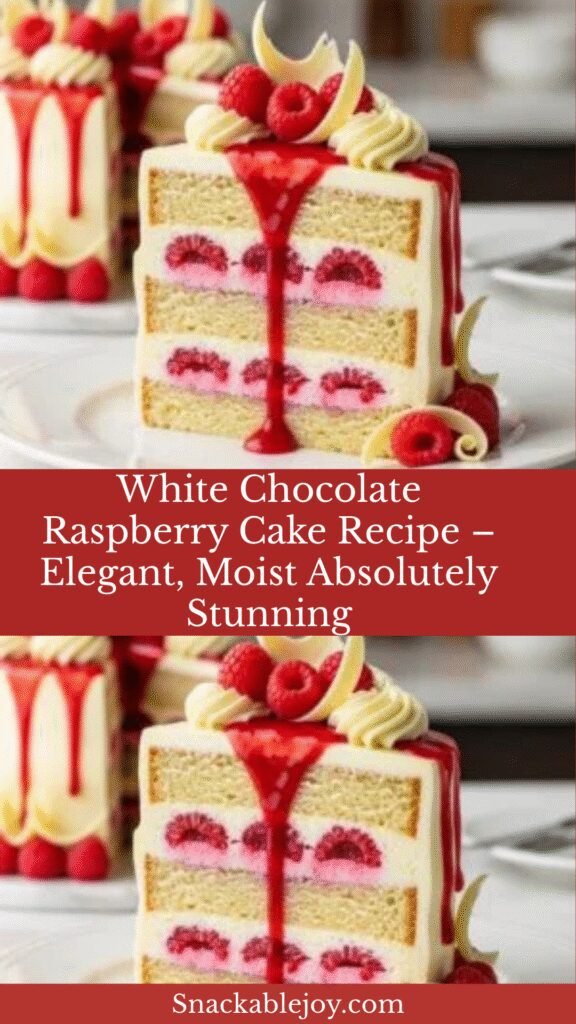
If you’re looking for a cake that tastes like it came from an upscale bakery but is surprisingly achievable at home, this white chocolate raspberry cake is about to become your new signature dessert. Picture layers of incredibly moist, tender white chocolate cake studded with fresh raspberries, filled and frosted with silky white chocolate buttercream, and finished with more juicy berries and elegant white chocolate curls. Every slice reveals gorgeous layers of pale cake dotted with jewel-toned raspberries—it’s the kind of cake that makes people gasp when you cut into it.
This cake brings together one of the most beloved flavor combinations in the dessert world: the creamy sweetness of white chocolate paired with the bright, tart pop of fresh raspberries. The contrast is absolutely magical—the white chocolate provides richness and buttery sweetness while the raspberries cut through with their fruity acidity, creating perfect balance in every bite. Despite looking incredibly sophisticated and elegant, this recipe breaks down the process into manageable steps that even intermediate bakers can master with confidence. Perfect for weddings, bridal showers, baby showers, Valentine’s Day, Mother’s Day, birthdays, or any celebration that deserves something truly special, this cake never fails to impress. It’s also surprisingly versatile—you can dress it up with elaborate decorations or keep it simple and rustic with fresh berries and a dusting of powdered sugar.
History / Background
The pairing of white chocolate and raspberry is a relatively modern flavor combination that emerged in the late 20th century as white chocolate gained acceptance in fine pastry. White chocolate itself has an interesting history—it was first created in Switzerland in the 1930s by Nestlé, who was looking for uses for excess cocoa butter. For decades, white chocolate was considered a novelty or inferior product compared to dark and milk chocolate, with food purists arguing it wasn’t “real” chocolate since it contains no cocoa solids, only cocoa butter.
The turning point came in the 1980s and 1990s when innovative pastry chefs, particularly in France and America, began experimenting with white chocolate as a sophisticated ingredient rather than just a candy. They discovered that white chocolate’s creamy, buttery, vanilla-forward flavor profile made it an excellent canvas for pairing with tart fruits, especially berries. Raspberries, with their perfect balance of sweetness and acidity, emerged as the ideal complement to white chocolate’s rich sweetness.
The white chocolate raspberry combination became especially popular in upscale bakeries and wedding cakes during the 1990s and early 2000s. It represented a departure from traditional chocolate or vanilla cakes, offering something elegant and contemporary. The color combination—pale ivory cake with vibrant pink-red berries—also made it visually stunning for special occasions, particularly weddings and showers where aesthetics matter as much as flavor.
Today, white chocolate raspberry cake has become a modern classic, appearing everywhere from high-end patisseries to home kitchens. It represents the evolution of American cake baking from simple layer cakes to more sophisticated flavor profiles that rival European pastries. The combination has proven so beloved that it’s inspired countless variations—cookies, tarts, cheesecakes, and more—but the layered cake remains the most show-stopping presentation.
Why You’ll Love This Recipe
This white chocolate raspberry cake delivers bakery-quality results without requiring professional pastry skills or specialized equipment. It’s one of those recipes that looks incredibly impressive but uses straightforward techniques that home bakers can absolutely master. The result is a cake that will have everyone convinced you either bought it from an expensive bakery or secretly trained as a pastry chef.
Here’s what makes this recipe truly special:
- Stunning visual impact – The pale layers with berry jewels are absolutely gorgeous when sliced
- Perfect flavor balance – Sweet white chocolate meets tart raspberries in ideal harmony
- Incredibly moist texture – This cake stays tender for days thanks to the white chocolate
- Special occasion worthy – Elegant enough for weddings, showers, and milestone celebrations
- Fresh fruit element – The raspberries add brightness and keep it from being too sweet
- Make-ahead friendly – Can be baked and assembled a day or two in advance
- Crowd-pleasing combination – Even people who don’t love chocolate often love white chocolate
- Versatile decoration – Dress it up elaborately or keep it simple and rustic
- Feeds a crowd – One three-layer cake serves 12-14 people generously
- Instagram-worthy – Photographs beautifully for social media and Pinterest
- Surprisingly achievable – Broken into clear steps, it’s more manageable than it looks
- Adaptable components – Can be made as cupcakes, sheet cake, or different sizes
This recipe proves that special occasion cakes don’t have to be intimidating. With good organization and clear instructions, you can create something truly extraordinary.
Ingredient Notes
For the White Chocolate Cake:
Cake Flour: Creates an incredibly tender, fine crumb that’s lighter than all-purpose flour. Cake flour has less protein, resulting in a more delicate texture perfect for layer cakes. If you don’t have cake flour, you can make a substitute: for each cup of cake flour, measure 1 cup all-purpose flour, remove 2 tablespoons, and replace with 2 tablespoons cornstarch. Sift well.
White Chocolate: Use high-quality white chocolate, not white chocolate chips. Chips contain stabilizers that prevent smooth melting. Look for white chocolate that lists cocoa butter as the first ingredient—brands like Ghirardelli, Guittard, or Lindt work beautifully. Avoid “white baking chips” or anything that doesn’t contain cocoa butter.
Buttermilk: Creates tender, moist cake with a slight tang that balances the sweetness. The acidity reacts with baking soda to give the cake lift. If you don’t have buttermilk, make your own by adding 2½ tablespoons of white vinegar or lemon juice to 2½ cups of whole milk and letting it sit for 5 minutes.
Eggs: Provide structure and richness. Use large eggs at room temperature—they incorporate more easily into the batter and create better texture.
Butter: Use unsalted butter at room temperature so you can control the salt level. Room temperature butter (cool but pliable) creams properly with sugar.
Vegetable Oil: Keeps the cake incredibly moist. The combination of butter (for flavor) and oil (for moisture) creates the perfect texture.
Vanilla Extract: Pure vanilla extract enhances the white chocolate flavor. Don’t use imitation—it tastes noticeably artificial.
Fresh Raspberries: The star fruit element. Fresh raspberries work best, but frozen can be used if tossed with flour while still frozen to prevent bleeding. Look for plump, dry berries without mold.
For the White Chocolate Buttercream:
White Chocolate: Again, use high-quality white chocolate. The buttercream showcases the chocolate, so quality matters enormously.
Unsalted Butter: Must be at room temperature and soft but not greasy. This is crucial for smooth, fluffy buttercream.
Powdered Sugar: Also called confectioners’ sugar, this sweetens and stabilizes the frosting. Sift it to remove lumps.
Heavy Cream: Helps achieve perfect consistency. Adjust the amount to get spreadable but stable frosting.
Equipment Needed
- Three 8-inch or 9-inch round cake pans – For layer cake; must be the same size
- Parchment paper – For lining pan bottoms and preventing sticking
- Large mixing bowls – At least two for different components
- Electric mixer – Stand mixer or hand mixer; stand mixer is easier
- Rubber spatula – For folding and scraping bowls
- Whisk – For combining dry ingredients
- Measuring cups and spoons – Accurate measurements are crucial
- Double boiler or microwave-safe bowl – For melting white chocolate
- Cooling racks – For cooling cake layers completely
- Offset spatula – Essential for frosting the cake smoothly
- Cake turntable – Optional but makes frosting much easier
- Serrated knife – For leveling cake layers if needed
- Cake board or serving plate – For presenting the finished cake
- Piping bags and tips – Optional, for decorative finishing
Print

White Chocolate Raspberry Cake Recipe
This white chocolate raspberry cake features three layers of moist, tender white chocolate cake studded with fresh raspberries, filled and frosted with silky white chocolate buttercream. It’s an elegant showstopper perfect for special occasions.
- Total Time: 2 hours 45 minutes
- Yield: 12-14 servings 1x
Ingredients
ScaleFor the White Chocolate Cake:
- 3 cups cake flour
- 2 teaspoons baking powder
- ½ teaspoon baking soda
- ½ teaspoon salt
- 6 oz high-quality white chocolate, finely chopped
- ¾ cup (1½ sticks) unsalted butter, room temperature
- 1¾ cups granulated sugar
- 4 large eggs, room temperature
- 1 tablespoon vanilla extract
- 2½ cups buttermilk, room temperature
- ⅓ cup vegetable oil
- 1½ cups fresh raspberries, plus more for garnish
- 2 tablespoons all-purpose flour (for tossing berries)
For the White Chocolate Buttercream:
- 12 oz high-quality white chocolate, finely chopped
- 1½ cups (3 sticks) unsalted butter, room temperature
- 4 cups powdered sugar, sifted
- 2 teaspoons vanilla extract
- 3-4 tablespoons heavy cream
- Pinch of salt
For Assembly and Decoration:
- Fresh raspberries
- White chocolate shavings or curls (optional)
- Powdered sugar for dusting (optional)
Instructions
Prepare the Cake Layers:
- Preheat and prep: Preheat your oven to 350°F (175°C). Grease three 8-inch round cake pans, line the bottoms with parchment paper circles, and grease the parchment. Lightly flour the pans and tap out excess.
- Melt white chocolate: Melt the 6 oz white chocolate in a double boiler or microwave (30-second intervals, stirring between). Let cool to lukewarm.
- Mix dry ingredients: In a medium bowl, whisk together cake flour, baking powder, baking soda, and salt. Set aside.
- Cream butter and sugar: In a large bowl using an electric mixer, beat the butter and sugar on medium-high speed for 3-4 minutes until light and fluffy, scraping down the bowl as needed.
- Add eggs: Add eggs one at a time, beating well after each addition. Mix in the vanilla extract and cooled melted white chocolate until combined.
- Alternate wet and dry: With the mixer on low speed, add the flour mixture in three additions alternating with the buttermilk mixture (buttermilk plus oil) in two additions, beginning and ending with flour. Mix each addition just until incorporated. Don’t overmix.
- Fold in berries: Toss the raspberries gently with 2 tablespoons all-purpose flour. Gently fold the floured raspberries into the batter using a rubber spatula, being careful not to crush them.
- Divide and bake: Divide the batter evenly among the three prepared pans (about 2½ cups each). Gently smooth the tops. Bake for 28-32 minutes, until a toothpick inserted in the center comes out clean or with a few moist crumbs. The tops should spring back when lightly pressed.
- Cool: Let the cakes cool in the pans on wire racks for 10 minutes. Then run a knife around the edges, invert onto the racks, peel off parchment, and cool completely before frosting (at least 1 hour).
Make the White Chocolate Buttercream:
- Melt chocolate: Melt the 12 oz white chocolate and let it cool to lukewarm (if it’s too hot, it will melt the butter).
- Beat butter: In a large bowl with an electric mixer, beat the room temperature butter on medium speed for 2-3 minutes until creamy and smooth.
- Add melted chocolate: Add the cooled melted white chocolate to the butter and beat until combined and smooth.
- Add sugar gradually: With the mixer on low, gradually add the sifted powdered sugar, 1 cup at a time, beating well after each addition.
- Add flavorings: Mix in vanilla extract and a pinch of salt.
- Adjust consistency: Add heavy cream 1 tablespoon at a time until the frosting reaches a smooth, spreadable consistency. Beat on medium-high for 1-2 minutes until light and fluffy.
Assemble the Cake:
- Level layers: If your cake layers have domed tops, use a serrated knife to level them for easier stacking.
- First layer: Place one cake layer on a cake board or serving plate. Spread about 1 cup of buttercream evenly over the top. Arrange a few fresh raspberries on the frosting if desired.
- Second layer: Place the second cake layer on top. Spread another 1 cup of buttercream over it, adding more raspberries if desired.
- Third layer: Place the final cake layer on top, flat side up for a smooth surface.
- Crumb coat: Apply a thin layer of buttercream all over the cake (top and sides) to seal in crumbs. This is your crumb coat. Refrigerate for 20-30 minutes until the frosting is firm.
- Final frosting: Apply the remaining buttercream in a thicker, final layer, smoothing with an offset spatula. Use a cake turntable if you have one, spinning while you hold the spatula still against the cake.
- Decorate: Arrange fresh raspberries on top of the cake. Add white chocolate curls or shavings if desired. Dust lightly with powdered sugar just before serving.
- Chill and serve: Refrigerate the cake for at least 30 minutes to set the frosting. Remove from the refrigerator 30 minutes before serving for best texture and flavor. Slice with a sharp knife, wiping it clean between cuts.
Notes
- Room temperature ingredients are crucial for proper mixing and texture. Set eggs, butter, and buttermilk out 1-2 hours before baking.
- Don’t overmix the batter after adding flour—this develops gluten and creates a tough cake.
- Tossing raspberries in flour helps prevent them from sinking to the bottom of the pans.
- The cake layers can be baked a day ahead, wrapped tightly, and stored at room temperature.
- For easier frosting, chill the cake layers for 30 minutes before assembling.
- If buttercream is too soft, refrigerate briefly. If too stiff, add more cream 1 teaspoon at a time.
- The assembled cake can be made 1-2 days ahead and refrigerated.
- Always bring cake to cool room temperature before serving for the best texture and flavor.
- Prep Time: 45 minutes
- Cook Time: 30 minutes
- Category: Dessert
- Method: Baking
- Cuisine: American
- Diet: Vegetarian
Nutrition
- Serving Size: 1 slice (based on 14 servings)
- Calories: 625
- Sugar: 58g
- Sodium: 220mg
- Fat: 34g
- Saturated Fat: 20g
- Unsaturated Fat: 11g
- Trans Fat: 0g
- Carbohydrates: 75g
- Fiber: 2g
- Protein: 7g
- Cholesterol: 115mg
Tips & Variations
Flavor Variations:
- Lemon White Chocolate Raspberry: Add 2 tablespoons lemon zest to cake batter and 1 tablespoon to frosting
- Almond Version: Replace vanilla with almond extract for sophisticated almond-raspberry flavor
- Champagne Cake: Replace ½ cup buttermilk with champagne for elegant twist
- Rose White Chocolate Raspberry: Add 1 teaspoon rose water to frosting for floral notes
- Mixed Berry: Use a combination of raspberries, blueberries, and blackberries
Frosting Variations:
- Cream Cheese Frosting: Use cream cheese frosting instead of buttercream for tangier option
- Swiss Meringue Buttercream: Make Swiss meringue buttercream with melted white chocolate for silkier texture
- Whipped Cream Frosting: Use stabilized whipped cream for lighter, less sweet option
- Raspberry Buttercream: Add 3-4 tablespoons raspberry puree to buttercream for pink frosting
Size Adaptations:
- Two-layer version: Use two 9-inch pans and reduce baking time by 3-5 minutes
- Cupcakes: Divide batter among 30 cupcake liners, bake 18-22 minutes
- Sheet cake: Bake in 9×13 pan for 35-40 minutes for easier serving
- Mini cakes: Use 6-inch pans for individual mini layer cakes (makes 2)
Decoration Ideas:
- Create an ombre effect with pink-tinted buttercream layers
- Use a rustic “naked cake” style with minimal frosting on sides
- Pipe decorative buttercream borders and rosettes
- Add edible flowers for romantic presentation
- Create chocolate drip effect with white chocolate ganache
Pro Chef Tips
Room Temperature Ingredients are Essential: This is not optional! Room temperature ingredients emulsify properly, creating smooth batter and preventing lumps. Cold ingredients don’t mix evenly and can cause the white chocolate to seize. Set your eggs, butter, and buttermilk out 1-2 hours before starting, or quick-warm eggs in a bowl of warm water for 5-10 minutes.
Don’t Overmix After Adding Flour: Once you add flour to the wet ingredients, mix only until just combined—you should still see a few small streaks of flour when you stop. Overmixing develops gluten, which makes the cake tough and dense instead of tender and light. Use a gentle hand and trust the process.
The Flour-Tossing Berry Trick: Tossing raspberries in flour before folding them in might seem fussy, but it’s brilliant science. The flour coating helps suspend the berries throughout the batter rather than letting them sink to the bottom. It also creates a barrier that reduces bleeding, keeping your cake layers pristine instead of streaky pink.
Cool White Chocolate Before Adding: Hot melted white chocolate will melt your butter and ruin your buttercream, creating a soupy mess. Always let melted white chocolate cool to lukewarm (you should be able to comfortably hold your finger in it) before adding to butter or cake batter. This patience makes all the difference.
The Crumb Coat is Not Optional: Professional bakers always do a crumb coat—that thin first layer of frosting that traps loose crumbs. It creates a smooth base for the final frosting layer, preventing crumb contamination that makes frosting look messy. The 20-minute chill time allows it to firm up, making the final frosting layer glide on smoothly.
Offset Spatula is Your Best Friend: If you don’t own an offset spatula, this is the recipe that will convince you to buy one. The angled blade makes frosting cakes exponentially easier, allowing you to reach across the top and smooth the sides with precision. It’s the single best tool for creating professional-looking frosted cakes.
The Warm Knife Trick: For bakery-perfect slices, dip your knife in hot water, wipe it completely dry, make one decisive cut, then wipe the knife clean and repeat. The warm knife cuts through cold buttercream without dragging or creating jagged edges. It’s how professionals get those gorgeous, Instagram-worthy cake slices.
Common Mistakes to Avoid
Using White Chocolate Chips Instead of Real White Chocolate: This is the most common mistake! White chocolate chips contain stabilizers that prevent them from melting smoothly, creating a grainy, separated mess in your cake and frosting. Always use real white chocolate bars or baking white chocolate (labeled as containing cocoa butter) and chop it yourself. The difference in texture and flavor is dramatic—smooth versus grainy, rich versus waxy.
Overmixing the Cake Batter: Once you start adding flour, gentle is the name of the game. Overmixing develops gluten strands that make the cake tough, chewy, and dense instead of tender and fluffy. Mix each flour addition just until the streaks disappear, and fold in the raspberries with a light hand. A few small flour streaks when you stop mixing will disappear during baking—trust that stopping early creates better texture.
Not Letting Cakes Cool Completely Before Frosting: I know you’re excited, but frosting warm or even slightly warm cake is a recipe for disaster. The warm cake will melt your buttercream, causing it to slide off in a slippery, soupy mess. Cake layers must be completely cool to room temperature—at least 1 hour on wire racks, or speed this up by chilling them wrapped for 30 minutes.
Adding Hot Melted Chocolate to Buttercream: If your melted white chocolate is even slightly warm when added to the buttercream, it will melt the butter and turn your frosting into a liquid puddle. Always let melted chocolate cool to lukewarm first. If you accidentally add it too warm and the buttercream becomes soupy, refrigerate it for 15-20 minutes, then rewhip—it should come back together.
Skipping the Parchment Paper: Greasing and flouring pans helps, but parchment paper on the bottom is insurance against sticking. Cake layers with raspberries are especially prone to sticking because the berries can caramelize on the bottom. The parchment circle guarantees your layers release cleanly every time. It takes 30 seconds to cut circles and prevents 30 minutes of frustration.
Not Bringing Cold Cake to Room Temperature Before Serving: Cake straight from the refrigerator is dense, firm, and lacks flavor. The butterfat in both the cake and frosting needs to soften to reveal the full flavor and achieve that tender, melt-in-your-mouth texture. Always remove the cake from the refrigerator 30-45 minutes before serving. The difference is remarkable—cold cake tastes muted, room temperature cake tastes amazing.
Storage & Meal Prep
Room Temperature Storage: Because this cake contains fresh raspberries, it should not be left at room temperature for extended periods. However, you can leave it out for 4-5 hours while serving at a party (if your room isn’t excessively warm). The buttercream is stable enough to hold up during normal party conditions.
Refrigerator Storage: Store the assembled cake covered in the refrigerator for up to 4-5 days. Place it in a cake keeper or cover loosely with plastic wrap (don’t let the wrap touch the frosting—use toothpicks to tent it if needed). The cake actually stays incredibly moist in the fridge and the flavors continue to develop. Some people prefer it after a day!
Freezing the Assembled Cake: This cake freezes beautifully! Flash-freeze the assembled, decorated cake uncovered for 1-2 hours until the frosting is firm. Then wrap the entire cake carefully in plastic wrap, followed by aluminum foil. Freeze for up to 2 months. Thaw overnight in the refrigerator, still wrapped, then bring to room temperature before serving.
Freezing Cake Layers: The unfrosted cake layers freeze exceptionally well, making them perfect for advance prep. Once completely cool, wrap each layer tightly in plastic wrap, then in foil. Freeze for up to 3 months. Thaw overnight in the refrigerator or at room temperature for 2-3 hours before frosting.
Storing Buttercream Separately: You can make buttercream up to 1 week ahead and store it in an airtight container in the refrigerator. When ready to use, let it come to room temperature (2-3 hours), then rewhip it with an electric mixer until fluffy again. It will look perfect!
Individual Slice Storage: Leftover slices can be wrapped individually in plastic wrap and stored in an airtight container in the refrigerator for up to 5 days. This makes grabbing a slice easy and prevents the whole cake from being exposed to air repeatedly.
Make-Ahead & Freezer Notes
Perfect Make-Ahead Timeline: This cake is actually ideal for making ahead—the layers stay moist for days, and the assembled cake improves as flavors meld. Breaking the work into stages also makes the process much more manageable and stress-free.
Component-by-Component Timeline:
- Cake layers: Bake up to 2 days ahead. Wrap tightly in plastic wrap and store at room temperature, or freeze for up to 3 months.
- Buttercream: Make up to 1 week ahead and refrigerate, or freeze for up to 3 months. Bring to room temperature and rewhip before using.
- Assembled cake: Complete the cake 1-2 days before your event. Refrigerate covered until ready to serve.
Day-Before Strategy (Recommended): The ideal approach for stress-free entertaining is to bake the cake layers and make the buttercream the day before. Wrap and store the layers at room temperature, refrigerate the buttercream. The day of your event, assemble and decorate the cake in the morning, refrigerate it, then bring it to room temperature 30 minutes before serving. This splits the work perfectly and ensures freshness.
Week-Before Prep: For maximum advance planning, bake the cake layers up to a week before and freeze them. Make the buttercream and freeze it too. Three days before your event, thaw everything in the refrigerator. The day before, assemble and decorate. Day-of, just bring to room temperature and serve.
Freezing for Long-Term: If you want to always have cake on hand (and who wouldn’t?), this recipe freezes beautifully at various stages:
- Freeze unfrosted layers individually for spontaneous assembly
- Freeze assembled, frosted cake for complete make-ahead convenience
- Freeze individual frosted slices for portion-controlled treats
Thawing Guidelines: Always thaw frozen cake in the refrigerator while still wrapped to prevent condensation from forming on the cake. Layers take 4-6 hours, whole cakes take overnight. Once thawed, unwrap and let come to room temperature before serving.
Holiday and Event Planning: For major holidays or events, complete the cake 2 days before. This gives you breathing room for other preparations while ensuring the cake is fresh, moist, and perfectly set. The flavors actually improve after 24 hours as they meld together.
Serving Suggestions
Classic Elegant Presentation:
This cake is a showstopper on its own, but thoughtful accompaniments can elevate the experience:
- Fresh raspberry sauce: Puréed and strained raspberries create beautiful plate decoration
- Whipped cream: Light dollop on the side provides creamy contrast
- Vanilla ice cream: Classic pairing; the cold-hot contrast is lovely
- Champagne: Celebrate special occasions with bubbles alongside
- Fresh berries: Additional raspberries, strawberries, or mixed berries
- Edible flowers: Roses, violets, or pansies for romantic presentation
- Mint sprigs: Fresh mint adds color and aromatic freshness
Beverage Pairings:
- Champagne or Prosecco: The bubbles and acidity cut through the richness perfectly
- Rosé wine: Fruity rosé complements raspberry beautifully
- Dessert wine: Moscato or late harvest Riesling echo the sweet notes
- Coffee or espresso: Classic pairing; provides bitter contrast
- Raspberry tea: Reinforces the berry flavor
- Hot chocolate: White hot chocolate doubles down on the white chocolate
- Milk: Simple, classic, especially for children
Occasion-Specific Serving:
- Weddings: This is a popular wedding cake flavor—elegant and crowd-pleasing
- Bridal showers: The feminine colors and flavors are perfect
- Baby showers: Works for both girl and neutral themes
- Valentine’s Day: Romantic pink and white colors
- Mother’s Day: Sophisticated and beautiful for celebrating mom
- Easter: Fresh, spring-appropriate flavors and colors
- Birthdays: Special enough for milestone celebrations
- Anniversaries: Romantic and elegant
Plating for Special Occasions:
- Place slice slightly off-center on white plate
- Add three dots of raspberry sauce in an arc
- Place a small quenelle of whipped cream
- Garnish with fresh raspberry and mint leaf
- Dust the plate edge with powdered sugar
- Add white chocolate curls or shavings
- Include an edible flower for luxury presentation
FAQs Section
Q: Can I use frozen raspberries instead of fresh?
A: You can, but with precautions. If using frozen raspberries, do NOT thaw them first—toss them with flour while still frozen and fold them in quickly. Frozen berries bleed more than fresh, which can create pink streaks in your cake. They also release more moisture, potentially making the cake slightly denser. Fresh raspberries truly work best for both appearance and texture, but frozen can work in a pinch if you’re careful.Q: My white chocolate seized and became grainy. What happened?
A: White chocolate is notoriously temperamental and seizes (becomes grainy and clumpy) if it comes into contact with even a tiny bit of water, gets too hot, or is overheated. To prevent this, melt it gently in 20-30 second microwave bursts, stirring between each, or use a double boiler. Make sure all utensils are completely dry. If it seizes, sometimes adding a tablespoon of vegetable oil or cocoa butter and stirring vigorously can bring it back, but prevention is better than cure.Q: Can I make this cake without the raspberries in the layers?
A: Absolutely! You can omit the berries from the cake layers and use them only for decoration and filling between layers. This creates a plain white chocolate cake that’s still delicious. Or you could replace raspberries with other berries like blueberries or strawberries (chopped small), or omit fruit entirely for a pure white chocolate cake.Q: Why is my buttercream too soft and won’t hold its shape?
A: Soft buttercream usually means it’s too warm. Buttercream needs to be made with room temperature (not warm) butter, and the melted white chocolate must be cooled before adding. If your buttercream is too soft, refrigerate it for 15-20 minutes, then rewhip it—the cooling will firm it up. If it’s still too soft, you may need to add more powdered sugar (¼ cup at a time) or a bit of extra melted and cooled white chocolate.Q: Can I make this as cupcakes instead of a layer cake?
A: Yes! This batter makes about 30 cupcakes. Line cupcake pans with paper liners, fill each about ⅔ full, and bake at 350°F for 18-22 minutes until a toothpick comes out clean. You can either fold mini berries into the batter or place 1-2 raspberries on top of each cupcake before baking. Frost cooled cupcakes with the white chocolate buttercream and top with fresh raspberries.Q: How do I prevent my cake layers from doming in the middle?
A: Doming happens when the edges set quickly while the center continues rising. To minimize this, make sure your oven temperature is accurate (use an oven thermometer), don’t overfill pans (2-2½ cups batter per 8-inch pan), and consider using baking strips (wet fabric strips wrapped around pans that slow edge baking). You can also level domed layers with a serrated knife before assembling—most bakers do this for perfectly flat layers.Q: My cake turned out dense instead of light and fluffy. What went wrong?
A: Dense cake usually results from one of several issues: overmixing the batter after adding flour (develops too much gluten), using expired leavening agents (baking powder/soda lose potency over time), not properly creaming the butter and sugar (should be light and fluffy, taking 3-4 minutes), or using cold ingredients that don’t emulsify properly. Make sure all ingredients are room temperature and mix gently once flour is added.Q: Can I use this recipe to make a two-layer cake instead of three?
A: Yes! For a two-layer cake, divide the batter between two 9-inch pans instead of three 8-inch pans. Bake for 30-35 minutes. You’ll use about two-thirds of the buttercream recipe (or make it all and have extra for another use—it freezes beautifully!). The cake will be slightly shorter but equally delicious.Conclusion
There’s something truly magical about cutting into this white chocolate raspberry cake and revealing those gorgeous pale layers studded with ruby-red berries. When you serve slices and watch people’s faces light up at that first bite—the creamy white chocolate, the burst of tart-sweet raspberry, the tender crumb—you’ll feel an immense sense of pride and accomplishment. This is the kind of cake that creates memories and becomes someone’s new favorite.
Whether you’re making this white chocolate raspberry cake for a milestone