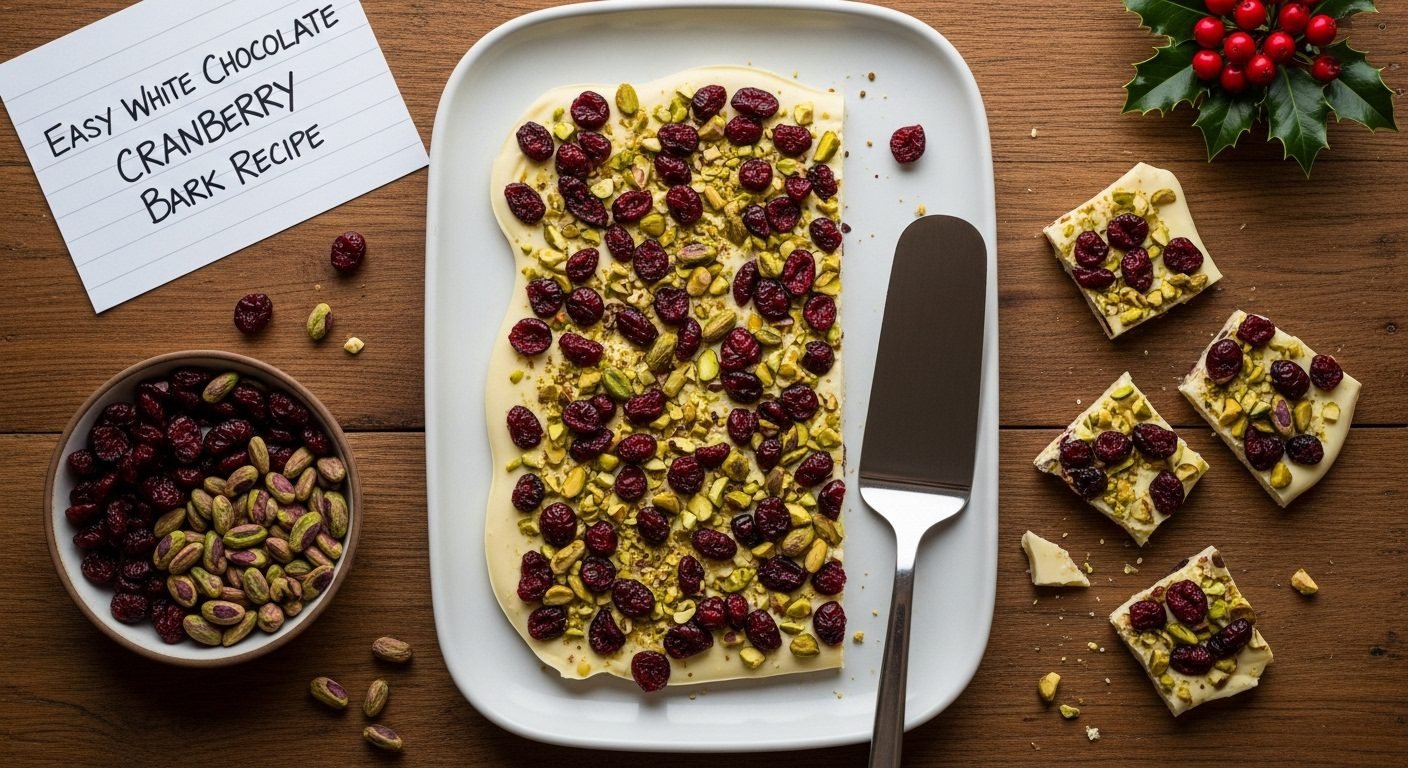
Easy White Chocolate Cranberry Bark Recipe – Perfect Holiday Treat in 10 Minutes!
White chocolate cranberry bark is the ultimate no-fuss holiday treat that looks like you spent hours in the kitchen but actually takes just minutes to make! This festive confection combines smooth, creamy white chocolate with tart dried cranberries and crunchy nuts for a beautiful contrast of flavors and textures. With only a handful of ingredients and zero baking required, this recipe is perfect for busy holiday seasons when you need impressive homemade gifts, last-minute party contributions, or simply a sweet treat to enjoy with your family. The stunning red and white color combination makes it especially popular during Christmas, but honestly, this bark is so delicious that it deserves a spot on your dessert table year-round! Whether you’re packaging it in pretty tins for neighbors, arranging it on a holiday cookie platter, or sneaking pieces from the refrigerator as an afternoon pick-me-up, white chocolate cranberry bark delivers bakery-quality results with minimal effort. The best part? You can customize it endlessly with different nuts, dried fruits, or flavor extracts to make it uniquely yours. If you’re looking for a foolproof recipe that impresses every single time, this is it!
History / Background
The story of chocolate bark is a beautiful example of how creative home cooks transformed candy-making from a complex art into an accessible craft. While the exact origin of chocolate bark is somewhat murky, the technique of spreading melted chocolate thin and breaking it into irregular pieces has been around for well over a century, likely originating as a way for confectioners to use up chocolate scraps and trimmings.
The term “bark” comes from the final product’s resemblance to tree bark – rough, irregular, and rustic in appearance. This casual, imperfect aesthetic was actually part of its charm, making chocolate bark one of the few candies where a homemade look was considered desirable rather than a flaw. In the early days of American candy-making, bark was often made with dark chocolate and simple additions like nuts, and it was sold in candy shops as an affordable alternative to more elaborate confections.
White chocolate bark specifically gained popularity in the latter half of the 20th century, following white chocolate’s commercial introduction in the 1930s by Nestlé in Switzerland. However, it wasn’t until the 1980s and 1990s that white chocolate became widely available and affordable in the United States. Home bakers quickly discovered that white chocolate’s creamy sweetness provided a perfect canvas for colorful, festive additions.
The pairing of white chocolate with cranberries is a distinctly American innovation that really took off in the 1990s and early 2000s. Cranberries, native to North America and deeply associated with American holidays like Thanksgiving and Christmas, were experiencing a renaissance as dried cranberries (often called “Craisins” after Ocean Spray’s branded product introduced in 1995) became widely available in grocery stores. These chewy, tart-sweet dried berries were being incorporated into everything from salads to baked goods, and creative home cooks discovered they were absolutely magical with white chocolate.
The color combination was perfect for Christmas – red and white, festive and elegant. The flavor pairing was equally brilliant: the tart cranberries cut through white chocolate’s sweetness while their chewy texture contrasted beautifully with the smooth chocolate and crunchy nuts. Food bloggers and Pinterest enthusiasts embraced white chocolate cranberry bark in the 2010s, sharing beautiful photos that showcased how easy it was to make something so visually stunning.
Today, white chocolate cranberry bark has become a holiday staple in American homes, right alongside cookies and fudge. It represents the evolution of candy-making from professional confectioners to home kitchens, and how simple combinations of quality ingredients can create something truly special. The recipe’s flexibility has also contributed to its enduring popularity – everyone has their own variation, whether it’s adding pistachios, pecans, orange zest, or other personal touches.
Why You’ll Love This Recipe
This white chocolate cranberry bark is about to become your secret weapon during the holidays and beyond. It’s one of those magical recipes that delivers maximum impact with minimal effort, making you look like a kitchen superstar without the stress. The gorgeous red and white presentation immediately catches the eye, while the flavor combination of sweet, tart, and crunchy keeps people coming back for more.
Here’s why this recipe will win your heart:
- Ready in 15 minutes – Just 10 minutes of prep time plus a quick chill means you can make this on a whim
- Only 4-5 ingredients – White chocolate, dried cranberries, nuts, and optional flavorings are all you need
- Zero baking required – No oven, no candy thermometer, no complicated techniques – just melt and spread!
- Foolproof for beginners – If you can melt chocolate and stir, you can master this recipe
- Stunning presentation – The festive red and white colors make it naturally beautiful without any special decorating skills
- Perfect for gifting – Package in cellophane bags or decorative tins for impressive homemade gifts that cost just pennies per serving
- Endlessly customizable – Change up the nuts, fruits, or add-ins to create your signature version
- Makes a large batch – One recipe yields plenty to share, making it ideal for parties and cookie exchanges
- Allergy-friendly options – Easy to make nut-free by simply omitting nuts or substituting seeds
- Budget-friendly – Creates an impressive amount of treats without expensive ingredients
- Holiday versatility – Perfect for Christmas, Valentine’s Day, Easter, or any celebration
- Great for kids – Children love helping sprinkle toppings and breaking the bark into pieces
Ingredient Notes
Let’s explore the simple ingredients that come together to create this show-stopping treat, and understand why each component plays an important role:
White Chocolate – The star of the show! You’ll need about 16-20 ounces (roughly 3-4 cups of white chocolate chips or chopped white chocolate bars). Quality matters tremendously here – look for white chocolate that lists cocoa butter as the primary ingredient rather than vegetable oils or palm kernel oil. High-quality brands like Ghirardelli, Lindt, or Guittard will give you the smoothest texture and best flavor. Avoid white candy melts or almond bark, as these coating products contain different fats and will result in a waxy texture and artificial flavor. Real white chocolate has a rich, creamy taste with subtle vanilla notes that make this bark truly special. If you’re using white chocolate bars instead of chips, simply chop them into small, uniform pieces for even melting.
Dried Cranberries – You’ll need about 1 to 1½ cups of dried cranberries (often labeled as “Craisins”). These provide the signature tart-sweet flavor that balances the white chocolate’s richness. Look for cranberries that are still soft and pliable rather than hard and dried out – fresher dried cranberries have better flavor and texture. You can find them in the baking aisle or with the dried fruits. If you prefer less sweetness, look for unsweetened or reduced-sugar dried cranberries, though these can be quite tart. For extra flavor, you can soak the cranberries in orange juice for 10 minutes and pat them dry before using.
Nuts – About ¾ to 1 cup of nuts adds essential crunch and richness. Pistachios are a popular choice for their beautiful green color and sophisticated flavor, while almonds (sliced or slivered) provide a classic pairing. Pecans offer buttery richness, and walnuts contribute earthy depth. You can use raw or roasted nuts, but toasted nuts have deeper flavor – if using raw, consider toasting them yourself for 5-7 minutes at 350°F until fragrant. For the best appearance, roughly chop larger nuts so you have varied sizes. You can also omit nuts entirely for a nut-free version, or substitute pumpkin seeds or sunflower seeds for allergies.
Vanilla Extract – Just ½ to 1 teaspoon of pure vanilla extract enhances the white chocolate’s flavor and adds aromatic depth. Always use real vanilla extract rather than imitation for the best flavor. This ingredient is optional but highly recommended.
Optional Add-ins & Flavor Enhancers:
- Orange or lemon zest (1-2 teaspoons) adds bright citrus notes that complement both the cranberries and white chocolate beautifully
- Sea salt flakes sprinkled on top create a sophisticated sweet-salty contrast
- A pinch of cinnamon or nutmeg adds warm, holiday spice
- White chocolate chips or dark chocolate drizzle creates visual interest
- Shredded coconut adds tropical flair and extra texture
- Freeze-dried raspberries or strawberries can supplement or replace some cranberries for varied flavor
Equipment Needed
The beauty of this recipe is its simplicity – you won’t need any specialized equipment. Here’s what you’ll need:
- Baking sheet – A standard half-sheet pan (approximately 13×18 inches) or quarter-sheet pan works perfectly
- Parchment paper or silicone baking mat – Essential for easy removal and cleanup; parchment paper is preferred for gift-giving as you can peel it off cleanly
- Medium saucepan or double boiler – For melting the white chocolate on the stovetop; a double boiler provides gentler, more controlled heat
- Large microwave-safe bowl – If you prefer the microwave method for melting chocolate
- Spatula or wooden spoon – For stirring the melting chocolate and spreading the bark
- Offset spatula or butter knife – Optional but helpful for spreading the chocolate evenly across the pan
- Sharp knife or pizza cutter – For cutting clean pieces if you prefer uniform sizes, or you can simply break it by hand
- Measuring cups – For accurate ingredient measurements
Optional but helpful tools include a candy thermometer if you want to temper the chocolate for a professional snap, and small cellophane bags or decorative tins if you’re planning to gift the bark.
Print
White Chocolate Cranberry Bark Recipe
This easy white chocolate cranberry bark combines creamy white chocolate with tart dried cranberries and crunchy nuts for a festive no-bake treat that’s ready in minutes. Perfect for holiday gifting or entertaining!
- Total Time: 45-70 minutes
- Yield: About 24 pieces (depending on how you break it) 1x
Ingredients
- 16-20 oz (3-4 cups) high-quality white chocolate chips or chopped white chocolate
- 1 to 1½ cups dried cranberries
- ¾ to 1 cup nuts (pistachios, almonds, pecans, or walnuts), roughly chopped
- 1 teaspoon pure vanilla extract (optional)
- 1-2 teaspoons orange or lemon zest (optional)
- Pinch of sea salt flakes for topping (optional)
Instructions
- Prepare your workspace: Line a baking sheet (half-sheet or quarter-sheet pan) with parchment paper or a silicone baking mat. Make sure the parchment extends slightly beyond the edges for easy removal later. Set aside within easy reach.
- Toast nuts (optional but recommended): If using raw nuts, spread them on a small baking sheet and toast in a 350°F oven for 5-7 minutes until fragrant and lightly golden. This step enhances their flavor significantly. Let them cool slightly while you melt the chocolate. If using pre-roasted nuts, you can skip this step.
- Melt the white chocolate (stovetop method): Fill a medium saucepan with about 1-2 inches of water and bring to a gentle simmer over medium-low heat. Place the white chocolate in a heat-safe bowl that fits over the saucepan without touching the water (creating a double boiler). Stir constantly as the chocolate melts, which should take 3-5 minutes. Once about 90% melted, remove from heat and continue stirring until completely smooth. The residual heat will melt the remaining pieces.
- Melt the white chocolate (microwave method): Place white chocolate in a large microwave-safe bowl. Microwave in 30-second intervals at 50% power, stirring thoroughly between each interval. This typically takes 2-3 minutes total. The key is using reduced power to prevent overheating, which can cause the chocolate to seize or become grainy. Once mostly melted, stir continuously until completely smooth.
- Add flavorings: Once the chocolate is melted and smooth, immediately stir in the vanilla extract and citrus zest if using. Mix thoroughly to distribute the flavors evenly throughout the chocolate.
- Add most of the mix-ins: Reserve about ⅓ cup of the dried cranberries and ¼ cup of the nuts for topping. Fold the remaining cranberries and nuts into the melted white chocolate, stirring gently until everything is evenly distributed throughout the mixture.
- Spread on prepared pan: Pour the chocolate mixture onto your prepared baking sheet. Use a spatula or offset spatula to spread it into an even layer about ¼-inch thick. You don’t need to spread it to fill the entire pan – a rustic rectangular or oval shape is perfectly fine and adds to the homemade charm. Aim for relatively even thickness so it sets uniformly.
- Add toppings: While the chocolate is still wet, quickly sprinkle the reserved cranberries and nuts over the top, pressing them gently into the surface so they adhere. If using sea salt flakes, sprinkle them sparingly across the bark now for that gourmet touch.
- Cool and set: You have two options here. For faster results, place the baking sheet in the refrigerator for 30-45 minutes until the bark is completely firm and set. For a better texture and shinier finish, let it set at cool room temperature (around 65-70°F) for 1-2 hours. Avoid warm rooms, as the chocolate may not set properly.
- Break into pieces: Once completely set and firm, remove the bark from the parchment paper by lifting the edges. Place on a cutting board and either break it by hand into rustic, irregular pieces (the traditional bark method), or use a sharp knife to cut it into neat squares or rectangles. For clean cuts, wipe your knife between cuts.
- Store properly: Layer the bark pieces in an airtight container with parchment paper between layers to prevent sticking.
Notes
- Temperature control: White chocolate is sensitive to heat. Always use low heat and never let water come into contact with the chocolate, as even a drop can cause it to seize.
- Thickness matters: Aim for bark that’s about ¼-inch thick. Too thin and it becomes brittle and breaks too easily; too thick and it’s hard to bite through.
- Customization: Feel free to swap nuts or add other dried fruits like cherries, blueberries, or chopped apricots.
- Setting issues: If your room is warm (above 75°F), the bark may not set properly at room temperature. Use the refrigerator instead.
- Make it festive: Add red and green sprinkles or edible glitter while the chocolate is still wet for extra holiday flair.
- Nut-free version: Simply omit the nuts or replace with pumpkin seeds or sunflower seeds for allergies.
- Prep Time: 10 minutes
- Cook Time: 3 minutes (melting time)
- Category: Dessert, Candy, Confection
- Method: No-Bake, Stovetop or Microwave
- Cuisine: American
- Diet: Gluten Free
Nutrition
- Serving Size: 1 piece (based on 24 pieces)
- Calories: 145
- Sugar: 15g
- Sodium: 20mg
- Fat: 8g
- Saturated Fat: 4g
- Unsaturated Fat: 4g
- Trans Fat: 0g
- Carbohydrates: 17g
- Fiber: 1g
- Protein: 2g
- Cholesterol: 5mg
Tips & Variations
One of the best things about white chocolate cranberry bark is how easily you can customize it to suit your taste, dietary needs, or the occasion. Here are some creative ideas:
Flavor Variations:
- Orange Cranberry Bark: Add 2 teaspoons of orange zest and ½ teaspoon of orange extract for a citrusy twist that’s absolutely divine
- Peppermint Cranberry Bark: Add ½ teaspoon peppermint extract and fold in ¼ cup crushed candy canes for a festive holiday flavor
- Maple Pecan Cranberry Bark: Use pecans exclusively and add 1 teaspoon maple extract for a warm, cozy variation
- Lemon Blueberry Bark: Substitute dried blueberries for cranberries and add lemon zest for a spring-inspired version
- Cherry Almond Bark: Use dried cherries instead of cranberries and almonds for the nuts, with a touch of almond extract
- Tropical Bark: Mix in dried pineapple, dried mango, and macadamia nuts with shredded coconut
Texture Add-Ins:
- Add ¼ cup of white chocolate chips or semi-sweet mini chocolate chips for extra chocolate bursts
- Fold in ½ cup of crispy rice cereal or crushed pretzels for added crunch
- Mix in ¼ cup of mini marshmallows for a fun, chewy element
- Add freeze-dried raspberries or strawberries for intense fruit flavor and pretty color
- Sprinkle flaked sea salt, granulated sugar, or pearl sugar on top for sparkle and crunch
Dietary Adaptations:
- Nut-Free: Omit nuts entirely or substitute with pumpkin seeds (pepitas) or sunflower seeds
- Vegan: Use dairy-free white chocolate chips (several brands make these now) and ensure your cranberries don’t contain honey
- Refined Sugar-Free: Use sugar-free white chocolate chips and unsweetened dried cranberries (note: these will be much more tart)
- Lower Sugar: Reduce the amount of chocolate slightly and increase the nuts for a less sweet version
Chocolate Variations:
- Create a marbled effect by drizzling melted dark or milk chocolate over the white chocolate before it sets
- Make a double-layer bark with dark chocolate on the bottom and white chocolate on top
- Use half white chocolate and half milk chocolate for a more subtle sweetness
Presentation Ideas:
- Cut into specific shapes using cookie cutters while still slightly soft
- Drizzle with melted dark chocolate in a decorative pattern after the bark sets
- Package in clear bags tied with festive ribbons for gift-giving
- Break into small pieces and package in small mason jars with fabric toppers
- Create a bark “board” by arranging pieces on a platter with fresh cranberries and evergreen sprigs
Pro Chef Tips
These insider secrets will elevate your white chocolate cranberry bark from delicious to absolutely extraordinary:
Temperature is everything: White chocolate is the most temperamental of all chocolates because it contains no cocoa solids, only cocoa butter, milk solids, and sugar. It has a lower melting point (around 110°F) compared to dark chocolate, which means it can go from perfectly melted to scorched in seconds. Always use gentle, indirect heat. If using a double boiler, make sure the water is barely simmering and the bowl never touches the water. For microwave melting, 50% power is non-negotiable. I’ve seen countless batches ruined by impatient cooks who cranked up the heat – don’t be that person!
The stir-and-rest technique: Once your white chocolate is about 90% melted, remove it from the heat source and continue stirring. The residual heat will melt the remaining pieces, and this technique prevents overheating. The chocolate should be smooth and fluid but not hot – if it’s too warm, it can cause the cranberries and nuts to sink to the bottom rather than staying suspended throughout the bark.
Prep everything in advance: White chocolate begins to set as it cools, so you need to work relatively quickly once it’s melted. Have your baking sheet lined, your nuts toasted and cooled, your cranberries measured, and any flavorings ready to go before you even start melting. This “mise en place” approach ensures you’re not scrambling while your chocolate is setting up.
The tap and spread method: After pouring your chocolate mixture onto the baking sheet, lift the pan about 2 inches off the counter and tap it firmly several times. This releases air bubbles and helps the bark settle into an even layer. Then use your spatula to spread it smooth. The combination of tapping and spreading creates a more uniform thickness than spreading alone.
Strategic topping placement: For the most attractive bark, don’t just randomly sprinkle your reserved nuts and cranberries on top. Take a moment to arrange them somewhat evenly across the surface, ensuring each future piece will have a good distribution of toppings. Press them gently but firmly into the surface – they should be partially embedded in the chocolate so they don’t fall off when you break or cut the bark.
The temperature set decision: While refrigerating makes your bark set faster, room temperature setting actually produces a better texture and shinier finish. The rapid temperature change of refrigeration can cause “bloom” (white streaks or spots) on the surface and can make the chocolate more brittle. If you have the time and a cool room (65-70°F), room temperature setting is worth the wait. However, during hot summer months or in warm kitchens, refrigeration is necessary.
Breaking versus cutting: Traditional bark is broken by hand into rustic, irregular pieces, which is actually easier than cutting and gives you that authentic artisanal look. However, if you want uniform pieces for professional presentation or gifting, use a large, sharp knife. Here’s the trick: let the bark warm up at room temperature for just 5-10 minutes after refrigerating, then cut. If it’s too cold, it will shatter; if it’s too warm, it will smush. That brief tempering period is crucial for clean cuts.
Flavor infusion technique: For even better flavor distribution, especially with extracts and zest, add them to the chocolate while it’s melting rather than after. This allows the flavors to fully incorporate and bloom in the warm chocolate. The heat actually helps release the aromatic compounds in vanilla, citrus zest, and other flavorings.
Common Mistakes to Avoid
Even though this is a simple recipe, there are several pitfalls that can affect your results. Here’s how to avoid them:
Mistake #1: Using Low-Quality White Chocolate or Candy Melts – This is the single most common mistake and the one that most dramatically affects your final product. White candy melts, almond bark, or white chocolate chips that don’t contain real cocoa butter will never taste as good or have the right texture. These coating products are made with vegetable oils that create a waxy texture and artificial flavor. The chocolate may set harder, but it won’t have that melt-in-your-mouth quality or rich flavor. Solution: Always check the ingredient label. The first few ingredients should be sugar, cocoa butter, and milk solids. If you see “palm kernel oil” or “vegetable oil” as a primary ingredient, that’s not real white chocolate. Yes, quality white chocolate costs more, but the difference is dramatic – this is not a place to skimp.
Mistake #2: Getting Water in Your Chocolate – Even a single drop of water can cause white chocolate to “seize,” turning it into a thick, grainy, unusable mess. This happens because the water causes the sugar in the chocolate to crystallize suddenly. If you’re using the double boiler method, make sure your bowl is completely dry before adding chocolate, and be careful that no steam condenses and drips into your chocolate. Solution: Keep everything dry. If your chocolate does seize, sometimes you can save it by vigorously stirring in a tablespoon of warm vegetable oil or cocoa butter, but it’s better to prevent the problem entirely.
Mistake #3: Overheating the Chocolate – White chocolate has a lower melting point than dark chocolate, and overheating causes the cocoa butter to separate from the other ingredients, resulting in a grainy texture and dull appearance. You’ll see it become oily or develop a separated look. Solution: Use gentle heat (low stovetop or 50% microwave power), stir constantly, and remove from heat when it’s only 90% melted. The residual heat will finish the job without risk of overheating.
Mistake #4: Making the Bark Too Thick or Too Thin – Bark that’s too thin (less than ⅛ inch) becomes brittle and breaks into tiny pieces that are difficult to handle and eat. Bark that’s too thick (more than ½ inch) is difficult to bite through and can be overwhelming. The ideal thickness is about ¼ inch. Solution: After spreading your chocolate, take a moment to check the thickness. You should be able to see the pan through the chocolate just slightly. If it’s too thick in some spots, use your spatula to redistribute the chocolate more evenly.
Mistake #5: Not Drying Soaked Cranberries – If you choose to soak your cranberries in juice for extra flavor (which is a great technique), you must pat them completely dry before adding to the chocolate. Wet cranberries will introduce moisture that can cause the chocolate to seize or create spots that won’t set properly. Solution: After soaking, drain cranberries thoroughly and pat them dry with paper towels until no moisture remains.
Mistake #6: Rushing the Setting Process – Moving or disturbing the bark before it’s completely set can cause cracks, uneven surfaces, or a dull finish. Some people try to speed up the process by putting the pan directly into the freezer, which can cause thermal shock and affect the texture. Solution: Be patient. If using the refrigerator, let it set for the full 30-45 minutes without touching or moving the pan. If setting at room temperature, give it the full 1-2 hours it needs.
Mistake #7: Improper Storage – White chocolate is particularly susceptible to picking up odors from other foods and can develop bloom (white streaks) if stored in fluctuating temperatures. Leaving it exposed to air will also dry it out. Solution: Always store in an airtight container with parchment between layers, in a cool, consistent environment away from strong-smelling foods.
Storage & Meal Prep
Proper storage ensures your white chocolate cranberry bark stays fresh, beautiful, and delicious:
Room Temperature Storage: If your home is consistently cool (below 70°F) and dry, you can store white chocolate cranberry bark at room temperature in an airtight container for up to 2 weeks. Place parchment or wax paper between layers to prevent pieces from sticking together. This method maintains the best texture – the bark won’t be too firm and will have a pleasant snap when you bite into it. Keep the container away from direct sunlight, heat sources, and areas with strong odors, as white chocolate readily absorbs flavors from its environment.
Refrigerator Storage: In warmer climates or during summer months, refrigeration is your best option. Store in an airtight container with parchment paper between layers for up to 3-4 weeks. The bark will become quite firm when cold, so for the best eating experience, remove it from the refrigerator about 10-15 minutes before serving to allow it to come closer to room temperature. This brings out the full flavor and gives it a better texture. Just be aware that moving the bark between warm and cold environments can sometimes cause condensation and potentially bloom (white streaks on the surface), though this doesn’t affect taste.
Preventing Bloom: Bloom is that white, chalky-looking coating that sometimes appears on chocolate. It occurs when fat crystals (fat bloom) or sugar crystals (sugar bloom) rise to the surface due to temperature fluctuations or moisture. While bloom is harmless and doesn’t affect flavor significantly, it does make your beautiful bark look less appealing. Prevent it by storing at a consistent temperature and ensuring the container is completely airtight to prevent moisture exposure.
Humidity Considerations: White chocolate is particularly sensitive to humidity. In humid climates, the bark can become sticky or develop sugar bloom. If you live in a humid area, refrigerator storage is almost always better than room temperature, and you might want to add a food-safe silica gel packet to your storage container (just make sure it doesn’t directly touch the chocolate).
Container Selection: Use a rigid container rather than plastic bags to prevent the bark from breaking. A metal tin or plastic container with a tight-fitting lid works perfectly. If gifting, those decorative holiday tins lined with tissue paper are ideal and can be reused by the recipient.
Make-Ahead & Freezer Notes
White chocolate cranberry bark is one of the best make-ahead treats, perfect for holiday planning and having homemade gifts ready whenever you need them:
Make-Ahead Timeline: One of the best things about this recipe is that it actually improves with a day or two of rest! The flavors meld together beautifully, and the texture becomes perfect as everything fully sets and stabilizes. You can make this bark up to 3-4 weeks in advance if stored properly in the refrigerator, or up to 3 months if frozen. This makes it ideal for tackling your holiday baking early, preparing for cookie exchanges, or always having homemade treats on hand.
Freezing Instructions: White chocolate cranberry bark freezes exceptionally well, making it perfect for long-term storage. Once the bark is completely set and broken or cut into pieces, arrange them in a single layer on a parchment-lined baking sheet and freeze until solid (about 1 hour). This initial freezing prevents pieces from sticking together. Then transfer the frozen pieces to a freezer-safe container or heavy-duty freezer bags, placing parchment or wax paper between layers. For extra protection against freezer burn and odor absorption, you can double-bag the bark or wrap individual pieces in plastic wrap before placing in containers. Properly stored, frozen bark maintains excellent quality for up to 3 months.
Thawing Method: The key to maintaining that perfect texture after freezing is proper thawing. Never thaw at room temperature from frozen, as this can cause condensation to form on the surface, creating sugar bloom and a sticky texture. Instead, transfer the amount you want to use from the freezer to the refrigerator and let it thaw slowly overnight. This gradual temperature change prevents condensation. Once thawed in the refrigerator, you can then bring it to room temperature if desired before serving. If you’re in a hurry, you can let refrigerator-thawed bark sit at room temperature for 15-20 minutes, but don’t rush the freezer-to-room-temperature transition.
Batch Gifting Strategy: Here’s a pro tip for holiday gifting: make a large batch (or several batches) of bark in early December, freeze it in pre-portioned gift-sized amounts wrapped individually in plastic wrap and then placed in freezer bags labeled with the date. When you need a hostess gift, teacher appreciation treat, or contribution to a party, simply pull out a portion, let it thaw in the refrigerator overnight, and package it in a pretty tin or cellophane bag. It looks thoughtful and fresh because it is, but you’ve done all the work in advance during a less hectic time!
Freshness After Thawing: Once thawed, treat the bark as if it were freshly made. It will last in the refrigerator for 2-3 weeks after thawing, or at cool room temperature for about a week. Don’t refreeze previously frozen bark, as this can affect the texture and appearance.
Gift-Giving Timing: If you’re giving bark as a gift, you can provide it frozen (with instructions to store in the freezer and thaw in the refrigerator when ready to enjoy), or thaw it yourself 1-2 days before gifting so the recipient can enjoy it immediately. Either way works well!
Serving Suggestions
While white chocolate cranberry bark is absolutely perfect on its own, here are creative ways to serve and present this festive treat:
Holiday Presentations:
- Arrange on a tiered serving stand with other holiday cookies and candies for a stunning dessert buffet centerpiece
- Create a holiday candy board by arranging bark pieces with fresh cranberries, rosemary sprigs, cinnamon sticks, and other festive elements
- Serve on individual small plates with after-dinner coffee or tea for an elegant finishing touch
- Place in decorative bowls around your home during the holidays for guests to snack on
- Package in clear cellophane bags tied with red and gold ribbons for party favors
Beverage Pairings:
- Hot chocolate or white hot chocolate – double the creamy indulgence
- Strong black coffee or espresso – the slight bitterness beautifully balances the sweet bark
- Chai tea or vanilla tea – warm spices complement the cranberries
- Cranberry cocktails or champagne for adults-only celebrations
- Cold milk – classic and comforting, especially for kids
- Mulled wine or apple cider during winter gatherings
Dessert Combinations:
- Crumble pieces over vanilla ice cream or frozen yogurt for added texture and flavor
- Use as a garnish on top of cheesecake, especially vanilla or white chocolate cheesecake
- Chop into small pieces and fold into cookie dough or brownie batter for a fun twist
- Layer pieces in a trifle with whipped cream and fresh berries
- Arrange alongside other chocolate barks (dark chocolate with peppermint, milk chocolate with toffee) for a chocolate bark sampler
Gift-Giving Ideas:
- Stack pieces in clear glass jars topped with fabric circles and ribbon for a rustic gift
- Arrange in decorative holiday tins lined with festive tissue paper
- Create “cookie boxes” that include bark along with 2-3 types of cookies
- Package individual pieces in small cellophane bags for stocking stuffers
- Include in homemade food gift baskets with hot cocoa mix, flavored coffees, and other treats
Entertaining Ideas:
- Serve on a wooden cutting board with fresh cranberries scattered around for a rustic presentation
- Create individual treat bags for each guest at holiday dinners
- Set up a “hot chocolate bar” with bark pieces as one of the topping options
- Include on a grazing board with fresh fruit, nuts, and other sweet treats
- Use as place card holders at holiday dinners by attaching name tags to pieces with decorative ribbon
Seasonal Versatility: While this bark is most popular during the winter holidays, don’t limit yourself! The red and white color scheme works beautifully for Valentine’s Day presentations, and you can easily adapt the flavor profile for other seasons by changing the dried fruits and nuts.
FAQs Section
Q: Can I use candy melts or almond bark instead of real white chocolate? A: While you technically can, I strongly recommend against it. Candy melts and almond bark are coating products made with vegetable oils rather than cocoa butter, which gives them a waxy texture and artificial flavor that can’t compare to real white chocolate. The difference in taste and mouthfeel is significant – real white chocolate melts smoothly on your tongue and has a rich, creamy flavor, while candy melts can taste plasticky and leave a coating in your mouth. If budget is a concern, look for sales on quality white chocolate chips or use a store brand that still lists cocoa butter as an ingredient. The extra dollar or two is absolutely worth it for a product you’ll be proud to serve and gift.
Q: My white chocolate seized and became thick and grainy. Can I fix it? A: Chocolate seizing is usually caused by water contact or overheating, and it’s frustrating when it happens! Sometimes you can save seized chocolate by vigorously stirring in vegetable oil, coconut oil, or additional melted cocoa butter – start with 1 tablespoon and add more as needed until the mixture becomes smooth again. However, the rescued chocolate may not set quite as firmly and might have a slightly different texture. Prevention is much easier than correction: keep all utensils completely dry, use gentle heat, and never let steam condense into your chocolate when using a double boiler. If your chocolate is truly unsalvageable, you may need to start over with fresh chocolate – it’s disappointing but sometimes necessary.
Q: How do I prevent the cranberries and nuts from sinking to the bottom? A: This is a common issue that happens when the chocolate is too warm when you add the mix-ins. When white chocolate is very hot, it has a thin consistency that allows heavier ingredients to sink. The solution is to let your melted chocolate cool for about 2-3 minutes after removing it from heat, stirring occasionally. It should still be fluid and pourable but not hot – around 95-100°F if you have a thermometer. At this temperature, the slightly thickened chocolate better suspends the cranberries and nuts throughout the mixture. Also, pressing your reserved toppings gently into the surface helps them stick rather than sink. If you notice sinking happening as you spread the mixture, work quickly and press the sunken pieces back to the surface before it sets.
Q: Can I make this bark dairy-free or vegan? A: Absolutely! The dairy-free chocolate market has expanded significantly, and several companies now make excellent dairy-free white chocolate chips. Look for brands like Enjoy Life, Pascha, or Lily’s (which uses plant-based ingredients). These products use rice milk, coconut milk, or oat milk instead of dairy milk. The method remains exactly the same, though be aware that different brands may have slightly different melting points and textures. Some dairy-free white chocolates are a bit softer at room temperature, so you may want to store your bark in the refrigerator. Always double-check that your dried cranberries are also vegan (some brands add honey) and use dairy-free chocolate exclusively. The results are just as delicious!
Q: Why does my bark have white streaks or spots (bloom)? A: Those white streaks or chalky-looking spots are called “bloom,” and there are two types. Fat bloom occurs when cocoa butter separates and rises to the surface, usually due to temperature fluctuations – this happens when chocolate melts slightly and then resolidifies, or when it’s stored in varying temperatures. Sugar bloom happens when moisture causes sugar crystals to dissolve and then recrystallize on the surface. Both types are completely harmless and don’t affect flavor significantly, but they do look less appealing. Prevent bloom by storing your bark at a consistent, cool temperature (ideally 60-70°F), keeping it in an airtight container to prevent moisture exposure, and avoiding moving it repeatedly between warm and cold environments. If bloom does occur, you can sometimes minimize its appearance by gently buffing the surface with a clean, dry cloth, but it won’t disappear completely.
Q: How thin or thick should I spread the chocolate? A: The ideal thickness for chocolate bark is about ¼ inch (roughly 6mm). This creates pieces that have a satisfying snap when you break them but aren’t so thick that they’re difficult to bite through or overwhelming to eat. If your bark is too thin (less than ⅛ inch), it becomes brittle and breaks into tiny, difficult-to-handle pieces. If it’s too thick (more than ½ inch), it can be hard to eat and feels too rich. Here’s a simple test: after spreading your chocolate, you should be able to see the parchment paper or baking mat through it very faintly – not completely opaque, but not transparent either. The mixture from this recipe, when spread on a half-sheet pan, should naturally achieve approximately the right thickness.