Wedding Cookies Recipe – Buttery, Melt-in-Your-Mouth Snowball Treats
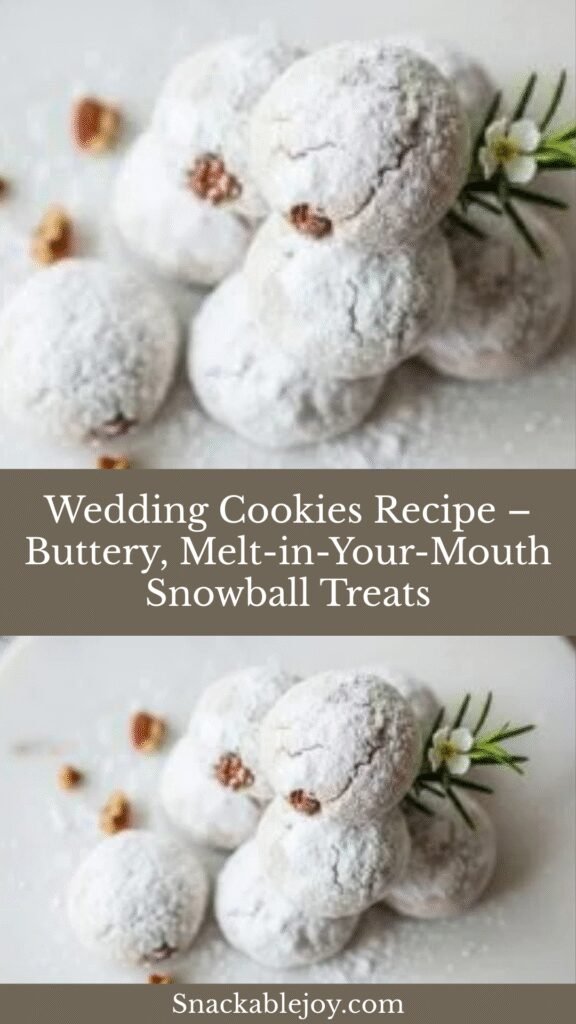
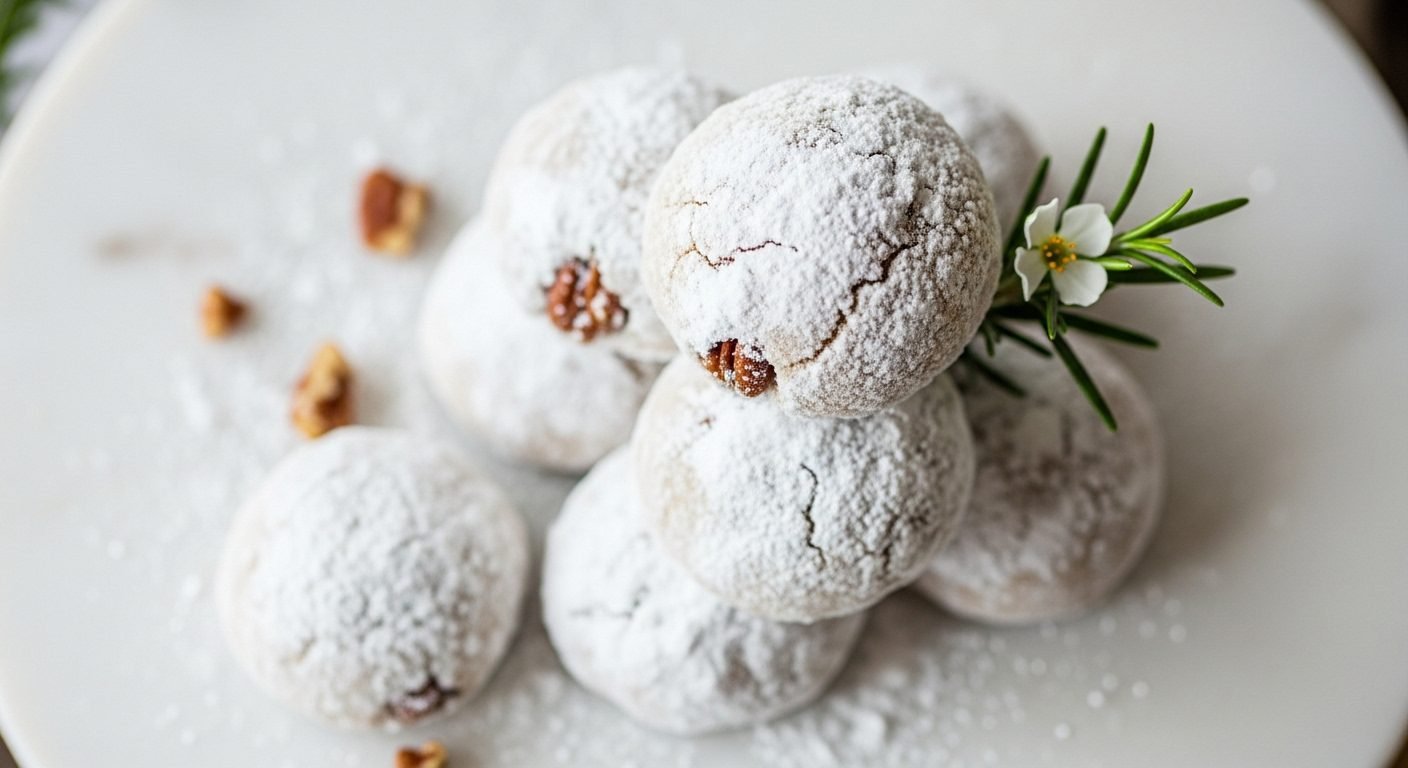
Wedding Cookies, also known as Mexican Wedding Cookies, Russian Tea Cakes, Snowball Cookies, or Butterballs, are delicate, crumbly shortbread-style cookies rolled in powdered sugar that literally melt in your mouth. These tender little spheres are made with butter, finely chopped nuts (usually pecans or walnuts), and a generous coating of snowy white powdered sugar that gives them their signature appearance.
These cookies are a beloved treat at weddings, holiday celebrations, cookie exchanges, and special gatherings throughout the year. Despite their elegant name and appearance, they’re surprisingly simple to make with just a handful of basic ingredients. The combination of buttery richness, subtle nutty flavor, and sweet powdered sugar coating creates an irresistible taste and texture that keeps people reaching for just one more.
What makes Wedding Cookies especially wonderful is their versatility and make-ahead friendliness. They can be prepared days or even weeks in advance, they freeze beautifully, and they’re perfect for gifting during the holidays. Plus, their small, bite-sized shape and pretty powdered sugar coating make them look absolutely stunning on any dessert table or cookie platter.
History / Background
Wedding Cookies have a fascinating and somewhat mysterious history with multiple cultures claiming them as their own. The most widely accepted origin story traces these delightful treats back to medieval Arabia, where similar nut-based cookies covered in powdered sugar were served at celebrations and special occasions.
From the Middle East, the recipe traveled along trade routes to Europe, where various countries adapted it to their own baking traditions. In Spain and other Mediterranean countries, these cookies became known as polvorones, meaning “dusty” in Spanish, referring to their powdered sugar coating. Spanish nuns in convents were known for baking these cookies for weddings and religious celebrations, which may be one source of the “wedding” association.
When Spanish colonizers came to Mexico in the 16th century, they brought this cookie tradition with them. Mexican bakers embraced the recipe, often using locally abundant pecans instead of almonds, and the cookies became a staple at Mexican weddings and celebrations, particularly during Christmas. This is how they earned the name “Mexican Wedding Cookies” in the United States.
Interestingly, similar cookies exist in many cultures around the world. In Russia and Eastern Europe, they’re called Russian Tea Cakes and were traditionally served with tea. In Greece, they’re known as kourabiedes and are popular during Christmas and weddings. Swedish butter balls, Danish klejner, and Austrian kipferl are all variations on this same basic concept of buttery, nut-filled cookies coated in powdered sugar.
The cookies gained immense popularity in the United States during the mid-20th century, particularly in the 1950s and 1960s, when they became a staple at holiday cookie exchanges and wedding receptions. American homemakers loved them because they were elegant enough for special occasions but simple enough for everyday baking. The fact that they could be made ahead and frozen made them even more appealing for busy hosts.
Today, Wedding Cookies remain a beloved tradition across multiple cultures and celebrations. Whether you call them Mexican Wedding Cookies, Russian Tea Cakes, Snowballs, or Butterballs, these tender, melt-in-your-mouth treats continue to bring joy to cookie lovers everywhere.
Why You’ll Love This Recipe
This Wedding Cookie recipe creates the perfect balance of buttery richness, delicate texture, and just the right amount of sweetness. These aren’t just any cookies – they’re special occasion treats that are surprisingly easy to make at home.
Here’s why this recipe will become one of your go-to favorites:
- Incredibly easy to make – No rolling, no cutting, no fancy techniques required – just mix, shape, and bake
- Only 6 simple ingredients – You probably have most of them in your pantry right now
- Melt-in-your-mouth texture – The high butter ratio creates the most tender, crumbly cookies that dissolve on your tongue
- Make-ahead friendly – Prepare the dough days in advance or freeze baked cookies for weeks
- Perfect for gifting – They look elegant, taste amazing, and travel well in tins or boxes
- Budget-friendly – Uses affordable, basic ingredients with no expensive add-ins required
- Versatile for any occasion – Perfect for weddings, holidays, showers, parties, or afternoon tea
- Customizable flavors – Easy to adapt with different nuts, extracts, or mix-ins
- No special equipment needed – Just basic mixing bowls and a baking sheet
- Kid-friendly to help make – Children love rolling these into balls and coating them in powdered sugar
- Freezer-friendly – Both dough and baked cookies freeze beautifully for up to 3 months
Whether you’re an experienced baker or just starting out, these cookies deliver impressive results every single time with minimal effort and maximum deliciousness.
Ingredient Notes
The beauty of Wedding Cookies lies in their simplicity. Let’s talk about each ingredient and why it matters for achieving that perfect melt-in-your-mouth texture.
Unsalted Butter – This is the star ingredient that creates the rich, tender texture. Always use unsalted butter so you can control the salt level. The butter should be softened to room temperature for easy mixing. Don’t use margarine or butter substitutes – real butter is essential for authentic flavor and texture.
Powdered Sugar (Confectioners’ Sugar) – You’ll need this in two places: in the dough for sweetness, and for coating the finished cookies. Powdered sugar dissolves completely into the dough, creating that delicate, fine crumb. Make sure to sift it if it’s lumpy. Regular granulated sugar won’t work the same way in this recipe.
All-Purpose Flour – Provides structure to the cookies. For the most accurate results, spoon flour into your measuring cup rather than scooping directly from the bag, which can compact the flour and make cookies dense.
Finely Chopped Pecans or Walnuts – The nuts add flavor, richness, and that characteristic sandy texture. Pecans are traditional for Mexican Wedding Cookies and have a sweeter, buttery flavor. Walnuts are common in Russian Tea Cakes and have a slightly more earthy taste. The nuts should be very finely chopped, almost to a meal consistency, but not ground into a paste. You can chop them by hand with a sharp knife or pulse them briefly in a food processor.
Vanilla Extract – Adds warmth and depth of flavor. Always use pure vanilla extract, not imitation, for the best taste. You can also experiment with almond extract for a different flavor profile.
Salt – Just a pinch enhances all the other flavors and balances the sweetness. Even though we use unsalted butter, a little salt is essential.
Optional Add-ins: Some bakers like to add a teaspoon of cinnamon for a warm spice note, or use almond extract instead of vanilla for a more pronounced nutty flavor.
Equipment Needed
You’ll need just a few basic tools to make perfect Wedding Cookies:
- Large mixing bowl – For combining all your ingredients
- Electric mixer or wooden spoon – A hand mixer or stand mixer makes creaming easier, but you can mix by hand with a sturdy spoon
- Measuring cups and spoons – Accurate measurements are important in baking
- Food processor or sharp knife – For chopping nuts finely and evenly
- Baking sheets – Two or three sheet pans for baking multiple batches
- Parchment paper or silicone baking mats – Prevents sticking and makes cleanup easy
- Cooling racks – Essential for cooling cookies properly
- Small bowl – For holding powdered sugar for rolling
- Airtight container – For storing finished cookies
Print

Wedding Cookies Recipe
Classic buttery Wedding Cookies (Mexican Wedding Cookies or Russian Tea Cakes) with finely chopped pecans and a generous coating of powdered sugar. These melt-in-your-mouth treats are perfect for holidays, weddings, and special celebrations.
- Total Time: 1 hour 15 minutes
- Yield: 48 cookies 1x
Ingredients
ScaleFor the Cookies:
- 1 cup (2 sticks) unsalted butter, softened to room temperature
- 1/2 cup powdered sugar (plus more for rolling)
- 1 teaspoon vanilla extract
- 2 cups all-purpose flour
- 1/4 teaspoon salt
- 3/4 cup pecans or walnuts, very finely chopped
For Coating:
- 1 to 1 1/2 cups powdered sugar (for rolling the finished cookies)
Instructions
- Prepare the nuts: If you haven’t already, finely chop your pecans or walnuts. You want them almost to a meal consistency but not completely ground. A food processor works well – just pulse 8-10 times. Set aside.
- Cream the butter and sugar: In a large mixing bowl, beat the softened butter and 1/2 cup powdered sugar together with an electric mixer on medium speed for 2-3 minutes until light and fluffy. Scrape down the sides of the bowl as needed.
- Add vanilla: Mix in the vanilla extract until well combined.
- Add dry ingredients: Add the flour and salt to the butter mixture. Mix on low speed just until combined and no flour streaks remain. Don’t overmix.
- Fold in nuts: Add the finely chopped nuts and mix on low speed or fold in by hand with a wooden spoon until evenly distributed throughout the dough.
- Chill the dough: Cover the bowl with plastic wrap and refrigerate for 30 minutes. This makes the dough easier to handle and helps cookies maintain their shape during baking. (You can skip this step if you’re short on time, but chilled dough is easier to work with.)
- Preheat oven: While the dough chills, preheat your oven to 350°F (175°C). Line baking sheets with parchment paper.
- Shape the cookies: Using your hands or a small cookie scoop, roll the dough into 1-inch balls (about 1 tablespoon of dough each). Place them on prepared baking sheets about 2 inches apart. They don’t spread much, so you can fit quite a few on each sheet.
- Bake: Bake for 12-15 minutes until the bottoms are very lightly golden but the tops still look pale. Don’t overbake – these cookies should stay pale. They’ll firm up as they cool.
- First sugar coating: Let cookies cool on the baking sheet for 5 minutes until you can handle them without burning yourself but while they’re still warm. Place about 1/2 cup of powdered sugar in a small bowl. Gently roll each warm cookie in the powdered sugar to coat completely. Place on a cooling rack.
- Cool completely: Let the cookies cool completely on the rack, about 30 minutes.
- Second sugar coating: Once cookies are completely cool, roll them in powdered sugar again for a thick, snowy coating. This second coating is what gives them that beautiful snowball appearance.
- Serve or store: Arrange on a serving platter or store in an airtight container. These cookies taste even better the next day once the flavors have melded together.
Notes
- For the finest nut texture, pulse whole nuts in a food processor until they’re finely chopped but not turned into nut butter.
- Don’t skip the double coating of powdered sugar – the first coating while warm helps it stick, and the second coating gives that beautiful snowy finish.
- These cookies should be pale when baked. If they’re browning, your oven is too hot.
- The dough can be made up to 3 days ahead and refrigerated, or frozen for up to 3 months.
- If the dough seems too crumbly to hold together, add 1-2 tablespoons of softened butter.
- For uniform cookies, use a small cookie scoop or tablespoon measure.
- Prep Time: 15 minutes (plus 30 minutes chilling time)
- Cook Time: 12-15 minutes per batch
- Category: Desert
- Method: Baking
- Cuisine: Mexican, American, Russian
- Diet: Vegetarian
Nutrition
- Serving Size: 1 cookie
- Calories: 85
- Sugar: 5g
- Sodium: 15mg
- Fat: 6g
- Saturated Fat: 3g
- Unsaturated Fat: 2.5g
- Trans Fat: 0g
- Carbohydrates: 8g
- Fiber: 0.5g
- Protein: 1g
- Cholesterol: 10mg
Tips & Variations
Wedding Cookies are wonderfully adaptable. Here are some delicious ways to customize them:
Flavor Variations:
- Almond Wedding Cookies – Replace vanilla extract with almond extract and use finely chopped almonds instead of pecans
- Chocolate Chip Snowballs – Fold in 1/2 cup mini chocolate chips with the nuts
- Lemon Wedding Cookies – Add 1 tablespoon lemon zest to the dough and use 1/2 teaspoon lemon extract plus 1/2 teaspoon vanilla
- Chai Spiced – Add 1 teaspoon ground cinnamon, 1/4 teaspoon ground cardamom, and a pinch of ground ginger
- Coffee Snowballs – Add 2 teaspoons instant espresso powder to the dough
- Orange Pecan – Add 1 tablespoon orange zest and use 1/2 teaspoon orange extract
Nut Options:
- Traditional pecans for sweeter flavor
- Walnuts for earthier taste
- Almonds for classic European style
- Hazelnuts for a richer, more sophisticated flavor
- Macadamia nuts for an ultra-buttery version
- Mix of nuts for complex flavor
Dietary Modifications:
- Gluten-Free – Replace all-purpose flour with a 1:1 gluten-free baking flour blend
- Vegan – Use vegan butter and ensure your powdered sugar is vegan (some brands use bone char)
- Nut-Free – Replace nuts with 1/2 cup quick-cooking oats pulsed in a food processor, or substitute with sunflower seeds
Size Variations:
- Make mini cookies using 1/2 tablespoon of dough (bake for 10-12 minutes)
- Make larger cookies using 2 tablespoons of dough (bake for 15-18 minutes)
- Shape into crescents for traditional Austrian kipferl style
Coating Options:
- Roll in cinnamon-sugar instead of plain powdered sugar
- Use a mix of powdered sugar and cocoa powder for chocolate snowballs
- Drizzle with melted chocolate after the powdered sugar coating
Pro Chef Tips
These professional techniques will elevate your Wedding Cookies from good to absolutely exceptional:
Use room temperature butter, but not too soft. The butter should be soft enough to press a finger into but still hold its shape. Butter that’s too soft or melted will make cookies spread and become greasy. If you forgot to soften your butter, cut it into small cubes and let it sit for 15-20 minutes – don’t microwave it.
Measure flour correctly for perfect texture. Too much flour makes these cookies dry and crumbly in a bad way. Use the spoon-and-level method: spoon flour into your measuring cup, then level it off with a knife. Don’t scoop directly from the bag or pack the flour down.
Chop nuts to the right size. The nuts should be finely chopped but not ground into a powder. When they’re too coarse, cookies can crack and fall apart. When ground too fine (like nut butter), they make cookies greasy. Aim for pieces about the size of coarse sand. Pulse in a food processor 8-10 times for perfect consistency.
Don’t overbake – these cookies should stay pale. The biggest mistake people make is baking these until they’re golden all over. They should be only lightly golden on the bottom and still pale on top. They’ll continue to firm up as they cool. Overbaked cookies are dry instead of tender.
Roll in powdered sugar twice for that gorgeous finish. The first roll while the cookies are still warm helps the sugar stick and creates a base layer. The second roll when they’re completely cool creates that thick, snowy coating that makes them so beautiful. Don’t skip either step.
Let the dough chill if you have time. While not absolutely necessary, chilling the dough for 30 minutes makes it easier to handle and helps cookies maintain their round shape during baking. It also allows the flour to hydrate fully, creating better texture.
Use fresh nuts for best flavor. Nuts can go rancid quickly, especially pecans and walnuts which have high oil content. Taste your nuts before using them – they should smell fresh and slightly sweet, not bitter or musty. Store nuts in the freezer to keep them fresh longer.
Handle cookies gently when warm. These cookies are delicate when they first come out of the oven. Let them rest on the baking sheet for 5 minutes before rolling in sugar. This prevents them from breaking while still allowing the sugar to stick properly.
Common Mistakes to Avoid
Even experienced bakers can encounter issues with these delicate cookies. Here’s how to avoid the most common pitfalls:
Using melted or too-soft butter. If your butter is melted or too soft, the cookies will spread too much during baking and become flat and greasy instead of round and tender. The butter should be soft enough to cream with sugar but still hold its shape. If your kitchen is very warm, you may need to chill the dough before shaping.
Overmixing the dough. Once you add the flour, mix just until combined. Overmixing develops gluten, which makes cookies tough instead of tender and crumbly. As soon as you don’t see any more flour streaks, stop mixing. When adding the nuts, fold them in gently rather than beating them in.
Making cookies too large or uneven sizes. If cookies are too large, they won’t bake evenly and may be undercooked in the center. If they’re different sizes, some will be overdone while others are underdone. Use a small cookie scoop or tablespoon measure to ensure uniform 1-inch balls that bake evenly.
Overbaking and letting them brown. These cookies should be barely golden only on the bottoms. If they’re browning on top, they’re overbaked and will be dry and crumbly in an unpleasant way. Set a timer and check them at the minimum baking time. Remember, they continue to cook slightly on the hot baking sheet after removal from the oven.
Rolling in powdered sugar only once. A single coating doesn’t give that beautiful snowy appearance these cookies are famous for. The double coating – once while warm and again when cool – is what creates that thick, gorgeous powdered sugar layer that’s signature to these cookies.
Storing cookies before they’re completely cool. If you put warm or even slightly warm cookies in a container, the powdered sugar coating will get sticky and absorb into the cookies, making them look wet and less appealing. Always let them cool completely before storing.
Storage & Meal Prep
Proper storage keeps Wedding Cookies fresh and maintains that beautiful powdered sugar coating.
Room Temperature Storage: Store completely cooled cookies in an airtight container at room temperature for up to 2 weeks. Place parchment paper or wax paper between layers to prevent the powdered sugar from rubbing off and to keep cookies from sticking together. The cookies actually taste better after a day or two as the flavors meld and the texture becomes even more tender.
Maintaining the Sugar Coating: The powdered sugar coating can absorb into the cookies over time, especially in humid environments. If you’re storing cookies for more than a few days, you can give them a fresh dusting of powdered sugar right before serving to restore that snowy appearance.
Preventing Moisture Issues: Wedding Cookies are best stored in a cool, dry place. Humidity is the enemy of powdered sugar coating, causing it to become sticky or dissolve. In very humid climates, store cookies in an airtight container with a small packet of food-safe silica gel to absorb excess moisture.
Refrigerator Storage: While not necessary, you can refrigerate these cookies in an airtight container for up to 3 weeks. Let them come to room temperature before serving for the best flavor and texture. The cold can make them a bit harder, so allowing them to warm up brings back that melt-in-your-mouth quality.
Reviving Cookies: If cookies have become slightly stale, you can refresh them in a 300°F oven for 3-4 minutes. Let them cool completely, then roll in fresh powdered sugar. This trick works great for cookies that have been stored for a while.
Packaging for Gifts: Wedding Cookies make wonderful gifts and travel well. Pack them in decorative tins or boxes lined with parchment paper. Place parchment between layers and fill any empty space with crumpled parchment to prevent shifting during transport. They can survive shipping and will stay fresh for up to 2 weeks when properly packaged.
Make-Ahead & Freezer Notes
Wedding Cookies are one of the best make-ahead cookies you can bake, making them perfect for stress-free holiday preparations or whenever you want to plan ahead.
Make-Ahead Dough: The cookie dough can be made up to 3 days in advance. After mixing, shape it into a disk, wrap tightly in plastic wrap, and refrigerate. When ready to bake, let the dough sit at room temperature for about 15 minutes to soften slightly before rolling into balls.
Freezing Cookie Dough: Cookie dough freezes beautifully for up to 3 months. You have two options:
- Freeze in bulk: Shape dough into a disk, wrap tightly in plastic wrap, then place in a freezer bag. Thaw overnight in the refrigerator before shaping and baking.
- Freeze pre-shaped: Roll dough into balls, place on a baking sheet, and freeze until solid (about 1 hour). Transfer frozen dough balls to a freezer bag. Bake directly from frozen, adding 2-3 minutes to the baking time.
Freezing Baked Cookies: Baked and cooled cookies (before the final powdered sugar coating) freeze exceptionally well for up to 3 months. Arrange cookies in a single layer on a baking sheet and freeze until solid. Transfer to freezer bags or airtight containers with parchment between layers.
Thawing Frozen Cookies: Remove frozen cookies from the freezer and let them thaw at room temperature for about 1 hour. Once thawed, roll them in fresh powdered sugar before serving. Never apply powdered sugar before freezing – it will absorb moisture and become sticky.
Best Reheating Method: While these cookies don’t require reheating, you can warm them slightly in a 300°F oven for 3-5 minutes if you want that fresh-from-the-oven warmth. Let them cool completely before rolling in fresh powdered sugar.
Holiday Prep Timeline:
- 3 months ahead: Make and freeze cookie dough in bulk or pre-shaped balls
- 1 month ahead: Bake cookies, freeze without final sugar coating
- 1 week ahead: Bake cookies, store in airtight containers at room temperature
- Day before: Bake cookies or thaw frozen cookies and apply final sugar coating
- Day of: Give cookies a fresh dusting of powdered sugar if needed
Pro Tip for Cookie Exchanges: Bake cookies 2-3 days before your cookie exchange. Store them in an airtight container and give them a fresh roll in powdered sugar the morning of the exchange. This ensures they look perfect and taste amazing.
Serving Suggestions
Wedding Cookies are versatile treats that shine in many different settings and pairings.
Classic Holiday Presentation: Arrange Wedding Cookies on a festive platter with other holiday cookies like gingerbread, sugar cookies, and chocolate crinkles. The white snowball appearance makes them look stunning on Christmas cookie platters. Add fresh cranberries, rosemary sprigs, or small pinecones as garnish.
With Hot Beverages: These cookies pair beautifully with coffee, hot chocolate, tea, or mulled cider. The buttery richness and powdered sugar coating make them perfect for dunking. Serve them alongside cappuccinos for an Italian-style coffee break, or with Earl Grey tea for an elegant afternoon tea.
Wedding and Shower Displays: For bridal showers or wedding receptions, arrange Wedding Cookies on tiered cake stands or elegant platters. They can be part of a dessert buffet or served as favors in small bags tied with ribbon. Consider adding fresh flowers or greenery to the display for extra elegance.
Cookie Gift Boxes: Layer Wedding Cookies in decorative tins or boxes with parchment paper between layers. Tie with ribbon and add a handmade tag. They make wonderful holiday gifts, teacher appreciation gifts, or hostess gifts for dinner parties.
Ice Cream Accompaniment: Serve Wedding Cookies alongside vanilla, butter pecan, or coffee ice cream. The tender cookie texture contrasts beautifully with cold, creamy ice cream. They’re also delicious crumbled over ice cream sundaes.
Dessert Charcuterie Boards: Include Wedding Cookies on dessert charcuterie boards along with chocolates, fresh fruit, dried fruits, nuts, and small pastries. Their small size makes them perfect for grazing.
Coffee Bar Station: Set out a bowl of Wedding Cookies at your coffee station during brunches or morning gatherings. They’re the perfect size for a quick sweet bite with morning coffee.
After-Dinner Treats: Serve 2-3 Wedding Cookies per person as a light dessert after a heavy meal. Their small size and simple flavor profile cleanse the palate without being too filling.
Wine and Cookie Pairing: Wedding Cookies pair surprisingly well with dessert wines. Try them with Moscato, Port, or late-harvest Riesling. The buttery cookie complements the sweet wine without overwhelming it.
FAQs Section
What’s the difference between Mexican Wedding Cookies and Russian Tea Cakes?
They’re essentially the same cookie with different names based on cultural tradition. Mexican Wedding Cookies typically use pecans and are associated with Mexican celebrations and Christmas traditions in the Southwest United States. Russian Tea Cakes usually use walnuts and are associated with Russian and Eastern European tea-drinking traditions. Both feature butter, nuts, and a generous powdered sugar coating, and the recipes are virtually identical.
Can I make these without nuts?
While nuts are traditional and provide that characteristic tender, sandy texture, you can make a nut-free version by replacing the nuts with 1/2 cup of quick-cooking oats pulsed into a fine meal, or by simply omitting them and adding an extra 1/4 cup of flour. The texture will be more like a traditional shortbread cookie, but they’ll still be delicious. Some people use finely crushed graham crackers as a substitute.
Why are my Wedding Cookies falling apart or too crumbly?
If your cookies are crumbling and falling apart, the most common causes are: overbaking (which dries them out), using too much flour (measure carefully using the spoon-and-level method), or not enough butter to hold everything together. The dough should hold together when pressed but still be slightly crumbly. If your dough seems too dry before baking, add 1-2 tablespoons of softened butter and mix gently.
Do I have to chill the dough before baking?
Chilling isn’t absolutely required, but it’s highly recommended. Chilled dough is easier to roll into balls without sticking to your hands, and it helps cookies maintain their shape during baking rather than spreading. If you’re short on time, you can skip it, but you might need to work quickly and keep your hands cool. Some bakers keep a bowl of cold water nearby to cool their hands between rolling cookies.
Can I use salted butter instead of unsalted?
You can use salted butter in a pinch, but omit the salt called for in the recipe. The flavor will be slightly different, and you’ll have less control over the salt level. Most bakers prefer unsalted butter for baking because it allows you to control the exact amount of salt and ensures the butter is fresh (salt acts as a preservative, so salted butter can be older).
How do I get that thick, snowy coating of powdered sugar?
The key is rolling the cookies twice – once while they’re still warm (about 5 minutes after removing from the oven) and again after they’ve cooled completely. The first coating helps the sugar stick and creates a base layer. The second coating creates that thick, beautiful snowy finish. Use a fresh bowl of powdered sugar for the second coating, and be generous with it.
My cookies are spreading too much during baking. What am I doing wrong?
Cookie spreading is usually caused by butter that’s too soft or melted. Make sure your butter is softened but still holds its shape – not greasy or shiny. Also ensure you’re chilling the dough before shaping if your kitchen is warm. Using parchment paper rather than a greased pan can also reduce spreading. Finally, make sure your baking sheets aren’t too hot – let them cool between batches.
Conclusion
There’s something truly magical about Wedding Cookies. Maybe it’s the way they literally melt in your mouth with each bite, or how that snowy coating of powdered sugar transforms a simple butter cookie into something special. Perhaps it’s the nostalgia they bring – reminding us of holiday gatherings, wedding celebrations, and precious moments shared with loved ones.
These little snowballs of joy prove that the simplest recipes are often the most beloved. With just six basic ingredients and minimal effort, you can create cookies that look like they came from a fancy bakery and taste absolutely heavenly. The fact that they’re make-ahead friendly and freeze beautifully is just the cherry on top.
Whether you’re baking these for a holiday cookie exchange, packaging them up as heartfelt gifts, serving them at a special celebration, or simply treating yourself to something sweet with your afternoon coffee, Wedding Cookies never disappoint. They’re proof that you don’t need complicated techniques or exotic ingredients to create something truly wonderful.
So preheat that oven, soften some butter, and get ready to fill your kitchen with the most amazing buttery, nutty aroma. Roll those little balls, coat them in snowy powdered sugar, and watch as they disappear from the plate almost as quickly as you can make them. Because that’s the thing about Wedding Cookies – one is never enough.
Happy baking, and may your cookie jar always be full of these tender, delicious treats!
Save this recipe to your Pinterest boards and share your beautiful Wedding Cookies with me – I love seeing your baking creations!