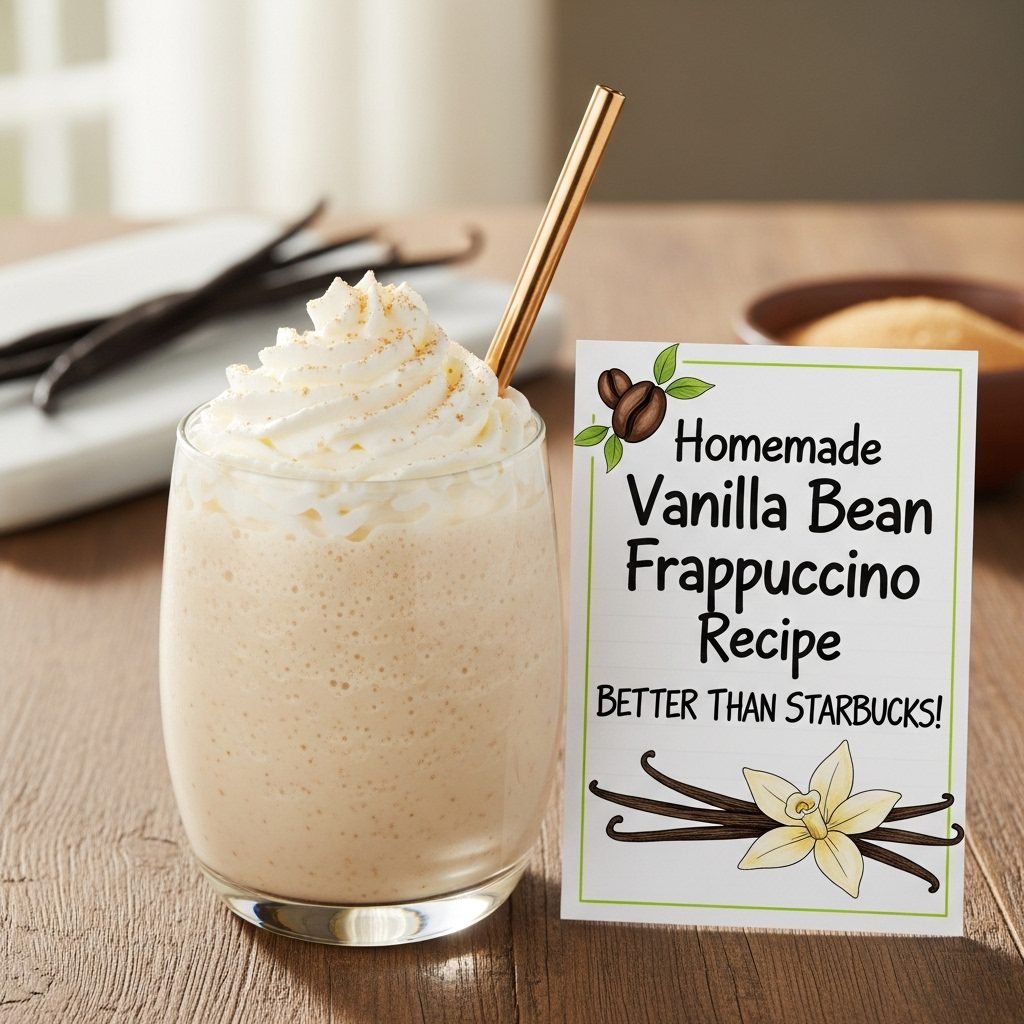
Homemade Vanilla Bean Frappuccino Recipe (Better Than Starbucks!)
There’s something magical about a creamy, icy Vanilla Bean Frappuccino on a warm afternoon—or honestly, any time of day! This beloved coffeehouse classic has captured hearts across America, and now you can make it right in your own kitchen for a fraction of the price. This homemade Vanilla Bean Frappuccino recipe delivers that signature sweet, vanilla-forward flavor with a perfectly smooth, frothy texture that rivals your favorite coffee shop version.
What makes this drink so irresistible? It’s the perfect balance of rich vanilla, creamy milk, and crushed ice blended into a frosty treat that’s both refreshing and indulgent. Unlike coffee-based frappuccinos, this vanilla bean version is caffeine-free, making it ideal for kids, pregnant women, or anyone avoiding caffeine who still wants to enjoy that frappuccino experience. Serve it as an afternoon pick-me-up, a sweet treat after dinner, a party beverage, or even as a special breakfast drink on lazy weekend mornings.
The best part? You probably have most of the ingredients in your kitchen right now, and it takes just five minutes to whip up. No more expensive coffee shop runs—you’re about to become your own favorite barista!
History / Background
The Frappuccino phenomenon began in the early 1990s when The Coffee Connection, a small Massachusetts coffee chain, created a blended coffee drink they trademarked as “Frappuccino”—a clever portmanteau of “frappé” (a Greek iced coffee drink) and “cappuccino.” When Starbucks acquired The Coffee Connection in 1994, they inherited this trademarked name and recipe, quickly recognizing its potential to revolutionize their menu.
Starbucks officially launched their Frappuccino line in 1995, and it became an instant sensation, transforming the coffee culture landscape in America. The Vanilla Bean Frappuccino was introduced as part of the original Crème Frappuccino line—a brilliant move to appeal to non-coffee drinkers who still wanted to participate in the coffeehouse culture. It quickly became one of the most popular menu items, especially among younger customers and those who preferred sweet, dessert-like beverages.
The drink’s appeal lies in its simplicity and versatility. Real vanilla bean specks suspended in a creamy, icy base created a visual and flavor experience that felt premium yet approachable. Over the years, the Vanilla Bean Frappuccino has become a canvas for customization, with customers adding everything from caramel drizzle to strawberry puree, creating countless variations.
The rise of food blogging and Pinterest in the 2010s sparked a “copycat recipe” movement, with home cooks determined to recreate their favorite restaurant and coffeehouse treats. The Vanilla Bean Frappuccino became one of the most sought-after recipes, leading to countless kitchen experiments and perfected homemade versions—like the one you’re about to make today!
Why You’ll Love This Recipe
This homemade Vanilla Bean Frappuccino isn’t just a drink—it’s an experience that brings coffeehouse luxury into your home without the hefty price tag or the wait in line. The beauty of making it yourself is the complete control you have over sweetness, thickness, and flavor intensity.
Here’s why this recipe will become your new obsession:
- Budget-Friendly: Make four frappuccinos at home for less than the cost of one at a coffee shop
- 5-Minute Prep: Faster than driving to Starbucks and waiting in line
- Customizable: Adjust sweetness, thickness, and flavor to your exact preferences
- Caffeine-Free: Perfect for kids, evening treats, or anyone avoiding caffeine
- No Special Equipment: Just a regular blender—no expensive machinery needed
- Better Ingredients: Control the quality and know exactly what’s going into your drink
- Impressive: Guests will be amazed you made this restaurant-quality drink at home
- Year-Round Treat: Refreshing in summer, comforting in winter
- Kid-Friendly: A special treat that children absolutely love
- Meal Prep Ready: Make the base ahead and blend when ready to serve
Ingredient Notes
Let’s break down what makes this Vanilla Bean Frappuccino so incredibly delicious and how each ingredient contributes to that signature flavor and texture:
Whole Milk: The foundation of your frappuccino’s creaminess. Whole milk provides the richest, most authentic texture, but you can substitute with 2% milk, oat milk, almond milk, or coconut milk. Keep in mind that lower-fat milks will produce a less creamy result, while alternative milks may alter the flavor slightly.
Vanilla Bean Paste or Vanilla Extract: This is where the magic happens! Vanilla bean paste gives you those beautiful black specks throughout the drink and delivers intense vanilla flavor. If using vanilla extract, use pure extract rather than imitation for the best taste. In a pinch, you can scrape a whole vanilla bean, but the paste is more economical and equally delicious.
Granulated Sugar: Provides sweetness and helps create the right consistency. White sugar dissolves easily in the cold mixture, ensuring no gritty texture. You can reduce the amount if you prefer less sweet drinks, or substitute with honey, maple syrup, or agave nectar (though these will slightly alter the flavor and color).
Ice: The star ingredient that creates that signature frozen, slushy texture. Use regular ice cubes—about 2-3 cups depending on your desired thickness. The more ice, the thicker and more frappé-like your drink becomes.
Heavy Cream (for topping): Optional but highly recommended! A dollop of whipped cream transforms this from a nice drink to a truly indulgent treat. You can use store-bought whipped cream or make your own with heavy cream and a touch of powdered sugar.
Vanilla Powder or Extra Vanilla Extract (optional): For true vanilla lovers who want even more intense flavor, adding an extra quarter teaspoon of vanilla extract or a pinch of vanilla powder creates that over-the-top vanilla experience.
Equipment Needed
The beauty of this recipe is its simplicity—you don’t need any fancy barista equipment! Here’s what you’ll need:
- High-Powered Blender: A Vitamix, Ninja, or similar blender works best for crushing ice smoothly. Even a standard blender will work; you may just need to blend a bit longer.
- Measuring Cups: For accurate liquid measurements
- Measuring Spoons: For vanilla and sugar
- Tall Glass: A 16-20 ounce glass for serving (mason jars work beautifully!)
- Straws: Wide reusable straws work best for the thick consistency
- Ice Cube Trays: For making fresh ice
- Whisk (optional): If making homemade whipped cream
- Piping Bag or Zip-Top Bag (optional): For a pretty whipped cream swirl on top
Print

Vanilla Bean Frappuccino Recipe
This creamy, dreamy Homemade Vanilla Bean Frappuccino tastes just like the coffeehouse classic but costs a fraction of the price! Perfectly sweet, wonderfully smooth, and topped with whipped cream, this caffeine-free frozen drink is ready in just 5 minutes.
- Total Time: 5 minutes
- Yield: 2 servings 1x
Ingredients
Scale- e cubes
- ¼ cup heavy cream (for blending, optional but recommended)
- Whipped cream (for topping)
- Extra vanilla bean paste or vanilla powder (for garnish, optional)
Instructions
- Prepare Your Blender: Make sure your blender is clean and completely dry. A wet blender can dilute your frappuccino and affect the texture.
- Add Liquids First: Pour the cold whole milk into the blender first. This helps protect your blender blades and creates better circulation for smooth blending. Add the heavy cream if using.
- Add Flavorings: Measure and add the granulated sugar and vanilla bean paste (or vanilla extract) to the blender. The sugar will dissolve as you blend, creating that sweet vanilla base.
- Add Ice Last: Add the ice cubes on top of the liquid ingredients. This layering technique helps the blades catch the ice more effectively and creates a smoother consistency.
- Blend on High: Start blending on low speed for a few seconds, then increase to high speed. Blend for 30-45 seconds, or until the mixture is completely smooth with no ice chunks remaining. You should hear the sound change from loud crushing to a smooth whir when it’s ready.
- Check Consistency: Stop the blender and check the thickness. Your frappuccino should be thick enough to require a straw but pourable. If it’s too thick, add 1-2 tablespoons more milk and pulse briefly. If it’s too thin, add 3-4 more ice cubes and blend again.
- Taste and Adjust: Give it a quick taste test! Add more sugar if you want it sweeter, or more vanilla for a stronger vanilla flavor. Blend for another 5-10 seconds if you make adjustments.
- Pour and Serve: Pour the frappuccino into tall glasses, leaving about an inch of space at the top for whipped cream.
- Top with Whipped Cream: Add a generous swirl of whipped cream on top. For an authentic coffeehouse look, use a piping bag or a zip-top bag with the corner snipped off.
- Garnish and Enjoy: For extra flair, sprinkle a tiny pinch of vanilla bean paste or vanilla powder on top of the whipped cream. Add a wide straw and serve immediately!
Notes
- Sweetness Level: Start with 3 tablespoons of sugar and adjust to taste. Some prefer 2 tablespoons for a less sweet version, while others go up to 4 tablespoons.
- Milk Alternatives: Oat milk provides the creamiest non-dairy option. Almond milk works but creates a thinner consistency. Coconut milk adds a subtle tropical flavor.
- Make It Stronger: For an even more intense vanilla flavor, use both vanilla bean paste AND vanilla extract.
- Xanthan Gum Trick: Professional baristas often add a tiny pinch (1/16 teaspoon) of xanthan gum to prevent separation and create an ultra-smooth texture. This is completely optional but worth trying if you want that authentic coffeehouse consistency.
- Best Served Fresh: Frappuccinos are best enjoyed immediately after blending, as they can separate or melt if left sitting.
- Prep Time: 5 minutes
- Cook Time: 0 minutes
- Category: Beverage
- Method: Blended
- Cuisine: American
- Diet: Gluten Free
Nutrition
- Serving Size: 1 frappuccino (½ recipe, with whipped cream)
- Calories: 285
- Sugar: 28g
- Sodium: 75mg
- Fat: 12g
- Saturated Fat: 7.5g
- Unsaturated Fat: 3.5g
- Trans Fat: 0g
- Carbohydrates: 38g
- Fiber: 0g
- Protein: 5g
- Cholesterol: 45mg
Tips & Variations
The beauty of making your own frappuccinos at home is the endless customization possibilities! Here are some delicious ways to make this recipe your own:
Flavor Variations:
- French Vanilla: Add ¼ teaspoon of almond extract along with the vanilla for a classic French vanilla flavor
- Vanilla Caramel: Drizzle 2 tablespoons of caramel sauce inside the glass before pouring, and drizzle more on top of the whipped cream
- Vanilla Bean & Cookie: Blend in 2-3 crushed Oreos or vanilla wafer cookies for a cookies and cream twist
- Birthday Cake: Add ½ teaspoon of butter extract and a few drops of pink food coloring, then top with rainbow sprinkles
- Protein Power: Add a scoop of vanilla protein powder for a post-workout treat
Dietary Modifications:
- Sugar-Free: Use your favorite sugar substitute like erythritol, stevia, or monk fruit sweetener
- Low-Calorie: Use unsweetened almond milk, sugar-free sweetener, and skip the heavy cream (add 1 tablespoon of sugar-free vanilla syrup instead)
- Vegan: Use oat milk or coconut milk, and top with coconut whipped cream
- Keto-Friendly: Use unsweetened almond milk, sugar-free sweetener, add 2 tablespoons MCT oil or heavy cream, and increase the vanilla
Texture Adjustments:
- Thicker Frappuccino: Add an extra ½ cup of ice or 2 tablespoons of instant vanilla pudding mix
- Smoother Consistency: Blend the milk, sugar, and vanilla first, then add ice gradually while blending
- Slushy Style: Use less milk (¾ cup) and more ice (3 cups) for a more icy, less creamy texture
Pro Chef Tips
Want to make your homemade frappuccino taste like it came from a professional coffeehouse? Here are insider secrets that make all the difference:
Use Frozen Milk Cubes: Freeze ½ cup of milk in ice cube trays the night before. Replace half your regular ice with these frozen milk cubes for an incredibly creamy frappuccino that doesn’t get watered down as it melts.
Pre-Chill Everything: Cold ingredients blend better and create a smoother texture. Keep your milk in the coldest part of your refrigerator, and chill your blender container in the freezer for 10 minutes before making your drink.
The Xanthan Gum Secret: Professional baristas add just a tiny pinch of xanthan gum (available in the baking aisle) to create that ultra-smooth, non-separating texture. It’s the secret ingredient that keeps everything perfectly blended.
Layer Your Blending: Don’t just dump everything in at once. Add liquids first, then flavorings, then ice last. This creates better circulation and prevents air pockets that lead to uneven blending.
The Pulse Technique: Start with 3-4 quick pulses to break up the ice, then blend continuously on high. This prevents strain on your blender motor and creates a more uniform texture.
Double Strain for Perfection: For an ultra-smooth, professional result, pour your finished frappuccino through a fine-mesh strainer to catch any ice chunks or unmixed vanilla specks. This extra step makes it silky smooth.
Temperature Matters: Your frappuccino should be cold enough that the glass frosts up on the outside. If it’s not that cold, your ice-to-liquid ratio needs adjustment, or your ingredients weren’t cold enough to start.
Common Mistakes to Avoid
Even simple recipes can go wrong! Here’s how to avoid the most common frappuccino fails:
1. Using Warm or Room Temperature Milk: This is the #1 mistake! Room temperature milk requires way more ice to achieve the right consistency, which dilutes the flavor. Always use cold milk straight from the refrigerator. If you forgot to keep it cold, add a few frozen milk cubes to compensate.
2. Over-Blending: Blending for too long (more than 60 seconds) can actually warm up your frappuccino from the friction and make it watery. Stop as soon as the mixture is smooth and you no longer hear ice chunks being crushed.
3. Adding Ice First: If you add ice before liquids, it can create air pockets around the blades, leading to uneven blending with chunks of ice remaining. Always put liquids in first for best circulation.
4. Using Low-Quality Vanilla: Imitation vanilla extract tastes artificial and chemical-like in cold applications. Invest in pure vanilla extract or vanilla bean paste—it makes an enormous difference in flavor quality.
5. Not Adjusting for Blender Power: High-powered blenders (like Vitamix) need less liquid and crush ice more efficiently. Standard blenders may need an extra ¼ cup of milk or fewer ice cubes to achieve the same smooth result. Know your equipment and adjust accordingly.
6. Letting It Sit Too Long: Frappuccinos begin separating within 5-10 minutes. The ice melts, and the drink becomes watery. Make them right before serving, not ahead of time, unless you’re using the make-ahead method described below.
7. Skipping the Heavy Cream: While optional, that ¼ cup of heavy cream blended into the base creates the rich, creamy mouthfeel that makes coffeehouse frappuccinos so irresistible. Without it, the drink can taste thin or icy rather than creamy.
Storage & Meal Prep
While frappuccinos are absolutely best enjoyed fresh from the blender, here’s how to handle leftovers and prep work:
Immediate Consumption: For the best taste and texture, drink your frappuccino within 5 minutes of blending. The ice begins melting immediately, and separation starts occurring around the 10-minute mark.
Short-Term Storage (1-2 hours): If you absolutely must store a prepared frappuccino, pour it into an airtight container or jar with a tight-fitting lid. Fill the container to the very top to minimize air exposure. Store in the freezer (not the refrigerator). When ready to drink, let it sit at room temperature for 3-5 minutes to soften slightly, then give it a vigorous shake or quick re-blend.
Leftover Reality Check: Honestly, stored frappuccinos are never quite the same as fresh ones. The texture changes, separation occurs, and ice crystals form. If you have leftovers, consider these options:
- Re-blend with 3-4 fresh ice cubes to restore texture
- Pour into popsicle molds for vanilla bean ice pops
- Let it melt completely and use as a vanilla milk base for iced coffee the next day
Pre-Measuring Ingredients: The best make-ahead approach is to pre-measure your dry ingredients. Mix the sugar and vanilla bean paste together in a small container or jar. Store in the refrigerator for up to 1 week. When ready to make your frappuccino, simply add this mixture to milk and ice—saves time and ensures consistency.
Whipped Cream Storage: Homemade whipped cream can be made up to 24 hours ahead and stored in the refrigerator in an airtight container. It may deflate slightly, but a quick whisk brings it back to life. Store-bought whipped cream lasts longer according to package directions.
Make-Ahead & Freezer Notes
Want to enjoy frappuccinos more conveniently? Here’s how to prep components in advance:
Vanilla-Sugar Base: Mix ½ cup sugar with 2 tablespoons vanilla bean paste until well combined. Store in an airtight container in the refrigerator for up to 2 weeks. Use 2 tablespoons of this mixture per frappuccino—add to blender with milk and ice.
Frozen Milk Cubes Method: This is a game-changer! Pour milk into ice cube trays and freeze completely (this takes about 4 hours). Store frozen milk cubes in a freezer bag for up to 1 month. When making your frappuccino, use 1 cup of frozen milk cubes plus ½ cup regular ice cubes and ¼ cup liquid milk. This creates an incredibly thick, creamy frappuccino that stays cold longer and doesn’t get watered down.
Complete Freezer Packs: For ultimate convenience, create individual freezer packs. In each freezer-safe bag, combine:
- 1 cup milk (frozen in a separate bag works best)
- 1½ tablespoons sugar
- ¾ teaspoon vanilla bean paste Freeze for up to 1 month. When ready to use, let thaw slightly (5-10 minutes at room temperature), add to blender with 1½ cups ice, and blend. This method works best if you freeze the milk separately and combine everything when blending.
Batch Vanilla Syrup: Make a vanilla simple syrup that keeps for weeks! Combine 1 cup water, 1 cup sugar, and 2 tablespoons vanilla bean paste in a saucepan. Heat until sugar dissolves, then simmer for 5 minutes. Cool completely and store in a jar in the refrigerator for up to 1 month. Use 2-3 tablespoons per frappuccino instead of sugar and vanilla. This dissolves better in cold liquids and provides more consistent sweetness.
Best Reheating Method: Since frappuccinos are frozen drinks, there’s no “reheating” involved. However, if you’ve frozen a complete frappuccino and want to restore it: Let it thaw in the refrigerator for 2-3 hours until it’s slushy but not completely liquid. Pour into the blender and give it a 10-15 second blend to restore the smooth texture. You may need to add 2-3 fresh ice cubes if it’s become too liquid.
Serving Suggestions
A Vanilla Bean Frappuccino is delicious on its own, but the right accompaniments can elevate your at-home coffeehouse experience! Here’s what to serve alongside:
Perfect Pastry Pairings:
- Warm blueberry muffins or banana bread slices
- Buttery croissants (plain or chocolate-filled)
- Lemon pound cake or vanilla scones
- Chocolate chip cookies or biscotti for dunking
- Cinnamon rolls or coffee cake
- Glazed donuts or cruller
Brunch & Breakfast Companions:
- Fluffy buttermilk pancakes with maple syrup
- French toast sticks with strawberry compote
- Breakfast sandwiches (egg, cheese, and bacon on English muffins)
- Fresh fruit parfaits with granola
- Avocado toast with everything bagel seasoning
- Spinach and feta quiche
Afternoon Snack Ideas:
- Cheese and crackers board with grapes
- Trail mix with dried fruits and nuts
- Pretzels with white chocolate dipping sauce
- Rice crispy treats or marshmallow squares
- Fruit kabobs with vanilla yogurt dip
- Shortbread cookies or madeleines
Party & Gathering Suggestions: Create a DIY Frappuccino Bar! Set out:
- Freshly blended vanilla bean frappuccino base in a pitcher
- Whipped cream with a piping bag
- Various toppings: caramel drizzle, chocolate syrup, crushed cookies, sprinkles, cinnamon sugar
- Fun straws and pretty glasses
- Let guests customize their own drinks—kids especially love this!
Seasonal Serving Ideas:
- Summer: Serve with fresh berries and angel food cake
- Fall: Pair with pumpkin bread and caramel apple slices
- Winter: Enjoy with gingerbread cookies and peppermint bark
- Spring: Accompany with lemon bars and fresh strawberries
FAQs Section
Q: Can I make this without vanilla bean paste?
A: Absolutely! Pure vanilla extract works beautifully—use 2 teaspoons instead of 1½ teaspoons of vanilla bean paste. The flavor will be just as delicious, though you won’t have those signature vanilla bean specks throughout the drink. You can also scrape half a real vanilla bean if you have one on hand. Avoid imitation vanilla extract as it tastes artificial in cold applications.Q: Why is my frappuccino watery or separating?
A: This usually happens for three reasons: (1) Your milk wasn’t cold enough—always use refrigerator-cold milk, (2) You used too much liquid relative to ice—try reducing milk by 2 tablespoons or adding 4-5 more ice cubes, or (3) Your frappuccino sat too long before drinking. These drinks are best consumed within 5 minutes of blending. For better stability, add a tiny pinch of xanthan gum (1/16 teaspoon) before blending.Q: Can I add coffee to make it caffeinated?
A: Yes! For a Vanilla Coffee Frappuccino, replace ¼ cup of the milk with ¼ cup of cold, strong-brewed coffee or add 1-2 shots of espresso. You can also add 1 teaspoon of instant coffee dissolved in 2 tablespoons of warm water (then cooled). The vanilla-coffee combination is absolutely delicious!Q: What’s the best milk alternative for this recipe?
A: Oat milk is hands-down the best dairy-free option because it’s naturally creamy and blends smoothly without separating. Barista-style oat milk works even better. Coconut milk (canned, full-fat) creates a rich, tropical-flavored version. Almond milk works but can be thinner—use the unsweetened vanilla variety and add an extra tablespoon of sugar. Cashew milk is also excellent for creaminess.Q: How can I make this lower in calories and sugar?
A: Several options! Use unsweetened almond milk instead of whole milk (saves about 100 calories), substitute the sugar with your preferred sugar-free sweetener like erythritol or stevia (saves about 100 calories), skip the heavy cream in the blend (saves about 50 calories), and use sugar-free whipped cream or skip it entirely (saves about 50 calories). With all substitutions, you can reduce the calories by more than half while still enjoying a delicious treat!Q: My blender isn’t crushing the ice smoothly. What should I do?
A: Try these techniques: (1) Use smaller ice cubes or crushed ice instead of large chunks, (2) Add the ice gradually while the blender is running rather than all at once, (3) Add an extra 2-3 tablespoons of liquid to help the blades catch the ice better, or (4) Let the ice sit at room temperature for 2-3 minutes to soften slightly before blending. If your blender is really struggling, you may need to blend in batches or invest in a higher-powered blender for frozen drink recipes.Q: Can I make a large batch for a party?
A: Frappuccinos don’t hold well in large batches since they separate and melt. Instead, make multiple single or double batches back-to-back. A better party approach: pre-measure your sugar and vanilla mixture into individual containers, have cold milk ready in a pitcher, and blend fresh drinks in batches throughout the event. You can also set up a self-serve station with all ingredients measured out and let guests take turns blending their own—it becomes a fun party activity!Conclusion
There you have it—your ticket to coffeehouse-quality Vanilla Bean Frappuccinos without ever leaving your kitchen! This recipe proves that the best treats don’t require fancy equipment or professional training, just quality ingredients and a little know-how. The creamy vanilla flavor, perfectly icy texture, and that crowning swirl of whipped cream create pure bliss in a glass.
Whether you’re treating yourself on a warm afternoon, serving a crowd at your next gathering, or making a special drink for the kids, this homemade frappuccino delivers every single time. Plus, knowing you’re saving $5+ per drink while enjoying something even better than the coffee shop version? That’s the kind of home cooking win we all love!
I hope you absolutely love this recipe as much as my family does. It’s become our weekend tradition and our go-to special treat. The best part is watching everyone’s faces light up when they take that first frosty sip!
Now it’s your turn! Try this recipe and let me know how it turns out in the comments below. Did you add any fun variations? What toppings did you use? I’d love to hear all about your frappuccino creations!
Don’t forget to:
- ⭐ Rate this recipe below
- 📷 Share your frappuccino photos on Instagram (tag me so I can see them!)
- 📌 Pin this recipe to your Pinterest boards so you can find it again (your followers will thank you!)
- ☕ Try my other copycat coffeehouse recipes
- 💌 Subscribe to my newsletter for more delicious homemade treats
Here’s to becoming your own favorite barista! Happy blending! ☕✨