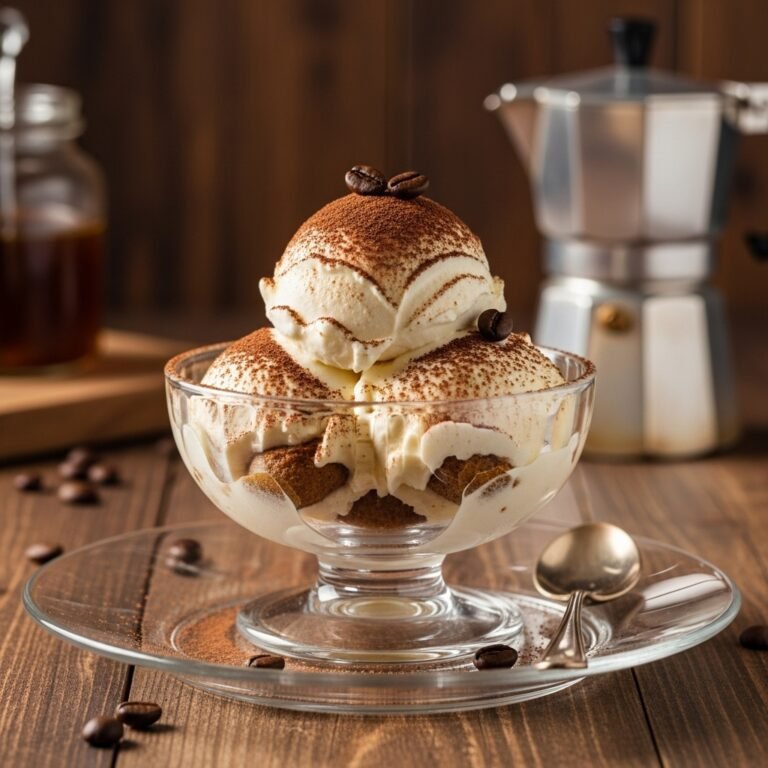
Homemade Tiramisu Gelato Recipe – Italian Coffee Ice Cream Heaven!
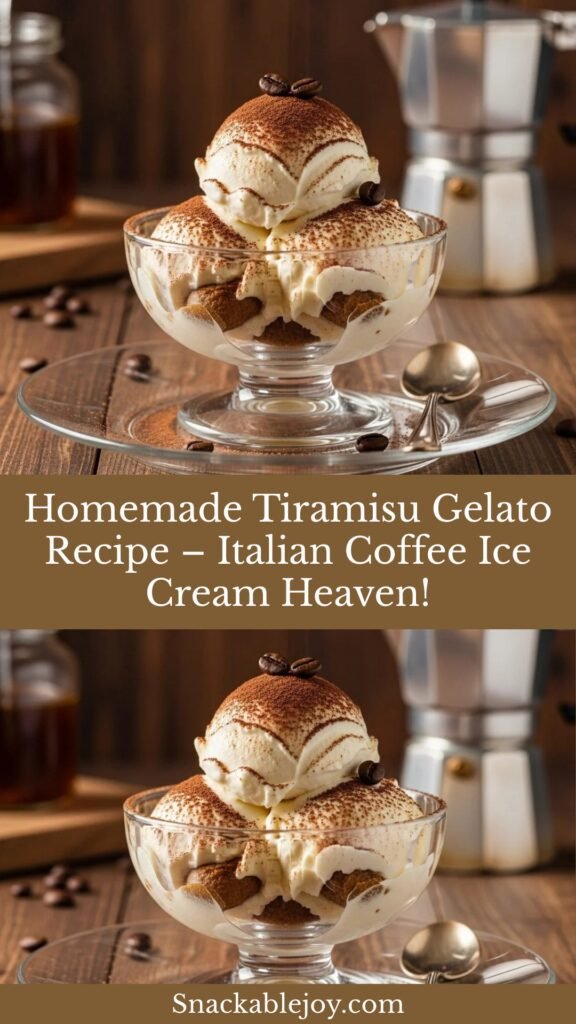
Imagine taking a spoonful of the world’s most beloved Italian dessert—tiramisu—and transforming it into the creamiest, dreamiest gelato you’ve ever tasted. That’s exactly what this Tiramisu Gelato recipe delivers! This luxurious frozen treat combines all the classic flavors of traditional tiramisu—rich espresso, sweet mascarpone, and a hint of cocoa—in a silky-smooth gelato that’s absolutely irresistible.
Tiramisu Gelato is perfect for summer gatherings, dinner parties, Italian-themed meals, or anytime you’re craving something indulgent and sophisticated. It’s an elegant dessert that impresses guests while being surprisingly simple to make at home. Unlike traditional tiramisu, this frozen version doesn’t require ladyfinger cookies or raw eggs, making it easier and safer for everyone to enjoy. The result is a gelato that tastes like you scooped it straight from a gelateria in Rome, with intense coffee flavor balanced by creamy sweetness and a whisper of cocoa. Whether you’re a tiramisu lover or a gelato enthusiast (or both!), this recipe is about to become your new favorite frozen dessert!
History / Background
To understand Tiramisu Gelato, we need to explore the beautiful marriage of two iconic Italian desserts: tiramisu and gelato. Both have deep roots in Italian culinary tradition, and their combination creates something truly magical.
Tiramisu’s Story: Traditional tiramisu—whose name translates to “pick me up” or “lift me up” in Italian—is a relatively modern dessert compared to many Italian classics. While its exact origins are debated, most food historians agree it was created in the Veneto region of northeastern Italy, likely in the 1960s or 1970s. The most popular origin story credits the dessert to the restaurant Le Beccherie in Treviso, where chef Roberto Linguanotto and restaurant owner Aldo Campeol supposedly invented it. The dessert quickly became a sensation throughout Italy and eventually conquered the world with its irresistible layers of coffee-soaked ladyfingers, mascarpone cream, and cocoa powder.
Gelato’s Ancient Roots: Gelato, on the other hand, has a much longer history dating back to ancient Rome, where people enjoyed frozen desserts made from snow brought down from the mountains and mixed with honey and fruit. Modern gelato as we know it emerged during the Italian Renaissance in Florence, with the Medici family commissioning elaborate frozen desserts for their grand celebrations. By the 17th century, gelato had become a refined art form, and by the 20th century, it had become synonymous with Italian culture worldwide.
The Fusion: Tiramisu Gelato represents the innovative spirit of Italian gelato makers (gelatieri) who constantly create new flavors inspired by beloved Italian desserts. This flavor combination likely emerged in Italian gelaterias in the 1980s and 1990s as tiramisu’s popularity soared. The genius of transforming tiramisu into gelato is that it captures all the essential flavors—espresso, mascarpone, and cocoa—while adding the smooth, dense texture that makes gelato so special. Today, you’ll find tiramisu gelato in gelaterias throughout Italy and in Italian ice cream shops worldwide, and now you can recreate this authentic taste right in your own kitchen!
Why You’ll Love This Recipe
This Tiramisu Gelato recipe brings the authentic taste of Italian gelato to your home kitchen, and trust me, once you try it, you’ll never want to go back to store-bought! I’ve perfected this recipe to give you that signature gelato texture—denser and silkier than regular ice cream—with all the complex flavors that make tiramisu so addictive.
Here’s why this recipe is absolutely worth making:
- Authentic Italian flavor – Tastes like it came straight from a Roman gelateria, with real espresso and mascarpone cheese creating that genuine tiramisu experience
- Incredibly creamy texture – The combination of mascarpone and whole milk creates that signature gelato density that’s smoother than American ice cream
- No raw eggs required – Unlike traditional tiramisu, this gelato uses a cooked custard base, making it completely safe for everyone to enjoy
- Less sugar, more flavor – Gelato traditionally has less fat and sugar than ice cream, letting the bold coffee and cocoa flavors really shine through
- Make-ahead perfection – Prepare it days in advance and have an impressive dessert ready whenever you need it
- Sophisticated yet simple – Looks and tastes like something from an upscale restaurant, but uses straightforward techniques any home cook can master
- Perfect temperature – Gelato is served slightly warmer than ice cream, so it’s softer and more flavorful right out of the freezer
- Customizable intensity – Easily adjust the coffee strength to suit your taste, from mild to bold espresso lovers’ heaven
- Budget-friendly luxury – Much cheaper than buying premium gelato, and tastes even better!
Ingredient Notes
Let’s break down each ingredient and why it’s crucial for achieving that perfect Tiramisu Gelato:
Whole Milk: The base of our gelato uses whole milk rather than heavy cream (unlike American ice cream). You’ll need about 2½ to 3 cups. Whole milk is essential because gelato has less fat than ice cream, which gives it that characteristic dense, silky texture rather than fluffy airiness. Don’t substitute with low-fat or skim milk—you need that fat content for proper texture and richness.
Heavy Cream: While gelato uses less cream than traditional ice cream, we still need about ½ to 1 cup of heavy cream for richness and smooth texture. This small amount adds just enough fat to create creaminess without making it too heavy. Make sure it’s cold from the refrigerator.
Mascarpone Cheese: This is the star ingredient that makes it truly tiramisu! You’ll need about ¾ to 1 cup of mascarpone. This Italian cream cheese is incredibly rich and smooth with a slightly sweet, buttery flavor. It’s what gives traditional tiramisu its distinctive taste and adds luxurious creaminess to our gelato. Don’t substitute with regular cream cheese—mascarpone has a unique, delicate flavor that’s essential. You can find it in most grocery stores in the specialty cheese section.
Granulated Sugar: You’ll need about ¾ to 1 cup, depending on your sweetness preference. Sugar not only sweetens but also prevents the gelato from freezing rock-hard. It lowers the freezing point, keeping the texture scoopable. The amount can be adjusted based on taste—gelato is typically less sweet than American ice cream.
Egg Yolks: About 4-6 large egg yolks create the custard base that gives gelato its smooth, rich texture. The yolks act as emulsifiers, binding the fat and water molecules together, preventing ice crystals, and creating that silky mouthfeel. Make sure they’re fresh and at room temperature for easier mixing.
Espresso or Strong Coffee: This is crucial for authentic tiramisu flavor! You’ll need about ½ to ¾ cup of strong brewed espresso or very strong coffee, cooled to room temperature. Use quality coffee beans or espresso—the better your coffee, the better your gelato. You can brew espresso, use a French press, or even use instant espresso powder dissolved in hot water. For the most intense flavor, use actual espresso shots.
Unsweetened Cocoa Powder: About 2-3 tablespoons of high-quality Dutch-process cocoa powder adds that signature tiramisu chocolate note without making it taste like chocolate gelato. Dutch-process cocoa has a deeper, mellower flavor that works perfectly here. Sift it to remove lumps before using.
Coffee Liqueur (Optional): A tablespoon or two of Kahlúa, Tia Maria, or other coffee liqueur adds depth and authentic tiramisu flavor. It’s optional but highly recommended for adults! The alcohol also helps keep the gelato slightly softer in the freezer.
Vanilla Extract: Just 1 teaspoon of pure vanilla extract enhances all the other flavors without overpowering them. Use real vanilla extract, not imitation.
Salt: A pinch of salt (about ⅛ teaspoon) is essential for balancing sweetness and amplifying all the flavors in the gelato.
Equipment Needed
Making gelato at home doesn’t require professional equipment, but having the right tools makes the process much smoother:
- Ice cream maker – This is the most important tool. A 1.5 to 2-quart capacity machine works perfectly. Whether you have a countertop electric model with a freezer bowl or a compressor model, either works great. Make sure the bowl is frozen solid (usually 24 hours in advance) if using the freezer bowl type.
- Medium to large saucepan – For making the custard base. Use heavy-bottomed cookware to prevent scorching.
- Whisk – Both a regular whisk and a larger balloon whisk are helpful for mixing the custard smoothly.
- Mixing bowls – At least 2-3 bowls in various sizes. One large bowl should be heatproof for tempering eggs.
- Fine-mesh strainer – Essential for straining the custard to remove any cooked egg bits and ensure silky smoothness.
- Measuring cups and spoons – Accurate measurements are important in gelato making.
- Instant-read thermometer – Highly recommended (but not required) for monitoring the custard temperature. You want to cook it to 170-175°F (77-80°C).
- Silicone spatula – Perfect for stirring the custard and scraping down the sides of bowls.
- Freezer-safe container – A shallow, airtight container (like a loaf pan or specifically designed gelato container) for storing the finished gelato.
- Ice bath setup – A large bowl filled with ice and water for cooling the custard quickly.
- Coffee maker or espresso machine – For brewing your coffee or espresso.
-
Print

Tiramisu Gelato Recipe
This authentic Tiramisu Gelato captures all the beloved flavors of classic Italian tiramisu—rich espresso, creamy mascarpone, and hints of cocoa—in a smooth, dreamy gelato that’s less sweet and more intensely flavored than traditional ice cream.
- Total Time: 5-7 hours (including chilling and churning)
- Yield: 1 quart (about 8 servings) 1x
Ingredients
ScaleFor the Gelato Base:
- 2½ cups whole milk
- ¾ cup heavy cream
- ¾ cup granulated sugar (divided)
- 5 large egg yolks
- ¾ cup mascarpone cheese, at room temperature
- ⅛ teaspoon salt
For the Tiramisu Flavor:
- ⅔ cup strong brewed espresso or very strong coffee, cooled
- 2 tablespoons unsweetened cocoa powder (Dutch-process preferred)
- 1 teaspoon pure vanilla extract
- 2 tablespoons coffee liqueur (such as Kahlúa), optional but recommended
For Garnish (Optional):
- Additional cocoa powder for dusting
- Chocolate shavings or espresso beans
Instructions
Step 1: Prepare the Coffee Brew ⅔ cup of strong espresso or very strong coffee. Let it cool completely to room temperature while you prepare the base. You can even refrigerate it to speed up cooling.
Step 2: Make the Custard Base In a medium saucepan, combine the whole milk, heavy cream, and half the sugar (about 6 tablespoons). Heat over medium heat, stirring occasionally, until the mixture is steaming and just begins to form tiny bubbles around the edges (about 170°F). Do not let it boil.
Step 3: Temper the Egg Yolks While the milk mixture heats, whisk together the egg yolks and remaining sugar in a medium heatproof bowl until the mixture is pale yellow and thick, about 2 minutes. This is called “ribboning”—when you lift the whisk, the mixture should fall in thick ribbons.
Once the milk mixture is hot, slowly pour about 1 cup of the hot milk into the egg yolk mixture while whisking constantly. This process, called tempering, gradually raises the temperature of the eggs without scrambling them. Whisk vigorously as you pour.
Step 4: Cook the Custard Pour the tempered egg mixture back into the saucepan with the remaining hot milk. Cook over medium-low heat, stirring constantly with a silicone spatula or wooden spoon, making sure to scrape the bottom and sides of the pan. Cook until the mixture thickens enough to coat the back of a spoon (about 170-175°F on an instant-read thermometer), approximately 8-12 minutes. When you run your finger across the back of the coated spoon, it should leave a clear trail. Do not let it boil or the eggs will curdle.
Step 5: Strain and Add Mascarpone Immediately remove from heat and strain the custard through a fine-mesh strainer into a clean bowl to remove any bits of cooked egg. While the custard is still hot, add the mascarpone cheese, salt, and vanilla extract. Whisk until the mascarpone is completely melted and incorporated, creating a smooth mixture.
Step 6: Add Coffee and Cocoa Sift the cocoa powder into the warm custard mixture and whisk until completely smooth with no lumps. Add the cooled espresso and coffee liqueur (if using). Whisk everything together until fully combined and silky smooth.
Step 7: Chill the Base Set up an ice bath by placing the bowl of gelato base into a larger bowl filled with ice and water. Stir occasionally until the mixture cools to room temperature, about 20-30 minutes. Once cooled, cover with plastic wrap pressed directly against the surface (to prevent a skin from forming) and refrigerate for at least 4-6 hours, or preferably overnight. The base must be completely cold before churning.
Step 8: Churn the Gelato Pour the chilled base into your ice cream maker and churn according to the manufacturer’s instructions, usually 25-30 minutes. The gelato is ready when it reaches a soft-serve consistency and has increased in volume. It should be thick, smooth, and creamy but still soft.
Step 9: Freeze Until Firm Transfer the churned gelato to a freezer-safe, airtight container. Press a piece of parchment paper directly onto the surface to prevent ice crystals from forming. Cover tightly with a lid and freeze for at least 4 hours, or until firm enough to scoop.
Step 10: Serve Let the gelato sit at room temperature for 5-10 minutes before scooping—gelato is best served slightly warmer than American ice cream (around 10-15°F). Scoop into bowls or cups, dust with additional cocoa powder, and garnish with chocolate shavings or whole espresso beans if desired. Enjoy immediately!
Notes
- Coffee strength: Adjust the amount of espresso based on your preference. For mild coffee flavor, use ½ cup; for intense espresso lovers, use up to ¾ cup.
- No ice cream maker? You can still make this! Pour the chilled base into a shallow pan, freeze, and stir vigorously every 30 minutes for 3-4 hours until smooth and creamy.
- Alcohol note: The coffee liqueur enhances flavor and keeps texture soft, but it’s optional. For kids, skip it entirely.
- Storage: Homemade gelato is best eaten within 1-2 weeks. After that, ice crystals may form and texture may suffer.
- Serving temperature: This is key! Gelato should be soft enough to scoop easily. If too hard, let it sit out 5-10 minutes.
- Prep Time: 30 minutes
- Cook Time: 15 minutes
- Method: Ice Cream Maker/Churning
- Cuisine: Italian
- Diet: Gluten Free
Nutrition
- Serving Size: ½ cup (1/8 of recipe)
- Calories: 285
- Sugar: 22g
- Sodium: 65mg
- Fat: 18g
- Saturated Fat: 11g
- Unsaturated Fat: 6g
- Trans Fat: 0g
- Carbohydrates: 25g
- Fiber: 0.5g
- Protein: 6g
- Cholesterol: 155mg
-
Tips & Variations
Flavor Variations:
- Extra Chocolate Tiramisu Gelato: Add 2 ounces of finely chopped dark chocolate to the hot custard base and whisk until melted, or swirl in chocolate sauce after churning
- Amaretto Tiramisu: Replace coffee liqueur with amaretto for an almond-flavored twist
- White Chocolate Tiramisu: Melt 3 ounces white chocolate into the warm custard base for extra sweetness and creaminess
- Mocha Tiramisu: Increase cocoa powder to ¼ cup for a more pronounced chocolate flavor
- Hazelnut Tiramisu: Add 2 tablespoons of hazelnut liqueur (Frangelico) and fold in ¼ cup toasted, chopped hazelnuts after churning
Texture Add-Ins:
- Crumbled ladyfinger cookies or biscotti stirred in during the last minute of churning for authentic tiramisu texture
- Mini chocolate chips folded in after churning for extra chocolate hits
- A swirl of dulce de leche or caramel for added indulgence
- Crushed amaretti cookies for almond crunch
Dietary Adaptations:
- Caffeine-free: Use decaf espresso or coffee for a bedtime-friendly version
- Lower fat: Replace ½ cup of heavy cream with additional whole milk (though texture will be slightly less rich)
- Sugar alternatives: You can use half the sugar amount and add 2-3 tablespoons of honey, though texture may be slightly different
Presentation Ideas:
- Serve in espresso cups for an elegant, authentic Italian presentation
- Layer in parfait glasses with whipped cream and cocoa powder
- Make gelato sandwiches with chocolate wafer cookies
- Scoop onto a chocolate brownie for an ultimate tiramisu brownie sundae
Pro Chef Tips
Temperature is Everything: The key to perfectly smooth gelato is careful temperature control. When cooking your custard, use an instant-read thermometer to ensure you reach 170-175°F—hot enough to thicken and pasteurize the eggs, but not so hot that they scramble. If you don’t have a thermometer, watch for the “nappe” stage where the custard coats the back of a spoon and holds a clear line when you run your finger through it.
The Colder, The Better: Your gelato base must be thoroughly chilled before churning—preferably overnight. This allows the flavors to meld and ensures the mixture churns quickly and evenly, incorporating less air and creating that characteristic dense gelato texture. A warm or room-temperature base will take too long to freeze and create a grainy texture.
Room Temperature Mascarpone is Key: Make sure your mascarpone is at room temperature before adding it to the hot custard. Cold mascarpone can seize up and create lumps that are difficult to remove. Room temperature mascarpone melts smoothly into the custard, creating a silky, lump-free base.
Quality Coffee = Quality Gelato: Since coffee is a primary flavor here, don’t skimp! Use freshly brewed espresso or high-quality strong coffee. Instant coffee can work in a pinch, but fresh espresso gives you that authentic Italian gelato shop taste. If you’re using coffee liqueur, it should complement, not overpower—2 tablespoons is the sweet spot.
Churn to Soft-Serve Consistency: Unlike ice cream, gelato should be churned just until it reaches a thick soft-serve consistency, not frozen solid in the machine. This incorporates less air, creating that dense, creamy texture that defines gelato. Over-churning incorporates too much air and creates an ice cream texture instead.
The Ice Bath Trick: After cooking your custard, cooling it quickly in an ice bath stops the cooking process immediately and prevents overcooking. It also speeds up the chilling process so you can get to churning faster. Stir the custard occasionally as it sits in the ice bath for even cooling.
Press and Seal: When storing your gelato, press parchment paper or plastic wrap directly onto the surface before sealing the container. This prevents ice crystals from forming on top and keeps your gelato fresh and creamy for longer. Air exposure is the enemy of smooth gelato!
Serve at the Right Temperature: This is crucial and often overlooked! Gelato should be served at 10-15°F, which is warmer than American ice cream (typically served at 0-5°F). Let your gelato sit at room temperature for 5-10 minutes before serving. At this slightly warmer temperature, the flavors are more pronounced and the texture is perfectly creamy and scoopable.
Common Mistakes to Avoid
Mistake #1: Boiling the Custard
If you let the custard boil, the eggs will scramble and create an unpleasant, grainy texture with visible chunks. Always cook over medium-low heat and stir constantly. If you see any steam or bubbles forming rapidly, immediately remove from heat. The custard should thicken gradually and smoothly. If you do accidentally scramble it, strain through a fine-mesh strainer to remove lumps, though the texture won’t be quite as silky.Mistake #2: Not Chilling the Base Long Enough
Trying to churn warm or room-temperature gelato base is a recipe for disaster. It will take forever to freeze, incorporate too much air, and result in an icy, grainy texture instead of smooth gelato. Always chill your base for at least 4-6 hours, or preferably overnight. It should be thoroughly cold—about 40°F or below—before churning.Mistake #3: Using Weak Coffee
One of the biggest disappointments is making tiramisu gelato that tastes more like vanilla than coffee. Don’t use regular-strength coffee—you need strong espresso or very concentrated coffee. The coffee flavor mellows slightly when frozen, so it needs to taste quite strong in the liquid base. If your coffee tastes weak when you add it, brew a stronger batch.Mistake #4: Skipping the Straining Step
Even if you think your custard looks perfectly smooth, always strain it through a fine-mesh strainer. This removes any tiny bits of cooked egg that you might have missed, ensures silky-smooth texture, and removes any skin that may have formed. This one simple step is the difference between professional-quality gelato and homemade that tastes amateur.Mistake #5: Storing Too Long Without Proper Protection
Homemade gelato doesn’t contain the stabilizers and emulsifiers that commercial gelato has, so it’s more susceptible to freezer burn and ice crystal formation. Always press parchment or plastic wrap directly on the surface, seal tightly in an airtight container, and consume within 1-2 weeks for best quality. After that, the texture deteriorates and ice crystals form, making it grainy.Storage & Meal Prep
Freezer Storage:
Store your Tiramisu Gelato in an airtight, freezer-safe container with parchment paper pressed directly against the surface. It will keep in the freezer for up to 2 weeks at peak quality. After that, it’s still safe to eat for up to 1 month, but the texture may become more icy and grainy as ice crystals form. Homemade gelato doesn’t contain stabilizers, so it’s best enjoyed fresh!Preventing Ice Crystals:
The biggest enemy of smooth gelato is temperature fluctuation. Every time gelato is exposed to warm air, surface ice crystals form. To minimize this:- Store in the coldest part of your freezer (usually the back)
- Press parchment paper directly on the surface before sealing
- Don’t let the container sit out while serving—scoop quickly and return immediately
- Use a shallow container rather than a deep one for easier scooping and less air exposure
Scooping Tips:
For the best texture and flavor, remove gelato from the freezer 5-10 minutes before serving. Unlike American ice cream, gelato should be served at a slightly warmer temperature (10-15°F vs 0-5°F). If your gelato becomes rock-hard after extended storage, let it soften longer at room temperature—never microwave it, as this creates uneven melting and ruins the texture.Portioning for Convenience:
If you’re making gelato for meal prep or portion control, consider scooping it into individual serving containers or using a muffin tin to create pre-portioned gelato “pucks” that you can pop out and serve individually. This minimizes air exposure to the main batch.Make-Ahead & Freezer Notes
Perfect Make-Ahead Timeline:
2-3 Days Before: This is actually the ideal time frame! Make your custard base, chill it overnight, then churn and freeze. Gelato tastes best within the first few days when the texture is at its creamiest and the flavors are most vibrant.
Same Day (If Rushed): You can make the custard in the morning, use an ice bath to cool it quickly, refrigerate for at least 4 hours, then churn in the afternoon or evening. It will need at least 4 hours in the freezer after churning to firm up enough to scoop.
Up to 1 Week Ahead: The gelato will still be delicious, though the texture may be slightly more icy than when first made. This is perfectly fine for most occasions.
Freezer-Friendly Details:
Tiramisu Gelato freezes beautifully, though the texture is always best within the first week. The mascarpone and egg yolk base creates a rich, creamy texture that holds up better than many homemade frozen desserts. The coffee liqueur (if using) helps keep it slightly softer and more scoopable even after extended freezing.Custard Base Storage:
Here’s a great trick—you can make the custard base up to 3 days ahead and keep it refrigerated until you’re ready to churn. This actually improves the flavor as the ingredients have more time to meld. Just give it a good whisk before pouring into your ice cream maker.No Reheating Needed:
Since this is a frozen dessert, there’s no reheating involved. Simply remove from the freezer, let it temper at room temperature for 5-10 minutes (depending on how cold your freezer is), and serve. The key is serving it at the proper temperature so it’s creamy and flavorful, not rock-hard.Batch Making:
This recipe makes about 1 quart. If you want to make multiple batches for a large gathering, prepare several custard bases the day before, refrigerate them separately, and churn them one at a time. Don’t try to double the batch in a single ice cream maker—it won’t freeze properly.Serving Suggestions
Tiramisu Gelato is spectacular on its own, but here are some wonderful ways to serve and pair it:
Classic Italian Presentation:
- Affogato style – Place a scoop in an espresso cup and pour a shot of hot espresso over it just before serving for an authentic Italian coffee shop experience
- In espresso cups – Scoop into small espresso or demitasse cups for an elegant, traditional Italian serving size
- With biscotti – Serve alongside almond or chocolate biscotti for dipping
- Pizzelle cones – Scoop into crispy Italian waffle cookies shaped into cones
Decadent Combinations:
- Chocolate brownie sundae – Serve over a warm chocolate brownie with whipped cream
- Tiramisu parfait – Layer with whipped cream, cocoa powder, and crumbled ladyfingers in clear glasses
- Gelato sandwich – Sandwich between two chocolate wafer cookies or amaretti cookies
- Over pound cake – Serve atop a slice of vanilla or lemon pound cake
Beverage Pairings:
- Espresso or cappuccino – The classic Italian pairing that doubles down on coffee flavor
- Vin Santo – This sweet Italian dessert wine complements the coffee and cream beautifully
- Amaretto – A small glass on the side for sipping
- Hot chocolate – For a cozy, indulgent treat in colder months
- Baileys or Irish cream liqueur – For adults, a small glass on the side
Toppings and Garnishes:
- Dust generously with unsweetened cocoa powder
- Shave dark chocolate or espresso-flavored chocolate over the top
- Drizzle with chocolate or caramel sauce
- Add a dollop of fresh whipped cream
- Sprinkle with crushed amaretti cookies or biscotti
- Garnish with chocolate-covered espresso beans
- Add a small piece of ladyfinger cookie
Party Presentation Ideas:
- Create a gelato bar with multiple flavors and toppings
- Serve in vintage Italian coffee cups for a charming touch
- Present in a stemmed coupe glass for elegance
- Arrange on a platter with other Italian desserts like cannoli and panna cotta
FAQs Section
Q: Can I make this without an ice cream maker?
A: Yes! While an ice cream maker produces the smoothest texture, you can make gelato without one. Pour your chilled base into a shallow, freezer-safe metal pan and freeze. Every 30 minutes for the first 3-4 hours, remove from freezer and stir vigorously with a fork or whisk, breaking up ice crystals. This manual churning method requires more effort but produces decent results. For an even easier method, you can use the “freezer bag” technique—pour the base into a gallon freezer bag, remove air, seal, and freeze, massaging and breaking up crystals every 30 minutes.Q: Why is my gelato icy instead of creamy?
A: There are several possible reasons: (1) The base wasn’t cold enough before churning, causing slow freezing and large ice crystal formation; (2) Too much churning time incorporated excess air; (3) The custard wasn’t cooked to the proper temperature (170-175°F), preventing proper thickening; (4) The gelato was stored too long without proper protection from air; or (5) Your freezer is too cold—gelato should be stored around 0-10°F, not in the coldest freezer setting. Also ensure you’re letting it temper at room temperature before serving.Q: Can I use decaf coffee or skip the coffee entirely?
A: Absolutely! You can use decaf espresso or coffee for a caffeine-free version that still has authentic tiramisu flavor. However, I don’t recommend skipping the coffee entirely, as that’s what makes it tiramisu gelato. If you want to make a coffee-free version, you’d essentially be making a mascarpone gelato—still delicious, but not tiramisu! You could add more cocoa powder or vanilla to compensate for the missing coffee flavor.Q: What’s the difference between gelato and ice cream?
A: Great question! Gelato has less fat (uses more milk and less cream), is churned more slowly to incorporate less air (making it denser), and is served at a warmer temperature (10-15°F vs 0-5°F for ice cream). These differences create gelato’s signature dense, silky texture and more intense flavor. Gelato also tends to be less sweet than American ice cream, allowing the main flavors to shine through more prominently.Q: Can I make this dairy-free or vegan?
A: It’s challenging to make this recipe dairy-free and still maintain authentic tiramisu flavor and gelato texture, since mascarpone cheese is a key ingredient. However, you could experiment with coconut milk-based custards and vegan cream cheese as a mascarpone substitute. You’d also need to replace egg yolks with a stabilizer like cornstarch or agar-agar. The result would taste different from traditional tiramisu gelato, but could still be delicious in its own right!Q: How long does homemade gelato last?
A: Homemade gelato is best consumed within 1-2 weeks. During the first week, it will maintain optimal creamy texture. After that, it’s still safe to eat for up to a month, but the texture may become more icy and grainy due to ice crystal formation. Since homemade gelato lacks the stabilizers and emulsifiers in commercial products, it’s more susceptible to texture changes over time. Always store with parchment paper pressed directly on the surface in an airtight container.Q: Why does my gelato have a weird eggy taste?
A: An eggy flavor usually means the custard wasn’t cooked quite long enough to properly cook the egg yolks, or the eggs weren’t fresh. Make sure to cook your custard to 170-175°F, which properly cooks the eggs and removes any raw egg flavor. Also, always use fresh eggs—old eggs can impart an unpleasant taste. Straining the custard through a fine-mesh strainer also helps remove any bits that might contribute to an eggy taste.Q: Can I add mix-ins like chocolate chips or cookie pieces?
A: Yes! Add any mix-ins during the last minute of churning so they’re evenly distributed but not crushed by the machine. Crumbled ladyfinger cookies or biscotti are particularly appropriate for tiramisu gelato. Mini chocolate chips, crushed amaretti cookies, or even small pieces of toffee all work beautifully. Just don’t add more than ½ to ¾ cup of mix-ins total, or they’ll interfere with the gelato’s texture. Make sure any cookies or biscuits are in small pieces so they don’t become too hard when frozen.Conclusion
There you have it—everything you need to create authentic, restaurant-quality Tiramisu Gelato right in your own kitchen! This recipe brings together the best of two iconic Italian desserts into one incredibly creamy, coffee-infused frozen treat that’s guaranteed to impress everyone who tries it.
While making gelato might seem intimidating at first, I promise that once you’ve made it once or twice, you’ll feel like a pro. The process is actually quite straightforward—make a custard, chill it thoroughly, churn it, and freeze. The results are absolutely worth every step, and you’ll taste the difference between homemade gelato and anything you can buy at the store. Plus, there’s something deeply satisfying about serving a dessert you made from scratch that tastes like it came from an Italian gelateria!
Remember, the keys to success are: use quality ingredients (especially good coffee and real mascarpone), be patient with your custard (don’t rush the cooking or chilling), and serve at the proper temperature (let it soften for 5-10 minutes before scooping). Follow these principles, and you’ll create gelato that rivals anything you’d find in Rome or Florence.
Now it’s your turn to create some Italian magic! Have you made tiramisu gelato before? What’s your favorite gelato flavor? I’d absolutely love to hear about your experience making this recipe!
Don’t forget to:
- Pin this recipe to your Pinterest dessert boards so you can find it easily for your next special occasion
- Leave a comment below with your results, questions, or favorite variations
- Share a photo of your beautiful gelato creation—I love seeing your kitchen successes!
- Rate this recipe using the stars below to help other home cooks
- Subscribe to the blog for more authentic Italian recipes and frozen dessert inspiration
Whether you’re serving this at a dinner party, enjoying it as a special weekend treat, or simply indulging your love of all things tiramisu, I hope this recipe brings a little taste of Italy to your home. Buon appetito! 🍨☕