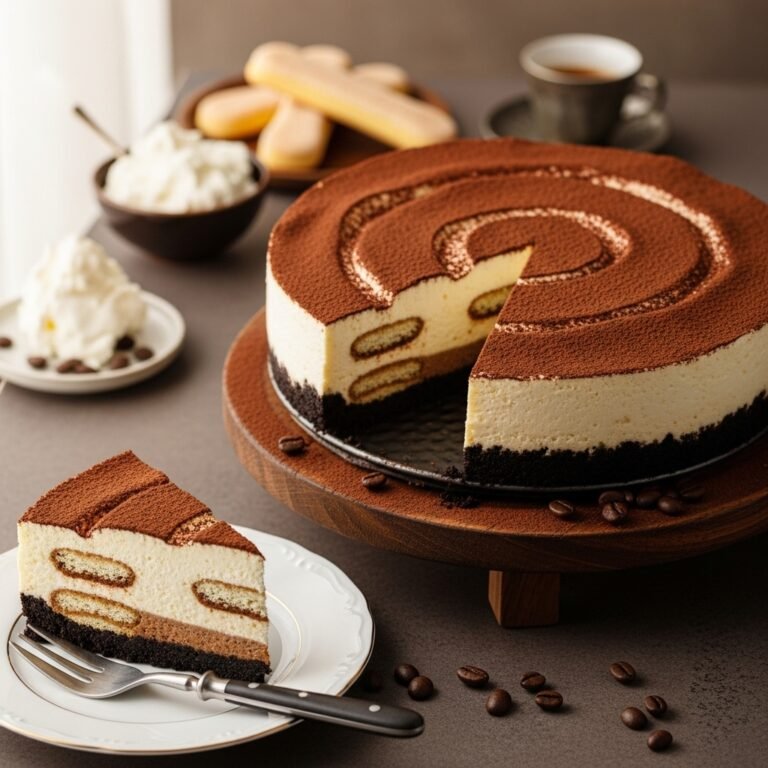
The Ultimate Tiramisu Cheesecake Recipe – Creamy, Dreamy Italian-Inspired Dessert

If you’ve ever found yourself torn between ordering tiramisu or cheesecake at a restaurant, this recipe is about to become your new obsession. Tiramisu Cheesecake combines the best of both worlds—the rich, velvety texture of classic New York-style cheesecake with the sophisticated coffee-soaked flavors of traditional Italian tiramisu. This showstopping dessert features a buttery cookie crust, ultra-creamy cheesecake filling infused with espresso and coffee liqueur, and a cloud-like mascarpone topping dusted with cocoa powder.
This is the perfect dessert for special occasions like birthdays, anniversaries, holiday gatherings, or dinner parties where you want to impress your guests without spending all day in the kitchen. It’s also wonderful for coffee lovers who appreciate desserts that aren’t overly sweet but pack incredible flavor. The best part? While it looks and tastes like something from an upscale Italian bakery, it’s surprisingly manageable to make at home with just a few quality ingredients and some patience during the chilling process.
History / Background
The story of this Tiramisu Cheesecake is really a beautiful marriage of two iconic desserts from different culinary traditions. Tiramisu, which translates to “pick me up” or “cheer me up” in Italian, originated in the Veneto region of Italy during the 1960s. The most popular origin story credits the dessert to Roberto Linguanotto, a chef at Le Beccherie restaurant in Treviso. The original tiramisu featured ladyfinger cookies soaked in espresso and layered with a mixture of mascarpone cheese, eggs, and sugar, then dusted generously with cocoa powder. The coffee and sugar combination was meant to provide an energy boost—hence the cheerful name.
Cheesecake, on the other hand, has ancient roots dating back to Greece, though the creamy, dense version Americans know and love was perfected in New York in the early 1900s after cream cheese was invented. New York-style cheesecake became famous for its thick, rich texture and slightly tangy flavor, traditionally baked in a water bath to prevent cracks.
Somewhere along the way, creative pastry chefs and home bakers began experimenting with fusion desserts, combining beloved flavors from different cultures. Tiramisu Cheesecake emerged as one of these brilliant innovations, bringing together the tang of cream cheese, the luxurious texture of mascarpone, and the bold coffee notes that make tiramisu so irresistible. Today, it’s a favorite at Italian-American restaurants and has become a Pinterest sensation, with home bakers sharing their own beautiful versions topped with everything from chocolate shavings to whole espresso beans.
Why You’ll Love This Recipe
This Tiramisu Cheesecake isn’t just another dessert—it’s an experience that will have everyone at your table asking for seconds and the recipe. The combination of textures and flavors creates something truly memorable, and the sophisticated presentation makes it perfect for impressing guests without requiring professional pastry skills.
Here’s why this recipe deserves a permanent spot in your dessert rotation:
- Best of both worlds – You get the creamy, tangy richness of cheesecake combined with the coffee-forward elegance of tiramisu in every single bite
- Make-ahead friendly – This dessert actually needs to chill overnight, which means you can prepare it a day before your event and have one less thing to worry about on the day of
- Impressive presentation – The layered look with cocoa powder dusting creates a stunning visual that photographs beautifully for Instagram and Pinterest
- Coffee lover’s dream – The espresso and coffee liqueur create deep, complex flavors that aren’t overly sweet, making this perfect for adults who appreciate sophisticated desserts
- No complicated techniques – While it looks fancy, the actual process is straightforward mixing and layering—no tempering chocolate or making complicated Italian meringue
- Crowd-pleaser – Even people who don’t typically love cheesecake often fall for this version because the mascarpone lightens the texture and the coffee adds intrigue
- Customizable – You can adjust the coffee intensity, make it alcohol-free, or add chocolate layers depending on your preferences
Ingredient Notes
Understanding your ingredients is the key to cheesecake success. Here’s what you need to know about each component and how to choose the best options:
Cream Cheese: Use full-fat, brick-style cream cheese (not the spreadable kind in a tub). Philadelphia brand works beautifully. Make absolutely sure it’s softened to room temperature before mixing—this prevents lumps and creates that silky texture we’re after. Cold cream cheese will result in a lumpy filling no matter how long you beat it.
Mascarpone Cheese: This Italian cream cheese is richer and less tangy than regular cream cheese. Look for it near the specialty cheeses at your grocery store. If you absolutely can’t find it, you can substitute with additional cream cheese mixed with heavy cream, but authentic mascarpone gives the best flavor and texture.
Espresso or Strong Coffee: Use freshly brewed espresso or very strong coffee that’s cooled to room temperature. Instant espresso powder dissolved in hot water works perfectly too. The coffee flavor is central to this dessert, so use good quality beans.
Coffee Liqueur: Kahlúa is the most common choice, but any coffee-flavored liqueur works. For an alcohol-free version, substitute with additional coffee or use coffee-flavored syrup. The liqueur adds depth and that authentic tiramisu flavor.
Ladyfinger Cookies or Graham Crackers: Traditional tiramisu uses ladyfingers, so using them in the crust creates an authentic connection. However, graham crackers work wonderfully too and are easier to find. You can also use chocolate graham crackers for extra richness.
Granulated Sugar: This sweetens the filling. Don’t reduce the amount significantly—cheesecake needs enough sugar for proper texture as well as sweetness.
Eggs: Use large eggs at room temperature. They incorporate more easily and create a smoother batter. Take them out of the fridge about 30 minutes before baking.
Vanilla Extract: Pure vanilla extract adds warmth and rounds out the flavors. Don’t skip it even though coffee is the star.
Cocoa Powder: Use unsweetened cocoa powder for dusting. Dutch-process cocoa gives a darker, more sophisticated look, but natural cocoa works fine too.
Heavy Cream: For the topping, you’ll need cold heavy whipping cream. Make sure it has at least 36% milk fat for the best whipping results.
Equipment Needed
Having the right tools makes this recipe so much easier. Here’s what you’ll need:
- 9-inch springform pan – Essential for cheesecakes since the removable sides let you unmold without destroying your creation
- Food processor or mixing bowl – For crushing cookies into fine crumbs for the crust
- Electric mixer (stand or hand) – Makes beating the cream cheese and mascarpone smooth and lump-free
- Large roasting pan – To create the water bath that prevents cracks
- Aluminum foil – Heavy-duty foil to wrap the springform pan and prevent water from seeping in
- Mixing bowls (various sizes) – For preparing different components
- Rubber spatula – For scraping down the bowl and smoothing the top
- Fine-mesh sieve – For dusting cocoa powder evenly over the finished cheesecake
- Measuring cups and spoons – For accurate measurements
- Offset spatula (optional) – Makes smoothing the mascarpone topping easier and more professional-looking
Print

Tiramisu Cheesecake Recipe
This Tiramisu Cheesecake combines the best elements of two beloved desserts—rich, creamy New York-style cheesecake infused with bold espresso and coffee liqueur, topped with sweetened mascarpone cream and dusted with cocoa powder. It’s the ultimate showstopper dessert for coffee lovers and special occasions.
- Total Time: 9 hours 45 minutes
- Yield: 12 servings 1x
Ingredients
ScaleFor the Crust:
- 2 cups ladyfinger cookies or graham cracker crumbs (about 24 ladyfingers or 16 graham crackers)
- 1/4 cup granulated sugar
- 6 tablespoons unsalted butter, melted
- Pinch of salt
For the Cheesecake Filling:
- 24 ounces cream cheese, softened to room temperature (three 8-ounce packages)
- 8 ounces mascarpone cheese, softened to room temperature
- 1 cup granulated sugar
- 3 large eggs, at room temperature
- 1/4 cup sour cream, at room temperature
- 1/4 cup strong brewed espresso or coffee, cooled
- 3 tablespoons coffee liqueur (Kahlúa)
- 1 tablespoon vanilla extract
- 2 tablespoons all-purpose flour
For the Mascarpone Topping:
- 1 cup heavy whipping cream, cold
- 8 ounces mascarpone cheese, softened
- 1/3 cup powdered sugar
- 1 teaspoon vanilla extract
For Garnish:
- 2 tablespoons unsweetened cocoa powder
- Chocolate shavings (optional)
- Whole espresso beans (optional)
Instructions
Step 1: Prepare Your Pan and Preheat Oven
Preheat your oven to 325°F (165°C). Wrap the outside of a 9-inch springform pan with two layers of heavy-duty aluminum foil, making sure it extends up the sides. This prevents water from the water bath from seeping into your cheesecake. Grease the inside of the pan lightly with butter or cooking spray.Step 2: Make the Crust
In a food processor, pulse the ladyfinger cookies or graham crackers until they form fine crumbs. Transfer to a bowl and mix with sugar, melted butter, and a pinch of salt until the mixture resembles wet sand and holds together when pressed. Press firmly into the bottom of the prepared springform pan, creating an even layer. Use the bottom of a measuring cup to pack it down. Bake for 10 minutes, then remove and let cool while you prepare the filling.Step 3: Prepare the Cheesecake Filling
In a large mixing bowl, beat the softened cream cheese and mascarpone cheese with an electric mixer on medium speed for about 3 minutes until completely smooth and creamy with no lumps. Scrape down the sides of the bowl. Add the sugar and beat for another 2 minutes until well incorporated and fluffy.Step 4: Add Eggs and Flavorings
Reduce mixer speed to low. Add eggs one at a time, mixing just until each is incorporated before adding the next. Don’t overmix once the eggs are added—this can incorporate too much air and cause cracks. Add the sour cream, cooled espresso, coffee liqueur, vanilla extract, and flour. Mix on low speed just until combined and smooth, about 30 seconds. Scrape down the sides and give it a final gentle stir with a spatula.Step 5: Prepare Water Bath
Pour the cheesecake filling over the cooled crust and smooth the top with a spatula. Place the springform pan inside a large roasting pan. Create a water bath by pouring hot water into the roasting pan until it comes about halfway up the sides of the springform pan. The water bath ensures gentle, even cooking and prevents cracks.Step 6: Bake the Cheesecake
Carefully transfer the roasting pan to the oven. Bake for 1 hour and 15 minutes. The cheesecake is done when the edges are set but the center still has a slight jiggle (about a 2-inch diameter circle in the middle). It will firm up as it cools. Don’t overbake or the texture will be grainy.Step 7: Cool Gradually
Turn off the oven and crack the door open slightly. Let the cheesecake cool in the oven for 1 hour—this gradual temperature change prevents cracking. Remove from the water bath and remove the foil. Let cool to room temperature on a wire rack, then cover with plastic wrap and refrigerate for at least 8 hours or overnight.Step 8: Make the Mascarpone Topping
When ready to serve, make the topping. In a chilled bowl, whip the cold heavy cream to soft peaks. In a separate bowl, beat the mascarpone, powdered sugar, and vanilla until smooth. Gently fold the whipped cream into the mascarpone mixture until combined and fluffy.Step 9: Assemble and Garnish
Remove the cheesecake from the springform pan by running a knife around the edges first, then releasing the sides. Spread or pipe the mascarpone topping over the chilled cheesecake. Using a fine-mesh sieve, dust the entire top generously with cocoa powder. Add chocolate shavings or espresso beans if desired.Step 10: Serve
Slice with a sharp knife, wiping the blade clean between cuts for neat slices. Serve chilled and enjoy!Notes
- Make sure all dairy ingredients are at room temperature before mixing to prevent lumps
- The cheesecake must chill overnight for best texture and to make slicing easier
- For alcohol-free version, replace coffee liqueur with additional coffee or coffee-flavored syrup
- The water bath is essential—don’t skip it or you’ll likely get cracks
- Store covered in the refrigerator for up to 5 days
- Prep Time: 30 minutes
- Cook Time: 1 hour 15 minutes
- Category: Desert
- Method: Baking
- Cuisine: Italian
- Diet: Vegetarian
Nutrition
- Serving Size: 1 slice (1/12 of cheesecake)
- Calories: 485
- Sugar: 28g
- Sodium: 285mg
- Fat: 35g
- Saturated Fat: 21g
- Unsaturated Fat: 12g
- Trans Fat: 0g
- Carbohydrates: 34g
- Fiber: 1g
- Protein: 8g
- Cholesterol: 145mg
Tips & Variations
Make It Extra Chocolatey: Add 1/2 cup mini chocolate chips to the filling or create a chocolate layer by melting 4 ounces of dark chocolate and spreading it over the crust before adding the filling.
Intensify the Coffee Flavor: Increase the espresso to 1/3 cup or add 1 tablespoon of instant espresso powder to the filling for an even bolder coffee taste that really captures authentic tiramisu.
Create Individual Servings: Make these in 4-inch mini springform pans or even in mason jars for personal-sized portions perfect for parties. Reduce baking time to 35-40 minutes for smaller versions.
Add Amaretto: Replace half of the coffee liqueur with amaretto for a nutty, almond undertone that’s common in some regional tiramisu variations.
Make It Boozy: Brush the crust with additional coffee liqueur before adding the filling, or soak the ladyfinger crumbs in espresso and liqueur for 30 seconds before making the crust.
Lighter Version: Use reduced-fat cream cheese (not fat-free) and replace half the heavy cream in the topping with Greek yogurt. The texture will be slightly different but still delicious.
Chocolate Crust: Use chocolate graham crackers or add 2 tablespoons of cocoa powder to the crust mixture for extra chocolate flavor.
Pro Chef Tips
Temperature is Everything: Seriously, this can’t be emphasized enough. Room temperature ingredients blend smoothly and create that luxurious, lump-free texture that separates amateur from professional-looking cheesecakes. Take everything out of the fridge at least an hour before starting.
Don’t Overmix After Adding Eggs: Once eggs go into the batter, mix on the lowest speed and only until just combined. Overmixing incorporates too much air, which expands during baking and then collapses, causing cracks and a dense texture.
Use the Jiggle Test: Your cheesecake is done when the outer 3-4 inches are set but the center still jiggles like Jell-O when you gently shake the pan. It might seem underdone, but it will continue cooking from residual heat and firm up perfectly as it cools.
Quality Coffee Makes a Difference: Since coffee is a primary flavor, use good beans. Freshly brewed espresso from a coffee shop or quality instant espresso powder will give you much better results than stale drip coffee.
Prevent the Topping from Weeping: Make sure the cheesecake is completely cold before adding the mascarpone topping. If the base is even slightly warm, it will melt the topping and create a watery mess.
The Knife Trick for Clean Slices: Dip your knife in hot water and wipe it completely dry before each cut. The warmth helps the knife glide through the dense cheesecake without dragging or creating messy edges.
Taste Your Espresso: Before adding it to the batter, taste your cooled espresso. It should be strong and flavorful but not burned or bitter, as any off-flavors will be amplified in the finished cheesecake.
Common Mistakes to Avoid
Using Cold Ingredients: This is the number one mistake home bakers make. Cold cream cheese will never fully incorporate, leaving you with lumps no matter how long you mix. Plan ahead and let everything sit out for at least an hour.
Skipping the Water Bath: Some people think they can skip this step, but the water bath creates humidity in the oven and ensures even, gentle heat distribution. Without it, your cheesecake will likely crack, have a dry texture, and cook unevenly with an overdone edge and underdone center.
Overbaking: Cheesecake should NOT be firm in the center when it comes out of the oven. If the entire surface is set solid, you’ve overbaked it and the texture will be grainy and dry. Remember, it continues cooking and firming up as it cools.
Opening the Oven Door Repeatedly: Every time you open that oven door, you release heat and create temperature fluctuations. These sudden changes can cause your cheesecake to crack. Trust the process and only check toward the end of baking time.
Skipping the Chill Time: Yes, overnight is a long time to wait, but cheesecake needs this time to set properly and for the flavors to develop and meld. Cutting into a warm or barely chilled cheesecake results in a messy, soft texture that won’t slice cleanly.
Storage & Meal Prep
Refrigerator Storage: Keep your Tiramisu Cheesecake covered tightly with plastic wrap or in an airtight container in the refrigerator. It will stay fresh and delicious for up to 5 days. The flavors actually deepen and improve after the first day as the coffee permeates throughout.
Covering Tips: If you’ve already added the mascarpone topping and cocoa dusting, tent the plastic wrap so it doesn’t touch the surface and ruin your beautiful presentation. Alternatively, you can use a cake dome if you have one.
Individual Slice Storage: If you’ve already cut the cheesecake, wrap individual slices in plastic wrap and store in an airtight container. This way, you can grab a slice whenever you want without exposing the entire cheesecake to air repeatedly.
Temperature for Serving: Cheesecake tastes best when it’s cold but not ice-cold. Take it out of the refrigerator about 20-30 minutes before serving to take the chill off and allow the flavors to fully bloom. The texture also becomes creamier at this slightly warmer temperature.
Reheating: Don’t! Cheesecake should always be served cold or at cool room temperature. Heating it will ruin the texture and cause the mascarpone topping to melt.
Make-Ahead & Freezer Notes
Make-Ahead Timeline: This is actually an ideal make-ahead dessert. You can bake the cheesecake up to 3 days before you need it. In fact, it tastes even better after sitting for a day or two as the flavors meld. Just wait to add the mascarpone topping and cocoa dusting until a few hours before serving.
Freezing the Whole Cheesecake: This cheesecake freezes beautifully. After it’s completely chilled, wrap it tightly in plastic wrap (while still in the springform pan or after removing—your choice), then wrap again with aluminum foil. Freeze for up to 2 months. Don’t add the topping before freezing.
Thawing Instructions: Transfer the frozen cheesecake to the refrigerator and let it thaw slowly overnight. Never thaw at room temperature or in the microwave, as this can create condensation and a watery texture. Once thawed, add the fresh mascarpone topping.
Freezing Individual Slices: Cut the cheesecake into slices and wrap each one individually in plastic wrap, then place in a freezer bag. This way, you can pull out just one or two servings at a time. Thaw in the refrigerator for 4-6 hours before serving.
The Topping Doesn’t Freeze Well: Never freeze the mascarpone whipped cream topping—it will separate and become grainy when thawed. Always make this fresh when you’re ready to serve, which only takes 10 minutes anyway.
Serving Suggestions
Classic Italian Coffee Service: Serve slices with small cups of hot espresso or cappuccino on the side. The bitter coffee contrasts beautifully with the sweet, creamy cheesecake and enhances the coffee flavors in the dessert.
Fresh Berries: Arrange a handful of fresh raspberries, strawberries, or blueberries on the side of each plate. The tartness cuts through the richness and adds a pop of color and freshness.
Chocolate Garnishes: Drizzle each slice with chocolate sauce or add chocolate curls on top of the cocoa powder. Dark chocolate works especially well because it’s not too sweet and complements the coffee.
Whipped Cream Rosettes: Add a small rosette of freshly whipped cream on the side of each slice for extra elegance and richness. Use a star piping tip for a professional bakery look.
After-Dinner Drinks: This pairs wonderfully with dessert wines like Moscato d’Asti, Vin Santo, or even a sweet Marsala. Coffee liqueur over ice or Irish coffee also complement the flavors beautifully.
Ice Cream Addition: While this cheesecake is already rich, a small scoop of vanilla gelato or coffee ice cream on the side creates an amazing hot-and-cold temperature contrast that guests love.
Biscotti on the Side: Serve with a few pieces of almond or chocolate biscotti for dipping in coffee—it creates a complete Italian dessert experience and adds a nice textural contrast to the creamy cheesecake.
FAQs Section
Can I make this without coffee liqueur?
Absolutely! Simply replace the coffee liqueur with an equal amount of additional brewed espresso or strong coffee. You can also use coffee-flavored syrup (the kind made for lattes) for a similar depth without the alcohol. The flavor will be slightly less complex but still delicious.Why did my cheesecake crack?
The most common causes are overbaking, sudden temperature changes, or skipping the water bath. Make sure you remove the cheesecake when the center still jiggles, cool it gradually in the oven with the door cracked, and always use a water bath. Also, overmixing after adding eggs incorporates too much air, which can cause cracking.Can I use a different size pan?
A 9-inch pan is really ideal for this recipe. If you use an 8-inch pan, the cheesecake will be much thicker and will need additional baking time (check at 1 hour 30 minutes). A 10-inch pan will give you a thinner cheesecake that may be done sooner (check at 55 minutes). Always use the jiggle test rather than relying solely on time.My cheesecake is grainy—what happened?
This usually means it was overbaked or the ingredients weren’t at room temperature. Overheating causes the proteins in the eggs to tighten too much, creating a grainy texture. Also, cold cream cheese that doesn’t mix smoothly can create textural issues. Make sure all ingredients are truly room temperature and watch your baking time carefully.Do I have to use a springform pan?
Springform pans make life so much easier for cheesecake because you can remove the sides without having to flip or scoop. If you absolutely don’t have one, you can use a regular 9-inch cake pan lined with parchment paper with long overhangs that you can use as handles to lift the cheesecake out. However, a springform is really worth investing in if you plan to make cheesecakes regularly.How do I know when it’s done baking?
Gently shake the pan. The outer 3-4 inches should be set and firm, but the center (about a 2-inch circle) should still jiggle like Jell-O. The center will look slightly underdone and shiny. It should NOT be completely firm or your cheesecake will be overbaked. Remember, it continues to cook and set as it cools.Can I skip the mascarpone topping?
Yes, though the topping adds authentic tiramisu flair and extra creaminess. You could simply dust the top with cocoa powder and add some chocolate shavings, or do a traditional whipped cream topping instead. Some people even love it plain, letting the coffee-infused cheesecake be the star.Conclusion
This Tiramisu Cheesecake truly is a celebration dessert that brings together two of the world’s most beloved sweet treats. The creamy, coffee-kissed filling, the cloud-like mascarpone topping, and that signature cocoa dusting create layers of flavor and texture that will have everyone at your table asking for the recipe. While it does require some planning ahead due to the overnight chill time, the actual hands-on work is straightforward and completely manageable for home bakers of any skill level.
The beauty of this dessert is that it’s impressive enough for the fanciest dinner party yet approachable enough to make for a casual weekend treat. Whether you’re a devoted coffee lover, a cheesecake enthusiast, or someone who just appreciates really good desserts, this recipe deserves a spot in your collection. The combination of Italian sophistication and classic American dessert comfort creates something truly special that bridges culinary traditions in the most delicious way possible.
So grab your springform pan, brew a pot of strong coffee, and get ready to create a dessert that will become legendary in your household. Don’t forget to take plenty of photos for Pinterest—that cocoa-dusted top is absolutely photo-worthy! Once you slice into that first piece and see those beautiful layers, you’ll understand why this fusion dessert has captured the hearts (and taste buds) of dessert lovers everywhere.
I’d love to hear how your Tiramisu Cheesecake turns out! Drop a comment below with your experience, share your photos, and let me know if you tried any of the variations. And if you’re feeling generous, please share this recipe on Pinterest so other home bakers can discover this amazing dessert too. Happy baking, friends!