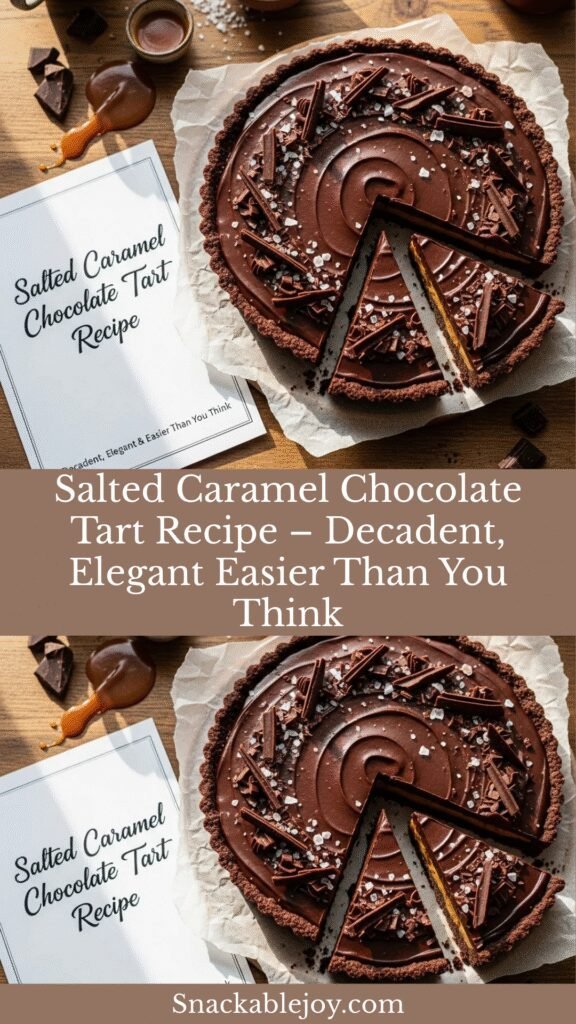
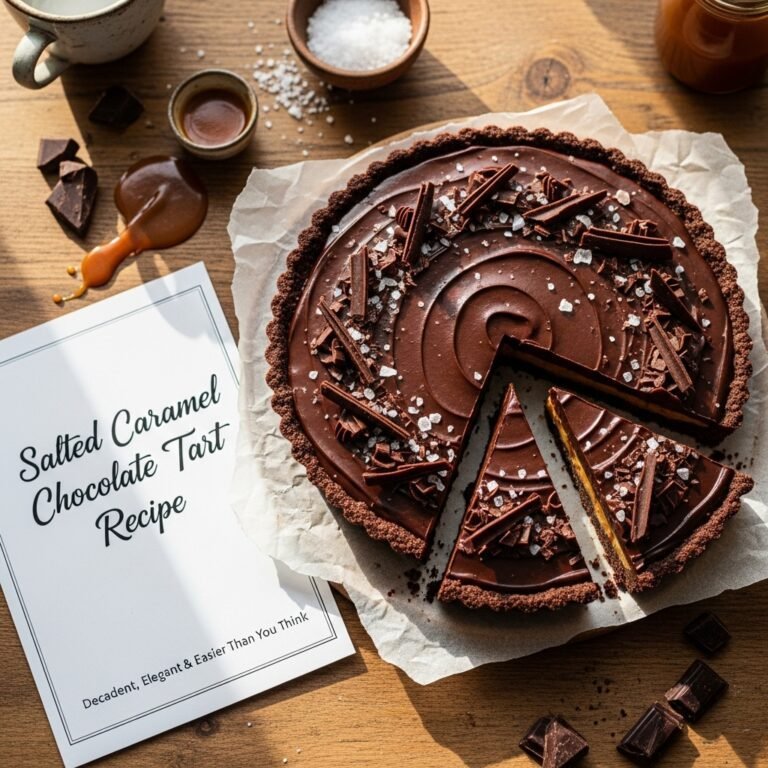
Salted Caramel Chocolate Tart Recipe – Decadent, Elegant Easier Than You Think
If you’re looking for a show-stopping dessert that tastes like it came from a French patisserie but doesn’t require culinary school to make, this salted caramel chocolate tart is your answer. Picture this: a buttery, crisp chocolate crust filled with the silkiest dark chocolate ganache you’ve ever tasted, topped with luscious homemade salted caramel that glistens like liquid gold, and finished with a sprinkle of flaky sea salt that makes every bite absolutely transcendent. It’s the kind of dessert that makes people go quiet for a moment as they savor the first bite, then immediately ask for the recipe.
This tart brings together three of the most beloved flavors in dessert—rich chocolate, buttery caramel, and that perfect touch of salt that makes everything taste more intense and complex. Despite looking incredibly sophisticated and tasting like restaurant-quality dessert, it’s surprisingly approachable for home bakers. The techniques are straightforward, the ingredients are accessible, and the result is nothing short of spectacular. Perfect for special occasions like dinner parties, holiday gatherings, anniversaries, or Valentine’s Day, this tart also works beautifully as an impressive weekend project or when you simply want to treat yourself to something extraordinary. Trust me, one slice of this tart and you’ll feel like a professional pastry chef.
History / Background
The combination of chocolate and caramel is a relatively modern pairing that became popular in the late 19th and early 20th centuries as chocolate production became more refined and accessible. However, the addition of salt to this classic duo is a much more recent innovation that has taken the culinary world by storm over the past two decades.
The chocolate tart itself has deep roots in French patisserie, where “tarte au chocolat” has been a beloved classic for generations. French pastry chefs perfected the art of creating smooth, rich chocolate fillings encased in buttery pâte sucrée (sweet pastry dough). These elegant tarts were staples in Parisian pastry shops and upscale restaurants throughout the 20th century.
Salted caramel as a flavor phenomenon really exploded in the early 2000s, largely credited to French chocolatier Henri Le Roux, who created salted butter caramels in the 1970s in Brittany, using the region’s famous salted butter. However, it wasn’t until the early 2000s that American pastry chefs and food writers began championing salted caramel as the next big thing. The combination became so popular that by the 2010s, salted caramel everything—from ice cream to cocktails to candy bars—had become a cultural phenomenon.
The salted caramel chocolate tart as we know it today represents the beautiful marriage of French pastry technique with modern American flavor trends. It takes the classic elegance of a French chocolate tart and elevates it with that trendy sweet-salty combination that has captivated dessert lovers worldwide. Today, variations of this tart appear on menus at high-end restaurants and trendy bakeries, but the recipe is absolutely achievable in home kitchens with patience and the right guidance.
Why You’ll Love This Recipe
This salted caramel chocolate tart strikes the perfect balance between impressive and achievable. While it looks like something you’d find in a fancy bakery window, the techniques are broken down into manageable steps that even intermediate bakers can master. It’s proof that restaurant-quality desserts don’t require professional training—just good ingredients and clear instructions.
Here’s what makes this recipe truly special:
- Show-stopping presentation – Looks like it belongs in a luxury bakery window
- Perfect flavor balance – Sweet caramel, rich chocolate, and that magical touch of salt
- Make-ahead friendly – Can be prepared in stages or completely ahead of time
- Impressive but manageable – Sophisticated result without requiring expert skills
- Stable for entertaining – Holds up beautifully at room temperature during parties
- Customizable intensity – Adjust chocolate darkness and salt level to your taste
- Silky smooth texture – That ganache filling melts on your tongue
- Feeds a crowd elegantly – One tart serves 10-12 people in refined portions
- Instagram-worthy – Photographs beautifully for social media
- Special occasion worthy – Perfect for celebrations, holidays, and romantic dinners
- Deeply satisfying – Rich enough that a small slice feels luxurious and complete
- Room temperature serving – No need to chill or warm; perfect as-is
This recipe transforms simple ingredients into something truly extraordinary, making you feel accomplished and creative while delivering dessert that will have everyone thinking you’re a professional pastry chef.
Ingredient Notes
For the Chocolate Tart Crust:
All-Purpose Flour: Creates the structure for the buttery crust. For a gluten-free version, use a 1:1 gluten-free baking flour blend. The crust should be tender and crisp, not tough.
Unsweetened Cocoa Powder: Adds deep chocolate flavor to the crust. Use Dutch-process cocoa for darker color and smoother flavor, or natural cocoa for brighter chocolate notes. Don’t substitute hot cocoa mix—it contains sugar and milk powder.
Powdered Sugar: Creates a tender, melt-in-your-mouth crust texture. The fine particles blend smoothly with butter and prevent toughness.
Unsalted Butter: The foundation of the crust’s flavor and flaky texture. It must be cold and cut into small pieces to create proper texture. European-style butter with higher fat content creates even better results.
Egg Yolk: Binds the dough together and adds richness. One large egg yolk is perfect for this amount of dough.
Vanilla Extract: Enhances the chocolate flavor. Always use pure vanilla extract, not imitation.
For the Chocolate Ganache Filling:
Dark Chocolate: The star of the filling. Use high-quality chocolate with 60-70% cacao for the best balance of sweetness and chocolate intensity. Brands like Ghirardelli, Callebaut, or Valrhona deliver excellent results. Avoid chocolate chips—they contain stabilizers that prevent smooth melting.
Heavy Cream: Creates the silky, smooth ganache texture. Must be heavy whipping cream with at least 36% fat. Half-and-half or milk won’t work—you need that fat content.
Butter: Adds extra richness and glossy shine to the ganache. Use unsalted butter at room temperature.
For the Salted Caramel Topping:
Granulated Sugar: The base of the caramel. White granulated sugar caramelizes beautifully without any additives.
Unsalted Butter: Adds richness and helps stop the caramelization process. Room temperature butter incorporates more smoothly.
Heavy Cream: Creates that smooth, pourable caramel texture. Must be warmed before adding to prevent crystallization.
Sea Salt: Use fine sea salt in the caramel itself, and flaky sea salt (like Maldon or fleur de sel) for finishing. The flaky salt provides beautiful texture and bursts of salty flavor.
Vanilla Extract: Rounds out the caramel flavor and adds complexity.
Equipment Needed
- 9-10 inch tart pan with removable bottom – Essential for clean removal and presentation
- Food processor – Makes quick work of the crust dough (or use pastry cutter)
- Rolling pin – For rolling out the tart dough
- Parchment paper – For rolling dough and lining during blind baking
- Pie weights or dried beans – For blind baking the crust
- Medium saucepan – For making the caramel
- Small saucepan – For heating the cream for ganache
- Heatproof bowl – For melting chocolate
- Whisk – For stirring ganache and caramel
- Rubber spatula – For spreading and smoothing
- Measuring cups and spoons – Precision matters in baking
- Kitchen thermometer – Optional but helpful for caramel
- Wire cooling rack – For cooling the tart properly
- Sharp knife – For chopping chocolate and cutting clean slices
- Offset spatula – Optional but helpful for spreading ganache
Salted Caramel Chocolate Tart Recipe
This salted caramel chocolate tart features a rich chocolate crust filled with silky dark chocolate ganache and topped with glossy homemade salted caramel. It’s an elegant, show-stopping dessert that’s perfect for special occasions.
- Total Time: 4 hours 15 minutes
- Yield: 10-12 servings 1x
Ingredients
For the Chocolate Tart Crust:
- 1¼ cups all-purpose flour
- ¼ cup unsweetened cocoa powder
- ½ cup powdered sugar
- ¼ teaspoon salt
- ½ cup (1 stick) cold unsalted butter, cut into small cubes
- 1 large egg yolk
- 1 teaspoon vanilla extract
- 1-2 tablespoons ice water (if needed)
For the Chocolate Ganache Filling:
- 12 oz high-quality dark chocolate (60-70% cacao), finely chopped
- 1 cup heavy cream
- 2 tablespoons unsalted butter, room temperature
- 1 teaspoon vanilla extract
- Pinch of salt
For the Salted Caramel Topping:
- 1 cup granulated sugar
- 6 tablespoons unsalted butter, room temperature, cut into pieces
- ½ cup heavy cream, warmed
- 1 teaspoon vanilla extract
- 1 teaspoon fine sea salt
- Flaky sea salt for garnish (Maldon or fleur de sel)
Instructions
Make the Chocolate Tart Crust:
- Prepare the dough: In a food processor, pulse together flour, cocoa powder, powdered sugar, and salt until combined. Add the cold butter cubes and pulse 10-15 times until the mixture resembles coarse crumbs with some pea-sized butter pieces remaining.
- Add wet ingredients: Add the egg yolk and vanilla extract. Pulse 5-8 times until the dough just starts to come together. If it seems too dry, add ice water 1 tablespoon at a time, pulsing briefly after each addition. The dough should hold together when pressed but not feel wet.
- Chill the dough: Turn the dough out onto a piece of plastic wrap, gather it into a disk, wrap tightly, and refrigerate for at least 30 minutes (or up to 2 days).
- Roll and shape: On a lightly floured surface, roll the chilled dough into an 11-12 inch circle about ⅛ inch thick. Carefully transfer to a 9-10 inch tart pan with removable bottom, pressing gently into the bottom and up the sides. Trim excess dough flush with the rim. Prick the bottom all over with a fork.
- Chill again: Freeze the tart shell for 15 minutes while you preheat the oven to 350°F (175°C).
- Blind bake: Line the frozen tart shell with parchment paper and fill with pie weights or dried beans. Bake for 20 minutes. Remove parchment and weights, and bake another 8-10 minutes until the crust looks dry and set. Cool completely on a wire rack.
Make the Chocolate Ganache:
- Chop chocolate: Place the finely chopped chocolate in a heatproof bowl.
- Heat cream: In a small saucepan, heat the heavy cream over medium heat until it just begins to simmer—small bubbles will form around the edges. Don’t let it boil.
- Create ganache: Pour the hot cream over the chopped chocolate. Let sit undisturbed for 2 minutes to allow the chocolate to soften. Then whisk gently from the center outward until completely smooth and glossy.
- Add butter: Add the room temperature butter, vanilla, and a pinch of salt. Whisk until the butter is fully incorporated and the ganache is silky smooth.
- Fill the tart: Pour the ganache into the cooled tart shell, using a spatula to spread it evenly. Gently tap the tart on the counter to release air bubbles. Let set at room temperature for 30 minutes, then refrigerate for at least 2 hours until firm.
Make the Salted Caramel:
- Caramelize sugar: In a medium, heavy-bottomed saucepan, heat the granulated sugar over medium heat. Don’t stir at first—just let it melt. As it begins to liquify and darken around the edges, gently stir with a heatproof spatula to help it melt evenly. Continue cooking until all the sugar is melted and turns a deep amber color (about 350°F if using a thermometer). This takes 8-12 minutes.
- Add butter: Remove from heat and immediately add the butter pieces. The mixture will bubble vigorously—this is normal. Whisk until the butter is completely melted and incorporated.
- Add cream: Carefully pour in the warm heavy cream while whisking constantly. The mixture will bubble up dramatically again. Continue whisking until smooth.
- Finish caramel: Whisk in the vanilla extract and fine sea salt. Let the caramel cool for 15-20 minutes until it thickens slightly but is still pourable.
Assemble the Tart:
- Top with caramel: Pour the cooled (but still fluid) salted caramel over the set chocolate ganache, spreading it evenly with a spatula. You can use all the caramel or reserve some for drizzling when serving.
- Add finishing salt: Immediately sprinkle the top with flaky sea salt to taste—don’t be shy! The salt crystals should be visible.
- Final chill: Refrigerate the tart for at least 1 hour to let the caramel set completely.
- Serve: Remove the tart from the refrigerator 20-30 minutes before serving to allow it to come to cool room temperature. Remove the outer ring of the tart pan, slice with a sharp knife (wiped clean between cuts), and serve.
Notes
Unsalted Butter: Adds richness and helps stop the caramelization process. Room temperature butter incorporates more smoothly.
Heavy Cream: Creates that smooth, pourable caramel texture. Must be warmed before adding to prevent crystallization.
Sea Salt: Use fine sea salt in the caramel itself, and flaky sea salt (like Maldon or fleur de sel) for finishing. The flaky salt provides beautiful texture and bursts of salty flavor.
Vanilla Extract: Rounds out the caramel flavor and adds complexity.
Equipment Needed
- 9-10 inch tart pan with removable bottom – Essential for clean removal and presentation
- Food processor – Makes quick work of the crust dough (or use pastry cutter)
- Rolling pin – For rolling out the tart dough
- Parchment paper – For rolling dough and lining during blind baking
- Pie weights or dried beans – For blind baking the crust
- Medium saucepan – For making the caramel
- Small saucepan – For heating the cream for ganache
- Heatproof bowl – For melting chocolate
- Whisk – For stirring ganache and caramel
- Rubber spatula – For spreading and smoothing
- Measuring cups and spoons – Precision matters in baking
- Kitchen thermometer – Optional but helpful for caramel
- Wire cooling rack – For cooling the tart properly
- Sharp knife – For chopping chocolate and cutting clean slices
- Offset spatula – Optional but helpful for spreading ganache
📋 Recipe Card
Prep Time: 45 minutes
Cook Time: 30 minutes
Chill Time: 3 hours
Total Time: 4 hours 15 minutes
Yield: 10-12 servings
Category: Dessert
Method: Baking
Cuisine: French-American
Diet: Vegetarian
Description
This salted caramel chocolate tart features a rich chocolate crust filled with silky dark chocolate ganache and topped with glossy homemade salted caramel. It’s an elegant, show-stopping dessert that’s perfect for special occasions.
Ingredients
For the Chocolate Tart Crust:
- 1¼ cups all-purpose flour
- ¼ cup unsweetened cocoa powder
- ½ cup powdered sugar
- ¼ teaspoon salt
- ½ cup (1 stick) cold unsalted butter, cut into small cubes
- 1 large egg yolk
- 1 teaspoon vanilla extract
- 1-2 tablespoons ice water (if needed)
For the Chocolate Ganache Filling:
- 12 oz high-quality dark chocolate (60-70% cacao), finely chopped
- 1 cup heavy cream
- 2 tablespoons unsalted butter, room temperature
- 1 teaspoon vanilla extract
- Pinch of salt
For the Salted Caramel Topping:
- 1 cup granulated sugar
- 6 tablespoons unsalted butter, room temperature, cut into pieces
- ½ cup heavy cream, warmed
- 1 teaspoon vanilla extract
- 1 teaspoon fine sea salt
- Flaky sea salt for garnish (Maldon or fleur de sel)
Instructions
Make the Chocolate Tart Crust:
- Prepare the dough: In a food processor, pulse together flour, cocoa powder, powdered sugar, and salt until combined. Add the cold butter cubes and pulse 10-15 times until the mixture resembles coarse crumbs with some pea-sized butter pieces remaining.
- Add wet ingredients: Add the egg yolk and vanilla extract. Pulse 5-8 times until the dough just starts to come together. If it seems too dry, add ice water 1 tablespoon at a time, pulsing briefly after each addition. The dough should hold together when pressed but not feel wet.
- Chill the dough: Turn the dough out onto a piece of plastic wrap, gather it into a disk, wrap tightly, and refrigerate for at least 30 minutes (or up to 2 days).
- Roll and shape: On a lightly floured surface, roll the chilled dough into an 11-12 inch circle about ⅛ inch thick. Carefully transfer to a 9-10 inch tart pan with removable bottom, pressing gently into the bottom and up the sides. Trim excess dough flush with the rim. Prick the bottom all over with a fork.
- Chill again: Freeze the tart shell for 15 minutes while you preheat the oven to 350°F (175°C).
- Blind bake: Line the frozen tart shell with parchment paper and fill with pie weights or dried beans. Bake for 20 minutes. Remove parchment and weights, and bake another 8-10 minutes until the crust looks dry and set. Cool completely on a wire rack.
Make the Chocolate Ganache:
- Chop chocolate: Place the finely chopped chocolate in a heatproof bowl.
- Heat cream: In a small saucepan, heat the heavy cream over medium heat until it just begins to simmer—small bubbles will form around the edges. Don’t let it boil.
- Create ganache: Pour the hot cream over the chopped chocolate. Let sit undisturbed for 2 minutes to allow the chocolate to soften. Then whisk gently from the center outward until completely smooth and glossy.
- Add butter: Add the room temperature butter, vanilla, and a pinch of salt. Whisk until the butter is fully incorporated and the ganache is silky smooth.
- Fill the tart: Pour the ganache into the cooled tart shell, using a spatula to spread it evenly. Gently tap the tart on the counter to release air bubbles. Let set at room temperature for 30 minutes, then refrigerate for at least 2 hours until firm.
Make the Salted Caramel:
- Caramelize sugar: In a medium, heavy-bottomed saucepan, heat the granulated sugar over medium heat. Don’t stir at first—just let it melt. As it begins to liquify and darken around the edges, gently stir with a heatproof spatula to help it melt evenly. Continue cooking until all the sugar is melted and turns a deep amber color (about 350°F if using a thermometer). This takes 8-12 minutes.
- Add butter: Remove from heat and immediately add the butter pieces. The mixture will bubble vigorously—this is normal. Whisk until the butter is completely melted and incorporated.
- Add cream: Carefully pour in the warm heavy cream while whisking constantly. The mixture will bubble up dramatically again. Continue whisking until smooth.
- Finish caramel: Whisk in the vanilla extract and fine sea salt. Let the caramel cool for 15-20 minutes until it thickens slightly but is still pourable.
Assemble the Tart:
- Top with caramel: Pour the cooled (but still fluid) salted caramel over the set chocolate ganache, spreading it evenly with a spatula. You can use all the caramel or reserve some for drizzling when serving.
- Add finishing salt: Immediately sprinkle the top with flaky sea salt to taste—don’t be shy! The salt crystals should be visible.
- Final chill: Refrigerate the tart for at least 1 hour to let the caramel set completely.
- Serve: Remove the tart from the refrigerator 20-30 minutes before serving to allow it to come to cool room temperature. Remove the outer ring of the tart pan, slice with a sharp knife (wiped clean between cuts), and serve.
Notes
- The tart crust can be made up to 2 days ahead and stored wrapped in the refrigerator.
- If your ganache looks grainy or separated, it may have gotten too hot or too cold. Gently reheat it over a double boiler while whisking to bring it back together.
- When making caramel, watch carefully as it can go from perfect to burnt in seconds. Remove from heat when it reaches deep amber.
- For the smoothest caramel, make sure the cream is warm before adding it to the hot sugar.
- The tart can be made completely 1-2 days ahead and stored in the refrigerator.
- For clean slices, use a sharp knife dipped in hot water and wiped dry between cuts.
- Store leftovers covered in the refrigerator for up to 5 days.
- Prep Time: 45 minutes
- Cook Time: 30 minutes
- Category: Desert
- Method: Baking
- Cuisine: French American
- Diet: Vegetarian
Nutrition
- Serving Size: 1 slice (based on 12 servings)
- Calories: 485
- Sugar: 38g
- Sodium: 285mg
- Fat: 33g
- Saturated Fat: 20g
- Unsaturated Fat: 10g
- Trans Fat: 0g
- Carbohydrates: 45g
- Fiber: 3g
- Protein: 5g
- Cholesterol: 95mg
Tips & Variations
Chocolate Variations:
- Milk Chocolate Version: Use milk chocolate (40-50% cacao) for sweeter, less intense flavor
- Extra Dark: Use 75-85% cacao chocolate for sophisticated, bitter-sweet profile
- White Chocolate Twist: Make white chocolate ganache for completely different tart
- Chocolate-Hazelnut: Add 2 tablespoons Nutella to the ganache for hazelnut notes
- Mocha Tart: Add 1 tablespoon instant espresso powder to ganache
Caramel Variations:
- Bourbon Caramel: Add 2 tablespoons bourbon to the caramel for adult version
- Vanilla Bean Caramel: Scrape in seeds from 1 vanilla bean for extra vanilla flavor
- Brown Butter Caramel: Brown the butter before making caramel for nutty depth
- Whiskey Caramel: Add 1-2 tablespoons whiskey for smoky undertones
- Coffee Caramel: Add 2 teaspoons instant espresso for coffee-caramel flavor
Topping Ideas:
- Add crushed pretzels or toffee bits for extra crunch
- Drizzle with additional melted dark or white chocolate
- Top with toasted nuts (pecans, hazelnuts, or almonds)
- Add chocolate shavings or curls for elegant finish
- Garnish with edible gold leaf for ultra-luxe presentation
- Top with fresh raspberries or strawberries for fruity contrast
Dietary Modifications:
- Gluten-Free: Use 1:1 gluten-free flour blend in the crust
- Dairy-Free: Use coconut cream and dairy-free chocolate and butter substitutes
- Less Sweet: Reduce sugar in caramel by ¼ cup and use extra dark chocolate
Pro Chef Tips
The Cold Butter Crust Secret: When making the tart crust, cold butter is absolutely essential. Those little pieces of cold butter create pockets that make the crust flaky and tender. If your butter gets warm while you’re working, pop the whole mixture in the freezer for 10 minutes before proceeding. Work quickly and confidently—overhandling develops gluten and makes the crust tough.
Blind Baking Prevents Soggy Bottom: Don’t skip the blind baking step or skimp on the pie weights. Properly blind baking creates a crisp, waterproof barrier that prevents the ganache from making the crust soggy. The crust should look dry and set before you add the filling. If you see any cracks forming during blind baking, patch them with leftover dough before adding ganache.
Ganache Temperature Matters: For the smoothest, glossiest ganache, the cream and chocolate temperatures need to be just right. The cream should be just barely simmering (not boiling), and you should let it sit on the chocolate for 2 full minutes before stirring. This allows the chocolate to melt evenly. Stir gently from the center outward—aggressive whisking incorporates air bubbles that mar the smooth surface.
Caramel Color is Your Guide: Making caramel is all about color. You want deep amber—the color of an old penny or maple syrup. If it’s too light (pale gold), it won’t have developed enough flavor. If it’s too dark (mahogany), it will taste burnt. Watch it constantly in the final minutes, and remember it continues cooking for a moment after you remove it from heat, so pull it just before it reaches your desired color.
Warm Cream is Essential for Smooth Caramel: Adding cold cream to hot caramel causes it to seize and crystallize. Always warm your cream first (microwave for 30-45 seconds works fine) before adding it to the caramelized sugar. This also reduces the dramatic bubbling that happens when cream meets hot sugar, though it will still bubble—that’s normal and expected.
Room Temperature Serving: This tart tastes best at cool room temperature, not cold. The chocolate ganache becomes too firm when cold, losing its silky texture. Take it out of the refrigerator 20-30 minutes before serving. The flavors are more pronounced, and the texture is absolutely perfect.
The Hot Knife Trick: For bakery-perfect slices, use a large, sharp chef’s knife dipped in hot water and wiped completely dry before each cut. The warm knife glides through the layers cleanly. Make one decisive cut rather than sawing back and forth. Wipe the knife completely clean and repeat the hot water dip between each slice.
Common Mistakes to Avoid
Overworking the Tart Dough: One of the biggest mistakes is overprocessing or overhandling the crust dough. Once the ingredients just come together, stop! Overworking develops gluten, which makes the crust tough and shrinks during baking. The dough should look slightly crumbly when you remove it from the processor—it will come together when you press it into a disk. If you can roll it out smoothly, you’re good.
Not Chilling the Dough Enough: Skipping or shortening the chilling time is tempting when you’re eager to bake, but this step is crucial. Chilling relaxes the gluten (preventing shrinkage) and solidifies the butter (creating flakiness). Always chill at least 30 minutes after making the dough, and again after shaping it in the pan. These chills make the difference between a professional-looking tart and one that shrinks and slumps.
Adding Cold Cream to Hot Caramel: This causes the caramel to seize up and become grainy or crystallized. Always warm your cream before adding it to the hot caramelized sugar. Even if the recipe doesn’t specify this, it’s a critical step for smooth caramel. Microwave it for 30-45 seconds until warm (not hot), then add carefully to the caramel while whisking constantly.
Stirring Sugar Too Early When Making Caramel: When making caramel, resist the urge to stir the sugar immediately. Let it melt on its own first, only stirring once it begins to liquify and color around the edges. Stirring too early can cause crystallization—those grainy sugar chunks that ruin your smooth caramel. Trust the process and be patient.
Cutting the Tart While Cold: I know you’re excited, but cutting a cold tart from the refrigerator creates messy slices. The firm ganache and caramel don’t cut cleanly when cold—they crack and shatter. Let the tart sit at room temperature for 20-30 minutes before slicing. The texture will be perfect, and your cuts will be clean and beautiful.
Not Using Quality Chocolate: Since chocolate is the star ingredient in the ganache, quality matters enormously. Chocolate chips or cheap chocolate bars contain stabilizers and have poor flavor. Invest in good chocolate bars (60-70% cacao from brands like Ghirardelli, Guittard, or Valrhona) and chop them yourself. The difference in flavor and texture is dramatic—this is not the place to skimp.
Storage & Meal Prep
Refrigerator Storage: This tart stores beautifully in the refrigerator for up to 5 days, making it perfect for making ahead. Once the tart is completely assembled and set, cover it loosely with plastic wrap or place in a large container (don’t let the wrap touch the caramel surface). The tart actually improves after a day as the flavors meld together.
Room Temperature Storage: If you plan to serve the tart within a few hours and your kitchen isn’t too warm (under 70°F), you can leave it at room temperature, loosely covered. Don’t leave it out for more than 4-5 hours, especially in warm weather, as the dairy-based ganache and caramel can spoil.
Protecting the Topping: The caramel and salt topping is somewhat delicate. When storing, make sure whatever cover you use doesn’t touch the surface, or it will stick. A large cake dome works perfectly, or you can insert toothpicks around the edge and tent foil or plastic wrap over them.
Freezing Individual Slices: This tart freezes surprisingly well! Cut into individual slices, wrap each slice tightly in plastic wrap, then place in a freezer-safe container or bag. Freeze for up to 2 months. Thaw individual slices in the refrigerator overnight, then bring to room temperature before serving.
Freezing the Whole Tart: You can freeze the entire assembled tart, though it’s trickier to wrap without damaging the surface. Flash-freeze it uncovered for 1-2 hours until firm, then wrap carefully in plastic wrap and foil. Freeze for up to 2 months. Thaw in the refrigerator overnight.
Maintaining Texture: The salted caramel may soften slightly in the refrigerator due to the salt attracting moisture. This is normal and doesn’t affect flavor. If you want the caramel firmer, you can make it slightly thicker by cooking it a bit longer before pouring over the tart.
Make-Ahead & Freezer Notes
Perfect Make-Ahead Timeline: This tart is actually ideal for making ahead—in fact, it tastes better after the flavors have time to meld. You can make it completely 1-2 days before serving, or break the components into stages over several days.
Component-by-Component Prep:
- Tart shell: Make and blind-bake up to 3 days ahead. Store wrapped at room temperature.
- Ganache: Make up to 3 days ahead and store in refrigerator. Rewarm gently to pouring consistency before using.
- Caramel: Make up to 1 week ahead and store in refrigerator. Rewarm gently before using.
1-2 Days Ahead (Ideal): Make the entire tart completely, including the caramel topping and salt garnish. Cover and refrigerate. This is perfect timing—the tart is completely set, the flavors have developed, and you just need to bring it to room temperature before serving.
Day-Of Assembly: If you prefer, you can make the crust and ganache filling ahead, then make fresh caramel the day you plan to serve. Fresh caramel is slightly glossier and softer, though day-old caramel tastes just as good.
Freezer-Friendly Components:
- Unbaked tart dough: Freeze wrapped disk for up to 3 months. Thaw in refrigerator overnight before rolling.
- Baked tart shell: Freeze for up to 1 month. No need to thaw—fill while frozen.
- Completed tart: Freeze for up to 2 months using the flash-freeze method described above.
Party Planning Strategy: For stress-free entertaining, make the tart 2 days before your event. Store covered in the refrigerator. On party day, simply remove from the refrigerator 30 minutes before serving—that’s it! No last-minute work required.
Thawing from Frozen: Thaw frozen tart (whole or slices) in the refrigerator overnight while still wrapped. Once thawed, unwrap and let come to room temperature for 20-30 minutes before serving. The texture will be nearly identical to fresh.
Serving Suggestions
Classic Elegant Presentation:
This tart is stunning on its own, but thoughtful accompaniments can elevate it further:
- Whipped cream: Lightly sweetened whipped cream provides creamy contrast to rich chocolate
- Crème fraîche: Tangy crème fraîche balances the sweet caramel beautifully
- Fresh berries: Raspberries or strawberries add color and fruity brightness
- Vanilla ice cream: A small scoop alongside (not on top) creates temperature contrast
- Coffee or espresso: The bitter coffee enhances chocolate and cuts through richness
- Extra caramel sauce: Drizzle reserved caramel on the plate for dramatic presentation
- Chocolate shavings: Dark chocolate curls add textural interest
Beverage Pairings:
- Espresso or strong coffee: Classic pairing; the bitterness balances sweetness perfectly
- Port wine: Tawny port or vintage port complement chocolate beautifully
- Red wine: Full-bodied reds like Cabernet or Merlot work with dark chocolate
- Dessert wine: Late harvest Riesling or Moscato echo the caramel notes
- Bourbon or whiskey: For adults, the oakiness enhances caramel flavor
- Hot chocolate: Double down on chocolate for the ultimate indulgence
- Milk: Simple, classic, especially appealing to those who find it very rich
Occasion-Specific Serving:
- Dinner parties: Plate individual slices with raspberry coulis and mint
- Valentine’s Day: Dust with cocoa powder in a heart stencil
- Holidays: Add gold leaf or edible glitter for festive sparkle
- Birthdays: Add birthday candles and serve with champagne
- Afternoon tea: Cut into small pieces and serve with coffee or tea
- Romantic dinners: One tart, two forks, two people—perfection
Restaurant-Style Plating:
- Place slice slightly off-center on white plate
- Add three dots of caramel sauce in a line
- Add a quenelle of whipped cream
- Garnish with a few fresh raspberries
- Dust the plate edge with cocoa powder
- Add a small mint sprig for color
FAQs Section
Q: Can I make this without a tart pan with a removable bottom?
A: You can use a regular pie pan, but presentation won’t be as elegant since you can’t remove the outer ring. The removable bottom allows you to slide the tart onto a serving plate, showcasing those beautiful clean edges. If using a regular pan, you’ll serve directly from it—still delicious, just less visually dramatic. A springform pan can work in a pinch, but the sides aren’t fluted.
Q: My caramel seized and became grainy. Can I fix it?
A: Seized caramel happens when cold liquid hits hot sugar, or if sugar crystals form. If it’s slightly grainy, you can try adding a tablespoon of water and gently reheating while stirring until smooth. If it’s completely seized with hard chunks, unfortunately it’s best to start over. Prevent this by ensuring cream is warm before adding, not stirring the sugar too early, and keeping the sides of the pan clean with a wet pastry brush.
Q: Can I use store-bought caramel sauce instead of making my own?
A: While homemade tastes infinitely better, you can use high-quality store-bought caramel sauce in a pinch. Choose a thick, premium caramel sauce (not the thin ice cream topping kind) and warm it until pourable. Add extra sea salt to compensate for store-bought being less flavorful. However, I really encourage making your own—it only takes 15 minutes and the flavor difference is remarkable.
Q: Why did my tart crust shrink during baking?
A: Shrinking happens when the dough isn’t chilled enough, or when it’s been overworked (developing too much gluten). Always chill the dough after making it AND after shaping it in the pan. The double chill relaxes the gluten and solidifies the butter. Also, don’t stretch the dough when fitting it into the pan—gently press it in without pulling, and it won’t shrink back.
Q: My ganache looks grainy instead of smooth. What happened?
A: Grainy ganache usually results from chocolate that got too hot (if cream was boiling) or from stirring too vigorously and incorporating air. The chocolate might also have seized from water contamination. To fix it, gently rewarm the ganache over a double boiler while stirring slowly until it comes back together. To prevent this, use simmering (not boiling) cream, stir gently, and ensure all utensils are completely dry.
Q: How do I know when the caramel is the right color?
A: Perfect caramel should be deep amber—the color of an old copper penny or dark maple syrup. It will smell nutty and complex, not burnt. If you have a thermometer, aim for 350°F. Watch very carefully in the final minute as it can go from perfect to burnt quickly. When in doubt, slightly lighter is better than burnt—you can always cook it a bit more, but you can’t undo burnt caramel.
Q: Can I make this tart dairy-free?
A: You can attempt a dairy-free version using coconut cream instead of heavy cream, and dairy-free chocolate and butter substitutes. However, the texture and flavor will be different—coconut cream doesn’t create quite the same silky ganache, and dairy-free butter behaves differently in caramel. The crust adapts most easily with dairy-free butter. Results will vary from the original but can still be delicious.
Q: How far in advance can I add the caramel topping?
A: You can add the caramel up to 2 days before serving. In fact, it’s fine to completely finish the tart ahead. The caramel sets in the refrigerator and holds its shape beautifully. Don’t add the flaky sea salt until shortly before serving (within 4-6 hours) as it will eventually dissolve into the caramel. If you wait to add salt, it maintains those beautiful crunchy crystals.
Conclusion
There’s something incredibly satisfying about creating a dessert this elegant and sophisticated in your own kitchen. When you set this salted caramel chocolate tart on the table—with its glossy caramel catching the light, those flakes of sea salt sparkling on top, and that rich chocolate ganache promising pure indulgence—you’ll feel an immense sense of accomplishment. And when you take that first bite, experiencing how all those flavors come together in perfect harmony, you’ll understand why this tart has become a modern classic.
Whether you’re making this salted caramel chocolate tart for a milestone celebration, impressing dinner guests, treating yourself to a weekend baking project, or creating something special for someone you love, this recipe delivers on every level. It proves that