Easy Rocky Road Fudge Recipe (Loaded with Marshmallows & Nuts!)
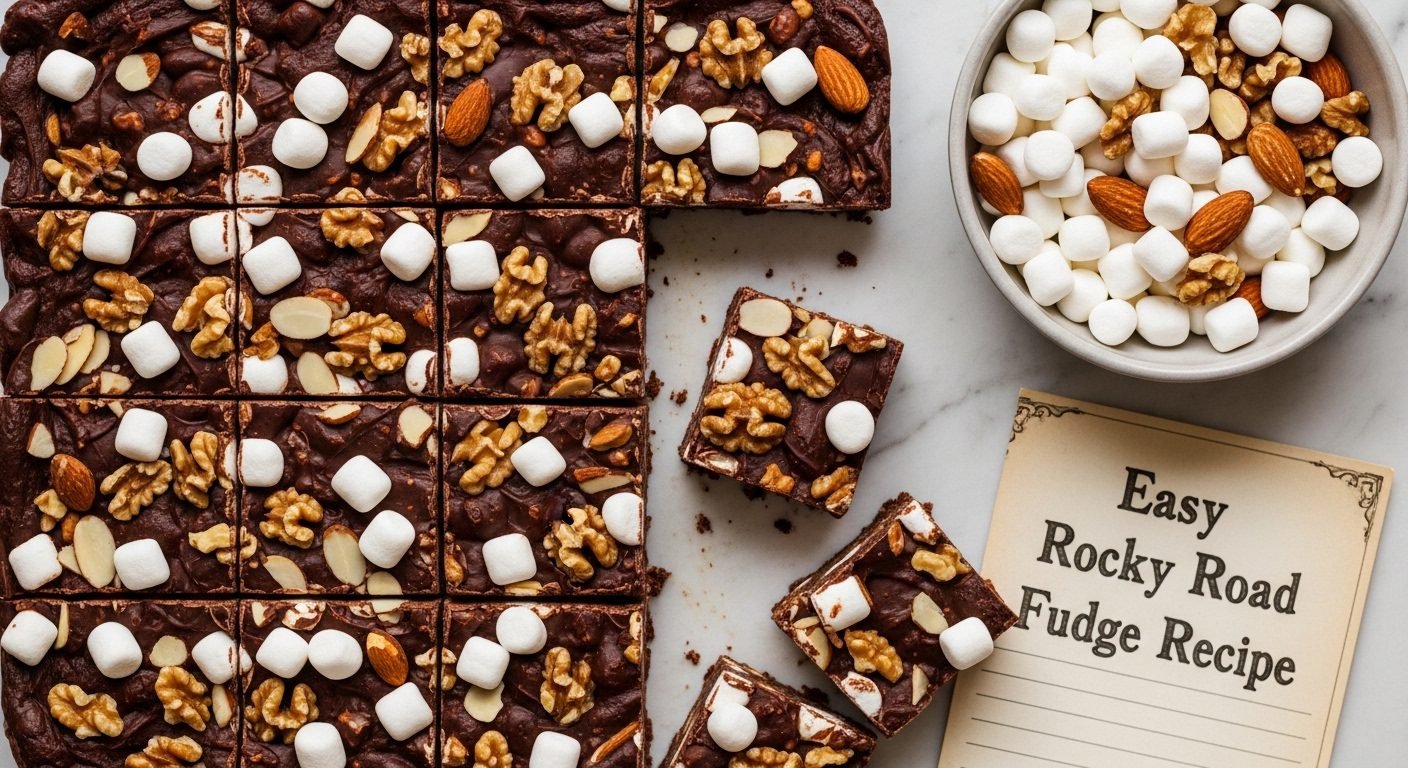
If you’ve ever craved the classic combination of chocolate, marshmallows, and nuts all in one irresistible bite, this rocky road fudge is about to become your new favorite treat. This no-fail recipe creates incredibly rich, creamy fudge studded with fluffy marshmallows and crunchy nuts – it’s like taking a bite of rocky road ice cream, but in fudge form. The best part? You don’t need a candy thermometer, and the whole thing comes together in about 15 minutes of active time.
Rocky road fudge is the ultimate crowd-pleaser for any occasion. The visual appeal alone is stunning – squares of glossy chocolate fudge with white marshmallows and nuts peeking through create an impressive presentation that looks like it came from a professional candy shop. It’s perfect for holiday gift-giving, bake sales, potlucks, birthday parties, or simply keeping a batch in the fridge for when that chocolate craving hits. Kids absolutely love helping make this recipe (marshmallow mixing is surprisingly fun!), and adults appreciate the nostalgic flavor combination that reminds them of childhood treats. Whether you’re an experienced baker or someone who’s never made fudge before, this foolproof recipe will make you look like a candy-making pro.
History / Background
Rocky road is one of those classic American flavor combinations with a fascinating history that spans from ice cream parlors to candy shops and home kitchens. To understand rocky road fudge, we need to trace the origins of rocky road itself.
The rocky road flavor combination was born during the Great Depression, around 1929, in Oakland, California. William Dreyer, owner of Dreyer’s Ice Cream (now Dreyer’s/Edy’s), is credited with creating rocky road ice cream. Working with his candy-maker partner Joseph Edy, Dreyer cut up marshmallows and walnuts with his wife’s sewing scissors and mixed them into chocolate ice cream. The name “rocky road” was chosen deliberately – it was a playful reference to the rough, rocky economic times Americans were facing during the Depression, offering a message of optimism that better times lay ahead.
The flavor was an immediate success. The combination of smooth chocolate with soft, chewy marshmallows and crunchy nuts created a delightful textural experience that stood out from other ice cream flavors. Rocky road quickly became a staple flavor in ice cream shops across America and remains popular to this day.
As rocky road ice cream gained popularity, the flavor combination naturally migrated to other confections. Candy makers began creating rocky road candy bars in the 1940s and 1950s, featuring chocolate with marshmallows and nuts. The Annabelle Candy Company began producing their Rocky Road bar in 1950, which became one of the most well-known commercially produced versions.
Fudge itself has been a beloved American confection since the late 1800s. The exact origins of fudge are debated, but most historians agree it emerged from the American college scene in the 1880s, with several women’s colleges claiming to be its birthplace. The word “fudge” possibly comes from the idea of “fudging” or botching a batch of caramels – turning a mistake into a delicious discovery.
Rocky road fudge emerged as home cooks began adapting their favorite flavor combinations into fudge form. By the mid-20th century, homemade fudge had become a staple of holiday candy-making, church bake sales, and gift-giving traditions. Rocky road fudge offered all the appeal of traditional fudge with the added excitement of those beloved mix-ins.
The recipe gained particular momentum in the 1970s and 1980s when easy fudge recipes using sweetened condensed milk became popular. These simplified methods meant anyone could make smooth, creamy fudge without the precise temperature control required by traditional recipes. Rocky road became one of the most requested variations, appealing to both children and adults.
Today, rocky road fudge remains a cherished treat in American homes, especially during the holidays. It represents the perfect marriage of nostalgia, ease of preparation, and crowd-pleasing flavors. The combination continues to evolve with modern variations, but the classic trio of chocolate, marshmallows, and nuts remains the gold standard.
Why You’ll Love This Recipe
This rocky road fudge recipe is absolutely going to blow you away with how simple it is to make such an impressive, delicious treat. It delivers on every level – taste, texture, visual appeal, and ease of preparation. You’ll find yourself making batch after batch because it’s just that good and that easy.
Here’s why this recipe is absolutely irresistible:
- No candy thermometer needed – Uses an easy condensed milk method that’s foolproof
- Ready in 2 hours – Only 15 minutes of active prep, then just refrigeration time
- Incredibly creamy texture – Melts in your mouth with no grainy crystals
- Triple texture experience – Smooth fudge, fluffy marshmallows, crunchy nuts all in one bite
- Kid-friendly to make – Children love stirring in the marshmallows and nuts
- Perfect for gifts – Looks professional and impressive when packaged
- Highly customizable – Easy to change up nuts, add-ins, or make substitutions
- Crowd-pleasing flavor – Everyone loves rocky road
- Budget-friendly – Makes a large batch for relatively little money
- No baking required – Perfect for summer or when you don’t want to use the oven
- Long shelf life – Stays fresh for weeks when stored properly
- Great for holidays – A festive addition to cookie trays and candy platters
- Naturally gluten-free – Safe for those avoiding gluten (verify ingredient labels)
- Makes great gifts – Package in decorative tins for impressive homemade presents
Ingredient Notes
Let me walk you through each ingredient in this rocky road fudge so you understand exactly what makes it so special and how to choose the best options.
Semi-Sweet Chocolate Chips: These form the base of your fudge and provide that rich chocolate flavor. Semi-sweet chocolate offers the perfect balance – sweet enough to be indulgent but with enough cocoa depth to taste authentically chocolate. You can use milk chocolate chips for a sweeter version or dark chocolate chips for more sophisticated, less sweet fudge. A 12-ounce bag (2 cups) is standard, but high-quality chips make a noticeable difference. Brands like Ghirardelli or Guittard are excellent choices.
Sweetened Condensed Milk: This is the secret ingredient that makes this fudge so incredibly easy and foolproof. Sweetened condensed milk is regular milk that’s had about 60% of the water removed and has sugar added. It’s thick, sweet, and creamy. When combined with chocolate, it creates a smooth, creamy fudge base without any of the temperature watching or beating required by traditional fudge recipes. One 14-ounce can is the standard size. Don’t confuse this with evaporated milk – they’re not interchangeable. You must use sweetened condensed milk for this recipe to work.
Butter (Unsalted): Adds richness, enhances flavor, and contributes to the smooth, creamy texture. Unsalted butter allows you to control the salt level in your fudge. Use real butter – margarine or spreads contain water and other ingredients that can affect texture. The butter should be at room temperature or slightly softened so it melts easily when stirred in.
Vanilla Extract: Pure vanilla extract enhances all the other flavors and adds depth and warmth to the fudge. It’s one of those ingredients that you might not consciously taste, but you’d notice if it were missing. Pure vanilla extract tastes significantly better than imitation, especially in simple recipes like this where every ingredient matters.
Mini Marshmallows: These are essential for creating that signature rocky road texture and appearance. Mini marshmallows distribute more evenly throughout the fudge than large marshmallows, ensuring you get a bit of marshmallow sweetness in every bite. They also look prettier in the finished fudge. You’ll need about 2 cups. Make sure they’re fresh – stale marshmallows won’t have that soft, pillowy texture. Regular marshmallows can work if cut into smaller pieces, but mini marshmallows are much easier.
Chopped Nuts: Traditionally, rocky road uses walnuts or almonds, both of which provide that essential crunchy contrast to the smooth fudge and soft marshmallows. Walnuts are the classic choice with their rich, slightly bitter flavor that balances the sweetness. Almonds offer a sweeter, more delicate nuttiness. Pecans work beautifully too with their buttery flavor. Use about 1 cup of chopped nuts. For the best flavor, toast your nuts before adding them – this intensifies their flavor significantly. Spread on a baking sheet and toast at 350°F for 7-8 minutes until fragrant.
Salt (Optional): Just a pinch of salt enhances all the sweet flavors and prevents the fudge from tasting flat or one-dimensional. Even though it’s optional, I highly recommend adding it.
Equipment Needed
The beauty of this recipe is its simplicity – you won’t need any special candy-making equipment or tools. Here’s what you’ll need:
- 8×8-inch square baking pan – Standard size that creates perfectly thick fudge pieces
- Parchment paper or aluminum foil – For lining the pan for easy removal
- Medium saucepan (2-3 quarts) – For melting the chocolate mixture
- Wooden spoon or silicone spatula – For stirring
- Measuring cups – For accurate measurements
- Sharp knife – For cutting the set fudge into squares
- Cutting board – For cutting the fudge once removed from pan
Nice to Have but Not Essential:
- Offset spatula – Makes spreading fudge in the pan easier
- Microwave-safe bowl – If you prefer to melt chocolate in the microwave
Print

Rocky Road Fudge Recipe
This easy rocky road fudge is incredibly rich and creamy, loaded with mini marshmallows and crunchy nuts. It requires no candy thermometer and is ready in just 2 hours with minimal effort. Perfect for holidays, gifts, or anytime you need a chocolate fix!
- Total Time: 2 hours 20 minutes (including setting time)
- Yield: 64 small pieces (1-inch squares) or 36 larger pieces 1x
Ingredients
Scale- 3 cups (18 ounces) semi-sweet chocolate chips
- 1 can (14 ounces) sweetened condensed milk
- 2 tablespoons unsalted butter
- 1 teaspoon pure vanilla extract
- Pinch of salt (optional)
- 2 cups mini marshmallows
- 1 cup chopped walnuts or almonds, toasted
Instructions
Step 1: Prepare Your Pan
Line an 8×8-inch square baking pan with parchment paper or aluminum foil, leaving an overhang on two opposite sides. This overhang will serve as handles to lift the fudge out later, making cutting much easier. Lightly grease the parchment or foil with butter or cooking spray. Set aside.
Step 2: Melt the Chocolate Base
In a medium saucepan, combine the chocolate chips, sweetened condensed milk, and butter. Place over low heat and stir constantly with a wooden spoon or silicone spatula. The mixture will gradually melt together into a smooth, glossy chocolate mixture. This takes about 5-7 minutes. Be patient and keep the heat low – rushing with high heat can cause the chocolate to scorch or seize.
Alternatively, you can melt this mixture in the microwave: Combine in a large microwave-safe bowl and microwave on 50% power for 1 minute. Stir, then continue microwaving in 30-second intervals at 50% power, stirring after each interval, until completely smooth. This takes about 2-3 minutes total.
Step 3: Add Vanilla and Salt
Once the chocolate mixture is completely smooth and melted, remove from heat. Stir in the vanilla extract and a pinch of salt (if using). Mix until fully incorporated. The mixture should be glossy, smooth, and thick but pourable.
Step 4: Fold in Marshmallows and Nuts
Let the chocolate mixture cool for about 2-3 minutes – it should still be warm but not steaming hot. This prevents the marshmallows from completely melting when you add them. Add the mini marshmallows and chopped nuts to the chocolate mixture. Using a rubber spatula, gently fold them in until evenly distributed throughout. Don’t overmix – you want the marshmallows to stay intact, not melt into the fudge.
Step 5: Spread in Pan
Immediately pour the fudge mixture into your prepared pan. Use a spatula or the back of a spoon to spread it evenly into all corners and smooth the top. Work fairly quickly as the fudge will start to set as it cools. You can press a few extra marshmallows and nuts on top for a prettier presentation if desired.
Step 6: Refrigerate to Set
Place the pan in the refrigerator and let the fudge set completely. This takes at least 2 hours, though overnight is even better. The fudge needs to be completely firm before cutting or it will be messy and won’t hold its shape. You’ll know it’s ready when it feels solid to the touch and doesn’t indent when you press it gently.
Step 7: Cut into Squares
Once completely set, use the parchment paper overhang to lift the entire slab of fudge out of the pan. Place it on a cutting board. Using a sharp knife, cut the fudge into squares. For small candy-sized pieces, cut into 1-inch squares (8 rows by 8 rows = 64 pieces). For larger serving pieces, cut into 1.5-inch squares (about 6 rows by 6 rows = 36 pieces).
For the cleanest cuts, wipe your knife with a damp cloth between each cut. You can also warm the knife briefly under hot water, dry it, and then cut – the warm knife glides through the fudge more smoothly.
Step 8: Store or Serve
Serve immediately or store in an airtight container in the refrigerator for up to 2 weeks, or at room temperature for up to 1 week.
Notes
- Toasting Nuts: Don’t skip toasting your nuts! It dramatically improves their flavor. Spread on a baking sheet and bake at 350°F for 7-8 minutes until fragrant.
- Marshmallow Tip: Let the chocolate mixture cool for 2-3 minutes before adding marshmallows so they don’t completely melt.
- Pan Size: An 8×8-inch pan creates thick, generous pieces. A 9×13-inch pan creates thinner fudge, which is also delicious but different.
- Storage: Store in the refrigerator for firmest texture, or at room temperature for softer, more melt-in-your-mouth fudge.
- Nut-Free Version: Omit nuts for allergies. Replace with extra marshmallows, Rice Krispies, or leave plain.
- Chocolate Choice: Semi-sweet is classic, but milk chocolate makes sweeter fudge and dark chocolate creates more sophisticated flavor.
- Prep Time: 15 minutes
- Cook Time: 5 minutes
- Category: Candy, Dessert
- Method: Baking
- Cuisine: American
- Diet: Gluten Free
Nutrition
- Serving Size: 1 piece (1-inch square)
- Calories: 95
- Sugar: 12g
- Sodium: 20mg
- Fat: 5g
- Saturated Fat: 2.5g
- Unsaturated Fat: 2g
- Trans Fat: 0g
- Carbohydrates: 13g
- Fiber: 1g
- Protein: 1g
- Cholesterol: 3mg
Tips & Variations
Once you’ve mastered the basic rocky road fudge, there are so many fun ways to customize it! Here are some delicious variations to try.
Different Nut Options:
- Pecan Rocky Road: Replace walnuts with toasted pecans for a buttery, Southern twist
- Peanut Rocky Road: Use roasted peanuts for a kid-friendly, peanut butter cup-like version
- Cashew Rocky Road: Cashews add a sweet, creamy nuttiness
- Mixed Nut: Use a combination of walnuts, almonds, and pecans for variety
- Nut-Free: Omit nuts entirely and add extra marshmallows or crispy rice cereal for crunch
Chocolate Variations:
- Dark Chocolate Rocky Road: Use dark chocolate chips for a more sophisticated, less sweet version
- Milk Chocolate Rocky Road: Sweeter and creamier, perfect for kids
- White Chocolate Rocky Road: Creates beautiful color contrast with dark nuts
- Peanut Butter Rocky Road: Replace 1 cup chocolate chips with peanut butter chips
- Mint Rocky Road: Add 1/2 teaspoon peppermint extract for a refreshing twist
Mix-In Variations:
- S’mores Rocky Road: Add 1/2 cup crushed graham crackers
- Cherry Rocky Road: Add 1/2 cup chopped maraschino cherries (drained and patted dry)
- Coconut Rocky Road: Add 1/2 cup shredded coconut
- Pretzel Rocky Road: Add 1 cup crushed pretzels for sweet-salty flavor
- Caramel Rocky Road: Swirl in 1/4 cup caramel sauce before refrigerating
- Cookie Rocky Road: Fold in 1 cup crushed Oreos or chocolate chip cookies
Holiday Versions:
- Christmas Rocky Road: Add red and green M&Ms or crushed candy canes
- Valentine’s Rocky Road: Use pink and red marshmallows, add freeze-dried strawberries
- Easter Rocky Road: Use pastel-colored marshmallows
- Halloween Rocky Road: Add orange and black sprinkles and candy corn
Topping Ideas:
- Sea Salt Rocky Road: Sprinkle flaky sea salt on top before refrigerating
- Drizzled Rocky Road: Drizzle melted white chocolate over the top
- Sprinkled Rocky Road: Add colorful sprinkles while still soft
- Extra Marshmallow: Press additional marshmallows on top for visual appeal
Pro Chef Tips
Want your rocky road fudge to rival professional candy shops? Here are expert techniques that will elevate your fudge-making.
Use Low Heat for Melting: The most common mistake is rushing the melting process with high heat. Low, slow heat prevents the chocolate from scorching and ensures the sweetened condensed milk blends smoothly without separating. Stirring constantly is key. The entire melting process should take 5-7 minutes. Patience here pays off in silky-smooth texture.
Toast Your Nuts Properly: This single step makes an enormous difference in flavor. Spread nuts in a single layer on a baking sheet and toast at 350°F for 7-8 minutes, stirring once halfway through. They should smell intensely nutty and be lightly golden. Let them cool completely before adding to fudge. Warm nuts can cause the fudge to become too soft or affect setting time.
Cool Before Adding Mix-Ins: Let the melted chocolate mixture cool for 2-3 minutes before adding marshmallows and nuts. If it’s too hot, the marshmallows will melt completely and lose their distinct texture. You want them soft but still recognizable as marshmallows. The mixture should still be warm and pourable but not steaming.
Work Quickly After Mixing: Once you’ve added marshmallows and nuts, work quickly to get the fudge into the pan and spread. The mixture starts to thicken and set rapidly as it cools. If you wait too long, it becomes difficult to spread evenly. Have your pan prepared and ready before you start mixing in the add-ins.
Create Clean Cuts: For professional-looking pieces, use these cutting techniques: (1) let fudge set completely – at least 2 hours, (2) lift the entire slab out using parchment overhang, (3) use a sharp knife, not a serrated one, (4) wipe the knife clean between each cut, or (5) warm the knife under hot running water, dry it quickly, then cut. The warm knife glides through fudge like butter.
Don’t Overmix: When folding in marshmallows and nuts, use a gentle folding motion rather than vigorous stirring. Overmixing can deflate marshmallows and break nuts into tiny pieces. You want visible, intact marshmallows and good-sized nut pieces throughout.
Line Pan Properly: Take time to line your pan correctly with overhang on opposite sides. This makes removal effortless and prevents damage to your fudge. Lightly greasing the parchment prevents sticking. If using foil, mold it to the outside of the pan first, then place inside – this creates perfect corners.
Consider Pan Size: An 8×8-inch pan creates thick, luxurious fudge pieces. If you prefer thinner fudge (which some people find easier to eat), use a 9×9-inch or 9×13-inch pan. Just know that the texture and appearance will be slightly different. Thinner fudge also sets faster.
Room Temperature vs. Refrigerated: Fudge texture changes with temperature. Refrigerated fudge is firm and snaps when you bite it. Room temperature fudge is softer and more melt-in-your-mouth. Both are delicious but offer different experiences. For gift-giving, room temperature is lovely; for long-term storage, refrigeration is better.
Common Mistakes to Avoid
Even though rocky road fudge is straightforward, there are a few pitfalls that can affect your results. Here’s how to avoid them.
Scorched or Burned Chocolate: This happens when you use heat that’s too high when melting the chocolate mixture. Chocolate is delicate and burns easily, creating a bitter, unpleasant flavor that can’t be fixed. Always use low heat on the stovetop or 50% power in the microwave. Stir constantly and be patient. If you smell any burning or see brown spots forming, remove from heat immediately. Unfortunately, burned chocolate means starting over.
Grainy or Separated Fudge: If your fudge looks curdled or grainy instead of smooth and glossy, the mixture either got too hot too quickly, or water somehow got into it. Make sure all your utensils are completely dry. Don’t let steam from the saucepan drip back into the mixture. Maintain low, steady heat and stir constantly. If separation starts, remove from heat and stir vigorously – sometimes this can save it.
Marshmallows Completely Melted: If your marshmallows disappeared into the fudge instead of staying intact, the chocolate mixture was too hot when you added them. Always let the mixture cool for 2-3 minutes after removing from heat. It should still be warm enough to be pourable but not steaming. You can test by dropping one marshmallow in – if it immediately starts melting, wait another minute.
Fudge Won’t Set or Is Too Soft: If your fudge remains soft and won’t firm up even after several hours in the refrigerator, one of several things happened: the mixture wasn’t heated enough to fully melt and combine, incorrect proportions were used, or the fudge wasn’t chilled long enough. Make sure the chocolate mixture is completely smooth before adding mix-ins. Measure ingredients accurately. Allow at least 2 hours of refrigeration, though overnight is better. If it still won’t set, try freezing it for 30 minutes.
Difficult to Cut/Crumbly Pieces: If your fudge crumbles when you try to cut it or sticks to the knife badly, it either wasn’t set completely, or you’re cutting it too cold. Make sure it’s fully refrigerated and firm before cutting. Use a sharp (not serrated) knife and wipe it clean between cuts. For very cold fudge, let it sit at room temperature for 10-15 minutes before cutting. A warm knife (run under hot water and dried) also helps immensely.
Storage & Meal Prep
Proper storage keeps your rocky road fudge fresh, creamy, and delicious for as long as possible. Here’s how to store it correctly.
Room Temperature Storage: Rocky road fudge can be stored at room temperature in an airtight container for up to 1 week in ideal conditions (cool, dry environment around 65-70°F). Layer pieces with wax paper or parchment paper between layers to prevent sticking. Keep the container in a cool, dark place away from heat sources and direct sunlight. Room temperature fudge is softer and more melt-in-your-mouth, which many people prefer.
Refrigerator Storage: For longer storage and firmer texture, keep fudge in an airtight container in the refrigerator for up to 2-3 weeks. Layer pieces with parchment paper between layers. Refrigerated fudge is firmer and snaps when you bite it. For the best eating experience, let refrigerated fudge sit at room temperature for 10-15 minutes before serving so it softens slightly and the flavors are more pronounced.
Preventing Sticking: Fudge pieces can stick together, especially in warmer conditions. Always layer with parchment or wax paper between layers. If fudge does stick together, gently separate pieces – they usually come apart without damage. Storing in a cool environment prevents excessive stickiness.
Gift Packaging: When packaging rocky road fudge for gifts, place pieces in decorative tins, cellophane bags, or small gift boxes lined with parchment paper. Include a note suggesting recipients refrigerate the fudge and consume within 1-2 weeks for best quality. If the fudge will be sitting out at room temperature for an extended period (like at a bake sale), make sure it’s in a cool location.
Signs of Freshness: Fresh fudge should be smooth, creamy, and rich-tasting with fresh-tasting nuts. If nuts taste stale or rancid, or if the fudge has developed an off odor, it’s past its prime. Properly stored fudge usually stays excellent for the entire recommended storage time.
Make-Ahead & Freezer Notes
Rocky road fudge is an excellent make-ahead treat, perfect for holiday preparation or anytime you want to prepare in advance.
Making Ahead for Events: You can make rocky road fudge up to 1 week ahead if stored at room temperature, or up to 2-3 weeks ahead if refrigerated. This makes it perfect for holiday baking marathons when you need to prepare multiple treats. Many people make all their candy in early December to have ready for gift-giving throughout the month. Fudge actually tastes better after a day or two as the flavors meld together.
Freezing Rocky Road Fudge: Yes, this fudge freezes beautifully for up to 3 months! Freezing is perfect for making extra-large batches or preparing far in advance. To freeze: wrap individual pieces or small portions tightly in plastic wrap, then place in a freezer-safe container or bag. Remove as much air as possible. Label with the date so you remember when you made it. The marshmallows and chocolate both freeze well with no texture changes.
Thawing Instructions: Remove frozen fudge from the freezer and let it thaw in the refrigerator overnight, still wrapped to prevent condensation. Once thawed in the fridge, let it come to room temperature (about 30 minutes) before serving for the best texture. Never thaw at room temperature initially, as this can cause condensation to form on the surface, making it wet and sticky. Thawed fudge tastes just as delicious as fresh.
Batch Preparation: If making multiple batches (perhaps with different variations), you can make them one after another. The process is so quick that you can easily make 3-4 batches in an afternoon. Just make sure to have multiple pans or let one batch set before starting the next if you only have one pan.
Timing for Gifts: For the freshest gifts, make fudge no more than 1 week before giving if storing at room temperature, or up to 2 weeks if refrigerating. Package 1-2 days before your event or holiday for optimal freshness.
Serving Suggestions
While rocky road fudge is delicious on its own, there are many creative ways to serve and present this treat.
Dessert Platters: Arrange rocky road fudge squares on a large platter alongside other treats like cookies, brownies, peanut brittle, and chocolate bark. The variety in color, texture, and flavor makes dessert platters more interesting. Rocky road’s visual appeal with the white marshmallows and brown nuts makes it a standout on any spread.
Ice Cream Topping: Chop rocky road fudge into small pieces and use as an ice cream topping. It’s especially delicious on vanilla, chocolate, or coffee ice cream. The fudge softens slightly from the cold ice cream, creating an incredible textural experience.
Hot Chocolate Stirrers: Place a small square of rocky road fudge on a spoon or stick and use it to stir hot chocolate. As it melts into the hot beverage, it creates an incredibly rich, chocolatey drink with melty marshmallows.
Coffee Pairing: Serve a piece or two with coffee, especially espresso or dark roasts that can stand up to the sweetness. The coffee’s bitterness beautifully balances the fudge’s sweetness. It’s a sophisticated afternoon pick-me-up.
Holiday Cookie Trays: Include rocky road fudge on holiday cookie platters and candy trays alongside traditional treats. The fudge adds both visual interest and flavor variety. It’s often the first thing to disappear because people love the familiar rocky road flavor.
Gift Boxes and Baskets: Package rocky road fudge in decorative tins or boxes as homemade gifts. Pair with other homemade treats like cookies, peanut brittle, or hot cocoa mix for impressive gift baskets. The fudge looks professional and shows you put thought and effort into the gift.
Party Favors: Cut fudge into small pieces and package in mini cellophane bags tied with ribbon as party favors for birthdays, baby showers, weddings, or corporate events. Customize ribbon colors to match your event theme.
Bake Sale Items: Rocky road fudge is perfect for bake sales. Package 2-4 pieces in small bags and price at $3-5 per bag. The visual appeal and familiar flavor make it a hot seller.
Movie Night Treat: Serve a plate of rocky road fudge during family movie nights. It pairs wonderfully with popcorn – the combination of chocolate fudge and salty popcorn is addictive!
FAQs Section
Can I use regular marshmallows instead of mini marshmallows?
Yes, but you’ll need to cut them into smaller pieces first. Regular-sized marshmallows are too large and won’t distribute evenly throughout the fudge. If using regular marshmallows, cut each one into 4-6 pieces with kitchen scissors (spray scissors with cooking spray to prevent sticking). Mini marshmallows are much more convenient and create better visual appeal, but regular marshmallows work in a pinch. You’ll need about 20-25 regular marshmallows to equal 2 cups of minis.
What if I don’t have sweetened condensed milk?
Unfortunately, sweetened condensed milk is essential to this recipe and can’t be easily substituted. It’s what makes this fudge foolproof and creates the smooth, creamy texture without temperature monitoring. Evaporated milk won’t work as a substitute because it’s not sweet and has different properties. If you absolutely can’t get sweetened condensed milk, you’d need to use a completely different fudge recipe that uses butter and cream instead, but it would be more complicated and require a candy thermometer.
Why is my fudge grainy instead of smooth?
Grainy fudge usually happens when the chocolate mixture gets too hot too quickly or when water gets into the mixture. Chocolate is sensitive to both heat and moisture. Make sure you’re using low heat and stirring constantly when melting. Keep all utensils completely dry. Don’t let steam from the saucepan drip into the mixture. If you’re using the microwave method, use 50% power with short intervals. Once grainy texture develops, it’s very difficult to fix, so prevention is key.
Can I make this fudge without nuts for allergies?
Absolutely! Rocky road fudge is still delicious without nuts. You can either omit them entirely (and just have chocolate marshmallow fudge), or replace them with nut-free alternatives like: toasted pumpkin seeds (pepitas), sunflower seeds, crispy rice cereal (adds nice crunch), crushed pretzels, or extra marshmallows. The texture will be slightly different without nuts, but it’s still wonderful. Just make sure all your other ingredients are processed in nut-free facilities if dealing with severe allergies.
How long does rocky road fudge need to set?
Rocky road fudge needs at least 2 hours in the refrigerator to set properly. However, for the cleanest cuts and best texture, overnight refrigeration (6-8 hours) is ideal. The fudge needs to be completely firm before cutting or it will be messy and pieces won’t hold their shape. You’ll know it’s ready when it feels solid to the touch an