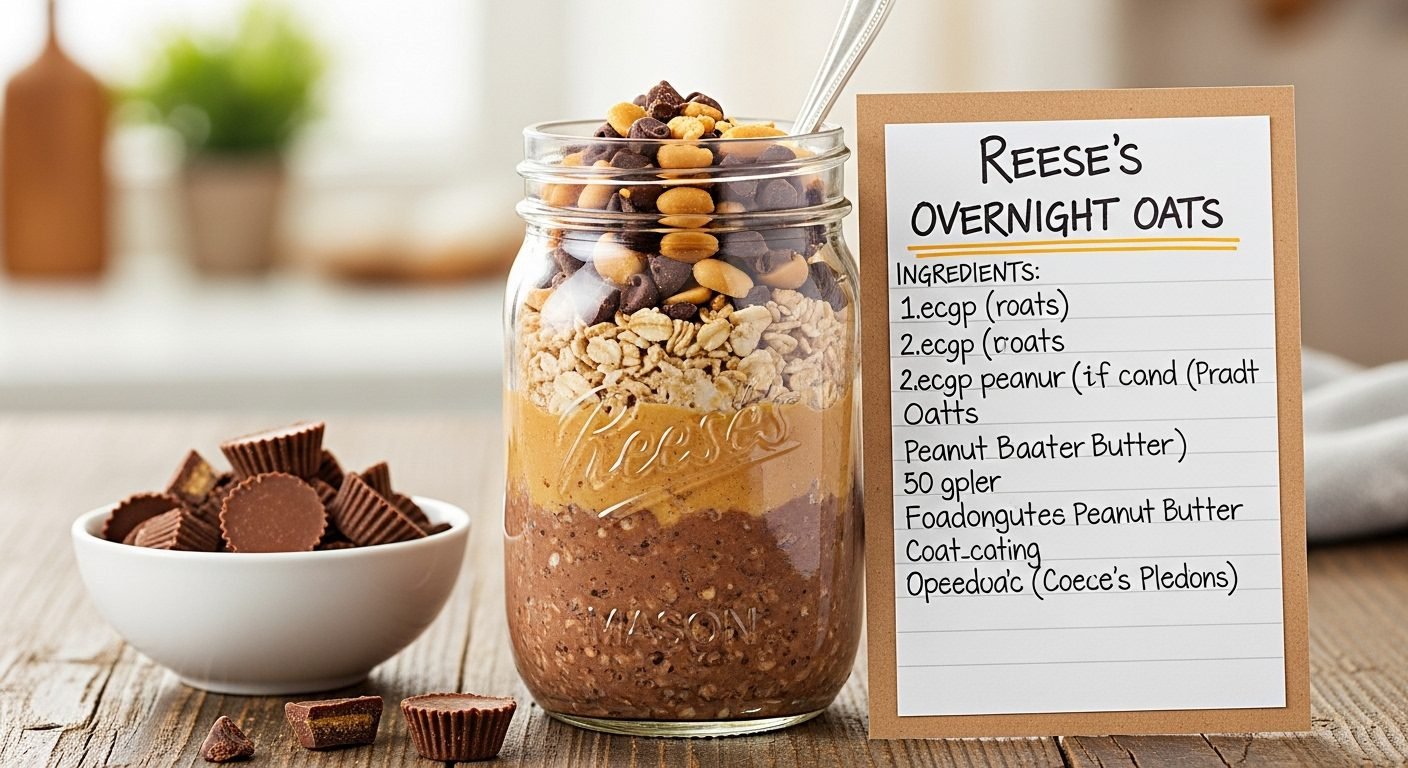
Reese’s Overnight Oats Recipe (No-Cook Chocolate Peanut Butter Breakfast)
Imagine waking up to a breakfast that tastes like dessert but fuels your day like a champion. That’s exactly what these Reese’s Overnight Oats deliver! This no-cook breakfast combines creamy oats with rich chocolate and peanut butter flavors that taste just like your favorite candy, but with wholesome ingredients that’ll keep you satisfied all morning long.
Perfect for busy weekday mornings, meal prep Sundays, or whenever you want a grab-and-go breakfast that feels indulgent, these overnight oats are assembled in just 5 minutes the night before. Come morning, you’ll have a thick, creamy, perfectly sweet breakfast waiting for you in the fridge. They’re ideal for anyone who hits the snooze button one too many times or needs a protein-packed breakfast that travels well to the office, gym, or school.
Whether you’re new to overnight oats or a seasoned meal prepper, this Reese’s-inspired version will quickly become your go-to breakfast. Kids and adults alike go crazy for the chocolate-peanut butter combination, making it a family-friendly option that actually gets everyone excited about eating a nutritious breakfast.
History / Background
Overnight oats originated from traditional Swiss muesli, created around 1900 by Swiss physician Maximilian Bircher-Benner. He developed the original recipe as a healthy meal for hospital patients, combining raw oats soaked in liquid with fresh fruit and nuts. The concept was revolutionary for its time, emphasizing whole grains and raw ingredients when most breakfast foods were heavily cooked.
The modern overnight oats trend exploded in popularity during the 2010s, particularly in North America, as people searched for convenient, healthy breakfast options that fit into busy lifestyles. The beauty of overnight oats lies in their flexibility—they can be customized with endless flavor combinations, making them perfect for creative home cooks.
The Reese’s-inspired variation is a relatively recent innovation that emerged from the broader “dessert-for-breakfast” trend on social media platforms, especially Pinterest and Instagram. Home cooks discovered that combining cocoa powder and peanut butter with oats created a remarkably similar flavor profile to Reese’s Peanut Butter Cups, the iconic American candy that’s been a beloved treat since H.B. Reese created it in 1928.
This particular recipe represents the perfect marriage of nostalgic candy flavors with modern wellness culture—proving that healthy eating doesn’t have to mean sacrificing the tastes you love. It’s become especially popular among fitness enthusiasts, parents trying to make breakfast more exciting for picky eaters, and anyone who believes breakfast should be both nutritious and delicious.
Why You’ll Love This Recipe
These Reese’s Overnight Oats are about to become your new breakfast obsession, and here’s why: they deliver that irresistible chocolate-peanut butter combo we all crave, but they’re actually good for you! Unlike grabbing a candy bar for breakfast (we’ve all been tempted), these oats provide sustained energy, protein, and fiber that’ll keep you full and focused throughout your morning.
The magic happens while you sleep—literally zero morning effort required. Just grab your jar from the fridge and you’re ready to conquer the day. No cooking, no heating, no stress. It’s the ultimate solution for those chaotic mornings when you’re rushing out the door but still want to eat something wholesome.
Here’s what makes this recipe truly special:
- Ready in 5 minutes of prep time the night before—no morning cooking required
- Tastes like dessert but packed with protein, fiber, and healthy fats to fuel your day
- Meal prep friendly—make 4-5 jars at once for the entire work week
- Customizable to your taste preferences and dietary needs
- Budget-friendly using simple pantry staples you probably already have
- Kid-approved flavor that makes healthy eating easy for the whole family
- Perfect texture every time—thick, creamy, and perfectly sweet
- Portable breakfast you can take anywhere (car, office, gym, park)
- Naturally gluten-free when using certified gluten-free oats
- No refined sugar needed—naturally sweetened with healthier alternatives
Ingredient Notes
Let’s talk about what goes into these magical jars and why each ingredient matters:
Rolled Oats (Old-Fashioned Oats): The foundation of this recipe. Use old-fashioned rolled oats, not quick oats or steel-cut oats. Rolled oats have the perfect texture for overnight soaking—they soften beautifully while maintaining a pleasant chew. Quick oats become mushy, and steel-cut oats stay too hard. For gluten-free diets, use certified gluten-free oats.
Milk: Any milk works here—dairy, almond, oat, cashew, soy, or coconut. The milk you choose affects the final creaminess and flavor. Whole milk creates the richest texture, while almond milk keeps it lighter. Oat milk adds extra oat flavor and creaminess. Use what you love or what fits your dietary needs.
Greek Yogurt: This is the secret to ultra-creamy overnight oats with a protein boost. Greek yogurt adds tanginess that balances the sweetness and creates that thick, spoonable texture. You can use plain or vanilla, full-fat or low-fat. For dairy-free options, coconut yogurt or almond yogurt work beautifully.
Cocoa Powder: Unsweetened cocoa powder gives you that chocolate flavor without added sugar. Dutch-processed cocoa creates a smoother, less acidic chocolate taste, while natural cocoa powder is more intense. Either works perfectly—use what’s in your pantry.
Peanut Butter: The star ingredient! Use creamy peanut butter for the smoothest texture, or crunchy if you like texture variation. Natural peanut butter (just peanuts and salt) is healthiest, but regular peanut butter works too. Make sure it’s well-stirred if using natural. For allergies, substitute with almond butter, cashew butter, or sunflower seed butter.
Sweetener: Maple syrup, honey, or agave nectar all work beautifully. Start with 1-2 tablespoons and adjust to your sweetness preference. You can also use mashed banana for natural sweetness, or try a few drops of liquid stevia for a low-calorie option.
Chia Seeds (optional but recommended): These tiny seeds create a pudding-like texture and add omega-3 fatty acids, fiber, and protein. They’re flavorless and practically invisible, but they make a huge difference in the final consistency.
Vanilla Extract: Just a splash enhances all the other flavors and adds warmth to the overall taste.
Salt: A tiny pinch brings out the chocolate and peanut butter flavors. Don’t skip it!
Equipment Needed
The beauty of overnight oats is that you need minimal equipment—no cooking tools required! Here’s what to gather:
- Mason jars or airtight containers (16-oz jars work perfectly for individual servings)
- Measuring cups and spoons for accurate ingredient portions
- Mixing spoon or small whisk to combine ingredients
- Medium bowl (optional, if you prefer mixing in a bowl before transferring to jars)
- Refrigerator for overnight storage
That’s it! The simplicity is part of what makes this recipe so appealing. No stove, no oven, no special appliances—just mix and chill.
Print
Reese’s Overnight Oats Recipe
Creamy, chocolate-peanut butter overnight oats that taste just like Reese’s candy but are packed with protein, fiber, and wholesome ingredients. This no-cook breakfast is perfect for busy mornings and meal prep!
- Total Time: 4 hours 5 minutes
- Yield: 2 servings 1x
Ingredients
- 1 cup rolled oats (old-fashioned oats)
- 1 cup milk (dairy or non-dairy)
- ½ cup Greek yogurt (plain or vanilla)
- 2 tablespoons unsweetened cocoa powder
- 2 tablespoons creamy peanut butter
- 1-2 tablespoons maple syrup or honey
- 1 tablespoon chia seeds (optional)
- ½ teaspoon vanilla extract
- Pinch of salt
For Topping (Optional but Delicious):
- 1 tablespoon peanut butter (for drizzling)
- 1 tablespoon chocolate chips or cacao nibs
- Sliced banana
- Chopped peanuts or Reese’s Pieces candy
- Extra drizzle of honey or maple syrup
Instructions
Step 1: Combine Dry Ingredients
In a mason jar or bowl, add the rolled oats, cocoa powder, chia seeds (if using), and a pinch of salt. Give it a quick stir to distribute the cocoa powder evenly throughout the oats. This ensures you won’t have clumps of cocoa powder in your finished oats.
Step 2: Add Wet Ingredients
Pour in the milk, Greek yogurt, peanut butter, maple syrup (or honey), and vanilla extract. The peanut butter might sit on top at first—that’s completely normal.
Step 3: Mix Thoroughly
Using a spoon or small whisk, stir everything together vigorously for about 30 seconds. You want to break up the peanut butter completely and ensure the cocoa powder is fully incorporated with no dry pockets of oats remaining. The mixture should be thick but pourable, with a uniform chocolate color throughout.
Step 4: Divide and Store
If you mixed in a bowl, divide the mixture evenly between two mason jars or airtight containers. If you mixed directly in jars, you’re already set! Make sure to leave a little room at the top for toppings later.
Step 5: Refrigerate Overnight
Seal the containers with tight-fitting lids and refrigerate for at least 4 hours, but preferably overnight (8-12 hours). During this time, the oats will absorb the liquid and soften, the chia seeds will create a pudding-like texture, and all the flavors will meld together beautifully.
Step 6: Stir and Serve
When you’re ready to eat, remove the jar from the fridge and give it a good stir. The oats will have thickened considerably. If the mixture is too thick for your liking, add a splash of milk and stir until you reach your desired consistency.
Step 7: Add Toppings
This is where the fun begins! Top your oats with an extra drizzle of peanut butter, a sprinkle of chocolate chips, sliced bananas, chopped peanuts, or even a few Reese’s Pieces for that authentic candy experience. Get creative and make it your own!
Step 8: Enjoy
Eat your overnight oats cold straight from the fridge, or if you prefer them warm, microwave for 45-60 seconds, stirring halfway through. Both ways are absolutely delicious!
Notes
- Consistency Tip: If your overnight oats are too thick in the morning, simply stir in an additional 2-4 tablespoons of milk until you reach your preferred consistency. If they’re too thin, add a tablespoon of oats or let them sit another 30 minutes in the fridge.
- Sweetness Level: Start with 1 tablespoon of sweetener and taste-test in the morning. You can always add more sweetener or honey when serving, but you can’t take it away. Remember that toppings like chocolate chips will add extra sweetness too.
- Peanut Butter Types: Natural peanut butter (just peanuts and salt) is healthiest but can be harder to mix in. If using natural PB, make sure it’s very well-stirred before adding. Regular peanut butter mixes more smoothly but contains added oils and sugar.
- Make It Vegan: Use non-dairy milk, dairy-free yogurt (coconut or almond), and maple syrup instead of honey. The recipe works beautifully with these substitutions!
- Texture Preference: For thicker, pudding-like oats, use less milk (¾ cup instead of 1 cup). For thinner, more pourable oats, use extra milk (1¼ cups).
- Prep Time: 5 minutes
- Cook Time: 0 minutes (no cooking required)
- Category: Breakfast
- Method: No-Cook / Refrigerated
- Cuisine: American
- Diet: Gluten Free
Nutrition
- Serving Size: 1 jar (½ of recipe)
- Calories: 385
- Sugar: 18g
- Sodium: 180mg
- Fat: 14g
- Saturated Fat: 3g
- Unsaturated Fat: 9g
- Trans Fat: 0g
- Carbohydrates: 52g
- Fiber: 9g
- Protein: 16g
- Cholesterol: 8mg
Tips & Variations
Flavor Variations:
- White Chocolate Reese’s: Swap cocoa powder for 2 tablespoons white chocolate chips, melted and cooled slightly before mixing
- Dark Chocolate Version: Use dark cocoa powder and add an extra tablespoon of cocoa for intense chocolate flavor
- Chocolate Almond: Replace peanut butter with almond butter and add ¼ teaspoon almond extract
- Peanut Butter Banana: Skip the cocoa powder and add ½ mashed banana for natural sweetness
- Protein-Packed: Add 1 scoop of chocolate protein powder and reduce cocoa powder to 1 tablespoon
- Mocha Reese’s: Add 1-2 tablespoons of cold brew coffee or 1 teaspoon instant espresso powder
- Coconut Reese’s: Use coconut milk and add 2 tablespoons shredded coconut
Dietary Modifications:
- Keto/Low-Carb: This recipe isn’t naturally keto-friendly due to oats, but you can make a chia seed pudding version using the same flavors with 4 tablespoons chia seeds instead of oats
- Paleo: Replace oats with equal parts shredded coconut and hemp seeds
- Nut-Free: Use sunflower seed butter instead of peanut butter and top with sunflower seeds instead of peanuts
- Higher Protein: Add 1 scoop protein powder, extra Greek yogurt (increase to ¾ cup), or 2 tablespoons hemp hearts
- Lower Sugar: Use unsweetened cocoa, skip the sweetener initially and add stevia drops to taste, choose sugar-free peanut butter
Texture Adjustments:
- Extra Creamy: Increase Greek yogurt to ¾ cup and reduce milk slightly
- Chunkier: Use crunchy peanut butter and add chopped peanuts
- Smoother: Blend all ingredients in a blender before refrigerating for ultra-smooth oats
- Pudding-Like: Double the chia seeds to 2 tablespoons for a thicker, pudding consistency
Pro Chef Tips
Tip #1: Toast Your Oats First
For an incredible depth of flavor, spread your oats on a baking sheet and toast them in a 350°F oven for 8-10 minutes until fragrant and lightly golden. Let them cool completely before making your overnight oats. This adds a subtle nutty flavor that elevates the entire dish.
Tip #2: Bloom Your Cocoa Powder
Professional bakers know this secret: mix your cocoa powder with a tablespoon of hot water to create a paste before adding it to your oats. This “blooming” process releases the full chocolate flavor compounds, making your oats taste richer and more intensely chocolatey without adding more cocoa.
Tip #3: Layer Your Ingredients Strategically
Instead of mixing everything together, try layering in your jar: oats on bottom, then a chocolate-milk mixture, then a peanut butter layer, then more oats and milk. This creates distinct flavor experiences in each bite and makes for stunning presentation—perfect for meal prep containers you’ll see sitting in your fridge.
Tip #4: Warm Your Peanut Butter
Microwave your peanut butter for just 10-15 seconds before adding it to the mixture. Warm peanut butter incorporates much more smoothly and evenly throughout the oats, preventing those stubborn peanut butter clumps that never quite mix in.
Tip #5: Salt Is Your Secret Weapon
Don’t skip the pinch of salt! Even better, use a flaky finishing salt like Maldon on top right before eating. Salt enhances both chocolate and peanut butter flavors dramatically, making everything taste more pronounced and “expensive.” It’s the difference between good overnight oats and absolutely incredible ones.
Tip #6: Use the “Two Jar” Method
For perfect texture every time, mix all your ingredients in one jar, then pour half into a second jar. This ensures both servings have identical ratios of all ingredients, preventing one jar from having all the chia seeds or peanut butter while the other is watery.
Common Mistakes to Avoid
Mistake #1: Using Quick Oats or Steel-Cut Oats
Quick oats turn to mush overnight, creating a gummy, unappetizing texture. Steel-cut oats stay too hard and chewy even after soaking for 12+ hours. Always use old-fashioned rolled oats for perfect texture. If you accidentally used quick oats, reduce the liquid by ¼ cup and refrigerate for only 2-3 hours maximum.
Mistake #2: Not Mixing Thoroughly Enough
Cocoa powder is notorious for clumping and creating dry pockets in overnight oats. Many people do a quick 10-second stir and call it done, but you need to mix vigorously for at least 30 seconds, scraping the bottom and sides of your container. Every bite should be uniformly chocolatey, not alternating between bland oats and cocoa powder clumps.
Mistake #3: Using Too Much Liquid
More liquid doesn’t equal better oats—it creates a soupy, watery mess that’s unpleasant to eat. Stick to the 1:1 ratio of oats to milk (plus the yogurt). If your oats are too thin in the morning, it’s easy to fix by adding a tablespoon of oats and waiting 20 minutes. But if they’re too watery, you can’t take the liquid back out.
Mistake #4: Skipping the Refrigeration Time
Patience is key! Oats need at least 4 hours to properly hydrate and soften, but 8-12 hours (overnight) is ideal. Making them in the morning to eat at lunch won’t give you the right texture—the oats will still be hard and the chia seeds won’t have gelled properly. Plan ahead for the best results.
Mistake #5: Adding Toppings Too Early
If you add banana slices, nuts, or granola the night before, they’ll become soggy and unappetizing by morning. Bananas will brown, granola will lose its crunch, and nuts will get soft. Always store toppings separately and add them right before eating for optimal texture and freshness.
Mistake #6: Not Adjusting for Your Milk Type
Different milks have different consistencies. Coconut milk and oat milk are thicker than almond milk or skim milk. If using a thinner milk, you might need slightly less liquid. If using a thicker milk or coconut yogurt, you might need a splash more. Pay attention the first time you make them and adjust as needed.
Mistake #7: Forgetting to Stir Before Eating
After sitting overnight, the liquid settles to the bottom and the oats form a solid mass on top. Many people forget to stir and get a mouthful of dry oats followed by a spoonful of liquid. Always give your jar a thorough stir before digging in to redistribute everything evenly.
Storage & Meal Prep
Refrigerator Storage:
Overnight oats are a meal prep champion! Store them in airtight containers or mason jars with tight-fitting lids in the refrigerator for up to 5 days. This makes them perfect for Sunday meal prep—make five jars at once and grab one each morning throughout the work week.
The texture actually improves over the first 2-3 days as the flavors continue to meld and the oats soften further. By day 4-5, they’re still perfectly safe and tasty to eat, though the texture becomes softer and the flavors less vibrant.
Best Containers:
Wide-mouth 16-oz mason jars are ideal because you can eat directly from them, and they’re stackable in the fridge. If you don’t have mason jars, any airtight container works—just make sure it seals well to prevent the oats from absorbing refrigerator odors. Glass containers are preferred over plastic because they don’t stain from the cocoa powder.
Meal Prep Tips:
When batch-making, mix all your ingredients in a large bowl, then portion into individual containers. This ensures consistency across all servings. Label each jar with the date you made them so you know which to eat first. Keep toppings in small separate containers or snack bags to add fresh each morning.
Reheating:
While overnight oats are traditionally eaten cold, some people prefer them warm, especially in winter months. To reheat, remove the metal lid (if using a mason jar), transfer to a microwave-safe bowl if needed, and microwave for 45-60 seconds, stirring halfway through. Add a splash of milk before reheating to prevent them from drying out. You can also warm them in a small saucepan over low heat, stirring constantly for 2-3 minutes.
Signs of Spoilage:
Properly stored overnight oats last 5 days, but always use your senses to check. Discard if you notice any off smells (sour or fermented odor), visible mold, or if the liquid has separated significantly with a watery layer on top. When in doubt, throw it out!
Make-Ahead & Freezer Notes
Make-Ahead Instructions:
These overnight oats are the ultimate make-ahead breakfast! You can prepare them up to 5 days in advance, making them perfect for weekly meal prep. Many people dedicate 15 minutes on Sunday evening to prepare five jars for the entire work week.
For the freshest taste and best texture, consume within 3-4 days. While they remain safe to eat for 5 days, the oats continue to soften and the fresh banana (if added as a topping) will brown. The chocolate and peanut butter flavors remain delicious throughout the full 5 days.
Freezer Instructions:
Yes, you can freeze overnight oats, though the texture changes slightly upon thawing! To freeze, prepare the oats as directed but skip any fresh fruit toppings. Pour into freezer-safe containers, leaving ½ inch of headspace for expansion. Seal tightly and freeze for up to 3 months.
To serve, transfer a frozen jar from the freezer to the refrigerator the night before you want to eat it. Let it thaw overnight (8-12 hours). In the morning, give it a good stir—the texture will be slightly more liquid than fresh overnight oats. You can thicken it by stirring in a tablespoon of oats or chia seeds and waiting 10 minutes. If you’re in a hurry, you can microwave frozen oats from solid for 2-3 minutes, stirring every minute, then let cool slightly and add toppings.
Best Reheating Method from Frozen:
For best results, always thaw overnight in the refrigerator rather than using the microwave from frozen. This preserves the creamy texture better. If you must reheat from frozen, use 50% power in the microwave, stirring every 45 seconds until just thawed, then let sit for a few minutes before eating.
Freezer-Friendly Tip:
Label each container with the date frozen and the recipe name. Freeze in single-serving portions for easiest thawing. Don’t freeze oats with yogurt that contains probiotics if you want to maintain the probiotic benefits—freezing kills those beneficial bacteria. Consider adding yogurt fresh after thawing instead.
Serving Suggestions
These Reese’s Overnight Oats are delicious on their own, but here are some fantastic ways to round out your breakfast or make it even more special:
Perfect Pairings:
- Fresh Fruit Plate: Serve alongside sliced strawberries, raspberries, or orange segments for a refreshing contrast to the rich chocolate-peanut butter flavor
- Protein Boost: Pair with a hard-boiled egg or two for extra protein and staying power through your morning
- Green Smoothie: Balance the indulgence with a nutrient-packed green smoothie made with spinach, banana, and almond milk
- Coffee or Latte: A hot cup of coffee or vanilla latte complements the Reese’s flavors beautifully—especially a mocha latte!
- Greek Yogurt Parfait: Serve the overnight oats in a bowl with layers of vanilla Greek yogurt for extra protein and creaminess
Topping Bar Ideas (Perfect for Brunch!):
Set up a DIY overnight oats topping bar for family brunch or meal prep parties:
- Sliced bananas, strawberries, and blueberries
- Chopped peanuts, almonds, and walnuts
- Chocolate chips, cacao nibs, and mini Reese’s cups
- Shredded coconut and hemp hearts
- Extra peanut butter and almond butter for drizzling
- Honey, maple syrup, and agave nectar
- Granola and crushed graham crackers
- Chia seeds and flax meal
For Kids:
Make breakfast fun by adding Reese’s Pieces candies, chocolate animal crackers, or peanut butter cookies crumbled on top. Let kids add their own toppings to encourage excitement about eating a healthy breakfast.
For Post-Workout:
Add an extra scoop of protein powder, a tablespoon of hemp hearts, and sliced banana for the perfect post-workout recovery meal with carbs and protein.
For Dessert:
Yes, overnight oats can be dessert! Top with a dollop of whipped cream, chocolate shavings, and a whole Reese’s Peanut Butter Cup on top. Serve in a pretty glass jar or parfait cup for an elegant presentation.
FAQs
Q: Can I use steel-cut oats instead of rolled oats?
A: Steel-cut oats don’t soften properly with the cold-soak method and will remain hard and chewy even after 24 hours in the fridge. They require cooking on the stovetop. Always use old-fashioned rolled oats for overnight oats. If you only have steel-cut oats, you’ll need to cook them first, let them cool completely, then proceed with the recipe.
Q: Do I have to use chia seeds?
A: No, chia seeds are optional! They add thickness, nutrition (omega-3s, fiber, protein), and help create that pudding-like texture, but your overnight oats will still be delicious without them. If you skip them, your oats will be slightly thinner and less pudding-like, but still creamy and satisfying. You can also substitute flax meal (ground flaxseed) in the same amount for similar nutritional benefits.
Q: Can I eat overnight oats warm instead of cold?
A: Absolutely! While traditionally eaten cold, many people prefer warm oats, especially in colder months. Simply microwave your jar (remove metal lid first) for 45-60 seconds, stirring halfway through. Add a splash of milk before heating to prevent drying out. You can also warm them in a small saucepan over low heat. The chocolate-peanut butter flavors are even more pronounced when warm!
Q: Why are my overnight oats watery/too thick?
A: Oat brands vary in absorption rates, and different milk types have different consistencies. If too watery, add 1-2 tablespoons more oats and refrigerate another 30 minutes. If too thick, stir in milk one tablespoon at a time until you reach desired consistency. Also check that you’re using old-fashioned rolled oats, not quick oats or steel-cut oats. Remember, you can always adjust consistency in the morning!
Q: Can I make these dairy-free/vegan?
A: Yes, easily! Use your favorite non-dairy milk (almond, oat, soy, coconut), dairy-free yogurt (coconut or almond yogurt work great), and maple syrup instead of honey. The recipe works perfectly with these substitutions and tastes just as creamy and delicious. Make sure your peanut butter doesn’t contain any hidden dairy ingredients (most don’t, but always check labels).
Q: How long do overnight oats really need to soak?
A: Minimum 4 hours, but 8-12 hours (overnight) is ideal for the best texture and flavor development. The oats need time to fully hydrate and soften, the chia seeds need to gel, and the flavors need to meld together. In a pinch, 4 hours will work, but the texture won’t be quite as creamy and perfect as true overnight soaking provides.
Q: Can I use instant oats or quick oats?
A: It’s not recommended. Quick oats and instant oats are cut much finer than rolled oats and will become mushy, gummy, and unpleasant after soaking overnight. The texture will be more like baby food than the thick, creamy, chewy consistency you want. If instant oats are all you have, use them but reduce the liquid by ¼ cup and only refrigerate for 2-3 hours maximum, though results still won’t be ideal.
Q: Is it safe to eat raw oats?
A: Yes, absolutely! Rolled oats are steamed and rolled during processing, making them perfectly safe to eat uncooked. This is different from raw oat groats, which are harder to digest. Overnight oats have been a traditional food in Switzerland for over 100 years. The soaking process actually makes them easier to digest and increases nutrient bioavailability.
Conclusion
There you have it—the ultimate Reese’s Overnight Oats recipe that’ll transform your mornings from chaotic to delicious! This no-cook breakfast proves that healthy eating doesn’t mean sacrificing the flavors you love. With just 5 minutes of prep the night before, you’ll wake up to a breakfast that tastes like your favorite candy but fuels your body with wholesome ingredients.
Whether you’re a busy parent trying to get everyone fed before school, a professional who needs a grab-and-go option for hectic workdays, or simply someone who loves the combination of chocolate and peanut butter (and who doesn’t?), these overnight oats are about to become your new breakfast bestie.
The beauty of this recipe is its flexibility—make it exactly as written, or customize it with your favorite toppings and variations. Meal prep a whole week’s worth on Sunday, experiment with different milk types and nut butters, and make it your own. Once you master the basic technique, you’ll find yourself creating all sorts of overnight oats flavors!
So grab those mason jars, stock up on some oats and cocoa powder, and get ready to fall in love with breakfast all over again. Your future self will thank you tomorrow morning when you’re enjoying a creamy, chocolatey, peanut buttery bowl of deliciousness while everyone else is scrambling to find something to eat.
Happy breakfasting, friends! If you make these Reese’s Overnight Oats, I’d love to hear how they turned out. Drop a comment below, rate the recipe, and share your favorite topping combinations. Let’s build a community of overnight oats lovers together! 🥜🍫
Don’t forget to pin this recipe to your Pinterest boards so you can find it easily whenever that chocolate-peanut butter craving hits. Breakfast just got a whole lot sweeter!