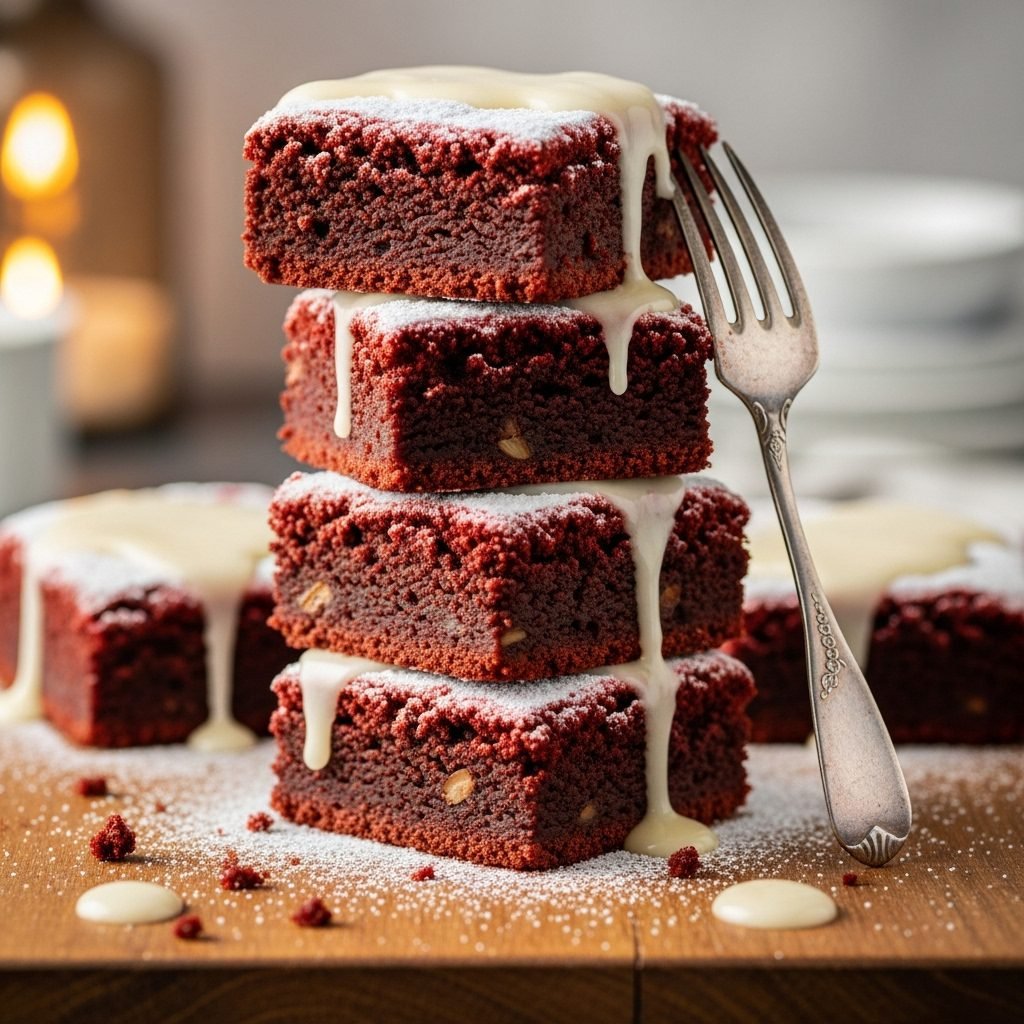
Red Velvet Brownies: The Perfect Fudgy Chocolate Dessert
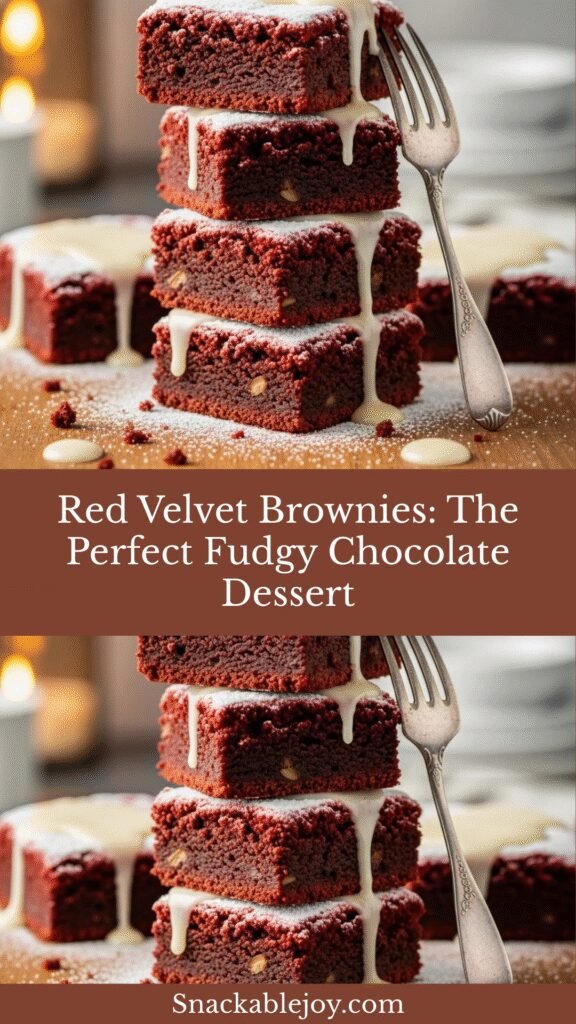
If you love the rich, velvety texture of classic red velvet cake but crave the dense, fudgy goodness of brownies, then red velvet brownies are about to become your new obsession. These stunning treats combine the best of both worlds—delivering that signature cocoa flavor with a gorgeous red hue and a hint of tanginess from buttermilk, all wrapped up in a chewy, brownie-style square.
Red velvet brownies are perfect for any occasion. Serve them at Valentine’s Day parties, Christmas gatherings, birthday celebrations, or just because you’re craving something indulgent on a Tuesday night. They’re show-stopping enough for special occasions yet simple enough for everyday baking. Plus, they’re absolutely irresistible when topped with a swirl of cream cheese frosting!
History / Background
Red velvet desserts have a fascinating history that dates back to the Victorian era. The term “velvet” was originally used to describe cakes with an exceptionally soft, fine crumb—a luxury texture that bakers achieved through specific techniques and ingredients. The red color initially came from a chemical reaction between natural cocoa powder and acidic ingredients like buttermilk and vinegar, which would turn the cocoa a reddish-brown hue.
During the Great Depression, red velvet cake gained popularity when a food coloring company promoted the recipe as a way to showcase their product. The Adams Extract Company distributed recipe cards featuring their red food coloring, and the rest is history. By the 1940s and 1950s, red velvet cake had become a Southern staple, particularly beloved at special occasions and holiday gatherings.
The brownie adaptation is a more modern twist on this classic flavor profile. Home bakers began experimenting with transforming the beloved red velvet cake into denser, more portable brownie form in the early 2000s. This innovation allowed people to enjoy red velvet’s distinctive flavor without the commitment of baking and frosting an entire layer cake. The brownie version maintains that characteristic mild chocolate flavor with hints of vanilla and tang, but delivers it in a rich, fudgy square that’s perfect for sharing—or not!
Why You’ll Love This Recipe
Red velvet brownies are truly the ultimate crowd-pleaser that brings together elegance and comfort in every bite. These gorgeous treats look like they came from a fancy bakery, but they’re surprisingly straightforward to make in your own kitchen.
Here’s why this recipe deserves a spot in your baking rotation:
- Stunning visual appeal – That deep red color makes these brownies absolutely Instagram and Pinterest-worthy
- Fudgy, dense texture – Not cakey, not overly gooey, but perfectly chewy in the middle
- Familiar flavor with a twist – If you love chocolate brownies, you’ll adore this tangy, cocoa-forward variation
- Quick prep time – Mix everything in one bowl and you’re done in under 15 minutes
- Cream cheese frosting optional – Delicious plain or dressed up with frosting
- Perfect for gifting – These brownies travel well and look impressive in a gift box
- Kid-friendly – Children love the fun color and sweet taste
- No special equipment needed – Just basic baking tools you already own
Ingredient Notes
All-Purpose Flour: The foundation of your brownie structure. All-purpose flour gives these brownies their perfect chewy texture without making them too cakey. Make sure to measure correctly by spooning flour into your measuring cup and leveling it off.
Unsweetened Cocoa Powder: This provides the chocolate flavor without overpowering the red velvet taste. Use natural cocoa powder, not Dutch-processed, as the acidity helps with both flavor and color. Hershey’s or any grocery store brand works beautifully.
Granulated Sugar: Sweetens the brownies while also contributing to their fudgy texture. Don’t reduce the amount or your brownies will turn out dry.
Unsalted Butter: Melted butter creates that rich, dense brownie consistency. If you only have salted butter, reduce the added salt in the recipe by half.
Eggs: Bind everything together and add moisture. Room temperature eggs incorporate better into the batter, so take them out of the fridge 30 minutes before baking.
Buttermilk: This is the secret ingredient that gives red velvet its signature tangy flavor. The acidity also reacts with the cocoa for that beautiful color. No buttermilk? Make your own by adding 1 tablespoon of white vinegar to regular milk and letting it sit for 5 minutes.
Red Food Coloring: Creates that iconic red velvet hue. Liquid or gel food coloring both work—gel is more concentrated, so you’ll need less. For a natural option, try beet powder, though the color won’t be quite as vibrant.
Vanilla Extract: Enhances all the other flavors. Use pure vanilla extract, not imitation, for the best taste.
White Vinegar: Works with the buttermilk to activate the cocoa and create tenderness in the brownies.
Salt: Balances the sweetness and enhances the chocolate flavor. Don’t skip it!
Equipment Needed
- 9×13-inch baking pan
- Parchment paper or aluminum foil (for easy removal)
- Large mixing bowl
- Whisk or electric hand mixer
- Rubber spatula
- Measuring cups and spoons
- Medium saucepan (for melting butter)
- Cooling rack
- Toothpick (for testing doneness)
- Knife for cutting (optional: bench scraper for clean cuts)
Print

Red Velvet Brownies
Fudgy red velvet brownies with a rich cocoa flavor, tangy buttermilk notes, and that gorgeous signature red color. Optional cream cheese frosting takes them over the top!
- Total Time: 40 minutes
- Yield: 16 brownies 1x
Ingredients
Scale- 1 cup (2 sticks) unsalted butter, melted
- 2 cups granulated sugar
- 4 large eggs, room temperature
- 1/4 cup buttermilk
- 2 tablespoons liquid red food coloring
- 2 teaspoons vanilla extract
- 1 teaspoon white vinegar
- 1 1/2 cups all-purpose flour
- 1/3 cup unsweetened cocoa powder
- 1/2 teaspoon salt
For Optional Cream Cheese Frosting:
- 8 oz cream cheese, softened
- 1/4 cup unsalted butter, softened
- 3 cups powdered sugar
- 1 teaspoon vanilla extract
- Pinch of salt
Instructions
- Preheat your oven to 350°F (175°C). Line a 9×13-inch baking pan with parchment paper, leaving an overhang on the sides for easy removal. Lightly grease the parchment.
- Melt the butter in a medium saucepan over low heat or in the microwave in 30-second intervals. Let it cool slightly for 5 minutes.
- Mix wet ingredients: In a large bowl, whisk together the melted butter and sugar until well combined. Add eggs one at a time, whisking after each addition until smooth.
- Add liquids: Stir in the buttermilk, red food coloring, vanilla extract, and vinegar. Mix until the color is evenly distributed and the mixture is vibrant red.
- Combine dry ingredients: In a separate bowl, whisk together the flour, cocoa powder, and salt.
- Fold dry into wet: Gently fold the dry ingredients into the wet mixture using a rubber spatula. Mix just until no flour streaks remain—don’t overmix or your brownies will be tough.
- Pour and spread: Transfer the batter to your prepared pan and spread it evenly to the edges using your spatula.
- Bake: Place in the preheated oven and bake for 25-28 minutes, or until a toothpick inserted in the center comes out with a few moist crumbs (not wet batter). The top should look set but still be slightly soft.
- Cool completely: Remove from the oven and let the brownies cool in the pan on a wire rack for at least 1 hour before cutting. This helps them set properly.
- Optional frosting: If using cream cheese frosting, beat the softened cream cheese and butter together until fluffy (about 2 minutes). Add powdered sugar, vanilla, and salt, then beat until smooth. Spread over cooled brownies.
- Cut and serve: Using the parchment overhang, lift the brownies out of the pan. Cut into 16 squares using a sharp knife, wiping the blade between cuts for clean edges.
Notes
- For cleaner cuts, chill the brownies in the refrigerator for 30 minutes before slicing.
- Don’t overbake! Brownies continue cooking as they cool, so slightly underdone is better than overdone.
- The vinegar smell will disappear completely during baking—don’t worry!
- Use gel food coloring if you want a more vibrant red with less liquid.
- Store unfrosted brownies at room temperature; frosted brownies should be refrigerated.
- Prep Time: 15 minutes
- Cook Time: 25 minutes
- Category: Desert
- Method: Baking
- Cuisine: American
- Diet: Vegetarian
Nutrition
- Serving Size: 1 brownie (1/16 of recipe)
- Calories: 285
- Sugar: 34g
- Sodium: 135mg
- Fat: 13g
- Saturated Fat: 8g
- Unsaturated Fat: 4g
- Trans Fat: 0g
- Carbohydrates: 40g
- Fiber: 1g
- Protein: 4g
- Cholesterol: 75mg
Tips & Variations
Make them extra fudgy: Reduce baking time by 2-3 minutes and let them cool completely before cutting. They’ll be gooier in the center.
Swirl in cream cheese: Before baking, drop spoonfuls of cream cheese filling on top of the batter and swirl with a knife for a marbled effect.
Add chocolate chips: Fold in 1 cup of white chocolate chips or dark chocolate chips for extra decadence.
Go mini: Pour batter into a mini muffin tin for brownie bites. Reduce baking time to 12-15 minutes.
Make them gluten-free: Substitute the all-purpose flour with a 1:1 gluten-free baking flour blend.
Reduce sugar: You can reduce the sugar by 1/4 cup if you prefer less sweet desserts, though the texture will be slightly less fudgy.
Natural coloring: Replace red food coloring with 2 tablespoons of beet powder. The color will be more burgundy than bright red.
Peppermint twist: Add 1/2 teaspoon of peppermint extract along with the vanilla for a holiday-inspired version.
Pro Chef Tips
Room temperature ingredients matter: When eggs and buttermilk are at room temperature, they incorporate more smoothly into the batter, creating a more uniform texture without overmixing.
Don’t skip the vinegar: Even though it seems like a tiny amount, the vinegar is crucial for the chemical reaction that enhances both the color and the tender crumb structure.
The toothpick test is everything: You want moist crumbs on your toothpick, not wet batter, but also not completely clean. This is the sweet spot for fudgy brownies.
Line your pan properly: Use parchment paper with a 2-inch overhang on two opposite sides. This creates “handles” that make removing the entire brownie slab effortless.
Let them cool completely: This is the hardest part, but essential! Brownies need time to set. Cutting them warm will result in a crumbly mess. Patience pays off with clean, beautiful squares.
Chill before cutting for perfection: If you want bakery-worthy presentation, refrigerate the brownies for 30 minutes before cutting. Use a large chef’s knife and wipe it clean between each cut.
Measure cocoa correctly: Cocoa powder can clump, so sift it if possible, or at least whisk it well with the flour before adding to the wet ingredients.
Common Mistakes to Avoid
Overmixing the batter: Once you add the flour, mix just until combined. Overmixing develops gluten, which makes brownies tough and cakey instead of fudgy. Use a gentle folding motion.
Overbaking: This is the #1 brownie killer! Red velvet brownies continue to cook from residual heat after you remove them from the oven. Take them out when they still look slightly underdone in the center.
Using cold ingredients: Cold eggs and buttermilk don’t blend well with melted butter, causing the butter to seize up and create lumps. Always bring dairy and eggs to room temperature first.
Skipping the parchment paper: Without a liner, you’ll struggle to get brownies out of the pan cleanly. The parchment creates easy removal and prevents sticking.
Not letting butter cool: If you add eggs to piping hot melted butter, you’ll scramble the eggs. Let the butter cool for 5 minutes after melting.
Cutting too soon: Warm brownies fall apart. Cool completely at room temperature (at least 1 hour) before cutting for clean squares.
Storage & Meal Prep
Room temperature storage: Keep unfrosted brownies in an airtight container at room temperature for up to 4 days. Place parchment paper between layers to prevent sticking.
Refrigerator storage: If you’ve added cream cheese frosting, store brownies in an airtight container in the refrigerator for up to 1 week. Let them sit at room temperature for 15-20 minutes before serving for best texture.
Reheating: For that fresh-baked taste, microwave individual brownies for 10-15 seconds. They’ll become slightly warm and extra fudgy!
Maintaining freshness: To keep brownies moist, add a slice of white bread to your storage container. The brownies will absorb moisture from the bread, staying soft while the bread gets stale instead.
Travel tips: These brownies travel beautifully! Wrap individual brownies in plastic wrap, then place in a container. They won’t dry out and are perfect for lunchboxes, potlucks, or gifts.
Make-Ahead & Freezer Notes
Prepare batter in advance: You can mix the brownie batter up to 24 hours ahead. Store it covered in the refrigerator, then bring to room temperature for 30 minutes before baking. Add 2-3 minutes to the baking time if the batter is still cool.
Bake ahead: Bake brownies up to 2 days in advance. Let them cool completely, then cover tightly with plastic wrap and store at room temperature. Don’t cut them until the day you plan to serve—they stay moister as a whole slab.
Freezer friendly: These brownies freeze exceptionally well! Wrap the entire uncut brownie slab tightly in plastic wrap, then in aluminum foil. Freeze for up to 3 months. Alternatively, cut into squares, wrap individually, and freeze for grab-and-go treats.
Thawing instructions: For the whole slab, thaw overnight in the refrigerator still wrapped, then bring to room temperature before cutting. Individual brownies can thaw at room temperature in about 30 minutes, or microwave for 20-30 seconds from frozen.
Frosting considerations: Freeze brownies unfrosted for best results. Add cream cheese frosting after thawing. If you must freeze frosted brownies, place them uncovered in the freezer for 30 minutes to firm up the frosting, then wrap tightly.
Best reheating method: Thawed brownies are delicious at room temperature, but if you want that warm, gooey experience, microwave for 10-15 seconds or heat in a 300°F oven for 5-7 minutes.
Serving Suggestions
Red velvet brownies are incredibly versatile and can be dressed up or down depending on the occasion. Here are some delicious ways to serve them:
Classic style: Simply dust with powdered sugar for an elegant, minimalist presentation that lets the red color shine through.
With ice cream: Serve warm brownies topped with a scoop of vanilla bean ice cream and a drizzle of chocolate sauce for an irresistible brownie sundae.
Coffee pairing: These brownies are phenomenal with a hot cup of coffee or a creamy latte. The slight tang of the red velvet complements the bitterness of coffee perfectly.
Milk and cookies: Go nostalgic and serve with a tall glass of cold milk—perfect for an afternoon snack.
Dessert charcuterie: Cut into small squares and arrange on a dessert board with fresh strawberries, raspberries, chocolate truffles, and whipped cream for dipping.
Party presentation: Top with cream cheese frosting, then sprinkle with red velvet cake crumbs, white chocolate shavings, or red sprinkles for a festive look.
Holiday spread: Serve alongside other festive desserts like sugar cookies, peppermint bark, and hot chocolate for Christmas gatherings or Valentine’s Day celebrations.
FAQs Section
Q: Can I use natural food coloring instead of artificial dye?
A: Yes! Beet powder is the best natural alternative. Use 2 tablespoons of beet powder mixed into the dry ingredients. The color will be more burgundy or maroon rather than bright red, but the flavor won’t be affected. You can also try freeze-dried strawberry powder.Q: Why are my brownies cakey instead of fudgy?
A: This usually happens from overbaking or overmixing. Make sure to remove brownies when a toothpick comes out with moist crumbs (not clean), and fold the dry ingredients gently into the wet—don’t beat them. Also check your oven temperature with an oven thermometer to ensure accuracy.Q: Can I make these without buttermilk?
A: Absolutely! Make a buttermilk substitute by adding 1 tablespoon of white vinegar or lemon juice to 1/4 cup of regular milk. Let it sit for 5 minutes until it curdles slightly, then use as directed. You can also use plain yogurt thinned with a little milk.Q: Do these taste like chocolate brownies or red velvet cake?
A: They’re a perfect hybrid! Red velvet has a more subtle cocoa flavor than traditional chocolate brownies, with a slight tang from the buttermilk and vinegar. Think of them as chocolate-adjacent with a unique flavor profile all their own.Q: How do I prevent my brownies from sticking to the pan?
A: Line your pan with parchment paper, leaving an overhang on two sides, and lightly grease the parchment. This creates handles for easy removal and prevents any sticking. Don’t skip this step!Q: Can I double this recipe?
A: Yes! Double all ingredients and use two 9×13-inch pans or one large sheet pan (18×13 inches). Baking time may increase by 5-10 minutes for a larger pan. Always do the toothpick test for doneness.Q: My brownies turned out dry. What went wrong?
A: Dry brownies are usually from overbaking, but can also result from measuring flour incorrectly (too much flour). Spoon flour into your measuring cup and level it off—don’t scoop directly from the bag, which packs in more flour. Also, measure carefully and bake until just done.Conclusion
Red velvet brownies are the show-stopping dessert you didn’t know you needed in your life! They combine elegance with comfort, delivering that perfect fudgy texture and tangy flavor in every bite. Whether you’re baking for a special occasion or just treating yourself on a weekday, these gorgeous brownies never disappoint.
The best part? They look like they took hours to make, but you can have them in the oven in just 15 minutes. With simple ingredients you probably already have in your pantry and no special techniques required, there’s no reason not to give them a try this week.
I’d love to see your red velvet brownie creations! Snap a photo and share it on Pinterest—tag me so I can see your beautiful bakes. And if you loved this recipe, please leave a comment below and let me know how yours turned out. Did you add frosting or keep them simple? Serve them warm or chilled? Your feedback helps me create more recipes you’ll love!
Happy baking, friend! Now go preheat that oven and treat yourself to something special. You deserve it! 🍫❤️