Stunning Pitaya Bowl Recipe – Vibrant, Healthy & Ready in 5 Minutes
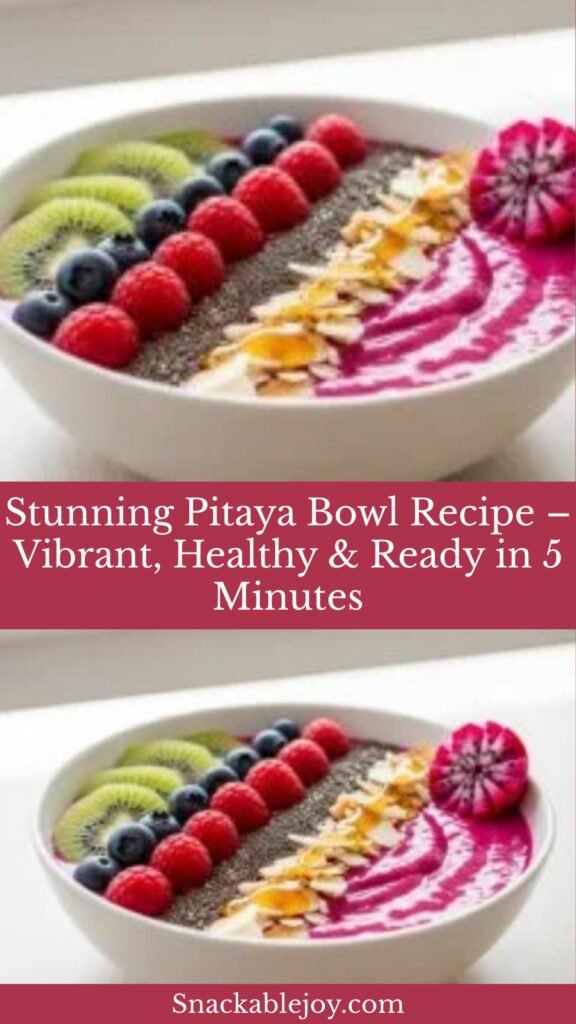
If you’re looking for a breakfast that’s as beautiful as it is nutritious, the pitaya bowl (also known as a dragon fruit bowl) is your answer. These gorgeous pink smoothie bowls have become a social media sensation, and it’s easy to see why. With their stunning magenta color and Instagram-worthy presentation, pitaya bowls are the perfect way to brighten your morning while nourishing your body with vitamins, antioxidants, and natural energy.
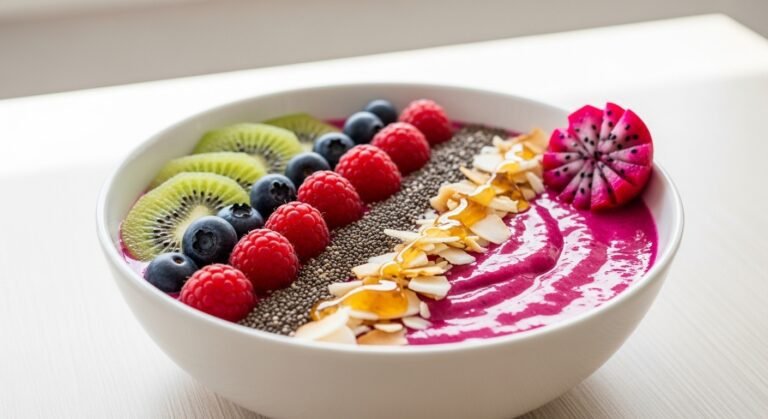
A pitaya bowl is essentially a thick, creamy smoothie made from frozen dragon fruit (pitaya), blended until it reaches a soft-serve ice cream consistency, then artfully topped with fresh fruit, crunchy granola, creamy nut butter, and superfood toppings. The mild, slightly sweet flavor of dragon fruit provides the perfect neutral base that pairs beautifully with virtually any topping combination you can imagine.
These bowls are ideal for busy weekday mornings when you need something quick but substantial, lazy weekend brunches when you want to impress, post-workout recovery meals, or even as a healthier dessert alternative. Best of all, you can create this cafe-quality masterpiece right in your own kitchen for a fraction of what you’d pay at your local smoothie shop. Whether you’re new to smoothie bowls or a longtime enthusiast, this recipe will guide you to pitaya bowl perfection every single time.
History / Background
Dragon fruit, or pitaya, comes from several species of cactus native to Central and South America, particularly Mexico and Central America. The fruit has been cultivated for centuries by indigenous peoples who recognized its nutritional value and drought-resistant growing properties. The name “dragon fruit” comes from its unique appearance—the bright pink or yellow skin with green scale-like leaves resembles something from a mythical creature.
While pitaya originated in the Americas, it became widely cultivated throughout Southeast Asia, particularly in Vietnam, Thailand, and the Philippines, where it’s now commercially grown on a large scale. The fruit comes in several varieties: the most common has bright pink skin with white flesh dotted with tiny black seeds, while the more vibrant variety (often called “red dragon fruit”) has pink skin with deep magenta flesh. It’s this magenta-fleshed variety that creates the stunning pink color in pitaya bowls.
Dragon fruit remained relatively unknown in the United States until the early 2010s when health-conscious consumers and smoothie shops began seeking alternatives to the traditional acai bowl. The fruit’s mild flavor, vibrant color, and impressive nutritional profile made it an instant hit. Pitaya bowls exploded in popularity around 2015-2016, particularly in California, Hawaii, and other health-focused communities.
The rise of Instagram and Pinterest played a huge role in pitaya’s popularity. Food bloggers and health influencers fell in love with the fruit’s photogenic qualities—that brilliant pink color creates stunning contrast with colorful toppings like kiwi, mango, and berries. Today, pitaya bowls are menu staples at smoothie shops and health cafes across America, and frozen pitaya packets are readily available in stores, making this tropical treat accessible to home cooks everywhere.
Why You’ll Love This Recipe
This homemade pitaya bowl recipe brings all the beauty and nutrition of your favorite smoothie shop creation straight to your kitchen, but with complete control over ingredients, sweetness, and toppings. You’ll save money while creating something that looks like it came from an expensive cafe.
Here’s why this recipe will become your new breakfast obsession:
- Incredibly quick – Ready in just 5 minutes from start to finish
- Stunning visual appeal – That gorgeous pink color makes every morning feel special
- Naturally nutritious – Packed with vitamin C, antioxidants, fiber, and beneficial plant compounds
- Budget-friendly – Costs less than half what you’d pay at a smoothie shop
- Mild, pleasant flavor – Not overpowering, making it perfect for picky eaters and kids
- Endless customization – Mix and match toppings to create new combinations every day
- No cooking required – Perfect for hot summer mornings or when you’re short on time
- Naturally vegan and dairy-free – Suitable for various dietary preferences and restrictions
- Energy-boosting – Provides sustained energy without sugar crashes or caffeine jitters
- Kid-approved – The fun pink color and sweet toppings make healthy eating exciting for children
- Meal prep friendly – Prep smoothie packs in advance for even faster morning prep
- Instagram-worthy – Always impressive and perfect for sharing on social media
- Lower in calories than acai – Great option if you’re watching calorie intake while still wanting a filling breakfast
Ingredient Notes
Creating the perfect pitaya bowl starts with understanding what goes into it. Here’s everything you need to know about your ingredients:
Frozen Pitaya (Dragon Fruit): This is your star ingredient and what gives the bowl its signature vibrant pink color. Pitaya comes in frozen packets (typically 100g each) found in the freezer section of health food stores, Whole Foods, Trader Joe’s, Costco, or online. Look for the pink/red flesh variety rather than white flesh for the most stunning color. Unlike acai, pitaya has a much milder, subtly sweet flavor that’s less intense and more universally appealing. If you can’t find frozen packets, some stores sell frozen dragon fruit chunks in bags.
Frozen Banana: Absolutely essential for achieving that thick, spoonable consistency that makes smoothie bowls special. The banana provides natural sweetness and creates a creamy, ice-cream-like texture. Always use frozen banana (not fresh) or your bowl will be too thin and runny. Very ripe bananas work best as they’re sweeter and blend more smoothly. Slice and freeze your bananas in advance so they’re always ready to go.
Frozen Fruit: Adding extra frozen fruit helps achieve the right consistency while boosting flavor and nutrition. Frozen strawberries, mango chunks, or pineapple work beautifully with dragon fruit. You can also use mixed berries, though these will slightly alter the pink color (blueberries will make it more purple). Stick with frozen rather than fresh to maintain that thick texture.
Liquid Base: You need just a small amount of liquid to help the blender blades move, but not so much that your bowl becomes a smoothie. Good options include coconut water (adds natural sweetness and electrolytes), coconut milk (extra creamy), almond milk, oat milk, regular milk, or even pineapple juice. The key is using as little as possible—start with just 2-3 tablespoons.
Natural Sweetener (Optional): Dragon fruit is naturally mild and slightly sweet, so depending on your preferences and the ripeness of your banana, you might want to add honey, agave nectar, or maple syrup. Always taste before adding sweetener, as you might not need any at all.
Toppings: This is where your creativity shines. Classic toppings include granola (adds crunch), fresh fruit (banana slices, berries, kiwi, mango), coconut flakes, chia seeds, hemp hearts, nut butter drizzles, honey, fresh mint, edible flowers, cacao nibs, and sliced almonds. The toppings add texture, visual appeal, and extra nutrition to your bowl.
Equipment Needed
You don’t need a professional kitchen to make amazing pitaya bowls. Here’s what you’ll need:
- High-powered blender – A strong blender like a Vitamix, Blendtec, Ninja, or NutriBullet is crucial for breaking down frozen fruit and achieving that smooth, thick texture. Regular blenders may struggle with frozen ingredients.
- Tamper or flexible spatula – Essential for pushing ingredients toward the blades when blending thick frozen mixtures without adding excess liquid
- Serving bowl – Choose a wide, shallow bowl rather than a deep one. This provides more surface area for arranging your beautiful toppings
- Butter knife or offset spatula – For smoothing the pitaya base before decorating with toppings
- Measuring cups and spoons – For accurate portioning of both base ingredients and toppings
- Sharp knife and cutting board – For slicing fresh fruit toppings into attractive pieces
- Small spoon or piping bag (optional) – For drizzling nut butter in decorative patterns
Print

Pitaya Bowl Recipe
This vibrant pitaya bowl features a thick, creamy dragon fruit base topped with fresh fruit, crunchy granola, and your favorite superfoods. It’s a delicious, energizing breakfast that looks like a work of art and tastes absolutely incredible.
- Total Time: 5 minutes
- Yield: 1 serving (easily doubled or tripled) 1x
Ingredients
ScaleFor the Pitaya Base:
- 1 packet (100g) frozen pitaya (pink dragon fruit), broken into chunks
- 1 frozen banana, sliced
- ½ cup frozen fruit (strawberries, mango, or pineapple)
- 3-4 tablespoons liquid (coconut water, coconut milk, or almond milk)
- ½ teaspoon honey or agave (optional, for extra sweetness)
For the Toppings:
- ¼ cup granola
- ½ fresh banana, sliced
- ¼ cup fresh strawberries, sliced
- ¼ cup fresh kiwi, sliced
- 3 fresh blueberries
- 2 tablespoons coconut flakes
- 1 tablespoon almond butter or peanut butter
- 1 tablespoon chia seeds
- 1 teaspoon honey for drizzling
- Optional: hemp hearts, sliced mango, passion fruit pulp, edible flowers, fresh mint
Instructions
- Prepare your frozen ingredients: Remove the pitaya packet from the freezer and let it sit at room temperature for about 2-3 minutes to soften slightly. This makes it easier to break apart and helps your blender process it more efficiently. Make sure your banana is pre-sliced and completely frozen solid.
- Break up the pitaya packet: Run the frozen pitaya packet under warm water for 20-30 seconds, then break it into 3-4 smaller chunks. This prevents your blender from working too hard and helps ensure even blending. Don’t let it thaw completely—just soften it enough to break apart.
- Layer ingredients in blender: Start with your liquid at the bottom of the blender (this helps the blades move more freely), followed by the pitaya chunks, frozen banana slices, and your choice of frozen fruit. If using sweetener, add it now. The order matters for optimal blending.
- Begin blending slowly: Start your blender on the lowest setting to break down the frozen chunks. Use your tamper to push ingredients down toward the blades, or stop frequently to scrape down the sides with a spatula. Be patient—this is a very thick mixture and needs time to get going.
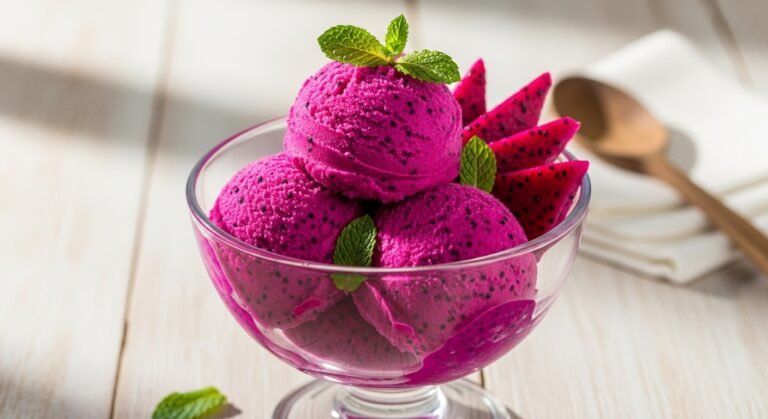
- Increase speed gradually: Once the mixture starts moving and breaking down, slowly increase the speed to medium-high. Blend until completely smooth and thick, with a consistency like soft-serve ice cream or frozen yogurt. This typically takes 1-2 minutes total blending time.
- Check consistency: The mixture should be thick enough that a spoon stands upright in it. If it’s too thick to blend and your blender is struggling, add liquid one tablespoon at a time. If it’s too thin and pourable, add more frozen banana or fruit and blend again briefly.
- Transfer to serving bowl: Immediately scoop the thick pitaya mixture into your serving bowl using a spatula. Work quickly so it doesn’t start to melt. Use the back of a spoon or an offset spatula to smooth the top surface, creating a nice flat canvas for your toppings.
- Arrange toppings artfully: Now for the fun part! Arrange your toppings in neat rows, sections, or a circular pattern. Start with granola along one edge, then create rows or sections with different fruits and toppings. Add coconut flakes, chia seeds, and finish with drizzles of nut butter and honey for that professional look.
- Serve immediately: Pitaya bowls are best enjoyed right away while still thick and frozen. Grab your spoon and enjoy this beautiful, nutritious creation!
Notes
- Consistency matters most: Your pitaya base should be very thick and spoonable, not drinkable. Use minimal liquid.
- Color variations: The final color depends on your pitaya brand and added fruits. Strawberries enhance the pink, while mango keeps it bright.
- Topping placement: Don’t add too many toppings or they’ll sink into the base. A light, artful layer looks best and tastes better.
- Blend carefully: Stop blending as soon as everything is smooth. Over-blending generates heat and can thin out your bowl.
- Fresh vs. frozen pitaya: If using fresh dragon fruit, you’ll need to freeze the flesh first, then blend it frozen for proper consistency.
- Banana substitute: If allergic to bananas, use frozen avocado or frozen cauliflower (sounds weird but works!) for thickness.
- Prep Time: 5 minutes
- Cook Time: 0 minutes
- Category: Breakfast / Brunch
- Method: Blending
- Cuisine: Tropical / American
- Diet: Gluten Free
Nutrition
- Serving Size: 1 bowl (with suggested toppings)
- Calories: 385
- Sugar: 35g
- Sodium: 70mg
- Fat: 14g
- Saturated Fat: 4g
- Unsaturated Fat: 8g
- Trans Fat: 0g
- Carbohydrates: 64g
- Fiber: 11g
- Protein: 7g
- Cholesterol: 0mg
Tips & Variations
Flavor Variations:
- Tropical Paradise Bowl: Use coconut milk as your base liquid, add frozen mango and pineapple, top with fresh mango, kiwi, coconut flakes, and macadamia nuts
- Berry Blast Bowl: Add mixed frozen berries to the base and top with fresh strawberries, blueberries, raspberries, and goji berries
- Green Dragon Bowl: Add a handful of spinach or kale to the base (you won’t taste it!) and top with kiwi, green grapes, and pumpkin seeds for a nutrient powerhouse
- Chocolate Dragon Bowl: Add 1 tablespoon cacao powder to the base and top with cacao nibs, dark chocolate chips, and banana
- Peanut Butter Dragon Bowl: Blend 1 tablespoon peanut butter into the base and top generously with banana slices, granola, and a heavy peanut butter drizzle
Dietary Modifications:
- Lower Sugar: Skip added sweetener, use unsweetened coconut milk, and choose low-sugar granola
- Higher Protein: Add a scoop of vanilla or unflavored protein powder to the base and top with Greek yogurt, nuts, and seeds
- Keto-Friendly: Replace banana with frozen avocado, use unsweetened coconut milk, skip granola, and top with nuts, seeds, and unsweetened coconut
- Nut-Free: Use sunflower seed butter instead of almond butter and avoid nut-based toppings
- Paleo-Friendly: Use honey as sweetener, choose paleo-approved granola, and avoid dairy-based toppings
Creative Topping Combinations:
- Hawaiian Style: Pineapple, mango, coconut flakes, macadamia nuts, lime zest
- Berry Decadent: All berries, dark chocolate chips, almond slices, honey drizzle
- Superfood Power: Goji berries, hemp hearts, chia seeds, spirulina, bee pollen
- Kid-Friendly Fun: Banana, strawberries, mini chocolate chips, teddy bear-shaped graham crackers, honey
Pro Chef Tips
The Frozen Banana Secret: For the absolute best texture, your banana must be frozen completely solid for at least 24 hours. A partially frozen or room-temperature banana will create a thin, disappointing bowl. Pro tip: buy bananas when they’re on sale, let them ripen with brown spots, peel and slice them, then freeze in portions. The riper the banana, the sweeter your bowl.
Master the Liquid Ratio: The single most important factor in pitaya bowl success is using minimal liquid. Start with just 2 tablespoons and add more only if your blender absolutely refuses to blend. Professional smoothie shop employees know this secret—thickness is everything. You can always thin it out, but you can’t thicken it once you’ve added too much liquid.
The Tamper Technique: If your blender came with a tamper, use it constantly while blending. Push down in a circular motion to move frozen chunks toward the blades without stopping the blender. This keeps the mixture moving without needing extra liquid. If you don’t have a tamper, invest in one—it’s a game-changer for smoothie bowls.
Temperature Management: Work quickly once your pitaya base is blended. The mixture will start melting immediately at room temperature. If you need a few minutes to prepare toppings, stick the bowl with the base in the freezer while you work. This keeps it perfectly thick for topping and photographing.
Topping Architecture: Professional bowl makers follow a specific order. First, smooth your base completely flat. Add heavier items like granola first so they sit on top rather than sinking. Add lighter items like berries and coconut next. Finish with drizzles and small seeds last. This layering creates the most photogenic presentation.
Color Preservation: If you want the brightest, most vibrant pink color, avoid adding dark berries like blueberries to the base. Stick with strawberries, mango, or pineapple. For an even more intense pink, add a tiny pinch of beet powder (truly just a pinch—too much will affect the flavor).
Perfect Drizzles: For those beautiful nut butter drizzles you see in photos, slightly warm your nut butter for 5-10 seconds in the microwave so it’s more fluid. Transfer to a small squeeze bottle or plastic bag with a tiny corner cut off. Drizzle in quick, confident strokes—don’t overthink it!
Common Mistakes to Avoid
Adding Too Much Liquid: This is by far the most common error. Many beginners panic when the blender struggles and pour in too much liquid, ending up with a drinkable smoothie instead of a thick bowl. Be patient and trust the process. Use your tamper, stop and scrape frequently if needed, and add liquid only as a last resort—one tablespoon at a time.
Using Fresh Instead of Frozen Fruit: All your fruit components must be frozen solid. Fresh or thawed fruit contains too much water and will create a thin, watery consistency. This applies to the banana, pitaya, and any additional fruit. No exceptions. Even partially thawed fruit will compromise your bowl’s texture.
Over-Blending the Mixture: Once your mixture is smooth, stop immediately. Continuing to blend generates friction heat that melts your frozen ingredients, thinning out your beautiful thick bowl. Blend just until smooth and combined—no longer. It should take 1-2 minutes maximum.
Overloading with Toppings: While it’s tempting to pile on every topping imaginable, too many toppings will sink into your base and create a soggy mess. Additionally, they can overwhelm the mild pitaya flavor. Stick to 4-6 different toppings, applied in a light, artful layer. Less is often more for both taste and presentation.
Not Preparing Ingredients in Advance: If you wait until morning to peel and slice bananas, or if you haven’t broken up your pitaya packet, you’re adding unnecessary time and frustration. Prep your frozen ingredients the night before or create full smoothie packs so you can literally dump and blend in the morning when you’re half asleep.
Storage & Meal Prep
Immediate Consumption: Pitaya bowls are absolutely best when consumed immediately after preparation. The frozen base begins melting within 10-15 minutes at room temperature, gradually becoming more like a smoothie. If you need to delay eating (for photos or other reasons), place the prepared bowl in the freezer for up to 30 minutes to keep it firm.
Storing Leftover Base: If you accidentally make too much pitaya base, you can store it in an airtight container in the freezer for up to one week. When you’re ready to eat it, let it thaw at room temperature for 5-10 minutes until slightly softened, then re-blend briefly with a tiny splash of liquid to restore the creamy texture.
Meal Prep Strategy: The most efficient way to meal prep pitaya bowls is by creating individual smoothie packs. In freezer-safe bags, combine: 1 broken-up pitaya packet, 1 sliced frozen banana, and ½ cup frozen fruit of choice. Remove air, seal, label with the date, and freeze flat for easy storage. When ready to make your bowl, empty one pack into the blender, add 3-4 tablespoons liquid, blend, and enjoy. These packs last 3 months in the freezer.
Prepping Toppings: Store different toppings separately in airtight containers. Keep granola at room temperature in a sealed container (stays fresh 1-2 weeks). Wash and prep fresh fruit the night before, storing in the refrigerator in containers. Portion out nuts, seeds, and coconut into small containers for grab-and-go convenience.
Leftover Management: Unlike savory meals, you cannot successfully reheat or revive a melted pitaya bowl. If your bowl melts before you finish it, pour it into a glass and drink it as a smoothie, or refreeze it in popsicle molds for a healthy frozen treat later.
Make-Ahead & Freezer Notes
Smoothie Pack Assembly: Dedicate 20-30 minutes on meal prep day to assembling your smoothie packs for the week. Break up pitaya packets into chunks, slice your bananas into coins, measure out frozen fruit portions, and combine everything into individual freezer bags. Squeeze out excess air, label with the date, and freeze flat (they stack beautifully this way). You’ll have 5-7 ready-to-blend packs waiting for you.
Proper Banana Freezing: Always peel bananas before freezing—frozen peels are nearly impossible to remove. Slice into 1-inch coins and freeze on a parchment-lined baking sheet for 1-2 hours until solid. This prevents them from sticking together in one giant clump. Transfer to a freezer bag or container. Properly frozen bananas last 3-6 months.
Pitaya Packet Storage: Frozen pitaya packets have a long shelf life. Once you open the outer box, the individual packets will keep in your freezer for 6-12 months. They don’t need any special storage beyond staying frozen. Some brands offer bulk bags of pitaya chunks, which are equally good and often more economical.
Batch-Blended Base: Some people prefer to blend a large batch of pitaya base (triple or quadruple the recipe), then portion it into individual containers and freeze. While this saves time on busy mornings, the texture after refreezing is never quite as good as freshly blended. If you choose this method, thaw containers 10-15 minutes before serving and re-blend briefly.
Topping Prep: You can pre-portion toppings into small containers or bags for the week. However, avoid cutting fresh fruit more than 24 hours in advance, as it can brown and lose quality. Berries can be washed and stored in the fridge for 2-3 days. Bananas should be sliced fresh each morning to prevent browning.
What Not to Freeze: Never freeze a finished, topped pitaya bowl. The granola will become soggy, fresh fruit will become mushy, and the presentation will be ruined. Always add fresh toppings just before serving, even if you’re using a pre-made frozen base.
Serving Suggestions
A pitaya bowl is satisfying enough to stand alone for breakfast, but you can create a complete morning spread with complementary items.
Beverage Pairings:
- Fresh coconut water – Hydrating and naturally complements the tropical flavors
- Green juice or green smoothie – Adds vegetables to balance the fruit-heavy bowl
- Iced matcha latte – The earthy matcha beautifully complements pitaya’s mild sweetness
- Fresh-squeezed orange juice – Classic breakfast pairing with extra vitamin C
- Herbal tea – Try hibiscus, passion fruit, or tropical fruit blends served over ice
- Cold brew coffee – For those who need caffeine with their breakfast
Complete Breakfast Additions:
- Protein boost – Add a hard-boiled egg, Greek yogurt parfait, or protein shake if the bowl alone doesn’t satisfy you
- Avocado toast – The savory, creamy toast provides nice contrast to the sweet bowl
- Overnight oats – For extra-hungry mornings or very active days
- Veggie egg muffins – Make ahead for a protein-rich, savory side
Brunch Party Ideas: Create a pitaya bowl bar for gatherings. Prepare multiple bowls of the pitaya base, then set out 8-10 different topping options in attractive bowls. Provide small serving spoons and let guests build their own custom creations. This works wonderfully for:
- Baby showers and bridal showers
- Birthday brunch parties
- Mother’s Day or Valentine’s Day breakfast
- Healthy potluck contributions
- Kids’ birthday parties (they love customizing!)
Kid-Friendly Presentation: Make pitaya bowls fun for children by using smaller bowls, letting them choose toppings, and helping them create designs or faces with the fruit. Use cookie cutters to cut fruit into fun shapes. The bright pink color naturally appeals to kids.
Post-Workout Fuel: After morning exercise, pair your pitaya bowl with a protein shake or add a scoop of protein powder directly to the base. The natural carbohydrates help replenish energy stores while protein supports muscle recovery. Add extra toppings like nuts and nut butter for healthy fats.
FAQs Section
What’s the difference between pitaya and acai bowls?
Both are smoothie bowls with similar consistency and topping styles, but they come from different fruits with distinct characteristics. Pitaya (dragon fruit) has a milder, slightly sweet flavor and vibrant pink color, while acai has a deeper, berry-like flavor with earthy notes and a purple color. Nutritionally, both are excellent, though acai has slightly more antioxidants while pitaya has more vitamin C. Pitaya is also generally lower in calories. Many people find pitaya’s mild flavor more universally appealing, especially for kids or picky eaters. Both are equally Instagram-worthy!
Where can I buy frozen pitaya?
Frozen pitaya is widely available these days. Check the freezer section of Whole Foods, Trader Joe’s, Target, Costco, Sprouts, and most health food stores. Look near the frozen fruit or in the specialty/health food freezer section. Many regular grocery stores now carry it too. If you can’t find it locally, you can order it online from Amazon, Thrive Market, or directly from brands like Pitaya Plus or Pure Traditions. A box typically contains 4 packets and costs $5-10, making each bowl about $1.50-2.50 for just the pitaya—much cheaper than the $10-15 you’d pay at a cafe.
Can I use fresh dragon fruit instead of frozen packets?
Yes, but with important modifications. Fresh dragon fruit contains a lot of water and won’t give you the thick consistency on its own. To use fresh dragon fruit: scoop out the flesh, freeze it solid (at least 4 hours or overnight), then blend it frozen with your other frozen ingredients. You’ll need about ¾ to 1 cup of frozen dragon fruit flesh to replace one packet. Fresh dragon fruit is more expensive per serving than frozen packets, but it’s a good option if you can’t find packets or want to experiment with homegrown or locally sourced fruit.
Why is my pitaya bowl too runny or thin?
A runny bowl typically results from too much liquid, fruit that wasn’t completely frozen, or over-blending. To fix it next time: use only 2-3 tablespoons of liquid (less is more!), ensure ALL fruit is frozen rock-solid, and stop blending the moment everything is smooth. If your bowl is already too thin, you can add more frozen banana or frozen fruit and re-blend briefly. If it’s way too thin, pour it into a glass and enjoy as a smoothie, or freeze in popsicle molds.
Is a pitaya bowl healthy?
Pitaya bowls can be incredibly nutritious when made thoughtfully at home. Dragon fruit is rich in vitamin C, antioxidants, fiber, and beneficial plant compounds while being relatively low in calories. However, the healthiness depends on your choices—store-bought versions often contain added sugars and oversized portions. Homemade bowls let you control sweetness, use quality ingredients, and choose nutritious toppings. Watch your portions with granola (can add up quickly in calories), go easy on honey drizzles, and load up on fresh fruit, nuts, and seeds for the healthiest bowl.
Can I make pitaya bowls without a high-powered blender?
It’s challenging but possible with a regular blender if you’re strategic. Let your frozen ingredients soften at room temperature for 5-10 minutes before blending. Break the pitaya into very small pieces. Add slightly more liquid than the recipe calls for (though still keep it minimal). Blend in short pulses, stopping frequently to scrape down sides and stir. It will take longer and require patience. A food processor can sometimes work better than a weak blender for frozen ingredients. For best results long-term, consider investing in a refurbished high-powered blender—it makes a huge difference.
How far in advance can I prepare pitaya bowls?
The finished bowl with toppings cannot be made in advance—it must be prepared and eaten immediately for best texture and appearance. However, you can absolutely prep the components ahead. Create smoothie packs with all frozen ingredients (pitaya, banana, fruit) and store in the freezer for up to 3 months. Prep your toppings the night before, storing separately. In the morning, the actual assembly takes just 5 minutes. Some people make large batches of just the pitaya base and freeze in portions, though freshly blended always has superior texture.
Conclusion
Congratulations—you now have everything you need to create gorgeous, cafe-worthy pitaya bowls in your own kitchen! Once you master the technique of achieving that perfect thick, creamy consistency, you’ll find yourself experimenting with different flavor combinations, seasonal toppings, and creative presentations. The beauty of pitaya bowls is their incredible versatility paired with stunning visual appeal, making healthy eating feel like a treat rather than a chore.
Making pitaya bowls at home empowers you to control exactly what goes into your breakfast while saving a significant amount of money. You can adjust sweetness levels, choose organic ingredients, and customize every element to match your dietary needs and taste preferences. Whether you’re rushing through a hectic weekday morning or leisurely enjoying a weekend brunch, this recipe adapts to your lifestyle.
So stock up on those frozen pitaya packets, prep some smoothie packs, and get ready to brighten your mornings with the most beautiful, delicious breakfast imaginable. Don’t forget to snap a photo before diving in—that gorgeous pink color deserves to be shared! Save this recipe to your favorite Pinterest board so you can reference it again and again as you perfect your pitaya bowl technique.
Here’s to colorful, nutritious mornings and breakfasts that make you smile. Happy blending!