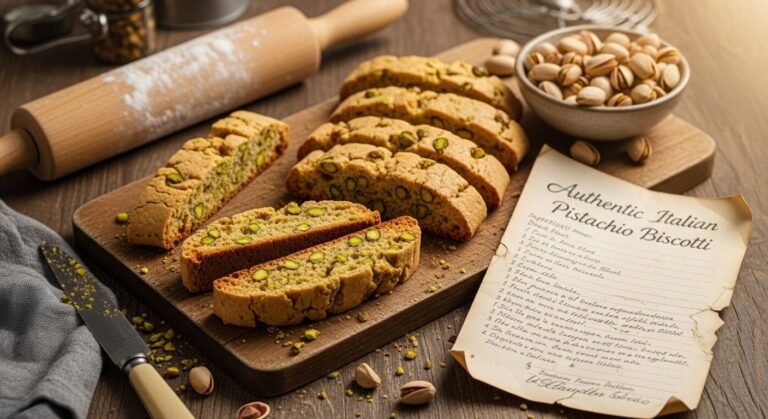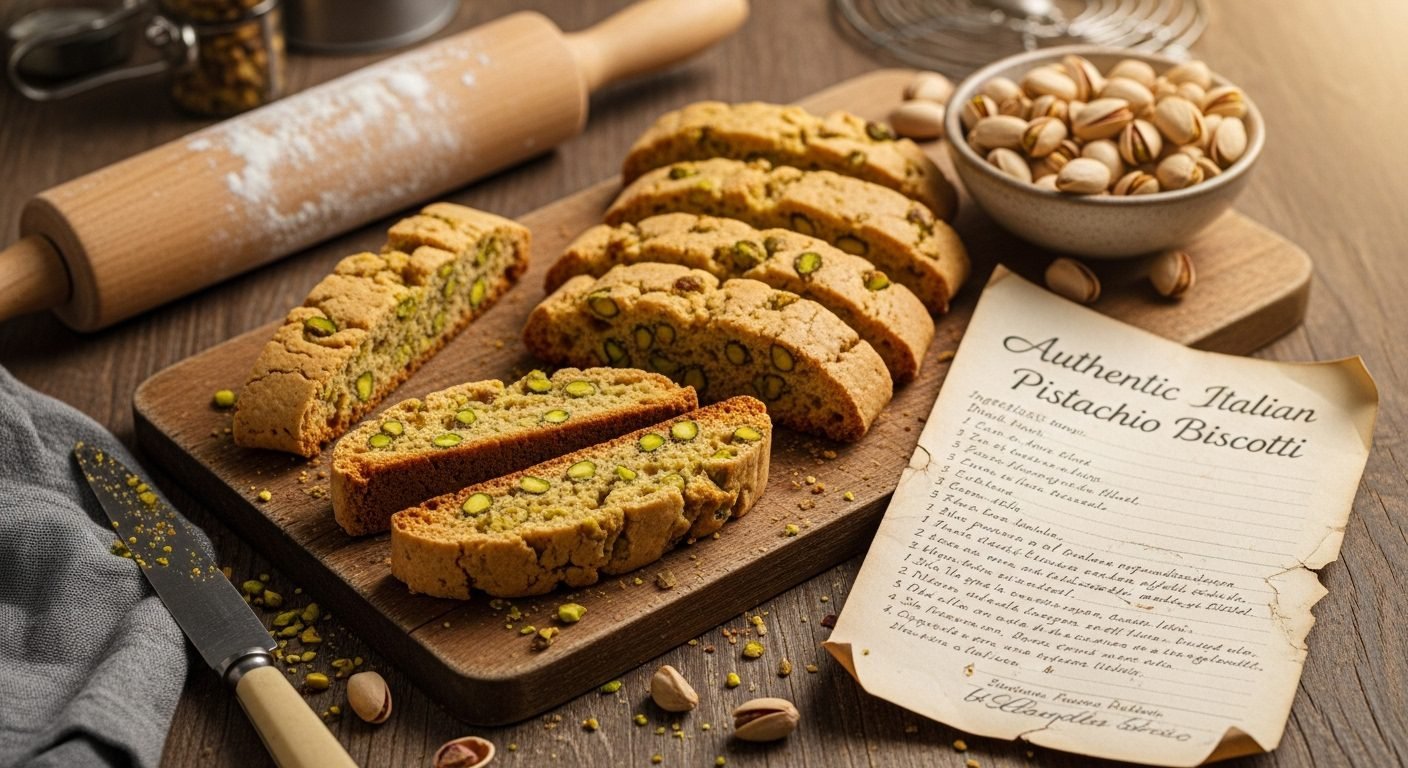
Authentic Italian Pistachio Biscotti Recipe (Perfectly Crunchy!)

Welcome to the wonderful world of homemade Pistachio Biscotti! These twice-baked Italian cookies are the perfect combination of crunchy texture, nutty richness, and subtle sweetness. If you’ve ever enjoyed dunking a crispy cookie into your morning coffee or afternoon tea, you already know the magic of biscotti. What makes this pistachio version so special is the gorgeous green color from the pistachios and their distinctive, slightly sweet flavor that pairs beautifully with the toasted, golden exterior.
Biscotti are incredibly versatile cookies that work for any occasion. Serve them at breakfast with your espresso, offer them as an elegant dessert alongside gelato, package them as thoughtful homemade gifts during the holidays, or simply keep a batch in your pantry for whenever you need something sweet with your coffee. They’re also wonderful for entertaining because they can be made days in advance and actually improve in flavor as they sit. Whether you’re hosting an Italian-themed dinner party, planning a coffee bar at a brunch, or looking for a sophisticated cookie that stands out from the usual chocolate chip, these Pistachio Biscotti deliver on every level.
History / Background
Biscotti, which means “twice-cooked” or “twice-baked” in Italian, have a rich history dating back to ancient Rome. Roman soldiers carried these dry, crunchy cookies on long military campaigns because their low moisture content made them shelf-stable for months. The twice-baking process removed moisture, creating a cookie that wouldn’t spoil during extended travel—a crucial feature before modern food preservation.
The modern biscotti we know and love originated in the Tuscan city of Prato during the Renaissance period, around the 14th century. These original “biscotti di Prato” or “cantucci” were made with almonds and became famous throughout Italy. Bakers discovered that the twice-baking method not only preserved the cookies but also created that distinctively satisfying crunch that made them perfect for dunking in Vin Santo, a traditional Tuscan dessert wine.
Pistachio biscotti, while a newer variation than the traditional almond version, has become increasingly popular over the past century, particularly in Sicily where pistachios grow abundantly. Sicilian pistachios from Bronte are considered among the finest in the world, with an intense flavor and vibrant green color. Italian immigrants brought biscotti recipes to America in the late 19th and early 20th centuries, and by the 1990s, biscotti became a coffeehouse staple across the United States, with pistachio emerging as one of the most beloved flavors alongside the classic almond.
Today, pistachio biscotti represent a perfect marriage of tradition and innovation—maintaining the time-honored twice-baking technique while celebrating the distinctive flavor of one of Italy’s most treasured nuts.
Why You’ll Love This Recipe
These Pistachio Biscotti are about to become your new favorite baking project! They combine impressive presentation with surprisingly simple preparation, making them perfect for bakers of all skill levels.
Here’s why this recipe deserves a permanent place in your recipe collection:
- Authentic Italian Flavor – True Italian-style biscotti with the perfect balance of sweetness and nuttiness
- Impressive Yet Easy – They look and taste like they came from an Italian bakery, but they’re actually simple to make
- Perfect Coffee Companion – Designed specifically for dunking without falling apart or getting soggy
- Long Shelf Life – These cookies stay fresh for weeks, making them ideal for gift-giving or keeping on hand
- Beautiful Presentation – The visible pistachio pieces create a stunning appearance that photographs beautifully
- Customizable – Easy to adapt with different nuts, dried fruits, or flavorings
- Healthier Cookie Option – Typically lower in fat and sugar than soft cookies, with the added benefit of protein-rich pistachios
- Budget-Friendly – One batch makes 24-30 biscotti, giving you excellent value
- No Special Equipment – Made with basic baking tools you already own
- Freezer-Friendly – Both baked biscotti and the dough freeze beautifully for future enjoyment
- Allergy-Friendly Adaptable – Can be modified for various dietary needs with simple substitutions
- Great for Gifting – Package them in cellophane bags or decorative tins for impressive homemade presents
Ingredient Notes
Understanding your ingredients helps you achieve the best results! Here’s what goes into these delightful biscotti and why each component matters:
All-Purpose Flour – Provides the structure for crispy, sturdy biscotti. You can substitute with a 1:1 gluten-free flour blend if needed, though add 1/2 teaspoon xanthan gum if your blend doesn’t include it.
Shelled Pistachios – The star ingredient! Use raw, unsalted pistachios for best results. Roasted pistachios work too, but raw nuts allow you to control the toasting. Look for vibrant green pistachios from California or Sicily for maximum color and flavor.
Granulated Sugar – Sweetens the dough without overpowering the pistachio flavor. You can reduce by 1/4 cup if you prefer less sweet biscotti.
Eggs – Bind the ingredients and provide structure. Room temperature eggs incorporate more easily into the dough. These make the biscotti sturdy enough for dunking.
Butter – Use unsalted butter at room temperature for even distribution. Some traditional recipes use olive oil instead, which creates a slightly different but equally delicious texture.
Vanilla Extract – Adds warmth and depth. Pure vanilla extract is preferred over imitation for authentic flavor.
Almond Extract – Just 1/2 teaspoon adds complexity and enhances the nutty flavor profile. This is optional but highly recommended. Don’t skip it unless you have nut allergies.
Baking Powder – Provides gentle lift during the first bake. Biscotti aren’t meant to be fluffy, so we use a moderate amount.
Salt – Enhances all the flavors and balances the sweetness. Even a small amount makes a big difference.
Optional: Orange Zest – One tablespoon of fresh orange zest adds a beautiful citrus note that complements pistachios perfectly. This is traditional in many Italian biscotti recipes.
Optional: Anise Seeds – 1-2 teaspoons of anise seeds add that classic Italian biscotti flavor. This is authentic but divisive—use only if you enjoy the licorice-like taste.
Equipment Needed
Gathering your tools before you start makes the baking process smooth and enjoyable:
- Large Mixing Bowl – For combining ingredients
- Medium Mixing Bowl – For whisking dry ingredients
- Electric Mixer or Whisk – Stand mixer, hand mixer, or strong whisk for beating eggs and sugar
- Measuring Cups and Spoons – For accurate measurements
- Wooden Spoon or Spatula – For mixing in the flour and nuts
- Baking Sheet – A standard half-sheet pan works perfectly
- Parchment Paper or Silicone Baking Mat – Prevents sticking and makes cleanup easy
- Sharp Serrated Knife – Essential for slicing the baked logs cleanly
- Wire Cooling Rack – Allows air circulation for cooling
- Food Processor (Optional) – If you want some finely ground pistachios in the dough for extra flavor and color
- Kitchen Scale (Optional but Helpful) – For precise measurements, especially when working with nuts
- Pastry Brush (Optional) – For brushing logs with egg wash if desired
Print

Pistachio Biscotti Recipe
Authentic Italian Pistachio Biscotti with the perfect crunchy texture and gorgeous green pistachios throughout. These twice-baked cookies are ideal for dunking in coffee, tea, or dessert wine, and they stay fresh for weeks!
- Total Time: 1 hour 15 minutes (plus cooling time)
- Yield: 24-30 biscotti 1x
Ingredients
Scale- 2 cups all-purpose flour
- 1 1/2 teaspoons baking powder
- 1/4 teaspoon salt
- 3/4 cup granulated sugar
- 1/2 cup unsalted butter, softened to room temperature
- 3 large eggs, room temperature
- 1 teaspoon vanilla extract
- 1/2 teaspoon almond extract
- 1 1/4 cups shelled raw pistachios, roughly chopped
- 1 tablespoon orange zest (optional but recommended)
- 1-2 teaspoons anise seeds (optional, for traditional flavor)
For Egg Wash (Optional):
- 1 egg, beaten with 1 tablespoon water
Instructions
- Preheat and Prepare – Preheat your oven to 350°F (175°C). Line a large baking sheet with parchment paper or a silicone baking mat. Set aside.
- Toast the Pistachios – Spread the chopped pistachios on a small baking sheet and toast in the preheated oven for 5-7 minutes until fragrant and lightly golden. Watch carefully to prevent burning. Remove and let cool completely. Keep the oven at 350°F.
- Mix Dry Ingredients – In a medium bowl, whisk together the flour, baking powder, and salt. Set aside.
- Cream Butter and Sugar – In a large mixing bowl, use an electric mixer to cream the softened butter and sugar together on medium speed for 2-3 minutes until light and fluffy.
- Add Eggs and Extracts – Add the eggs one at a time, beating well after each addition. Mix in the vanilla extract, almond extract, and orange zest (if using) until fully incorporated.
- Combine Wet and Dry – With the mixer on low speed (or using a wooden spoon), gradually add the flour mixture to the wet ingredients. Mix just until the flour is incorporated and no streaks remain. The dough will be thick and slightly sticky.
- Add Pistachios – Fold in the cooled toasted pistachios (and anise seeds if using) with a spatula or wooden spoon until evenly distributed throughout the dough.
- Shape the Logs – Turn the dough out onto the prepared baking sheet. With lightly floured hands, divide the dough in half and shape each half into a log approximately 12 inches long, 2-3 inches wide, and 3/4 inch tall. Space the logs at least 3 inches apart as they will spread during baking. The logs don’t need to be perfect—slightly rustic is fine!
- Optional Egg Wash – If desired, brush the tops of the logs with the beaten egg wash for a shiny, golden finish.
- First Bake – Bake for 25-30 minutes until the logs are golden brown, firm to the touch, and a toothpick inserted in the center comes out clean. They will spread slightly and may crack a bit on top—this is normal.
- Cool and Slice – Remove from the oven and let the logs cool on the baking sheet for 15-20 minutes. Keep the oven on. Once cool enough to handle, transfer the logs to a cutting board. Using a sharp serrated knife, cut each log diagonally into 3/4-inch thick slices. Use a gentle sawing motion to prevent crumbling.
- Second Bake – Arrange the sliced biscotti cut-side down on the same baking sheet (you may need two sheets). Return to the oven and bake for 10-12 minutes. Flip each biscotti over and bake for another 10-12 minutes until both sides are golden and crisp.
- Final Cooling – Transfer the biscotti to a wire cooling rack and let them cool completely. They will continue to crisp up as they cool. This is when they develop that perfect crunchy texture!
- Store and Enjoy – Once completely cooled, store in an airtight container at room temperature for up to 3 weeks, or freeze for longer storage.
Notes
- Don’t Rush the Cooling – Let the logs cool for at least 15 minutes before slicing, or they may crumble. They should feel firm to the touch.
- Sharp Knife is Key – A serrated knife works best for clean cuts without crushing the biscotti. Wipe the blade between cuts if it gets sticky.
- Second Bake Time – The longer you bake during the second bake, the crunchier they’ll be. For slightly softer biscotti, reduce the second bake by 3-4 minutes per side.
- Nut Substitutions – If pistachios are too expensive, you can use half pistachios and half almonds, or all almonds for traditional biscotti.
- Storage Secret – Biscotti actually improve over the first few days as flavors meld. Don’t worry if they seem too hard at first—dunking transforms them!
- Prep Time: 20 minutes
- Cook Time: 55 minutes (includes both baking sessions)
- Category: Desert
- Method: Baking
- Cuisine: Italian
- Diet: Vegetarian
Nutrition
- Serving Size: 1 biscotti
- Calories: 95
- Sugar: 6g
- Sodium: 45mg
- Fat: 4.5g
- Saturated Fat: 28g
- Unsaturated Fat: 2.5g
- Trans Fat: 0g
- Carbohydrates: 12g
- Fiber: 1g
- Protein: 2g
- Cholesterol: 30mg
Tips & Variations
Make these biscotti your own with these delicious customizations:
Chocolate-Dipped Pistachio Biscotti – After cooling completely, dip one end of each biscotti in melted dark chocolate and let set on parchment paper. This makes them extra special for gifts!
Cranberry Pistachio Biscotti – Add 1/2 cup dried cranberries along with the pistachios for a beautiful color contrast and tart flavor.
White Chocolate Pistachio – Fold 1/2 cup white chocolate chips into the dough or drizzle melted white chocolate over cooled biscotti.
Lemon Pistachio Biscotti – Replace the orange zest with lemon zest and add 1 teaspoon of lemon extract for a bright, citrusy version.
Rose Pistachio Biscotti – Add 1 teaspoon of rose water and 1 tablespoon of dried culinary rose petals for an elegant Middle Eastern twist.
Chocolate Chip Pistachio – Fold in 1/2 cup mini chocolate chips along with the pistachios.
Vegan Pistachio Biscotti – Replace butter with vegan butter or coconut oil, and use flax eggs (3 tablespoons ground flax + 9 tablespoons water, let sit 5 minutes). They’ll be slightly less rich but still delicious.
Gluten-Free Version – Use a 1:1 gluten-free flour blend plus 1/2 teaspoon xanthan gum. The texture will be slightly more delicate.
Sugar-Free Biscotti – Substitute the sugar with a granulated sugar alternative like erythritol or monk fruit sweetener (follow package directions for conversion).
Cherry Almond Pistachio – Add 1/2 cup dried cherries and replace almond extract with 1 teaspoon of cherry extract.
Pro Chef Tips
Elevate your biscotti from good to extraordinary with these professional secrets:
Tip #1: The Toasting Trick – Toast your pistachios before adding them to the dough. This intensifies their flavor and brings out their natural oils, creating a more aromatic and flavorful biscotti.
Tip #2: Pulse for Color – Place 1/4 cup of your pistachios in a food processor and pulse until finely ground, then add to the dough along with the chopped pistachios. This distributes green color throughout and intensifies the pistachio flavor.
Tip #3: Flatten the Logs – Many home bakers make their logs too thick. Keep them under 1 inch tall during shaping—they’ll rise during baking. Thinner logs create more biscotti and ensure even baking.
Tip #4: The Cooling Window – There’s a sweet spot for slicing—too early and they crumble, too late and they’re rock hard. Aim for 15-20 minutes when the logs are firm but still warm to the touch.
Tip #5: Angle Your Cuts – Cut your biscotti at a diagonal (45-degree angle) rather than straight across. This creates that classic elegant biscotti shape and gives you a larger surface for dunking.
Tip #6: Double-Parchment Method – If your biscotti are browning too quickly on the bottom during the second bake, stack two sheets of parchment paper on your baking sheet for insulation.
Tip #7: Steam for Softness – If your biscotti come out too hard, place them in an airtight container with a slice of bread for 24 hours. The moisture from the bread will soften them slightly while maintaining their crunch.
Tip #8: The Dunking Test – Professional biscotti should hold up in hot liquid for 5-10 seconds without disintegrating. If yours fall apart, increase the second baking time slightly next batch.
Common Mistakes to Avoid
Learn from these common errors to ensure perfect biscotti every time:
Mistake #1: Slicing Too Soon – Cutting into logs that haven’t cooled enough causes them to crumble and fall apart. The proteins and starches need time to set. Be patient and wait the full 15-20 minutes even though it’s tempting to rush.
Mistake #2: Using a Dull Knife – A dull knife crushes the biscotti instead of cleanly slicing through. Always use a sharp serrated knife with a gentle sawing motion. A bread knife works perfectly.
Mistake #3: Overbaking the First Time – If you bake the logs too long during the first bake, they become too dry and will crumble when you try to slice them. They should be golden and firm, but not rock hard. Better to slightly underbake than overbake.
Mistake #4: Skipping the Toasting – Raw pistachios have a subtly bitter taste compared to toasted ones. Taking 5 minutes to toast them makes a dramatic difference in the final flavor. It’s not optional in my book!
Mistake #5: Making Logs Too Thick – Thick logs don’t bake evenly and result in fewer biscotti. They can also have raw centers. Keep your logs low and wide (2-3 inches wide, less than 1 inch tall) for best results.
Mistake #6: Not Cooling Completely Before Storing – Storing biscotti while they’re still warm creates condensation in your container, which makes them soggy instead of crispy. Always wait until they’re completely cool.
Mistake #7: Forgetting to Space the Logs – The dough spreads during the first bake. If your logs are too close together, they’ll merge into one giant biscotti. Keep them at least 3 inches apart.
Storage & Meal Prep
Proper storage is key to maintaining that perfect crispy texture:
Room Temperature Storage – Store completely cooled biscotti in an airtight container at room temperature for up to 3 weeks. Yes, three weeks! The low moisture content makes them incredibly shelf-stable. Place parchment paper between layers if stacking.
Maintaining Crispness – To keep biscotti extra crispy, add a food-safe silica gel packet (the kind that comes in beef jerky packages) to your storage container. Never store biscotti in the refrigerator, as the humidity will make them soft.
Softening Too-Hard Biscotti – If your biscotti turn out too hard for your preference, place them in an airtight container with a slice of fresh bread. The biscotti will absorb moisture from the bread over 12-24 hours, softening slightly while maintaining their structure.
Re-Crisping – If your biscotti lose some crispness due to humidity, place them on a baking sheet and warm in a 275°F oven for 5-10 minutes. Let cool completely before storing again.
Travel and Gifting – Biscotti travel exceptionally well because they’re so sturdy. Wrap them individually in cellophane bags, stack them in decorative tins, or pack them in boxes with tissue paper for beautiful homemade gifts that will last.
Vacuum Sealing – For maximum shelf life, vacuum seal biscotti in portions. They’ll stay fresh for up to 6 weeks at room temperature when vacuum sealed.
Make-Ahead & Freezer Notes
Biscotti are fantastic for advance preparation—perfect for busy bakers!
Freezing Baked Biscotti – Completely cooled biscotti freeze beautifully for up to 3 months. Place them in a single layer on a baking sheet and freeze until solid (about 1 hour), then transfer to a freezer bag or airtight container. This prevents them from sticking together. Thaw at room temperature for 30 minutes before serving.
Freezing After First Bake – This is my preferred method! After baking and cooling the logs completely, wrap them tightly in plastic wrap, then aluminum foil. Freeze for up to 3 months. When ready to finish, let them thaw for 15 minutes, slice, and complete the second bake as directed.
Freezing the Dough – You can shape the logs and freeze them unbaked. Wrap tightly in plastic wrap and aluminum foil. Freeze for up to 2 months. Bake directly from frozen, adding 5-7 minutes to the first bake time.
Make-Ahead Strategy – Bake the logs up to 2 days in advance, wrap well, and store at room temperature. Slice and complete the second bake the day you plan to serve or gift them. This spreads out the work and ensures maximum freshness.
Refreshing from Frozen – For the best texture after freezing, warm thawed biscotti in a 275°F oven for 5 minutes. This restores their fresh-baked crispness and releases the pistachio aroma.
Pre-Sliced Freezing – You can also freeze already-sliced biscotti after the second bake. This allows you to pull out just a few at a time. Place parchment paper between layers to prevent sticking.
Serving Suggestions
Biscotti are incredibly versatile! Here’s how to serve them:
Coffee and Espresso – The classic pairing! Serve biscotti alongside espresso, cappuccino, caffe latte, or regular drip coffee. The dunking ritual is half the enjoyment.
Afternoon Tea – Excellent with Earl Grey, English Breakfast, green tea, or herbal tea. The subtle sweetness won’t overpower delicate tea flavors.
Dessert Wine Pairing – Traditional Tuscan style calls for dunking biscotti in Vin Santo, a sweet Italian dessert wine. Also wonderful with Moscato d’Asti, Port, or sweet Sherry.
With Gelato or Ice Cream – Serve alongside pistachio gelato, vanilla bean ice cream, or chocolate gelato. You can even use them as edible “spoons” for soft ice cream.
Cheese Board Addition – Add biscotti to your cheese board with mascarpone, ricotta, or mild soft cheeses, plus fresh figs or grapes. The contrast of textures is delightful.
Breakfast Basket – Include them in a breakfast spread with croissants, fruit, yogurt, and coffee for an Italian-inspired morning.
Hot Chocolate Dunkers – Wonderful with thick Italian-style hot chocolate or regular hot cocoa, especially during winter months.
Holiday Cookie Tray – Include these on your holiday cookie assortment. Their elegant appearance and unique texture stand out among the usual suspects.
Yogurt Topper – Break biscotti into pieces and use as a crunchy topping for Greek yogurt parfaits.
Gift Presentation – Stack 6-8 biscotti vertically in a clear cellophane bag tied with ribbon, or arrange them in a decorative tin lined with tissue paper.
FAQs Section
Q: Why are my biscotti falling apart when I slice them?
A: This usually means the logs haven’t cooled long enough or were underbaked during the first bake. The logs should feel firm to the touch and be golden all over before slicing. Let them cool for at least 15-20 minutes. Also ensure you’re using a sharp serrated knife with a gentle sawing motion rather than pressing down.Q: Can I make biscotti without a second bake?
A: Technically yes, but they won’t be true biscotti. The second bake is what removes moisture and creates that signature dry, crunchy texture perfect for dunking. After just one bake, they’ll be more like soft cookies that will get soggy when dunked. The double baking is essential for authentic results.Q: My pistachios are salted—can I still use them?
A: Yes, but make adjustments! Reduce or eliminate the salt in the recipe (use only a pinch), and rinse the pistachios under water to remove excess salt, then pat them very dry before using. The result won’t be quite as good as using unsalted pistachios, but it will work in a pinch.Q: How do I know when the second bake is done?
A: The biscotti should be golden brown on both sides and feel completely dry to the touch. They should look toasted and feel very light when you pick them up. Remember, they’ll continue to crisp as they cool, so they might seem slightly softer than you expect when hot.Q: Can I use pistachio paste instead of whole pistachios?
A: Pistachio paste can be added (2-3 tablespoons) for extra flavor and color, but don’t substitute it for the chopped pistachios. The whole nuts provide essential texture and visual appeal. Use the paste in addition to, not instead of, the chopped pistachios.Q: Why did my biscotti spread too much during baking?
A: This usually happens when the dough is too wet or the butter was too soft. Make sure you’re measuring flour correctly (spoon it into the measuring cup and level off—don’t scoop directly). Also, the butter should be softened but still hold its shape. If your kitchen is very warm, chill the shaped logs for 15 minutes before the first bake.Q: Are biscotti supposed to be this hard?
A: Yes! Authentic biscotti are meant to be very hard and dry—that’s what makes them perfect for dunking without falling apart. They should be hard enough that you wouldn’t want to bite into one without dunking first. If you prefer softer biscotti, reduce the second baking time by 3-4 minutes per side, but know they’ll be more fragile when dunked.Conclusion
And there you have it—everything you need to create authentic, delicious Italian Pistachio Biscotti in your own kitchen! These twice-baked beauties are proof that sometimes the simplest recipes are the most rewarding. From that first satisfying dunk in your morning coffee to the last crunch of pistachio-studded cookie, these biscotti deliver pure joy with every bite.
The beauty of homemade biscotti is that they’re actually easier than you think, yet they impress everyone who tries them. Whether you’re building an Italian dessert spread, searching for the perfect homemade gift, or simply want a sophisticated cookie to keep on hand for guests (or yourself!), this recipe has you covered. And because they stay fresh for weeks, you can bake once and enjoy for ages.
I hope these biscotti bring a little taste of Italy into your home and become a treasured recipe you turn to again and again. There’s something deeply satisfying about pulling those golden logs from the oven, hearing the crackle as you slice through them, and finally dunking that first finished biscotto into a perfect cup of coffee.
Happy baking, and may your biscotti always be perfectly crunchy! ☕🌰✨