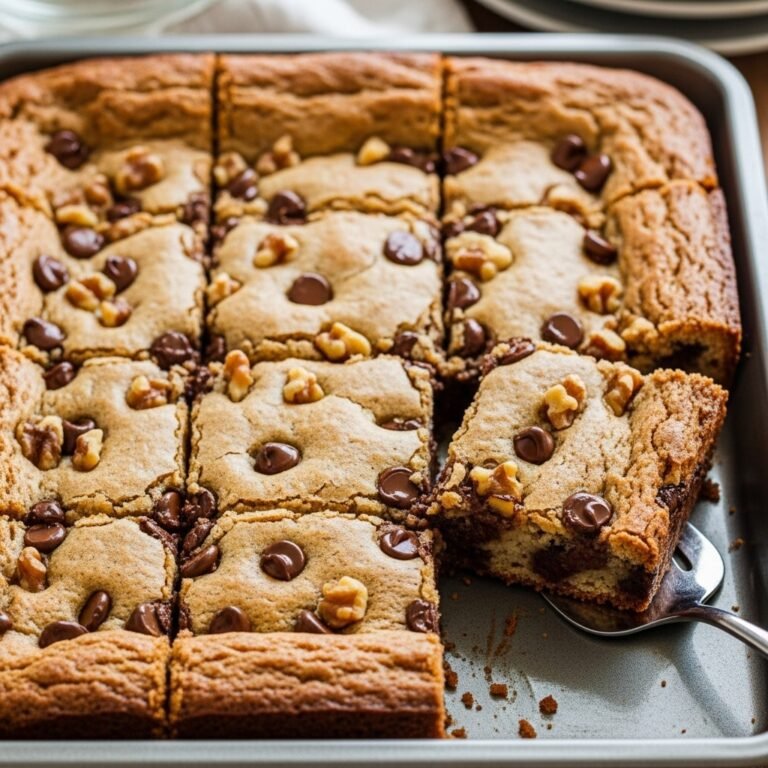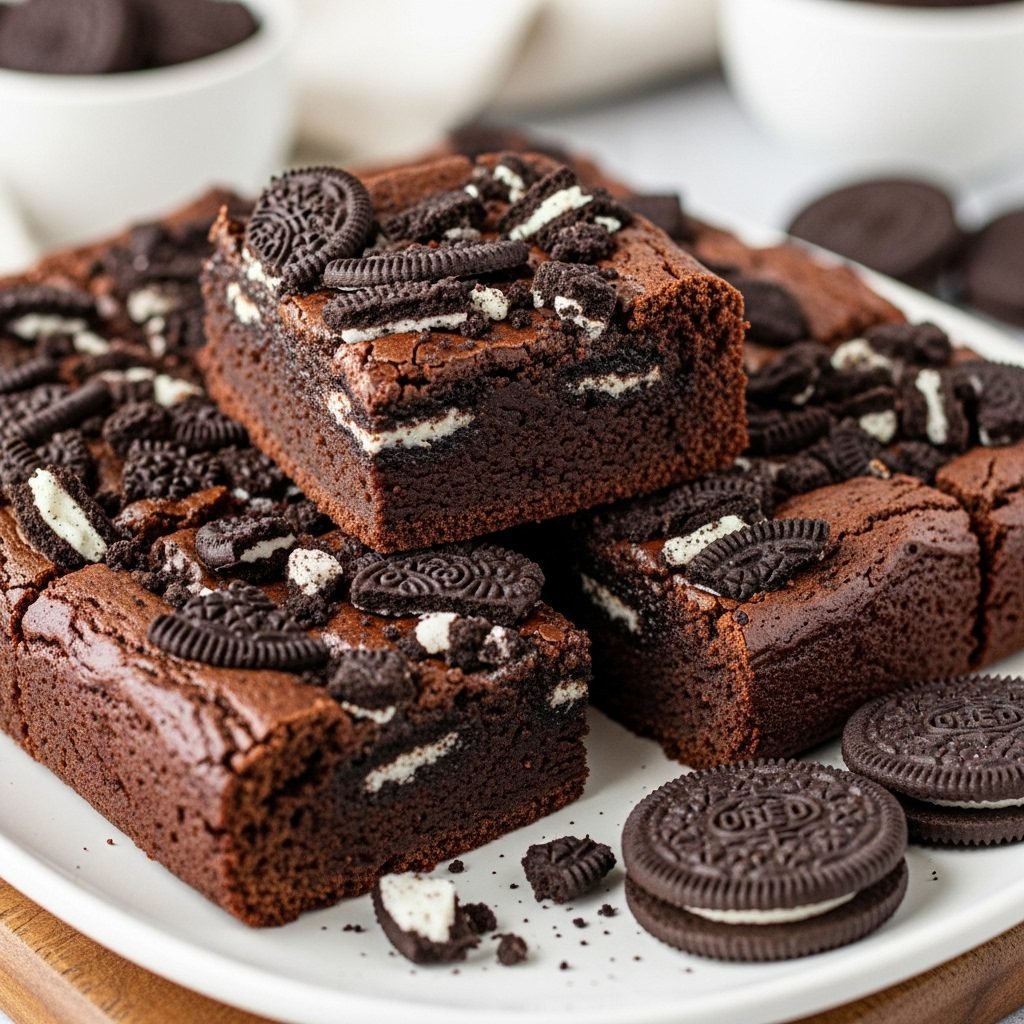
Ultimate Oreo Brownies Recipe: Fudgy, Decadent, and Irresistibly Delicious
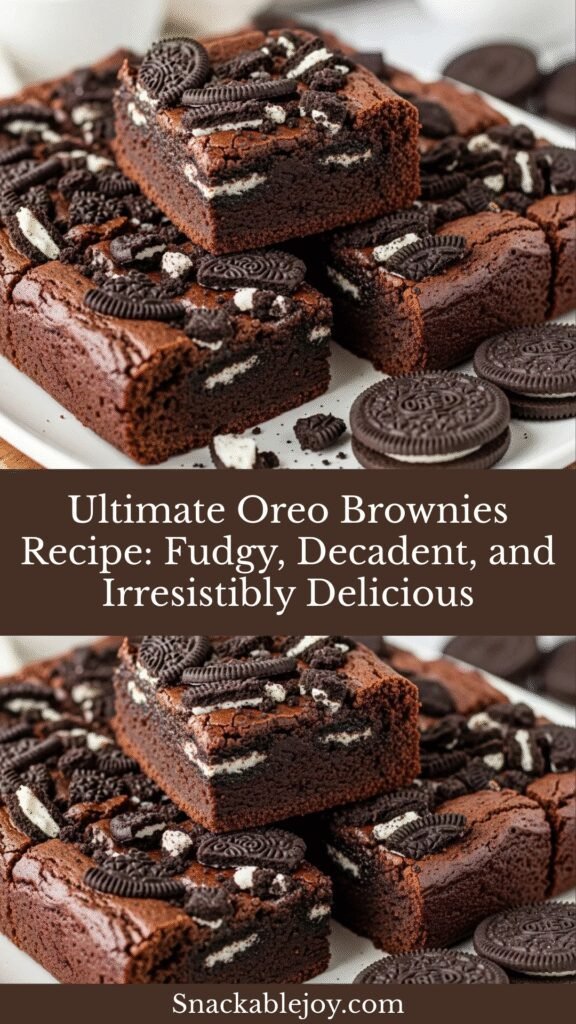
If you’re looking for a dessert that combines the rich, fudgy perfection of homemade brownies with the iconic crunch and cream of Oreo cookies, these Oreo Brownies are about to become your new obsession. This recipe takes classic chocolate brownies to the next level by layering whole Oreo cookies right into the batter, creating pockets of cookies and cream heaven in every single bite. The result? A dessert that’s incredibly indulgent, visually stunning with its black-and-white swirls, and surprisingly simple to make.
These Oreo Brownies are perfect for just about any occasion you can think of. Bring them to potlucks and watch them disappear within minutes. Bake them for birthday parties where both kids and adults will be fighting over the last piece. Pack them in lunchboxes for a special treat that’ll make you the most popular parent at school. Or simply whip up a batch on a lazy Sunday afternoon when you’re craving something sweet and comforting. The beauty of this recipe is that it delivers bakery-quality results without requiring any advanced baking skills or unusual ingredients.
What makes these brownies truly special is the textural contrast—you get the dense, fudgy brownie base with its crackly top, combined with the satisfying crunch of Oreo cookies that soften slightly during baking but still maintain their distinctive texture. The cream filling from the Oreos creates beautiful marbled swirls throughout the brownies, adding visual appeal that makes these treats absolutely Instagram-worthy and perfect for sharing on Pinterest.
History / Background
The marriage of brownies and Oreos is a relatively modern culinary innovation that emerged from America’s love affair with mashup desserts. To understand Oreo Brownies, we need to look at the history of both components separately before they came together in delicious harmony.
Brownies themselves have been an American staple since the late 1800s. While the exact origin is debated, most food historians credit the brownie’s creation to the 1893 Chicago World’s Fair, where Bertha Palmer, a prominent Chicago socialite, requested a dessert that was smaller than a cake but more substantial than a cookie—something ladies could eat while attending the fair without making a mess. The result was the brownie, which quickly became a beloved fixture in American home baking.
Oreo cookies, on the other hand, were introduced by Nabisco in 1912 in New York City. Originally called “Oreo Biscuits,” they featured the same chocolate wafer and cream filling design we know today. The cookies were an instant success and have since become the best-selling cookie in the United States, with over 450 billion Oreos sold since their creation.
The concept of combining Oreos with other desserts really took off in the 1980s and 1990s as home bakers became more experimental and creative with their recipes. The cookies and cream flavor profile became wildly popular after ice cream manufacturers started crushing Oreos into vanilla ice cream. This sparked a revolution in American dessert culture, inspiring bakers to incorporate Oreos into cheesecakes, milkshakes, cakes, and eventually, brownies.
Oreo Brownies as we know them today represent the quintessential American dessert mashup—taking two beloved treats and combining them into something even better than the sum of their parts. The recipe gained massive popularity through food blogs and Pinterest in the 2010s, where home bakers shared countless variations and techniques. Today, Oreo Brownies are considered a modern classic, especially popular at bake sales, family gatherings, and anywhere people want to serve an impressive dessert that’s guaranteed to please a crowd.
Why You’ll Love This Recipe
These Oreo Brownies have earned their place as a reader favorite, and once you make them, you’ll understand exactly why they’ve become such a beloved treat in kitchens across America. This recipe strikes the perfect balance between impressive presentation and approachable execution, making it ideal for both novice bakers and experienced home cooks.
Here’s why this recipe deserves a permanent spot in your dessert rotation:
- Minimal effort, maximum impact – These brownies look like they came from a fancy bakery, but they’re actually incredibly simple to make with just basic mixing and layering
- Uses simple pantry ingredients – No exotic or expensive ingredients required; everything you need is probably already in your kitchen or easily available at any grocery store
- Perfect fudgy texture – The brownies are dense and moist without being underbaked, with that coveted shiny, crackly top that brownie lovers crave
- Kid-approved and adult-loved – The combination of chocolate brownies and Oreos appeals to every age group, making these perfect for family gatherings
- Highly customizable – Once you master the basic recipe, you can experiment with different Oreo flavors, add extra toppings, or adjust the sweetness level
- Budget-friendly indulgence – Creates 16 generous servings for less than the cost of a single bakery brownie
- Freezer-friendly for convenience – Make them ahead and freeze for up to three months, giving you an emergency dessert option whenever you need one
- No special equipment required – A single baking pan, one bowl, and a whisk are all you need to create these spectacular treats
- Great for sharing and gifting – These brownies transport beautifully and make wonderful gifts for teachers, neighbors, or party hosts
- Visually stunning – The black-and-white contrast of Oreos against the dark chocolate brownie creates an eye-catching dessert that photographs beautifully for social media
Ingredient Notes
Understanding your ingredients helps you achieve the best possible results and make smart substitutions when needed. Here’s what you need to know about each component of these incredible Oreo Brownies:
Unsalted Butter – The foundation of rich, fudgy brownies. Melted butter creates a denser texture compared to oil-based brownies. Always use unsalted so you can control the salt level. If you only have salted butter, reduce the added salt to ¼ teaspoon. European-style butter with higher fat content (82-84%) will create even more decadent brownies.
Granulated Sugar – Provides sweetness and contributes to that signature shiny, crackly top on brownies. The sugar also helps create the fudgy texture by interfering with gluten development. Don’t reduce the sugar significantly, as it affects both texture and moisture retention.
Brown Sugar – Adds moisture and a subtle caramel undertone that deepens the chocolate flavor. Light brown sugar works perfectly here, though dark brown sugar will create a slightly more complex flavor profile with molasses notes.
Large Eggs – Provide structure, richness, and help create that fudgy texture. Room temperature eggs incorporate more smoothly into the batter. The number of eggs is crucial—too few makes crumbly brownies, too many makes them cakey rather than fudgy.
Vanilla Extract – Enhances and rounds out the chocolate flavor without competing with it. Always use pure vanilla extract rather than imitation for the best taste. The vanilla also helps balance the sweetness.
All-Purpose Flour – Provides structure without making the brownies cakey. The relatively small amount of flour (compared to cake recipes) is key to achieving fudgy rather than cakey brownies. Measure carefully by spooning into your measuring cup and leveling off—don’t scoop directly from the bag, which packs in too much flour.
Unsweetened Cocoa Powder – Creates that deep, intense chocolate flavor. Dutch-processed cocoa will give a darker color and mellower flavor, while natural cocoa provides a more acidic, fruity chocolate taste. Either works beautifully; I prefer Dutch-processed for its rich appearance.
Salt – Don’t skip this! Salt enhances the chocolate flavor and balances the sweetness. It’s essential for bringing out all the complex flavors in your brownies.
Oreo Cookies – The star addition that transforms ordinary brownies into something extraordinary. Regular Oreos work best for this recipe. While Double Stuf Oreos are tempting, they can make the brownies overly sweet and create texture issues. You’ll need about 12-15 cookies depending on your pan size and how generously you want to layer them.
Optional: Semi-Sweet Chocolate Chips – For extra chocolate intensity, you can fold chocolate chips into the batter or sprinkle them on top before baking. They create pockets of melted chocolate that take these brownies over the top.
Equipment Needed
Having the right tools makes the brownie-making process smoother and helps ensure perfect results every time. Here’s everything you’ll need:
- 9×9-inch square baking pan – The standard size for this recipe, creating perfectly thick brownies. A metal pan conducts heat better than glass, giving you better edges.
- Parchment paper – Line your pan with parchment paper with overhang on two sides to create handles for easy removal. This prevents sticking and makes cutting clean squares effortless.
- Large mixing bowl – For combining all your ingredients. Glass or metal bowls work best for mixing brownie batter.
- Medium saucepan or microwave-safe bowl – For melting the butter. I prefer the stovetop method for more control, but microwave works perfectly fine.
- Whisk – Essential for thoroughly combining the wet ingredients and incorporating air for that crackly top. A balloon whisk works better than a fork.
- Rubber spatula – For folding in the dry ingredients gently and scraping down the bowl sides to ensure everything is incorporated.
- Measuring cups and spoons – Accurate measurements are crucial in baking. Use dry measuring cups for flour and cocoa, and liquid measuring cups for wet ingredients.
- Sifter or fine-mesh sieve (optional but recommended) – Sifting the cocoa powder and flour removes lumps and creates a smoother batter, resulting in a more professional texture.
- Toothpick or cake tester – For checking doneness. The toothpick should come out with a few moist crumbs attached, not wet batter.
- Cooling rack – Allows air to circulate around the pan for even cooling, preventing soggy bottoms.
- Sharp knife – For cutting clean brownie squares. Wipe the knife clean between cuts for the neatest presentation.
Print

Oreo Brownies Recipe
These ultra-fudgy Oreo Brownies combine rich, chocolatey brownie batter with layers of whole Oreo cookies for a decadent treat that’s perfect for any occasion. With a crackly top and gooey center studded with cookies and cream, these brownies deliver bakery-quality results with minimal effort.
- Total Time: 50 minutes
- Yield: 16 brownies 1x
Ingredients
ScaleFor the Brownies:
- ¾ cup (1½ sticks) unsalted butter
- 1¼ cups granulated sugar
- ¾ cup packed light brown sugar
- 3 large eggs, room temperature
- 2 teaspoons pure vanilla extract
- ¾ cup all-purpose flour
- ¾ cup unsweetened cocoa powder
- ½ teaspoon salt
- 12-15 Oreo cookies, depending on preference
- ½ cup semi-sweet chocolate chips (optional, for extra chocolatey brownies)
Instructions
Prepare Your Pan and Oven:
- Position your oven rack in the center and preheat to 350°F (175°C). Line a 9×9-inch baking pan with parchment paper, leaving about 2 inches of overhang on two opposite sides—these will serve as handles for easy brownie removal later. Lightly grease the parchment with butter or non-stick spray to prevent any sticking.
Melt the Butter: 2. Cut the butter into tablespoon-sized pieces and place in a medium saucepan over medium-low heat. Stir occasionally as it melts completely, then remove from heat immediately. Alternatively, melt in the microwave in 30-second intervals, stirring between each interval until fully melted. Let the butter cool for about 5 minutes—it should be warm but not hot enough to scramble the eggs when you add them.
Mix Wet Ingredients: 3. Pour the melted butter into a large mixing bowl. Add both the granulated sugar and brown sugar to the butter, whisking vigorously for about 1-2 minutes until the mixture is smooth, glossy, and well combined. The sugar won’t fully dissolve, but it should be thoroughly incorporated with no butter streaks visible.
Add Eggs and Vanilla: 4. Add the eggs one at a time to the butter-sugar mixture, whisking well after each addition. Make sure each egg is fully incorporated before adding the next one. The mixture should become lighter in color and increase in volume slightly. Add the vanilla extract and whisk until evenly distributed. This vigorous whisking incorporates air that contributes to the crackly top we’re after.
Combine Dry Ingredients: 5. In a separate medium bowl, whisk together the flour, cocoa powder, and salt. For the smoothest brownies, sift the cocoa powder if it’s lumpy. This simple step ensures your brownies won’t have any clumps of cocoa or flour.
Fold Together: 6. Add the dry ingredients to the wet ingredients all at once. Using a rubber spatula, gently fold the mixture together using a figure-eight motion. Mix just until no flour streaks remain—you should see a thick, glossy, uniform brownie batter. Be careful not to overmix; stop as soon as everything is combined. Overmixing develops gluten and creates tough, cakey brownies instead of fudgy ones.
Layer the Batter and Oreos: 7. Pour half of the brownie batter into your prepared pan, spreading it evenly to the edges with your spatula. Arrange 6-8 Oreo cookies on top of this layer in a single layer—they can touch but shouldn’t overlap. You can place them in neat rows or scatter them randomly, depending on your preference.
Add Remaining Batter: 8. Pour the remaining brownie batter over the Oreos, spreading carefully to cover them completely. Use your spatula to smooth the top as evenly as possible. Press 4-7 additional Oreo cookies gently into the top of the batter, creating a decorative pattern. You can leave them whole, break them in half, or quarter them for different visual effects. If using chocolate chips, sprinkle them over the top now.
Bake to Perfection: 9. Place the pan in your preheated oven and bake for 32-37 minutes. The brownies are done when the edges look set and have pulled away slightly from the pan sides, the top has developed that signature shiny, crackly surface, and a toothpick inserted into the center (avoiding Oreos) comes out with a few moist crumbs attached—not wet batter, but not completely clean either. This is the key to fudgy brownies. Start checking at 30 minutes, as oven temperatures vary.
Cool Completely: 10. Remove the pan from the oven and place it on a cooling rack. This is the hardest part—you must let the brownies cool completely in the pan for at least 1 hour, preferably 2 hours. I know it’s tempting to cut into them warm, but brownies continue to set as they cool. Cutting too early will result in a gooey mess (delicious, but messy!). For the cleanest cuts, refrigerate the cooled brownies for 30 minutes before slicing.
Cut and Serve: 11. Once completely cool, use the parchment paper overhang to lift the entire brownie slab out of the pan onto a cutting board. Use a sharp knife to cut into 16 squares (4×4 grid), wiping the knife clean with a damp paper towel between each cut for the neatest edges. For extra-clean cuts, warm your knife under hot water, dry it, then slice—the warm blade cuts through more smoothly.
Notes
- Don’t overbake – Brownies continue cooking from residual heat after you remove them from the oven. If the toothpick comes out completely clean, you’ve overbaked them and they’ll be dry rather than fudgy.
- Room temperature eggs mix better – Cold eggs can cause the melted butter to seize up and create a grainy texture. If you forget to bring eggs to room temperature, place them in a bowl of warm water for 10 minutes.
- Oreo placement matters – The cookies in the middle layer will be softer and more integrated with the brownie, while those pressed on top maintain more texture and create visual appeal.
- Pan size affects baking time – If using an 8×8-inch pan, your brownies will be thicker and require 40-45 minutes baking time. A 9×13-inch pan creates thinner brownies that bake in 25-28 minutes.
- The shiny crackly top comes from sugar and eggs – Vigorous whisking of eggs and sugar incorporates air and creates that desirable papery crust on top. Don’t skip the whisking step!
- Prep Time: 15 minutes
- Cook Time: 35 minutes
- Category: Desert
- Method: Baking
- Cuisine: American
- Diet: Vegetarian
Nutrition
- Serving Size: 1 brownie (1/16 of recipe)
- Calories: 285
- Sugar: 32g
- Sodium: 135mg
- Fat: 13g
- Saturated Fat: 7g
- Unsaturated Fat: 5g
- Trans Fat: 0g
- Carbohydrates: 41g
- Fiber: 2g
- Protein: 3g
- Cholesterol: 55mg
Tips & Variations
Mint Oreo Brownies: Use Mint Oreo cookies instead of regular for a refreshing chocolate-mint combination that’s especially popular around the holidays. The mint flavor pairs beautifully with dark chocolate.
Peanut Butter Swirl: Before baking, drop spoonfuls of peanut butter over the top of the batter and swirl with a knife for gorgeous marbled brownies with peanut butter-Oreo-chocolate flavor. Alternatively, use Peanut Butter Oreos.
Extra Fudgy Version: Replace ¼ cup of flour with an additional ¼ cup of cocoa powder for even more intense chocolate flavor and denser texture.
Brownie Sundae Bars: Cut brownies into squares and serve warm topped with vanilla ice cream, hot fudge sauce, whipped cream, and crushed Oreos for an over-the-top dessert.
Birthday Cake Oreos: Use Birthday Cake Oreos and add rainbow sprinkles to the batter for a fun, festive twist perfect for birthday celebrations.
Caramel Drizzle: After brownies cool completely, drizzle with homemade or store-bought caramel sauce and sprinkle with sea salt for salted caramel Oreo brownies.
Gluten-Free Version: Substitute the all-purpose flour with a 1:1 gluten-free baking flour blend. The texture will be slightly different but still delicious. Make sure your Oreos are gluten-free as well (some specialty flavors are).
Cream Cheese Swirl: Beat 8 oz softened cream cheese with ¼ cup sugar and 1 egg. Drop spoonfuls over the brownie batter and swirl for cheesecake-Oreo brownies.
Smaller Batch: Halve all ingredients and bake in an 8×8-inch pan for 8 brownies. Perfect when you want to satisfy a craving without having a full batch tempting you.
Pro Chef Tips
Use metal pans over glass: Metal pans conduct heat more efficiently and create better texture and crust development. If you must use glass, reduce oven temperature by 25°F and expect slightly longer baking time.
Measure flour correctly: Too much flour is the number one cause of dry, cakey brownies. Spoon flour into your measuring cup and level it off with a knife—never scoop directly from the bag, which packs in up to 25% more flour than the recipe intends.
Don’t skip the cooling time: This cannot be stressed enough. Brownies are structurally fragile when hot and need time to set up. Patience here is the difference between perfect squares and a crumbly mess.
Create steam for fudgier brownies: Place a pan of water on the bottom oven rack while baking. The steam creates a more humid environment that keeps brownies extra moist and fudgy.
The refrigerator is your friend: For the absolute cleanest cuts, refrigerate the completely cooled brownies for 30 minutes before slicing. The cold firms up the brownies, making cutting through the Oreos much easier.
Revive stale brownies: If your brownies dry out, place a slice of bread in the storage container with them. The brownies will absorb moisture from the bread, softening them again. Replace the bread slice every day or two.
Test multiple spots: When checking for doneness, insert your toothpick in 2-3 different spots (avoiding visible Oreos). Ovens have hot spots, and one area might be more done than another.
Use quality cocoa powder: Since cocoa is a primary flavor component, using high-quality Dutch-processed cocoa (like Valrhona or Guittard) creates noticeably richer, more complex chocolate flavor.
Common Mistakes to Avoid
Overbaking is the cardinal sin: Most people overbake brownies because they expect the toothpick to come out clean like a cake. Remember, a few moist crumbs on the toothpick mean perfect fudgy brownies. Completely clean means overdone and dry.
Using a pan that’s the wrong size: Pan size dramatically affects baking time and texture. Too large a pan spreads the batter thin, creating crispy brownies that overbake easily. Too small a pan creates very thick brownies with an underbaked center and overbaked edges.
Not letting butter cool before adding eggs: If your melted butter is too hot (over 110°F), it can partially cook the eggs when you add them, creating a grainy texture and preventing proper emulsification. Let butter cool until it’s warm to the touch but not hot.
Overmixing after adding flour: Once flour hits liquid, gluten development begins. Mixing too vigorously or for too long creates tough, chewy brownies with a dense crumb rather than the tender, fudgy texture we want. Fold gently just until combined.
Forgetting to line the pan: Even with greasing, brownies can stick stubbornly to the pan, especially where Oreos contact the edges. Parchment paper with overhang is insurance for perfect removal and beautiful presentation.
Storage & Meal Prep
Room Temperature Storage: Store brownies in an airtight container at room temperature for up to 4 days. Layer parchment paper between layers if stacking to prevent sticking. Keep away from direct sunlight and heat sources. If your kitchen is very warm (over 75°F), refrigerate instead to prevent the chocolate from blooming.
Refrigerator Storage: Brownies stay fresh in the refrigerator for up to 1 week when stored in an airtight container. Let them sit at room temperature for 15-20 minutes before serving for the best flavor and texture. Cold brownies are more fudgy and dense, while room temperature brownies are softer and more chocolatey-tasting.
Individual Wrapping: For grab-and-go convenience, wrap individual brownies tightly in plastic wrap, then store all wrapped brownies in a larger container or freezer bag. Perfect for packing in lunches or having portion-controlled treats ready.
Maintaining Freshness: Place a piece of bread in your brownie storage container. As the bread dries out, it releases moisture that the brownies absorb, keeping them soft and fresh longer. Replace the bread every 2-3 days.
Make-Ahead & Freezer Notes
Bake Ahead: These brownies are actually better the day after baking, as the flavors meld and the texture improves. Bake up to 2 days ahead, let cool completely, then store at room temperature wrapped tightly in plastic wrap.
Freeze Whole or Sliced: Oreo Brownies freeze beautifully for up to 3 months. For whole pan freezing: let brownies cool completely, wrap the entire pan tightly in plastic wrap, then again in aluminum foil. For individual freezing: cut into squares, wrap each square in plastic wrap, then store all wrapped brownies in a freezer-safe bag or container.
Thawing Instructions: For whole pan, thaw overnight in the refrigerator still wrapped, then bring to room temperature. For individual brownies, thaw at room temperature for 30-45 minutes, or microwave frozen brownies for 15-20 seconds for a warm, gooey treat.
Flash Freezing: For the neatest individual brownie storage, place unwrapped brownies on a parchment-lined baking sheet and freeze for 1-2 hours until solid. Then wrap individually in plastic wrap—this prevents them from sticking together or getting squished.
Freezing Unbaked Batter: You can also freeze the brownie batter before baking! Prepare the batter, layer in your pan with Oreos as directed, wrap tightly, and freeze for up to 2 months. Bake from frozen, adding 10-15 minutes to the baking time.
Best Reheating Method: For that fresh-from-the-oven experience, microwave individual brownies for 10-15 seconds (don’t overdo it!), or warm the whole pan in a 300°F oven for 8-10 minutes. Serve warm brownies with cold ice cream for the ultimate contrast.
Serving Suggestions
These Oreo Brownies are incredibly versatile and can be enjoyed in numerous delicious ways:
Classic Dessert Pairings:
- Tall glass of cold whole milk for dunking—honoring the Oreo tradition
- Vanilla ice cream or cookies and cream ice cream for a decadent brownie sundae
- Fresh whipped cream and a sprinkle of crushed Oreos
- Hot fudge sauce drizzled over warm brownies
Coffee Shop Style:
- Strong hot coffee or espresso to balance the sweetness
- Iced coffee with cream for a refreshing contrast
- Hot chocolate topped with marshmallows for ultimate chocolate indulgence
- Caramel macchiato for a sophisticated flavor pairing
Party Presentation:
- Cut into small bite-sized pieces for dessert buffets or cocktail parties
- Serve on a tiered stand for elegant presentation
- Offer with various ice cream flavors and toppings for a DIY brownie bar
- Top with whipped cream and a mini Oreo on a stick for individual servings
Special Occasion Ideas:
- Birthday parties: Add candles and use as a brownie “cake”
- Game day: Cut into squares and arrange on a platter with team-colored napkins
- Potlucks: Transport in the pan and cut on-site for maximum freshness
- Gift giving: Wrap individual brownies in cellophane tied with ribbon
Complementary Desserts:
- Serve alongside vanilla cheesecake for variety
- Pair with fresh strawberries to cut through the richness
- Include in a cookie and brownie assortment platter
- Serve with chocolate mousse for serious chocolate lovers
FAQs Section
Can I use a different type of cookie instead of Oreos? Absolutely! The recipe works with most sandwich cookies. Try Golden Oreos for a vanilla version, chocolate chip cookies broken into pieces, Nutter Butters for peanut butter brownies, or even Milano cookies for an elegant twist. Keep in mind that different cookies have different moisture contents, which may slightly affect the final texture, but the brownies will still be delicious.
Why are my brownies cakey instead of fudgy? Several factors cause cakey brownies: too much flour (always measure carefully by spooning and leveling), too many eggs, overbaking, or overmixing the batter after adding flour. The ratio of ingredients in this recipe is specifically designed for fudgy brownies, so if you follow the measurements precisely and don’t overbake, you should get perfect fudgy texture every time.
Can I make these in a different pan size? Yes, but you’ll need to adjust baking time. An 8×8-inch pan creates thicker brownies that need 40-45 minutes. A 9×13-inch pan makes thinner brownies that bake in 25-28 minutes. Always use the toothpick test rather than relying solely on time, as all ovens vary. The 9×9-inch pan specified in this recipe creates the perfect thickness-to-texture ratio.
My Oreos sank to the bottom. What did I do wrong? This usually happens when the batter is too thin or the cookies are too heavy. Make sure you’re using regular Oreos (not Double Stuf, which are heavier). The layering method in this recipe—with Oreos in the middle and pressed on top rather than mixed throughout—prevents sinking. If you prefer mixing cookies throughout, toss crushed Oreos in a tablespoon of flour before folding into the batter to help them stay suspended.
How do I know when the brownies are perfectly done? The best indicator is the toothpick test: insert a toothpick into the center (avoiding any visible Oreos or chocolate chips). It should come out with a few moist crumbs attached—not wet batter, but definitely not clean like a cake. The edges should look set and may have pulled slightly from the pan sides, and the top should have that shiny, crackly appearance. When in doubt, slightly underbake rather than overbake.
Can I double this recipe? Yes! Double all ingredients and bake in a 9×13-inch pan for 35-40 minutes, or make two separate 9×9-inch pans. Making two pans is actually preferable because it ensures even baking. If using a 9×13-inch pan, watch carefully as the thinner brownies can go from perfect to overbaked quickly.
Why do my brownies stick to the pan even though I greased it? Greasing alone often isn’t enough, especially with fudgy brownies. The parchment paper sling method (lining the pan with parchment that overhangs on two sides) is foolproof. You can lift the entire brownie slab out of the pan after cooling, making cutting incredibly easy. If you forget parchment paper, let the brownies cool completely in the pan, then warm the bottom of the pan briefly by setting it on a warm stovetop or dipping the bottom in hot water for a few seconds—this loosens the brownies.
Can I reduce the sugar? I don’t recommend reducing sugar significantly in this recipe. Sugar does more than just sweeten—it provides moisture, creates tender texture, and contributes to that shiny crackly top. Reducing sugar by more than 25% will result in dry, tough brownies without the characteristic texture. If you find brownies too sweet, try balancing with a sprinkle of flaky sea salt on top, which enhances chocolate flavor and reduces perceived sweetness.
Conclusion
You’re now armed with everything you need to create the most incredible Oreo Brownies that’ll have everyone begging for your secret recipe! These brownies prove that you don’t need complicated techniques or exotic ingredients to make something truly spectacular—just quality ingredients, proper technique, and a little patience (especially during that crucial cooling time!).
The beauty of this recipe lies in its perfect balance of fudgy chocolate richness and the nostalgic crunch of Oreo cookies. Whether you’re baking for a special celebration, bringing treats to share with friends, or simply satisfying a chocolate craving on a rainy afternoon, these Oreo Brownies deliver every single time. They’re forgiving enough for beginners yet impressive enough to serve at the fanciest gatherings.
Remember the key points for success: measure your flour carefully, don’t overbake (moist crumbs on the toothpick are your goal), and resist the urge to cut into them while they’re still warm. That patience will be rewarded with perfectly fudgy, clean-cutting brownies that look as good as they taste.
I absolutely love hearing about your baking adventures! Did your family devour these in one sitting? Did you try any of the variations? What occasion did you make them for? Drop a comment below sharing your experience, upload a photo, and don’t forget to rate this recipe—your feedback helps other home bakers and lets me know what recipes you’d like to see more of.
Ready to start baking? Save this recipe to your Pinterest boards so you’ll always have it when a brownie craving strikes (and it will!). Share it with your chocolate-loving friends who need these brownies in their lives. And when you make them, I’d be absolutely thrilled if you’d tag me on Instagram or Facebook—there’s nothing I love more than seeing your delicious creations!
Now grab that apron, preheat that oven, and get ready to bake the brownies that’ll make you the most popular person at any gathering. Happy baking, and here’s to creating sweet memories one fudgy, Oreo-packed brownie at a time! 🍫