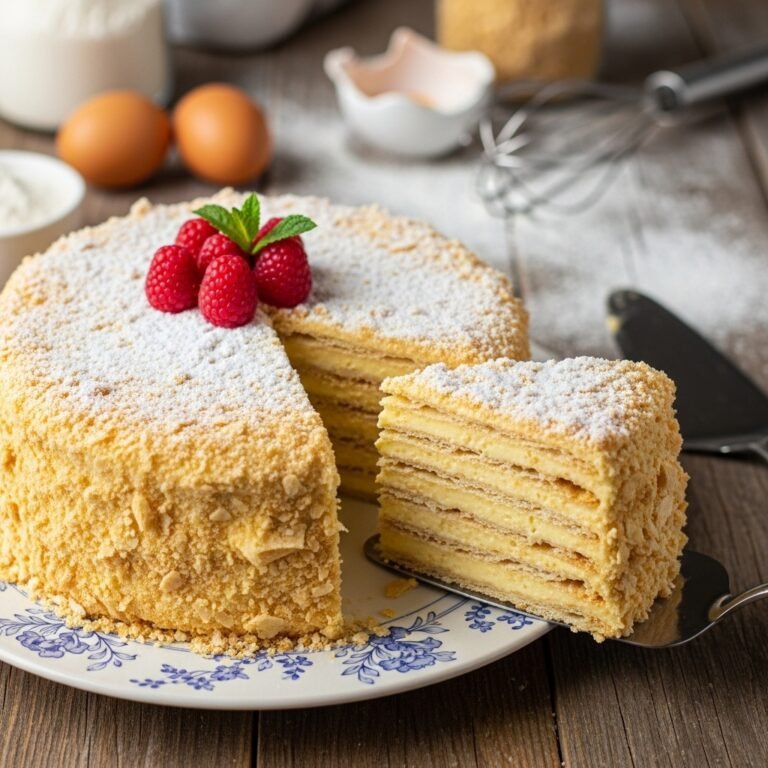
The Ultimate Napoleon Cake Recipe: Layers of Flaky Pastry & Silky Custard Cream
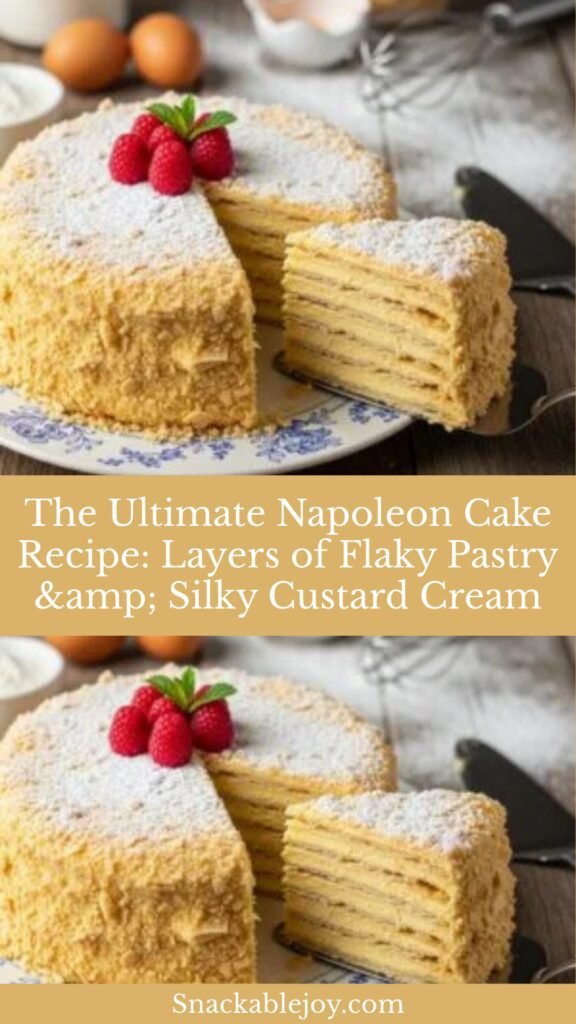
Napoleon Cake is an absolutely stunning Russian dessert that features delicate, crispy layers of puff pastry alternating with luscious vanilla custard cream. This showstopping cake, known as “Napoleonsky Tort” in Russia, is a celebration cake that graces tables during special occasions, holidays, and family gatherings. With its gorgeous golden layers visible from the side and a cloud of pastry crumbs adorning the top, Napoleon Cake is as beautiful as it is delicious.
Despite its elegant appearance, this recipe is surprisingly approachable for home bakers willing to invest a bit of time and love into creating something truly special. The combination of buttery, flaky pastry with smooth, vanilla-scented custard creates an irresistible texture contrast that keeps everyone coming back for another slice. Whether you’re celebrating a birthday, hosting a dinner party, or simply want to impress your family with your baking skills, this Napoleon Cake will absolutely steal the show.
History / Background
Napoleon Cake has a fascinating and somewhat mysterious history that’s deeply rooted in Russian and Soviet culinary traditions. Despite its name, this dessert actually has no connection to the French emperor Napoleon Bonaparte. The most popular theory suggests the cake was created in Russia in 1912 to commemorate the 100th anniversary of Russia’s victory over Napoleon in the War of 1812. Ironically, the cake was named after the very leader Russia had defeated—a culinary celebration of triumph!
Another theory proposes that the name comes from the French pastry “mille-feuille” (meaning “thousand leaves”), which features similar layered construction. As this French dessert technique made its way to Russia, it evolved into something uniquely Russian with adaptations to local tastes and available ingredients.
During the Soviet era, Napoleon Cake became one of the most beloved desserts across all Soviet republics, with each region developing its own slight variations. Home bakers would spend hours carefully rolling out dough layers and preparing custard from scratch, making it a true labor of love reserved for the most special occasions.
Today, Napoleon Cake remains one of the most requested and cherished desserts throughout Russia, Ukraine, and other former Soviet countries. It’s practically mandatory at weddings, New Year’s celebrations, and milestone birthdays. The cake represents nostalgia, tradition, and the warmth of home baking passed down through generations.
Why You’ll Love This Recipe
This Napoleon Cake recipe strikes the perfect balance between impressive presentation and achievable home baking. While it does require some time and patience, the process itself is actually quite straightforward, and the results are absolutely worth every minute.
Here’s why this recipe will become your go-to celebration cake:
- Stunning visual appeal – Those visible layers and rustic pastry crumb topping make this cake Instagram and Pinterest-worthy
- Make-ahead friendly – Actually tastes better after resting overnight as the pastry softens into the perfect texture
- Customizable sweetness – You control the sugar level in the custard to suit your taste preferences
- Feeds a crowd – One cake easily serves 12-16 people, making it perfect for gatherings
- Unique flavor and texture – The combination of crispy-yet-tender pastry with silky custard is unlike any American layer cake
- Conversation starter – Guests always ask about this impressive dessert and its fascinating history
- Surprisingly economical – Made with simple, affordable ingredients: flour, butter, eggs, milk, and sugar
- Room temperature stable – The custard is a cooked pastry cream that’s safe at room temp for serving
Ingredient Notes
Let’s break down the key ingredients that make this Napoleon Cake so special:
For the Pastry Layers:
- All-purpose flour – Provides the structure for flaky layers. Bread flour works too for slightly sturdier layers.
- Cold unsalted butter – The key to flakiness! Keep it very cold and cut it into the flour until it resembles coarse crumbs. European-style butter with higher fat content creates even flakier results.
- Sour cream – This is the Russian secret ingredient that makes the dough tender and easier to work with than traditional puff pastry. You can substitute with full-fat Greek yogurt in a pinch.
- Eggs – Bind the dough and add richness.
- Vodka or vinegar – A small amount prevents gluten development, keeping layers tender. The alcohol evaporates during baking.
For the Custard Cream:
- Whole milk – Creates a rich, creamy custard. Don’t use low-fat milk as it won’t be as luscious.
- Granulated sugar – Sweetens the custard. Adjust to your preference.
- Egg yolks – These are the thickening agents that create silky custard. Save those whites for meringues!
- Cornstarch – Provides additional stability and prevents the custard from being too loose.
- Unsalted butter – Added at the end for glossy, smooth texture and rich flavor.
- Vanilla extract or vanilla bean paste – Essential for that classic custard flavor. Pure vanilla extract is worth the investment.
Equipment Needed
Having the right tools makes this recipe much easier:
- Large mixing bowl – For preparing the dough
- Rolling pin – Essential for rolling out thin, even pastry layers
- Baking sheets (2-3) – For baking multiple layers simultaneously
- Parchment paper – Prevents sticking and makes cleanup easy
- Plate or pot lid (9-inch) – Use as a template to cut perfect circles
- Sharp knife or pizza cutter – For trimming pastry circles
- Medium saucepan – For cooking the custard
- Whisk – For smooth, lump-free custard
- Fine-mesh strainer – Optional but helpful for ultra-smooth custard
- Offset spatula or butter knife – For spreading custard between layers
- Plastic wrap – For wrapping and chilling the cake
- Food processor – Optional, for crushing pastry scraps into fine crumbs
Print

Napoleon Cake Recipe
This classic Russian Napoleon Cake features ultra-thin layers of crispy puff pastry alternating with smooth vanilla custard cream. A stunning celebration dessert that’s worth every minute of preparation!
- Total Time: 9 hours 30 minutes
- Yield: 12-16 servings 1x
Ingredients
ScaleFor the Pastry Layers:
- 4 cups (500g) all-purpose flour, plus more for rolling
- 1 cup (226g) cold unsalted butter, cubed
- 1 cup (240g) sour cream, cold
- 2 large eggs
- 2 tablespoons vodka or white vinegar
- ½ teaspoon salt
- 1 tablespoon granulated sugar
For the Custard Cream:
- 4 cups (960ml) whole milk
- 1 cup (200g) granulated sugar
- 6 large egg yolks
- ⅓ cup (45g) cornstarch
- 4 tablespoons (56g) unsalted butter
- 2 teaspoons vanilla extract
- Pinch of salt
Instructions
Making the Pastry Dough:
- Prepare the butter mixture: In a large mixing bowl, combine flour, salt, and sugar. Add the cold cubed butter and use a pastry cutter or your fingertips to work it into the flour until the mixture resembles coarse breadcrumbs with pea-sized butter pieces remaining.
- Combine wet ingredients: In a separate bowl, whisk together sour cream, eggs, and vodka (or vinegar) until well combined and smooth.
- Form the dough: Pour the wet ingredients into the flour-butter mixture. Stir with a wooden spoon until the dough just comes together. It will look shaggy at first—that’s perfect! Turn it out onto a lightly floured surface and knead gently 3-4 times until it forms a cohesive ball. Don’t overwork it.
- Divide and chill: Divide the dough into 8-10 equal portions (depending on how many layers you want). Shape each into a flat disk, wrap individually in plastic wrap, and refrigerate for at least 30 minutes or up to 2 days.
Baking the Pastry Layers:
- Preheat oven: Heat your oven to 400°F (200°C). Line 2-3 baking sheets with parchment paper.
- Roll out dough: Working with one dough disk at a time (keep others refrigerated), roll it out on a well-floured surface as thin as possible—aim for about 1/16-inch thickness or thinner. The thinner you roll, the crispier and more delicate your layers will be.
- Cut circles: Using a 9-inch plate, pot lid, or cake pan as a template, cut out a perfect circle from the rolled dough. Prick the entire surface with a fork to prevent puffing. Transfer to a prepared baking sheet. Save all the dough scraps!
- Bake: Bake for 5-7 minutes, until the pastry is golden brown and crispy. Watch carefully as thin pastry can burn quickly! The layers should be evenly golden and look dry.
- Repeat: Continue rolling, cutting, and baking all remaining dough portions. You should end up with 8-10 crispy pastry circles. Bake the scraps too—these become your topping!
- Cool completely: Let all pastry layers cool completely on wire racks. They’ll crisp up even more as they cool.
Making the Custard Cream:
- Prepare egg mixture: In a medium bowl, whisk together egg yolks, cornstarch, and ¼ cup of the milk until smooth and no lumps remain. Set aside.
- Heat milk: In a medium saucepan, combine the remaining milk, sugar, and salt. Heat over medium heat, stirring occasionally, until it just begins to simmer. Don’t let it boil.
- Temper the eggs: Slowly pour about 1 cup of the hot milk into the egg yolk mixture while whisking constantly. This gradually raises the temperature of the eggs without scrambling them.
- Cook the custard: Pour the tempered egg mixture back into the saucepan with the remaining milk. Cook over medium heat, whisking constantly, until the mixture thickens significantly—about 5-7 minutes. It should coat the back of a spoon and hold its shape when you draw a line through it with your finger.
- Finish the custard: Remove from heat and immediately whisk in the butter and vanilla extract until completely smooth. For ultra-smooth custard, strain through a fine-mesh sieve into a clean bowl.
- Cool: Press plastic wrap directly onto the surface of the custard to prevent a skin from forming. Let it cool to room temperature, about 30 minutes.
Assembling the Napoleon Cake:
- Choose your base: Place your best-looking pastry layer on a serving plate or cake stand. If any layers cracked during baking, save those for the middle where they won’t be visible.
- Spread custard: Spread about ½ cup of custard evenly over the pastry layer, leaving a small border around the edge. The custard will spread slightly as layers are added.
- Stack and repeat: Place another pastry layer on top and spread with custard. Continue layering until you’ve used all pastry layers, ending with a pastry layer on top (no custard on the very top).
- Crush the scraps: Place all the baked pastry scraps in a food processor and pulse until they form fine crumbs. Alternatively, crush them in a zip-top bag with a rolling pin.
- Top the cake: Spread a very thin layer of custard on the top and sides of the cake. Generously press the pastry crumbs all over the top and sides of the cake, coating it completely. This is the signature Napoleon Cake look!
- Chill overnight: Cover the cake loosely with plastic wrap and refrigerate for at least 8 hours or preferably overnight. This resting time is crucial—it allows the pastry to soften and meld with the custard, creating that perfect tender-yet-structured texture that makes Napoleon Cake so special.
- Serve: Remove from refrigerator 15-20 minutes before serving to take the chill off. Slice with a sharp knife, wiping it clean between cuts for neat slices.
Notes
- Dough temperature matters: Keep everything cold for the flakiest layers. If your kitchen is warm, pop the dough back in the fridge if it becomes too soft to work with.
- Rolling thickness: The thinner you can roll the dough, the more delicate and authentic your Napoleon Cake will be. Aim for translucent thinness!
- Custard consistency: Your custard should be thick enough to hold its shape but spreadable. If it’s too thick, whisk in a tablespoon of milk at a time.
- Patience pays off: Don’t skip the overnight rest! The cake needs time for the layers to soften and flavors to meld.
- Serving temperature: Napoleon Cake is best served slightly chilled or at cool room temperature.
- Prep Time: 1 hour
- Cook Time: 30 minutes
- Category: Desert
- Method: Baking
- Cuisine: Russian
- Diet: Vegetarian
Nutrition
- Serving Size: 1 slice (1/14 of cake)
- Calories: 385
- Sugar: 18g
- Sodium: 145mg
- Fat: 22g
- Saturated Fat: 13g
- Unsaturated Fat: 7g
- Trans Fat: 0g
- Carbohydrates: 41g
- Fiber: 1g
- Protein: 7g
- Cholesterol: 165mg
Tips & Variations
Flavor Variations:
- Chocolate Napoleon: Add 2 tablespoons of cocoa powder to the custard for a chocolate twist, or drizzle melted chocolate between layers.
- Citrus Napoleon: Add lemon or orange zest to the custard for a bright, refreshing flavor.
- Coffee Napoleon: Dissolve 2 tablespoons instant espresso powder in the milk before making the custard.
- Dulce de Leche Napoleon: Replace half the custard with dulce de leche for a caramel variation.
- Berry Napoleon: Add a thin layer of berry preserves between every other layer of custard.
Dietary Adaptations:
- For a less rich version, you can use half-and-half instead of whole milk in the custard, though it won’t be quite as creamy.
- The pastry dough can be made with salted butter if that’s what you have—just omit the additional salt.
Texture Preferences:
- For crunchier layers, reduce the chilling time to 4-6 hours.
- For softer, more cake-like texture, let it rest for 24-48 hours.
Pro Chef Tips
Achieve perfectly thin layers: Professionals often roll the dough directly on parchment paper, then slide the entire sheet onto the baking tray. This prevents tearing and maintains that ultra-thin consistency.
Temperature control is everything: The contrast between cold butter in the dough and the hot oven creates steam pockets that make the pastry flaky. Never let your dough get warm while working with it.
Custard technique matters: When cooking custard, constant whisking prevents lumps and ensures even cooking. The moment it thickens to pudding consistency, remove it from heat immediately to prevent overcooking the eggs.
Even custard distribution: Use an offset spatula and work from the center outward in concentric circles for perfectly even custard layers.
The overnight rest is non-negotiable: This isn’t just a suggestion—the magic of Napoleon Cake happens during this resting period. The moisture from the custard softens the crispy pastry layers into something tender yet still structured. Freshly assembled Napoleon Cake tastes completely different (and much worse!) than one that’s rested overnight.
Sharp knife for clean slices: Warm your knife under hot water, wipe it dry, then make each cut. Clean and rewarm the knife between each slice for bakery-perfect presentation.
Common Mistakes to Avoid
1. Overworking the dough: This develops too much gluten, resulting in tough, chewy pastry instead of flaky layers. Mix just until combined and handle minimally.
2. Rolling dough too thick: Thick layers won’t crisp properly and will remain doughy even after baking. They also won’t soften correctly during the resting period. Roll as thin as you possibly can—you should almost be able to see through it.
3. Undercooking the custard: If your custard is too thin, it will make the cake soggy and won’t hold its structure. Cook until it’s thick enough to coat a spoon heavily and hold a line when you draw your finger through it.
4. Not chilling long enough: I know it’s tempting to cut into this beauty immediately, but Napoleon Cake needs that full overnight rest. Without it, the layers will be too crunchy and separate, rather than cohesive.
5. Spreading custard on warm pastry: Always let pastry layers cool completely before assembling. Warm layers will melt the custard and create a soggy mess instead of distinct layers.
Storage & Meal Prep
Refrigerator Storage:
Napoleon Cake stores beautifully in the refrigerator for up to 5 days. Cover it loosely with plastic wrap or place in a cake dome to prevent it from absorbing other refrigerator odors. The texture actually continues to improve through day 2 or 3 as the layers soften further.Room Temperature:
While the cooked custard is stable for a few hours at room temperature during serving, don’t leave Napoleon Cake out for more than 2-3 hours. The butter in both the pastry and custard can become too soft in warm conditions.Reheating:
Napoleon Cake is served cold or at cool room temperature—never reheat it! Simply remove from the refrigerator 15-20 minutes before serving to take off the chill slightly.Texture Changes:
As the cake sits, the layers continue to absorb moisture from the custard. By day 4-5, it will be quite soft (still delicious, just less texturally distinct). If you prefer crunchier layers, enjoy it within 2-3 days of assembly.Make-Ahead & Freezer Notes
Make-Ahead Component Preparation:
- Pastry layers: Bake the pastry layers up to 3 days in advance. Store in an airtight container at room temperature with parchment paper between layers. They’ll stay crispy and perfect for assembly.
- Custard cream: Make the custard up to 2 days ahead. Store in an airtight container in the refrigerator with plastic wrap pressed directly on the surface. Whisk briefly before using to restore smooth texture.
- Fully assembled cake: As mentioned, Napoleon Cake is actually better when made a day ahead! The full overnight rest is part of the recipe.
Freezing Options:
- Unbaked dough: The pastry dough disks freeze beautifully for up to 3 months. Wrap each disk tightly in plastic wrap, then place in a freezer bag. Thaw overnight in the refrigerator before rolling and baking.
- Baked pastry layers: Freeze baked (and cooled) layers for up to 2 months. Layer them with parchment paper in an airtight container. No need to thaw—they come to room temperature quickly.
- Fully assembled cake: This is not recommended. The custard doesn’t freeze well and will separate and become grainy when thawed. Plus, the texture balance will be completely off.
Best Method for Entertaining: Bake all your pastry layers 2-3 days before your event. Make the custard the day before. Assemble the cake the night before serving. This spreads out the work and ensures the cake is at peak perfection when you’re ready to serve!
Serving Suggestions
Napoleon Cake is a rich, satisfying dessert that pairs beautifully with several accompaniments:
Beverages:
- Strong black coffee or espresso – The classic pairing! The slight bitterness cuts through the cake’s richness perfectly.
- Hot tea – Try Earl Grey, English Breakfast, or Russian Caravan tea for authentic pairing.
- Champagne or sparkling wine – For celebrations, the bubbles and acidity balance the sweet custard.
- Dessert wine – A sweet Riesling or Moscato complements the vanilla beautifully.
- Milk – Simple and nostalgic, especially for kids!
Complementary Dessert Elements:
- Fresh berries – Raspberries, strawberries, or blackberries add a tart contrast.
- Berry compote – A spoonful of mixed berry sauce on the side provides fruity brightness.
- Whipped cream – Though the cake is already creamy, a small dollop adds visual appeal.
- Chocolate sauce – A drizzle of dark chocolate sauce creates an elegant restaurant-style presentation.
Serving Occasions: Napoleon Cake is traditionally served at birthdays, weddings, New Year’s Eve celebrations, anniversaries, graduation parties, and any special family gathering. It’s the kind of impressive dessert that makes any occasion feel more festive and memorable.
Portion Sizes: Because this cake is quite rich, slices are typically cut narrower than regular American layer cakes. Aim for 12-16 slices from a 9-inch cake. Serve on dessert plates with small forks—this is meant to be savored slowly!
FAQs Section
Q: Can I use store-bought puff pastry instead of making the dough?
A: Yes! Using frozen puff pastry sheets is a great time-saving shortcut. You’ll need about 3-4 packages (depending on brand). Roll each sheet very thin, cut into circles, prick with a fork, and bake at 400°F until golden and crispy (8-10 minutes). The texture will be slightly different—a bit more uniform and less rustic—but still delicious. This cuts your prep time significantly!Q: Why is my custard lumpy?
A: Lumps usually happen from either not whisking the cornstarch mixture thoroughly enough at the beginning, or not whisking constantly while the custard cooks. If you do end up with lumps, simply strain the finished custard through a fine-mesh sieve into a clean bowl. For future batches, make sure to whisk continuously once the mixture goes on the heat, and use a vigorous whisking motion to keep everything moving.Q: How do I know when the custard is thick enough?
A: The custard should coat the back of a spoon heavily, and when you draw your finger through it, the line should hold without running back together. It should look like thick pudding or pastry cream consistency—not pourable like milk, but not as stiff as butter. If you’re unsure, it’s better to cook it a bit longer than to undercook it.Q: Can I make a smaller version of this cake?
A: Absolutely! You can easily halve this recipe to make a 6-layer cake using a 7-inch circle template. Divide the dough into 6 portions, halve the custard ingredients, and proceed with the same technique. You’ll end up with a cake that serves 6-8 people—perfect for a small gathering.Q: Why did my pastry layers puff up unevenly or create bubbles?
A: This usually means you didn’t prick the dough thoroughly enough with a fork before baking. Those little holes allow steam to escape so the pastry bakes flat and crispy. Make sure to prick the entire surface generously—don’t be shy! If bubbles do form during baking, you can gently press them down with a spatula in the first minute or two.Q: My assembled cake is leaning or sliding. How do I fix this?
A: This happens when the custard is too thin or warm when assembling. Make sure your custard has cooled to room temperature and is thick enough to hold its shape. During assembly, spread the custard evenly and try to stack each layer as centered as possible. A slight lean is okay—it adds rustic charm! But if it’s really unstable, your custard may need to be thicker next time.Q: Can I make this cake dairy-free or vegan?
A: This is a challenging adaptation because both the buttery pastry and egg custard are fundamental to Napoleon Cake. For the pastry, you could try using vegan butter and non-dairy sour cream, though the texture may differ. For the custard, you’d need to use full-fat coconut milk or other creamy plant milk, and replace eggs with a combination of cornstarch and agar powder as thickeners. Honestly, this cake is so reliant on traditional dairy ingredients that the result would be quite different from authentic Napoleon Cake, but it could still be tasty in its own right!Conclusion
There you have it—the complete guide to creating an authentic, showstopping Russian Napoleon Cake right in your own kitchen! Yes, this recipe requires some time and patience, but I promise you that every minute is absolutely worth it when you see the faces of your family and friends as you bring this stunning layered masterpiece to the table.
The beauty of Napoleon Cake isn’t just in its elegant appearance or fascinating history—it’s in those perfect bites where crispy-tender pastry meets silky vanilla custard. It’s in the tradition you’re carrying forward when you make this beloved Eastern European dessert. And it’s in the memories you’ll create as you share slices with the people you love.
Don’t be intimidated by the steps! Take your time, follow the instructions, and remember that even if your layers aren’t perfectly round or your cake leans a little, it will still taste absolutely incredible. Home-baked Napoleon Cake has a charm and flavor that no bakery version can match.
I’d love to hear about your Napoleon Cake adventures! Did you try any of the flavor variations? How did your family react? Drop a comment below and share your experience. And if you loved this recipe, please PIN IT to your Pinterest boards so you can find it again—and help other home bakers discover this amazing dessert too!
Happy baking, and enjoy every delicious layer! 🍰✨