Ingredients
For the Biscoff Cookie Crust:
- 24-26 Lotus Biscoff cookies (about 250g or one package)
- 5 tablespoons unsalted butter, melted
- 1 tablespoon granulated sugar (optional, for extra sweetness)
- Pinch of salt
For the Cheesecake Filling:
- 24 ounces (3 packages) cream cheese, room temperature
- 1 cup powdered sugar, sifted
- 1 cup Biscoff cookie butter spread (smooth), room temperature
- 1½ teaspoons pure vanilla extract
- ¼ teaspoon salt
- 1½ cups heavy whipping cream, cold
- 1 teaspoon unflavored gelatin + 2 tablespoons cold water (optional but recommended for stability)
For Topping (Optional):
- ¼ cup Biscoff cookie butter, slightly warmed for drizzling
- 8-10 whole Biscoff cookies for decoration
- Crushed Biscoff cookies
- Whipped cream
Instructions
Step 1: Prepare the Springform Pan
Line the bottom of a 9-inch springform pan with parchment paper for easy removal later. You can trace the bottom of the pan on parchment and cut it out for a perfect fit. Lightly grease the sides with butter or cooking spray. This preparation ensures your beautiful cheesecake releases perfectly.
Step 2: Make the Biscoff Cookie Crust
Add the Biscoff cookies to your food processor and pulse until you have fine, even crumbs—they should resemble coarse sand with no large pieces remaining. If you don’t have a food processor, place cookies in a sealed plastic bag and crush with a rolling pin until finely ground. Transfer the crumbs to a medium bowl, add the melted butter, sugar (if using), and pinch of salt. Mix thoroughly with a fork until all crumbs are evenly moistened and the mixture resembles wet sand. It should hold together when squeezed.
Step 3: Press and Chill the Crust
Pour the cookie mixture into your prepared springform pan. Using the bottom of a flat measuring cup or glass, press the crumbs firmly and evenly across the bottom of the pan, pressing slightly up the sides (about ½ inch). The key is firm, even pressure to prevent a crumbly crust. Place the pan in the refrigerator while you prepare the filling—at least 15 minutes to help it set.
Step 4: Bloom the Gelatin (If Using)
In a small saucepan, sprinkle the gelatin over 2 tablespoons of cold water. Let it sit for 5 minutes to bloom (it will look spongy and absorbed). Then, heat it over very low heat, stirring constantly, just until the gelatin completely dissolves—about 1-2 minutes. Don’t let it boil. Set aside to cool slightly but not solidify.
Step 5: Beat the Cream Cheese Base
In a large bowl using your stand mixer or hand mixer, beat the room temperature cream cheese on medium speed for 2-3 minutes until completely smooth and fluffy with no lumps whatsoever. Scrape down the bowl sides frequently. Add the powdered sugar and beat for another 2 minutes until fully incorporated and silky smooth.
Step 6: Add Cookie Butter and Flavorings
Add the Biscoff cookie butter (make sure it’s at room temperature so it incorporates smoothly), vanilla extract, and salt to the cream cheese mixture. Beat on medium speed for 1-2 minutes until everything is completely combined and the mixture is uniform in color and texture. If you’re using gelatin, drizzle in the cooled (but still liquid) gelatin while mixing on low speed until incorporated.
Step 7: Whip the Heavy Cream
In a separate clean, cold bowl, beat the cold heavy whipping cream on high speed until stiff peaks form—this takes about 3-4 minutes. You’ll know it’s ready when you lift the beaters and the cream stands up in peaks that hold their shape without drooping. Don’t overwhip or you’ll end up with butter!
Step 8: Fold and Combine
Using a rubber spatula, gently fold about one-third of the whipped cream into the cream cheese mixture to lighten it. Use a folding motion (cutting down through the center, along the bottom, and up the side) rather than stirring to preserve the airiness. Once incorporated, gently fold in the remaining whipped cream in two additions until no white streaks remain. Be patient and gentle—this folding technique is what creates that light, mousse-like texture.
Step 9: Fill and Swirl
Pour the cheesecake filling into the prepared crust, smoothing the top with an offset spatula or the back of a spoon. For a decorative finish, warm about ¼ cup of extra cookie butter in the microwave for 10-15 seconds until it’s pourable but not hot. Drizzle it over the top of the cheesecake in lines or dots, then use a toothpick or thin knife to swirl it into beautiful patterns. Don’t over-swirl or you’ll lose the definition!
Step 10: Chill Overnight
Cover the cheesecake carefully with plastic wrap or aluminum foil (make sure it doesn’t touch the surface). Refrigerate for at least 6 hours, but overnight (8-12 hours) is ideal for the best texture and flavor. This chilling time is crucial—don’t rush it! The cheesecake needs this time to set properly and for all the flavors to meld together beautifully.
Step 11: Decorate and Serve
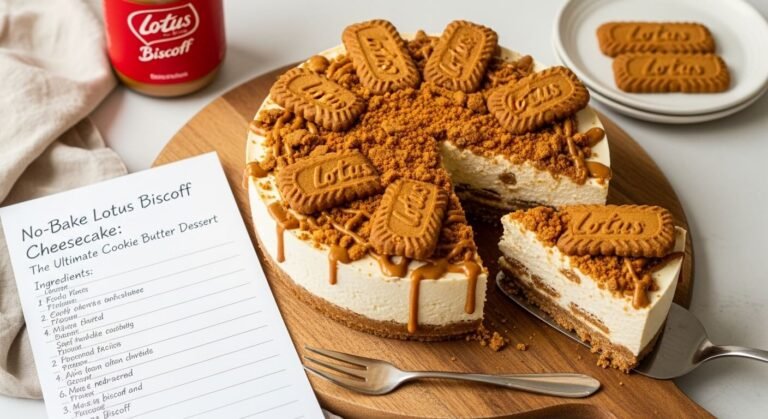
Just before serving, remove the cheesecake from the refrigerator. Run a thin knife around the edge of the pan, then carefully release and remove the springform sides. Decorate the top with whole Biscoff cookies arranged in a pattern, crushed cookies sprinkled around the edges, extra cookie butter drizzle, or dollops of whipped cream. Get creative with your presentation!
Step 12: Slice and Enjoy
For perfectly clean slices, use a sharp knife dipped in hot water and wiped dry between each cut. Make smooth, confident cuts straight down rather than sawing. The warm knife glides through the filling like butter, creating those beautiful, professional-looking slices that showcase the gorgeous layers.
Notes
Step 1: Prepare the Springform Pan
Line the bottom of a 9-inch springform pan with parchment paper for easy removal later. You can trace the bottom of the pan on parchment and cut it out for a perfect fit. Lightly grease the sides with butter or cooking spray. This preparation ensures your beautiful cheesecake releases perfectly.
Step 2: Make the Biscoff Cookie Crust
Add the Biscoff cookies to your food processor and pulse until you have fine, even crumbs—they should resemble coarse sand with no large pieces remaining. If you don’t have a food processor, place cookies in a sealed plastic bag and crush with a rolling pin until finely ground. Transfer the crumbs to a medium bowl, add the melted butter, sugar (if using), and pinch of salt. Mix thoroughly with a fork until all crumbs are evenly moistened and the mixture resembles wet sand. It should hold together when squeezed.
Step 3: Press and Chill the Crust
Pour the cookie mixture into your prepared springform pan. Using the bottom of a flat measuring cup or glass, press the crumbs firmly and evenly across the bottom of the pan, pressing slightly up the sides (about ½ inch). The key is firm, even pressure to prevent a crumbly crust. Place the pan in the refrigerator while you prepare the filling—at least 15 minutes to help it set.
Step 4: Bloom the Gelatin (If Using)
In a small saucepan, sprinkle the gelatin over 2 tablespoons of cold water. Let it sit for 5 minutes to bloom (it will look spongy and absorbed). Then, heat it over very low heat, stirring constantly, just until the gelatin completely dissolves—about 1-2 minutes. Don’t let it boil. Set aside to cool slightly but not solidify.
Step 5: Beat the Cream Cheese Base
In a large bowl using your stand mixer or hand mixer, beat the room temperature cream cheese on medium speed for 2-3 minutes until completely smooth and fluffy with no lumps whatsoever. Scrape down the bowl sides frequently. Add the powdered sugar and beat for another 2 minutes until fully incorporated and silky smooth.
Step 6: Add Cookie Butter and Flavorings
Add the Biscoff cookie butter (make sure it’s at room temperature so it incorporates smoothly), vanilla extract, and salt to the cream cheese mixture. Beat on medium speed for 1-2 minutes until everything is completely combined and the mixture is uniform in color and texture. If you’re using gelatin, drizzle in the cooled (but still liquid) gelatin while mixing on low speed until incorporated.
Step 7: Whip the Heavy Cream
In a separate clean, cold bowl, beat the cold heavy whipping cream on high speed until stiff peaks form—this takes about 3-4 minutes. You’ll know it’s ready when you lift the beaters and the cream stands up in peaks that hold their shape without drooping. Don’t overwhip or you’ll end up with butter!
Step 8: Fold and Combine
Using a rubber spatula, gently fold about one-third of the whipped cream into the cream cheese mixture to lighten it. Use a folding motion (cutting down through the center, along the bottom, and up the side) rather than stirring to preserve the airiness. Once incorporated, gently fold in the remaining whipped cream in two additions until no white streaks remain. Be patient and gentle—this folding technique is what creates that light, mousse-like texture.
Step 9: Fill and Swirl
Pour the cheesecake filling into the prepared crust, smoothing the top with an offset spatula or the back of a spoon. For a decorative finish, warm about ¼ cup of extra cookie butter in the microwave for 10-15 seconds until it’s pourable but not hot. Drizzle it over the top of the cheesecake in lines or dots, then use a toothpick or thin knife to swirl it into beautiful patterns. Don’t over-swirl or you’ll lose the definition!
Step 10: Chill Overnight
Cover the cheesecake carefully with plastic wrap or aluminum foil (make sure it doesn’t touch the surface). Refrigerate for at least 6 hours, but overnight (8-12 hours) is ideal for the best texture and flavor. This chilling time is crucial—don’t rush it! The cheesecake needs this time to set properly and for all the flavors to meld together beautifully.
Step 11: Decorate and Serve
Just before serving, remove the cheesecake from the refrigerator. Run a thin knife around the edge of the pan, then carefully release and remove the springform sides. Decorate the top with whole Biscoff cookies arranged in a pattern, crushed cookies sprinkled around the edges, extra cookie butter drizzle, or dollops of whipped cream. Get creative with your presentation!
Step 12: Slice and Enjoy
For perfectly clean slices, use a sharp knife dipped in hot water and wiped dry between each cut. Make smooth, confident cuts straight down rather than sawing. The warm knife glides through the filling like butter, creating those beautiful, professional-looking slices that showcase the gorgeous layers.
- Prep Time: 30 minutes
- Cook Time: 0 minutes (no-bake)
- Category: Dessert
- Method: No-Bake, Refrigerated
- Cuisine: American-Belgian Fusion
- Diet: Vegetarian
Nutrition
- Serving Size: 1 slice (1/12 of cheesecake)
- Calories: 485
- Sugar: 32g
- Sodium: 325mg
- Fat: 35g
- Saturated Fat: 20g
- Unsaturated Fat: 13g
- Trans Fat: 0g
- Carbohydrates: 38g
- Fiber: 0.5g
- Protein: 6g
- Cholesterol: 95mg