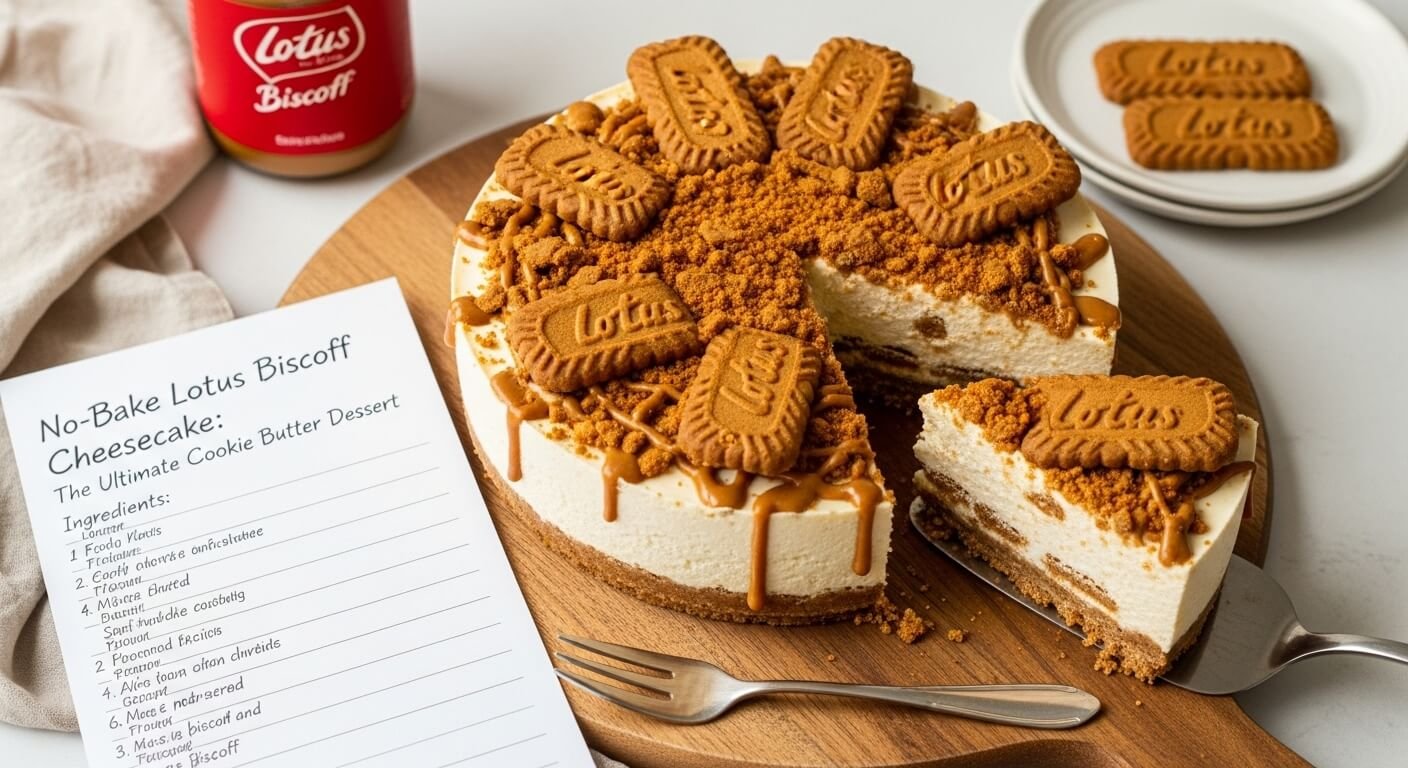
No-Bake Lotus Biscoff Cheesecake Recipe: The Ultimate Cookie Butter Dessert

If you’ve ever dreamed of transforming those irresistible Lotus Biscoff cookies into the ultimate creamy, no-bake dessert, this Lotus Biscoff Cheesecake is about to become your new obsession! This show-stopping cheesecake combines a crunchy Biscoff cookie crust with an impossibly smooth, cookie butter-swirled filling that tastes like pure heaven. And the best part? You don’t even need to turn on your oven.
This no-bake cheesecake is perfect for those hot summer days when you want an impressive dessert without heating up your kitchen, or any time you need a foolproof showstopper that looks like it came from a fancy bakery. Whether you’re celebrating a birthday, hosting a dinner party, bringing dessert to a potluck, or simply treating yourself to something extraordinary, this Lotus Biscoff Cheesecake delivers restaurant-quality results with minimal effort.
The combination of that signature caramelized, slightly spiced Biscoff flavor with rich, tangy cream cheese creates a dessert that’s sophisticated yet comforting. Every bite offers the perfect balance of creamy and crunchy, sweet and tangy, indulgent yet somehow light. Trust me when I say that this cheesecake has converted countless non-cheesecake lovers and has become my most-requested dessert recipe. Once you make it, you’ll understand why people go absolutely crazy for this creation!
History / Background
To truly appreciate this cheesecake, we need to understand the fascinating journey of its star ingredient. Lotus Biscoff cookies—originally known as Speculoos—have a rich history dating back to 1932 in the small Belgian town of Lembeke. Local baker Jan Boone Sr. crafted a secret recipe that perfectly balanced caramelized sugar, warming spices like cinnamon and nutmeg, and just the right amount of crispness to create what would become an iconic European treat.
For generations, Speculoos cookies were primarily enjoyed in Belgium and the Netherlands, traditionally served during the Sinterklaas (St. Nicholas Day) celebrations in early December. Families would gather around beautifully decorated cookie tins, savoring these thin, crispy delights with their afternoon coffee or tea. The name “Speculoos” itself is believed to derive from the Latin word “speculum,” meaning mirror, as the cookies were originally pressed into wooden molds featuring intricate designs and images.
The international breakthrough came in the 1980s when Delta Air Lines began serving these cookies on flights. American travelers became instantly smitten with these caramelized treats, creating a cult following that spread like wildfire. People would stash extras from flights, seek them out in specialty stores, and eventually demand them be made available nationwide. Recognizing this growing American love affair, Lotus Bakeries rebranded the cookies as “Biscoff”—a clever combination of “biscuit” and “coffee”—specifically for the U.S. market.
The true game-changer arrived in 2008 when Lotus Bakeries introduced Biscoff spread (also called cookie butter), a smooth, spreadable version of the crushed cookies. This innovation sparked a culinary revolution in American kitchens. Food bloggers and home bakers immediately began experimenting, incorporating this magical spread into everything from brownies to ice cream to cheesecakes. The no-bake Biscoff cheesecake emerged as one of the most beloved applications, combining American cheesecake tradition with European Biscoff heritage.
This recipe represents a beautiful fusion of cultures: the American love of creamy, indulgent cheesecake meets the Belgian tradition of caramelized cookie perfection. It’s become a modern classic that honors its roots while creating something entirely new and irresistible.
Why You’ll Love This Recipe
This Lotus Biscoff Cheesecake has earned its reputation as an absolute crowd-pleaser, and I’m about to tell you exactly why it deserves a permanent spot in your dessert rotation. The beauty of this recipe lies in its perfect balance of impressive presentation and surprisingly simple preparation—it looks like a million bucks but comes together easier than you’d ever imagine.
Here’s what makes this recipe absolutely irresistible:
- No baking required – Perfect for summer or when you don’t want to heat up the kitchen
- Make-ahead friendly – Actually needs to chill overnight, making it ideal for stress-free party planning
- Crowd-pleaser guaranteed – I’ve never served this to someone who didn’t ask for the recipe immediately
- Minimal hands-on time – Only about 30 minutes of active work for such an impressive result
- Stable and slice-able – Sets beautifully with clean, professional-looking slices every time
- Customizable decorating – Top with whole cookies, drizzle with melted cookie butter, or keep it elegantly simple
- Unique flavor profile – That signature caramelized Biscoff taste sets this apart from ordinary cheesecakes
- No water bath needed – Unlike baked cheesecakes, there’s zero risk of water seeping into your pan
- Texture perfection – Incredibly creamy yet firm enough to hold its shape beautifully
- Budget-friendly luxury – Tastes like a $60 bakery cheesecake but costs a fraction to make
- Foolproof for beginners – If you can use a mixer and refrigerator, you can make this cheesecake
Ingredient Notes
Understanding your ingredients is the foundation of baking success, so let’s break down what goes into this spectacular cheesecake and why each component matters.
Lotus Biscoff Cookies: These form the base of your crust and provide that essential caramelized flavor throughout. You’ll need about 24-26 cookies for the crust (roughly one package). The cookies are naturally crispy and have just the right amount of sweetness to create the perfect foundation. Don’t substitute with other cookies—the unique flavor is what makes this cheesecake special!
Cream Cheese: This is the heart of your cheesecake filling. Always use full-fat, brick-style cream cheese (not spreadable or whipped varieties). Let it come to true room temperature—this means leaving it out for at least 2 hours. Cold cream cheese creates lumps that are nearly impossible to smooth out, ruining the velvety texture we’re after.
Biscoff Cookie Butter Spread (Smooth): The star ingredient that transforms ordinary cheesecake into something extraordinary! Use the smooth variety for the filling to ensure even distribution. The creamy version blends seamlessly, creating those gorgeous swirls and distributing flavor throughout. You can find it near the peanut butter in most grocery stores.
Heavy Whipping Cream: This adds richness and helps create that light, mousse-like texture that makes no-bake cheesecake so special. It must be cold from the refrigerator to whip properly. Don’t substitute with half-and-half or milk—you need the high fat content for proper structure.
Powdered Sugar: Also called confectioners’ sugar, this dissolves smoothly into the filling without grittiness. Granulated sugar would leave a grainy texture, so don’t substitute. Sift it if there are any lumps for the smoothest results.
Unsalted Butter: Binds the cookie crumbs together to create a sturdy crust. Melted butter coats each crumb perfectly, allowing them to stick together when pressed into the pan. Unsalted lets you control the exact salt level in your dessert.
Vanilla Extract: Pure vanilla extract adds depth and enhances all the other flavors. The imitation stuff just doesn’t compare—invest in real vanilla for the best results.
Gelatin (Optional but Recommended): A small amount of unflavored gelatin helps stabilize the filling, ensuring it slices cleanly without being too soft. If you skip it, increase your refrigeration time and expect slightly softer slices. For vegetarian alternatives, use agar-agar powder following package conversion instructions.
Salt: Just a pinch in the filling enhances sweetness and brings all the flavors into perfect harmony. Never skip the salt—it’s the secret to balanced desserts!
Equipment Needed
Having the right tools makes this recipe even easier and more enjoyable. Here’s everything you’ll need:
- 9-inch springform pan – Essential for easy removal and beautiful presentation; regular cake pans don’t work well
- Food processor or plastic bag + rolling pin – For crushing cookies into fine crumbs
- Stand mixer or hand mixer – For whipping cream and beating cream cheese to silky perfection
- Large mixing bowls (at least 2) – One for crust, one for filling
- Rubber spatula – For scraping bowls clean and folding ingredients gently
- Measuring cups and spoons – Accurate measurements ensure consistent results
- Offset spatula or butter knife – For smoothing the top and creating decorative swirls
- Plastic wrap or aluminum foil – To cover the cheesecake while it chills
- Small saucepan (if using gelatin) – For blooming and melting gelatin properly
- Microwave-safe bowl – For melting butter and warming cookie butter
- Wire cooling rack – Allows air circulation under the pan
- Sharp knife and hot water – For cutting perfect slices with clean edges

Lotus Biscoff Cheesecake Recipe
This luscious no-bake Lotus Biscoff Cheesecake features a crunchy Biscoff cookie crust topped with an incredibly creamy, cookie butter-swirled cheesecake filling. It’s the perfect make-ahead dessert that requires no oven and delivers bakery-quality results with minimal effort.
- Total Time: 6 hours 30 minutes (includes chilling time)
- Yield: 12-14 servings 1x
Ingredients
For the Biscoff Cookie Crust:
- 24-26 Lotus Biscoff cookies (about 250g or one package)
- 5 tablespoons unsalted butter, melted
- 1 tablespoon granulated sugar (optional, for extra sweetness)
- Pinch of salt
For the Cheesecake Filling:
- 24 ounces (3 packages) cream cheese, room temperature
- 1 cup powdered sugar, sifted
- 1 cup Biscoff cookie butter spread (smooth), room temperature
- 1½ teaspoons pure vanilla extract
- ¼ teaspoon salt
- 1½ cups heavy whipping cream, cold
- 1 teaspoon unflavored gelatin + 2 tablespoons cold water (optional but recommended for stability)
For Topping (Optional):
- ¼ cup Biscoff cookie butter, slightly warmed for drizzling
- 8-10 whole Biscoff cookies for decoration
- Crushed Biscoff cookies
- Whipped cream
Instructions
Step 1: Prepare the Springform Pan
Line the bottom of a 9-inch springform pan with parchment paper for easy removal later. You can trace the bottom of the pan on parchment and cut it out for a perfect fit. Lightly grease the sides with butter or cooking spray. This preparation ensures your beautiful cheesecake releases perfectly.
Step 2: Make the Biscoff Cookie Crust
Add the Biscoff cookies to your food processor and pulse until you have fine, even crumbs—they should resemble coarse sand with no large pieces remaining. If you don’t have a food processor, place cookies in a sealed plastic bag and crush with a rolling pin until finely ground. Transfer the crumbs to a medium bowl, add the melted butter, sugar (if using), and pinch of salt. Mix thoroughly with a fork until all crumbs are evenly moistened and the mixture resembles wet sand. It should hold together when squeezed.
Step 3: Press and Chill the Crust
Pour the cookie mixture into your prepared springform pan. Using the bottom of a flat measuring cup or glass, press the crumbs firmly and evenly across the bottom of the pan, pressing slightly up the sides (about ½ inch). The key is firm, even pressure to prevent a crumbly crust. Place the pan in the refrigerator while you prepare the filling—at least 15 minutes to help it set.
Step 4: Bloom the Gelatin (If Using)
In a small saucepan, sprinkle the gelatin over 2 tablespoons of cold water. Let it sit for 5 minutes to bloom (it will look spongy and absorbed). Then, heat it over very low heat, stirring constantly, just until the gelatin completely dissolves—about 1-2 minutes. Don’t let it boil. Set aside to cool slightly but not solidify.
Step 5: Beat the Cream Cheese Base
In a large bowl using your stand mixer or hand mixer, beat the room temperature cream cheese on medium speed for 2-3 minutes until completely smooth and fluffy with no lumps whatsoever. Scrape down the bowl sides frequently. Add the powdered sugar and beat for another 2 minutes until fully incorporated and silky smooth.
Step 6: Add Cookie Butter and Flavorings
Add the Biscoff cookie butter (make sure it’s at room temperature so it incorporates smoothly), vanilla extract, and salt to the cream cheese mixture. Beat on medium speed for 1-2 minutes until everything is completely combined and the mixture is uniform in color and texture. If you’re using gelatin, drizzle in the cooled (but still liquid) gelatin while mixing on low speed until incorporated.
Step 7: Whip the Heavy Cream
In a separate clean, cold bowl, beat the cold heavy whipping cream on high speed until stiff peaks form—this takes about 3-4 minutes. You’ll know it’s ready when you lift the beaters and the cream stands up in peaks that hold their shape without drooping. Don’t overwhip or you’ll end up with butter!
Step 8: Fold and Combine
Using a rubber spatula, gently fold about one-third of the whipped cream into the cream cheese mixture to lighten it. Use a folding motion (cutting down through the center, along the bottom, and up the side) rather than stirring to preserve the airiness. Once incorporated, gently fold in the remaining whipped cream in two additions until no white streaks remain. Be patient and gentle—this folding technique is what creates that light, mousse-like texture.
Step 9: Fill and Swirl
Pour the cheesecake filling into the prepared crust, smoothing the top with an offset spatula or the back of a spoon. For a decorative finish, warm about ¼ cup of extra cookie butter in the microwave for 10-15 seconds until it’s pourable but not hot. Drizzle it over the top of the cheesecake in lines or dots, then use a toothpick or thin knife to swirl it into beautiful patterns. Don’t over-swirl or you’ll lose the definition!
Step 10: Chill Overnight
Cover the cheesecake carefully with plastic wrap or aluminum foil (make sure it doesn’t touch the surface). Refrigerate for at least 6 hours, but overnight (8-12 hours) is ideal for the best texture and flavor. This chilling time is crucial—don’t rush it! The cheesecake needs this time to set properly and for all the flavors to meld together beautifully.
Step 11: Decorate and Serve
Just before serving, remove the cheesecake from the refrigerator. Run a thin knife around the edge of the pan, then carefully release and remove the springform sides. Decorate the top with whole Biscoff cookies arranged in a pattern, crushed cookies sprinkled around the edges, extra cookie butter drizzle, or dollops of whipped cream. Get creative with your presentation!
Step 12: Slice and Enjoy
For perfectly clean slices, use a sharp knife dipped in hot water and wiped dry between each cut. Make smooth, confident cuts straight down rather than sawing. The warm knife glides through the filling like butter, creating those beautiful, professional-looking slices that showcase the gorgeous layers.
Notes
Step 1: Prepare the Springform Pan
Line the bottom of a 9-inch springform pan with parchment paper for easy removal later. You can trace the bottom of the pan on parchment and cut it out for a perfect fit. Lightly grease the sides with butter or cooking spray. This preparation ensures your beautiful cheesecake releases perfectly.
Step 2: Make the Biscoff Cookie Crust
Add the Biscoff cookies to your food processor and pulse until you have fine, even crumbs—they should resemble coarse sand with no large pieces remaining. If you don’t have a food processor, place cookies in a sealed plastic bag and crush with a rolling pin until finely ground. Transfer the crumbs to a medium bowl, add the melted butter, sugar (if using), and pinch of salt. Mix thoroughly with a fork until all crumbs are evenly moistened and the mixture resembles wet sand. It should hold together when squeezed.
Step 3: Press and Chill the Crust
Pour the cookie mixture into your prepared springform pan. Using the bottom of a flat measuring cup or glass, press the crumbs firmly and evenly across the bottom of the pan, pressing slightly up the sides (about ½ inch). The key is firm, even pressure to prevent a crumbly crust. Place the pan in the refrigerator while you prepare the filling—at least 15 minutes to help it set.
Step 4: Bloom the Gelatin (If Using)
In a small saucepan, sprinkle the gelatin over 2 tablespoons of cold water. Let it sit for 5 minutes to bloom (it will look spongy and absorbed). Then, heat it over very low heat, stirring constantly, just until the gelatin completely dissolves—about 1-2 minutes. Don’t let it boil. Set aside to cool slightly but not solidify.
Step 5: Beat the Cream Cheese Base
In a large bowl using your stand mixer or hand mixer, beat the room temperature cream cheese on medium speed for 2-3 minutes until completely smooth and fluffy with no lumps whatsoever. Scrape down the bowl sides frequently. Add the powdered sugar and beat for another 2 minutes until fully incorporated and silky smooth.
Step 6: Add Cookie Butter and Flavorings
Add the Biscoff cookie butter (make sure it’s at room temperature so it incorporates smoothly), vanilla extract, and salt to the cream cheese mixture. Beat on medium speed for 1-2 minutes until everything is completely combined and the mixture is uniform in color and texture. If you’re using gelatin, drizzle in the cooled (but still liquid) gelatin while mixing on low speed until incorporated.
Step 7: Whip the Heavy Cream
In a separate clean, cold bowl, beat the cold heavy whipping cream on high speed until stiff peaks form—this takes about 3-4 minutes. You’ll know it’s ready when you lift the beaters and the cream stands up in peaks that hold their shape without drooping. Don’t overwhip or you’ll end up with butter!
Step 8: Fold and Combine
Using a rubber spatula, gently fold about one-third of the whipped cream into the cream cheese mixture to lighten it. Use a folding motion (cutting down through the center, along the bottom, and up the side) rather than stirring to preserve the airiness. Once incorporated, gently fold in the remaining whipped cream in two additions until no white streaks remain. Be patient and gentle—this folding technique is what creates that light, mousse-like texture.
Step 9: Fill and Swirl
Pour the cheesecake filling into the prepared crust, smoothing the top with an offset spatula or the back of a spoon. For a decorative finish, warm about ¼ cup of extra cookie butter in the microwave for 10-15 seconds until it’s pourable but not hot. Drizzle it over the top of the cheesecake in lines or dots, then use a toothpick or thin knife to swirl it into beautiful patterns. Don’t over-swirl or you’ll lose the definition!
Step 10: Chill Overnight
Cover the cheesecake carefully with plastic wrap or aluminum foil (make sure it doesn’t touch the surface). Refrigerate for at least 6 hours, but overnight (8-12 hours) is ideal for the best texture and flavor. This chilling time is crucial—don’t rush it! The cheesecake needs this time to set properly and for all the flavors to meld together beautifully.
Step 11: Decorate and Serve
Just before serving, remove the cheesecake from the refrigerator. Run a thin knife around the edge of the pan, then carefully release and remove the springform sides. Decorate the top with whole Biscoff cookies arranged in a pattern, crushed cookies sprinkled around the edges, extra cookie butter drizzle, or dollops of whipped cream. Get creative with your presentation!
Step 12: Slice and Enjoy
For perfectly clean slices, use a sharp knife dipped in hot water and wiped dry between each cut. Make smooth, confident cuts straight down rather than sawing. The warm knife glides through the filling like butter, creating those beautiful, professional-looking slices that showcase the gorgeous layers.
- Prep Time: 30 minutes
- Cook Time: 0 minutes (no-bake)
- Category: Dessert
- Method: No-Bake, Refrigerated
- Cuisine: American-Belgian Fusion
- Diet: Vegetarian
Nutrition
- Serving Size: 1 slice (1/12 of cheesecake)
- Calories: 485
- Sugar: 32g
- Sodium: 325mg
- Fat: 35g
- Saturated Fat: 20g
- Unsaturated Fat: 13g
- Trans Fat: 0g
- Carbohydrates: 38g
- Fiber: 0.5g
- Protein: 6g
- Cholesterol: 95mg
Flavor Variations:
- Chocolate Biscoff Cheesecake: Add ½ cup melted and cooled dark chocolate to the cream cheese mixture for a chocolate twist
- Salted Caramel Biscoff: Drizzle salted caramel sauce between layers and on top, sprinkle with flaky sea salt
- Espresso Enhancement: Add 2 tablespoons instant espresso powder to intensify the caramelized flavor notes
- White Chocolate Swirl: Melt white chocolate and swirl into the filling along with the cookie butter
- Crunchy Texture: Use crunchy Biscoff spread instead of smooth for added cookie pieces throughout
Crust Alternatives:
- Graham Cracker Base: Mix half Biscoff cookies and half graham crackers for a milder flavor
- Pretzel Crust: Substitute pretzels for a sweet-salty combination that’s incredibly addictive
- Oreo Biscoff Hybrid: Use half Oreo cookies and half Biscoff for chocolate lovers
- Gluten-Free Option: Use gluten-free cookies or almond flour mixed with melted butter and sugar
Dietary Modifications:
- Lighter Version: Use ⅓-less-fat cream cheese and substitute half the heavy cream with Greek yogurt (texture will be slightly different)
- Stabilized Without Gelatin: Use an extra ½ cup of whipped cream and increase chilling time to 12 hours
- Dairy-Free Alternative: Use dairy-free cream cheese and coconut cream (chilled overnight) whipped to stiff peaks
Presentation Ideas:
- Individual Servings: Make in small mason jars or dessert cups for perfect portion control
- Cookie Border: Press whole Biscoff cookies around the outer edge standing upright before chilling
- Caramel Drip: Pour warm caramel over the chilled cheesecake for an elegant drip effect
- Mirror Glaze: Top with a thin mirror glaze made from cookie butter for ultra-shiny finish
Pro Chef Tips
Temperature Synchronization: Professional pastry chefs know that ingredient temperature dramatically impacts texture. Remove cream cheese from the refrigerator 3-4 hours before starting, or microwave in 10-second intervals (carefully!) until just softened but not warm. Similarly, let cookie butter sit at room temperature—cold cookie butter will create lumps that never fully incorporate.
The Folding Technique: When combining whipped cream with the cream cheese mixture, always lighten the base first by folding in a small amount of whipped cream. This creates a similar consistency, making it easier to fold in the remaining cream without deflating it. Use broad, sweeping strokes cutting through the center, along the bottom, and up the side. Rotate the bowl as you work for even incorporation.
Crust Compression Secret: The difference between a crumbly crust and a perfectly firm one is all about compression. After pressing the crumbs into the pan, use the bottom of a flat glass or measuring cup and press HARD with your full body weight. Really compact it! Then, use the side of the glass to press and seal the edge where the bottom meets the sides. This creates a cohesive crust that holds together beautifully when sliced.
Gelatin Mastery: If using gelatin, timing is everything. It must be fully dissolved but not hot when added to the cream cheese, or it can cause lumps or cook the eggs (if using). Let it cool for 2-3 minutes after dissolving, then drizzle it in a thin stream while the mixer runs on low. This distributes it evenly before it has a chance to set in clumps.
The Slice Science: For magazine-worthy slices, use this three-step process: 1) Run a thin knife around the pan edge while the cheesecake is still cold, 2) Dip your cutting knife in very hot water, wipe completely dry, 3) Make one smooth, confident cut straight down (no sawing!). Clean and reheat the knife between every single slice. The warm blade melts through the filling while the cold cheesecake holds its shape perfectly.
Sweetness Calibration: Biscoff cookies and spread are already quite sweet, so this recipe uses less sugar than traditional cheesecakes. If you prefer sweeter desserts, you can increase the powdered sugar to 1¼ cups, but I recommend making it as written first—most people find the balance perfect as is.
Common Mistakes to Avoid
Using Cold Cream Cheese: This is the number one killer of smooth cheesecake filling! Cold cream cheese will not blend smoothly no matter how long you beat it. You’ll end up with a lumpy, curdled-looking mixture with chunks that never fully incorporate. Plan ahead and let it sit at room temperature for at least 2-3 hours, or carefully soften in short microwave bursts.
Over-Mixing After Adding Whipped Cream: Once you fold in that beautifully whipped cream, your mixing days are done! Over-mixing or using vigorous stirring motions will deflate all those air bubbles you worked so hard to create, resulting in a dense, heavy cheesecake instead of that signature light, mousse-like texture. Fold gently and stop as soon as no white streaks remain.
Skipping the Chilling Time: I know it’s tempting to dig in early, but patience truly pays off here. A cheesecake that hasn’t chilled for at least 6 hours will be too soft to slice cleanly, may not hold its shape when removed from the pan, and won’t have that perfect firm-yet-creamy texture we’re after. Trust the process and let it set overnight for best results.
Loose Springform Pan: If your springform pan doesn’t seal tightly or has any gaps in the bottom seal, filling can leak out during chilling, creating a mess in your refrigerator and potentially causing your crust to become soggy. Test your pan by filling it with water over the sink first. If it leaks, line the outside with aluminum foil or place the entire pan on a rimmed baking sheet.
Crushing Cookies Unevenly: Large cookie chunks in your crust create weak spots that crumble when sliced, while some areas become rock-hard. Take the time to process or crush your cookies until they’re uniformly fine—like coarse sand with no pieces larger than a pea. This ensures even distribution of butter and creates a cohesive, sturdy base.
Storage & Meal Prep
Refrigerator Storage: This no-bake cheesecake is a dream for storage—it actually improves after a day or two! Store the cheesecake covered in the refrigerator for up to 5 days. Use plastic wrap pressed directly against the surface (if undecorated) or tent aluminum foil over decorated cheesecakes to prevent the topping from getting damaged. The flavors meld and deepen over time, making day-two slices even more delicious.
Covering Without Damage: To prevent condensation from dripping onto your beautiful cheesecake surface and ruining the decoration, use toothpicks inserted into the top edge around the perimeter before covering with plastic wrap. This creates a tent that keeps the wrap from touching the surface. Alternatively, use a cake keeper or place an inverted large bowl over the cheesecake.
Preventing Odor Absorption: Cream cheese is notorious for absorbing refrigerator odors, which can affect your cheesecake’s delicate flavor. If storing for more than 2 days, double-wrap it or place it in an airtight container. Keep it away from strongly scented foods like onions, garlic, or leftover curry.
Maintaining Slice Quality: Cut only the slices you plan to serve immediately. The cut edges will dry out slightly over time, so it’s best to keep the cheesecake whole until serving. If you’ve already cut the entire cake, press plastic wrap directly against the cut edges to minimize exposure to air.
Individual Slice Storage: If you prefer pre-portioned servings for grab-and-go desserts, slice the cheesecake when fully set, then wrap individual pieces tightly in plastic wrap. Store them in an airtight container in the refrigerator. This method is perfect for portion control and makes serving incredibly convenient.
Make-Ahead & Freezer Notes
The Ultimate Make-Ahead Dessert: This is one of the best make-ahead desserts you can prepare! Not only can you make it in advance, but you MUST let it chill for at least 6 hours, making it perfect for party planning. I recommend making it 1-2 days before your event. The texture improves and the flavors deepen as it sits, and you’ll have one less thing to worry about on the day of your gathering.
Freezing the Whole Cheesecake: This cheesecake freezes beautifully for up to 2 months! Make it completely as directed, let it chill and set fully, then freeze it uncovered for 2-3 hours until the top is solid. Wrap the entire cheesecake (still in the springform pan) tightly with plastic wrap, then again with heavy-duty aluminum foil. Label with the date and contents.
Freezing Individual Slices: For ultimate convenience, slice the frozen cheesecake while it’s still firm (before wrapping), then wrap each slice individually in plastic wrap followed by foil. Place all wrapped slices in a freezer-safe zip-top bag. This method lets you thaw only what you need—perfect for portion control or impromptu dessert cravings!
Thawing Instructions: For best texture, thaw the whole cheesecake in the refrigerator overnight (8-12 hours), still wrapped. Never thaw at room temperature, as this can cause condensation and texture issues. Individual slices can thaw in the refrigerator in 3-4 hours or at room temperature for 30-45 minutes. The texture after freezing and thawing is virtually identical to fresh!
Pre-Making Components: You can make the crust up to 3 days in advance. Press it into the pan, cover tightly, and refrigerate. You can even freeze the prepared crust for up to 1 month. Let it come to room temperature slightly before adding the filling. The filling itself is best made and used immediately, but you can prepare all the ingredients (room temperature cream cheese, sifted sugar, measured ingredients) a day ahead to save time.
Decoration Timing: If freezing, I recommend decorating after thawing rather than before freezing. Whipped cream decorations don’t freeze and thaw well, and cookie decorations can become soft. Keep it simple before freezing, then add your beautiful finishing touches after thawing for the freshest look.
Serving Suggestions
This Lotus Biscoff Cheesecake is incredibly rich and indulgent, so a little goes a long way. Enhance your dessert experience with these perfect pairings and serving ideas.
Coffee and Espresso Pairings: Since Biscoff literally means “biscuit” and “coffee,” this cheesecake has a natural affinity for coffee-based beverages. Serve slices alongside freshly brewed espresso, cappuccino, or a rich French press coffee. The slight bitterness of coffee perfectly balances the sweetness of the cheesecake. For something special, try pairing it with an affogato (espresso poured over vanilla ice cream) for a double dessert experience.
Fresh Fruit Accompaniments: Cut through the richness with fresh berries—strawberries, raspberries, or blackberries all provide tart contrast that balances the sweet, creamy filling. Sliced bananas also work wonderfully, as banana-Biscoff is a classic combination. Arrange the fruit on the plate alongside your slice for a pop of color and freshness.
Sauce Drizzles: Elevate individual slices with a drizzle of sauce. Salted caramel sauce is absolutely divine with Biscoff, as is chocolate ganache, berry coulis, or even dulce de leche. Warm the sauce slightly and drizzle it artfully over and around the slice for restaurant-style plating.
Ice Cream Pairing: Serve a small slice with a scoop of vanilla bean, caramel, cinnamon, or even coffee ice cream on the side. The temperature contrast between cold cheesecake and frozen ice cream creates an amazing textural experience. Brown butter ice cream is particularly magical with Biscoff flavors.
Whipped Cream or Crème Fraîche: A dollop of freshly whipped cream (perhaps lightly sweetened with a hint of cinnamon) adds airiness and helps balance the dense richness. For adult palates, crème fraîche with a touch of honey provides sophisticated tang that complements the caramelized sweetness.
Beverage Pairings: Beyond coffee, this cheesecake pairs beautifully with chai tea, which echoes the warm spices in Biscoff. For adults, consider dessert wines like late-harvest Riesling, Moscato d’Asti, or even a creamy Irish coffee. Non-alcoholic options include spiced apple cider, hot chocolate, or a vanilla cream soda for a nostalgic touch.
Plating Presentation: For an elegant presentation, place your slice slightly off-center on a white plate, add a few fresh berries, a mint sprig, a dusting of powdered sugar, and a sauce drizzle. A small tuile cookie or extra Biscoff cookie leaning against the slice adds height and visual interest. These small touches transform your dessert into a restaurant-worthy creation.
FAQs Section
Can I make this cheesecake without a springform pan?
While a springform pan is definitely easiest for clean removal, you can use a regular 9-inch cake pan or pie dish. Line it completely with parchment paper, leaving long overhangs on two sides that act as handles. After chilling, lift the entire cheesecake out using these “handles” and transfer to a serving plate. The presentation won’t be quite as pristine, but it will still taste incredible. Alternatively, make individual servings in mason jars or small dessert cups.
Why is my cheesecake filling too soft and won’t set properly?
The most common causes are insufficient chilling time (it needs at least 6 hours, preferably overnight), not whipping the cream to stiff peaks (soft cream can’t provide enough structure), or the cream cheese mixture was too warm when you folded in the whipped cream (this deflates the air bubbles). If it’s been more than 12 hours and still seems soft, place it in the freezer for 2-3 hours to firm up, then transfer back to the refrigerator.
Can I use the crunchy Biscoff spread instead of smooth?
Absolutely! Crunchy Biscoff spread adds delightful cookie pieces throughout the filling, creating interesting texture contrast. However, it’s slightly harder to swirl decoratively on top since the cookie pieces can clog your piping or drizzling tool. For best results, use crunchy in the filling if you like texture, but keep smooth spread for decorative drizzles on top.
How do I prevent cracks in my no-bake cheesecake?
Good news—no-bake cheesecakes rarely crack since they don’t undergo the temperature changes that cause traditional baked cheesecakes to crack! However, you can get surface imperfections from condensation dripping down while covered. Prevent this by using the toothpick tent method (insert toothpicks around the edge to hold plastic wrap up off the surface) or by covering very loosely with foil that doesn’t touch the top.
Can I make this cheesecake with reduced-fat or fat-free cream cheese?
I strongly recommend against using fat-free cream cheese—it simply won’t set properly or have that luxurious, creamy texture we’re after. The fat content is essential for structure in no-bake cheesecakes. You can use ⅓-less-fat (Neufchâtel) cream cheese with acceptable results, though the texture will be slightly less rich. For best results, stick with full-fat cream cheese—this is a special occasion dessert, so embrace the indulgence!
My cheesecake has a slightly grainy texture—what went wrong?
Graininess usually comes from one of three sources: 1) Cold cream cheese that didn’t fully incorporate (always use room temperature!), 2) Powdered sugar that wasn’t sifted and still has lumps, or 3) Gelatin that solidified into small pieces before being fully mixed in (it must be liquid when added and drizzled in slowly while mixing). The good news is that even slightly grainy cheesecake still tastes delicious—just