Lemon Raspberry Bars Recipe – Bright, Buttery Perfectly Tangy
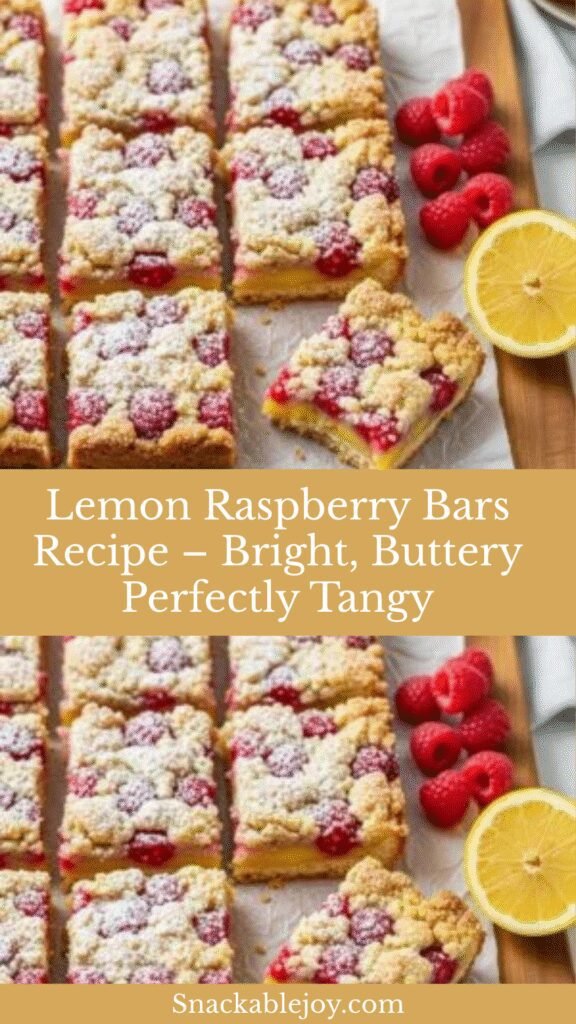
If sunshine had a flavor, it would taste like these lemon raspberry bars. Imagine biting into a buttery shortbread crust that practically melts in your mouth, followed by a layer of bright, tangy lemon curd studded with fresh raspberries, all finished with a delicate dusting of powdered sugar. These bars are the perfect marriage of tart and sweet, with the raspberries adding gorgeous pops of color and bursts of fruity flavor that complement the lemon beautifully.
Lemon raspberry bars are the ultimate spring and summer dessert, though honestly, they’re so delicious you’ll want to make them year-round. They’re incredibly versatile—elegant enough for bridal showers, baby showers, and afternoon tea parties, yet casual enough for backyard barbecues, potlucks, and simple weeknight treats. What makes them truly special is how they manage to taste sophisticated and bakery-worthy while being surprisingly straightforward to make at home. The combination of buttery crust, creamy lemon filling, and fresh berries creates a dessert that’s refreshing, not too heavy, and absolutely irresistible. One bite and you’ll understand why these bars disappear faster than almost any other dessert at gatherings.
History / Background
Lemon bars have a rich history in American baking, though their exact origins are somewhat debated. The classic lemon bar as we know it today—with its shortbread crust and custard-like lemon filling—is believed to have emerged in the United States sometime in the 1960s, though similar lemon-based desserts existed in European baking traditions long before. The lemon bar gained massive popularity when various versions started appearing in women’s magazines and community cookbooks throughout the 1970s and 80s.
The genius of lemon bars lies in their simplicity: they take the beloved flavors of lemon meringue pie and make them more accessible by eliminating the fussy meringue topping and simplifying the preparation. Instead of dealing with pie dough and meringue peaks, you press a simple shortbread crust into a pan and pour a lemon custard filling on top. It’s brilliant in its efficiency.
The addition of raspberries to lemon bars is a more modern innovation, likely emerging in the 1990s and early 2000s as home bakers began experimenting with fruit combinations. Raspberries and lemons have long been recognized as complementary flavors—the sweet-tart berry beautifully balances the bright acidity of lemon while adding textural interest and visual appeal. The combination became especially popular in upscale bakeries and cafes before home bakers adopted and adapted the pairing.
Today, lemon raspberry bars represent the evolution of classic American bar desserts—taking a beloved foundation and elevating it with fresh, seasonal ingredients. They’ve become a Pinterest favorite precisely because they photograph beautifully (those pink berries against the sunny yellow filling!), taste amazing, and feel special without requiring professional pastry skills.
Why You’ll Love This Recipe
These lemon raspberry bars deliver everything you want in a crowd-pleasing dessert while remaining genuinely achievable for home bakers of all skill levels. Unlike temperamental layer cakes or finicky French pastries, these bars are forgiving and reliable, producing consistent, beautiful results every single time.
Here’s what makes this recipe truly special:
- Perfect flavor balance – Tart lemon meets sweet raspberries in ideal harmony
- Gorgeous presentation – The vibrant colors make these Instagram and Pinterest-worthy
- Easy to make – No complicated techniques or special skills required
- Feeds a crowd – One pan makes 16-20 bars, perfect for gatherings
- Make-ahead friendly – Actually taste better after chilling overnight
- Easily portable – Cut and transport without worrying about delicate plating
- Refreshing, not heavy – Light enough to enjoy even after a big meal
- Budget-friendly – Uses simple, affordable ingredients
- Naturally impressive – Looks like you spent hours, takes under an hour active time
- Versatile for occasions – Works for everything from casual to elegant events
- Great texture contrast – Buttery crust, creamy filling, and juicy berries
- Gluten-free adaptable – Easy to modify for dietary needs
This recipe strikes that perfect sweet spot between elegant and approachable, making you look like a baking genius while keeping the process stress-free.
Ingredient Notes
For the Shortbread Crust:
All-Purpose Flour: Creates the structure for the buttery shortbread base. For gluten-free bars, substitute with a 1:1 gluten-free baking flour blend. The crust should be tender and crumbly, not tough.
Unsalted Butter: The star of the shortbread crust, providing rich flavor and that melt-in-your-mouth texture. It must be softened (not melted!) to the right consistency—it should be cool but pliable, leaving a slight indent when pressed. Salted butter can work if that’s what you have; just reduce or omit the added salt.
Powdered Sugar: Also called confectioners’ sugar, this creates a more tender, delicate crust than granulated sugar would. The fine texture helps the crust hold together beautifully without being tough.
Vanilla Extract: Adds depth and warmth to the buttery crust. Pure vanilla extract tastes noticeably better than imitation in simple recipes like this where every ingredient shines through.
Salt: Just a pinch enhances all the other flavors and prevents the crust from tasting flat.
For the Lemon Raspberry Filling:
Fresh Lemons: You’ll need both zest and juice. Fresh lemon juice is absolutely essential—bottled lemon juice has a flat, artificial taste that will disappoint. Plan on 4-5 medium lemons for ¾ cup of juice. Choose lemons that feel heavy for their size (they’re juicier) and have bright yellow, unblemished skin.
Granulated Sugar: Sweetens the tart lemon filling. The amount can be adjusted slightly if you prefer more or less sweetness, but remember that raspberries add their own tartness.
Eggs: Provide structure and create that smooth, custard-like texture in the lemon layer. Large eggs at room temperature incorporate most smoothly. You’ll need 4 eggs total.
All-Purpose Flour: Just a small amount thickens the lemon filling slightly so it sets properly while maintaining that creamy, curd-like consistency.
Fresh Raspberries: The star addition that makes these bars special! Fresh raspberries work best, but frozen can be used in a pinch—just don’t thaw them first, or they’ll bleed too much. Choose berries that are plump, dry, and free of mold. You’ll need about 1½ cups.
Powdered Sugar (for dusting): The finishing touch that makes these bars look bakery-perfect. Dust just before serving for the prettiest presentation.
Equipment Needed
- 9×13-inch baking pan – Standard rectangular pan; glass or metal both work well
- Parchment paper or aluminum foil – For lining the pan and easy removal
- Large mixing bowl – For the crust mixture
- Medium mixing bowl – For the lemon filling
- Electric mixer or wooden spoon – For creaming butter and sugar
- Whisk – For mixing the lemon filling smoothly
- Microplane or zester – For zesting lemons
- Citrus juicer – Makes extracting lemon juice much easier
- Fine-mesh sieve – For straining lemon juice and removing seeds/pulp
- Measuring cups and spoons – Accuracy matters in baking
- Rubber spatula – For spreading crust and smoothing filling
- Sharp knife – For cutting clean bars
- Wire cooling rack – For cooling the bars properly

Lemon Raspberry Bars Recipe
These lemon raspberry bars feature a buttery shortbread crust topped with a tangy lemon filling studded with fresh raspberries. They’re the perfect balance of sweet and tart, with gorgeous color and refreshing flavor that makes them ideal for any occasion.
- Total Time: 3 hours 10 minutes
- Yield: 16-20 bars 1x
Ingredients
For the Shortbread Crust:
- 2 cups all-purpose flour
- ½ cup powdered sugar
- 1 cup (2 sticks) unsalted butter, softened
- 1 teaspoon vanilla extract
- ¼ teaspoon salt
For the Lemon Raspberry Filling:
- 4 large eggs, room temperature
- 1½ cups granulated sugar
- ¾ cup fresh lemon juice (about 4-5 lemons)
- 2 tablespoons lemon zest (from about 2 lemons)
- ¼ cup all-purpose flour
- ½ teaspoon baking powder
- Pinch of salt
- 1½ cups fresh raspberries
For Topping:
- Powdered sugar for dusting
Instructions
Prepare the Pan and Preheat:
- Preheat oven: Preheat your oven to 350°F (175°C). Line a 9×13-inch baking pan with parchment paper or aluminum foil, leaving overhang on two opposite sides for easy removal later. Lightly spray with non-stick cooking spray.
Make the Shortbread Crust:
- Cream butter and sugar: In a large mixing bowl, beat the softened butter and powdered sugar together with an electric mixer on medium speed for 2-3 minutes until light and fluffy. The mixture should look pale and creamy.
- Add vanilla: Mix in the vanilla extract until combined.
- Add dry ingredients: Add the flour and salt to the butter mixture. Mix on low speed (or stir with a wooden spoon) until the mixture comes together and resembles coarse crumbs. It should hold together when pressed but still look crumbly.
- Press into pan: Transfer the crust mixture to your prepared pan. Using your hands or the bottom of a measuring cup, press the mixture firmly and evenly into the bottom of the pan, making sure to reach all corners and edges. The crust should be compact and level.
- Pre-bake crust: Bake the crust for 20-25 minutes until it’s lightly golden around the edges and set in the center. Don’t let it get too brown. Remove from oven and set aside. Keep the oven on at 350°F.
Make the Lemon Raspberry Filling:
- Zest and juice lemons: While the crust is baking, zest your lemons using a microplane, being careful to only get the yellow part, not the bitter white pith. Then cut and juice the lemons, straining the juice through a fine-mesh sieve to remove seeds and pulp. You need ¾ cup of juice.
- Whisk eggs and sugar: In a medium bowl, whisk together the eggs and granulated sugar until well combined and slightly thickened, about 1-2 minutes.
- Add lemon: Whisk in the lemon juice and lemon zest until fully incorporated.
- Add dry ingredients: In a small bowl, whisk together the flour, baking powder, and a pinch of salt. Add this to the lemon mixture and whisk until smooth with no lumps.
Assemble and Bake:
- Pour filling: Pour the lemon filling over the hot, pre-baked crust. It’s okay that the crust is still warm—this actually helps the filling set properly.
- Add raspberries: Gently scatter the fresh raspberries evenly over the top of the lemon filling. They’ll sink slightly into the filling, which is perfect. Try to distribute them somewhat evenly so every bar gets berries.
- Bake: Carefully transfer the pan back to the oven and bake for 25-30 minutes. The filling is done when it’s set around the edges but still has a slight wobble in the very center (about a 2-inch circle). It will continue to firm up as it cools. The top should look matte, not wet.
Cool and Serve:
- Cool completely: Remove from oven and place the pan on a wire cooling rack. Let cool to room temperature, about 1-2 hours. Don’t rush this step—the filling needs time to set completely.
- Refrigerate: Once cooled to room temperature, cover the pan and refrigerate for at least 2 hours or preferably overnight. The bars must be completely cold before cutting for clean slices.
- Cut and dust: Use the parchment overhang to lift the entire bar out of the pan onto a cutting board. Use a large, sharp knife (wiped clean between cuts) to slice into 16-20 bars, depending on your preferred size.
- Dust with powdered sugar: Just before serving, dust the tops generously with powdered sugar using a fine-mesh sieve or small strainer. Serve cold or at cool room temperature and enjoy!
Notes
- Room temperature eggs incorporate more smoothly into the filling. If your eggs are cold, place them in a bowl of warm water for 5-10 minutes.
- Don’t skip pre-baking the crust! This prevents it from getting soggy and ensures proper texture.
- The filling should still have a slight wobble in the center when you remove it from the oven. It will firm up completely as it cools.
- For the cleanest cuts, chill overnight, use a sharp knife, and wipe the blade clean between each cut.
- Wait to dust with powdered sugar until just before serving, as it will absorb and disappear if done too far in advance.
- If using frozen raspberries, do not thaw them—add them frozen to prevent excessive bleeding.
- These bars can be cut into 16 larger servings or 20-24 smaller bite-sized pieces.
- Prep Time: 20 minutes
- Cook Time: 4o minutes
- Category: Desert
- Method: Baking
- Cuisine: American
- Diet: Vegetarian
Nutrition
- Serving Size: 1 bar (based on 16 servings)
- Calories: 245
- Sugar: 24g
- Sodium: 85mg
- Fat: 12g
- Saturated Fat: 7g
- Unsaturated Fat: 4g
- Trans Fat: 0g
- Carbohydrates: 32g
- Fiber: 1g
- Protein: 3g
- Cholesterol: 75mg
Tips & Variations
Flavor Variations:
- Classic Lemon Bars: Omit the raspberries for traditional lemon bars
- Blueberry Lemon Bars: Substitute blueberries for raspberries
- Blackberry Lemon Bars: Use blackberries instead for deeper color and flavor
- Mixed Berry: Use a combination of raspberries, blueberries, and blackberries
- Lemon Lavender Raspberry: Add 1 teaspoon dried culinary lavender to the crust
- Meyer Lemon Version: Use Meyer lemons for sweeter, more floral flavor
- Lime Raspberry Bars: Replace lemon juice with fresh lime juice for a twist
- Coconut Lemon Raspberry: Add ½ cup shredded coconut to the crust
Crust Variations:
- Graham Cracker Crust: Replace half the flour with graham cracker crumbs
- Almond Crust: Replace ½ cup flour with almond flour for nutty flavor
- Gluten-Free: Use 1:1 gluten-free flour blend in both crust and filling
- Coconut Oil Crust: Replace butter with softened coconut oil for dairy-free
Healthier Modifications:
- Reduce sugar in filling by ¼ cup if you prefer less sweet
- Use whole wheat pastry flour for added fiber (texture will be slightly denser)
- Replace some butter with Greek yogurt in the crust (though texture will change)
- Use a sugar substitute like Swerve if reducing sugar (follow package conversion)
Presentation Ideas:
- Top with fresh whipped cream and extra berries
- Drizzle with white chocolate for elegant finish
- Garnish with fresh mint leaves
- Add candied lemon slices as decoration
- Serve on pretty dessert plates with berry coulis
Pro Chef Tips
The Soft Butter Secret: The texture of your crust depends entirely on properly softened butter. It should be cool but pliable—if you press your finger into it, it should leave an indent but not sink all the way through. Butter that’s too cold won’t cream properly with the sugar, resulting in a tough crust. Butter that’s too soft or melted makes the crust greasy and dense. Let it sit at room temperature for 30-60 minutes before starting.
Zest Before You Juice: Always zest your lemons before cutting and juicing them—it’s nearly impossible to zest a halved lemon. Use a microplane or fine grater and only remove the bright yellow outer layer, not the bitter white pith underneath. The zest contains intensely aromatic oils that provide much more flavor than juice alone.
The Hot Crust Advantage: Pouring the lemon filling onto a hot, freshly baked crust isn’t just okay—it’s actually beneficial. The heat helps the filling begin setting immediately and creates a better seal between crust and filling, preventing sogginess. Just be careful not to burn yourself!
Room Temperature Eggs Mix Smoother: Cold eggs don’t incorporate as smoothly into the filling and can create a slightly grainy texture. Room temperature eggs (left out for 30 minutes or placed in warm water for 5-10 minutes) blend beautifully and create a silkier filling.
The Wobble Test Never Fails: Judging doneness by the wobble is more reliable than timing alone, since ovens vary. The edges should be completely set and look matte, while the center (about 2-3 inches) should still jiggle slightly like gelatin when you gently shake the pan. If it looks liquid, it needs more time. If there’s no wobble at all, you’ve slightly overbaked it (still delicious, just a bit firmer).
Patience Pays Off: This is one dessert where patience is absolutely essential. The bars need to cool to room temperature, then chill completely before cutting—preferably overnight. Rushing this step results in messy cuts and filling that hasn’t fully set. Plan ahead and let time do its work.
The Clean Knife Trick: For professional-looking cuts that would make a bakery jealous, use a large, sharp knife dipped in hot water and wiped completely dry between every single cut. Yes, every cut! The warm knife glides through the filling cleanly, and wiping removes the sticky residue that would drag and create messy edges. This technique transforms homemade bars into bakery-quality beauties.
Common Mistakes to Avoid
Not Pre-Baking the Crust Long Enough: If you pull the crust out before it’s set and lightly golden, it will be soft and potentially soggy once the filling is added. The crust needs that full 20-25 minutes to develop structure and flavor. It should be lightly golden around the edges and set in the center. An undercooked crust will absorb liquid from the filling and become mushy instead of maintaining that lovely shortbread texture.
Overbaking the Filling: This is one of the most common mistakes! The lemon layer should NOT be completely firm when it comes out of the oven. If you bake until there’s no wobble at all, the filling will be tough and rubbery once cooled, rather than creamy and luscious. Remember: the center should still jiggle slightly when you remove it from the oven. It continues cooking from residual heat and firms up completely as it cools.
Cutting Before Completely Chilled: I know it’s tempting to cut into these bars as soon as they’re cool enough to touch, but resist! The filling needs several hours in the refrigerator to fully set. Cutting warm or room-temperature bars results in filling that oozes everywhere, raspberries that smear, and edges that fall apart. Trust the process and chill completely—preferably overnight—for clean, beautiful slices.
Using Bottled Lemon Juice: Please don’t do this! Bottled lemon juice has a flat, artificial, almost chemical taste that’s especially noticeable in recipes where lemon is the star flavor. Fresh lemons cost a bit more and require some effort, but the bright, vibrant, authentic lemon flavor is absolutely worth it. This is the one ingredient you cannot compromise on if you want truly delicious results.
Forgetting to Line the Pan: Trying to cut and remove these bars directly from an unlined pan is frustrating and messy. The parchment or foil overhang is essential—it allows you to lift the entire sheet of bars out onto a cutting board where you have better control and visibility for making clean cuts. Don’t skip this step!
Dusting Powdered Sugar Too Early: If you dust the bars with powdered sugar and then refrigerate them or let them sit for hours, the sugar will absorb moisture and basically disappear, leaving splotchy, wet-looking patches. Always wait to dust with powdered sugar until just before serving—ideally within 30 minutes of serving time—for that beautiful, snowy appearance.
Storage & Meal Prep
Refrigerator Storage: Lemon raspberry bars must be stored in the refrigerator due to the egg-based filling. Once completely cooled and set, store them in an airtight container with parchment or wax paper between layers to prevent sticking. Properly stored, they’ll keep for 5-7 days, though they’re best within the first 3-4 days. The crust may soften very slightly with extended storage, but they remain delicious.
Storing Before Cutting: For longest freshness, keep the bars uncut in the pan, tightly covered with plastic wrap or aluminum foil. Cut only what you plan to serve, keeping the rest intact. This prevents the cut edges from drying out.
Individual Wrapping: For grab-and-go convenience, wrap individual bars in plastic wrap once fully chilled. This makes them perfect for packed lunches, snacks, or portion control. They stay fresh and are easy to transport individually.
Maintaining Crispness: While the crust will naturally soften slightly in the refrigerator, you can help maintain some crispness by ensuring your storage container isn’t too airtight—a little air circulation helps. However, don’t leave them uncovered or they’ll dry out.
Freezer Storage: Great news—these bars freeze beautifully! Once completely cooled and chilled, cut into individual bars, wrap each one tightly in plastic wrap, then place wrapped bars in a freezer-safe zip-top bag or container. Freeze for up to 3 months. The lemon filling and shortbread crust both freeze and thaw beautifully without significant texture changes.
Thawing Instructions: Thaw frozen bars overnight in the refrigerator, still wrapped. Once thawed, unwrap and dust with fresh powdered sugar before serving. They’ll taste nearly identical to fresh. Don’t thaw at room temperature or in the microwave—slow thawing preserves the best texture.
Serving Temperature: These bars are best served cold or at cool room temperature. If they’ve been refrigerated, you can let them sit out for 10-15 minutes before serving to take the chill off slightly, but don’t let them get warm or the filling becomes too soft.
Make-Ahead & Freezer Notes
Perfect Make-Ahead Dessert: Lemon raspberry bars are actually one of the best make-ahead desserts because they absolutely require chilling time anyway, and they genuinely taste better after sitting for a day. The flavors meld, the texture improves, and all your work is done ahead of time—making them ideal for entertaining without stress.
1-2 Days Ahead (Ideal Timing): The sweet spot for making these bars is 1-2 days before serving. Bake, cool, and chill completely, then keep covered in the refrigerator. The lemon flavor develops beautifully, the crust maintains its texture, and the raspberries infuse the filling with subtle fruity notes. Cut and dust with powdered sugar just before serving.
Up to 5 Days Ahead: You can push it to 4-5 days if needed, though the crust may soften slightly with extended storage. The flavor remains excellent. Keep tightly covered in the refrigerator until ready to serve.
Component Prep: While these bars are already easy, you can break up the work even more. Make and bake the crust a day ahead, wrap tightly, and store at room temperature. The next day, make the filling, pour over the crust, add berries, and bake. This splits the minimal work into two short sessions.
Freezing for Long-Term Storage: These bars are fantastic freezers, making them perfect for batch baking or keeping on hand for unexpected guests or sudden cravings. Freeze cut bars individually wrapped in plastic wrap, then stored together in a freezer bag. They maintain excellent quality for up to 3 months.
Holiday Prep: For holiday gatherings, make and freeze these bars up to 2-3 weeks ahead. Thaw in the refrigerator overnight 1-2 days before your event. This clears up valuable pre-holiday baking time while still providing homemade desserts.
Transporting: These bars travel exceptionally well, making them perfect for potlucks, picnics, and parties. Transport in the pan covered with foil, or pack cut bars in a covered container with parchment between layers. Keep cold with ice packs if traveling more than an hour. Bring the powdered sugar in a separate bag and dust just before serving.
Serving Suggestions
Classic Presentation:
These lemon raspberry bars are stunning with minimal embellishment, but a few simple touches can elevate them further:
- Fresh berries: A few extra raspberries on the side add color and reinforce flavor
- Whipped cream: Light dollop of freshly whipped cream provides creamy contrast
- Lemon slices: Thin lemon wheels or twists make elegant garnish
- Fresh mint: A small sprig adds color and aromatic freshness
- Edible flowers: Violets or pansies create beautiful spring presentation
- Berry sauce: Drizzle of raspberry coulis on the plate looks restaurant-worthy
Beverage Pairings:
- Iced tea: Lemon bars and iced tea are a match made in heaven—try raspberry tea
- Lemonade: Doubles down on the lemon flavor in the best way
- Sparkling water: With lemon or raspberry, provides refreshing contrast
- Champagne: For celebrations, the bubbles cleanse the palate beautifully
- Coffee: Hot or iced coffee balances the sweet-tart flavor
- Hot tea: Earl Grey or chamomile complement the lemon perfectly
- Milk: Classic pairing, especially appealing to kids
Occasion-Specific Serving:
- Bridal showers: The elegant appearance makes these perfect for showers—pastel colors, too!
- Baby showers: Cut into smaller pieces and arrange on a tiered stand
- Spring brunches: Serve alongside scones, fruit salad, and quiche
- Summer picnics: Pack in a covered container with ice packs
- Afternoon tea: Cut into dainty squares for proper tea service
- Bake sales: Wrap individually in cellophane with ribbons
- Mother’s Day: Beautiful and special without being fussy
- Easter: The bright colors fit the holiday perfectly
Complete Dessert Experience:
- Plate with a swoosh of raspberry coulis and fresh berries
- Add a small scoop of vanilla ice cream or lemon sorbet
- Serve with a cup of hot tea and fresh fruit
- Create a dessert trio with different bar flavors
- Pair with other spring desserts like strawberry shortcake
FAQs Section
Q: Can I use bottled lemon juice instead of fresh?
A: I really don’t recommend it. Bottled lemon juice has a flat, artificial taste that’s especially noticeable in recipes where lemon is the primary flavor. Fresh lemon juice provides bright, vibrant, authentic flavor that makes these bars truly special. Since you need 4-5 lemons anyway for the zest, you might as well use the fresh juice! Trust me—the difference is dramatic.
Q: My filling didn’t set properly. What went wrong?
A: The most common cause is not baking long enough. The filling needs the full baking time to cook the eggs and activate the flour. It should be mostly set with just a slight wobble in the center when removed from the oven. Also, make sure you used the correct amount of flour—too little and it won’t thicken properly. Finally, the bars absolutely must be completely chilled (ideally overnight) for the filling to fully firm up. If they’re still soft after thorough chilling, the eggs may not have cooked enough.
Q: Can I make these bars gluten-free?
A: Yes! Replace the all-purpose flour in both the crust and filling with a 1:1 gluten-free baking flour blend (like Bob’s Red Mill or King Arthur). The texture will be nearly identical. Make sure your baking powder is also gluten-free (most are, but check the label). Some people find gluten-free shortbread crust slightly more crumbly, but the taste is excellent.
Q: Why do my bars fall apart when I cut them?
A: This usually happens if the bars aren’t completely chilled before cutting. They need at least 2-4 hours in the refrigerator, but overnight is better. Also, make sure you’re using a sharp knife and wiping it completely clean between every cut. A dull or sticky knife drags the filling and creates messy edges. Finally, lift the entire sheet out of the pan using the parchment overhang before cutting—it’s much easier on a cutting board.
Q: Can I use frozen raspberries?
A: Yes, but with caution. Frozen raspberries work, but they must be used frozen—do not thaw them first or they’ll bleed excessively into the lemon filling, turning everything pink. Scatter them over the filling while still frozen. Be aware that frozen berries may release more liquid during baking, potentially making the filling slightly looser. Fresh is ideal if available.
Q: How do I know when the filling is done baking?
A: The filling is perfectly baked when the edges are completely set and look matte (not shiny or wet), while the center still has a slight jiggle—about a 2-3 inch circle in the middle. When you gently shake the pan, it should wobble like just-set gelatin, not slosh like liquid. If there’s no wobble at all and the center is completely firm, you’ve slightly overbaked it (still tasty, just firmer). Use the wobble test rather than relying solely on time, since ovens vary.
Q: Can I make these in a different size pan?
A: You can, but you’ll need to adjust baking times. An 8×8 or 9×9 square pan will make thicker bars—increase filling baking time by 8-10 minutes. A larger pan (like 10×15) will make thinner bars and require less baking time—reduce by 5-7 minutes. Always use the wobble test to determine doneness rather than relying solely on timing.
Q: Why is there powdered sugar in the crust but granulated sugar in the filling?
A: Great question! Powdered sugar creates a more tender, melt-in-your-mouth shortbread texture because the fine particle size distributes more evenly and creates a delicate crumb. Granulated sugar in the crust would make it more cookie-like and less tender. In the filling, granulated sugar dissolves properly and provides the right texture, while powdered sugar would make the filling too dense because of the cornstarch it contains.
Conclusion
There’s something absolutely magical about cutting into a pan of lemon raspberry bars and seeing those gorgeous layers—the golden shortbread bottom, the sunny yellow lemon filling studded with jewel-like raspberries, all topped with a snowy dusting of powdered sugar. These bars bring together everything we love about spring and summer desserts: bright flavors, beautiful colors, and that perfect balance of sweet and tart that keeps you reaching for just one more piece (and then another!).
Whether you’re making these lemon raspberry bars for a special celebration, bringing them to a potluck where you want to be remembered, or simply treating yourself and your loved ones to something beautiful and delicious, this recipe delivers every single time. It’s proof that impressive, bakery-worthy desserts don’t require professional skills or hours of work—just good ingredients, clear instructions, and a little patience during the chilling time.
I’d absolutely love to hear about your lemon raspberry bar adventures! Did you try any flavor variations? How did they go over at your gathering? Do you have questions or tips to share with fellow bakers? Drop a comment below—I read every single one and love celebrating your baking successes! And if this recipe brings you as much joy as it brings me, please save it to your Pinterest boards and share it with friends who appreciate beautiful, delicious, easy desserts. Let’s spread the lemony, raspberry love!
Now grab those lemons and let’s create something sunshine-bright and absolutely delicious! 🍋🍰✨