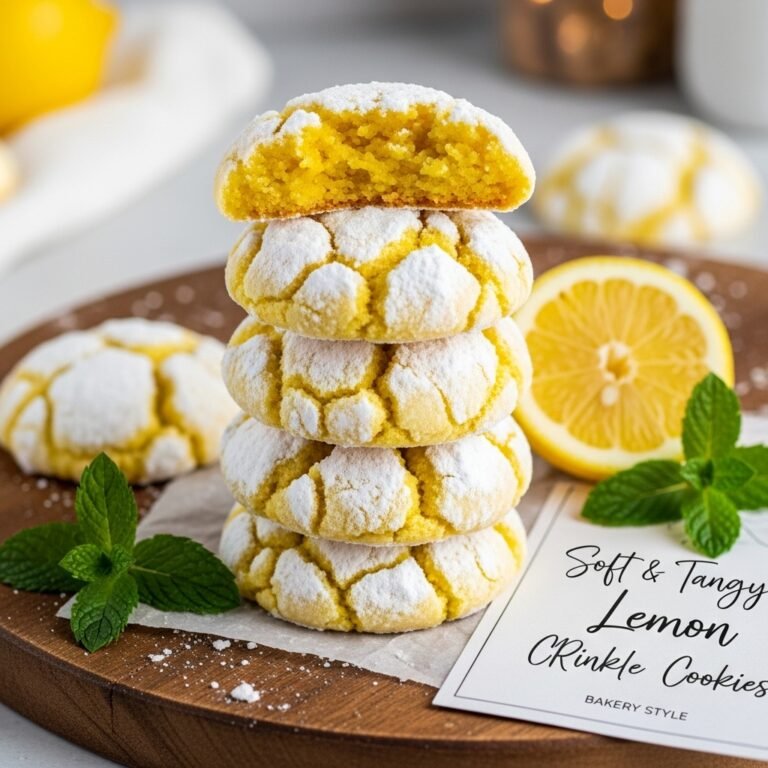
Soft & Tangy Lemon Crinkle Cookies Recipe (Just Like Bakery Style!)

If you’ve been searching for the perfect balance of sweet and tangy in a cookie, these Lemon Crinkle Cookies are about to become your new obsession! These beautifully crackled treats are soft, chewy, and bursting with bright citrus flavor that tastes like sunshine in every bite. Rolled in powdered sugar before baking, they emerge from the oven with a gorgeous crinkled appearance that looks absolutely stunning on any dessert table.
These cookies are perfect for spring gatherings, Easter brunches, summer picnics, baby showers, or simply when you’re craving something that’s not chocolate. They’re also wonderful for gift-giving, bake sales, or as a refreshing addition to your holiday cookie exchange. The zesty lemon flavor combined with that signature powdered sugar coating makes these cookies irresistible to both kids and adults alike.
History / Background
Crinkle cookies have a fascinating history that dates back to the early 20th century in America. The original crinkle cookie was actually chocolate-based, first appearing in cookbooks during the 1940s and 1950s. The distinctive cracked appearance comes from the interaction between the dough’s moisture and the powdered sugar coating during baking, creating those beautiful fissures that give the cookies their name.
Lemon Crinkle Cookies are a more modern variation of this classic American treat. As home bakers began experimenting with the original chocolate crinkle formula, citrus versions started appearing in the 1980s and 1990s, particularly in regions where lemon desserts were already popular. The Mediterranean influence on American baking brought lemon into the spotlight, and bakers quickly discovered that the bright, acidic notes of lemon paired beautifully with the sweet powdered sugar coating.
Today, lemon crinkle cookies have become a beloved springtime favorite across the United States. They’re especially popular in California, Florida, and other citrus-growing states where fresh lemons are abundant. The recipe has been passed down through generations and shared across social media platforms, making it a Pinterest favorite and a staple at family gatherings nationwide.
Why You’ll Love This Recipe
These Lemon Crinkle Cookies are everything you want in a homemade cookie and more! They strike the perfect balance between impressive presentation and easy preparation, making them ideal for both novice and experienced bakers.
Here’s why this recipe deserves a spot in your baking rotation:
- Bright, Refreshing Flavor – The tangy lemon cuts through the sweetness perfectly, making these cookies light and never cloying
- Bakery-Quality Results – That gorgeous crackled appearance makes them look like they came from an upscale bakery
- Simple Ingredients – Made with pantry staples you probably already have on hand
- No Chilling Required – Unlike many cookie recipes, you can make these from start to finish in under an hour
- Perfect Texture – Soft and chewy centers with slightly crisp edges
- Crowd-Pleaser – The universal appeal of lemon makes these a hit with everyone
- Eye-Catching Presentation – The powdered sugar coating and crackled surface photograph beautifully for social media
- Versatile – Perfect for any season or occasion, though especially loved in spring and summer
- Make-Ahead Friendly – The dough freezes beautifully for future baking sessions
- Budget-Friendly – Lemons are inexpensive, and the recipe makes a generous batch
Ingredient Notes
Understanding your ingredients is key to baking success! Here’s what goes into these delightful cookies and why each component matters:
All-Purpose Flour – Provides structure to the cookies. You can substitute with a 1:1 gluten-free baking blend if needed, though the texture may be slightly different.
Granulated Sugar – Sweetens the dough and helps create that beautiful crackled texture when combined with the powdered sugar coating.
Eggs – Bind the ingredients together and add moisture. Room temperature eggs incorporate more easily into the batter.
Butter – Use unsalted butter so you can control the salt level. It should be softened but not melted for the perfect creamy texture.
Fresh Lemon Juice – This is where the magic happens! Fresh is absolutely essential here – bottled lemon juice simply doesn’t have the same vibrant flavor. You’ll need about 2-3 medium lemons.
Lemon Zest – The oils in lemon zest pack an incredible punch of flavor. Always zest your lemons before juicing them!
Baking Powder – Helps the cookies rise and creates that signature crinkle effect when they expand in the oven.
Salt – Enhances all the flavors and balances the sweetness.
Vanilla Extract – Adds depth and rounds out the lemon flavor beautifully.
Powdered Sugar – Creates that iconic white coating and crackled appearance. Don’t skip this step!
Optional: Lemon Extract – If you want an even more intense lemon flavor, add 1/2 teaspoon of lemon extract along with the vanilla.
Equipment Needed
Having the right tools makes baking so much easier! Here’s what you’ll need:
- Mixing Bowls – At least two (one large, one medium)
- Electric Mixer – Stand mixer or hand mixer for creaming butter and sugar
- Measuring Cups and Spoons – For accurate measurements
- Microplane or Zester – For zesting the lemons
- Citrus Juicer – Makes extracting lemon juice much easier
- Whisk – For combining dry ingredients
- Rubber Spatula – For scraping down bowl sides and folding ingredients
- Cookie Scoop – A 1-tablespoon or 1.5-tablespoon scoop ensures uniform cookies
- Baking Sheets – Two to three sheets for efficient baking
- Parchment Paper or Silicone Baking Mats – Prevents sticking and makes cleanup easier
- Small Bowl – For the powdered sugar coating
- Wire Cooling Rack – Allows cookies to cool evenly
- Cooling Timer – To prevent overbaking
Print

Lemon Crinkle Cookies Recipe
Bright, tangy Lemon Crinkle Cookies with soft, chewy centers and a gorgeous powdered sugar coating. These bakery-style cookies are perfect for spring gatherings, holidays, or anytime you crave a refreshing citrus treat!
- Total Time: 27 minutes
- Yield: 24 cookies 1x
Ingredients
Scale- 2 cups all-purpose flour
- 1 teaspoon baking powder
- 1/2 teaspoon salt
- 1/2 cup unsalted butter, softened
- 1 cup granulated sugar
- 2 large eggs, room temperature
- 3 tablespoons fresh lemon juice
- 2 tablespoons lemon zest (from about 2 large lemons)
- 1 teaspoon vanilla extract
- 1/2 teaspoon lemon extract (optional, for extra lemon flavor)
- 1 cup powdered sugar (for coating)
Instructions
- Preheat the Oven – Preheat your oven to 350°F (175°C). Line two baking sheets with parchment paper or silicone baking mats and set aside.
- Mix Dry Ingredients – In a medium bowl, whisk together the flour, baking powder, and salt until well combined. Set aside.
- Cream Butter and Sugar – In a large mixing bowl, use an electric mixer to cream together the softened butter and granulated sugar on medium-high speed for 2-3 minutes until light and fluffy. The mixture should be pale and airy.
- Add Wet Ingredients – Beat in the eggs one at a time, mixing well after each addition. Add the lemon juice, lemon zest, vanilla extract, and lemon extract (if using). Mix until fully incorporated. The mixture may look slightly curdled – this is normal!
- Combine Wet and Dry – With the mixer on low speed, gradually add the flour mixture to the wet ingredients. Mix just until no flour streaks remain. Do not overmix! The dough will be soft and slightly sticky.
- Coat with Powdered Sugar – Place the powdered sugar in a small bowl. Using a cookie scoop or spoon, scoop about 1 tablespoon of dough and roll it into a ball with your hands. Roll the dough ball generously in the powdered sugar, making sure it’s completely coated. Place on the prepared baking sheet.
- Space and Repeat – Continue rolling and coating dough balls, placing them about 2 inches apart on the baking sheets. You should get about 12 cookies per sheet.
- Bake – Bake for 11-13 minutes, until the cookies have spread, crackled, and the edges are set but the centers still look slightly soft. The cookies will appear underdone but will continue to set as they cool. Do not overbake!
- Cool – Let the cookies cool on the baking sheet for 5 minutes, then carefully transfer them to a wire rack to cool completely. The cookies are delicate when warm and will firm up as they cool.
- Serve and Store – Once completely cooled, store in an airtight container at room temperature for up to 5 days, or freeze for longer storage.
Notes
- Fresh Lemon is Essential – Do not substitute bottled lemon juice. Fresh lemons provide the bright, vibrant flavor these cookies are known for.
- Don’t Overbake – These cookies should look slightly underdone when you remove them from the oven. They’ll continue cooking on the hot pan.
- Room Temperature Ingredients – Bring eggs and butter to room temperature for best results and easier mixing.
- Generous Sugar Coating – Don’t be shy with the powdered sugar! A thick coating is what creates those beautiful cracks.
- Dough Consistency – If your dough seems too sticky to roll, refrigerate it for 15-20 minutes to firm up slightly.
- Prep Time: 15 minutes
- Cook Time: 12 minutes
- Category: Desert
- Method: Baking
- Cuisine: American
- Diet: Vegetarian
Nutrition
- Serving Size: 1 cookie
- Calories: 135
- Sugar: 14g
- Sodium: 75mg
- Fat: 5g
- Saturated Fat: 3g
- Unsaturated Fat: 2g
- Trans Fat: 0g
- Carbohydrates: 21g
- Fiber: 0g
- Protein: 2g
- Cholesterol: 30mg
Tips & Variations
Want to customize these cookies to your taste? Here are some delicious variations to try:
Lemon-Lime Crinkles – Replace half the lemon juice and zest with lime for a tropical twist.
Meyer Lemon Version – Use Meyer lemons for a sweeter, more floral lemon flavor.
Glazed Lemon Crinkles – After cooling, drizzle with a simple glaze made from powdered sugar and lemon juice for extra sweetness.
Lemon Lavender Cookies – Add 1 teaspoon of culinary lavender to the dry ingredients for an elegant, sophisticated flavor.
White Chocolate Lemon – Fold 1/2 cup of white chocolate chips into the dough before rolling.
Lemon Poppy Seed – Add 2 tablespoons of poppy seeds for a classic combination and added texture.
Coconut Lemon Crinkles – Add 1/2 cup of finely shredded sweetened coconut to the dough.
Vegan Version – Use vegan butter, flax eggs (2 tablespoons ground flax + 6 tablespoons water), and ensure your sugar is vegan-certified.
Gluten-Free – Substitute with a 1:1 gluten-free flour blend. The texture may be slightly more delicate.
Extra Tangy – Increase the lemon zest to 3 tablespoons for a more pronounced citrus punch.
Pro Chef Tips
Take your Lemon Crinkle Cookies from good to absolutely phenomenal with these professional baking secrets:
Tip #1: The Two-Zest Method – Zest your lemons directly over the sugar bowl and rub the zest into the sugar with your fingertips before creaming with butter. This releases the lemon oils and distributes flavor throughout the entire cookie.
Tip #2: Temperature Control – Ensure your oven temperature is accurate by using an oven thermometer. Even a 25-degree difference can affect how your cookies spread and crackle.
Tip #3: The Double-Coat Technique – For maximum crinkle effect, roll your dough balls in powdered sugar, let them sit for 2 minutes, then roll them again. This creates an extra-thick coating that cracks beautifully.
Tip #4: Uniform Sizing – Use a cookie scoop for perfectly uniform cookies that bake evenly. Consistent size means consistent results.
Tip #5: Rotate Halfway – Rotate your baking sheet 180 degrees halfway through baking to ensure even coloring and cracking.
Tip #6: The Tap Test – Gently tap the baking sheet on the counter once when you remove it from the oven. This helps settle the cookies and creates more dramatic cracks.
Tip #7: Quality Ingredients Matter – Use European-style butter with higher fat content for richer flavor and better texture.
Tip #8: Lemon Selection – Choose lemons that feel heavy for their size and have thin, smooth skin – they’re juicier and more flavorful than thick-skinned varieties.
Common Mistakes to Avoid
Learn from others’ errors and ensure perfect cookies every time:
Mistake #1: Using Bottled Lemon Juice – Bottled juice tastes flat and artificial compared to fresh. Always use fresh lemons for vibrant, authentic flavor. If you absolutely must use bottled juice, reduce the amount slightly as it can be more acidic.
Mistake #2: Overbaking – The number one cookie crime! These should look barely set when you remove them. They’ll firm up as they cool. Overbaked lemon crinkles are dry and lose their soft, chewy texture.
Mistake #3: Skimping on Powdered Sugar – A light dusting won’t give you those gorgeous cracks. You want a thick, generous coating that almost looks excessive – that’s what creates the signature crinkle effect.
Mistake #4: Warm Dough – If your kitchen is very warm or your dough becomes too soft to handle, it will spread too much in the oven and won’t crackle properly. Chill the dough for 15-20 minutes if needed.
Mistake #5: Overmixing the Dough – Once you add the flour, mix just until combined. Overmixing develops gluten and creates tough, dense cookies instead of soft, tender ones.
Mistake #6: Crowding the Pan – Give your cookies space! They need room to spread. Place them at least 2 inches apart or they’ll bake into one giant cookie sheet.
Mistake #7: Not Zesting Before Juicing – Always zest your lemons before cutting and juicing them. It’s nearly impossible to zest a halved lemon, and you’ll lose all that flavorful zest.
Storage & Meal Prep
Proper storage ensures your cookies stay fresh and delicious:
Room Temperature Storage – Store completely cooled cookies in an airtight container at room temperature for up to 5 days. Place a piece of parchment paper between layers to prevent sticking. The powdered sugar coating may absorb slightly into the cookie over time, but the flavor remains excellent.
Refrigerator Storage – These cookies don’t need refrigeration and actually taste best at room temperature. However, if your kitchen is very warm or humid, you can refrigerate them in an airtight container for up to 1 week. Let them come to room temperature before serving for the best texture.
Preventing Sogginess – To keep cookies crisp on the outside, add a piece of white bread to your storage container. The bread will absorb excess moisture. Replace the bread every 2 days.
Reviving Day-Old Cookies – If your cookies lose some of their crackle, place them on a baking sheet and warm in a 300°F oven for 3-5 minutes. This refreshes the texture beautifully.
Travel Tips – These cookies travel well for potlucks and picnics. Pack them in a rigid container with parchment paper between layers, and keep them cool during transport.
Make-Ahead & Freezer Notes
These cookies are wonderfully freezer-friendly, making them perfect for advance preparation:
Freezing Baked Cookies – Let cookies cool completely, then freeze them in a single layer on a baking sheet for 1 hour until solid. Transfer to a freezer-safe container or bag, separating layers with parchment paper. Freeze for up to 3 months. Thaw at room temperature for 30 minutes before serving.
Freezing Cookie Dough – This is my favorite method! Scoop and roll the dough balls in powdered sugar, then freeze on a baking sheet until solid (about 2 hours). Transfer to a freezer bag and freeze for up to 3 months. Bake directly from frozen, adding 1-2 extra minutes to the baking time. No thawing required!
Pre-Portioned Dough Balls – Roll dough into balls (without the sugar coating) and freeze. When ready to bake, let them sit at room temperature for 10 minutes, roll in powdered sugar, and bake as directed.
Dough Storage – Unbaked cookie dough can be wrapped tightly and refrigerated for up to 3 days. Let it sit at room temperature for 15 minutes before scooping and baking.
Emergency Cookies – Having frozen dough balls means you can bake fresh cookies anytime with minimal effort – perfect for unexpected guests!
Reheating from Frozen – Thaw frozen baked cookies at room temperature, or warm them in a 300°F oven for 5 minutes for that fresh-baked taste and aroma.
Serving Suggestions
These versatile lemon cookies pair beautifully with various accompaniments:
Beverages – Serve with hot tea (especially Earl Grey or chamomile), iced lemonade, cold milk, coffee, or sparkling water with lemon. For adults, they’re lovely with limoncello or a crisp Prosecco.
Dessert Platter Additions – Arrange alongside fresh berries, particularly strawberries and blueberries. Add some white chocolate bark, lemon bars, or shortbread cookies for a stunning dessert spread.
Ice Cream Pairing – Serve with vanilla bean ice cream, lemon sorbet, or raspberry gelato. You can also make ice cream sandwiches using slightly larger cookies.
Tea Party Perfect – These cookies are ideal for afternoon tea service. Plate them with cucumber sandwiches, scones with clementine curd, and petit fours.
Brunch Accompaniment – Add to your brunch spread alongside fruit salad, yogurt parfaits, and breakfast pastries.
Picnic Basket Essential – Pack them for outdoor gatherings with fresh fruit, cheese, crackers, and cold beverages.
Gift Presentation – Layer in a decorative tin or box with tissue paper for a beautiful homemade gift. Add a ribbon and a handwritten recipe card.
Kids’ Party – Serve with pink lemonade or fruit punch. The bright flavor appeals to children without being overly sweet.
FAQs Section
Q: Can I use lemon extract instead of fresh lemon juice?
A: While lemon extract adds flavor, it cannot replace the acidity and moisture that fresh lemon juice provides. The juice is essential for the cookie’s texture and structure. However, you can add extra lemon extract (up to 1 teaspoon total) along with the fresh juice for a more intense lemon flavor.Q: Why didn’t my cookies crackle?
A: Several factors affect crackling: insufficient powdered sugar coating, overbaking (which sets the surface too quickly), or dough that’s too cold. Make sure you coat the dough balls very generously in powdered sugar and don’t refrigerate them before baking unless the dough is too soft to handle.Q: Can I make these cookies egg-free?
A: Yes! You can substitute each egg with a “flax egg” (1 tablespoon ground flaxseed mixed with 3 tablespoons water, left to sit for 5 minutes) or use a commercial egg replacer. The texture will be slightly different but still delicious.Q: My cookies spread too much. What went wrong?
A: Excessive spreading usually means the butter was too warm, the dough wasn’t mixed enough, or the oven temperature was too low. Make sure your butter is softened but not melted, mix until just combined, and verify your oven temperature with a thermometer.Q: Can I use Meyer lemons instead of regular lemons?
A: Absolutely! Meyer lemons have a sweeter, less acidic flavor with floral notes. They make wonderful crinkle cookies, though the flavor will be milder. You might want to add an extra tablespoon of Meyer lemon juice for brightness.Q: How do I prevent the powdered sugar from disappearing during baking?
A: Some absorption is normal and creates the beautiful crackle effect. To maintain more white coating, use a very generous amount of powdered sugar when rolling, and make sure the sugar coating is at room temperature (cold powdered sugar can melt too quickly).Q: Can I add food coloring to make these more festive?
A: Yes! Add 2-3 drops of yellow gel food coloring to the dough for sunshine-yellow cookies, or leave them natural. You can also tint the powdered sugar with a small amount of food coloring for pastel cookies, though this is less common and may affect the crackle appearance.Conclusion
There you have it – the ultimate guide to creating bakery-worthy Lemon Crinkle Cookies in your own kitchen! These sunny, delightful treats are proof that simple ingredients can create something truly spectacular. From the first bite of that soft, tangy center to the sweet powdered sugar coating, these cookies deliver pure joy.
Whether you’re baking them for a special occasion, preparing them for your weekly meal prep, or simply treating yourself to something wonderful, these lemon crinkles never disappoint. The best part? They’re actually easier to make than they look, which means you’ll be impressing friends and family with minimal effort.
I hope this recipe brings as much happiness to your kitchen as it has to mine. Don’t forget to snap a photo of your gorgeous crackled creations and share them with fellow baking enthusiasts! There’s something magical about pulling a tray of these beauties from the oven and watching them crack and settle into their signature appearance.
Happy baking, and may your cookies be forever crinkled and delicious! 🍋✨