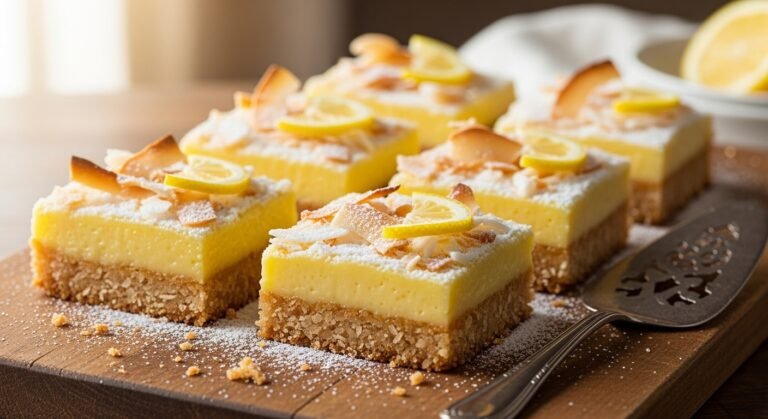
Irresistible Lemon Coconut Bars Recipe – Tropical Citrus Bars with Coconut Crust

Lemon Coconut Bars are bright, tangy, and tropical dessert bars that combine a buttery coconut shortbread crust with a silky, tart lemon curd filling. These sunshine-yellow bars deliver the perfect balance of sweet coconut and zesty lemon in every bite, creating a flavor combination that’s both refreshing and indulgent. The crispy coconut crust provides wonderful texture contrast to the smooth, creamy lemon layer, while a sprinkle of toasted coconut on top adds the finishing touch.
These beautiful bars are perfect for spring and summer gatherings, bridal showers, Easter celebrations, Mother’s Day brunches, or any time you want to bring a taste of tropical sunshine to your table. They’re wonderful for potlucks because they travel well, look impressive, and appeal to a wide range of tastes. The best part? They’re surprisingly easy to make with straightforward techniques and ingredients you can find at any grocery store. Whether you’re an experienced baker or just starting out, these Lemon Coconut Bars are guaranteed to become a favorite in your dessert repertoire.
History / Background
Lemon Coconut Bars represent a delicious marriage of two beloved classic American bar desserts: lemon bars and coconut bars. Lemon bars themselves have a fascinating history dating back to the early 20th century when citrus fruits became more widely available across the United States. The classic lemon bar with its shortbread crust and tangy lemon curd filling became popular in the 1960s and remains a bakery staple today.
Coconut bars, on the other hand, gained popularity in the mid-20th century when sweetened coconut became a common pantry ingredient in American households. The tropical flavor of coconut represented something exotic and special during this era, particularly for inland Americans who had never seen a palm tree or tasted fresh coconut.
The combination of lemon and coconut as a dessert duo likely emerged in the 1970s and 1980s when fusion flavors and tropical-inspired desserts became trendy. Home bakers and professional pastry chefs alike discovered that the bright acidity of lemon perfectly complements the sweet, mild richness of coconut. The pairing is reminiscent of tropical drinks and island flavors, evoking vacation vibes and sunny beach days.
This recipe draws inspiration from classic American bar cookies but adds a sophisticated twist by incorporating coconut directly into the shortbread crust rather than just using it as a topping. This technique creates a more integrated flavor profile where coconut and lemon work together rather than competing. The result is a dessert that tastes both familiar and special—comforting yet elegant enough for celebrations.
Today, Lemon Coconut Bars have become particularly popular in coastal regions and warm-weather states, though their appeal is universal. They’ve become a favorite for spring and summer celebrations, garden parties, and anywhere people want a dessert that tastes light and refreshing rather than heavy and rich. The combination of flavors continues to be beloved because it captures that perfect balance of sweet, tart, and tropical.
Why You’ll Love This Recipe
These Lemon Coconut Bars are about to become your new favorite spring and summer dessert, and here’s why: they deliver sophisticated flavor with surprisingly simple techniques. These bars look like they came from a high-end bakery but require no special skills or fancy equipment.
Here’s what makes this recipe exceptional:
- Perfectly balanced flavors – Sweet coconut meets tart lemon in harmony
- Stunning presentation – Bright yellow color with coconut topping looks gorgeous
- Two-layer simplicity – Just a crust and filling, nothing complicated
- Make-ahead friendly – Actually tastes better after chilling overnight
- Crowd-pleaser – Appeals to both coconut and lemon lovers
- Feeds a crowd – One 9×13 pan makes 24 generous bars
- Light and refreshing – Not too heavy, perfect for warm weather
- Tropical vacation vibes – Tastes like sunshine and paradise
- Versatile occasions – Perfect for casual and formal events
- Beautiful for gifting – Impressive presentation for hostess gifts
- Kid-approved – Sweet enough for children but sophisticated too
- Budget-friendly – Uses affordable, accessible ingredients
- No complicated techniques – Straightforward mixing and baking
Ingredient Notes
For the Coconut Crust:
All-Purpose Flour: The foundation of the shortbread crust, flour provides structure. Measure carefully using the spoon-and-level method for best results. The flour combines with butter to create that classic shortbread texture.
Sweetened Shredded Coconut: Coconut adds tropical flavor, sweetness, and texture to the crust. Use sweetened shredded coconut (not unsweetened desiccated coconut) for the right moisture level and sweetness. The moisture in sweetened coconut helps bind the crust. Toast half of it for the topping to intensify the flavor and add crunch.
Powdered Sugar: Also called confectioners’ sugar, this sweetens the crust while keeping it tender. Powdered sugar dissolves easily and creates a more delicate crumb than granulated sugar would.
Unsalted Butter: Butter provides richness, flavor, and helps create that melt-in-your-mouth shortbread texture. Use unsalted so you can control the salt level. The butter should be melted and slightly cooled.
Salt: A pinch enhances all the flavors and balances the sweetness. Don’t skip it!
For the Lemon Filling:
Large Eggs: Eggs are what transform the filling from liquid to a set custard. They provide structure, richness, and create that silky texture. Use large eggs at room temperature for best results.
Granulated Sugar: Sweetens the tart lemon filling and balances the acidity. The amount is calibrated to create the perfect sweet-tart balance that makes lemon bars so addictive.
Fresh Lemon Juice: This is the star of the filling. Fresh-squeezed lemon juice is essential—bottled juice simply doesn’t have the same bright, vibrant flavor. You’ll need about 4-5 lemons to get ½ cup of juice. Look for lemons that feel heavy for their size (they’re juicier) and have thin, smooth skin.
Lemon Zest: The zest contains aromatic oils that intensify the lemon flavor without adding more acidity. Use a microplane or fine grater and only remove the yellow part—the white pith underneath is bitter.
All-Purpose Flour: Just a small amount of flour helps thicken the lemon filling and ensures it sets properly. It’s essential for creating that perfect custard-like texture.
Baking Powder: A tiny amount helps the filling puff up slightly as it bakes, creating a lighter texture. Don’t confuse with baking soda.
Optional Coconut Extract: A few drops enhance the coconut flavor throughout the bars. It’s not essential but adds extra tropical punch.
Equipment Needed
You’ll need basic baking equipment:
- 9×13-inch baking pan – Standard size (metal or glass, though metal is preferred)
- Parchment paper – For easy removal and cleanup (highly recommended)
- Two mixing bowls (medium and large) – For crust and filling
- Microplane or zester – For lemon zest
- Citrus juicer – Manual or electric for juicing lemons
- Whisk – For mixing the lemon filling smoothly
- Measuring cups and spoons – For accurate measurements
- Rubber spatula – For scraping and spreading
- Wire cooling rack – For cooling
- Sharp knife – For cutting clean bars
- Small skillet – For toasting coconut (optional but recommended)
Print

Lemon Coconut Bars Recipe
These bright, refreshing Lemon Coconut Bars feature a buttery coconut shortbread crust topped with tangy, silky lemon curd filling and toasted coconut. The perfect balance of sweet and tart with tropical coconut flavor, these bars are ideal for spring and summer gatherings, bridal showers, or any time you want a taste of sunshine. Easy to make and stunning to serve!
- Total Time: 1 hour (plus cooling and chilling time)
- Yield: 24 bars 1x
Ingredients
ScaleFor the Coconut Crust:
- 2 cups (250g) all-purpose flour
- 1 cup (80g) sweetened shredded coconut
- ½ cup (60g) powdered sugar
- 1 cup (230g) unsalted butter, melted and slightly cooled
- ¼ teaspoon salt
- ½ teaspoon coconut extract (optional)
For the Lemon Filling:
- 4 large eggs, at room temperature
- 1¾ cups (350g) granulated sugar
- ½ cup (120ml) fresh lemon juice (from 4-5 lemons)
- 2 tablespoons fresh lemon zest (from 2-3 lemons)
- ⅓ cup (40g) all-purpose flour
- ½ teaspoon baking powder
For Topping:
- ⅓ cup (25g) sweetened shredded coconut, toasted
- Powdered sugar for dusting (optional)
Instructions
Make the Coconut Crust:
- Preheat and prep: Preheat your oven to 350°F (175°C). Line a 9×13-inch baking pan with parchment paper, leaving overhang on two sides for easy removal later. This makes cutting and serving so much easier.
- Mix the crust: In a medium bowl, combine flour, coconut, powdered sugar, and salt. Stir with a fork to distribute everything evenly. Pour the melted butter (and coconut extract if using) over the dry ingredients. Stir with a fork or spatula until the mixture is evenly moistened and resembles wet sand. All the dry ingredients should be coated with butter—there shouldn’t be any dry pockets.
- Press the crust: Transfer the crust mixture to the prepared pan. Using your hands or the bottom of a measuring cup, press the mixture firmly and evenly into the bottom of the pan. Make sure to press into the corners and create an even layer across the entire surface. A firmly pressed crust prevents it from crumbling later.
- Pre-bake the crust: Bake the crust for 18-20 minutes until it’s lightly golden brown around the edges and set in the center. It should look dry and no longer greasy. Remove from the oven and set aside while you prepare the filling. Leave the oven on.
Make the Lemon Filling:
- Whisk the filling: While the crust is baking, prepare the lemon filling. In a large bowl, whisk together the eggs and granulated sugar vigorously for about 1 minute until the mixture is smooth and slightly lighter in color. Add the lemon juice and lemon zest, whisking until well combined.
- Add flour mixture: In a small bowl, whisk together the flour and baking powder. Sprinkle this over the egg mixture and whisk gently until just combined and smooth. Don’t overmix—you just want to incorporate the flour without creating lumps.
- Pour over crust: Once the crust has finished its initial bake, pour the lemon filling evenly over the warm crust. The crust should still be hot or warm when you add the filling. Use a spatula to spread the filling into an even layer if needed, making sure it reaches all corners.
Bake and Cool:
- Bake the bars: Return the pan to the oven and bake for 20-25 minutes. The filling is done when it’s set around the edges but still has a slight jiggle in the very center when you gently shake the pan. It should look puffy and the surface should be matte, not shiny. Don’t overbake or the filling will be grainy instead of creamy. The filling will continue to set as it cools.
- Cool completely: Remove from the oven and place the pan on a wire cooling rack. Let cool to room temperature, which takes about 1 hour. Once cooled, cover the pan with plastic wrap or foil and refrigerate for at least 2 hours or preferably overnight. Chilling is essential for clean cuts and the best texture.
Toast Coconut and Finish:
- Toast the coconut: While the bars are chilling, toast the remaining coconut. Spread it in a dry skillet over medium heat, stirring frequently, for 3-5 minutes until golden brown and fragrant. Watch carefully as it can burn quickly. Let cool completely.
- Cut and serve: When ready to serve, use the parchment overhang to lift the entire slab out of the pan onto a cutting board. Sprinkle with toasted coconut and dust with powdered sugar if desired. Using a sharp knife (wipe clean between cuts), cut into 24 bars (6 rows by 4 rows). For the cleanest cuts, the bars should be completely chilled.
Notes
- Fresh lemon juice is essential: Bottled juice lacks the bright, fresh flavor that makes these bars special.
- Don’t skip chilling: The bars need at least 2 hours in the refrigerator to set properly for clean cuts and best texture.
- Crust should be hot: Pour the lemon filling over a warm/hot crust so it adheres properly and bakes into one cohesive bar.
- The jiggle test: The filling should still jiggle slightly in the center when done. It firms up completely during chilling.
- Make ahead: These taste even better the next day after the flavors meld together.
- Prep Time: 20 minutes
- Cook Time: 40 minutes
- Category: Desert
- Method: Baking
- Cuisine: American
- Diet: Vegetarian
Nutrition
- Serving Size: 1 bar (1/24 of recipe)
- Calories: 195
- Sugar: 19g
- Sodium: 75mg
- Fat: 9g
- Saturated Fat: 6g
- Unsaturated Fat: 2g
- Trans Fat: 0g
- Carbohydrates: 27g
- Fiber: 1g
- Protein: 3g
- Cholesterol: 55mg
Tips & Variations
Lime Coconut Bars: Replace the lemon juice and zest with fresh lime juice and zest for a tropical twist. Use Key limes if available for authentic island flavor. The bright green color is stunning!
Mango Coconut Bars: Add ½ cup of pureed fresh mango to the lemon filling for a tropical mango-lemon combination. Reduce lemon juice to ⅓ cup to maintain the right consistency.
Raspberry Lemon Coconut Bars: Scatter ½ cup of fresh raspberries over the crust before pouring the lemon filling. The tart berries add beautiful color and complementary flavor.
White Chocolate Drizzle: Melt white chocolate and drizzle over the finished, chilled bars for extra decadence. The white chocolate complements both lemon and coconut beautifully.
Coconut-Free Version: Omit coconut from the crust and increase flour by ½ cup. Use all butter-based shortbread. You’ll have classic lemon bars without the tropical twist.
Meyer Lemon Bars: If you can find Meyer lemons, they create a sweeter, more floral lemon flavor that’s absolutely wonderful. You may want to reduce sugar slightly as Meyer lemons are less tart.
Toasted Coconut Crust: Toast all the coconut before adding to the crust for deeper, more intense coconut flavor throughout.
Lighter Version: Replace half the butter in the crust with coconut oil for a slightly lighter profile that enhances coconut flavor.
Lavender Lemon Coconut Bars: Add 1 teaspoon of dried culinary lavender to the crust for an elegant, floral note.
Pro Chef Tips
Room temperature eggs are crucial: Cold eggs don’t emulsify as well with sugar and can create a grainy filling. Set eggs out 30 minutes before baking, or place them (still in shells) in warm water for 5 minutes to bring to room temperature quickly.
Zest before juicing: Always zest your lemons before cutting and juicing them. It’s nearly impossible to zest a juiced lemon half. Use a microplane for the finest zest that distributes flavor evenly.
The hot crust technique: Professional bakers pour lemon filling over a hot or warm crust because this helps it adhere properly and creates a cohesive bar rather than separate layers. The heat also starts cooking the bottom of the filling, creating better texture.
Don’t overbake the filling: The number one mistake people make with lemon bars is overbaking the filling, which creates a grainy, dry texture instead of silky and creamy. The filling should still jiggle in the center when you remove it—it will firm up completely during cooling and chilling.
Toast coconut for maximum flavor: Toasting releases coconut’s natural oils and creates a nuttier, deeper flavor. It also adds beautiful golden color and crunch. Watch it carefully as coconut burns easily once it starts browning.
Sharp knife, clean cuts: For bakery-perfect bars, use a large sharp knife and wipe it completely clean between each cut. This prevents dragging filling and creates clean edges. Warming the knife under hot water (then drying it) can also help.
Double sifting for smooth tops: Professional pastry chefs sift powdered sugar twice before dusting over bars—once to remove lumps, and a second time while actually dusting to ensure even, delicate coverage.
Chill before cutting: This is non-negotiable for clean cuts. Overnight chilling is ideal—the bars are at their absolute best texture and slice beautifully when fully chilled.
Common Mistakes to Avoid
Mistake #1: Using bottled lemon juice instead of fresh. Bottled lemon juice tastes flat, artificial, and slightly bitter compared to fresh-squeezed. It lacks the bright, vibrant flavor that makes lemon bars so delicious. Fresh lemon juice is absolutely essential for this recipe—there’s no substitute. Buy extra lemons if needed and squeeze them yourself.
Mistake #2: Cutting the bars before they’re completely chilled. If you try to cut warm or room-temperature bars, the lemon filling will be too soft and will smear everywhere, creating messy bars with ragged edges. You need at least 2 hours of refrigeration (preferably overnight) for the filling to firm up properly. Be patient—it’s worth the wait!
Mistake #3: Overbaking the lemon filling. The filling should still have a slight wobble in the center when you remove it from the oven. If you bake until it’s completely set and no longer jiggles at all, you’ve overbaked it. The result will be grainy, dry, and chalky instead of smooth and creamy. Remember, it continues to set during cooling and chilling.
Mistake #4: Not pressing the crust firmly enough. A loosely pressed crust will be crumbly and fall apart when you try to cut the bars. You need to really press down firmly and evenly across the entire surface, compacting the mixture. Use the bottom of a flat-bottomed glass or measuring cup to apply even pressure.
Mistake #5: Skipping the parchment paper. While you can grease the pan instead, parchment paper makes removal and cutting dramatically easier. Without it, you have to cut the bars in the pan and remove them one at a time, which often results in broken bars. The parchment overhang lets you lift out the entire slab for clean, easy cutting.
Storage & Meal Prep
Refrigerator Storage: Lemon Coconut Bars must be stored in the refrigerator because of the egg-based filling. Keep them in an airtight container or cover the pan tightly with plastic wrap or aluminum foil. They’ll stay fresh for up to 5 days. The bars actually improve over the first 24-48 hours as the flavors meld together.
Serving Temperature: These bars are delicious cold straight from the refrigerator, which is how most people prefer them. The chilled filling is firm and refreshing. However, you can let them sit at room temperature for 15-20 minutes before serving if you prefer a softer texture.
Preventing Sogginess: The toasted coconut topping should be added shortly before serving if possible, as it can lose its crunch when stored directly on the bars. If making ahead, store the toasted coconut separately and sprinkle on just before serving.
Individual Wrapping: For lunch boxes, picnics, or gifting, wrap individual bars in plastic wrap or parchment paper squares. They’re perfect portable treats that travel well.
Layer Separation: When storing multiple bars in a container, place parchment or wax paper between layers to prevent them from sticking together.
Make-Ahead & Freezer Notes
Make-Ahead Instructions: Lemon Coconut Bars are ideal for making ahead—in fact, they taste better after a day or two as the flavors develop and meld. You can make them up to 3 days before you need them. Keep them covered and refrigerated until ready to serve. Add the toasted coconut topping and powdered sugar dusting shortly before serving for best appearance and texture.
You can also prep components separately: make and toast the coconut up to a week ahead and store airtight, or prepare the crust and bake it a day ahead, storing it covered at room temperature before adding filling the next day.
Freezing Instructions: These bars freeze beautifully for up to 2 months. Let them cool and chill completely, then cut into bars. Wrap each bar individually in plastic wrap, then place all wrapped bars in a freezer-safe zip-top bag or airtight container. This prevents freezer burn and lets you grab just one or two at a time.
Thawing Method: Thaw frozen bars in the refrigerator overnight or at room temperature for 1-2 hours. Don’t microwave as this can make the texture rubbery. Add toasted coconut and powdered sugar after thawing.
Freezing Uncut: You can also freeze the entire uncut slab. Wrap it tightly in plastic wrap, then aluminum foil, and freeze for up to 2 months. Thaw overnight in the refrigerator, then cut into bars and add toppings.
Fresh Toppings After Freezing: Always add toasted coconut and powdered sugar after thawing, never before freezing. These toppings don’t freeze and thaw well.
Serving Suggestions
Lemon Coconut Bars are delicious on their own, but here’s how to present and serve them beautifully:
Classic Presentation: Serve chilled on a pretty platter, dusted with powdered sugar and topped with toasted coconut. Garnish the platter with fresh lemon slices and mint leaves for a beautiful presentation.
Tea Party Perfect: These bars are ideal for afternoon tea, garden parties, or bridal showers. Serve on delicate plates with hot tea, iced tea, or lemonade.
Brunch Dessert: Perfect for Mother’s Day brunch, Easter brunch, or spring celebrations. Pair with mimosas, bellinis, or fruit-infused water.
Tropical Theme: For luau parties or tropical-themed gatherings, serve these alongside fresh pineapple, mango, and other tropical fruits.
Coffee Pairing: The bright lemon flavor pairs beautifully with coffee. Serve with cappuccino, latte, or iced coffee for a delightful contrast.
Beverage Pairings: Serve with iced tea (especially mint or peach tea), lemonade, sparkling water with lemon, coconut water, or tropical fruit punch. For adults, they pair wonderfully with prosecco, white wine, or coconut rum cocktails.
Elegant Plating: For dinner parties, place one bar on a small plate, add a dollop of whipped cream and fresh berries, and drizzle with raspberry or passion fruit sauce.
Picnic Perfect: These travel well to picnics and outdoor gatherings. Pack in a container with parchment between layers and keep in a cooler until serving.
FAQs Section
Can I use bottled lemon juice?
While technically possible, it’s strongly not recommended. Bottled lemon juice lacks the bright, fresh flavor of freshly squeezed lemons and can taste flat or slightly bitter. Fresh lemon juice is truly essential for these bars to taste their best. It’s worth the extra few minutes to juice fresh lemons.Why is my lemon filling grainy?
Grainy filling is usually caused by overbaking. The filling should still jiggle slightly in the center when you remove it from the oven. It will firm up completely during cooling and chilling. If you bake until completely set, the eggs overcook and create a grainy texture. Also ensure your oven temperature is accurate with an oven thermometer.Can I make these gluten-free?
Yes! Use a 1:1 gluten-free flour blend in place of regular all-purpose flour in both the crust and filling. Make sure your baking powder and other ingredients are certified gluten-free. The texture might be slightly different but still delicious.Do these need to be refrigerated?
Yes, absolutely. The egg-based lemon filling is perishable and must be refrigerated. Don’t leave these at room temperature for more than 2 hours for food safety reasons.Can I use unsweetened coconut?
You can, but you’ll need to adjust the recipe. Unsweetened coconut is drier and less sweet, so increase the powdered sugar in the crust by 2-3 tablespoons and consider adding a tablespoon of milk or coconut milk to the crust mixture to add moisture.How do I know when the lemon filling is done?
The filling is done when the edges are set and puffed slightly, but the center still jiggles like Jell-O when you gently shake the pan. It should look matte rather than shiny. A toothpick inserted in the center should come out mostly clean with perhaps a few moist crumbs. It will firm up completely during cooling.Can I double this recipe?
Yes! Use two 9×13 pans and double all ingredients. The baking times should remain the same—just check each pan individually as ovens have hot spots. This is perfect for large gatherings.Conclusion
Congratulations—you now have everything you need to make stunning Lemon Coconut Bars that will brighten any occasion! These bars are proof that tropical flavors and classic techniques can come together to create something truly special. The combination of tart lemon and sweet coconut is timeless, and these bars deliver that perfect balance in every bite.
The beauty of this recipe is how it looks incredibly impressive while being surprisingly straightforward to make. Your guests will think you spent hours creating these bakery-quality bars, but you’ll know the secret—simple ingredients, basic techniques, and a little patience during chilling are all it takes.
I hope these Lemon Coconut Bars become a go-to recipe for your spring and summer celebrations. There’s something wonderfully uplifting about the bright yellow color and refreshing flavor—it’s like capturing sunshine in dessert form. Whether you’re baking for a special event or just because you want to brighten your week, these bars deliver joy in every square.
If you try this recipe, I’d absolutely love to hear about it! Drop a comment below sharing how your bars turned out, any variations you tried, or questions you might have. And if you loved these Lemon Coconut Bars as much as I think you will, please share this recipe on Pinterest so other home bakers can discover this perfect tropical-citrus treat too.
Happy baking, and here’s to bringing sunshine and smiles to your kitchen! 🍋🥥✨