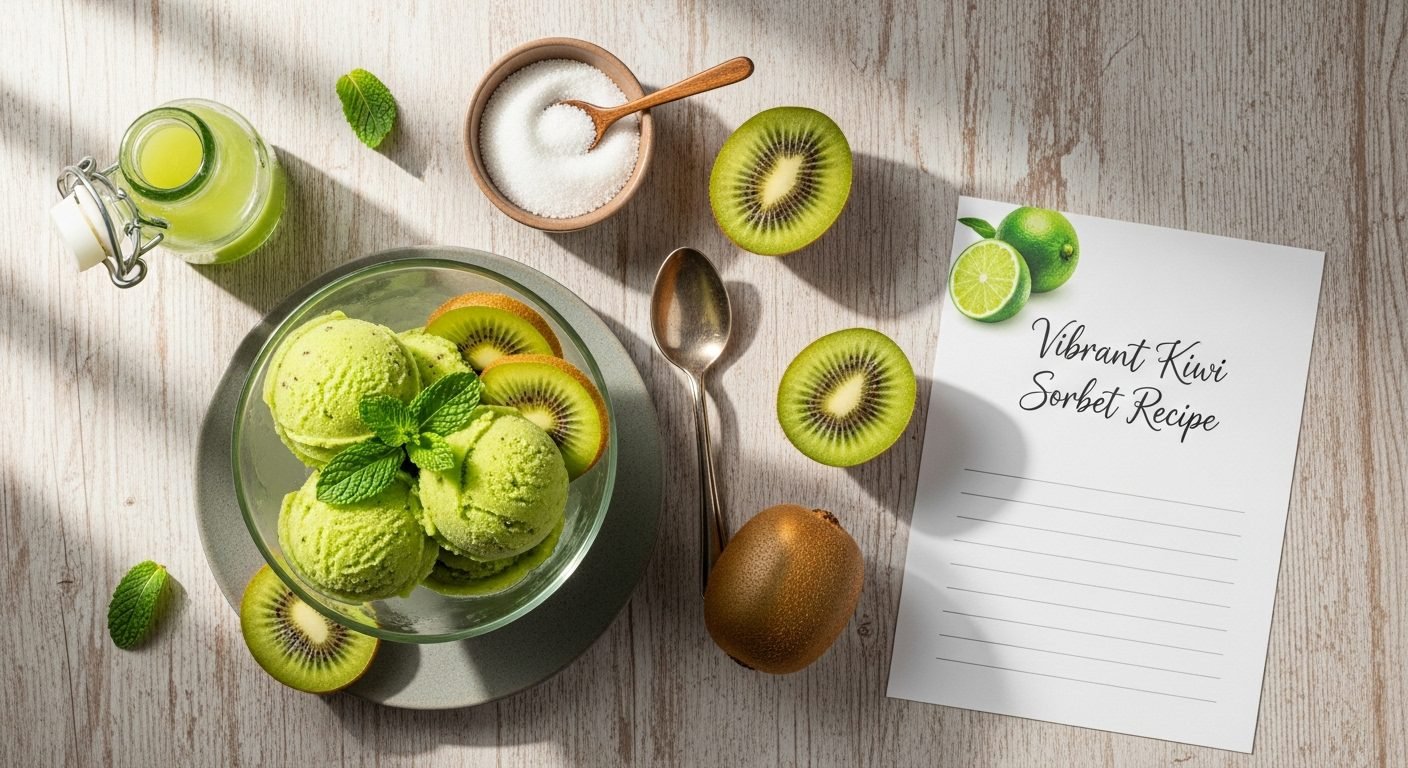
Vibrant Kiwi Sorbet Recipe – Easy 4-Ingredient Tropical Frozen Treat
If you’re looking for a frozen dessert that’s as stunning to look at as it is delicious to eat, Kiwi Sorbet is about to become your new obsession. This brilliant green sorbet captures the unique tangy-sweet flavor of fresh kiwi fruit in the most refreshing, vibrant way imaginable. With its jewel-toned emerald color, bright tropical taste, and silky-smooth texture, kiwi sorbet is like tasting pure sunshine with a delightful tart twist that keeps you coming back for more.
What makes this recipe absolutely perfect for home cooks is its beautiful simplicity—you need just four basic ingredients and about 20 minutes of active time to create a dessert that looks like it came from a high-end patisserie or trendy gelato shop. Unlike heavy ice cream that can feel indulgent to the point of overwhelming, this sorbet is naturally light, dairy-free, vegan-friendly, and allows the distinctive flavor of kiwi to shine brilliantly without any competition.
Kiwi sorbet is wonderfully versatile for countless occasions. Serve it as an elegant palate cleanser between courses at dinner parties, scoop it into bowls for a vitamin C-packed afternoon refreshment, blend it into tropical smoothies for breakfast, layer it in parfaits with yogurt and granola, or even transform it into sophisticated cocktails by topping with sparkling wine. The tangy-sweet flavor pairs beautifully with everything from other tropical fruits like mango and pineapple to chocolate desserts, vanilla cake, or even savory dishes featuring seafood or chicken. It’s sophisticated enough for special celebrations yet simple enough to whip up whenever you’re craving something cold, refreshing, and genuinely good for you. Plus, the stunning bright green color makes it absolutely irresistible on camera—perfect for your Instagram and Pinterest feeds!
History / Background
The fascinating history of sorbet stretches back over three millennia to ancient civilizations that first discovered the magic of combining fruit with ice. The earliest frozen desserts appeared around 500 BC in ancient Persia and China, where resourceful cooks realized that snow and ice harvested from mountain peaks could be flavored with fruit juices, honey, and other sweeteners to create refreshing treats. These early frozen delicacies were extremely rare luxuries, reserved exclusively for royalty, nobility, and the exceptionally wealthy, as obtaining and storing ice was incredibly difficult, dangerous, and expensive.
The word “sorbet” has rich multicultural linguistic roots, derived from the Arabic word “sharba” (meaning “to drink”) and the Turkish “şerbet,” which originally referred to sweetened, chilled fruit beverages rather than frozen desserts. As merchants, explorers, and traders traveled along the ancient Silk Road, these refreshing concepts spread westward from the Middle East into Europe, evolving and transforming along the way.
When the legendary explorer Marco Polo returned from his epic travels in the 13th century, he brought back detailed recipes and innovative techniques for frozen desserts that would forever revolutionize European cuisine. By the Italian Renaissance, chefs had refined sorbet-making into a sophisticated culinary art form, creating “sorbetto” that became a defining feature of elegant dining. The powerful Medici family in Florence became particularly famous for serving elaborate, colorful frozen desserts at their legendary feasts.
French chefs embraced and perfected these techniques enthusiastically, and by the glorious reign of King Louis XIV in the 17th century, sorbet had become fashionable throughout European royal courts. It was traditionally served between multiple courses as a palate cleanser—a practice that continues in fine dining establishments today.
Kiwi fruit itself has a surprisingly recent and fascinating history for such a beloved fruit. Native to China, where it was called “yang tao” (meaning “sunny peach”), the fruit was originally a small, relatively unremarkable berry growing wild in the Yangtze River valley. In the early 1900s, seeds were brought to New Zealand by missionaries and teachers who had been working in China. New Zealand growers saw potential in the fuzzy fruit and began cultivating larger, sweeter varieties through careful selection and breeding.
The fruit was initially called “Chinese gooseberry” in English-speaking markets, but in the 1950s, New Zealand exporters brilliantly renamed it “kiwifruit” after New Zealand’s national bird, the kiwi, because of the fruit’s brown, fuzzy exterior resembling the flightless bird’s feathers. The new name was also more marketable and helped distinguish it from actual gooseberries. The name change was wildly successful, and kiwifruit became an international sensation.
Today, New Zealand, Italy, Chile, Greece, and France are among the world’s largest kiwi producers, with California also growing significant quantities. The fruit is now available year-round in most American supermarkets thanks to Southern Hemisphere growing seasons that complement Northern Hemisphere production.
The pairing of ancient sorbet technique with relatively modern kiwifruit represents a beautiful fusion of old-world craftsmanship and new-world ingredients. Kiwi sorbet became particularly popular in the 1980s and 1990s as kiwifruit became widely available and health-conscious eating trends encouraged fruit-based desserts. Modern home cooks and professional chefs celebrate kiwi sorbet for its stunning visual appeal, unique tangy-sweet flavor profile, impressive vitamin C content, and the fact that it requires no artificial colors—that brilliant green is 100% natural!
Why You’ll Love This Recipe
This Kiwi Sorbet is about to become your go-to summer frozen dessert, and I’m thrilled to tell you why: it transforms simple, affordable kiwifruit into an elegant, restaurant-quality treat that tastes incredibly sophisticated while being remarkably easy to make. There’s something truly magical about the way freezing intensifies kiwi’s distinctive tangy-sweet flavor while maintaining that tropical character that’s both refreshing and exciting.
Unlike complicated desserts requiring specialty ingredients, obscure equipment, or culinary school techniques, this sorbet celebrates beautiful simplicity at its finest. The kiwi does virtually all the work—your job is simply to peel, blend, sweeten appropriately, and freeze. The result is a clean, bright, vibrant flavor that’s never artificial, cloying, or overwhelming. It’s refreshing in the truest, most satisfying sense, leaving your palate feeling renewed, awakened, and delighted rather than weighed down or overly sugared.
Here’s what makes this recipe absolutely irresistible:
- Super Simple & Quick – If you can peel kiwis and operate a blender, you can create stunning gourmet sorbet at home
- Only 4 Ingredients – Kiwi, sugar, water, and lime juice—that’s literally all you need! No weird additives, stabilizers, or hard-to-find ingredients
- Naturally Vegan & Dairy-Free – Perfect for guests with dietary restrictions, lactose intolerance, or vegan lifestyles without requiring any modifications
- Stunning Visual Appeal – The brilliant emerald green color is 100% natural and absolutely gorgeous in photos, perfect for Pinterest and Instagram
- Packed with Vitamin C – Kiwis contain more vitamin C than oranges, making this a dessert you can actually feel good about eating
- Budget-Friendly – Kiwis are affordable year-round, making this an economical way to serve impressive, elegant dessert
- Kid-Approved – The bright color and sweet-tart flavor appeals to children while being sophisticated enough for adult palates
- Unique Flavor Profile – Unlike common vanilla or chocolate, kiwi offers distinctive tropical taste that feels special and memorable
- Make-Ahead Perfect – Prepare days or weeks in advance and store in the freezer for completely stress-free entertaining
- Lower Calorie Treat – Significantly lower in calories and fat than ice cream while still feeling genuinely satisfying and indulgent
- Incredibly Versatile – Enjoy it straight, with champagne, in smoothies, with chocolate, or as part of elegant dessert presentations
- Health Benefits Bonus – Rich in antioxidants, fiber, and digestive enzymes while being naturally low in fat and sodium
Ingredient Notes
Let’s dive into the simple ingredients that create this spectacular tropical frozen dessert. The beauty of sorbet is that quality ingredients truly shine through—there’s nowhere to hide, which means using ripe, flavorful kiwis makes all the difference in the world.
Ripe Kiwifruit: This is your absolute star ingredient, so selection matters tremendously! Ripe kiwis yield to gentle pressure (like a ripe peach or avocado), have a sweet, slightly tropical aroma, and give slightly when pressed. Avoid rock-hard kiwis as they’re underripe and too tart. You’ll need about 10-12 medium kiwis to yield approximately 2 cups of pureed fruit. Both green kiwis (Hayward variety) and golden kiwis work beautifully—golden kiwis are slightly sweeter and less tart with smoother skin. You can leave the tiny edible seeds in for texture and visual interest, or strain them out if you prefer ultra-smooth sorbet. Substitution: While nothing quite replicates kiwi’s unique flavor, you could experiment with other tart fruits like passion fruit, green grapes, or a combination of pineapple and lime for different tropical flavors.
Granulated Sugar: Sugar serves the critical dual purpose of sweetening the naturally tart kiwi and preventing the sorbet from freezing into a solid, unscoopable ice block. Sugar molecules interfere with water molecules’ ability to form large ice crystals, creating that smooth, creamy, scoopable texture we all love in good sorbet. The amount of sugar needed varies based on kiwi ripeness and your personal sweetness preference—always taste and adjust! Substitution: Superfine (caster) sugar dissolves more quickly and easily. You can replace up to half the granulated sugar with honey, agave nectar, or maple syrup, though this will slightly affect the final texture and flavor profile, creating a softer sorbet with different taste notes.
Water: Clean, filtered water creates the liquid base that gives sorbet its perfect, light consistency and refreshing character. It dilutes the concentrated kiwi just enough to create ideal texture—not too thick like a smoothie, not too icy like a popsicle, but perfectly balanced for smooth, easy scooping.
Fresh Lime Juice: This is your secret weapon that elevates good sorbet to absolutely extraordinary status! Lime juice brightens the kiwi’s natural tangy flavor, adds complexity and depth, and enhances the fruit’s natural sweetness without making the sorbet taste overtly citrusy. The acidity balances the sugar perfectly and prevents the sorbet from tasting flat, dull, or one-dimensional. Lime and kiwi are natural flavor partners. Substitution: Fresh lemon juice works equally well and provides similar acidity and brightness. Always use fresh-squeezed citrus—bottled juice simply doesn’t deliver the same vibrant, fresh flavor.
Optional Enhancers: A tiny pinch of fine sea salt (just 1/8 teaspoon) enhances every single flavor without tasting salty at all. One tablespoon of vodka or white rum creates significantly softer, more scoopable texture because alcohol doesn’t freeze solid—this is a professional pastry chef trick that makes a noticeable difference!
Equipment Needed
Great news—you probably already have everything you need sitting in your kitchen right now! Here’s your simple equipment list:
- Sharp Knife and Cutting Board – For peeling and chopping kiwis efficiently
- High-Powered Blender or Food Processor – Absolutely essential for pureeing kiwis until silky smooth and perfectly creamy
- Fine-Mesh Strainer (Optional) – For ultra-smooth, seed-free sorbet, though many people love the seeds for texture and appearance
- Large Mixing Bowl – To hold your beautiful bright green kiwi puree
- Measuring Cups and Spoons – For accurate measurements that ensure consistent, perfect results every time
- Small Saucepan – To make simple syrup if you choose that method (highly recommended for smoothest texture)
- Whisk or Wooden Spoon – For stirring your simple syrup until sugar dissolves completely
- Ice Cream Maker – Makes the smoothest, creamiest sorbet with minimal effort and best results (most home models work great)
- Freezer-Safe Container with Tight-Fitting Lid – A loaf pan, plastic container, or metal tin works perfectly for storage
- Ice Cream Scoop – For beautiful, professional-looking serving presentation
- Rubber Spatula – To scrape every precious drop of delicious puree from your blender without waste
Don’t have an ice cream maker? No problem at all—you can absolutely make this! Use the still-freeze method: pour the mixture into a shallow metal baking pan, freeze for 45 minutes, then use a sturdy fork or whisk to scrape and vigorously break up any ice crystals. Repeat this scraping process every 30-40 minutes for about 3-4 hours until smooth and completely frozen. It’s more labor-intensive and requires you to be home, but it totally works and produces great results. Alternatively, freeze the mixture completely solid, then break it into chunks and blend in batches in a high-powered blender (like a Vitamix or Blendtec) right before serving for instant “soft-serve” style sorbet.
Print
Kiwi Sorbet Recipe
Bright, refreshing homemade kiwi sorbet made with fresh kiwi fruit, a touch of sugar, and lemon juice. This easy 4-ingredient frozen dessert is naturally vegan, dairy-free, and perfect for hot summer days!
- Total Time: 4 hours 15 minutes
- Yield: 6 servings (about 3 cups) 1x
Ingredients
- 8-10 medium ripe kiwis (about 2 pounds)
- 1/2 to 3/4 cup granulated sugar (adjust to taste)
- 2-3 tablespoons fresh lemon juice
- 1/2 cup water
Instructions
Step 1: Prepare the Kiwis Peel the kiwis using a vegetable peeler or small knife, removing all the fuzzy brown skin. Cut each kiwi into quarters. If any kiwis have tough white cores, you can trim those out, though they’re perfectly edible.
Step 2: Make the Simple Syrup Base In a small saucepan, combine the sugar and water. Heat over medium heat, stirring constantly, until the sugar completely dissolves (about 2-3 minutes). You don’t need to boil it – just warm enough to dissolve the sugar. Remove from heat and let it cool for 5 minutes.
Step 3: Blend Everything Together Place the kiwi chunks, cooled simple syrup, and fresh lemon juice into your blender or food processor. Blend on high speed for 60-90 seconds until completely smooth and no chunks remain. The mixture should be bright green and pourable.
Step 4: Taste and Adjust This is your chance to perfect the flavor! Taste the mixture (it should be sweeter than you think necessary since freezing dulls sweetness). Add more sugar if needed for sweetness or more lemon juice for tanginess. Blend again briefly to incorporate any additions.
Step 5: Strain (Optional) If you prefer a completely smooth sorbet without the tiny black kiwi seeds, pour the mixture through a fine-mesh strainer into a bowl, pressing with a spatula to extract all the liquid. Most people skip this step and enjoy the seeds for added texture.
Step 6: Initial Freeze Pour the kiwi mixture into a shallow, freezer-safe container (a loaf pan or square baking dish works great). Cover tightly with plastic wrap or a lid. Place in the freezer for about 1 hour until the edges start to freeze but the center is still slushy.
Step 7: Break Up Ice Crystals Remove from the freezer and use a fork or whisk to vigorously stir and break up any ice crystals that have formed. This is crucial for achieving a smooth texture! Return to the freezer.
Step 8: Repeat the Stirring Process Every 30-45 minutes for the next 2-3 hours, remove the sorbet and stir it thoroughly to break up ice crystals. The more frequently you stir, the smoother your final sorbet will be. After 3-4 stir sessions, you can let it freeze completely overnight.
Step 9: Serve and Enjoy When ready to serve, let the sorbet sit at room temperature for 5-10 minutes to soften slightly for easier scooping. Use an ice cream scoop to create beautiful rounded servings. Garnish with fresh kiwi slices or mint leaves if desired.
Notes
- Sweetness Level: Start with 1/2 cup sugar and add more if needed. Very ripe kiwis may need less sugar, while tart ones may need the full 3/4 cup.
- Seeds: The tiny black kiwi seeds add visual appeal and a slight crunch. They’re completely edible and most people prefer keeping them in.
- Texture Tip: The more frequently you stir during freezing, the smoother and creamier your sorbet will be.
- Ice Cream Maker Method: If you have an ice cream maker, churn the mixture according to manufacturer’s instructions for an even smoother result.
- Serving Temperature: Sorbet is best served at about 10-15°F, slightly warmer than a standard freezer temperature, which makes scooping easier.
- Prep Time: 15 minutes
- Cook Time: 0 minutes
- Category: Desert
- Method: No-Churn Freezing
- Cuisine: International
- Diet: Gluten Free
Nutrition
- Serving Size: 1/2 cup
- Calories: 110
- Sugar: 22g
- Sodium: 3mg
- Fat: 0.5g
- Saturated Fat: 0g
- Unsaturated Fat: 0.5g
- Trans Fat: 0g
- Carbohydrates: 27g
- Fiber: 2g
- Protein: 1g
- Cholesterol: 0mg
Tips & Variations
Flavor Variations:
- Kiwi-Strawberry Sorbet: Replace 2-3 kiwis with 1 cup fresh strawberries for a beautiful pink-and-green swirl
- Tropical Twist: Add 1/2 cup fresh pineapple or mango chunks for extra tropical flavor
- Mint Kiwi: Blend in 1/4 cup fresh mint leaves for a refreshing mojito-like flavor
- Coconut Kiwi: Replace the water with coconut milk for a creamier, more indulgent version
- Boozy Version: Add 2 tablespoons of rum, vodka, or prosecco for an adult-only treat (note: alcohol prevents complete freezing, so use sparingly)
Sweetener Alternatives:
- Use honey or agave nectar instead of sugar for a more natural sweetness (reduce amount by about 1/4)
- Try maple syrup for a subtle maple-kiwi flavor combination
- Use stevia or monk fruit sweetener for a low-calorie option (adjust to taste as these are much sweeter)
Texture Modifications:
- For a granita-style texture, skip the stirring process and simply scrape the frozen mixture with a fork before serving
- Add 1 tablespoon of vodka or corn syrup to make the sorbet softer and easier to scoop straight from the freezer
- Fold in small chunks of fresh kiwi after the final stir for added fruit pieces
Pro Chef Tips
Choose the Right Ripeness: Press gently on your kiwis at the store – they should give slightly like a ripe avocado. If they’re rock hard, let them ripen on your counter for 3-5 days with a banana or apple to speed up the process.
Temperature Matters for Blending: Make sure your simple syrup has cooled before blending with the kiwi. Hot syrup will cook the fruit slightly and dull that vibrant green color you want to achieve.
The Oversweet Trick: Professional sorbet makers always make their base sweeter than seems necessary. Freezing temperatures dull our taste perception, so what tastes perfectly sweet at room temperature will taste bland when frozen. Your mixture should taste almost too sweet before freezing.
Embrace the Fat Addition: While traditional sorbet is fat-free, adding just 1 tablespoon of neutral oil or vodka to your mixture can dramatically improve the scoopability and mouthfeel without making it noticeably greasy. This is a secret many gelato shops use.
Master the Freeze-Stir Technique: Professional kitchens know that the key to smooth sorbet without an ice cream maker is breaking up ice crystals every 30-45 minutes during the initial freeze. Set a timer – it’s worth the effort. Each stir session should be vigorous and thorough, scraping the sides and bottom of the container.
Serving Vessel Matters: Chill your serving bowls or glasses in the freezer for 15 minutes before serving. This keeps the sorbet from melting too quickly and maintains that perfect temperature longer.
The Balancing Act: Remember the flavor triangle – sweet, acid, and fruit flavor must be in harmony. If your sorbet tastes flat, it needs more lemon juice. If it’s too tart, add more sugar. If it’s too sweet, add more kiwi or lemon.
Common Mistakes to Avoid
Using Underripe Kiwis: Rock-hard kiwis will make your sorbet unbearably tart and require excessive amounts of sugar. Always wait until your kiwis are ripe – they should yield slightly to pressure but not feel mushy.
Skipping the Sugar Dissolving Step: Adding granulated sugar directly to the blender without dissolving it first can result in a grainy texture. The simple syrup method ensures smooth integration of sweetness throughout the sorbet.
Not Tasting Before Freezing: Once the mixture is frozen, you can’t adjust the flavor. Always taste your base before freezing and remember it should taste slightly too sweet at room temperature.
Using a Deep Container: Freezing sorbet in a deep, narrow container means the outside freezes while the inside stays liquid, making the stirring process difficult. Use a shallow, wide container for even freezing and easier stirring.
Forgetting to Stir: If you skip the stirring steps during freezing, you’ll end up with a solid ice block instead of smooth, scoopable sorbet. Those periodic stirs are essential for breaking up large ice crystals and creating the right texture.
Storing Too Long: While technically safe to eat for months, sorbet quality declines after 2-3 weeks in the freezer. Ice crystals grow larger over time, and the bright flavors begin to fade. Make it when you plan to eat it within a couple of weeks.
Serving It Too Hard: Pulling sorbet straight from a zero-degree freezer and trying to scoop it immediately will frustrate you and potentially break your ice cream scoop. Let it temper for 5-10 minutes at room temperature first.
Storage & Meal Prep
Refrigerator Storage: The unblended mixture or blended base can be stored in the refrigerator for up to 24 hours before freezing. This actually works to your advantage if you want to make it ahead – the flavors meld and develop overnight.
Freezer Storage: Once frozen, kiwi sorbet keeps beautifully in the freezer for up to 3 weeks at peak quality. Store it in an airtight container with plastic wrap pressed directly against the surface to prevent ice crystals from forming. For longer storage (up to 2 months), the texture may become slightly icier but it’s still perfectly safe and tasty.
Preventing Freezer Burn: Use a container that’s appropriately sized for your sorbet – you want minimal air space above it. Press plastic wrap or parchment paper directly onto the surface of the sorbet before sealing with a lid. This prevents exposure to air, which causes freezer burn and ice crystal formation.
Portion Control Tip: Consider freezing your sorbet in individual portions using a muffin tin or small containers. Once frozen solid, pop them out and store in a freezer bag. This makes it easy to grab single servings without exposing the entire batch to temperature changes.
Scooping Made Easy: If your sorbet becomes too hard to scoop after extended freezer time, let it sit at room temperature for 10-15 minutes or microwave it for 5-10 seconds at a time until it softens slightly. You can also run your ice cream scoop under hot water between scoops.
Make-Ahead & Freezer Notes
Advance Preparation: This sorbet is perfect for making ahead! In fact, it MUST be made at least 4-6 hours before serving (or overnight is ideal). You can prepare it up to 2 weeks in advance of when you need it, making it perfect for party planning.
Best Make-Ahead Timeline: For optimal flavor and texture, make your kiwi sorbet 1-3 days before you plan to serve it. This gives it time to fully freeze while the flavors are still at their brightest and most vibrant. After a week, it’s still delicious but may lose some of that fresh, just-made quality.
Freezer-Friendly Status: Kiwi sorbet is completely freezer-friendly and, unlike many desserts, is actually meant to be stored frozen. The key is proper storage in an airtight container to maintain quality.
Refreezing Protocol: If your sorbet melts slightly while serving or sitting out, you can refreeze it without food safety concerns. However, the texture may become slightly icier with each freeze-thaw cycle. To minimize this, work quickly when serving and return it to the freezer immediately.
Best Reheating Method: Since this is a frozen dessert, you’re not reheating it in the traditional sense. Instead, you’re tempering it. Remove from the freezer 8-10 minutes before serving and let it sit at room temperature. The sorbet should be soft enough to scoop but still frozen – not melted or slushy.
Batch Freezing: This recipe doubles or triples beautifully if you want to make large batches. Just be sure you have enough freezer space in shallow containers to ensure even freezing. Don’t try to freeze a huge amount in one deep container, or the middle will never freeze properly.
Serving Suggestions
Kiwi sorbet is incredibly versatile and can be served in numerous delightful ways!
Classic Presentations: Serve in chilled martini glasses or small dessert bowls with a fresh mint sprig and a thin kiwi slice for garnish. For a more elegant presentation, scoop into hollowed-out lemon or orange halves. You can also layer it in parfait glasses with whipped coconut cream and granola for a beautiful breakfast-dessert hybrid.
Beverage Pairings: This sorbet pairs wonderfully with sparkling wine, prosecco, or champagne – simply float a small scoop in the glass for an elegant cocktail. It’s also incredible blended into smoothies or served alongside iced green tea or lemonade. For kids, serve with sparkling water or lemon-lime soda.
Complementary Desserts: Serve a small scoop of kiwi sorbet alongside chocolate cake, brownies, or chocolate mousse – the tart fruitiness cuts through rich chocolate beautifully. It’s also delicious with angel food cake, shortbread cookies, or vanilla panna cotta.
Fruit Combinations: Create a tropical fruit plate with fresh mango, pineapple, papaya, and passion fruit alongside your kiwi sorbet. Or go for a berry bowl with strawberries, raspberries, and blueberries for a red, white, and blue theme that’s perfect for summer holidays.
Brunch Ideas: Serve small scoops in shot glasses as a palate cleanser between brunch courses. It’s also fantastic as a topping for waffles or pancakes, or served alongside fresh fruit salad for a lighter breakfast option.
Toppings & Mix-ins: Drizzle with honey, chocolate sauce, or passion fruit pulp. Sprinkle with toasted coconut flakes, chopped pistachios, or dark chocolate shavings. Fresh berries, pomegranate seeds, or edible flowers make beautiful garnishes.
FAQs Section
Can I make this without a blender? While a blender or food processor is highly recommended for the smoothest texture, you can mash very ripe kiwis with a fork or potato masher in a pinch. The texture won’t be as silky smooth, but it will still be delicious. An immersion blender also works well if you have one.
Why is my sorbet too icy and hard to scoop? This usually happens when the mixture doesn’t contain enough sugar (which prevents large ice crystal formation) or when you skipped the stirring steps during freezing. Make sure your base tastes quite sweet before freezing, and stir every 30-45 minutes during the first few hours of freezing to break up ice crystals.
Can I use frozen kiwi instead of fresh? Absolutely! Thawed frozen kiwi works perfectly in this recipe. Just make sure to drain any excess liquid before blending. You may need to adjust the sugar slightly depending on whether the frozen kiwi was sweetened.
How do I know when my kiwis are ripe enough? Ripe kiwis should yield to gentle pressure, similar to a ripe avocado or peach. They shouldn’t be rock hard or mushy. If you press gently and they give slightly, they’re perfect. The skin may also develop a slightly softer texture when ripe.
Can I make this in an ice cream maker? Yes! If you have an ice cream maker, simply blend all ingredients, chill the mixture in the refrigerator for at least 2 hours, then churn according to your machine’s instructions (usually 20-30 minutes). Transfer to a freezer-safe container and freeze for 2-4 hours until firm. This method produces an even smoother texture.
Is it normal for the sorbet to have black specks? Yes! Those black specks are the tiny edible seeds from the kiwi fruit. They’re completely safe to eat and add a nice visual element and subtle texture to the sorbet. If you prefer a completely smooth, seed-free sorbet, strain the mixture through a fine-mesh sieve before freezing.
How can I make my sorbet less tart? Start by using very ripe kiwis, which are naturally sweeter than underripe ones. Increase the sugar to 3/4 cup or even 1 cup if you prefer a sweeter dessert. You can also reduce the lemon juice to 1-2 tablespoons instead of 3. Remember to taste before freezing!
Can I add alcohol to this recipe? Yes, adding 2-3 tablespoons of vodka, rum, or white wine can actually improve the texture by preventing the sorbet from freezing rock solid. However, too much alcohol will prevent proper freezing, so don’t exceed 3 tablespoons per batch. This also makes it an adults-only treat!
Conclusion
There you have it – a simple, stunning, and absolutely delicious homemade kiwi sorbet that rivals anything you’d find at a fancy ice cream shop! This recipe proves that you don’t need complicated equipment or professional training to create restaurant-quality desserts in your own kitchen. With just four basic ingredients and a little patience, you can transform fresh kiwis into a refreshing frozen treat that’s perfect for any occasion.
The bright, tangy flavor and vibrant green color make this sorbet as beautiful to look at as it is to eat. Whether you’re serving it at a dinner party, enjoying it poolside on a hot day, or sneaking a healthy sweet treat after the kids are in bed, this kiwi sorbet delivers every single time.
Don’t forget to experiment with the variations and make this recipe your own! Try different fruit combinations, adjust the sweetness to your liking, or add a splash of your favorite liquor for an adult version. The beauty of homemade sorbet is that you have complete control over every ingredient.
I hope you love this recipe as much as I do! If you make it, I’d absolutely love to see your creations – take a photo and share it on Pinterest or Instagram and tag me so I can see your beautiful kiwi sorbet. And if you have any questions or your own tips to share, drop them in the comments below. Happy freezing, friends!