The Ultimate Homemade Hot Fudge Sundae Recipe: Restaurant-Quality Dessert in 10 Minutes

There’s a magical moment when warm, silky hot fudge meets cold vanilla ice cream—that perfect contrast of temperatures, textures, and flavors that makes your taste buds absolutely sing. This homemade hot fudge sundae recipe captures that magic and brings it straight into your kitchen, without the need for a fancy ice cream parlor or the hefty price tag that comes with it.
A hot fudge sundae is more than just dessert. It’s comfort, it’s celebration, it’s that special treat you anticipate from the moment you finish dinner. Whether you’re treating yourself after a long week, impressing guests at a dinner party, or creating a cherished memory with your family, a perfectly made hot fudge sundae delivers pure joy in a dish.
The beauty of making this at home is that you control everything. You choose the quality of your ice cream, you decide how thick or saucy your fudge should be, and you customize every single topping to match your exact preferences. Store-bought hot fudge sauce can’t compare to the rich, decadent homemade version that comes together in minutes on your stovetop. Plus, making your own costs significantly less than purchasing it at a restaurant or café.
This recipe isn’t complicated or intimidating. Even novice cooks can create a restaurant-quality hot fudge sundae that will impress everyone at your table. In just ten minutes from start to finish, you’ll have a dessert that tastes like you spent hours perfecting it. Let me show you exactly how to do it.
The History and Golden Era of Hot Fudge Sundaes
To truly appreciate the hot fudge sundae, we need to travel back to the early 1900s and explore the fascinating story of how this beloved American dessert was born.
The sundae’s origin story is delightfully complicated and involves ice cream, ingenious marketing, and a dash of controversy. Most historians credit the invention of the sundae to the American ice cream parlor culture of the late 1800s and early 1900s. During this era, ice cream parlors were gathering places for families and communities—similar to how coffee shops function today. These weren’t just places to grab a quick treat; they were social hubs where people spent time, celebrated occasions, and enjoyed the novelty of this relatively new frozen treat.
The term “sundae” itself has an interesting origin. Some historians believe it comes from the word “Sunday,” as some ice cream parlors only served these elaborate creations on Sundays, making them a special, anticipated treat. Others suggest the name was created to distinguish these fancy ice cream creations from the simpler ice cream “sodas” that were served throughout the week. Regardless of the exact origin, the name “sundae” stuck and became synonymous with luxury, celebration, and indulgence.
Now, when exactly hot fudge was first drizzled over ice cream remains a matter of culinary debate, but what we know for certain is that by the 1920s, hot fudge sundaes had become phenomenally popular across America. The contrast of hot and cold was revolutionary—it was luxurious, it was unexpected, and it created a sensory experience unlike anything else available at the time.
The golden age of sundaes coincided with the soda fountain era. Soda fountains became iconic American institutions, with elaborate ice cream parlors featuring beautiful marble countertops, ornate mirrors, and skilled “soda jerks” (the term for ice cream parlor attendants) who could craft elaborate sundaes with impressive showmanship and precision. These weren’t just employees—they were artists, creating towering ice cream confections that were as much about visual spectacle as they were about taste.
During the 1950s and 1960s, hot fudge sundaes reached peak popularity in American culture. They appeared in movies, were featured in advertising, and became the go-to celebration dessert for countless occasions. The combination of tradition, luxury, and indulgence that a sundae represented made it the perfect symbol of American comfort and prosperity.
Even as restaurant culture evolved and fast-casual dining became dominant, the hot fudge sundae never lost its charm. Today, it remains a timeless classic—equally at home in a fine dining restaurant, an old-fashioned ice cream parlor, or your own kitchen. This recipe honors that beautiful tradition while making it accessible to anyone who wants to create this iconic dessert at home.
Why You’ll Love This Hot Fudge Sundae Recipe
This isn’t just another dessert recipe—it’s your ticket to creating something truly special in your own home. Here’s exactly why you’re going to absolutely adore making this hot fudge sundae:
This recipe is refreshingly easy and requires no special baking skills whatsoever. No complex techniques, no temperamental ingredients, and no stress. If you can melt chocolate and scoop ice cream, you can create a restaurant-quality hot fudge sundae that will impress everyone. The hot fudge sauce comes together in a saucepan in just five minutes, making this one of the quickest desserts you can prepare.
From gathering ingredients to enjoying that first spoonful, this entire recipe takes approximately ten minutes. That means you can satisfy dessert cravings immediately without hours of prep or complicated planning. It’s faster than driving to an ice cream shop and significantly more affordable.
Here’s what makes this hot fudge sundae recipe genuinely special:
- ⏰ Lightning-fast – Takes just 10 minutes from start to finish
- 👨👩👧👦 Family-friendly – Perfect for kids and adults alike
- 💰 Budget-friendly – Costs a fraction of what you’d pay at an ice cream parlor
- 🍫 Rich and luxurious – Feels like an indulgent restaurant dessert
- 🎉 Impressive – Guests think you’re a culinary genius
- 🌟 Customizable – Endless topping possibilities
- 📱 Instagram-worthy – Beautiful enough to photograph and share
- 💛 Brings joy – Creates special moments and memories
Understanding Your Key Ingredients
Let’s explore each ingredient and understand exactly why it matters to your final masterpiece:
Chocolate is the star. For hot fudge sauce, use high-quality dark or semi-sweet chocolate. Brands like Ghirardelli, Lindt, or Callebaut produce superior results. You could use chocolate chips in a pinch, but chopped chocolate from a solid bar melts more smoothly and creates a glossier sauce. The quality of chocolate directly impacts how delicious your fudge tastes—don’t skimp here.
Butter provides richness and helps create that silky, smooth texture that makes hot fudge so luxurious. Use real butter, not margarine or substitutes. The flavor difference is noticeable and butter creates better texture when cooled and reheated.
Cocoa powder intensifies chocolate flavor and adds depth. Use unsweetened cocoa powder—Dutch-processed has a smoother flavor, while natural cocoa is slightly more acidic and intense. Either works beautifully in this recipe.
Sweetened condensed milk is the secret ingredient that makes homemade hot fudge so special. It provides sweetness, creaminess, and helps achieve that perfect thick-but-pourable consistency that makes real hot fudge sauce so distinctive. This ingredient is non-negotiable for authentic hot fudge.
Corn syrup adds shine and prevents crystallization, helping your fudge maintain that smooth, glossy appearance even after cooling and reheating. It also contributes to the perfect consistency.
Vanilla extract rounds out the chocolate flavor and adds smoothness without asserting itself too strongly. Use pure vanilla extract for the best results.
Salt enhances all the chocolate flavors and prevents the sauce from tasting one-dimensionally sweet. A small pinch makes an enormous difference.
Vanilla ice cream is your base. Choose premium vanilla ice cream if possible—the quality directly impacts your final sundae. Look for ice cream made with real vanilla beans rather than just vanilla flavor.
Optional toppings like whipped cream, chopped nuts, and maraschino cherries are traditional for a reason. They add texture, visual appeal, and additional flavor dimensions to your sundae.
Equipment You’ll Need
The wonderful thing about this recipe is its minimal equipment requirements:
- Saucepan – A medium 2-3 quart saucepan works perfectly for making the fudge sauce
- Wooden spoon or silicone spatula – For stirring and combining ingredients
- Measuring cups – For measuring chocolate, butter, and condensed milk
- Measuring spoons – For cocoa powder, vanilla, and salt
- Whisk – Optional but helpful for smooth blending
- Ice cream scoop – For portioning ice cream nicely
- Serving bowls or dishes – Preferably chilled for serving
- Candy thermometer (optional) – For those who want to monitor temperature
- Spoon for serving – A regular serving or dessert spoon works perfectly
That’s truly all you need! This recipe proves that spectacular desserts don’t require complicated equipment.
Print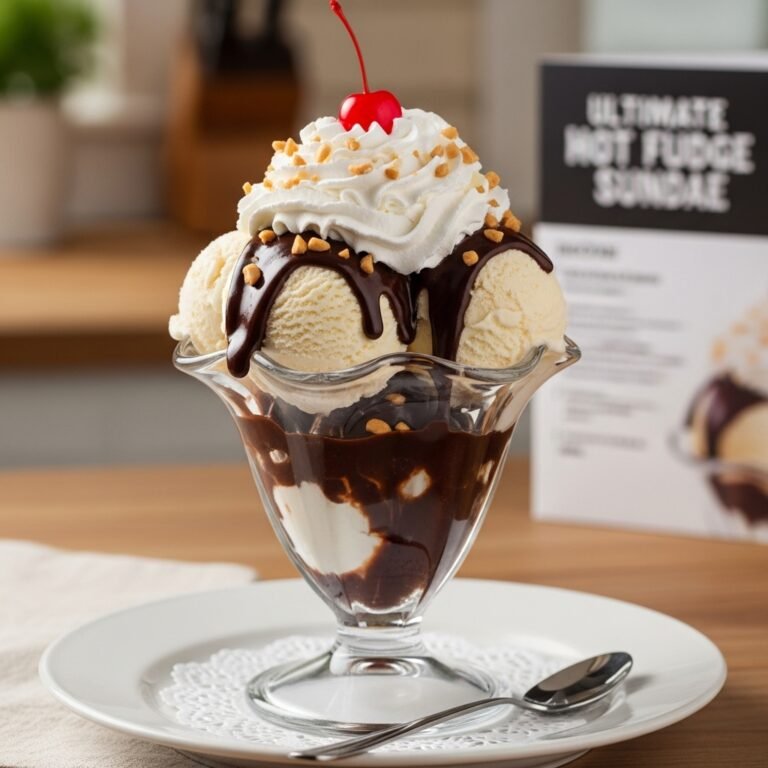
Hot Fudge Sundae Recipe
This homemade hot fudge sundae recipe creates restaurant-quality dessert at home in just ten minutes. Featuring silky, decadent hot fudge sauce made from real chocolate and condensed milk, served over premium vanilla ice cream and topped with whipped cream and your favorite garnishes. The contrast of warm fudge and cold ice cream creates pure dessert perfection.
- Total Time: 5 minutes
- Yield: 4 sundaes 1x
Ingredients
For the Hot Fudge Sauce:
- 4 ounces high-quality dark or semi-sweet chocolate, chopped (about ¾ cup)
- 3 tablespoons unsalted butter
- ¼ cup unsweetened cocoa powder
- ½ cup sweetened condensed milk
- ¼ cup light corn syrup
- ½ teaspoon vanilla extract
- Pinch of sea salt
For Serving (Per Sundae):
- 2 scoops premium vanilla ice cream
- Whipped cream (homemade or store-bought)
- 2 tablespoons hot fudge sauce (or more, to taste)
- Optional toppings: crushed nuts, sprinkles, maraschino cherry, wafer cookie
Instructions
- Gather all ingredients. Make sure your chocolate is chopped into small, uniform pieces to encourage even melting. Have your condensed milk and corn syrup measured and ready. This mise en place approach makes the cooking process smooth and quick.
- Combine chocolate and butter in saucepan. Place your chopped chocolate and 3 tablespoons of butter into a medium saucepan over medium heat. Do not use high heat—medium heat ensures gentle, even melting without burning or separating your ingredients.
- Melt while stirring occasionally. Stir every 30 seconds or so, helping the chocolate and butter combine smoothly as they melt. This should take about 2-3 minutes total. The mixture will look slightly separated at first, but continuous stirring brings it together beautifully.
- Add cocoa powder and whisk. Once the chocolate and butter are mostly melted, add ¼ cup unsweetened cocoa powder. Whisk vigorously to combine thoroughly, breaking up any lumps. This ensures smooth texture and prevents grittiness in your finished sauce.
- Stir in condensed milk and corn syrup. Slowly add ½ cup sweetened condensed milk and ¼ cup light corn syrup, stirring constantly. These ingredients will blend smoothly into your chocolate mixture. The sauce will look thick and glossy—this is perfect.
- Continue cooking gently. Keep stirring over medium heat for about 1-2 minutes. You’re not looking for a boil—just a gentle, consistent heat that helps all ingredients combine perfectly and reaches a uniform, smooth consistency.
- Remove from heat and add final touches. Take your saucepan off the heat and stir in ½ teaspoon vanilla extract and a small pinch of sea salt. The vanilla adds smoothness and depth, while salt enhances all the chocolate flavors.
- Test consistency. The sauce should be thick but still pourable—imagine honey or thick syrup. If it’s too thick, whisk in cream or milk 1 tablespoon at a time until desired consistency. If it’s too thin, you can add an additional tablespoon of cocoa powder or chocolate.
- Prepare your sundae dishes. If possible, chill your serving bowls or dishes in the freezer for 5 minutes. Cold dishes help keep ice cream from melting too quickly and keep your sundae cold and delicious.
- Scoop ice cream into prepared dishes. Place 2 generous scoops of premium vanilla ice cream into each chilled bowl. Space them slightly apart to allow room for sauce, toppings, and whipped cream.
- Drizzle with hot fudge. Pour approximately 2 tablespoons of hot fudge sauce over each sundae, allowing it to drip down the sides and pool slightly at the bottom. The warm sauce will partially melt the ice cream, creating that perfect hot-and-cold contrast.
- Add whipped cream and toppings. Top each sundae with a generous dollop of whipped cream. Add your favorite toppings: crushed walnuts or pecans, colorful sprinkles, a maraschino cherry, or a wafer cookie. Be creative and have fun with this step!
- Serve immediately. Sundaes are best enjoyed right away, while the ice cream is still cold and the fudge is still warm. This temperature contrast is what makes a hot fudge sundae so special.
Notes
- Make extra fudge sauce: This recipe makes approximately ¾ cup of sauce, which is perfect for 3-4 sundaes. The sauce keeps beautifully in the refrigerator for up to 2 weeks and can be reheated gently before serving.
- Sauce consistency: Hot fudge sauce will thicken as it cools. If you’re making it ahead, gently reheat in a saucepan or microwave (in 30-second intervals, stirring between) before serving.
- Batch sundaes: This recipe easily multiplies. Use these proportions as your base and scale up for parties or large gatherings.
- Chocolate preference: Dark chocolate creates a more sophisticated, less sweet sundae. Semi-sweet chocolate is more classic and sweet. Choose based on your preference.
- Toppings bar: For parties, set out bowls of different toppings and let guests customize their own sundaes.
- Prep Time: 5 minutes
- Cook Time: 0 minutes
- Category: Desert
- Method: Stovetop
- Cuisine: American
- Diet: Gluten Free
Nutrition
- Serving Size: 1 sundae
- Calories: 580
- Sugar: 65g
- Sodium: 180mg
- Fat: 28g
- Saturated Fat: 17g
- Unsaturated Fat: 8g
- Trans Fat: 0.5g
- Carbohydrates: 78g
- Fiber: 2g
- Protein: 9g
- Cholesterol: 65mg
Tips and Creative Variations
The beauty of hot fudge sundaes is how easily they adapt to different preferences and creativity:
The Salted Caramel Swirl: Make the fudge sauce as directed, then drizzle with store-bought salted caramel sauce before topping. The combination of chocolate and caramel is absolutely divine.
The Brownie Sundae: Crumble warm brownies over the ice cream before adding hot fudge sauce. This creates an incredible texture and flavor combination.
The Peanut Butter Cup Version: Add 2 tablespoons of peanut butter to the fudge sauce while cooking. Serve with crushed peanut butter cups sprinkled on top. Absolutely irresistible.
The Espresso Lover’s Sundae: Add ½ teaspoon instant espresso powder to the fudge sauce for a mocha-inspired creation that’s sophisticated and rich.
The Bourbon Version (Adults Only): Add ½ ounce (1 tablespoon) bourbon whiskey to the finished hot fudge sauce. The vanilla and caramel notes in bourbon complement chocolate beautifully.
The Mint Chocolate Version: Use mint chocolate chip ice cream instead of vanilla. Add ⅛ teaspoon peppermint extract to the fudge sauce for enhanced mint flavor. Garnish with crushed candy canes.
The Vegan Version: Use dairy-free butter, coconut milk instead of condensed milk, and dairy-free vanilla ice cream. The fudge sauce will be slightly different in texture but still delicious.
The Healthier Version: Use darker chocolate (85% cacao), reduce sugar by adding less corn syrup, and use Greek yogurt instead of whipped cream. Still indulgent but with less sugar and more protein.
The Cookie Crumble Sundae: Crush your favorite cookies (Oreos, chocolate chip, oatmeal) and layer them with ice cream before adding hot fudge sauce.
Pro Chef Tips for Maximum Deliciousness
Temperature is everything. The magic of a hot fudge sundae lies in the temperature contrast. Keep your ice cream as cold as possible—use chilled serving bowls and scoop ice cream directly from the freezer. Make your fudge sauce hot but not scalding (around 160-170°F). This contrast creates the perfect sensory experience.
Use quality chocolate. Don’t use low-quality chocolate chips or chocolate sauce mix. Real, quality chocolate makes an enormous difference in flavor depth and richness. Invest in a good chocolate bar that you actually enjoy eating plain—if it tastes good on its own, it will taste incredible in your sauce.
Bloom your cocoa powder. For the smoothest, richest chocolate flavor, whisk your cocoa powder with a small amount of hot water before adding to your chocolate mixture. This “blooming” releases cocoa’s full flavor potential. It’s a professional technique that makes a noticeable difference.
Don’t skip the salt. Even if you don’t particularly like salty foods, a pinch of salt in chocolate sauce is essential. It doesn’t make the sauce taste salty—it makes the chocolate taste more chocolatey by enhancing all the subtle flavor notes.
Make sauce ahead. Prepare your hot fudge sauce up to 2 weeks ahead and store it in an airtight container in the refrigerator. Simply reheat gently before serving. This strategy is perfect for entertaining or when you want a quick dessert without active cooking time.
Use real vanilla extract. Pure vanilla extract adds smoothness and depth that imitation vanilla simply cannot replicate. The small price difference is absolutely worth the flavor improvement.
Whisk in your cocoa smoothly. When adding cocoa powder, whisk vigorously to ensure no lumps remain. Lumps of cocoa powder create a gritty, unpleasant texture. Take 30 seconds to whisk thoroughly—this small effort makes a big difference.
Let condensed milk be your secret weapon. Sweetened condensed milk is what separates homemade hot fudge from regular chocolate sauce. It adds creaminess, richness, and helps achieve that perfect consistency that makes people say “this tastes like a real ice cream parlor!”
Common Mistakes to Avoid
Using chocolate that’s too hot. If your chocolate gets too hot, it can separate and become grainy. Keep heat at medium, not high. If your chocolate does separate, remove from heat and whisk in a small amount of cream to restore smoothness.
Skipping the cocoa powder step. Cocoa powder intensifies chocolate flavor and prevents the sauce from tasting too sweet. Don’t skip it or reduce it—it’s crucial for authentic hot fudge flavor.
Making the sauce too thick or too thin. Hot fudge sauce should drip and flow over ice cream, not sit stiffly or run off immediately. Test the consistency before serving and adjust with cream or more cocoa powder as needed.
Using warm ice cream bowls. Warm bowls speed up ice cream melting and ruin the temperature contrast that makes hot fudge sundaes special. Always use chilled bowls or serve directly from the freezer.
Not tasting and adjusting before serving. Everyone’s taste preferences differ regarding sweetness and chocolate intensity. Always taste your sauce and adjust vanilla or cocoa powder before serving to guests.
Storage and Meal Prep Guidelines
Hot fudge sauce refrigeration. Store leftover hot fudge sauce in an airtight container in the refrigerator for up to 2 weeks. The sauce will thicken significantly as it cools, but this is normal and expected.
Reheating your sauce. To reheat, place the desired amount in a small saucepan over medium-low heat, stirring frequently, until warmed through (about 2-3 minutes). Alternatively, microwave in 30-second intervals, stirring between, until warm. Avoid overheating, which can cause graininess.
Freezing hot fudge sauce. This sauce freezes beautifully for up to 3 months. Pour into ice cube trays for easy portioning, freeze until solid, then transfer cubes to a freezer bag. Thaw and reheat as needed for quick individual sundaes.
Shelf life. Unopened cans of condensed milk last years in the pantry. Opened, store in the refrigerator for 5-7 days. Chocolate keeps indefinitely in a cool, dry place. Butter lasts about 1-2 weeks after opening in the refrigerator.
Make-Ahead and Freezer-Friendly Notes
Can you make this ahead? Yes! Prepare your hot fudge sauce up to 2 weeks ahead and store in the refrigerator. When ready to serve, simply reheat gently before pouring over ice cream. The ice cream component must be made fresh (you can’t really make assembled sundaes ahead of time as they’ll melt), but having the sauce prepared means your dessert comes together in seconds.
Freezer-friendly strategy. Make extra hot fudge sauce and freeze it in portions. On busy weeknights, you can have a gourmet hot fudge sundae ready in just minutes without active cooking. Thaw and reheat as needed.
Best reheating method. Gentle, low heat is best for reheating hot fudge sauce. Use a saucepan over medium-low heat and stir frequently. Microwave also works—heat in 30-second intervals, stirring between, until warm. High heat or prolonged cooking can cause the sauce to become grainy or separated.
Party prep strategy. For gatherings, make your hot fudge sauce hours ahead and keep it warm in a slow cooker on the “warm” setting. Set out bowls of toppings and let guests assemble their own sundaes. This creates an interactive, fun experience.
Serving Suggestions
This hot fudge sundae shines in many contexts and situations:
As an elegant dinner party dessert: Serve in individual chilled bowls alongside coffee. It feels fancy without requiring hours of preparation.
For casual family dessert nights: Make it a fun family activity where everyone customizes their own with their favorite toppings from a toppings bar.
Holiday celebration dessert: Perfect for Christmas, Valentine’s Day, or any special occasion. The visual presentation is beautiful and the taste is always impressive.
Late-night indulgence: A smaller hot fudge sundae is perfect for that cozy late-night snack when you want something special but not too heavy.
With coffee or tea: A hot fudge sundae pairs beautifully with coffee or hot tea. The warmth of the beverage complements the temperature contrast of the sundae perfectly.
Alongside pie or cake: Serve a smaller sundae alongside a slice of pie, cake, or brownies for a decadent dessert course.
Summer entertaining: Hot fudge sundaes are perfect for summer gatherings, pool parties, or outdoor celebrations. Set up a sundae bar and let guests create their own combinations.
Birthday celebrations: Personalize sundaes by serving them on the birthday person’s favorite color plates or with their favorite toppings.
Frequently Asked Questions
Q: Can I use store-bought hot fudge sauce instead of making my own?
A: You absolutely can, and there’s no shame in that! However, homemade hot fudge has superior flavor, better texture, and is more economical. Once you try homemade, you might find you prefer it. Plus, it takes just 5 minutes to make.
Q: What’s the best vanilla ice cream brand for sundaes?
A: Premium brands like Häagen-Dazs, Ben & Jerry’s, Talenti, or local creamery brands produce excellent results. However, any quality vanilla ice cream works. Choose one you enjoy eating plain—if it tastes good on its own, it will be delicious in your sundae.
Q: Can I make hot fudge sauce dairy-free?
A: Yes! Use dairy-free butter, coconut milk or cashew cream instead of condensed milk, and ensure your chocolate is dairy-free. The texture will be slightly different but still delicious. Be aware that the sauce may be thinner than traditional hot fudge.
Q: How do I prevent the ice cream from melting too quickly?
A: Use chilled bowls (freeze them for at least 10 minutes before serving), keep ice cream in the freezer until the last moment, and work quickly when assembling. The temperature contrast is part of the appeal, so some melting is normal and even desirable—just not so much that it becomes soup!
Q: Can I make individual hot fudge sundae portions ahead for a party?
A: Not really—assembled sundaes don’t store well as the ice cream will melt. However, you can prepare individual components ahead: chill bowls, scoop ice cream directly into bowls and freeze them, and keep hot fudge warm. Assemble just before serving for best results.
Q: Is hot fudge sauce the same as chocolate sauce?
A: They’re similar but different. Hot fudge sauce uses sweetened condensed milk and is specifically designed to harden slightly when it contacts cold ice cream, creating that delicious fudgy texture. Chocolate sauce is typically thinner and remains pourable. This recipe creates true hot fudge sauce.
Q: Can I add liqueur to homemade hot fudge sauce?
A: Yes! Add ½ ounce (1 tablespoon) of your favorite liqueur—bourbon, brandy, or Grand Marnier work beautifully. Add it to the finished sauce off the heat. This creates an adults-only version that’s sophisticated and delicious.
Closing Thoughts
There you have it—the complete guide to creating restaurant-quality hot fudge sundaes in your own home in just ten minutes. This isn’t just a dessert; it’s a celebration, a moment of indulgence, a memory-maker, and a reason to smile.
What I truly love about this recipe is how it honors the golden age of American ice cream parlors while bringing that magic into modern, convenient reality. You’re creating something with real ingredients and genuine care, yet it requires minimal time and effort. There’s no complicated technique, no special skills needed—just quality ingredients, a little heat, and love.
This hot fudge sundae is destined to become a beloved tradition in your home. Make it for your family on ordinary Tuesdays to brighten the week. Serve it to guests to create lasting impressions. Enjoy it solo as a well-deserved treat after a tough day. Most importantly, savor every warm, cold, silky, creamy, absolutely perfect spoonful.
I’d absolutely love to hear from you! Have you made hot fudge sundaes at home before? What are your favorite toppings? Do you prefer dark or milk chocolate? Leave a comment below and share your sundae dreams and experiences. If you make this recipe, please photograph it and share on Pinterest or tag me on social media—I absolutely adore seeing your sundae creations!
Pin this recipe to your dessert board so you can find it whenever a craving strikes. Share it with friends and family who appreciate simple, delicious, impressive desserts. Get ready to become the hero of every dessert occasion. Happy sundae making! 🍨✨🍫