Ultimate Green Smoothie Bowl Recipe – Thick, Creamy & Nutrient-Packed!
If you’ve been scrolling through Pinterest looking for the perfect healthy breakfast that’s both gorgeous and nutritious, this Green Smoothie Bowl is exactly what you need! Imagine a vibrant, creamy bowl packed with leafy greens, tropical fruit, and superfoods that tastes absolutely amazing—not grassy or bitter like you might expect. It’s thick enough to eat with a spoon, topped with crunchy granola, fresh fruit, and all your favorite toppings that make every bite exciting.
This recipe has become a morning staple for health-conscious families, busy professionals, and anyone who wants to start their day with serious nutrition without sacrificing flavor. Whether you’re rushing to get the kids out the door, need post-workout fuel that tastes indulgent, or want a energizing breakfast that keeps you satisfied until lunch, this green smoothie bowl delivers on every level. The best part? It takes just 5 minutes to make, requires zero cooking, and can be customized endlessly based on what you have in your fridge.
Green smoothie bowls have exploded in popularity because they solve a major breakfast dilemma: how do you get more vegetables into your morning without feeling like you’re eating a salad at 7 AM? By blending spinach or kale with naturally sweet frozen fruit and creamy ingredients like banana and avocado, you create something that tastes like a tropical vacation while secretly packing in 2-3 servings of greens. It’s the ultimate way to trick your taste buds (and your kids!) into loving vegetables for breakfast. Let’s dive into why this vibrant green bowl is about to become your new morning obsession!
History / Background
The green smoothie movement began in the early 2000s with raw food advocates and health enthusiasts who were looking for ways to consume more leafy greens in an appealing format. Victoria Boutenko, a raw food educator, is often credited with popularizing green smoothies after she began experimenting with blending greens with fruit to make them more palatable for her family. Her 2005 book on green smoothies sparked a wellness revolution that continues today.
The evolution from drinkable green smoothies to green smoothie bowls happened around 2013-2015, influenced by the açaí bowl trend that was sweeping through California and Hawaii. Health bloggers and Instagram influencers realized that by making smoothies thicker and eating them from a bowl with toppings, they could create a more satisfying, complete meal that felt more substantial than a drink. The visual appeal was undeniable—that gorgeous bright green color against colorful toppings like berries, kiwi, and granola made for stunning photos that went viral across social media.
Green smoothie bowls became particularly popular in yoga communities, fitness circles, and among plant-based eaters who were seeking nutrient-dense meals that supported their active lifestyles. The concept aligned perfectly with the growing movement toward eating more whole foods, adding more plants to your diet, and creating meals that nourish both body and mind. Unlike juice cleanses or restrictive diets, green smoothie bowls felt accessible, sustainable, and genuinely enjoyable.
Today, green smoothie bowls are served at health cafés, smoothie shops, and breakfast spots worldwide. They’ve become a symbol of the modern wellness lifestyle—beautiful, nutritious, and Instagram-worthy. This recipe honors that tradition while being simple enough for anyone to make at home with basic ingredients. The green smoothie bowl proves that eating healthy doesn’t have to be complicated, expensive, or taste like punishment. It’s about finding delicious ways to fuel your body with real, whole foods that make you feel amazing.
Why You’ll Love This Recipe
This Green Smoothie Bowl is about to revolutionize your morning routine, and I’m going to tell you exactly why it deserves a permanent spot in your breakfast rotation.
First and foremost, it tastes incredible—naturally sweet from the tropical fruit with absolutely no bitter or grassy flavor that people associate with green drinks. The combination of frozen banana, mango or pineapple, and just the right amount of liquid creates a smooth, creamy texture that’s almost like eating frozen yogurt or soft-serve ice cream. The greens completely blend into the background flavor-wise while still providing all their nutritional benefits. It’s the perfect introduction to green smoothies for skeptics and picky eaters.
Here’s what makes this recipe absolutely irresistible:
- Ready in 5 minutes – Faster than waiting in line at a coffee shop or café for your morning meal
- Packed with 2-3 servings of greens – Spinach or kale blends invisibly, giving you major nutritional benefits without the grassy taste
- Naturally energizing – The combination of fruits, greens, and healthy fats provides sustained energy without the caffeine crash
- Kid-approved nutrition – Even picky eaters love the sweet tropical flavor and fun toppings while getting their vegetables
- Completely customizable – Adjust sweetness, add protein powder, use different greens, or change up toppings based on preferences
- Thick and spoonable texture – The consistency is perfect for holding toppings and eating slowly like a proper breakfast
- Budget-friendly ingredients – Uses affordable staples like frozen fruit, spinach, and bananas that won’t break the bank
- Stunning presentation – That vibrant green color looks absolutely gorgeous topped with colorful fruits and toppings
- Keeps you full for hours – Balanced with fiber, healthy fats, and optional protein so you’re satisfied until lunch
- Supports gut health – Fiber-rich ingredients and optional additions like chia seeds promote healthy digestion
- Vegan and gluten-free friendly – Naturally fits multiple dietary preferences without modifications
Whether you’re meal prepping for busy weekday mornings, recovering from a workout, trying to eat more vegetables, or introducing your family to healthier breakfast options, this green smoothie bowl checks every single box. It proves that nutritious eating can be absolutely delicious, visually stunning, and surprisingly simple!
Ingredient Notes
Let me walk you through each ingredient and explain why it matters for creating the perfect green smoothie bowl. Understanding your ingredients helps you make smart substitutions and achieve consistently amazing results.
Leafy Greens (Spinach or Kale) – This is what makes your smoothie bowl green and provides the nutritional powerhouse of vitamins, minerals, and antioxidants. Baby spinach is the best choice for beginners because it has a very mild flavor that disappears completely when blended with fruit. Kale has a slightly stronger flavor and more fibrous texture but provides even more nutrients. Use fresh greens, not frozen, and pack them into your measuring cup. If you’re new to green smoothies, start with 1 cup of spinach and work your way up to 2 cups as you get comfortable with the taste. Substitute with Swiss chard, romaine lettuce, or even frozen spinach (though fresh blends more smoothly).
Frozen Banana – The foundation of your creamy, thick texture. Frozen bananas are absolutely essential—they create that soft-serve ice cream consistency while adding natural sweetness and potassium. Always use frozen (not fresh) and make sure they’re very ripe with brown spots before freezing for maximum sweetness and easier blending. If you can’t do bananas, substitute with frozen cauliflower (which sounds weird but tastes neutral) plus frozen avocado for creaminess.
Frozen Tropical Fruit (Mango or Pineapple) – This adds sweetness, tropical flavor, and helps mask any green taste from the leafy vegetables. Mango creates a slightly sweeter, creamier bowl while pineapple adds brightness and tang. Both work beautifully! Using frozen fruit (not fresh) is key for achieving that thick, spoonable consistency. You can also use a combination of both fruits, or substitute with frozen peaches or frozen berries.
Liquid Base – You need just a small amount to help everything blend without making your bowl too thin. Coconut water adds natural sweetness and electrolytes, almond milk keeps it creamy and mild, coconut milk makes it richer, or regular water keeps it light and lets the fruit flavors shine. Start with just 1/4 cup—you can always add more if needed, but you can’t take it away!
Avocado (Optional but Recommended) – Adding 1/4 to 1/2 of a frozen avocado creates an incredibly creamy, luxurious texture while providing healthy fats that keep you satisfied longer. The avocado flavor completely disappears when blended with the fruit and greens. This is especially important if you’re skipping banana or want extra creaminess.
Natural Sweetener (Optional) – Depending on how sweet your fruit is and your personal preference, you might want to add a touch of honey, maple syrup, or pitted dates. Start without sweetener and taste your smoothie before adding any—often the banana and mango provide enough natural sweetness. For a sugar-free option, use stevia or monk fruit.
Protein Powder (Optional) – Adding a scoop of vanilla or unflavored protein powder transforms this into a complete meal with staying power. This is perfect for post-workout recovery or if you need more protein in your diet. Choose a high-quality powder that blends smoothly without grittiness.
Toppings – This is where creativity shines! Fresh fruit (kiwi, berries, banana slices), crunchy granola, coconut flakes, chia seeds, hemp hearts, sliced almonds, cacao nibs, nut butter drizzle, and edible flowers are all excellent choices. The toppings add texture, nutrition, and make your bowl Pinterest-worthy.
Equipment Needed
Creating the perfect green smoothie bowl requires minimal equipment—most of which you probably already have in your kitchen! Here’s what you’ll need:
- High-Powered Blender – This is your most important tool. You need a blender strong enough to pulverize frozen fruit and leafy greens into a completely smooth consistency. A Vitamix, Blendtec, or Ninja blender works best because they have powerful motors (1000+ watts) that can handle frozen ingredients without struggling. If you only have a standard blender, you’ll need to let your frozen fruit soften for 5-10 minutes, add more liquid, and blend in smaller batches while stopping frequently to scrape down the sides.
- Tamper Tool – If your high-powered blender came with a tamper (that long stick you push through the lid while blending), use it! This is the secret weapon for achieving ultra-thick smoothie bowls without adding excess liquid. The tamper pushes ingredients down toward the blades, ensuring everything blends evenly.
- Measuring Cups and Spoons – For accurately portioning your ingredients, especially the liquid (which needs to be minimal for thick consistency) and any add-ins like protein powder or sweeteners.
- Sharp Knife and Cutting Board – For preparing your fresh toppings—slicing kiwi, strawberries, bananas, and any other fruits you’re using to garnish your bowl.
- Wide, Shallow Serving Bowl – Choose a bowl that’s wider than it is deep. This gives you maximum surface area for arranging beautiful toppings and makes your smoothie bowl look more impressive. Coconut bowls are Instagram-perfect, but any ceramic cereal bowl or wide soup bowl works great.
- Rubber Spatula – Essential for scraping down the sides of your blender and getting every last bit of that precious green smoothie into your serving bowl.
Optional but helpful: kitchen scissors for trimming greens if needed, a small fine-mesh strainer if you’re using fresh berries that need rinsing, and decorative spoons or bowls if you’re photographing your creation for social media.
Print
Green Smoothie Bowl Recipe
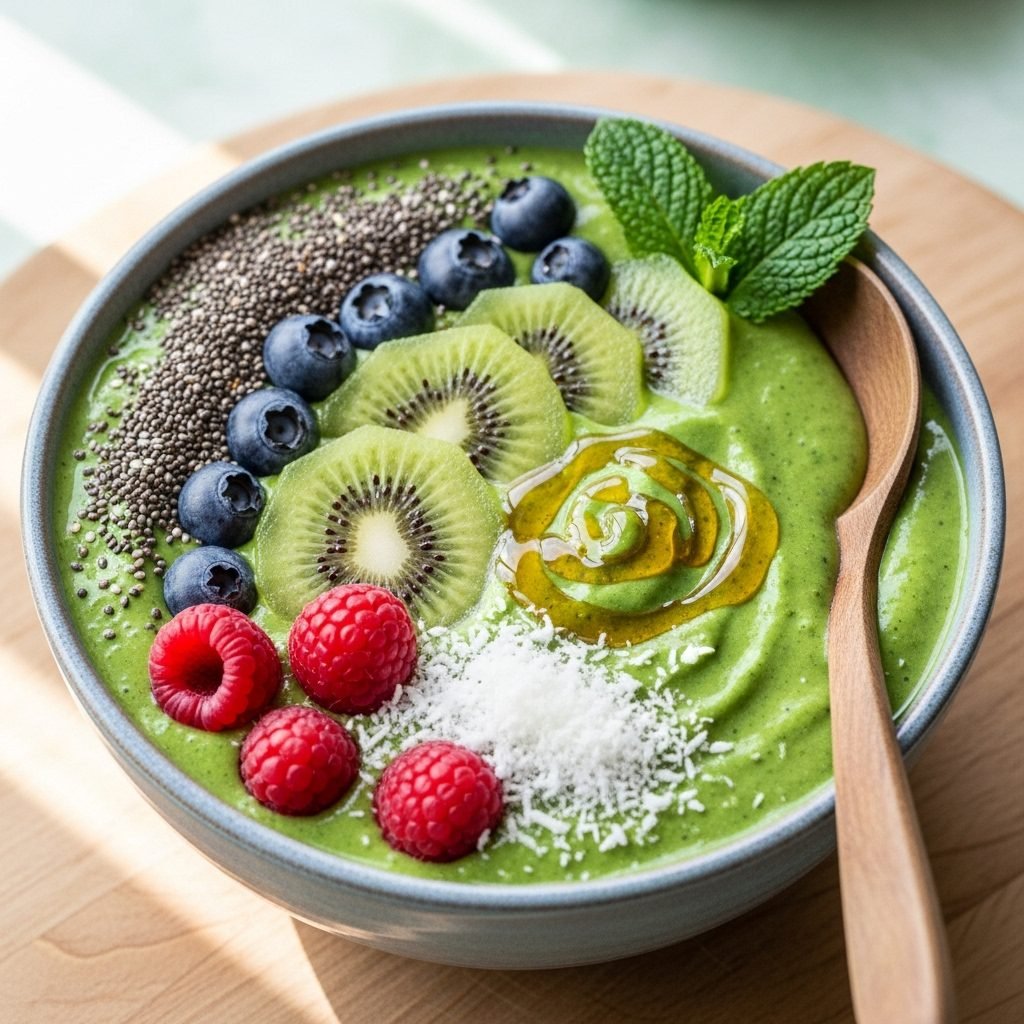
A vibrant, nutrient-packed green smoothie bowl that’s thick, creamy, and tastes like a tropical treat! Made with fresh spinach, frozen banana, tropical fruit, and your choice of liquid, this energizing bowl is topped with crunchy granola, fresh fruit, and superfoods. It’s naturally sweetened, loaded with vitamins and minerals, and ready in just 5 minutes—perfect for busy mornings or post-workout fuel that tastes amazing!
- Total Time: 5 minutes
- Yield: 1 large smoothie bowl (or 2 small) 1x
Ingredients
For the Smoothie Bowl Base:
- 2 cups fresh baby spinach (packed, or 1.5 cups kale)
- 1 large frozen banana (sliced before freezing)
- 1 cup frozen mango chunks (or pineapple)
- 1/4 to 1/2 cup liquid (coconut water, almond milk, or water)
- 1/4 ripe avocado (optional, for extra creaminess)
- 1 tablespoon honey or maple syrup (optional, adjust to taste)
- 1 scoop vanilla protein powder (optional)
- 2-3 ice cubes (optional, for extra thickness)
Topping Suggestions:
- 1/4 cup granola
- Fresh kiwi slices
- Fresh berries (blueberries, strawberries, raspberries)
- Sliced banana
- Coconut flakes
- Chia seeds
- Hemp hearts
- Sliced almonds
- Almond butter or peanut butter drizzle
- Fresh mint leaves
Instructions
- Prep Your Ingredients – Make sure your banana is sliced and frozen solid (at least 4 hours or overnight). Wash your spinach thoroughly if not pre-washed. Measure out your frozen mango. Have all your toppings prepped and ready so you can assemble quickly once the smoothie is blended.
- Layer Ingredients Properly – Add ingredients to your blender in this order for best blending results: liquid first (start with just 1/4 cup), then fresh spinach, then frozen mango, then frozen banana slices on top, then any optional add-ins like avocado or protein powder. This layering helps the blender blades catch the liquid and greens first, making it easier to blend the frozen fruit.
- Blend Until Smooth and Thick – Start your blender on low speed to break up the frozen fruit, then gradually increase to high speed. Use your tamper tool constantly to push ingredients down toward the blades without adding extra liquid. Blend for 45-60 seconds until completely smooth with no chunks of spinach or fruit remaining. Stop and scrape down the sides if needed. The consistency should be very thick—like frozen yogurt or soft-serve ice cream, not pourable like a regular smoothie.
- Check and Adjust Consistency – Your smoothie bowl should be thick enough to hold a spoon upright. If it’s too thin, add 2-3 ice cubes and blend again. If it’s too thick to blend even with the tamper, add just 1 tablespoon of liquid at a time until it blends smoothly. Remember: you want it thick enough to eat with a spoon and hold toppings without them sinking!
- Taste and Adjust Sweetness – Before pouring into your bowl, taste the smoothie. If it’s not sweet enough (depending on fruit ripeness), blend in a tablespoon of honey or a pitted date. If it tastes too “green,” add a squeeze of lemon juice to brighten the flavors.
- Transfer to Serving Bowl – Use a spatula to scoop the thick green smoothie into a wide, shallow bowl. Smooth the top with the back of a spoon to create an even surface—this makes your toppings look more professional and organized.
- Add Beautiful Toppings – Now for the fun part! Arrange your toppings in sections or rows for that Instagram-worthy presentation. Try creating a pattern: granola in a line down the center, kiwi slices on one side, berries on the other, with coconut flakes and seeds sprinkled throughout. Finish with a drizzle of nut butter and a mint leaf for color contrast.
- Serve Immediately – Grab a spoon and dig in right away! Smoothie bowls are best enjoyed immediately while still thick and cold. The vibrant green color, crunchy toppings, and creamy base create the perfect textural and flavor experience.
Notes
- Leafy Green Options: Baby spinach has the mildest flavor and blends smoothest. Kale provides more nutrients but has a slightly stronger taste—remove thick stems before blending. Start with spinach if you’re new to green smoothies.
- Achieving the Perfect Thickness: The secret is using as little liquid as possible. Start with just 1/4 cup and add more only if your blender absolutely won’t blend. The tamper tool is essential for thick smoothie bowls.
- Banana-Free Version: Replace the frozen banana with 1 cup frozen cauliflower plus 1/2 frozen avocado. Add 1-2 tablespoons of honey or maple syrup since you’re losing the banana’s natural sweetness.
- Color Tip: For the brightest, most vibrant green color, use spinach (not kale) and stick with mango or pineapple (not berries which can muddy the color). Adding too much avocado can make it more brown-green.
- Protein Boost: Adding protein powder makes this a complete meal. Vanilla protein works best with the tropical flavors. Start with half a scoop if you’re new to protein powder to avoid grittiness.
- Prep Ahead: Pre-portion your greens and frozen fruit into freezer bags. In the morning, dump one bag into your blender with liquid and blend. Keeps for 3 months in the freezer!
- Prep Time: 5 minutes
- Cook Time: 0 minutes
- Category: Breakfast
- Method: Blending
- Cuisine: American
- Diet: Gluten Free
Nutrition
- Serving Size: 1 large smoothie bowl (without toppings)
- Calories: 285
- Sugar: 32g
- Sodium: 95mg
- Fat: 5g
- Saturated Fat: 1g
- Unsaturated Fat: 3.5g
- Trans Fat: 0g
- Carbohydrates: 62g
- Fiber: 9g
- Protein: 5g
- Cholesterol: 0mg
Tips & Variations
Let’s explore all the creative ways you can customize this green smoothie bowl to match your taste preferences, dietary needs, and what you have available in your kitchen!
Flavor Variations:
- Tropical Paradise: Use half mango and half pineapple, add a squeeze of lime juice, and top with fresh pineapple chunks, mango slices, and toasted coconut for a vacation-inspired bowl.
- Berry Green Fusion: Replace mango with frozen mixed berries (though this will make the color more purple-brown). Top with fresh strawberries, blueberries, and raspberry drizzle for a berry-lover’s dream.
- Peanut Butter Green: Add 2 tablespoons of peanut butter to the blend and use pineapple as your fruit. Top with sliced banana, granola, and extra peanut butter drizzle for a PB&J vibe.
- Mint Chocolate Chip: Add 1/4 teaspoon peppermint extract and 1 tablespoon cacao powder to your blend. Top with cacao nibs and dark chocolate chips for a healthier dessert-like breakfast.
- Ginger Zinger: Add a small piece of fresh ginger (about 1/2 inch) while blending for a spicy, anti-inflammatory kick. Pairs beautifully with mango and pineapple.
Dietary Modifications:
- High-Protein Version: Add a full scoop of protein powder, top with Greek yogurt (if not vegan), and sprinkle with hemp hearts and sliced almonds for a protein-packed meal with 25+ grams of protein.
- Keto/Low-Carb: Replace banana and mango with frozen cauliflower, avocado, and a small handful of frozen berries. Use unsweetened almond milk, add MCT oil or coconut oil for healthy fats, and sweeten with stevia. Top with nuts, seeds, and coconut flakes (skip granola).
- Kid-Friendly Version: Use spinach (not kale), add extra banana for sweetness, use apple juice as your liquid, and top with fun toppings like granola, banana slices, and a few mini chocolate chips to make it exciting.
Boosting Nutrition:
Add superfood ingredients like 1 tablespoon chia seeds, 1 tablespoon flax seeds, 1 teaspoon spirulina powder (makes it darker green), 1 teaspoon maca powder for energy, or 1 tablespoon collagen powder for skin and joint health. These blend in without affecting flavor significantly.
Texture Modifications:
For an even thicker, ice cream-like consistency, freeze your avocado and use frozen spinach instead of fresh. For a lighter, more refreshing bowl, use coconut water and add a handful of fresh mint leaves while blending.
Pro Chef Tips
Want to elevate your green smoothie bowl from good to absolutely incredible? Here are professional-level techniques that will transform your breakfast game:
Master the Perfect Green Color – Professional smoothie bowl makers know that achieving that gorgeous, vibrant green (not brown-green or murky) requires the right ratio of ingredients. Use 2 parts leafy greens to 3 parts light-colored fruit (banana, mango, pineapple). Avoid berries in the base as they create a muddy brown color. If you want berries, save them for toppings only. Adding a squeeze of lemon juice brightens the green color naturally.
The Tamper Technique – High-end smoothie shops use a constant tamping motion while blending—pushing down in circular motions to keep ingredients moving toward the blades without creating air pockets. This creates an ultra-smooth, creamy texture without needing extra liquid. Think of it as “folding” the ingredients as they blend.
Layer Your Toppings Strategically – Professional food stylists place heavier ingredients (granola, nuts) first so they stick to the smoothie, then add lighter items (berries, coconut flakes) on top for dimension. Create visual interest by arranging toppings in sections, rows, or color gradients rather than randomly sprinkling everything. Use odd numbers (3 strawberry slices, 5 blueberries) which are more visually pleasing than even numbers.
Pre-Freeze Your Bowl – This café trick keeps your smoothie bowl cold and thick while you eat and photograph it. Place your serving bowl in the freezer for 15-20 minutes before making your smoothie. The cold bowl prevents the smoothie from melting quickly, maintaining that perfect soft-serve consistency longer.
Balance Sweet and Acid – Professional chefs know that great flavor comes from balancing sweetness with acidity. Even though your smoothie bowl should taste sweet, a small squeeze of lemon or lime juice (just 1/2 teaspoon) brightens all the flavors and cuts through the richness, making everything taste more vibrant and fresh. This is especially important if you’re using avocado.
Build in Healthy Fats – Nutritionists recommend including healthy fats (avocado, nut butter, or coconut) in your smoothie bowl because they help your body absorb fat-soluble vitamins (A, K) from the greens and keep you satisfied for 4-5 hours instead of getting hungry an hour later.
The Upside-Down Blend Method – Some professional smoothie makers flip their blender jar upside down (if the model allows it) for the first few seconds of blending. This pulls the liquid and greens down first, making it easier to blend frozen fruit. Check your blender manual before trying this technique.
Common Mistakes to Avoid
Let me save you from the frustrations and disappointments I’ve seen (and experienced myself) when making green smoothie bowls:
Mistake #1: Adding Too Much Liquid – This is the absolute most common mistake that ruins smoothie bowls! When you add too much liquid, your smoothie becomes thin and drinkable instead of thick and spoonable. Your toppings will sink, it’ll be soupy and messy, and the whole experience is disappointing. Always start with just 1/4 cup of liquid maximum and add more only if your blender truly cannot blend. Use your tamper tool aggressively before adding more liquid—90% of the time, you just need to push ingredients down, not add liquid.
Mistake #2: Using Fresh Fruit Instead of Frozen – Fresh bananas and fresh mango will make your smoothie bowl thin, watery, and room temperature—not thick and cold like you want. Frozen fruit is absolutely essential for creating that ice cream-like consistency. Always slice your bananas and freeze them at least 4 hours ahead or keep a stash in your freezer. If you accidentally use fresh fruit, add 1 cup of ice cubes to compensate, though it won’t be quite as creamy.
Mistake #3: Not Washing Greens Properly – Even pre-washed spinach can have grit, dirt, or insects hiding in the leaves. Always rinse your greens under cold running water, especially if buying from farmers markets or using kale which tends to hold more dirt in its curly leaves. Nobody wants a gritty smoothie bowl! Dry the greens in a salad spinner or pat with paper towels before using.
Mistake #4: Overblending – There’s a sweet spot with blending smoothie bowls. You want to blend just until everything is completely smooth and creamy, then stop. Overblending incorporates too much air, can make the mixture thinner, and can actually warm up the smoothie from friction. Blend on high for 45-60 seconds maximum—once it’s smooth, you’re done!
Mistake #5: Waiting Too Long to Eat – Smoothie bowls start melting immediately, especially in warm kitchens or during summer. They’re at their absolute best within the first 10 minutes after making them. Prep all your toppings before you blend so you can assemble and eat right away. If you must wait, stick the bowl back in the freezer for 5-10 minutes to firm it back up.
Mistake #6: Not Using Ripe Enough Fruit – Underripe bananas that are still yellow-green will make your smoothie bowl taste starchy and not sweet enough. Always wait until your bananas have lots of brown spots before peeling, slicing, and freezing them. Ripe fruit = naturally sweeter smoothie bowls that need less added sweetener.
Storage & Meal Prep
While green smoothie bowls are definitely best enjoyed fresh, here are smart strategies for storage and meal prep that make healthy breakfasts more convenient:
Can You Store a Completed Smoothie Bowl?
Unfortunately not. Once blended and topped, smoothie bowls don’t store well—the texture becomes icy and separated, and fresh toppings get soggy and unappetizing. However, you can definitely store the components separately for quick assembly.
Best Meal Prep Strategy:
Create “smoothie bowl packs” by pre-portioning all your ingredients into individual freezer bags or containers. For each pack, combine 2 cups fresh spinach (or kale), 1 sliced frozen banana, 1 cup frozen mango, and any optional frozen add-ins. Press out the air, seal, label with the date, and freeze flat for easy stacking. These packs last 3 months in the freezer. In the morning, dump one pack into your blender, add your liquid, blend, and you’re eating breakfast in 3 minutes!
Storing the Blended Base:
If you make too much smoothie base, you can store the excess in an airtight container in the freezer for up to 5 days. It will freeze solid like ice cream. When ready to eat, let it thaw at room temperature for 10-15 minutes until slightly softened, then scoop back into your blender, add 1-2 tablespoons of liquid, and re-blend for 20 seconds to restore creaminess.
Topping Prep:
Wash, slice, and store all your fresh toppings in separate containers in the refrigerator. Fresh fruit (berries, kiwi, banana) lasts 3-4 days when prepped. Keep granola, nuts, and seeds in airtight containers at room temperature. This makes morning assembly lightning-fast—just grab and sprinkle!
Batch Blending:
You can blend a double or triple batch of the smoothie base and portion it into containers for the week. Store in the freezer and thaw/re-blend one portion each morning. This method saves time but the texture won’t be quite as perfect as fresh.
Leftover Timeline:
- Blended smoothie base: Consume immediately for best texture
- Frozen smoothie base: Up to 5-7 days in freezer
- Pre-portioned freezer packs: Up to 3 months in freezer
- Fresh prepped toppings: 3-4 days in refrigerator
- Frozen banana slices: Up to 3 months in freezer
Make-Ahead & Freezer Notes
The beauty of smoothie bowls is that while they don’t store well once completed, the components are extremely freezer-friendly and perfect for advance preparation:
Freezer Prep Packs (Highly Recommended):
This is hands-down the best make-ahead strategy! Spend 20 minutes on meal prep Sunday creating individual smoothie bowl packs for the entire week. In each gallon-sized freezer bag, combine 2 cups fresh spinach, 1 sliced banana (pre-frozen or fresh—both work since the whole bag will freeze), 1 cup frozen mango chunks, and any other frozen add-ins you like (avocado, extra fruit, etc.). Press out all the air, seal, and freeze flat. Stack them in your freezer like files. Each morning, dump one pack into your blender with 1/4-1/2 cup liquid and blend. It’s faster than making toast and you’ll actually want to get out of bed for this breakfast!
Pre-Sliced Frozen Bananas:
Always keep a large container or freezer bag full of pre-sliced frozen banana in your freezer. When bananas get those perfect brown spots and you know you won’t eat them fresh, peel them, slice them into coins, spread them on a parchment-lined baking sheet, and freeze until solid (about 2 hours). Then transfer to a freezer bag. They’ll last 3 months and you’ll always be ready for smoothie bowls. This is a game-changer for reducing food waste and having healthy breakfast options ready to go.
Freezing Portioned Smoothie Cubes:
Here’s a clever technique: blend a large batch of your smoothie base (without toppings), pour into ice cube trays, and freeze completely. Pop out the cubes and store in a freezer bag. When you want a smoothie bowl, add 8-10 smoothie cubes to your blender with a tiny splash of liquid and blend until creamy. This method gives you the convenience of pre-made smoothies with better texture than freezing in one large container.
Flash-Freezing Toppings:
You can also freeze extra fruit toppings (berries, kiwi slices, banana) on parchment paper, then store in freezer bags. Use these frozen toppings directly on your bowl—they’ll thaw by the time you’re ready to eat and keep your smoothie bowl extra cold.
Best Re-Blending Method:
If your smoothie base has been frozen solid, don’t try to eat it straight from the freezer (it’ll be rock hard). Let it sit at room temperature for 10-15 minutes until it’s softened but still very cold. Scoop it back into your blender, add 2-3 tablespoons of liquid, and blend on high for 20-30 seconds until smooth and creamy again. The texture won’t be exactly like fresh, but it’s still delicious and much better than skipping breakfast!
Make-Ahead Timeline:
- Freezer smoothie packs: 3 months
- Frozen banana slices: 3 months
- Frozen leafy greens: 2 months (though fresh is better for smoothie bowls)
- Smoothie cubes: 2 weeks for best quality
- Frozen fruit toppings: 3 months
Serving Suggestions
A green smoothie bowl is substantial enough to be a complete breakfast on its own, but here are creative ways to serve it and ideas for building a well-rounded meal:
For a Complete Breakfast:
If you’re very active or need more protein, pair your green smoothie bowl with a side of hard-boiled eggs, a slice of whole grain toast with avocado, or a small handful of raw almonds. This adds extra protein and healthy fats that make your breakfast even more satisfying and balanced.
Weekend Brunch Spread:
Create a DIY smoothie bowl bar for family brunch or when hosting friends! Blend a large batch of the green smoothie base and serve it in a big bowl with ice packs underneath to keep it cold. Set out a gorgeous spread of topping options: various fresh fruits (berries, kiwi, banana, mango), different crunchy elements (multiple granola flavors, nuts, seeds), superfood additions (chia, hemp, cacao nibs), and drizzles (nut butters, honey, coconut cream). Let everyone create their own custom bowl. This is incredibly fun for kids and makes healthy eating feel like a special treat!
Post-Workout Recovery:
After morning exercise, serve your green smoothie bowl with added protein powder, topped with extra hemp hearts and almond butter, alongside a protein-rich side like Greek yogurt or a protein shake. The combination of carbohydrates from the fruit and protein helps with muscle recovery while the greens provide anti-inflammatory benefits.
Light Breakfast with Coffee:
Pair your smoothie bowl with a hot cup of coffee or matcha latte. The warmth of the beverage balances the coldness of the smoothie bowl beautifully. The slight bittern coffee or earthiness of matcha complements the sweet tropical flavors perfectly.