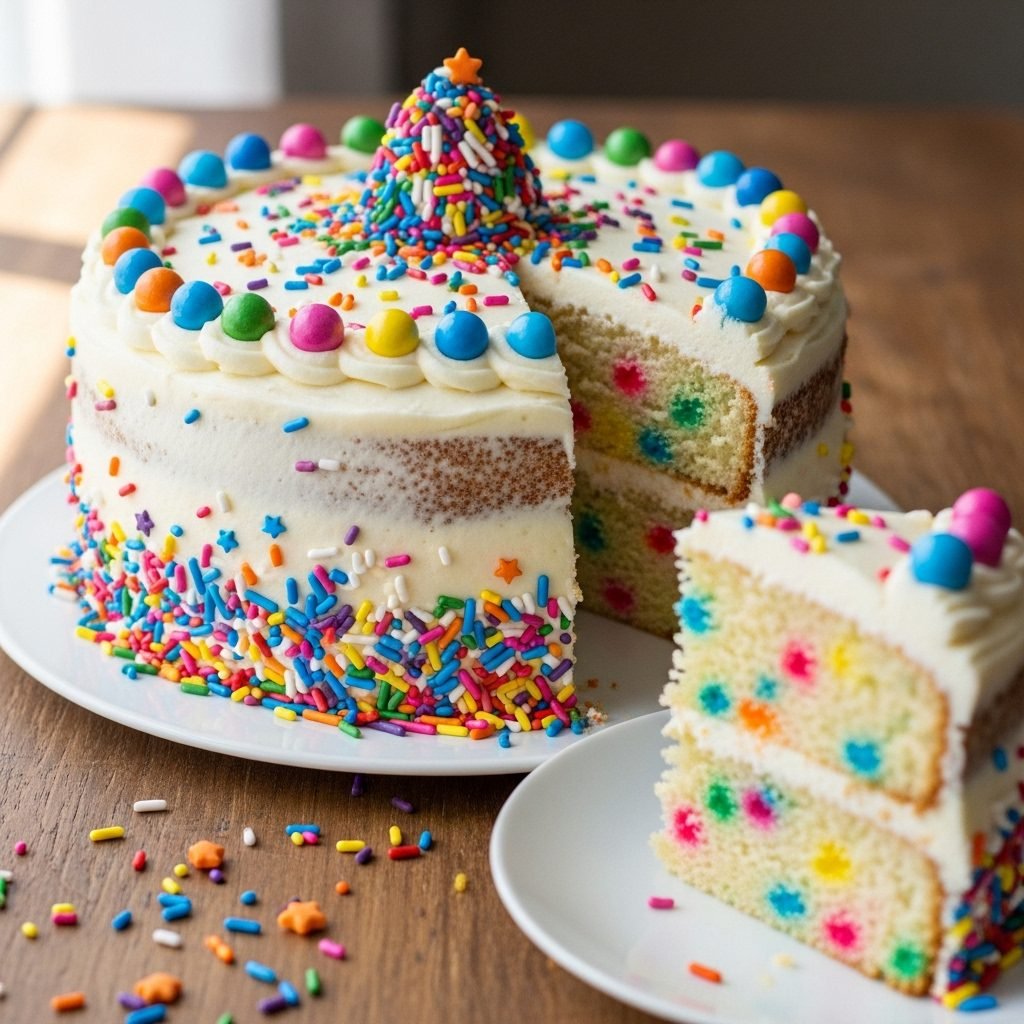
The Best Homemade Funfetti Cake Recipe: Moist, Fluffy, and Full of Sprinkles!
Is there anything more joyful than slicing into a cake and discovering colorful rainbow sprinkles throughout every layer? Funfetti cake is pure happiness in dessert form—a soft, tender vanilla cake studded with festive rainbow sprinkles that create little bursts of color and fun in every bite. This isn’t just any birthday cake; it’s THE celebration cake that brings smiles to faces of all ages and turns any ordinary day into a party.
What makes Funfetti cake so beloved is its perfect combination of nostalgia and pure deliciousness. The moist, buttery vanilla cake has a tender crumb that melts in your mouth, while those iconic rainbow sprinkles add pops of color and a subtle sweetness throughout. When paired with fluffy vanilla buttercream frosting (and yes, more sprinkles on top!), you get a dessert that’s both visually stunning and absolutely irresistible.
This homemade version beats any boxed mix by a mile—it’s more flavorful, has better texture, and tastes genuinely special. It’s perfect for birthdays, baby showers, kids’ parties, graduation celebrations, or any time you want to bring joy to the table. The best part? It’s surprisingly easy to make from scratch, uses simple pantry ingredients, and comes together in about an hour. Whether you’re an experienced baker or making your first layer cake, this foolproof recipe will help you create a showstopping dessert that looks and tastes like it came from a professional bakery!
History / Background
Funfetti cake has a fascinating origin story that’s more recent than you might think. The iconic cake flavor was actually created by the Pillsbury Company in 1989 when they introduced their “Funfetti” cake mix to the American market. The name itself is a clever combination of “fun” and “confetti,” perfectly capturing the celebratory spirit of this sprinkle-filled creation.
Before Funfetti, rainbow sprinkles (also called jimmies or hundreds and thousands) had been used as cake decorations for decades, but Pillsbury’s innovation was incorporating them directly into the cake batter. This created something entirely new—a cake where every single bite contained colorful surprise elements, not just the frosting or top decoration. The concept was instantly successful, particularly with children and families looking for festive birthday cake options.
The 1990s saw Funfetti cake become a cultural phenomenon in American homes. It represented a shift toward more playful, fun baking, moving away from traditional formal cakes toward something more whimsical and child-friendly. The cake became synonymous with birthday parties, and an entire generation of millennials grew up with Funfetti as their default birthday cake choice. It achieved such iconic status that “Funfetti” became almost generic—people started calling any sprinkle-filled vanilla cake “funfetti cake,” even when made from scratch.
Interestingly, Pillsbury trademarked the name “Funfetti,” which is why you’ll sometimes see homemade versions called “confetti cake,” “sprinkle cake,” or “rainbow chip cake” instead. Despite the trademark, the concept has become so beloved that home bakers have spent years perfecting from-scratch versions that capture (and often improve upon) that nostalgic flavor.
What makes Funfetti cake particularly special in American baking culture is how it democratized celebration cakes. You didn’t need professional decorating skills or expensive ingredients to make something that looked festive and special—just sprinkles mixed into simple vanilla batter. It represented joy, childhood, and celebration in the most accessible way possible.
Today, Funfetti has experienced a major renaissance, particularly on social media and food blogs. Adult millennials seeking comfort and nostalgia have elevated Funfetti from simple kids’ birthday fare to a trendy, Instagram-worthy dessert. You’ll find Funfetti everything: cookies, pancakes, ice cream, and of course, beautifully decorated layer cakes that honor the original while adding sophisticated techniques. This homemade version respects the nostalgia while delivering superior flavor and texture that makes it worthy of any celebration!
Why You’ll Love This Recipe
This from-scratch Funfetti cake recipe has been tested and perfected to deliver everything you want: incredibly moist layers, tender crumb, rich vanilla flavor, and of course, plenty of colorful sprinkles throughout. I’ve made this cake dozens of times for birthdays and celebrations, and it never fails to be the star of the party—both kids AND adults ask for seconds!
Here’s what makes this recipe absolutely irresistible:
- Better than any box mix – Homemade flavor and texture that’s noticeably superior to store-bought versions
- Incredibly moist and fluffy – Stays tender for days thanks to the perfect ratio of ingredients
- Rich vanilla flavor – Real vanilla extract and butter create authentic, delicious taste
- Foolproof recipe – Clear instructions that work every single time, even for beginners
- Perfect for any celebration – Birthdays, baby showers, graduations, or “just because” moments
- Kid-friendly baking project – Children love helping add the sprinkles and decorating
- Gorgeous presentation – Those colorful sprinkles inside make every slice Instagram-worthy
- Customizable – Easy to adapt with different colors, flavors, or decorations
- Budget-friendly – Costs less than ordering from a bakery and feeds a crowd
- Make-ahead friendly – Cake layers can be made in advance and frozen without losing quality
- Pure joy in cake form – Impossible to feel sad when eating Funfetti cake!
Ingredient Notes
Understanding your ingredients helps you become a better baker and ensures the best possible results. Let’s break down what makes this Funfetti cake so special.
All-Purpose Flour: This provides the structure for your cake. I recommend measuring by spooning flour into your measuring cup and leveling it off (don’t pack it down), or better yet, use a kitchen scale for 315g. Cake flour can be substituted for an even more tender crumb—just replace 2 tablespoons of each cup of all-purpose flour with cornstarch. For gluten-free, use a 1:1 gluten-free baking flour blend.
Baking Powder and Baking Soda: These leavening agents work together to create the perfect rise and tender texture. Make sure they’re fresh (check expiration dates!) or your cake won’t rise properly. The combination creates just the right amount of lift without an alkaline aftertaste.
Butter: Use unsalted butter at room temperature—it should be soft enough to leave a fingerprint when pressed but not greasy or melted. Room temperature butter creams properly with sugar, creating the light, fluffy texture we want. Don’t use margarine; real butter creates superior flavor and texture.
Granulated Sugar: Provides sweetness and helps create tender texture through the creaming process. The sugar crystals create tiny air pockets when beaten with butter, which is crucial for a light, fluffy cake.
Eggs: Use large eggs at room temperature. Room temperature eggs incorporate more smoothly and create better volume. To quickly warm cold eggs, place them in a bowl of warm (not hot) water for 5-10 minutes before using.
Whole Milk: Full-fat milk creates the moistest cake. Don’t substitute with skim or low-fat milk—you need the fat content for proper texture and richness. Buttermilk can be substituted for extra tenderness and tang (use the same amount).
Vanilla Extract: Pure vanilla extract is essential—don’t use imitation vanilla in this cake where the flavor really shines through. The vanilla is the star flavor that complements the sprinkles, so quality matters here!
Sour Cream: This is the secret ingredient that makes the cake incredibly moist and tender! The acidity tenderizes the gluten and adds richness. You can substitute with full-fat Greek yogurt if needed.
Rainbow Sprinkles (Jimmies): This is what makes it Funfetti! Use traditional rainbow jimmies/sprinkles, NOT nonpareils (the tiny round balls) which will bleed color into the batter and turn it gray. Look for “jimmies” or “sprinkles” that are rod-shaped. Make sure they’re specifically labeled as good for baking—some decorative sprinkles melt and disappear.
Salt: Enhances all the other flavors and balances the sweetness. Don’t skip it!
Vegetable Oil: Just a small amount adds extra moisture and keeps the cake tender for days. Don’t substitute with more butter—the oil serves a specific purpose for texture.
Equipment Needed
Having the right tools makes baking easier and produces better results. Here’s what you’ll need:
- Two or three 8-inch or 9-inch round cake pans – For creating beautiful layers
- Parchment paper – Line the bottom of pans to prevent sticking
- Stand mixer or hand mixer – Makes mixing much easier and creates better texture
- Large mixing bowls (at least 2) – One for wet ingredients, one for dry
- Measuring cups and spoons – Accurate measurements are crucial in baking
- Kitchen scale (optional but recommended) – The most accurate way to measure
- Whisk – For combining dry ingredients evenly
- Rubber spatula – For scraping bowls and folding ingredients
- Wire cooling racks – Essential for cooling cakes properly
- Toothpick or cake tester – To check if cakes are done
- Offset spatula – Makes frosting layers much easier
- Cake turntable (optional but helpful) – For easier frosting and decorating
- Serrated knife – For leveling cake layers if needed
- Pastry brush – For brushing away loose crumbs before frosting
Print

Funfetti Cake Recipe
This homemade Funfetti Cake features moist, fluffy vanilla layers loaded with colorful rainbow sprinkles throughout. It’s the ultimate celebration cake that’s perfect for birthdays and special occasions—so much better than any box mix!
- Total Time: 50 minutes (plus cooling time)
- Yield: 12-16 servings 1x
Ingredients
ScaleFor the Funfetti Cake:
- 2¾ cups (315g) all-purpose flour
- 1 tablespoon baking powder
- ½ teaspoon baking soda
- ½ teaspoon salt
- 1 cup (2 sticks or 226g) unsalted butter, room temperature
- 1¾ cups (350g) granulated sugar
- 4 large eggs, room temperature
- 1 tablespoon pure vanilla extract
- 1¼ cups (300ml) whole milk, room temperature
- ½ cup (120g) sour cream, room temperature
- 2 tablespoons vegetable oil
- ¾ cup (120g) rainbow sprinkles (jimmies), plus more for decorating
For the Vanilla Buttercream Frosting:
- 1½ cups (3 sticks or 339g) unsalted butter, room temperature
- 5-6 cups (600-720g) powdered sugar, sifted
- 2 teaspoons pure vanilla extract
- ¼ teaspoon salt
- 3-5 tablespoons heavy cream or whole milk
- Additional rainbow sprinkles for decorating
Instructions
Step 1: Preheat and Prepare Pans
Preheat your oven to 350°F (175°C). Grease two or three 8-inch (or 9-inch) round cake pans with butter or baking spray, then line the bottoms with parchment paper rounds. Grease the parchment too for insurance. This double-layer of protection ensures your cakes release perfectly every time.Step 2: Mix Dry Ingredients
In a large bowl, whisk together the flour, baking powder, baking soda, and salt until well combined. Whisking ensures all leavening agents are evenly distributed for uniform rising. Set this bowl aside.Step 3: Cream Butter and Sugar
In your stand mixer bowl (or large bowl with hand mixer), beat the room-temperature butter on medium speed for about 1 minute until smooth. Add the sugar and beat on medium-high speed for 3-4 minutes until light, fluffy, and pale in color. This creaming process is crucial—it incorporates air that creates light, tender cake texture. Scrape down the bowl sides occasionally.Step 4: Add Eggs and Vanilla
Add the eggs one at a time, beating well after each addition (about 30 seconds per egg). The mixture may look slightly curdled—that’s normal! Add the vanilla extract and beat until combined. Scrape down the bowl to ensure everything is evenly mixed.Step 5: Combine Wet Ingredients
In a separate measuring cup or bowl, whisk together the milk, sour cream, and vegetable oil until smooth. Having these combined makes it easier to add them to the batter alternately with the dry ingredients.Step 6: Alternate Adding Dry and Wet Ingredients
With your mixer on low speed, add the flour mixture in three additions, alternating with the milk mixture in two additions. Start and end with flour: flour, milk mixture, flour, milk mixture, flour. Mix just until each addition is incorporated—don’t overmix! Scrape down the bowl sides and bottom to catch any unmixed bits.Step 7: Fold in Sprinkles
Using a rubber spatula, gently fold the rainbow sprinkles into the batter by hand. Don’t use the mixer or the sprinkles might bleed color. Fold just until the sprinkles are evenly distributed throughout the batter. The batter should be thick, smooth, and gorgeously speckled with color!Step 8: Divide and Bake
Divide the batter evenly among your prepared pans (use a kitchen scale for precision—each pan should have equal weight). Smooth the tops with a spatula. Bake for 28-32 minutes (check at 28 minutes), or until a toothpick inserted in the center comes out clean or with just a few moist crumbs, and the tops spring back when lightly touched. The cakes should be golden and pulling away slightly from the pan sides.Step 9: Cool Completely
Let cakes cool in the pans on wire racks for 10-15 minutes. This brief resting period helps them set without becoming soggy. Then carefully turn them out onto the wire racks, remove parchment paper, and let them cool completely (at least 1 hour) before frosting. Frosting warm cakes will cause the frosting to melt!Step 10: Make the Buttercream Frosting
In a clean mixing bowl, beat the room-temperature butter on medium speed for 2 minutes until creamy and smooth. Add 4 cups of powdered sugar, vanilla, and salt. Beat on low speed until the sugar is incorporated, then increase to medium-high and beat for 2-3 minutes until fluffy. Add heavy cream 1 tablespoon at a time until you reach your desired consistency. Add more powdered sugar if too thin, more cream if too thick.Step 11: Level and Layer
If your cake layers have domed tops, use a serrated knife to carefully level them so they stack evenly. Place your first layer on a cake stand or serving plate, spread about 1 cup of frosting evenly on top, place the second layer, and repeat. Add the final layer and frost the top and sides of the entire cake. Use an offset spatula for smooth, professional results.Step 12: Decorate and Serve
Decorate the frosted cake with rainbow sprinkles—press them gently into the sides and sprinkle generously on top. Get creative! Refrigerate the cake for 30 minutes to set the frosting before slicing for the cleanest cuts. Slice, serve, and watch everyone’s faces light up!Notes
- Room temperature ingredients – Critical for proper mixing and texture
- Don’t overmix – Mix just until combined after adding flour to keep cake tender
- Use jimmie-style sprinkles – Rod-shaped sprinkles won’t bleed color like nonpareils
- Cool completely before frosting – Patience prevents melted frosting disasters
- Level your layers – Creates a stable, professional-looking cake
- Make ahead – Cake layers can be baked, wrapped, and frozen for up to 3 months
- Prep Time: 20 minutes
- Cook Time: 30 minutes
- Category: Desert
- Method: Baking
- Cuisine: American
- Diet: Vegetarian
Nutrition
- Serving Size: 1 slice (1/14 of cake)
- Calories: 565
- Sugar: 62g
- Sodium: 245mg
- Fat: 28g
- Saturated Fat: 17g
- Unsaturated Fat: 9g
- Trans Fat: 0g
- Carbohydrates: 75g
- Fiber: 0.5g
- Protein: 5g
- Cholesterol: 115mg

Tips & Variations
Flavor Variations:
- Chocolate Funfetti: Replace ½ cup flour with cocoa powder for chocolate sprinkle cake
- Lemon Funfetti: Add 2 tablespoons lemon zest and 1 tablespoon lemon juice to batter
- Almond Funfetti: Replace 1 teaspoon vanilla with almond extract for different flavor
- Strawberry Funfetti: Add ¼ cup freeze-dried strawberry powder to batter
- Birthday Cake Funfetti: Add 1 tablespoon cake batter extract for extra nostalgia
Frosting Variations:
- Cream Cheese Frosting: Replace half the butter with cream cheese for tangy twist
- Chocolate Buttercream: Add ¾ cup cocoa powder to the frosting recipe
- Strawberry Buttercream: Add ¼ cup freeze-dried strawberry powder to frosting
- Fun fetti Buttercream: Fold sprinkles into the frosting too for extra festivity
Cupcake Conversion:
- Use the same batter to make 24-30 cupcakes
- Fill liners ⅔ full
- Bake at 350°F for 18-22 minutes
- Perfect for parties with individual servings
Different Pan Sizes:
- Sheet Cake: Bake in 9×13″ pan for 35-40 minutes, frost as single layer
- Bundt Cake: Bake in greased bundt pan for 50-60 minutes, drizzle with glaze
- Three 6-inch Layers: Create a taller, more dramatic layered cake
Pro Chef Tips
The Creaming Method is Everything: Professional bakers know that properly creaming butter and sugar is what creates light, tender cake. Beat for the full 3-4 minutes—the mixture should be noticeably paler, fluffier, and almost doubled in volume. This incorporates air bubbles that create the fine, delicate crumb structure we want. Under-creamed butter produces dense, heavy cake.
Room Temperature Ingredients Create Emulsion: All your dairy ingredients (butter, eggs, milk, sour cream) should be at room temperature (around 65-70°F). When everything is the same temperature, they emulsify properly into a smooth, homogeneous batter. Cold ingredients can cause the batter to curdle or separate, resulting in uneven texture in the finished cake.
Fold Sprinkles Gently by Hand: Never use the mixer to incorporate sprinkles! The friction and heat from mixing can cause the color coating on sprinkles to bleed into your batter, turning it an unappetizing grayish color. Always fold them in gently by hand with a spatula, using broad, sweeping motions that minimize friction.
The Alternate Mixing Method Prevents Toughness: Adding dry and wet ingredients alternately (starting and ending with dry) is a classic technique that prevents gluten overdevelopment. If you dump all the flour in at once, you’ll need to mix longer, which develops more gluten and creates a tougher, chewier cake instead of the tender crumb we want.
Cool Cakes Upside Down for Flat Surfaces: Professional cake decorators often flip cakes upside down when cooling so the flat bottom becomes the top layer. This creates perfectly flat surfaces that are easier to frost and stack. If you do this, make sure cakes are completely cool first and place parchment between the cake and cooling rack to prevent grid marks.
Crumb Coat Before Final Frosting: Apply a thin layer of frosting all over the cake first (the “crumb coat”), then refrigerate for 15-20 minutes until firm. This seals in all the crumbs. Then apply your final, decorative layer of frosting over the crumb coat for a perfectly smooth, professional finish with no cake crumbs in your frosting.
Common Mistakes to Avoid
Using the Wrong Type of Sprinkles: Not all sprinkles are created equal! Nonpareils (tiny round balls) and some decorative sprinkles will bleed their color into cake batter, turning it an unappealing gray-brown. Always use jimmie-style sprinkles (rod-shaped) that are specifically labeled as suitable for baking. These maintain their color and shape when mixed into batter.
Overmixing After Adding Flour: Once you add flour to your batter, gluten development begins. Mix only until you can’t see dry flour streaks anymore, then STOP. Overmixing creates a tough, dense, rubbery cake instead of the tender, fluffy texture we want. It’s okay if mixing takes a minute or two on low speed—just avoid prolonged or vigorous mixing.
Frosting Warm Cake Layers: I know it’s tempting to frost your cake as soon as possible, but this is a recipe for disaster! Warm cake will cause buttercream to melt and slide right off, creating a mess. Always let cakes cool completely to room temperature (at least 1 hour) before even thinking about frosting. For insurance, you can even refrigerate cooled layers for 15 minutes before assembly.
Opening the Oven Door Too Early: Resist the urge to check on your cakes before 25 minutes! Opening the oven door releases heat and can cause cakes to sink in the middle as the structure hasn’t set yet. Wait until at least 25 minutes have passed, then open quickly to check. The sudden temperature drop from frequent door-opening is a common cause of sunken cakes.
Not Greasing Pans Properly: Even with parchment paper, you need to grease your pans thoroughly—both the bottom AND sides. Butter or baking spray every inch, including corners where pans meet. Then add parchment to the bottom and grease that too. This might seem like overkill, but it’s insurance against cakes sticking and breaking when you try to remove them.
Storage & Meal Prep
Room Temperature Storage: Frosted Funfetti cake can be stored covered at room temperature for up to 3 days. Use a cake dome or cover loosely with plastic wrap (don’t let it touch the frosting). The cake actually tastes better after sitting overnight as flavors meld and moisture redistributes, making it even more tender!
Refrigerator Storage: Because this recipe uses buttercream frosting (which contains dairy), you can refrigerate the cake covered for up to 5 days. The cold will firm up the frosting considerably, so remove the cake from the refrigerator 30-60 minutes before serving to let it come to room temperature for the best texture and flavor.
Storing Unfrosted Layers: Unfrosted cake layers can be wrapped tightly in plastic wrap and stored at room temperature for up to 2 days. This is actually a great strategy—bake your layers a day or two ahead, then frost the day of your event for maximum freshness and minimum stress!
Keeping Cake Moist: If you notice your cake starting to dry out, place a piece of bread in the storage container with the cake. The cake will absorb moisture from the bread, staying soft and tender. Replace the bread every day or two. This trick works surprisingly well!
Make-Ahead & Freezer Notes
Freezing Unfrosted Cake Layers (Best Method!): This is the ultimate make-ahead strategy! Bake your cake layers, let them cool completely, then wrap each layer tightly in two layers of plastic wrap followed by aluminum foil. Freeze flat for up to 3 months. When ready to use, thaw overnight in the refrigerator (still wrapped), then bring to room temperature before frosting. The texture remains perfect!
Freezing Frosted Cake: You can freeze a fully frosted and decorated cake! Place it in the freezer uncovered for 1-2 hours until the frosting is rock-hard, then wrap carefully in plastic wrap and foil. Freeze for up to 2 months. Thaw overnight in the refrigerator, then bring to room temperature before serving. The frosting may look slightly different but will taste fine.
Freezing Individual Slices: Cut unfrosted or frosted cake into individual slices, wrap each slice tightly in plastic wrap, then place all wrapped slices in a freezer bag. Freeze for up to 3 months. Thaw individual slices at room temperature for 1-2 hours, or microwave frozen slices for 20-30 seconds for instant cake!
Make-Ahead Frosting: Buttercream frosting can be made up to 1 week ahead and refrigerated in an airtight container, or frozen for up to 3 months. When ready to use, bring to room temperature, then re-whip with your mixer for 2-3 minutes to restore the fluffy texture. Add a splash of cream if it seems too thick.
Strategic Timeline for Events: For stress-free party prep, bake cake layers 2-3 days ahead (or even weeks ahead if freezing), make frosting 1-2 days ahead (refrigerate), then assemble and decorate the morning of or night before your event. This spreads out the work and ensures everything is fresh!
Serving Suggestions
Funfetti cake is the star of any celebration, but the right accompaniments enhance the experience!
Beverage Pairings:
- Cold Milk: The classic pairing that never disappoints
- Hot Coffee: For adult celebrations, coffee balances the sweetness perfectly
- Pink Lemonade: Matches the playful, festive mood of the cake
- Champagne or Prosecco: For adult birthday parties or celebrations
- Fruit Punch: Perfect for kids’ parties with colorful theme
Ice Cream Pairing: Serve slices with a scoop of vanilla bean, birthday cake, or strawberry ice cream on the side. The cold ice cream melting into the cake creates an irresistible combination. For extra fun, make Funfetti cake ice cream sandwiches!
Fresh Fruit: Balance the sweetness with fresh berries—strawberries, raspberries, or blueberries add color, freshness, and a slight tartness that complements the rich cake. Arrange them on the plate beside each slice or on top of the cake itself.
Whipped Cream: A dollop of freshly whipped cream (lightly sweetened with vanilla) adds lightness and provides textural contrast to the dense buttercream frosting.
Party Presentation: For kids’ parties, serve cake slices on colorful paper plates with matching napkins and plastic forks. For adult celebrations, use white or clear glass plates to showcase the colorful cake interior beautifully.
Birthday Candles: Don’t forget candles for birthday celebrations! The Funfetti cake is the perfect backdrop for making wishes come true.
FAQs Section
Can I use a box cake mix instead of making from scratch?
While you certainly can use a box mix (doctor it up with sour cream, extra egg, and oil for better texture), this from-scratch version tastes noticeably better with more authentic vanilla flavor and superior moistness. It’s not much more difficult than a box mix and uses simple ingredients you probably already have!
Why did my sprinkles bleed and turn the batter gray?
This happens when you use the wrong type of sprinkles or overmix them. Always use jimmie-style sprinkles (rod-shaped) labeled as suitable for baking, NOT nonpareils (tiny balls) or some decorative sprinkles. Fold them in gently by hand at the very end—never use the mixer. The friction and heat from mixing can cause color bleeding.
Can I make this as cupcakes instead of a layer cake?
Absolutely! This batter makes 24-30 cupcakes. Fill cupcake liners about ⅔ full and bake at 350°F for 18-22 minutes, until a toothpick comes out clean. Start checking at 18 minutes. Cool completely before frosting. Cupcakes are perfect for parties where individual servings are easier!
How do I prevent my cake layers from doming in the middle?
Doming is common and can be minimized by using cake strips (wet fabric strips wrapped around pans) or baking at a slightly lower temperature (325°F for an extra 5-8 minutes). However, slight doming is normal—just level the tops with a serrated knife before assembly for perfectly flat layers.
Can I make this cake ahead of time?
Yes! Unfrosted cake layers can be baked up to 2 days ahead and stored wrapped at room temperature, or frozen for up to 3 months. The fully assembled and frosted cake can be made 1 day ahead and stored at room temperature or refrigerated. The cake actually tastes better the next day as flavors meld!
My cake came out dry—what went wrong?
Dry cake is usually caused by overbaking (even a few extra minutes matters) or using too much flour (measure carefully by spooning and leveling, not scooping). Other causes: oven running hot (use an oven thermometer), or old leavening agents. Start checking your cake at 28 minutes and remove it when a toothpick has just a few moist crumbs.
Do I have to use sour cream?
Sour cream creates incredibly moist, tender texture, but you can substitute with full-fat Greek yogurt (same amount) if needed. Don’t omit it entirely—the acidity and fat content are important for texture. If you absolutely must skip it, increase the milk by ¼ cup, though the cake won’t be quite as moist.
Conclusion
There you have it—everything you need to create the most amazing homemade Funfetti Cake that will become your go-to celebration recipe! This cake is pure joy in every slice, with its moist, fluffy layers, rich vanilla flavor, and those iconic rainbow sprinkles that make everyone smile. Whether you’re celebrating a birthday, special milestone, or just want to bring happiness to your table, this cake delivers every single time.
The beauty of making Funfetti cake from scratch is that it tastes SO much better than any box mix while being just as approachable for home bakers. Once you’ve made this recipe, you’ll never go back to store-bought versions. The homemade difference is real, and your friends and family will absolutely taste it. Plus, there’s something incredibly satisfying about serving a beautiful layer cake that you made entirely yourself!
I’d absolutely love to hear how your Funfetti Cake turns out! What occasion are you baking it for? Did you try any of the variations? Drop a comment below and share your celebration cake adventures—I read every single comment and genuinely love seeing how this recipe brings joy to your tables!
Please save this recipe to your Pinterest dessert board so you’ll have it ready for every birthday and celebration coming your way (and trust me, once people taste this cake, they’ll request it constantly!). If you snap a photo of your gorgeous Funfetti creation, tag me on social media—I absolutely love seeing your colorful, sprinkle-filled masterpieces!
Now grab those rainbow sprinkles and get ready to bake some happiness. Your kitchen is about to smell amazing, and you’re about to create memories (and the most delicious cake ever). Happy baking and celebrating, friends! 🎉🍰✨