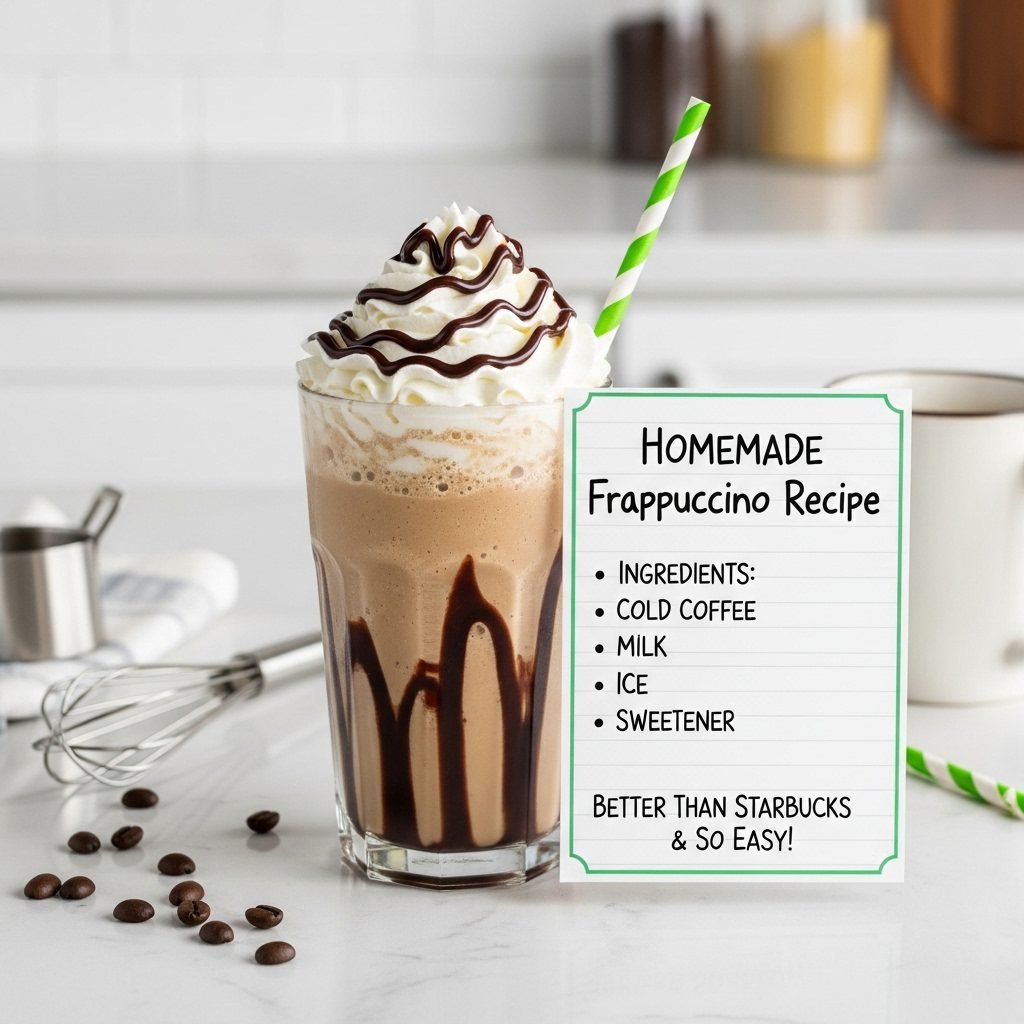
Homemade Frappuccino Recipe (Better Than Starbucks & So Easy!)

Get ready to discover the ultimate secret to making your own Frappuccino at home—and trust me, once you try this, you’ll never want to wait in that Starbucks drive-thru line again! This Homemade Frappuccino is a creamy, icy, blended coffee drink that tastes just like (or honestly, even better than) the famous Starbucks version, and you can make it in your own kitchen in less than 5 minutes.
A Frappuccino is essentially a blended iced coffee beverage made with coffee, milk, ice, and your choice of sweeteners and flavorings, all whirled together in a blender until smooth, thick, and slushy. The result is that perfect combination of refreshing and indulgent—cold and icy yet creamy and satisfying, with a strong coffee flavor balanced by just the right amount of sweetness. Top it with whipped cream, and you’ve got café-quality perfection!
This amazing drink is perfect for hot summer afternoons when you need serious refreshment, as a special weekend breakfast treat that feels like dessert, for afternoon pick-me-ups when regular coffee feels too heavy, or anytime you’re craving that signature Starbucks experience without leaving home (or spending $7!). Frappuccinos have become an absolute phenomenon in coffee culture, representing the perfect fusion of coffee shop luxury and milkshake indulgence.
What makes this homemade version truly special is that you control everything—the coffee strength, the sweetness level, the thickness, and all the fun flavor additions. Plus, making it at home costs a fraction of what you’d pay at a coffee shop (we’re talking $1-2 versus $6-8), and you can customize it exactly to your preferences. Whether you’re team mocha, vanilla, caramel, or classic coffee, this recipe is your blank canvas!
History / Background
The Frappuccino has one of the most interesting origin stories in coffee culture because it started as a small business innovation and became a global phenomenon that literally changed how the world drinks coffee.
The story begins in the early 1990s in Boston, Massachusetts, at a small coffee shop chain called The Coffee Connection. In 1992, owner George Howell developed a line of blended coffee drinks and trademarked the name “Frappuccino”—a portmanteau of “frappé” (a New England term for a thick milkshake) and “cappuccino” (the Italian espresso drink). The original Frappuccino was made with coffee, ice, and dairy, blended into a smooth, frosty beverage that quickly became popular among customers who wanted something cold, refreshing, and caffeinated.
In 1994, everything changed when Starbucks purchased The Coffee Connection for $23 million—primarily to acquire the Frappuccino recipe and trademark. Starbucks had been experimenting with their own cold blended drinks but couldn’t use the name “Frappuccino” until this acquisition. This turned out to be one of the smartest business moves in coffee history.
Starbucks rolled out Frappuccinos across all their stores in 1995, and the response was explosive. The timing was perfect—specialty coffee culture was booming, people wanted cold coffee options beyond iced coffee, and the Frappuccino offered something unique: a coffee drink that felt like a treat, almost like a socially acceptable coffee milkshake you could enjoy any time of day.
The drink became a cultural phenomenon throughout the late 1990s and early 2000s. Starbucks continuously expanded the line with new flavors—Mocha Frappuccino, Caramel Frappuccino, Java Chip Frappuccino, and eventually dozens of seasonal and permanent varieties. By 2015, Frappuccinos represented nearly 20% of Starbucks’ annual sales, generating billions in revenue.
The success of the Frappuccino influenced the entire coffee industry. Suddenly, every coffee chain needed their own blended iced coffee drinks. McDonald’s created Frappes, Dunkin’ introduced Coolattas, and independent coffee shops developed their own versions. The Frappuccino essentially created a new category of coffee beverages and introduced countless people to coffee drinking—many customers who never liked hot coffee became coffee lovers through Frappuccinos.
Culturally, the Frappuccino became more than just a drink—it became a status symbol, a lifestyle marker, and an Instagram icon. The clear plastic cup with the green straw became instantly recognizable. People began ordering increasingly complex customizations (Starbucks baristas have stories!), and the drink represented accessible luxury—something relatively affordable that made you feel pampered.
Today, while the Starbucks version remains wildly popular, home recipes have empowered coffee lovers to recreate that experience themselves. The rise of high-powered blenders, specialty ingredients available online, and recipe-sharing culture means anyone can make café-quality Frappuccinos at home. This DIY movement represents taking back control of what was once exclusive to coffee shops, making it more accessible, affordable, and customizable than ever.
Why You’ll Love This Recipe
This Homemade Frappuccino recipe is about to revolutionize your coffee routine, and I’m genuinely excited to share why! Not only does it taste absolutely incredible—creamy, perfectly sweet, intensely coffee-flavored, and refreshingly icy—but it’s so ridiculously easy that you’ll wonder why you ever waited in line and paid premium prices for someone else to blend coffee and ice for you.
Making Frappuccinos at home means you control every element—the coffee strength (want it stronger? add more coffee!), the sweetness level (adjust to your taste!), the thickness (more ice for thicker texture!), and all the flavor additions and toppings. You’ll save a fortune while enjoying exactly what you want, exactly when you want it. Plus, the process itself is fun and satisfying!
Here’s why this recipe will become your summer staple:
- Incredibly Quick: Ready in literally 5 minutes from start to sipping
- Only 5 Basic Ingredients: Coffee, milk, ice, sweetener, and ice cream or xanthan gum for thickness
- Massive Cost Savings: Costs $1-2 per serving versus $6-8 at Starbucks
- Infinitely Customizable: Create any flavor combination your heart desires
- Perfectly Thick & Creamy: That authentic Frappuccino texture you crave
- Strong Coffee Flavor: Adjust the coffee strength exactly to your preference
- No Special Skills Required: If you can use a blender, you can make this!
- Uses Leftover Coffee: Perfect use for that morning coffee you didn’t finish
- Healthier Options Available: Control sugar, use dairy-free milk, add protein
- Kid-Friendly Versions: Make decaf or coffee-free versions for children
- Impressive for Guests: Looks and tastes professional
- Year-Round Enjoyment: Perfect for summer, but honestly delicious anytime
- Batch-Friendly: Make multiple servings at once for the whole family
Ingredient Notes
Let’s break down the simple ingredients that create this café-quality frozen coffee drink!
Brewed Coffee: This is your flavor foundation! You need ¾ to 1 cup of strong brewed coffee, cooled to room temperature or chilled. Strong coffee is key—weak coffee creates a watery, disappointing Frappuccino. Use whatever brewing method you prefer: drip coffee maker, French press, pour-over, cold brew (excellent choice!), or even instant coffee dissolved in hot water then cooled. For the best flavor, use quality coffee beans and brew it double-strength (use twice the normal amount of grounds). Leftover morning coffee works perfectly—this is an excellent way to use coffee that would otherwise go to waste! Pro tip: Make coffee ice cubes by freezing brewed coffee in ice cube trays. Using coffee ice instead of regular ice prevents dilution and intensifies the coffee flavor as they melt.
Milk: This creates the creamy base. Whole milk produces the richest, most indulgent Frappuccino, but any milk works beautifully! 2% milk is a nice middle ground, skim milk keeps it lighter, half-and-half or heavy cream makes it ultra-luxurious (seriously decadent!), or use any plant-based milk—oat milk is incredibly creamy and popular for coffee drinks, almond milk keeps it light, coconut milk adds tropical notes, soy milk provides protein, or cashew milk offers luxurious richness. The fattier your milk, the creamier your Frappuccino. You’ll need about ½ cup, but you can adjust for desired thickness.
Ice: Essential for that slushy, frozen texture! You’ll need 1½ to 2 cups of ice cubes. The more ice you use, the thicker and more frozen your Frappuccino will be (think milkshake consistency). Less ice creates a thinner, more drinkable consistency. Regular ice works fine, but coffee ice cubes are a game-changer—they prevent dilution and intensify the coffee flavor. The size of your ice cubes matters: smaller cubes blend more easily, while larger cubes create a chunkier texture (though high-powered blenders handle both).
Sweetener: Adjust this entirely to your taste! Classic options include: granulated sugar (2-3 tablespoons for traditional sweetness), simple syrup (easier to blend—2-3 tablespoons), honey or maple syrup (natural alternatives), agave nectar, or flavored syrups like vanilla, caramel, or hazelnut (2-3 tablespoons—these add both sweetness and flavor). For sugar-free versions, use liquid stevia, monk fruit sweetener, or sugar-free syrups. Start with 2 tablespoons, blend, taste, and add more if needed. Remember, you can always add sweetness but can’t take it away!
Thickening Agent (Essential for authentic texture): This is the secret to that thick, creamy, authentic Frappuccino consistency! Choose one: Vanilla ice cream (2-3 tablespoons—this is my favorite method because it adds creaminess, sweetness, and thickness all at once), xanthan gum (just ¼ teaspoon—a tiny amount creates incredible thickness without adding calories or flavor), instant pudding mix (1-2 tablespoons vanilla pudding mix), or heavy cream (¼ cup for extra richness). The thickening agent prevents that icy, watery texture and creates that signature Starbucks mouthfeel.
Optional Flavor Add-Ins: Vanilla extract (½ teaspoon for vanilla Frappuccino), cocoa powder (2 tablespoons for mocha), chocolate syrup, caramel sauce, peppermint extract, or any flavored coffee syrup!
Toppings: Whipped cream (essential!), chocolate or caramel drizzle, chocolate shavings, cinnamon, cocoa powder, or even crushed cookies for java chip versions!
Equipment Needed
The beauty of this recipe is how minimal the equipment needs are—you probably have everything already!
- High-powered blender: This is your most important tool! Vitamix, Blendtec, Ninja, or any powerful blender works great. Even standard blenders work, though high-powered ones create a smoother texture
- Measuring cups: For coffee and milk
- Measuring spoons: For sweetener and other ingredients
- Tall glass: 16-20 oz size is perfect—clear glass shows off the beautiful color
- Wide straw or spoon: Those thick Frappuccino straws exist for a reason—the drink is too thick for regular straws!
- Optional: Coffee ice cube tray: For making coffee ice cubes ahead of time
- Optional: Whipped cream dispenser: If you want to make homemade whipped cream
Print

Frappuccino Recipe
This Homemade Frappuccino tastes just like Starbucks but costs a fraction of the price! Blended with strong coffee, milk, ice, sweetener, and a secret ingredient for that signature thick and creamy texture, it’s ready in 5 minutes and completely customizable. Perfect for coffee lovers who want café-quality frozen coffee drinks at home!
- Total Time: 5 minutes
- Yield: 1 large serving (16-20 oz) or 2 small servings 1x
Ingredients
ScaleBase Recipe:
- ¾ cup strong brewed coffee, cooled (or cold brew coffee)
- ½ cup milk of choice (whole milk for creamiest texture)
- 1½ to 2 cups ice cubes (more ice = thicker consistency)
- 2-3 tablespoons sugar or sweetener of choice (adjust to taste)
- 2-3 tablespoons vanilla ice cream OR ¼ teaspoon xanthan gum (for thickness)
- ½ teaspoon vanilla extract (optional, for vanilla flavor)
For Topping:
- Whipped cream
- Optional: chocolate or caramel drizzle, cocoa powder, cinnamon
Instructions
- Brew and Cool Coffee: If you haven’t already, brew ¾ cup of strong coffee using your preferred method. The coffee should be noticeably stronger than what you’d normally drink—use double the amount of coffee grounds. Let it cool to room temperature or chill it in the refrigerator for 15-20 minutes. You can also use cold brew coffee straight from the fridge (ideal!) or leftover morning coffee. For quick cooling, pour hot coffee over ice cubes in a separate glass, then use that cooled coffee in your Frappuccino (this slightly dilutes it, so brew extra strong).
- Prepare Coffee Ice (Optional but Recommended): If you have time and want the ultimate Frappuccino, use coffee ice cubes instead of regular ice. Simply pour cooled brewed coffee into an ice cube tray and freeze for at least 4 hours or overnight. Coffee ice prevents dilution and creates more intense coffee flavor. This step is optional but makes a noticeable difference!
- Add Ingredients to Blender: Into your blender, add the cooled coffee first (liquid ingredients go in first for easier blending), followed by milk, your choice of sweetener (sugar, simple syrup, or flavored syrup), vanilla extract if using, and your thickening agent (vanilla ice cream or xanthan gum). Finally, add the ice cubes on top.
- Blend Until Smooth: Secure the lid tightly! Start blending on low speed for a few seconds to break up the ice, then gradually increase to high speed. Blend for 30-60 seconds until the mixture is completely smooth, creamy, and no large ice chunks remain. The consistency should be thick like a milkshake or smoothie—able to hold its shape but still pourable. If your blender struggles, stop and stir/push ingredients down with a spatula, then continue blending.
- Check Consistency and Adjust: After blending, check the thickness. Too thick? Add 2-3 tablespoons more milk and pulse to blend. Too thin or icy? Add 2-3 tablespoons ice cream or a few more ice cubes and blend again. Check the sweetness too—add more sweetener if needed and pulse to combine.
- Pour and Top: Pour your Frappuccino into a tall glass. Top generously with whipped cream—this is non-negotiable for the full experience! Drizzle with chocolate or caramel sauce if desired, or dust with cocoa powder or cinnamon for a beautiful finishing touch.
- Serve Immediately: Insert a wide straw or grab a spoon (Frappuccinos are thick!) and enjoy immediately. The texture is best right after blending—it starts melting and becoming less thick after 10-15 minutes, so sip and savor while it’s perfect!
Notes
- Coffee strength is crucial: Weak coffee = weak-tasting Frappuccino. Always use strong coffee, ideally double-strength. Cold brew is excellent because it’s naturally concentrated.
- Coffee ice cubes prevent dilution: Regular ice melts and waters down your drink. Coffee ice maintains flavor intensity.
- Thickening agent is essential: Without ice cream or xanthan gum, you’ll get icy, watery texture instead of smooth, creamy consistency. This is the secret to authentic Starbucks-style texture!
- Adjust thickness: More ice = thicker. More milk = thinner. Find your perfect balance!
- Sweetness varies: Start with 2 tablespoons sweetener, taste after blending, then adjust. Everyone’s preference differs!
- Blend in stages: If your blender struggles, add ingredients gradually—liquid first, then ice in batches.
- Use immediately: Frappuccinos are best fresh. They separate and become icy if left sitting.
- Prep Time: 3 minutes
- Cook Time: 0 minutes (2 minutes blending time)
- Category: Beverage
- Method: Blending
- Cuisine: American / Coffee Shop Inspired
- Diet: Gluten Free
Nutrition
- Serving Size: 1 large Frappuccino (16 oz, made with whole milk and sugar)
- Calories: 210
- Sugar: 28g
- Sodium: 75mg
- Fat: 7g
- Saturated Fat: 4g
- Unsaturated Fat: 2.5g
- Trans Fat: 0g
- Carbohydrates: 32g
- Fiber: 0g
- Protein: 5g
- Cholesterol: 25mg
Tips & Variations
Create Your Perfect Frappuccino:
- Mocha Frappuccino: Add 2 tablespoons cocoa powder and 1 tablespoon chocolate syrup. Top with chocolate whipped cream and chocolate shavings. Heaven!
- Caramel Frappuccino: Replace regular sweetener with caramel syrup (3 tablespoons). Drizzle caramel sauce inside the glass before pouring, and top with caramel drizzle and sea salt.
- Vanilla Bean Frappuccino: Omit the coffee entirely! Use milk, vanilla extract (1 teaspoon), vanilla bean paste or seeds from 1 vanilla bean, ice cream, and ice. Perfect for non-coffee drinkers!
- Java Chip Frappuccino: Make mocha version, then add ¼ cup chocolate chips before final blend for chunks throughout.
- Pumpkin Spice Frappuccino: Add 3 tablespoons pumpkin puree and 1 teaspoon pumpkin pie spice. Fall perfection!
- Peppermint Mocha Frappuccino: Make mocha version, add ¼ teaspoon peppermint extract. Top with crushed peppermint candies. Holiday magic!
- Protein Frappuccino: Add a scoop of vanilla or chocolate protein powder for a post-workout treat that tastes indulgent.
- Healthier Version: Use unsweetened almond milk, sugar-free sweetener, skip the ice cream (use xanthan gum instead), and top with a small amount of light whipped cream or skip it.
- Keto Frappuccino: Use unsweetened almond milk, sugar-free sweetener, add 2 tablespoons heavy cream for richness, and use sugar-free whipped cream.
- Coconut Frappuccino: Use coconut milk, add ½ teaspoon coconut extract, and top with toasted coconut flakes.
- Cookie Butter Frappuccino: Add 2 tablespoons cookie butter (like Biscoff spread) before blending. Mind-blowing!
- Double Chocolate Chip Frappuccino: Make mocha version extra chocolatey, add mini chocolate chips, and top with chocolate whipped cream and more chips.
Pro Chef Tips
Professional Secrets for Perfect Frappuccinos Every Time:
- The Coffee Ice Cube Game-Changer: This single tip transforms your Frappuccino from good to exceptional. Regular ice dilutes your drink as it melts, weakening the coffee flavor with every minute that passes. Coffee ice cubes solve this completely—as they melt, they add more coffee flavor instead of watering it down. Make a big batch on Sunday: brew a pot of strong coffee, let it cool, pour into ice cube trays, and freeze. Store the frozen coffee cubes in a freezer bag for up to 3 months. Your future self will thank you every time you make a Frappuccino that stays intensely flavorful from first sip to last!
- Layer Your Blending for Smooth Texture: Professional baristas know the order matters! Always add liquid ingredients first (coffee, then milk), followed by sweet syrups and flavorings, then your thickening agent, and finally ice on top. This creates a vortex in the blender that pulls ingredients down toward the blades efficiently. If you add ice first, it creates a barrier that prevents proper blending and can strain your blender motor. Start blending on low to break up ice, then increase to high speed gradually.
- The Xanthan Gum Secret: This is what Starbucks uses to achieve that signature thick, creamy texture without tons of calories! Xanthan gum is a natural thickening agent—you need only ¼ teaspoon (seriously, a tiny amount!) and it creates incredible body and smoothness. Too much makes it gummy, so measure carefully. It’s flavorless, calorie-free, and the reason Starbucks Frappuccinos have that specific mouthfeel. You can find it in the baking aisle of most grocery stores or online. If you prefer to avoid additives, vanilla ice cream works wonderfully and adds delicious flavor, though with extra calories.
- Brew Coffee Double-Strength Always: Weak coffee is the #1 reason homemade Frappuccinos disappoint. The ice and milk dilute the coffee significantly, so you need to start with concentrated coffee flavor. Use twice the amount of coffee grounds you normally would (so if you typically use 2 tablespoons grounds per cup of water, use 4 tablespoons). Cold brew concentrate is ideal because it’s naturally strong and smooth. If using instant coffee, use 2-3 tablespoons dissolved in ¾ cup hot water, then cooled.
- Chill Your Glass: For the ultimate experience and to keep your Frappuccino colder longer, place your serving glass in the freezer for 15-20 minutes before making your drink. This prevents the Frappuccino from melting quickly and keeps that perfect frozen texture longer. Professional coffee shops do this with all their cold drink glassware!
- The Two-Stage Blend: For the smoothest possible texture, blend in two stages. First, blend just the coffee, milk, sweetener, and thickener until completely smooth (about 20 seconds). Then add the ice and blend again until uniform and slushy (another 30-40 seconds). This method ensures no pockets of syrup or unmixed ingredients and creates superior texture, especially in less powerful blenders.
- Taste and Adjust Before Serving: After blending, taste your Frappuccino before pouring and topping! Too weak? Add a tablespoon of instant coffee and blend again. Too bitter? Add more sweetener. Too thin? Add more ice or a spoonful of ice cream. Too thick? Add a splash more milk. This 10-second check ensures every Frappuccino is perfect before you add the whipped cream and commit. Once topped, adjustments are messy!
Common Mistakes to Avoid
- Using Weak Coffee: This is the most common mistake that results in disappointing, watery-tasting Frappuccinos! Regular-strength coffee gets diluted by all the milk, ice, and other ingredients, leaving you with a drink that tastes more like sweet milk than coffee. Always, always use strong coffee—at least double-strength. The coffee flavor should be noticeably intense when you taste it on its own because it will mellow significantly once blended with everything else. Cold brew concentrate is ideal, or brew your regular coffee with twice the normal amount of grounds.
- Skipping the Thickening Agent: Without ice cream, xanthan gum, or another thickening agent, your Frappuccino will be icy, watery, and nothing like Starbucks. It’ll taste like blended iced coffee instead of that signature creamy, smooth, thick texture. The thickening agent is essential—it’s literally the difference between icy coffee slush and a real Frappuccino. Vanilla ice cream is the easiest solution (adds thickness, creaminess, and sweetness all at once), or use xanthan gum for a lower-calorie option that creates authentic texture.
- Adding Hot or Warm Coffee: If you add hot or even warm coffee to your blender with ice, the heat melts the ice immediately, creating a thin, watery drink instead of a thick, frozen one. Your coffee MUST be completely cooled to room temperature or chilled before blending. If you’re in a hurry and just brewed coffee, pour it over ice in a separate glass to cool it quickly (then use coffee ice cubes in your Frappuccino to compensate for dilution).
- Overloading with Ice: While you want a thick Frappuccino, too much ice creates a chunky, icy texture instead of smooth and creamy. It also strains your blender and can dull blades over time. The sweet spot is 1½ to 2 cups of ice for one serving—enough for frosty thickness but not so much that it becomes granita-like. If you want it thicker, add more ice cream or thickener rather than more ice. The balance between ice and liquid ingredients creates that perfect slushy-yet-smooth texture.
- Not Tasting Before Topping: Once you’ve added whipped cream and drizzles, adjusting the flavor of your Frappuccino becomes messy and difficult. Always taste after blending and before topping! Check sweetness, coffee strength, and overall flavor balance. Add more sweetener, a splash of vanilla, or a bit more coffee if needed, then blend for a few seconds to incorporate. These final adjustments take 10 seconds but make the difference between “okay” and “perfect.” Then add your gorgeous whipped cream topping with confidence!
Storage & Meal Prep
Storing Your Frappuccino:
- Fresh is Best: Frappuccinos are absolutely best enjoyed immediately after blending—that’s when the texture is perfect, the temperature is ideal, and everything is at its peak. Within 15-20 minutes, they start melting, the texture becomes less thick, and the layers separate. If you need to make it slightly ahead, keep it in the freezer (not fridge!) for up to 30 minutes, then stir before serving.
- Leftover Frappuccino: If you have leftover blended Frappuccino, you can store it in an airtight container in the freezer for up to 2 days. It will freeze solid and become more like coffee granita. To use, let it thaw slightly on the counter for 10-15 minutes until slushy, then stir well or re-blend briefly. The texture won’t be quite as smooth as fresh, but it’s still delicious!
- Pre-Made Coffee Concentrate: The smartest meal prep strategy is making strong coffee in advance! Brew a big batch of double-strength coffee, let it cool, and store in the refrigerator for up to 1 week. When you want a Frappuccino, you have ready-to-blend coffee waiting. This is especially convenient if you’re making Frappuccinos regularly.
- Coffee Ice Cubes: Make large batches of coffee ice cubes and store them in freezer bags for up to 3 months. Label them clearly (“Coffee Ice—for Frappuccinos!”). This is the ultimate meal prep for Frappuccino lovers—you always have what you need ready to go.
Why Frappuccinos Don’t Store Well:
The nature of blended drinks means they separate as they sit. The ice melts, the liquid separates from the frozen portion, and you lose that perfect creamy texture. Unlike smoothies (which can sometimes be prepped ahead), Frappuccinos need to be made fresh for best results.
Make-Ahead & Freezer Notes
Smart Preparation Strategies:
- Coffee Prep-Ahead: The best make-ahead strategy is preparing your coffee! Every Sunday, brew a large pot of double-strength coffee. Let it cool completely, then divide it: pour some into ice cube trays for coffee ice cubes, and store the rest in a pitcher or jar in the refrigerator. Throughout the week, you have coffee ready for instant Frappuccinos. This prep takes 15 minutes once a week but saves time daily.
- Pre-Portioned Dry Ingredients: If you make the same Frappuccino flavor repeatedly, pre-mix dry ingredients. For example, combine sugar, cocoa powder, and a pinch of xanthan gum in small containers—one container per serving. When ready, just add coffee, milk, ice, and your pre-mixed flavor base. Saves measuring time!
- Flavored Syrup Storage: Make homemade flavored syrups (vanilla, caramel, mocha) in advance and store in squeeze bottles in the refrigerator for up to 2 weeks. This makes daily Frappuccinos faster and gives you café-style flavor control.
- Frozen Coffee Cubes with Mix-Ins: Get creative by freezing coffee with sweetener already added! Brew strong sweet coffee (add sugar while it’s hot to dissolve), cool, pour into ice cube trays, and freeze. Each cube contains coffee AND sweetener, simplifying your recipe.
Freezer-Friendly Components:
While you can’t freeze a finished Frappuccino and expect it to maintain texture, you can freeze components:
- Coffee ice cubes: Up to 3 months
- Leftover blended Frappuccino: Up to 2 days (texture changes but still tasty)
- Homemade whipped cream: Up to 1 month in dollops on parchment
Best Make-Ahead System:
Keep a dedicated Frappuccino station: pitcher of strong coffee in the fridge, bag of coffee ice cubes in the freezer, and your preferred sweetener/syrups easily accessible. Making a Frappuccino becomes as quick as making toast—just blend and go!
Serving Suggestions
Frappuccinos are complete, satisfying drinks on their own, but here’s how to create a full café experience:
Perfect Food Pairings:
- Breakfast/Brunch: Serve alongside croissants, muffins, banana bread, scones, coffee cake, or cinnamon rolls
- Light Breakfast: Pair with yogurt parfaits, granola, fresh fruit bowls, or avocado toast
- Afternoon Snack: Enjoy with cookies, biscotti, brownies, blondies, or cake slices
- Summer BBQ: Serve as a refreshing coffee drink at outdoor gatherings
- Dessert Replacement: This is rich enough to serve as dessert after dinner
- Study/Work Sessions: Pair with energy balls, protein bars, or trail mix for sustained focus
Occasion Ideas:
- Weekend Morning Treat: Make Frappuccinos part of your leisurely Saturday or Sunday morning routine
- Pool/Beach Day: Perfect refreshing caffeine boost for hot outdoor days
- Work-From-Home Afternoon: That 2pm pick-me-up that feels like a vacation
- Girls’ Brunch: Set up a Frappuccino bar with different flavors and toppings
- Study Sessions: Caffeinated fuel for late-night studying or project work
- Summer Coffee Alternative: When hot coffee sounds terrible but you need caffeine
- Birthday Breakfast: Special morning treat for birthdays or celebrations
Create a Frappuccino Bar (So Fun for Parties!):
Set up a DIY station:
- Base Frappuccino in a blender or large pitcher
- Multiple milk options
- Various syrups: vanilla, caramel, hazelnut, chocolate
- Toppings bar: whipped cream, chocolate chips, caramel drizzle, chocolate sauce, cinnamon, cocoa powder, crushed cookies
- Let guests build their dream Frappuccino!
FAQs Section
Q: Can I make a Frappuccino without a blender?
A: Unfortunately, not really. A blender is essential for creating that smooth, slushy, evenly blended texture that defines a Frappuccino. You need the blender’s power to crush ice and incorporate all ingredients uniformly. However, if you have a food processor with a strong motor, that can work in a pinch—just pulse carefully to avoid overheating the motor. Immersion blenders won’t work well because they can’t properly crush ice. If you don’t have a blender, consider making iced coffee instead, or invest in an affordable blender—you can find decent ones for $30-50 that work great for Frappuccinos!
Q: Why is my Frappuccino watery and not thick like Starbucks?
A: This usually happens for one of three reasons: (1) You didn’t use a thickening agent—ice cream or xanthan gum is essential for that signature creamy thickness; without it, you just have blended iced coffee which is thinner and icier. (2) You didn’t use enough ice—you need 1½ to 2 cups of ice for proper thickness. (3) Your coffee was warm instead of cold, which melted the ice during blending. The fix: always use chilled coffee, add vanilla ice cream or ¼ teaspoon xanthan gum, and use plenty of ice. These three elements create that thick, milkshake-like consistency!
Q: Can I make Frappuccinos ahead of time for meal prep?
A: Not really, unfortunately. Frappuccinos are best made fresh because the blended texture separates and becomes icy as it sits. However, you CAN meal prep components! Brew strong coffee in advance and store it in the fridge (up to 1 week), make coffee ice cubes and keep them in freezer bags (up to 3 months), pre-mix dry ingredients or syrups, and have everything ready to blend when you want one. The actual blending takes only 2 minutes, so prepping components makes it just as convenient as grabbing a premade drink. If you absolutely must make them ahead, blend and immediately transfer to the freezer (not fridge) for up to 30 minutes, then stir well before serving—but fresh is always best!
Q: How can I make my Frappuccino healthier or lower calorie?
A: Great news—there are tons of ways to lighten it up! Use unsweetened almond milk or cashew milk instead of whole milk (saves 80+ calories), replace sugar with stevia, monk fruit sweetener, or sugar-free syrups (saves 50-60 calories), use xanthan gum instead of ice cream for thickness (saves 60+ calories), skip the whipped cream topping or use light whipped cream (saves 50-80 calories), add a scoop of protein powder for nutritional boost without much added sugar, or use cold brew coffee which is naturally less bitter so you need less sweetener. A “skinny” version using these swaps can be as low as 80-100 calories versus 300+ for traditional versions!
Q: What’s the difference between a Frappuccino and regular iced coffee?
A: Great question! Iced coffee is simply brewed coffee poured over ice—it’s liquid, thin, and primarily coffee-flavored with maybe some milk and sweetener added. A Frappuccino is a blended frozen beverage that’s thick, creamy, and slushy like a milkshake. The blending process incorporates air and breaks down ice into tiny crystals, creating a completely different texture and experience. Frappuccinos also typically contain thickening agents (ice cream or xanthan gum) that make them creamy and smooth rather than just cold and liquid. Think of it this way: iced coffee is to Frappuccino what coffee is to coffee ice cream—same basic flavor, completely different form and texture!
Q: Can I make Frappuccinos without coffee for non-coffee drinkers?
A: Absolutely! These are called “Crème Frappuccinos” and they’re delicious. Simply omit the coffee entirely and use all milk (or a mix of milk and cream for extra richness). Make a Vanilla Bean Frappuccino with milk, vanilla extract or vanilla bean paste, ice, sweetener, and ice cream blended until smooth—kids especially love this! You can also make chocolate crème (like a frozen chocolate milk), strawberry (with fresh or frozen strawberries), matcha (with matcha powder and milk), or any flavor you can imagine. They’re caffeine-free, kid-friendly, and just as fun as coffee versions!
Q: Why does my blender struggle with making Frappuccinos?
A: Frappuccinos are tough on blenders because of all the ice! Here are solutions: Add liquid ingredients first (coffee and milk), then ice on top—this helps create a vortex for better blending. Start on low speed to break up ice, then gradually increase to high rather than starting on high immediately. Don’t overload with too much ice—stick to 1½-2 cups maximum. Add ice in batches if needed—blend half the ice first, then add the rest. Use smaller ice cubes if possible, as they’re easier to crush. If your blender consistently struggles, it may not have enough power (under 500 watts)—consider upgrading to a more powerful blender if you’ll make these regularly. High-powered blenders (Vitamix, Blendtec, Ninja) handle Frappuccinos effortlessly.
Q: How do I recreate specific Starbucks Frappuccino flavors at home?
A: Easy! Here are the popular ones: Caramel Frappuccino = base recipe with 3 tbsp caramel syrup, drizzle caramel inside glass and on top. Mocha Frappuccino = add 2 tbsp cocoa powder and 1 tbsp chocolate syrup. Java Chip Frappuccino = mocha version plus ¼ cup mini chocolate chips blended in. Vanilla Bean = no coffee, add 1 tsp vanilla extract and vanilla bean seeds. Pumpkin Spice = add 3 tbsp pumpkin puree and 1 tsp pumpkin pie spice. Peppermint Mocha = mocha version plus ¼ tsp peppermint extract. The key is using flavored syrups (Torani and Monin brands are excellent) in place of plain sugar. Experiment to match your favorite Starbucks drink!
Conclusion
And there you have it—your complete, foolproof guide to making Starbucks-worthy Frappuccinos right in your own kitchen! This isn’t just about saving money (though you’ll save a fortune—we’re talking $5-7 per drink!), it’s about empowerment. You now have the knowledge and skills to create any Frappuccino flavor your heart desires, customized exactly to your preferences, whenever the craving strikes. No more drive-thru lines, no more hoping they get your order right, no more paying premium prices for what is essentially blended coffee, milk, and ice.
The real magic of homemade Frappuccinos is the control and creativity you have. Want it less sweet? Adjust the sugar. Want it more caffeinated? Add extra coffee. Craving a completely unique flavor combination that Starbucks doesn’t make? Go for it! You’re the barista now, and your kitchen is your coffee shop. Plus, there’s something genuinely satisfying about hearing that blender whir, watching the ingredients transform into that thick, creamy, perfectly blended frozen coffee drink, and knowing you made it yourself.
Remember the essential keys to success: always use strong, cold coffee (double-strength is ideal), don’t skip the thickening agent (ice cream or xanthan gum creates that authentic texture), use enough ice for proper thickness (1½-2 cups), start with less sweetener and adjust to taste, and blend in stages for the smoothest texture. Follow these principles and you’ll create café-quality Frappuccinos every single time. Coffee ice cubes are your secret weapon for preventing dilution—once you try them, you’ll never go back to regular ice!
Now it’s time to blend up your own Frappuccino magic! I’m genuinely excited to hear how yours turns out. What flavor did you make? Did you go classic coffee or adventurous with mocha or caramel? Have these homemade versions saved your coffee shop budget? Are you already planning your next flavor experiment? Drop a comment below and share your Frappuccino success story—I read every single comment and love seeing how you customize these recipes! And if you successfully recreated that Starbucks experience at home (for a fraction of the cost), please pin this recipe to your favorite Pinterest board so your friends can discover the joy of homemade Frappuccinos too. Your shares help our community grow and spread the coffee love!
Here’s to cold, creamy, perfectly blended coffee drinks, to summer afternoons made better with frozen coffee in hand, to saving money while treating yourself, and to never waiting in line for a $7 drink again. May your blender be powerful, your coffee be strong, your ice cream be vanilla, and your Frappuccinos always be thick, creamy, and Instagram-perfect! Happy blending, coffee lovers! ☕❄️✨