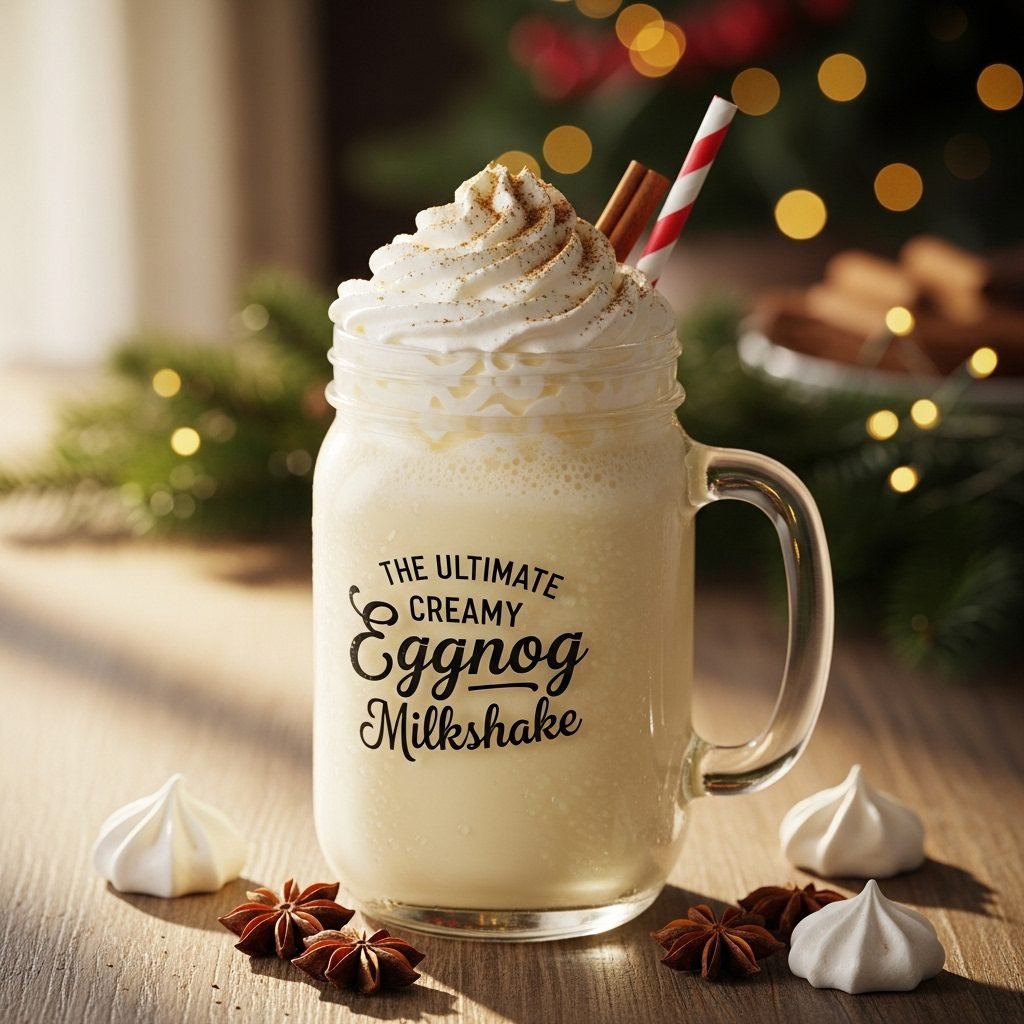
The Ultimate Creamy Eggnog Milkshake Recipe: A Holiday Favorite for Every Home Cook
There’s something absolutely magical about a thick, creamy eggnog milkshake that just screams holidays and comfort. If you’re a fan of seasonal flavors and indulgent treats, this eggnog milkshake recipe is about to become your new obsession. Whether you’re looking for a quick dessert, a festive party drink, or just a cozy afternoon treat, this recipe delivers pure nostalgia in every sip.
This homemade eggnog milkshake goes beyond the typical store-bought version. It’s rich, velvety, and completely customizable to your taste preferences. The beauty of making your own? You control exactly what goes into it—no artificial flavors, no weird additives, just pure, delicious eggnog goodness blended with premium ice cream and your favorite spirits (optional, of course!).
Perfect for holiday gatherings, Christmas parties, Thanksgiving celebrations, or even a quiet winter evening by the fireplace, this milkshake proves that the best holiday treats are the ones you make at home. Plus, it comes together in literally five minutes. Yes, you read that right—five minutes to festive bliss.
The History and Background of Eggnog
To truly appreciate your eggnog milkshake, let’s dive into the fascinating history of eggnog itself. This beloved beverage has a story that stretches back centuries and crosses continents.
Eggnog traces its roots to medieval Europe, where monks created a drink called “posset”—a warm mixture of milk, eggs, and spices, often fortified with alcohol. However, the American version we know and love today has a distinctly colonial American origin story. Back in the 1700s, when rum was plentiful in the American colonies (thanks to the Caribbean trade), colonists started adding it to their milk and egg mixtures. This combination was revolutionary because it was a way to preserve the drink during winter months. Alcohol acts as a preservative, and refrigeration didn’t exist back then.
The name “eggnog” itself is believed to come from the combination of “egg” and “grog” (a nautical term for rum), or possibly from “egg” and the wooden mugs called “noggins” that were commonly used to serve the drink. Either way, the name stuck, and eggnog became deeply embedded in American holiday tradition.
What’s particularly interesting is that eggnog represented a sign of wealth and celebration. Eggs, dairy, sugar, and spirits were expensive commodities in colonial times, so serving eggnog was a way to show hospitality and celebration. Recipes were closely guarded family secrets, passed down through generations like precious heirlooms.
By the 1800s, eggnog had become firmly established as the quintessential American holiday drink. Thomas Jefferson himself had a famous eggnog recipe, and cookbooks throughout the 19th and 20th centuries featured countless variations. Today, eggnog has evolved from just a holiday punch to inspire creative treats like this delicious milkshake, bringing together tradition and modern convenience.
Why You’ll Love This Eggnog Milkshake Recipe
This isn’t just another holiday recipe—it’s a game-changer for home cooks. Here’s exactly why you’re going to adore making this at home:
This recipe is incredibly easy. Seriously, there’s no cooking involved, no temperamental steps, and no special skills required. If you can operate a blender, you can make this masterpiece. Even kids can help assemble the ingredients, making it a fun family activity.
It’s faster than ordering from a café. Five minutes from fridge to glass means you can satisfy those holiday cravings immediately. No waiting in long lines, no disappointing frozen drinks that taste nothing like real eggnog.
The flavor is unmatched. When you make it at home, you can use high-quality ingredients. Real vanilla, premium ice cream, and quality eggnog make all the difference in taste. Store-bought milkshakes simply cannot compete.
It’s endlessly customizable. Want it boozy? Add rum or brandy. Prefer it lighter? Use less ice cream and more milk. Love spices? Sprinkle cinnamon on top. The possibilities are endless.
Perfect for entertaining. Make a batch and serve it at your next holiday party. Your guests will be absolutely amazed that you made it from scratch.
Here’s what makes this recipe special:
- ⏰ Super quick – Takes just 5 minutes from start to finish
- 👨👩👧👦 Family-friendly – Kids and adults both love it (alcohol is optional)
- 💰 Budget-friendly – Costs significantly less than café drinks
- 🎉 Party-ready – Easily multiplied for a crowd
- 🎄 Festive feels – Screams holiday season in the best way
- 🥛 Rich and creamy – Tastes like pure indulgence
- 📱 Instagram-worthy – Gorgeous enough to share on social media
Understanding the Key Ingredients
Let’s break down exactly what goes into this eggnog milkshake and why each ingredient matters:
Eggnog is the star here, and quality matters. You have two options: store-bought (convenient and reliable) or homemade (if you’re feeling ambitious). Store-bought eggnog is perfectly fine—brands like Organic Valley and Southern Comfort make excellent versions. The eggnog provides that rich, creamy base with subtle nutmeg and vanilla flavors that define this drink. If you have dietary concerns about raw eggs, rest assured that commercial eggnog is pasteurized, making it safe to consume.
Vanilla ice cream creates the thick, creamy texture that makes this a true milkshake rather than just a blended drink. Use premium ice cream if possible—brands like Häagen-Dazs or Ben & Jerry’s make a noticeable difference in richness. You could also experiment with butter pecan ice cream for extra nutty flavor or bourbon vanilla for a more sophisticated taste.
Whole milk acts as the liquid component that helps everything blend smoothly. If you prefer a thicker shake, use less milk; if you want something closer to a drinkable consistency, add more. You can substitute with 2% milk, but whole milk creates a creamier result.
Nutmeg is optional but highly recommended. Just a small pinch of fresh nutmeg brings authentic eggnog flavor. Pre-ground nutmeg works, but freshly grated is superior. Avoid using too much—a light dusting is all you need.
Cinnamon complements the nutmeg beautifully and adds warmth. Use high-quality ground cinnamon for better flavor.
Rum or brandy (optional) takes this from a kid-friendly treat to a sophisticated adult beverage. Dark spiced rum works wonderfully, as does cognac or brandy. Start with ½ ounce and adjust to taste.
Equipment You’ll Need
Making this eggnog milkshake requires minimal equipment, which is part of its appeal:
- Blender – A high-powered blender like a Vitamix works best, but even a basic blender handles this recipe easily
- Measuring cups – For portioning eggnog and milk
- Measuring spoons – For spices and spirits
- Large drinking glass – For serving (or multiple glasses if making several)
- Bar spoon or long spoon – For stirring and measuring spirits
- Can opener (if using canned eggnog)
- Microplane grater – For fresh nutmeg (optional but recommended)
That’s it! This recipe is beautifully simple in terms of equipment needs.
Print
Eggnog Milkshake Recipe
This creamy eggnog milkshake is the ultimate holiday treat—rich, velvety, and ready in just five minutes. Made with real eggnog, premium vanilla ice cream, and a touch of warm spices, it tastes like liquid nostalgia. Perfect for holiday parties, festive gatherings, or cozy winter afternoons.
- Total Time: 5 minutes
- Yield: 2 servings 1x
Ingredients
- 2 cups whole milk
- 2 cups high-quality vanilla ice cream
- 1 cup cold eggnog (store-bought or homemade)
- ½ teaspoon vanilla extract
- Pinch of ground nutmeg (plus more for garnish)
- ¼ teaspoon ground cinnamon
- ½ ounce dark spiced rum or brandy (optional, can use 1 ounce for stronger flavor)
- Pinch of sea salt
Instructions
- Gather your ingredients. Make sure your eggnog is cold straight from the refrigerator. Cold ingredients create a thicker, more luxurious milkshake texture.
- Add eggnog and milk to the blender. Pour 1 cup of eggnog and 2 cups of whole milk into your blender first. This creates the liquid base for blending.
- Add the ice cream. Scoop 2 cups of vanilla ice cream directly into the blender. Don’t pre-soften it—you want it cold and firm for maximum creaminess.
- Add vanilla extract and spices. Pour in ½ teaspoon vanilla extract, then add a generous pinch of nutmeg and ¼ teaspoon cinnamon. These spices are essential for that authentic eggnog flavor.
- Add spirits (if using). If you’re making the adult version, add ½ ounce of dark spiced rum or brandy. Start with this amount and taste-test before adding more—you can always add more rum, but you can’t take it out.
- Blend until smooth. Blend on high speed for about 60-90 seconds until completely smooth and creamy. You should see no chunks of ice cream remaining. The mixture should be thick but pourable.
- Taste and adjust. Pour a small amount into a glass and taste it. If you want more eggnog flavor, add a splash of additional eggnog. If you want it sweeter, add a touch more vanilla. If you want more spice, sprinkle in a bit more cinnamon or nutmeg.
- Pour into serving glasses. Divide evenly between two large glasses. The shake should have a thick, luxurious consistency.
- Garnish and serve immediately. Top each shake with a light dusting of fresh nutmeg and a sprinkle of cinnamon. Serve with a thick straw immediately for the best texture.
Notes
- Make it extra thick: Use less milk (reduce to 1.5 cups) and add an extra scoop of ice cream for an almost dessert-like consistency.
- Make it drinkable: Add an extra ½ cup of milk if you prefer a thinner, more milkshake-like consistency that’s easier to drink.
- Prep ahead: Blend everything except the spirits up to 1 hour ahead. Keep refrigerated. Blend once more before serving, or stir vigorously with a spoon.
- Batch recipe: This recipe easily doubles, triples, or quadruples for parties. Simply multiply all ingredients accordingly.
- Alcohol note: The alcohol is completely optional. This tastes wonderful without it, making it perfect for kids and non-drinkers.
- Prep Time: 5 minutes
- Cook Time: 0 minutes
- Category: Dessert & Beverages
- Method: Blender
- Cuisine: American
- Diet: Gluten Free
Nutrition
- Serving Size: 1 shake (16 oz)
- Calories: 485
- Sugar: 48g
- Sodium: 165mg
- Fat: 22g
- Saturated Fat: 14g
- Unsaturated Fat: 6g
- Trans Fat: 0.5g
- Carbohydrates: 58g
- Fiber: 0g
- Protein: 9g
- Cholesterol: 95mg
Tips and Creative Variations
The beauty of this eggnog milkshake is how easily it adapts to your preferences:
The Spiced Version: Add ⅛ teaspoon of ground cloves and a tiny pinch of ground ginger for a more complex spice profile. This creates an almost mulled wine vibe that’s absolutely stunning.
The Bourbon Version: Replace the rum with bourbon whiskey for a sophisticated American twist. Bourbon’s vanilla and caramel notes complement eggnog beautifully.
The Coffee Lover’s Version: Add 1 tablespoon of cold brew coffee or espresso powder to create an eggnog-coffee hybrid. This is surprisingly delicious and energizing.
The Skinny Version: Use 2% milk instead of whole milk and lower-fat ice cream. Add an extra tablespoon of eggnog for richness without the extra calories. Still delicious!
The Extra Creamy Version: Replace some of the milk with heavy cream (use 1 cup milk and ½ cup heavy cream). This creates an ultra-luxurious texture.
The Coconut Version: Use coconut ice cream instead of vanilla and add ¼ teaspoon coconut extract. Absolutely tropical and festive.
The Vegan Version: Use coconut or oat milk and dairy-free ice cream. Many brands now make eggnog-flavored plant-based options.
The Holiday Punch Bowl: Make a large batch in a punch bowl by multiplying ingredients by 6. Add cinnamon sticks and star anise for decoration. Serve cold in glasses.
Pro Chef Tips for Maximum Flavor
Chill everything first. Use ice cream straight from the freezer and eggnog straight from the refrigerator. This prevents the shake from becoming watery and ensures a thick, luxurious texture that doesn’t separate.
Taste as you go. Everyone’s palate is different. Start with the suggested spice amounts and adjust to your preference. You want eggnog flavor to shine through without overwhelming spice.
Use fresh spices. Nutmeg and cinnamon lose potency over time. If your spices have been in your cabinet for more than two years, they’re likely not at their best. Fresh spices make a noticeable difference.
Don’t over-blend. Blend until smooth but stop as soon as the mixture reaches your desired consistency. Over-blending can warm up the shake slightly and make it less thick.
Layer your flavors. If using alcohol, add it at the end and blend briefly. This preserves the alcohol’s unique flavor profile rather than letting it blend into everything.
Use premium eggnog. This is not the place to save money. Quality eggnog brands like Organic Valley, Southern Comfort, and local dairy brands taste vastly superior to budget options. The difference is immediately noticeable.
Toast your spices: For the ultimate flavor boost, quickly toast your cinnamon and nutmeg in a dry pan for 20 seconds, then grind them fresh (if using whole spices). This releases essential oils and intensifies flavor. Allow them to cool completely before adding.
Make your own eggnog: If you’re ambitious, homemade eggnog tastes even better. The recipes aren’t difficult, just time-consuming. Your milkshake will be absolutely incredible.
Common Mistakes to Avoid
Using melted ice cream: Start with frozen ice cream. If your ice cream has softened, let it refreeze before blending. Melted ice cream creates a thin, watery shake instead of the thick, creamy consistency you want.
Adding too much milk: This is the most common mistake. Start with 2 cups and add more only if needed. You want a thick shake, not a thin beverage. You can always add more milk, but you can’t remove it.
Forgetting to taste before serving: Everyone’s preferences differ. Always do a small taste test and adjust spices, sweetness, or thickness before serving to guests.
Blending warm spirits: Cold ingredients create the best texture. If using alcohol, use it straight from the refrigerator or freezer. Room temperature spirits can warm up your shake.
Skipping the garnish: A simple dusting of fresh nutmeg and cinnamon isn’t just pretty—it’s delicious. These garnishes add essential flavor and aroma that enhance each sip.
Storage and Meal Prep Guidelines
Immediate consumption is best: This shake is absolutely best enjoyed immediately after blending. The texture is perfect, the flavors are fresh, and it hasn’t started to separate.
Short-term storage (up to 1 hour): If you need to make it ahead, blend everything except alcohol and store in the refrigerator in an airtight container. Before serving, blend once more (or stir vigorously) to recombine. Then add alcohol if desired and drink immediately. The separation that occurs is completely normal—just restir.
Don’t store the finished shake: Once blended with ice cream, the shake begins to separate and becomes watery as the ice cream melts and the ingredients separate. Storing it doesn’t improve anything.
Storing the components separately: Keep eggnog, milk, and ice cream all stored properly in the refrigerator and freezer respectively. Eggnog keeps 5-7 days after opening (always check the expiration date). Ice cream keeps about 3-4 months in the freezer if properly sealed.
Make-Ahead and Freezer-Friendly Notes
Can you make this ahead? Yes, but with caveats. The unblended components can certainly be prepared ahead. Measure all dry ingredients into a small bowl and refrigerate. Measure all liquids into a container and refrigerate. When ready to serve, simply blend everything together with the ice cream.
Freezer-friendly details: You can freeze the finished shake in popsicle molds to create eggnog milkshake pops—a fun variation! Freeze for at least 6 hours until solid. These keep about 1 month in the freezer.
Prep stations for parties: If you’re hosting, set up a “shake station” where guests can blend their own. Pre-portion all ingredients into individual cups, have the blender ready, and let guests customize their shake with their preferred spirits and spice levels.
Best reheating method: This shake doesn’t need reheating. If the finished shake has begun to melt slightly, simply reblend it with a fresh scoop of ice cream for a fresh texture, or freeze it temporarily before serving.
Serving Suggestions
This eggnog milkshake is absolutely delicious on its own, but here are some wonderful ways to serve it:
As a holiday dessert course: Serve after dinner in small glasses (4-6 oz) as a lighter dessert. It’s rich enough to satisfy sweet cravings but light enough not to feel like an overly heavy dessert.
With breakfast: Yes, really! A small eggnog milkshake alongside breakfast creates a festive, indulgent morning. Pair with cinnamon rolls or gingerbread cookies.
Holiday party drink: Make a large batch and serve in a punch bowl with cinnamon sticks for garnish. Guests can serve themselves at their leisure.
After-dinner drink: Serve in small glasses alongside holiday cookies, gingerbread, or shortbread. The combination is absolutely magical.
Dessert duo: Serve alongside a slice of apple pie, pecan pie, or pumpkin cheesecake for a delicious dessert pairing.
Late-night cozy drink: Perfect for those late nights by the fireplace with a good book or movie.
Alongside coffee: A small eggnog milkshake pairs beautifully with black coffee for an interesting contrast of flavors.
Frequently Asked Questions
Q: Can I use store-bought eggnog?
A: Absolutely! Store-bought eggnog is convenient, reliable, and creates a delicious milkshake. Quality brands like Organic Valley, Southern Comfort, and local dairy versions produce excellent results. This recipe uses store-bought eggnog for simplicity and accessibility.
Q: Is this safe to drink if I’m pregnant?
A: Most store-bought eggnog is pasteurized, making it safe for pregnant women. However, always check the label to confirm. Commercial eggnog is heat-treated to eliminate potential pathogens. If you’re concerned, check with your healthcare provider or use eggnog you’ve made yourself with pasteurized eggs.
Q: How many calories are in this shake?
A: Per the nutrition facts above, one shake contains approximately 485 calories without alcohol. This accounts for standard ice cream and whole milk. Using lower-fat options will reduce this considerably. Remember that this is a rich, indulgent treat meant to be enjoyed in moderation as part of a balanced diet.
Q: Can I make this dairy-free?
A: Yes! Use dairy-free milk (oat milk works beautifully) and dairy-free ice cream. Some brands now make eggnog-flavored plant-based options, or use vanilla ice cream. The result is slightly less rich but still delicious. Many people find they can’t even taste the difference.
Q: What if I don’t like alcohol?
A: Simply omit it entirely! This shake is absolutely delicious without any spirits. It’s perfect for kids, non-drinkers, and anyone who prefers the pure eggnog flavor without complexity from alcohol.
Q: Can I use homemade eggnog instead?
A: Definitely! Homemade eggnog creates an even more luxurious shake, though it’s more time-consuming to make. Homemade versions often taste superior because you control the quality of ingredients. Just ensure any homemade eggnog with raw eggs has been properly aged and/or pasteurized for safety.
Q: How long does this shake last if I store it?
A: This shake is best enjoyed immediately. If you must store it, cover tightly and refrigerate up to 1 hour, but expect separation. Reblend before serving. For longer storage, freeze individual portions in popsicle molds for eggnog milkshake pops that last about 1 month in the freezer.
Closing Thoughts
There you have it—the ultimate eggnog milkshake recipe that brings holiday joy to your kitchen in just five minutes. This isn’t just a drink; it’s a celebration of seasonal flavors, a nod to centuries of culinary tradition, and a delicious reminder that the best treats are made with love and simple, quality ingredients.
What I love most about this recipe is how it bridges tradition and convenience. You’re honoring the heritage of this beloved holiday classic while making something genuinely easy and approachable. Whether you’re a seasoned home cook or someone who rarely ventures into the kitchen, you can absolutely nail this recipe.
This eggnog milkshake has become a holiday staple in my family, and I have a feeling it’s about to become one in yours too. Make it for your family, serve it at your parties, and share it with friends. Most importantly, savor every creamy, spiced, absolutely delicious sip.
I’d absolutely love to hear from you! Have you tried making eggnog milkshakes at home before? What variations do you think you’ll try? Leave a comment below and let me know your favorite way to enjoy this festive treat. And if you make this recipe, please share your results on Pinterest or tag me on social media—I love seeing your creations!
Pin this recipe to your holiday board, share it with a friend who loves seasonal treats, and get ready to become the hero at every holiday gathering. Happy blending! 🥛🎄