Perfect Crème Caramel Recipe – Silky French Flan with Caramel Sauce

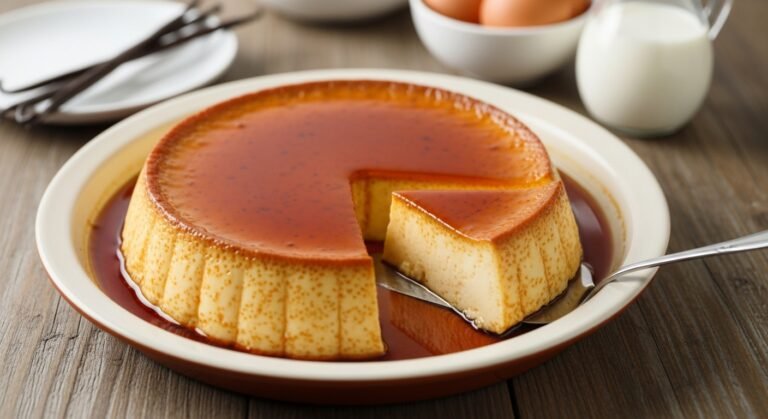
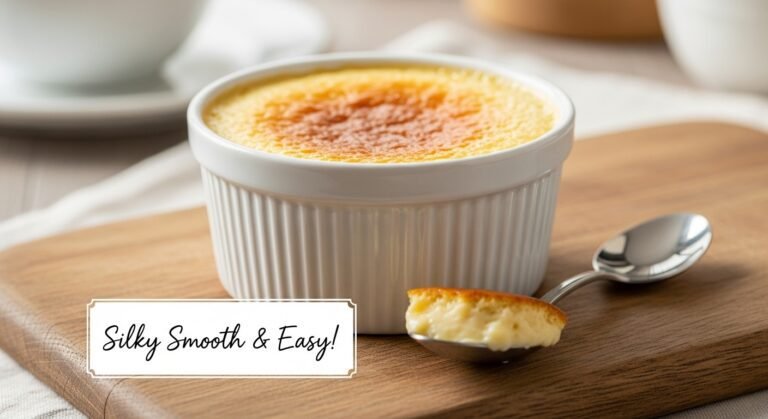
Crème Caramel, also known as flan in many parts of the world, is an elegant French dessert that consists of silky smooth vanilla custard topped with a layer of glossy caramel sauce. When you unmold this stunning dessert, the caramel cascades down the sides of the custard, creating a beautiful golden pool that’s as impressive to look at as it is delicious to eat. The contrast between the rich, creamy custard and the bittersweet caramel creates a flavor combination that’s absolutely divine.
This classic dessert is perfect for dinner parties, special occasions, holidays like Easter or Christmas, or any time you want to impress your guests with a restaurant-quality dessert made at home. Despite its sophisticated appearance, Crème Caramel is surprisingly simple to make with just a handful of basic ingredients. It’s also a wonderful make-ahead dessert that actually benefits from overnight chilling, making it ideal for entertaining when you want to prepare everything in advance.
History / Background
Crème Caramel has a rich history that dates back centuries in European cuisine. While its exact origins are debated, most food historians credit France with perfecting this elegant custard dessert in the 1700s, though similar custard dishes existed throughout Europe and even in ancient Rome. The French elevated the simple egg custard by introducing the caramelized sugar topping, transforming it into the sophisticated dessert we know today.
The technique of making caramel and custard requires precision and patience, which is why Crème Caramel became associated with fine dining and skilled pastry chefs. In French culinary tradition, it’s considered one of the fundamental desserts that every serious cook should master, often appearing in classical cooking examinations. The dessert’s French name literally translates to “caramel cream,” perfectly describing its two essential components.
As French cuisine spread across the globe through colonization and cultural exchange, Crème Caramel traveled too, adapting to local tastes and ingredients. In Spain and Latin America, it became known as “flan” and is often flavored with dulce de leche or condensed milk. In Japan, it’s called “purin” and is a beloved café dessert. In Vietnam, it’s “bánh flan” and may include coffee or coconut flavors. Each culture has embraced this dessert while maintaining its essential character—a smooth custard with caramel.
What makes Crème Caramel so enduringly popular is its perfect balance of textures and flavors. The silky custard melts on your tongue, while the caramel adds a sophisticated bittersweet note that prevents the dessert from being too sweet. It’s the kind of dessert that makes you close your eyes and savor every spoonful, appreciating the craftsmanship that goes into creating something so seemingly simple yet so profoundly delicious.
Why You’ll Love This Recipe
This Crème Caramel recipe is going to become one of your signature desserts, and here’s why: it delivers Michelin-star elegance with ingredients you probably already have in your kitchen. While it looks and tastes like something from a fancy French patisserie, the actual technique is straightforward and forgiving once you understand the basics.
Here’s what makes this recipe exceptional:
- Impressive presentation – The dramatic caramel waterfall effect never fails to wow guests
- Make-ahead friendly – Actually tastes better when made 1-2 days in advance
- Simple ingredients – Just eggs, milk, sugar, and vanilla create magic
- Naturally gluten-free – Perfect for guests with dietary restrictions
- Budget-friendly – Uses basic pantry staples to create an elegant dessert
- Silky smooth texture – The custard practically melts in your mouth
- Not overly sweet – The slightly bitter caramel balances the sweet custard perfectly
- Portion-controlled – Individual servings mean no cutting or serving mess
- Scalable recipe – Easy to make just one or multiply for a crowd
- Restaurant-quality – Tastes like it costs $12 at a French bistro
- Versatile flavor base – Can be customized with different extracts and add-ins
Ingredient Notes
Granulated Sugar (for caramel and custard): Sugar plays two crucial roles in this recipe. The first portion is transformed into caramel through a process of heating until the sugar molecules break down and recombine into new compounds that give caramel its distinctive color and complex flavor. For the custard, sugar sweetens and also affects texture by interfering with protein bonds in the eggs, creating a more tender result. Always use regular granulated white sugar for caramel—brown sugar or alternative sweeteners won’t work the same way.
Whole Milk: Whole milk provides richness and body to the custard without making it too heavy. The fat content (usually around 3.5%) creates a creamy texture while keeping the custard light enough to wobble gently when unmolded. You can substitute with 2% milk in a pinch, but the custard will be slightly less rich. Avoid skim milk, which will result in a watery, less satisfying texture.
Heavy Cream: Adding cream to the milk mixture creates an even more luxurious custard with a silky, velvety texture. The higher fat content contributes to the mouthfeel and richness that makes this dessert so special. If you prefer a lighter version, you can use all milk instead of a milk-cream combination, but the texture will be less decadent.
Large Eggs: Eggs are the magic ingredient that transforms liquid into custard. The proteins in eggs coagulate when heated gently, creating the structure that holds the custard together. Use large eggs at room temperature for best results—they incorporate more smoothly and cook more evenly. Cold eggs can lower the temperature of your custard mixture too much and affect cooking time.
Pure Vanilla Extract: Vanilla enhances all the other flavors in the custard and adds warmth and depth. Use pure vanilla extract rather than imitation for the best flavor. If you want to get really fancy, you can split a vanilla bean and scrape the seeds directly into the milk as it heats, then strain them out before mixing with eggs.
Salt: Just a pinch of salt enhances all the flavors in the dessert, making the caramel taste more complex and the custard taste richer. Don’t skip this tiny but important ingredient.
Water (for caramel): A small amount of water helps dissolve the sugar evenly at the beginning of the caramel-making process. Once the sugar dissolves, the water evaporates, and the sugar begins to caramelize. Some recipes skip water and make “dry” caramel, but adding water gives you more control and reduces the risk of burning.
Equipment Needed
Having the right equipment makes this recipe much easier:
- Medium heavy-bottomed saucepan – For making caramel (heavy bottom prevents hot spots and burning)
- Large mixing bowl – For preparing the custard mixture
- Whisk – For blending eggs and dairy smoothly
- Fine-mesh strainer – Essential for removing any egg bits or foam for ultra-smooth custard
- Six 6-ounce ramekins or custard cups – Individual molds for baking (you can also use one large 8-inch round baking dish)
- Large roasting pan or baking dish – Must be deep enough to hold ramekins and hot water for the water bath
- Kettle or pot for boiling water – For the bain-marie (water bath)
- Kitchen towel – To line the bottom of the roasting pan (prevents ramekins from sliding)
- Measuring cups and spoons – For accurate measurements
- Oven mitts – For handling hot pans and water
- Small offset spatula or butter knife – For loosening custards before unmolding
- Serving plates – For presenting the finished dessert
- Optional: kitchen thermometer – For checking custard doneness (should reach 170-175°F)
Print

Crème Caramel Recipe
This classic French Crème Caramel features silky smooth vanilla custard with a glossy caramel topping that creates a stunning presentation when unmolded. Made with simple ingredients and baked in a gentle water bath, this elegant dessert is naturally gluten-free and perfect for make-ahead entertaining. The bittersweet caramel sauce perfectly balances the sweet, creamy custard for a sophisticated dessert that tastes like it came from a Parisian bistro.
- Total Time: 1 hour 5 minutes (plus 4 hours chilling time)
- Yield: 6 servings 1x
Ingredients
ScaleFor the Caramel:
- 1 cup (200g) granulated sugar
- ¼ cup (60ml) water
- 1 tablespoon light corn syrup (optional, helps prevent crystallization)
For the Custard:
- 2 cups (480ml) whole milk
- 1 cup (240ml) heavy cream
- ¾ cup (150g) granulated sugar
- 5 large eggs
- 2 large egg yolks
- 2 teaspoons pure vanilla extract
- ⅛ teaspoon salt
Instructions
- Prepare your molds: Before starting the caramel, have your six 6-ounce ramekins ready and nearby. Caramel hardens quickly, so you need to work fast once it’s ready. Place the ramekins on a rimmed baking sheet for easy handling.
- Cook the caramel: In a medium heavy-bottomed saucepan, combine 1 cup sugar, water, and corn syrup if using. Stir gently to combine, making sure all the sugar is moistened. Place over medium heat and bring to a boil without stirring. Once boiling, stop stirring completely—swirl the pan occasionally if needed for even cooking. Cook for 8-12 minutes until the caramel turns a deep amber color (think the color of an old penny). Watch carefully in the final minutes as it can go from perfect to burned quickly. The caramel should smell nutty and complex, not acrid or burnt.
- Divide the caramel: As soon as the caramel reaches the right color, immediately remove from heat. Working quickly but carefully (caramel is extremely hot), pour about 2-3 tablespoons into each ramekin, tilting each one to coat the bottom evenly. Don’t worry if it’s not perfectly even—it will melt during baking and unmolding. Set aside to harden while you make the custard.
Make the Custard:
- Heat the dairy: Preheat your oven to 325°F (163°C). In a medium saucepan, combine milk and cream. Heat over medium heat until it just begins to steam and tiny bubbles form around the edges (about 180°F). Don’t let it boil. Remove from heat and let cool slightly for 5 minutes.
- Mix eggs and sugar: In a large mixing bowl, whisk together eggs, egg yolks, and ¾ cup sugar until smooth and well combined but not foamy. You want to mix them thoroughly but avoid creating too many air bubbles. Whisk for about 1 minute until the mixture is pale and slightly thickened.
- Temper the eggs: This is a crucial step. Slowly pour about ½ cup of the warm milk mixture into the egg mixture while whisking constantly. This gradually raises the temperature of the eggs without scrambling them. Then slowly pour in the remaining warm milk mixture, whisking continuously. Add vanilla extract and salt, and whisk to combine.
- Strain the custard: Pour the entire custard mixture through a fine-mesh strainer into a large measuring cup or bowl with a pouring spout. This removes any bits of cooked egg and foam, ensuring your custard is perfectly smooth. Press gently with a spoon to push everything through.
- Fill the ramekins: Carefully divide the strained custard among the caramel-lined ramekins, filling each about three-quarters full. If you see any bubbles on the surface, gently skim them off with a spoon or pop them with a toothpick for the smoothest finish.
Bake in Water Bath:
- Prepare the water bath: Place a folded kitchen towel in the bottom of a large roasting pan (this prevents the ramekins from sliding and insulates them). Arrange the filled ramekins on the towel. Place the roasting pan on the oven rack, then carefully pour hot water into the pan until it comes halfway up the sides of the ramekins. The water bath ensures gentle, even cooking that prevents curdling.
- Bake: Bake for 40-50 minutes until the custards are just set but still slightly jiggly in the center when gently shaken. They should wobble like Jell-O but not slosh like liquid. The edges should be set, and the center should be just barely firm. A thermometer inserted in the center should read 170-175°F. Don’t overbake, or the custard will be grainy instead of silky.
- Cool: Carefully remove the roasting pan from the oven. Let the custards sit in the water bath for 10 minutes, then carefully remove each ramekin from the water using tongs or oven mitts. Place on a wire rack and let cool to room temperature, about 1 hour. Once cooled, cover each ramekin with plastic wrap and refrigerate for at least 4 hours or preferably overnight. The custards need this chilling time to fully set and develop flavor.
Unmold and Serve:
- Unmold the custards: When ready to serve, run a thin knife or small offset spatula around the edge of each custard to loosen it from the ramekin. Place a dessert plate upside down over the ramekin, then quickly but confidently flip both over together. Give the ramekin a gentle shake if needed, and the custard should slide out onto the plate with the caramel sauce pooling around it. If it doesn’t release immediately, let it sit for a minute—gravity will do the work.
Notes
- Caramel color is key: Don’t undercook your caramel. Pale caramel tastes simply sweet, while properly cooked deep amber caramel has complex, slightly bitter notes that balance the sweet custard. Look for the color of an old penny or dark honey.
- Water bath is non-negotiable: Never skip the water bath. It’s what creates the silky texture and prevents the eggs from curdling or developing holes.
- Make ahead for best results: This dessert actually improves with time. The flavors meld and the texture becomes even silkier after 24 hours in the refrigerator.
- Room temperature eggs: Take eggs out of the refrigerator 30 minutes before using for easier mixing and more even cooking.
- Don’t overbake: Slightly underdone is better than overdone. The custard will continue to set as it cools.
- Prep Time: 20 minutes
- Cook Time: 45 minutes
- Category: Desert
- Method: Baking (Water Bath)
- Cuisine: French
- Diet: Gluten Free
Nutrition
- Serving Size: 1 custard (1/6 of recipe)
- Calories: 385
- Sugar: 48g
- Sodium: 130mg
- Fat: 16g
- Saturated Fat: 9g
- Unsaturated Fat: 6g
- Trans Fat: 0g
- Carbohydrates: 52g0
- Fiber: 0g
- Protein: 9g
- Cholesterol: 235mg
Tips & Variations
Coffee Crème Caramel: Add 2 tablespoons of instant espresso powder or very finely ground coffee to the warm milk mixture. The coffee enhances the caramel flavor and adds sophistication. This is especially popular in Vietnamese and Spanish versions.
Coconut Crème Caramel: Replace 1 cup of the milk with full-fat coconut milk and add ½ teaspoon coconut extract along with the vanilla. Top with toasted coconut flakes before serving for a tropical twist.
Orange Crème Caramel: Add the zest of one orange to the milk as it heats, then strain it out before mixing with eggs. You can also add 1 tablespoon of orange liqueur like Grand Marnier to the custard for an elegant adult version.
Chocolate Crème Caramel: Melt 3 ounces of chopped dark chocolate into the warm milk mixture and whisk until smooth. This creates a rich chocolate custard that pairs beautifully with the caramel.
Dulce de Leche Flan: Replace half the milk with sweetened condensed milk for a richer, creamier version similar to Latin American flan. Reduce the sugar in the custard to ½ cup since condensed milk is already sweetened.
Individual Flavor Variations: Add different extracts like almond, maple, or rum in place of or in addition to vanilla. Start with ½ teaspoon of stronger flavors and adjust to taste.
Lighter Version: Use all 2% milk instead of the milk-cream combination and reduce to 4 whole eggs plus 2 egg whites. The texture will be slightly less rich but still delicious.
Large Flan: Instead of individual ramekins, use one 8-inch round baking dish or 9-inch pie plate. Increase baking time to 50-60 minutes and check for doneness the same way.
Pro Chef Tips
Master the caramel color: Professional pastry chefs know that caramel color directly correlates to flavor complexity. Cook it until it’s a deep amber—almost the color of mahogany. The darker (but not burnt) the caramel, the more complex and less cloyingly sweet it will taste. It should smell nutty and rich, not sharp or burnt.
Tempering is everything: The key to smooth custard without scrambled egg bits is proper tempering. Always add hot liquid to eggs slowly while whisking constantly, never the other way around. This gradually raises the egg temperature without cooking them. Rush this step and you’ll have sweet scrambled eggs.
Strain twice if needed: Restaurant kitchens often strain custard mixtures twice for absolute smoothness. If you see any foam or tiny egg bits after the first strain, pour through the strainer again. This extra step takes 30 seconds and makes a noticeable difference in the final texture.
The wobble test: Professional bakers check doneness by gently shaking the pan. The custard should wobble like firm Jell-O, not slosh like liquid or sit completely still like solid. The center should be slightly looser than the edges. When you tap the ramekin gently, you should see concentric ripples moving from the center.
Low and slow wins the race: Baking at a lower temperature (325°F) in a water bath creates the silkiest possible texture. Higher temperatures might save time, but they risk curdling and creating a grainy, tough custard with holes. Patience is key—gentle, even heat produces a custard that melts on your tongue.
Overnight is optimal: While you can serve Crème Caramel after 4 hours of chilling, overnight is when the magic happens. The custard fully sets, flavors meld and deepen, and the texture becomes even more luxurious. Professional pastry chefs always make these at least 24 hours ahead.
Unmolding confidence: The secret to clean unmolding is running your knife around the edge twice—once to loosen, then pull the custard away from the edge slightly to let air in. This breaks the seal and makes the custard slide out easily. If you’re nervous, let the inverted plate and ramekin sit for 1-2 minutes before lifting the ramekin—gravity helps.
Common Mistakes to Avoid
Mistake #1: Not cooking the caramel long enough. Pale, blonde caramel tastes one-dimensional and overly sweet. You need that deep amber color to develop the complex, slightly bitter notes that make caramel special. Many home cooks pull it off the heat too early because they’re nervous about burning it. Trust the process—watch for that rich mahogany color and nutty aroma. Remember, you can always practice making caramel separately before incorporating it into the recipe.
Mistake #2: Creating bubbles in the custard. Whisking too vigorously or too long introduces air bubbles that create holes in your finished custard. Mix only until ingredients are combined—this is custard, not meringue. If you do create foam, let the mixture rest for a few minutes, skim off the foam, and definitely strain before pouring into ramekins.
Mistake #3: Skipping or skimping on the water bath. Some people try to save time by baking without the water bath or don’t add enough water. This is a critical error. The water bath insulates the delicate custard, ensuring even, gentle cooking. Without it, you’ll get overcooked, rubbery edges and an undercooked center. The water should come halfway up the ramekins—measure before putting it in the oven to be sure.
Mistake #4: Overbaking the custards. This is perhaps the most common mistake. Overbaked custard becomes grainy, develops holes, and loses that signature silky texture. Remember that custard continues to cook from residual heat even after leaving the oven, so take it out when the center still has a slight wobble. It should jiggle, not slosh. When in doubt, pull it earlier rather than later.
Mistake #5: Trying to unmold the custards warm or too soon. Patience is essential. Custards need at least 4 hours (preferably overnight) in the refrigerator to fully set and develop proper structure. Attempting to unmold them too early will result in a puddle instead of a beautiful molded dessert. The caramel also needs time to liquefy slightly and create that gorgeous sauce—this happens during the chilling process.
Storage & Meal Prep
Refrigerator Storage: Crème Caramel stores beautifully in the refrigerator. Keep the custards unmolded in their ramekins, covered tightly with plastic wrap, for up to 4 days. In fact, they taste even better on days 2 and 3 as the flavors continue to develop. The caramel will continue to liquefy slightly over time, creating even more sauce. Once unmolded, the custards should be eaten within a few hours as they’ll begin to weep and the caramel sauce will spread.
Pre-Service Planning: For entertaining, unmold your Crème Caramels up to 2 hours before serving and keep them refrigerated. This allows any excess caramel to pool beautifully around the custard. However, don’t do this more than 2-3 hours in advance, as the custards can start to look weepy and the presentation isn’t as pristine.
Component Prep: You can make the caramel and coat the ramekins up to 2 days in advance. Store the caramel-coated ramekins at room temperature, covered loosely with plastic wrap. This actually works great because the hardened caramel has more time to develop flavor.
Traveling with Crème Caramel: If you need to transport these to a party, keep them unmolded in their ramekins in a cooler with ice packs. Unmold just before serving at your destination. This dessert is remarkably sturdy when kept chilled in its mold.
Make-Ahead & Freezer Notes
Make-Ahead Instructions: Crème Caramel is an ideal make-ahead dessert that actually benefits from advance preparation. You can make the entire dessert up to 3 days before serving. In fact, many professional pastry chefs insist that Crème Caramel tastes best when made 24-48 hours ahead, as this allows the custard to fully set and the caramel to develop a more liquid consistency that creates a better sauce. The flavors also meld and mellow beautifully over time.
For optimal make-ahead planning, bake your custards 1-3 days before your event. Let them cool completely, then cover each ramekin tightly with plastic wrap and refrigerate. The caramel will gradually liquefy, creating more of that gorgeous glossy sauce that pools around the unmolded custard. Unmold them 30 minutes to 2 hours before serving for the best presentation.
Freezing: Unlike many custard desserts, Crème Caramel can be frozen with some success, though the texture is slightly affected. To freeze, bake and cool the custards completely in their ramekins. Wrap each ramekin tightly in plastic wrap, then again in aluminum foil to prevent freezer burn. Freeze for up to 2 months. Thaw overnight in the refrigerator before unmolding and serving. The texture will be slightly less silky than fresh, and the caramel may separate somewhat, but it’s still quite good and certainly better than store-bought.
Best Serving Method: Crème Caramel should always be served cold or at cool room temperature, never warm. Remove from the refrigerator 10-15 minutes before serving to take the chill off slightly, which allows the flavors to be more pronounced.
Serving Suggestions
Crème Caramel is such an elegant dessert that it needs very little accompaniment, but here are some wonderful ways to enhance your presentation:
Simple Garnishes: A dollop of lightly sweetened whipped cream, a few fresh berries (strawberries, raspberries, or blueberries), a sprig of fresh mint, candied orange peel, or a light dusting of cocoa powder all complement the custard beautifully without overwhelming it.
Beverage Pairings: Serve with espresso, French press coffee, or a dessert wine like Sauternes or late-harvest Riesling. For a sophisticated dinner party, pair with a small glass of Cognac or Armagnac. Non-alcoholic options include strong black tea, chai, or a coffee drink like café au lait.
After What Meal: This rich dessert is best served after lighter main courses. It pairs beautifully following French dishes like coq au vin, beef bourguignon, or bouillabaisse. It’s also lovely after grilled fish, roasted chicken, or any meal where you want an elegant but not overly heavy finish. Because it’s quite rich despite its light texture, serve it after meals that aren’t cream-heavy.
Seasonal Adaptations: In summer, serve with fresh berries and maybe a berry coulis. In fall, add a touch of cinnamon to the custard and serve with caramelized apple slices. In winter, a splash of rum or brandy in the custard and a sprinkle of toasted nuts is lovely. In spring, pair with fresh strawberries and edible flowers.
Plating Ideas: For restaurant-style presentation, unmold the custard onto a white plate, then use the back of a spoon to artfully spread some of the caramel sauce in a swoosh across the plate. Add your garnish on the side rather than on top to showcase the glossy custard surface.
French Café Experience: Serve your Crème Caramel with a small pitcher of heavy cream on the side (very traditional in French cafés) along with crispy butter cookies or delicate langue de chat biscuits for textural contrast.
FAQs Section
Can I make Crème Caramel without a water bath?
While technically possible, it’s not recommended. The water bath (bain-marie) is essential for creating the signature silky texture of Crème Caramel. Without it, the custard cooks unevenly—the edges become rubbery and overcooked while the center remains undercooked. The gentle, even heat from the water bath is what creates that melt-in-your-mouth texture. If you’re worried about the hassle, know that it’s actually quite simple once you try it.Why did my caramel harden in the ramekins?
This is completely normal and exactly what should happen! The caramel hardens as it cools, creating a solid layer at the bottom of each ramekin. Don’t worry—it will liquify again during baking and chilling. The moisture from the custard and the heat from baking soften it, and it continues to liquify in the refrigerator, eventually becoming that beautiful glossy sauce that flows around the unmolded custard.My custard has tiny holes in it. What went wrong?
Holes in custard typically indicate one of three issues: overbaking (the most common cause), insufficient water bath depth, or oven temperature that’s too high. The custard should be removed from the oven when the center still jiggles slightly—it continues cooking from residual heat. Make sure your water bath comes halfway up the sides of the ramekins and that your oven temperature is accurate (use an oven thermometer to verify).Can I use a different type of milk?
Yes, with some modifications. You can use 2% milk instead of whole milk, though the custard will be slightly less rich. You could also use half-and-half instead of the milk-cream combination for an even richer result. However, avoid skim or 1% milk, which will produce a watery, less satisfying texture. For dairy-free versions, full-fat coconut milk works surprisingly well, though the flavor will obviously be different.What if my custard won’t unmold?
First, make sure you’ve run a knife around the edge to loosen it completely. Then try these tricks: dip the bottom of the ramekin in warm water for 10-15 seconds to slightly melt the caramel, which acts like a lubricant. Or let the inverted plate and ramekin sit for 2-3 minutes—sometimes gravity just needs time to work. As a last resort, you can serve it in the ramekin with a spoon—it still tastes delicious!Is there a difference between Crème Caramel and Flan?
They’re essentially the same dessert, though recipes vary slightly by region. French Crème Caramel typically uses a higher ratio of whole eggs and has a firmer texture. Latin American flan often includes sweetened condensed milk or evaporated milk and can be richer and sweeter. Spanish flan may include cinnamon or citrus zest. The technique and basic concept—custard with caramel sauce—remains the same across cultures.Can I make one large Crème Caramel instead of individual ones?
Absolutely! Use an 8-inch round cake pan or 9-inch deep-dish pie plate. Pour all the caramel into the bottom, then add all the custard. Bake in the water bath for 50-60 minutes (longer than individual ramekins because there’s more volume). Check for doneness the same way—it should wobble gently in the center. Unmolding a large one requires confidence and a large serving platter. Let it sit inverted for 3-5 minutes before lifting the pan.Conclusion
Congratulations—you now have everything you need to make perfect Crème Caramel right in your own kitchen! This stunning French dessert might seem intimidating at first, but once you make it a time or two, you’ll realize how straightforward it actually is. The combination of silky smooth custard and glossy caramel sauce creates a dessert experience that’s truly special and memorable.
The beauty of this recipe is that it looks and tastes like something from a fancy restaurant, but it uses simple ingredients you probably already have in your kitchen. Plus, because it’s make-ahead friendly, you can prepare it days in advance and just unmold when you’re ready to serve—no last-minute stress when you’re entertaining!
I hope you enjoy making this classic Crème Caramel as much as I do. There’s something so satisfying about that moment when you unmold the custard and watch the caramel cascade down the sides like liquid gold. It’s pure magic, and your guests will be absolutely impressed!
If you try this recipe, I’d love to hear how it turned out! Drop a comment below sharing your experience, any variations you tried, or questions you might have. And if you loved this Crème Caramel as much as I think you will, please share it on Pinterest so other home cooks can discover this wonderful dessert too.
Happy baking, and here’s to mastering the art of classic French pastry! 🍮✨