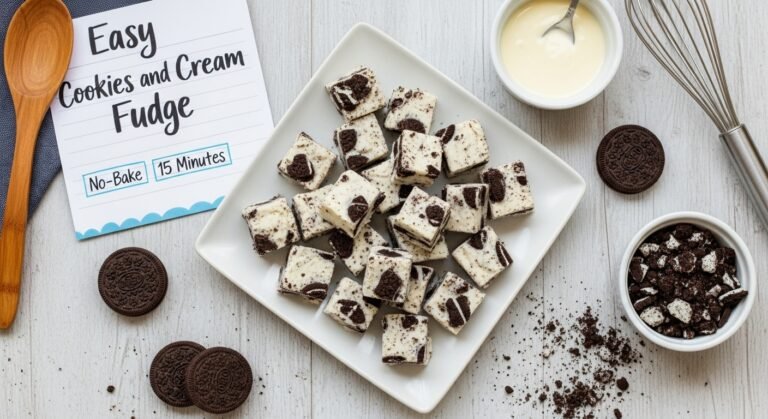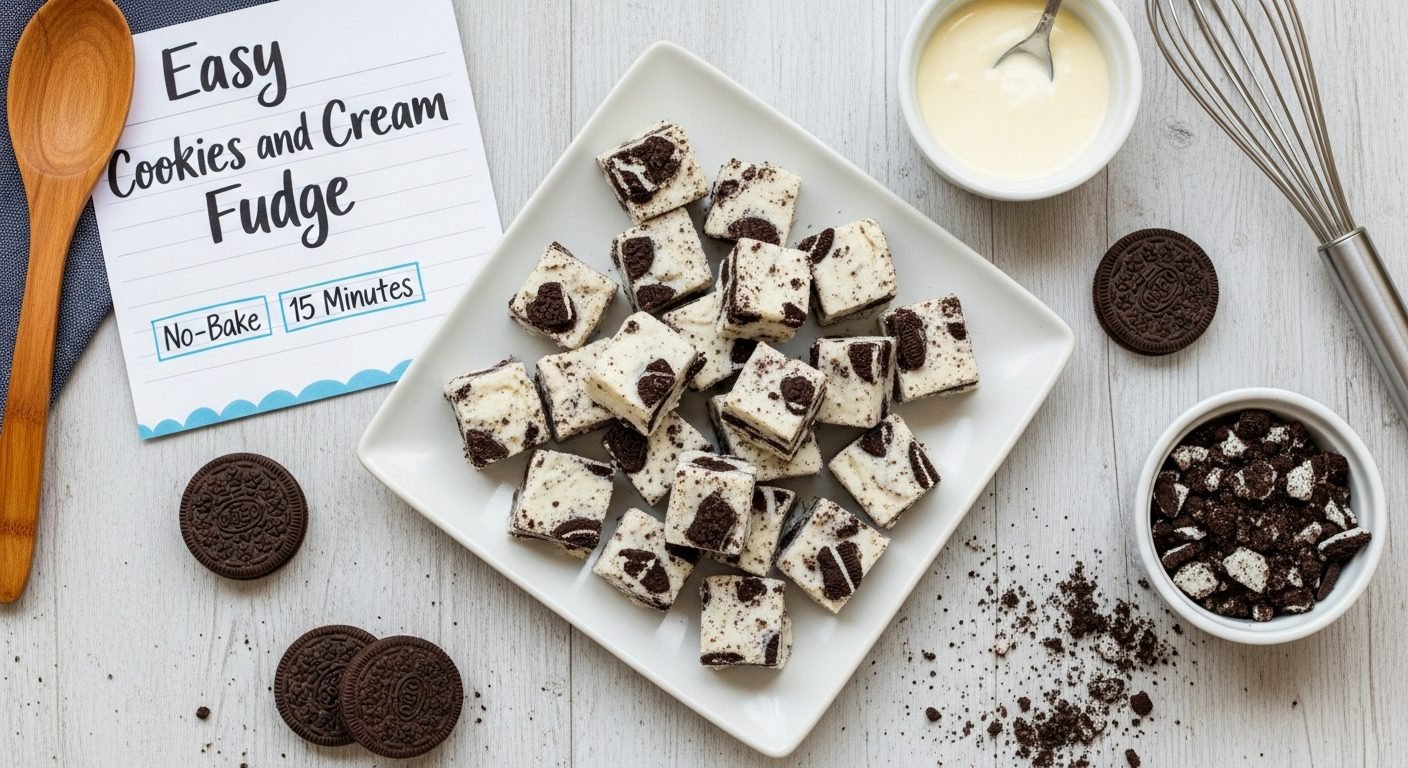
Easy Cookies and Cream Fudge Recipe – No-Bake Oreo Fudge in 15 Minutes!

The story of cookies and cream fudge is really a beautiful marriage of two beloved American classics: traditional fudge and Oreo cookies. To understand this decadent treat, we need to look at both components separately before seeing how they came together to create something magical.
Fudge itself has been an American favorite since the late 1800s, with its origin story rooted in happy accidents at East Coast women’s colleges. The confection quickly became a symbol of homemade American candy-making, with recipes passed down through generations and adapted countless times over the decades.
Oreo cookies, on the other hand, were introduced by Nabisco in 1912 and quickly became America’s best-selling cookie. The iconic chocolate wafers sandwiching sweet cream filling captured hearts (and taste buds) across the nation. The distinctive flavor combination was so popular that by the mid-20th century, “cookies and cream” had become its own recognized flavor profile.
The cookies and cream flavor explosion really took off in the 1970s and 1980s when ice cream manufacturers began incorporating crushed Oreos into vanilla ice cream bases. This flavor became so wildly popular that it inspired bakers and candy makers to incorporate the same combination into other desserts. By the 1990s, cookies and cream had infiltrated everything from cheesecakes to milkshakes to brownies.
Cookies and cream fudge emerged as part of this trend, combining the nostalgic appeal of homemade fudge with the irresistible flavor of Oreos. The recipe gained significant traction in the early 2000s as food bloggers and home bakers discovered how incredibly easy it was to make and how impressive it looked. The visual appeal of dark cookie pieces studded throughout pristine white fudge made it especially popular on Pinterest and Instagram, where beautiful food photography helped recipes go viral.
Today, cookies and cream fudge represents the evolution of traditional American candy-making – honoring classic techniques while embracing modern flavor combinations that speak to contemporary tastes. It’s become a staple at bake sales, holiday cookie exchanges, and homemade gift boxes, proving that sometimes the best innovations come from combining two beloved classics into something even more spectacular.
Why You’ll Love This Recipe
This cookies and cream fudge is about to become your secret weapon for every occasion that calls for a show-stopping dessert. The genius of this recipe lies in its perfect balance of simplicity and sophistication – it’s ridiculously easy to make, yet the results look and taste like you spent hours in the kitchen. There’s something incredibly satisfying about creating professional-quality candy with minimal effort and maximum flavor.
Here’s why this recipe will steal your heart:
- No candy thermometer required – Unlike traditional fudge recipes that demand precise temperature monitoring, this version is completely foolproof
- Ready in under 20 minutes – Just 15 minutes of active time means you can whip this up on a whim whenever cravings strike
- Only 5 ingredients – White chocolate chips, sweetened condensed milk, butter, vanilla, and Oreos – that’s all you need!
- Kid-friendly and fun – Children love helping crush the cookies and seeing them mixed into the fudge, making this a great family activity
- Visually stunning – The black and white contrast makes for a gorgeous presentation that photographs beautifully for social media
- No baking necessary – Your oven stays completely off, making this perfect for hot summer days or when your oven is occupied
- Budget-friendly indulgence – Makes a generous batch that serves a crowd without breaking the bank
- Universally loved – Cookies and cream is such a popular flavor that this fudge appeals to kids and adults alike
- Infinitely giftable – Package it in pretty tins or cellophane bags for impressive homemade gifts that people actually want to receive
- Customizable – Once you nail the basic recipe, you can experiment with different cookie varieties and mix-ins
Ingredient Notes
Let’s dive into the simple ingredient list that transforms into this spectacular treat, and explore why each component matters:
White Chocolate Chips – The foundation of your cookies and cream fudge, white chocolate chips (about 3 cups or 18 ounces) create that smooth, creamy base that makes fudge so irresistible. I strongly recommend using high-quality white chocolate chips that list cocoa butter as an ingredient rather than vegetable oils. Brands like Ghirardelli or Guittard work beautifully and melt smoothly. Avoid white candy melts or almond bark, as they lack the richness of real white chocolate and can result in a waxy texture. If you can only find white chocolate bars, simply chop them into small, uniform pieces for even melting.
Sweetened Condensed Milk – This is the magic ingredient that makes this recipe so foolproof! One 14-ounce can of sweetened condensed milk provides the perfect amount of sweetness and creaminess while helping the fudge achieve its ideal texture without requiring precise temperature control. Always use full-fat sweetened condensed milk for the richest results. Don’t confuse this with evaporated milk – they’re completely different products and aren’t interchangeable. The condensed milk also helps bind all the ingredients together and contributes to that signature smooth mouthfeel.
Unsalted Butter – Just a few tablespoons (typically 3-4 tablespoons) of butter add richness and contribute to the glossy, professional finish you want in premium fudge. Butter also helps achieve the perfect consistency and prevents the fudge from being too hard or too soft. I prefer unsalted butter because it allows you to control the overall flavor profile, but if you only have salted butter, it will work fine – you’ll just get a subtle salty-sweet combination that some people actually prefer with the cookies.
Pure Vanilla Extract – About 1-2 teaspoons of real vanilla extract enhances all the other flavors and adds depth to your fudge. Don’t skip this ingredient or substitute with imitation vanilla – the real thing makes a noticeable difference in the final flavor. The vanilla also helps balance the sweetness and complements both the white chocolate and the Oreos beautifully.
Oreo Cookies – The star of the show! You’ll need about 20-24 Oreo cookies (roughly 2 cups when crushed and chopped). I recommend using regular Oreos rather than Double Stuf or thin varieties for the best texture and appearance. You’ll want to create a variety of sizes – some fine crumbs for distribution throughout the fudge, and some larger chunks for visual appeal and texture contrast. You can use the food processor for some and hand-crush others for the perfect mix. While I love classic Oreos, feel free to experiment with flavored varieties like mint, peanut butter, or golden Oreos for fun variations.
Optional Add-Ins – While not traditional, you can customize your fudge with mini chocolate chips, crushed candy canes during the holidays, or even a drizzle of melted dark chocolate on top after it sets.
Equipment Needed
The beauty of this recipe is its simplicity – you won’t need any specialized candy-making equipment. Here’s your straightforward list:
- Medium saucepan – For melting your white chocolate mixture on the stovetop; a 2-3 quart size works perfectly
- 8×8-inch or 9×9-inch square baking pan – This size creates fudge pieces with ideal thickness for the best texture
- Parchment paper or aluminum foil – Essential for lining your pan and ensuring easy removal without sticking
- Wooden spoon or heat-resistant silicone spatula – For stirring your mixture as it melts smoothly
- Measuring cups and spoons – For accurate measurements of all ingredients
- Food processor or ziplock bag with rolling pin – For crushing your Oreos to various sizes
- Sharp knife – For cutting your finished fudge into neat, uniform squares
- Cutting board – To protect your countertop when slicing the fudge
- Mixing bowl – For holding your crushed cookies before adding to the fudge
Print

Cookies and Cream Fudge Recipe
This irresistible cookies and cream fudge combines smooth white chocolate with crunchy Oreo pieces for a no-bake treat that’s ready in minutes. Perfect for gifts, parties, or satisfying your sweet tooth!
- Total Time: 2 hours 18 minutes
- Yield: 40-48 pieces 1x
Ingredients
Scale- 3 cups (18 oz) white chocolate chips
- 1 can (14 oz) sweetened condensed milk
- 4 tablespoons unsalted butter
- 2 teaspoons pure vanilla extract
- 20-24 Oreo cookies (about 2 cups crushed and chopped)
- Pinch of salt (optional)
Instructions
- Prepare your pan: Line an 8×8-inch or 9×9-inch square baking pan with parchment paper, making sure to leave about 2 inches of overhang on two opposite sides. This creates handles for easy removal later. Lightly spray or butter the parchment paper. Set aside.
- Crush the Oreos: Place about 15 Oreos in a food processor and pulse until you have fine crumbs. Roughly chop the remaining 5-9 cookies by hand into larger chunks (about quarter-sized pieces). Keep these separate – you’ll add them at different times. The combination of fine crumbs and chunky pieces creates the best texture and appearance.
- Melt the base: In a medium saucepan over low heat, combine the white chocolate chips, sweetened condensed milk, and butter. Stir constantly with a wooden spoon or silicone spatula. This is crucial – constant stirring prevents scorching and ensures everything melts evenly.
- Watch it transform: Continue stirring over low heat for about 5-7 minutes until the white chocolate chips are completely melted and the mixture is smooth, glossy, and well combined. The mixture should be thick but pourable. Never rush this step by increasing the heat, as white chocolate can seize or become grainy if overheated.
- Add flavorings: Once completely smooth, remove the pan from heat. Immediately stir in the vanilla extract and a pinch of salt if using. Mix thoroughly to distribute the vanilla evenly throughout the mixture.
- Fold in Oreo crumbs: Add the fine Oreo crumbs (not the chunks yet) to the warm fudge mixture and stir until evenly distributed. The crumbs should be completely incorporated, creating a speckled appearance throughout the white chocolate base.
- Add chunky pieces: Gently fold in about three-quarters of the larger Oreo chunks, reserving some for topping. Don’t overmix – you want visible chunks of cookies throughout for that signature cookies and cream look.
- Pour and top: Immediately pour the fudge mixture into your prepared pan, using your spatula to spread it evenly into all corners and smooth the top. Press the reserved Oreo chunks into the top of the fudge for a beautiful presentation. Work quickly, as the fudge will begin to set as it cools.
- Cool completely: Allow the fudge to cool at room temperature for about 20-30 minutes, then transfer to the refrigerator to set completely for 2-3 hours. For best results, let it chill overnight for the firmest texture and cleanest cuts.
- Cut and serve: Once fully set, use the parchment paper overhang to lift the entire block of fudge out of the pan. Place on a cutting board and use a large, sharp knife to cut into squares. For the cleanest cuts, wipe your knife with a warm, damp cloth between each slice.
- Store properly: Layer your cookies and cream fudge pieces in an airtight container with parchment or wax paper between layers to prevent sticking.
Notes
- Temperature is key: Always use low heat when melting to prevent the white chocolate from seizing or separating.
- Cookie variety: While traditional Oreos work best, you can experiment with mint Oreos, peanut butter Oreos, or golden Oreos for fun variations.
- Texture tip: Don’t over-crush all your cookies – keeping some larger chunks creates better visual appeal and texture contrast.
- Clean cuts: For professional-looking squares, use a large sharp knife warmed in hot water and wiped dry between each cut.
- Setting time: If you’re in a hurry, place the pan in the freezer for 1 hour instead of refrigerating for 2-3 hours.
- Make it extra: Top with a drizzle of melted dark chocolate or extra crushed Oreos while the fudge is still warm for added flair.
- Prep Time: 12 minutes
- Cook Time: 6 minutes
- Category: Dessert, Candy, Confection
- Method: Stovetop, No-Bake
- Cuisine: American
- Diet: Vegetarian
Nutrition
- Serving Size: 1 piece (based on 48 pieces)
- Calories: 110
- Sugar: 14g
- Sodium: 45mg
- Fat: 5.5g
- Saturated Fat: 3.4g
- Unsaturated Fat: 2g
- Trans Fat: 0g
- Carbohydrates: 15g
- Fiber: 0.5g
- Protein: 1.5g
- Cholesterol: 6mg
Tips & Variations
One of the most exciting aspects of this cookies and cream fudge is how versatile it is. Here are creative ways to customize and personalize your fudge:
Cookie Variations:
- Mint Cookies and Cream: Use mint Oreos or add 1/2 teaspoon peppermint extract to the base for a refreshing twist
- Peanut Butter Oreo Fudge: Swap regular Oreos for peanut butter Oreos for a delicious PB & cookies combination
- Golden Oreo Fudge: Use golden Oreos for a vanilla-on-vanilla experience with a lighter appearance
- Birthday Cake Fudge: Use birthday cake Oreos and add rainbow sprinkles for a festive treat
- Red Velvet Fudge: Incorporate red velvet Oreos for a gorgeous color and unique flavor
Texture Add-Ins:
- Mix in 1/2 cup mini chocolate chips along with the Oreos for extra chocolate bursts
- Add 1/2 cup chopped pecans or walnuts for additional crunch and sophistication
- Swirl in 1/4 cup of chocolate sauce or caramel before setting for a marbled effect
- Layer half the fudge mixture, add a row of whole Oreos, then top with remaining mixture
- Fold in mini marshmallows for a fun Rocky Road-inspired variation
Presentation Ideas:
- Drizzle melted dark or milk chocolate over the top in a zigzag pattern after the fudge sets
- Dust the top with powdered sugar for an elegant, snow-like finish
- Press whole Oreo cookies into the top in a decorative pattern before cooling
- Cut into different shapes using cookie cutters for special occasions
- Add edible gold leaf or luster dust for an upscale presentation
Seasonal Twists:
- Halloween: Use chocolate orange Oreos and add orange food coloring to the base
- Christmas: Use peppermint Oreos and add crushed candy canes on top
- Valentine’s Day: Add a few drops of pink food coloring and use strawberry cream Oreos
- Easter: Top with pastel-colored mini chocolate eggs or spring sprinkles
Pro Chef Tips
These insider secrets will take your cookies and cream fudge from delicious to absolutely extraordinary:
Master the melt: The single most important factor in perfect fudge is temperature control. White chocolate is incredibly sensitive to heat and can go from perfectly smooth to grainy and seized in seconds. Always use the lowest heat setting on your stove and never walk away while melting. If you see any signs of the mixture becoming lumpy or separating, immediately remove it from heat and stir vigorously. Sometimes you can save it by adding a tablespoon of warm cream and stirring until smooth again.
Cookie crushing strategy: The secret to professional-looking cookies and cream fudge is in how you handle the Oreos. Create a mix of textures: pulse some in a food processor until they’re fine crumbs (these distribute throughout and color the base), hand-chop some into medium pieces (these provide texture), and leave some in larger chunks (these create visual appeal on top). This variety ensures every bite has the perfect balance of smooth fudge and crunchy cookie.
The fold, don’t stir rule: When adding your crushed Oreos to the fudge mixture, use a gentle folding motion rather than vigorous stirring. This prevents the cookies from breaking down too much and keeps those beautiful chunks intact. It also helps maintain some marbling rather than turning the entire mixture gray from over-mixing.
Quick work pays off: Once your fudge mixture is ready, work quickly but deliberately. The mixture begins to set as it cools, so have your pan prepared, your Oreos crushed, and your tools ready before you even start melting. The faster you can get everything mixed and poured, the smoother your final product will be.
The tap and smooth technique: After pouring your fudge into the pan, lift the pan about 2 inches off the counter and drop it firmly several times. This releases air bubbles and helps the mixture settle evenly. Then use an offset spatula dipped in hot water (and dried) to smooth the top in long, even strokes. This creates that professional, glass-smooth surface.
Temperature patience equals clean cuts: The difference between mediocre-looking fudge and professional-looking fudge often comes down to patience. Let your fudge set completely – ideally overnight in the refrigerator – before cutting. When it’s time to cut, bring it to room temperature for about 10 minutes (this prevents cracking), then use a large chef’s knife that you’ve warmed in hot water and dried thoroughly. Make one cut, wipe the blade clean with a warm damp towel, warm it again, and repeat. Yes, it’s tedious, but the perfectly clean squares are worth it.
Storage trick for lasting freshness: White chocolate fudge can develop a white bloom (sugar or fat crystals rising to the surface) if stored improperly. To prevent this, always let your fudge come to room temperature before storing in an airtight container, and add a piece of parchment between the fudge and the container lid to absorb any condensation.
Common Mistakes to Avoid
Even simple recipes have potential pitfalls. Here’s how to sidestep the most common cookies and cream fudge mistakes:
Mistake #1: Overheating the White Chocolate – This is by far the most common error and the hardest to fix. White chocolate contains more milk solids than dark chocolate, making it especially prone to seizing (becoming thick, grainy, and clumpy) when overheated. If your heat is too high or you melt it too quickly, the chocolate proteins will clump together and create a grainy texture that can’t be fully corrected. Solution: Always use the lowest heat setting and stir constantly. Be patient – it’s better to take 10 minutes to melt chocolate properly than to rush it and ruin your entire batch.
Mistake #2: Adding Cookies Too Early – If you add Oreos to the mixture while it’s still on the heat or immediately after removing it, the residual heat can make them soggy and cause them to disintegrate into the fudge, creating a muddy appearance rather than distinct cookie pieces. Solution: Let the fudge mixture cool for about 30-60 seconds after removing from heat before folding in your cookies. This brief cooling period helps preserve the cookie texture and appearance.
Mistake #3: Over-Crushing Everything – When all the Oreos are pulverized into fine dust, you lose the visual appeal and textural contrast that makes cookies and cream fudge special. The fudge can end up looking uniformly gray with no distinct cookie pieces visible. Solution: As mentioned in the pro tips, create a variety of sizes – fine crumbs, medium chunks, and larger pieces – for the best appearance and texture.
Mistake #4: Not Lining the Pan Properly – Attempting to remove fudge from an unlined or improperly lined pan often results in broken pieces and frustration. Even with greasing, the sticky fudge can be difficult to remove cleanly. Solution: Always line your pan with parchment paper or aluminum foil with at least 2 inches of overhang on opposite sides. This creates easy-to-grab handles that let you lift the entire block out in one piece.
Mistake #5: Cutting Before Fully Set – Warm or partially set fudge won’t cut cleanly and will instead squish under your knife, creating messy, uneven pieces that stick to your blade. Solution: Resist the temptation to cut your fudge early. Wait until it’s completely firm – at least 2-3 hours in the refrigerator, or ideally overnight. When you do cut, use a sharp knife warmed in hot water and wiped dry for the cleanest edges.
Mistake #6: Using Low-Quality Chocolate – White candy melts or white almond bark may seem like convenient substitutes for white chocolate chips, but they create an entirely different product. These coating products have a waxy texture and artificial taste that can’t compare to real white chocolate. Solution: Invest in quality white chocolate chips or bars that list cocoa butter in the ingredients. The difference in flavor and texture is dramatic and worth the extra dollar or two.
Storage & Meal Prep
Proper storage keeps your cookies and cream fudge tasting fresh and maintaining its perfect texture:
Room Temperature Storage: If your home is cool and dry (below 70°F), you can store cookies and cream fudge at room temperature in an airtight container for up to 5 days. Layer the pieces with parchment or wax paper between them to prevent sticking. Keep the container away from direct sunlight, heat sources, and humidity. This method works well if you’re planning to serve or gift the fudge within a few days and want it to maintain a softer, more immediately enjoyable texture.
Refrigerator Storage: For longer-term storage or in warmer climates, refrigeration is your best bet. Store in an airtight container with parchment paper between layers for up to 3 weeks. The fudge will become quite firm when chilled, so for the best eating experience, remove it from the refrigerator and let it sit at room temperature for 10-15 minutes before serving. This allows the texture to soften slightly and brings out the full flavor of both the white chocolate and the Oreos. Refrigeration is especially important during summer months or if your kitchen tends to be warm.
Preventing Cookie Softness: One challenge with cookies and cream fudge is that the Oreo pieces can sometimes absorb moisture from the fudge and lose their crunch over time. To minimize this, make sure your fudge is completely cool before storing, always use an airtight container, and if possible, add a food-safe silica gel packet (the kind found in vitamin bottles) to your storage container to absorb excess moisture. Just ensure the packet doesn’t directly touch the fudge pieces.
Preventing White Bloom: White chocolate can sometimes develop a whitish coating called bloom when temperature fluctuations cause fat or sugar crystals to migrate to the surface. While harmless, it’s not attractive. Prevent this by storing at a consistent temperature and always letting refrigerated fudge come to room temperature slowly (don’t microwave or heat it) before serving.
Make-Ahead & Freezer Notes
Cookies and cream fudge is an excellent candidate for advance preparation, making it perfect for holiday planning or having homemade treats ready whenever you need them:
Make-Ahead Timeline: This fudge actually benefits from being made ahead! The flavors meld together beautifully, and the texture firms up perfectly when given time. You can make it up to 3 weeks in advance if stored in the refrigerator, or up to 3 months if frozen. This makes it ideal for holiday baking marathons, gift-giving preparations, or simply having a special treat on hand for unexpected guests or personal cravings.
Freezing Instructions: Cookies and cream fudge freezes exceptionally well with proper technique. Once your fudge is completely set and cut into pieces, place them in a single layer on a parchment-lined baking sheet. Freeze until solid (about 1-2 hours), then transfer the frozen pieces to a freezer-safe container or heavy-duty freezer bags. Layer the pieces with parchment or wax paper to prevent them from sticking together. For extra protection against freezer burn, you can individually wrap each piece in plastic wrap before placing in the container. Properly stored, frozen fudge maintains excellent quality for up to 3 months.
Thawing Method: The key to perfect texture after freezing is slow, gradual thawing. Transfer the amount of fudge you want to enjoy from the freezer to the refrigerator and let it thaw overnight. This slow thawing prevents condensation from forming on the surface and keeps the texture smooth. If you need fudge more quickly, you can let it sit at room temperature for 1-2 hours, but refrigerator thawing is gentler and produces better results. Never microwave frozen fudge to thaw it, as this can cause the chocolate to separate and become grainy.
Gifting Strategy: One of my favorite tricks is to make a large batch of cookies and cream fudge, cut it into gift-sized portions, individually wrap each portion in plastic wrap and then decorative cellophane or wax paper, and freeze them. When you need a last-minute gift, hostess offering, or contribution to a potluck, simply pull out a wrapped portion and let it thaw. It looks thoughtful and homemade because it is, but you’ve done all the work in advance!
Quality Notes: While frozen fudge maintains its flavor well, the Oreo pieces may lose a tiny bit of their crunch after freezing and thawing. The difference is minimal and most people won’t notice, but if you’re particularly concerned about cookie texture, you might prefer refrigerator storage for shorter periods rather than freezing.
Serving Suggestions
While cookies and cream fudge is absolutely perfect on its own, here are creative ways to serve and present this irresistible treat:
Dessert Presentations:
- Arrange on a tiered dessert stand with other black-and-white treats like brownies and chocolate cookies for an elegant monochromatic display
- Serve as petit fours after dinner alongside coffee and tea for a sophisticated touch
- Create a dessert charcuterie board featuring the fudge alongside fresh berries, chocolate-covered strawberries, and gourmet chocolates
- Crumble pieces over vanilla ice cream for a deconstructed cookies and cream sundae
- Use as a garnish on top of chocolate or vanilla cupcakes
Beverage Pairings:
- Ice-cold whole milk – the classic pairing that never disappoints
- Hot chocolate topped with whipped cream – double the chocolate indulgence
- Strong espresso or black coffee – the slight bitterness balances the sweet fudge perfectly
- Vanilla milkshakes – blend pieces right into the shake for an extra-rich treat
- Dessert wines like cream sherry or late-harvest Riesling
- Irish cream liqueur or coffee liqueur for adults-only gatherings
Party and Gift Ideas:
- Package in clear cellophane bags tied with black and white ribbons for birthday party favors
- Arrange in decorative tins lined with tissue paper for holiday gifts
- Create a “cookie bar” dessert table featuring various cookie-based treats with this fudge as the centerpiece
- Cut into small pieces and serve on a platter with toothpicks for easy party snacking
- Include in dessert grazing boxes for special events or celebrations
Themed Presentations:
- Game day: Cut into small squares and serve alongside other finger foods
- Movie night: Place a platter on the coffee table with popcorn and other movie snacks
- Kids’ parties: Serve with other Oreo-themed treats like Oreo truffles or Oreo cheesecake
- Bridal or baby showers: Cut into elegant small squares and dust with edible pearl dust for sophistication
- Holiday cookie exchanges: Package in festive boxes with labels noting that it’s no-bake
Mix with Other Treats: This fudge plays beautifully with others! Consider creating combination dessert platters featuring cookies and cream fudge alongside chocolate chip cookies, peanut butter fudge, chocolate-covered pretzels, caramel corn, and mixed nuts for a well-rounded selection of sweets and salty-sweet treats.
FAQs Section
Q: Can I use a different type of cookie instead of Oreos? A: Absolutely! While Oreos create the classic cookies and cream flavor, you can experiment with other sandwich cookies. Chocolate chip cookies create a different but delicious texture, Nutter Butters make an amazing peanut butter version, and Vienna Fingers or Golden Oreos create a vanilla-on-vanilla experience. Just keep in mind that the visual contrast of chocolate cookies in white fudge is part of what makes this recipe so stunning, so lighter cookies will look different (though still tasty!).
Q: My fudge turned out grainy instead of smooth. What happened? A: Graininess in fudge is almost always caused by overheating the white chocolate. White chocolate has a lower melting point than dark chocolate and contains more milk solids, making it prone to seizing if heated too quickly or at too high a temperature. The proteins and sugars separate, creating that unpleasant grainy texture. Unfortunately, once white chocolate seizes, it’s difficult to fix completely. The best prevention is using low heat, stirring constantly, and being patient with the melting process. In the future, consider using a double boiler for even gentler heat control.
Q: Can I make this in the microwave instead of on the stovetop? A: Yes! Microwave method works well for this recipe. Combine the white chocolate chips, sweetened condensed milk, and butter in a large microwave-safe bowl. Microwave in 30-second intervals at 50% power, stirring thoroughly between each interval. This usually takes 2-3 minutes total. The key is using reduced power and short intervals to prevent overheating. Once melted and smooth, proceed with adding vanilla and Oreos as directed. Some people actually find the microwave method easier because they have more control over the heating process.
Q: How do I prevent the Oreos from getting soggy in the fudge? A: While some softening is natural as the cookies absorb a bit of moisture from the fudge, you can minimize this by: (1) letting the fudge mixture cool for 30-60 seconds after removing from heat before adding cookies, (2) storing the finished fudge in an airtight container with minimal air exposure, (3) adding a food-safe silica packet to your storage container, and (4) consuming the fudge within 1-2 weeks for maximum cookie crunch. The pieces you press into the top of the fudge will stay crunchier than those folded throughout the mixture.
Q: Why won’t my fudge set properly? A: If your fudge remains soft after several hours in the refrigerator, a few things could be wrong: (1) The mixture was overheated, causing the chocolate to separate – the oils won’t re-solidify properly, (2) You didn’t use enough white chocolate relative to the condensed milk – the ratio needs to be correct for proper setting, (3) You used low-quality white chocolate or candy melts that don’t contain real cocoa butter, or (4) Your refrigerator isn’t cold enough. Try adding the pan to the freezer for 2 hours to see if that helps. If it still won’t set, you can try remelting and adding another cup of white chocolate chips, but prevention is easier than correction.
Q: Can I make this recipe dairy-free or vegan? A: This is challenging because both white chocolate and sweetened condensed milk are dairy-based. However, you can try using dairy-free white chocolate chips (brands like Enjoy Life make them) and coconut sweetened condensed milk. The texture and flavor will be different from the traditional version, and you’ll need to experiment with the ratios as these substitutes don’t behave identically to their dairy counterparts. Some people have success with this swap, while others find the texture doesn’t quite match the original.
Q: How far in advance can I make this for a party or as gifts? A: This is one of the best make-ahead desserts! You can make cookies and cream fudge up to 3 weeks in advance if stored in the refrigerator in an airtight container, or up to 3 months in advance if frozen. For gifting, I recommend making it no more than 1-2 weeks ahead and keeping it refrigerated until you’re ready to package it. The Oreos maintain better texture when the fudge is fresher. If freezing for later gifting, thaw in the refrigerator overnight before packaging.
Q: What’s the best way to cut perfect squares? A: Professional-looking cuts require the right technique: (1) Make sure your fudge is completely set and cold, (2) Remove