The Ultimate Cookies and Cream Cake Recipe: Decadent, Easy, and Crowd-Pleasing
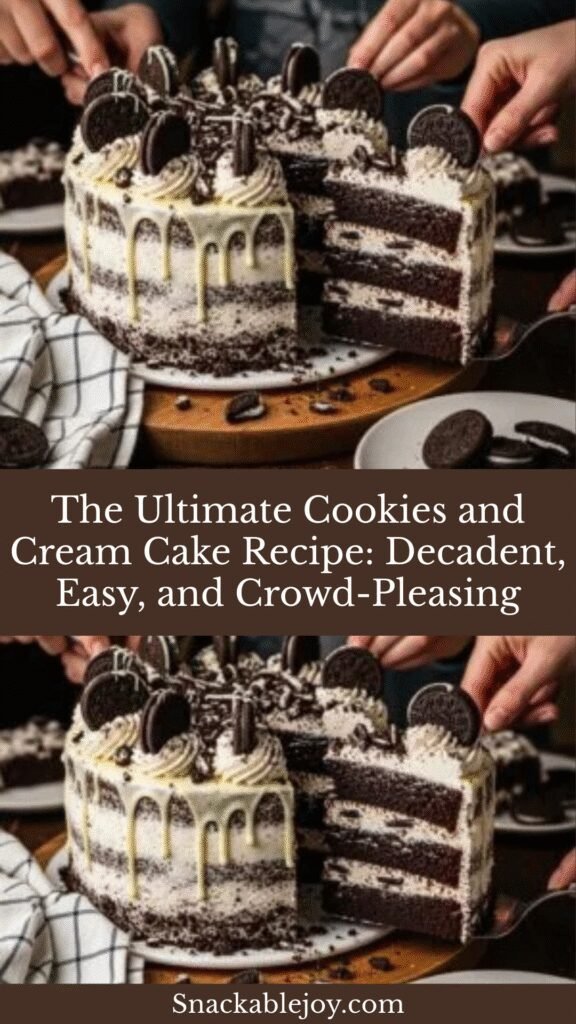
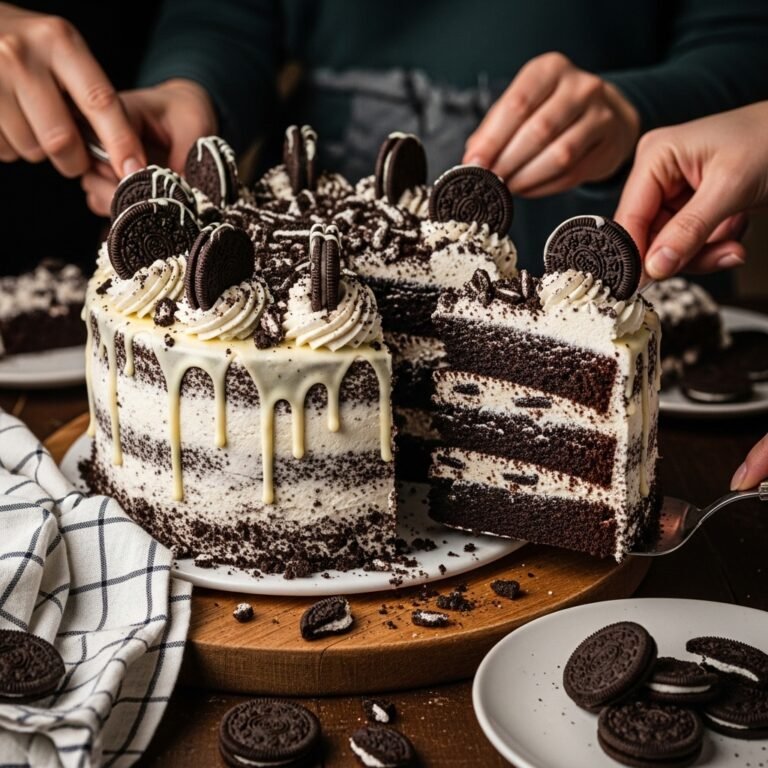
If you’re searching for a show-stopping dessert that combines the nostalgic flavor of Oreo cookies with the elegance of a homemade layer cake, this Cookies and Cream Cake is exactly what you need. This spectacular dessert features moist, tender vanilla cake layers generously studded with crushed Oreo cookies, all wrapped in a silky-smooth cookies and cream buttercream frosting. It’s the perfect centerpiece for birthday celebrations, potlucks, holiday gatherings, or any time you want to impress your guests without spending all day in the kitchen.
What makes this cake truly special is how it balances sophisticated presentation with familiar, comforting flavors. The Oreo cookies provide delightful texture throughout the cake while infusing every bite with that distinctive chocolate-vanilla combination we all love. Whether you’re an experienced baker or just starting your cake-making journey, this recipe breaks down each step so clearly that you’ll feel confident creating a bakery-quality dessert right in your own kitchen. The best part? While it looks incredibly impressive, it’s actually quite forgiving and comes together more easily than you might think.
History / Background
The Cookies and Cream flavor combination has become an American classic since Oreo cookies were first introduced by Nabisco in 1912. Originally called “Oreo Biscuits,” these iconic sandwich cookies were created in New York City and quickly became the best-selling cookie in the United States. For decades, Oreos were enjoyed simply as a cookie—dunked in milk, twisted apart, or eaten whole—but creative home bakers began incorporating them into other desserts in the mid-20th century.
The evolution of Cookies and Cream as a distinct dessert flavor really took off in the 1970s and 1980s when ice cream manufacturers began adding crushed Oreos to vanilla ice cream, creating the now-ubiquitous “cookies and cream” flavor. This sparked a culinary revolution, inspiring bakers across America to incorporate Oreos into cheesecakes, brownies, milkshakes, and eventually, layer cakes.
The Cookies and Cream Cake as we know it today emerged from this creative period of American baking, combining traditional layer cake techniques with the playful, crowd-pleasing appeal of Oreo cookies. It represents the perfect marriage of homestyle baking tradition and modern flavor innovation. While you won’t find this cake in vintage cookbooks from the early 1900s, it has quickly become a contemporary classic that’s now a staple at American birthday parties, celebrations, and family gatherings. The recipe continues to evolve as home bakers add their own creative twists, but the core concept—tender cake studded with Oreo pieces and frosted with cookies and cream buttercream—remains wonderfully consistent.
Why You’ll Love This Recipe
This Cookies and Cream Cake has earned its place as a reader favorite on countless food blogs, and once you make it, you’ll understand why it generates so much enthusiasm. The combination of flavors and textures creates an eating experience that appeals to kids and adults alike, making it the ultimate crowd-pleaser for any occasion.
Here’s why this recipe deserves a permanent spot in your baking rotation:
- Universally loved flavor – Oreos are America’s favorite cookie, so this cake is practically guaranteed to be a hit with everyone from toddlers to grandparents
- Surprisingly simple – Despite its impressive appearance, this cake uses straightforward techniques that don’t require professional pastry skills
- Customizable sweetness – You can adjust the amount of frosting and cookie pieces to suit your taste preferences
- Perfect texture contrast – The soft, fluffy cake paired with crunchy cookie bits creates an irresistible textural experience
- Budget-friendly indulgence – You don’t need expensive ingredients or specialty items to create this bakery-worthy dessert
- Flexible serving size – This recipe works beautifully as a two-layer 9-inch cake (serves 12-14) or can be adapted to different pan sizes
- Make-ahead friendly – The cake layers can be baked in advance and frozen, making party prep much easier
- Visually stunning – The dramatic black-and-white appearance looks gorgeous on a dessert table and photographs beautifully for social media
- No artificial flavoring needed – The Oreos provide all the cookies and cream flavor naturally, without any need for extracts or artificial ingredients
- Endlessly adaptable – Once you master the basic recipe, you can easily create variations with different cookie types or flavored frostings
Ingredient Notes
Understanding your ingredients helps you make smart substitutions and troubleshoot potential issues. Here’s what you need to know about the key components of this Cookies and Cream Cake:
All-Purpose Flour – Provides the structure for your cake layers. I recommend measuring by weight if possible (spooning and leveling if using cups) to avoid dense cake. Cake flour can be substituted for an even more tender crumb—use 2 cups plus 2 tablespoons of cake flour for every 2 cups of all-purpose flour.
Granulated Sugar – Sweetens the cake and helps create a tender crumb by interfering with gluten development. Don’t reduce the sugar significantly, as it also affects the cake’s moisture and texture.
Butter (Unsalted) – Provides flavor and richness. Always use unsalted butter so you can control the salt level. The butter should be at room temperature (around 65-68°F) for proper creaming. European-style butter with higher fat content will create an even richer cake.
Eggs (Large) – Add structure, moisture, and richness. Room temperature eggs incorporate more easily into the batter. If your eggs are cold, place them in warm water for 5-10 minutes before using.
Buttermilk – Creates the most tender, moist cake with a subtle tang that balances the sweetness. If you don’t have buttermilk, make a substitute by adding 1 tablespoon of white vinegar or lemon juice to 1 cup of regular milk and letting it sit for 5 minutes.
Vegetable Oil – Keeps the cake incredibly moist even after refrigeration. Unlike butter, oil remains liquid at cool temperatures, preventing the cake from becoming dry when chilled.
Vanilla Extract – Use pure vanilla extract rather than imitation for the best flavor. The vanilla enhances the overall taste without competing with the Oreo flavor.
Baking Powder and Baking Soda – These leavening agents work together to create a light, fluffy texture. Make sure they’re fresh (less than 6 months old) for maximum lift.
Oreo Cookies – The star ingredient! You’ll need about 24-30 cookies total—some crushed into the batter, some crushed into the frosting, and some left whole or halved for decoration. Regular Oreos work best; avoid Double Stuf as they can make the frosting too dark and affect texture.
Powdered Sugar – Creates a smooth, sweet frosting. Sift it if it has lumps to avoid a grainy texture in your buttercream.
Heavy Cream – Adds richness to the buttercream and helps achieve the perfect spreading consistency. Whole milk can work in a pinch, but heavy cream creates superior flavor and texture.
Equipment Needed
Having the right tools makes baking this cake much easier and ensures better results. Here’s everything you’ll need:
- Two 9-inch round cake pans – For creating classic layer cake. Make sure they’re at least 2 inches deep.
- Parchment paper – Line the bottom of your pans to prevent sticking and ensure easy cake removal.
- Stand mixer or hand mixer – Essential for properly creaming butter and sugar, and for making smooth buttercream frosting.
- Medium and large mixing bowls – For combining dry ingredients and wet ingredients separately.
- Rubber spatula – For scraping down bowl sides and folding ingredients gently.
- Wire cooling racks – Allow air to circulate around the cakes for even cooling and prevent soggy bottoms.
- Offset spatula – Makes frosting the cake layers much easier and creates a professional-looking finish.
- Cake turntable (optional but helpful) – Rotating the cake while frosting creates more even coverage.
- Bench scraper or straight-edge spatula – For creating smooth sides on your frosted cake.
- Food processor or rolling pin with ziplock bag – For crushing Oreo cookies to the right consistency.
- Measuring cups and spoons – Accurate measurements are crucial in baking.
- Toothpicks – For testing cake doneness.
- Cake leveler or serrated knife – For trimming dome tops to create flat, even layers.
- Piping bag and decorating tips (optional) – If you want to add decorative frosting borders or rosettes.
Print

Cookies and Cream Cake Recipe
This stunning Cookies and Cream Cake features moist vanilla cake layers loaded with crushed Oreos and covered in silky cookies and cream buttercream frosting. Perfect for birthdays, celebrations, or any time you want to impress with a homemade dessert that tastes as amazing as it looks.
- Total Time: 1 hour 58 minutes (includes cooling)
- Yield: 12-14 servings 1x
Ingredients
ScaleFor the Cake Layers:
- 2 ¾ cups all-purpose flour
- 1 ½ cups granulated sugar
- ½ cup unsalted butter, room temperature
- ½ cup vegetable oil
- 4 large eggs, room temperature
- 1 cup buttermilk, room temperature
- 2 teaspoons pure vanilla extract
- 1 tablespoon baking powder
- ½ teaspoon baking soda
- ¾ teaspoon salt
- 15 Oreo cookies, coarsely crushed (about 1 ½ cups crushed)
For the Cookies and Cream Buttercream:
- 1 ½ cups unsalted butter, room temperature
- 6 cups powdered sugar, sifted
- ⅓ cup heavy cream
- 2 teaspoons pure vanilla extract
- ¼ teaspoon salt
- 15 Oreo cookies, finely crushed (about 1 ¼ cups crushed)
- 6-8 whole Oreo cookies for decoration
Instructions
Prepare the Cake Pans:
- Preheat your oven to 350°F (175°C). Grease two 9-inch round cake pans generously with butter or non-stick spray, then line the bottoms with parchment paper circles. Grease the parchment as well. This double insurance ensures your cakes will release perfectly.
Mix the Dry Ingredients: 2. In a medium bowl, whisk together the flour, baking powder, baking soda, and salt. Set this aside—you’ll add it to the wet ingredients later.
Cream Butter and Sugar: 3. In the bowl of your stand mixer (or large bowl if using a hand mixer), beat the room-temperature butter and sugar together on medium-high speed for 3-4 minutes. The mixture should become pale, fluffy, and increased in volume. This creaming process incorporates air that helps create a light cake texture, so don’t rush this step.
Add Eggs and Oil: 4. Reduce mixer speed to medium-low and add eggs one at a time, beating well after each addition and scraping down the bowl sides as needed. Pour in the vegetable oil and vanilla extract, mixing until fully incorporated. The batter may look slightly separated—this is normal and will come together when you add the flour.
Alternate Dry and Wet Ingredients: 5. With the mixer on low speed, add the flour mixture in three additions, alternating with the buttermilk in two additions. Begin and end with flour mixture. Mix each addition just until the flour streaks disappear—overmixing develops gluten and creates tough cake. The pattern is: flour, buttermilk, flour, buttermilk, flour.
Fold in Crushed Oreos: 6. Remove the bowl from the mixer and use a rubber spatula to gently fold in the coarsely crushed Oreos. Make sure they’re evenly distributed throughout the batter, but be careful not to overmix.
Bake the Cakes: 7. Divide the batter evenly between your prepared pans (I recommend using a kitchen scale for accuracy—each pan should have about 650-700g of batter). Smooth the tops with your spatula. Bake for 28-32 minutes, or until a toothpick inserted into the center comes out with just a few moist crumbs (not wet batter). The cake tops should spring back when lightly pressed.
Cool Completely: 8. Remove cakes from the oven and let them cool in the pans for 15 minutes on wire racks. This rest period helps the cakes set up so they won’t break when removed from the pans. After 15 minutes, run a knife around the edges, invert onto the cooling racks, peel off the parchment paper, and let cool completely (about 1 hour). The cakes must be completely cool before frosting, or the buttercream will melt.
Make the Buttercream: 9. While the cakes cool, prepare your frosting. In a clean stand mixer bowl, beat the room-temperature butter on medium speed for 2-3 minutes until creamy and smooth. Reduce speed to low and gradually add the sifted powdered sugar, one cup at a time, beating well after each addition.
Add Cream and Flavoring: 10. Once all the powdered sugar is incorporated, add the heavy cream, vanilla extract, and salt. Increase mixer speed to medium-high and beat for 3-4 minutes until the frosting becomes light, fluffy, and increased in volume. The frosting should hold stiff peaks.
Add Crushed Oreos to Frosting: 11. With the mixer on low speed (or by hand with a spatula), fold in the finely crushed Oreos. The frosting will turn a lovely speckled gray color. If it seems too thick, add a tablespoon of cream at a time until you reach your desired consistency.
Level and Layer: 12. If your cake layers have domed tops, use a cake leveler or long serrated knife to trim them flat. Place your first cake layer on a serving plate or cake board. If desired, place strips of parchment paper under the edges to keep your plate clean while frosting—you can remove them when finished.
Frost the Cake: 13. Spread about 1 cup of buttercream evenly over the first layer, going right to the edges. Place the second cake layer on top, cut side down. Apply a thin “crumb coat” of frosting over the entire cake—this seals in crumbs and creates a smooth base. Refrigerate for 15-20 minutes to set the crumb coat.
Final Frosting and Decoration: 14. Remove the cake from the refrigerator and apply the remaining frosting, smoothing it with an offset spatula. For clean sides, hold a bench scraper or straight-edge spatula against the side while slowly rotating the cake (this is where a turntable really helps). Decorate the top and sides with whole or halved Oreo cookies, pressing them gently into the frosting.
Chill and Serve: 15. Refrigerate the finished cake for at least 30 minutes before slicing—this sets the frosting and makes cutting much neater. For best flavor and texture, remove the cake from the refrigerator 20-30 minutes before serving so the frosting can soften slightly. Slice with a sharp knife, wiping it clean between cuts for beautiful, professional-looking slices.
Notes
- Room temperature ingredients are crucial – Cold eggs and buttermilk won’t incorporate properly, potentially creating a dense cake. Plan ahead and take them out of the refrigerator 1-2 hours before baking.
- Don’t overmix the batter – Once you add the flour, mix just until combined. Overmixing develops gluten, which creates tough, rubbery cake instead of tender crumb.
- Crush Oreos to different consistencies – For the cake, leave some larger pieces for texture. For the frosting, crush more finely so it spreads smoothly without lumps.
- Frosting consistency matters – If your buttercream is too stiff to spread easily, add cream one tablespoon at a time. If it’s too soft, add more powdered sugar or refrigerate briefly.
- Cake is best served at cool room temperature – The frosting needs to be chilled to hold its shape, but the cake tastes best when not ice-cold from the refrigerator.
- Prep Time: 30 minutes
- Cook Time: 28 minutes
- Category: Desert
- Method: Baking
- Cuisine: American
- Diet: Vegetarian
Nutrition
- Serving Size: 1 slice (1/14 of cake)
- Calories: 625
- Sugar: 68g
- Sodium: 320mg
- Fat: 32g
- Saturated Fat: 18g
- Unsaturated Fat: 12g
- Trans Fat: 0.5g
- Carbohydrates: 82g
- Fiber: 1g
- Protein: 5g
- Cholesterol: 115mg
Tips & Variations
Chocolate Cake Version: Replace ¾ cup of the flour with unsweetened cocoa powder for a chocolate cookies and cream cake that’s even more decadent.
Mini Cakes: Divide the batter among cupcake liners (fills about 24 cupcakes) and bake for 18-22 minutes for adorable individual cookies and cream cupcakes.
Different Cookie Options: While Oreos are classic, you can experiment with other sandwich cookies like Mint Oreos (for a mint cookies and cream cake), Birthday Cake Oreos, or even Nutter Butters for a peanut butter twist.
Reduce Sweetness: If you find traditional American buttercream too sweet, reduce the powdered sugar to 4½-5 cups or try a cream cheese frosting variation (replace half the butter with cream cheese).
Add Coffee: Dissolve 1 tablespoon of instant espresso powder in the buttermilk before adding to the batter. Coffee enhances chocolate flavors without making the cake taste like coffee.
Cake Mix Shortcut: If you’re short on time, you can use a box white or vanilla cake mix as the base, then add ½ cup of crushed Oreos to the prepared batter and proceed with the homemade frosting recipe.
Cookies and Cream Cheesecake Cake: Add a layer of no-bake cookies and cream cheesecake between the cake layers for an ultra-indulgent hybrid dessert.
Gluten-Free Adaptation: Substitute the all-purpose flour with a 1:1 gluten-free baking flour blend and use gluten-free sandwich cookies instead of Oreos.
Pro Chef Tips
Bring ingredients to room temperature faster: Place eggs in a bowl of warm (not hot) water for 10 minutes. Microwave butter in 5-second intervals until softened but not melted. Leave buttermilk on the counter for 30 minutes.
Test your leavening agents: Before you begin, test that your baking powder and baking soda are active. For baking powder, stir a teaspoon into hot water—it should bubble vigorously. For baking soda, mix with a bit of vinegar—it should fizz immediately.
Create extra-flat layers: Wrap your cake pans with wet baking strips or wet towels secured with safety pins before baking. This insulates the pan edges, helping the cakes bake more evenly with minimal doming.
The toothpick test isn’t always reliable: Instead, gently press the center of the cake with your fingertip. It should spring back immediately and feel firm, not squishy or jiggly. The edges will have pulled away slightly from the pan sides.
Make your own cake flour substitute: For every cup of all-purpose flour, remove 2 tablespoons and replace with 2 tablespoons of cornstarch. Sift together three times. This creates a lower-protein flour that produces tender cake.
Achieve bakery-smooth frosting: After applying your final coat of frosting, dip your offset spatula or bench scraper in very hot water, dry it off, and smooth over the frosting in long, continuous strokes. The heat gently melts the buttercream surface, creating an incredibly smooth finish.
Stabilize your layers: If you’re worried about your cake layers sliding, insert a long wooden dowel or thick straw straight down through the center of both layers. Trim it so it’s flush with the top layer. This technique is especially helpful if transporting the cake.
Intensify Oreo flavor: For maximum cookies and cream taste, separate some of the Oreos and use the cream filling in your buttercream while reserving the cookie wafers for crushing. This creates a deeper, more authentic Oreo flavor.
Common Mistakes to Avoid
Using cold ingredients: This is the number one reason for dense, heavy cake. Cold butter won’t cream properly, cold eggs won’t emulsify into the batter, and cold buttermilk will cause the butter to seize up and create lumps. Everything should be at room temperature (about 65-70°F) for optimal texture.
Overmixing the batter: Once you add flour to wet ingredients, gluten development begins. Mix only until you no longer see dry flour streaks. Overmixed batter creates tough, rubbery cake with tunnels and holes. Use low speed and a gentle hand during this final stage.
Opening the oven door too early: Resist the urge to peek at your cakes before at least 25 minutes of baking time. Opening the door causes temperature fluctuations that can make cakes fall or bake unevenly. When you do check, open and close quickly.
Frosting warm cakes: This is a recipe for disaster—the buttercream will melt into a soupy mess and slide right off your cake. Cakes must be completely cool to the touch, ideally cooled to room temperature or even slightly chilled before frosting.
Not crushing Oreos finely enough for frosting: Large cookie chunks make the buttercream difficult to spread smoothly and can create tears in your crumb coat. For the frosting, crush cookies into fine crumbs using a food processor or by placing them in a sealed bag and crushing with a rolling pin until very fine.
Storage & Meal Prep
Room Temperature Storage: If your kitchen is cool (below 70°F) and you’ll serve the cake within 24 hours, you can keep it covered on the counter. However, buttercream frosting is more stable when refrigerated, especially in warmer weather.
Refrigerator Storage: Cover the cake loosely with plastic wrap or place it in a cake carrier, and refrigerate for up to 5 days. The cake actually becomes more moist after a day or two of refrigeration as the flavors meld together. Always let it sit at room temperature for 20-30 minutes before serving for the best texture and flavor.
Leftover Slice Storage: Wrap individual slices tightly in plastic wrap and store in an airtight container. This keeps them fresh and prevents them from absorbing refrigerator odors. Slices can be taken directly from the fridge for a quick treat, or warmed to room temperature.
Transporting the Cake: If you need to transport your cake, keep it chilled until the last possible moment, then transport in an air-conditioned vehicle. A cake carrier with a locking lid is your best option. If the cake will be out of refrigeration for more than 2 hours, consider using a buttercream recipe with less cream and more sugar for better stability.
Make-Ahead & Freezer Notes
Bake Ahead: The cake layers can be baked up to 2 days in advance. Once completely cooled, wrap each layer tightly in plastic wrap, then again in aluminum foil. Store at room temperature if baking within 24 hours, or refrigerate for up to 2 days.
Freeze Unfrosted Layers: For best results, freeze cake layers unfrosted. Wrap cooled layers in plastic wrap, then aluminum foil, and place in a freezer-safe bag. Freeze for up to 3 months. Thaw overnight in the refrigerator still wrapped (this prevents condensation from forming on the cake surface), then bring to room temperature before frosting.
Freeze Assembled Cake: You can freeze the fully assembled and frosted cake. First, place it uncovered in the freezer for about 1 hour until the frosting is firm (“flash freezing”). Then wrap carefully in plastic wrap and foil. Freeze for up to 2 months. Thaw overnight in the refrigerator, still wrapped to prevent condensation, then let sit at room temperature for 30-60 minutes before serving.
Make-Ahead Frosting: Buttercream can be made up to 1 week ahead and stored in an airtight container in the refrigerator, or frozen for up to 3 months. Before using, bring to room temperature and re-whip with a mixer for 2-3 minutes until light and fluffy again—it will look separated and weird at first but will come back together with beating.
Best Reheating Method: This cake is best served at cool room temperature rather than warmed. However, if you want to serve it with a slightly softer texture, let slices sit at room temperature for 30-45 minutes before serving. Don’t microwave, as this can make the frosting melt and the cake become rubbery.
Serving Suggestions
This Cookies and Cream Cake is spectacular enough to stand alone, but here are some delicious ways to elevate your dessert experience:
Classic Accompaniments:
- Tall glasses of cold whole milk for dunking—embracing the Oreo tradition
- Vanilla bean ice cream or cookies and cream ice cream for an over-the-top indulgent dessert
- Fresh whipped cream on the side for those who want extra richness
- Hot coffee or espresso to balance the sweetness (especially popular with adults)
Complementary Beverages:
- Cold brew coffee with a splash of cream
- Hot chocolate topped with marshmallows for a cozy winter treat
- Vanilla or cookies and cream milkshakes to commit fully to the theme
- Dessert wines like Moscato or Port for elegant dinner parties
Party Presentation Ideas:
- Serve on a cake stand surrounded by additional Oreo cookies for a dramatic display
- Add sparkler candles for birthday celebrations
- Pair with vanilla pudding cups topped with crushed Oreos for the kids’ table
- Set out bowls of fresh berries (strawberries, raspberries) to cut through the richness
Special Occasion Pairings:
- Birthday parties: Serve with cookies and cream ice cream and chocolate sauce
- Baby showers: Cut into smaller petits fours-sized pieces for a dessert buffet
- Casual dinners: Serve with strong black coffee and a splash of Bailey’s Irish Cream
- Kids’ parties: Pair with chocolate milk and let them decorate their own slices with extra Oreos and sprinkles
FAQs Section
Can I use a different type of cookie instead of Oreos? Absolutely! Golden Oreos create a lighter, vanilla-only flavor. Chocolate sandwich cookies work perfectly if you can’t find Oreos. Mint Oreos add a refreshing twist. Peanut butter sandwich cookies create an entirely different but equally delicious cake. The basic recipe stays the same regardless of which sandwich cookie you choose—just make sure to use the same quantity (15 cookies for the cake, 15 for the frosting).
Why did my cake turn out dense instead of fluffy? The most common culprits are: using cold ingredients (especially butter and eggs), overmixing the batter after adding flour, or using old leavening agents. Make sure your baking powder and baking soda are fresh (less than 6 months old), all ingredients are at room temperature, and you mix the batter just until the flour disappears. Measuring flour incorrectly (packing it into the cup instead of spooning and leveling) can also create dense cake.
Can I make this cake without buttermilk? Yes! Make a buttermilk substitute by adding 1 tablespoon of white vinegar or fresh lemon juice to 1 cup of whole milk. Stir and let sit for 5-10 minutes until slightly thickened. You can also use plain yogurt thinned with a bit of milk to a pourable consistency, or use sour cream thinned the same way. Each substitute brings slightly different flavor notes but all work well in this recipe.
My frosting is too soft/runny. How do I fix it? If your buttercream won’t hold its shape, there are several solutions: Add more powdered sugar ¼ cup at a time until it thickens. Make sure your butter wasn’t too soft (it should hold its shape but be easily pressed with a finger). Refrigerate the frosting for 15-20 minutes, then re-whip it—this often solves the problem. If your kitchen is very warm, the frosting may simply need to be chilled. As a last resort, add 2-3 tablespoons of additional butter that’s been chilled and cut into small pieces, then beat until smooth.
How do I prevent my cake layers from sticking to the pans? The foolproof method is to grease the pans thoroughly with butter or shortening, line the bottoms with parchment paper rounds cut to fit exactly, then grease the parchment as well. Some bakers also dust the greased pans lightly with flour or cocoa powder (for chocolate cakes) after greasing. Avoid using non-stick spray with flour—it can create a gummy coating. Let the cakes cool in the pans for exactly 15 minutes before inverting; cooling too long can cause sticking, while removing too early can cause breaking.
Can this recipe be made as cupcakes or in different pan sizes? Yes! For cupcakes, divide the batter among 24 lined cupcake cups (fill about ⅔ full) and bake at 350°F for 18-22 minutes. For a 9×13-inch sheet cake, use the entire recipe and bake for 35-40 minutes. For three 8-inch layers (making a taller cake), divide the batter among three pans and reduce baking time to 22-26 minutes. Always check for doneness with the toothpick test and by pressing gently on the center—it should spring back.
How far in advance can I decorate this cake? A fully frosted and decorated Cookies and Cream Cake can be made up to 2 days ahead. Store it covered in the refrigerator. The frosting actually helps seal in moisture, so the cake often tastes even better after sitting for a day. If decorating with fresh fruit, add those just before serving. Oreo cookie decorations can be added in advance—they’ll soften slightly but still taste delicious. For the freshest appearance, add any sprinkles or final decorative touches within 24 hours of serving.
The Oreos in my cake sank to the bottom. What happened? Cookie pieces sink when the batter is too thin or when the pieces are too large and heavy. To prevent this: Make sure you’re crushing the cookies to the right consistency (pea-sized pieces work best). Toss the crushed cookies in a tablespoon of flour before folding them in—this helps them stay suspended in the batter. Make sure your batter is thick enough (it should be similar to thick pancake batter). Don’t overmix after adding the cookies, as this can thin out the batter. Finally, make sure your oven is properly preheated so the batter begins setting immediately when it goes in.
Conclusion
Congratulations—you now have everything you need to create a stunning Cookies and Cream Cake that will have everyone asking for seconds and begging for the recipe! This showstopping dessert proves that you don’t need professional pastry training to create something truly spectacular. With tender, moist cake layers studded with everyone’s favorite sandwich cookies and enrobed in silky buttercream, this cake delivers on both flavor and visual impact.
The beauty of this recipe lies in its versatility and forgiving nature. Whether you’re baking for a child’s birthday party, contributing to a potluck, or simply treating your family to something special, this Cookies and Cream Cake rises to any occasion. The combination of familiar Oreo flavor with elegant layer cake presentation makes it universally appealing to guests of all ages.
Remember, the keys to success are simple: room temperature ingredients, gentle mixing, patience during cooling, and taking your time with the frosting. Even if your first attempt isn’t picture-perfect, it will still taste absolutely incredible. Like any skill, cake decorating improves with practice, and this recipe is forgiving enough that even beginners can achieve beautiful results.
I’d love to hear about your Cookies and Cream Cake adventures! Did you try any of the variations? Did your family devour it in one sitting? What occasion did you bake it for? Leave a comment below sharing your experience, and don’t forget to rate this recipe. Your feedback helps other home bakers and helps me know what content you love most.
Ready to get started? Pin this recipe to your Pinterest boards so you’ll have it saved for your next celebration. Share it with friends and family who love Oreos as much as you do. And if you make this cake, I’d be absolutely thrilled if you’d tag me on Instagram or Facebook with a photo of your creation—I genuinely love seeing your beautiful bakes come to life!
Happy baking, and here’s to creating delicious memories one slice at a time! 🍰