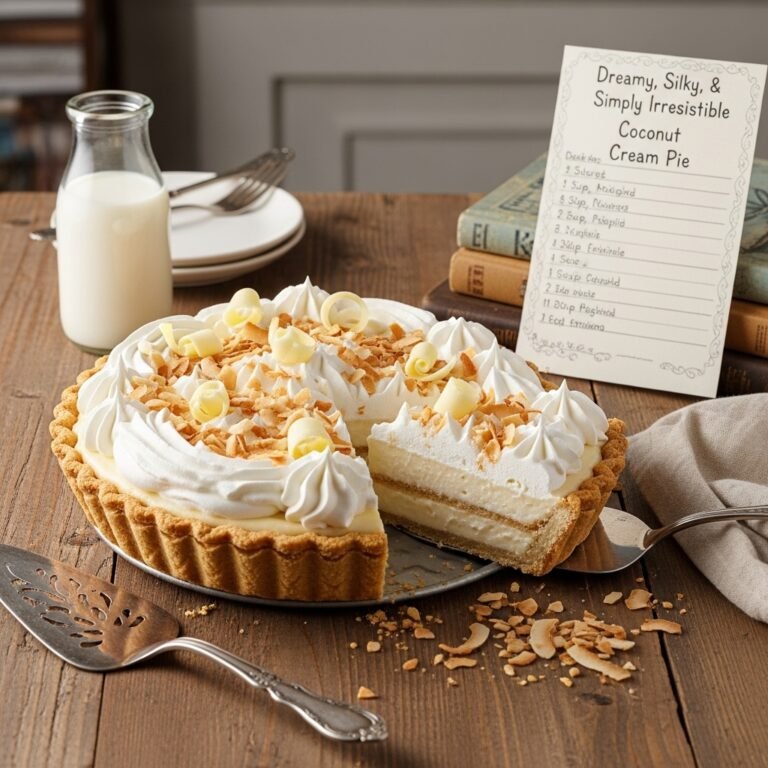
Classic Coconut Cream Pie Recipe: Dreamy, Silky, Simply Irresistible
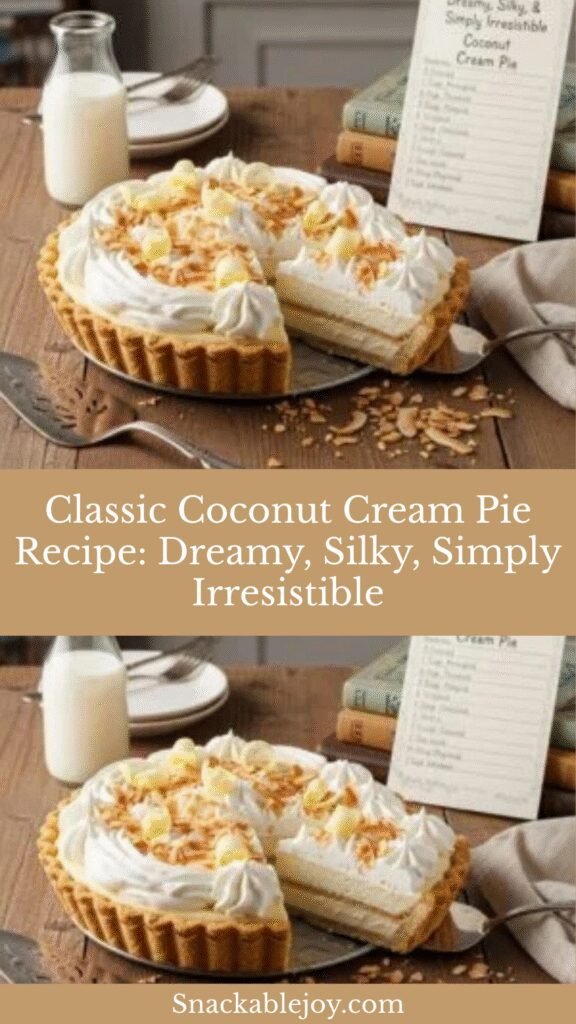
If there’s one dessert that makes people stop mid-conversation and say “wow,” it’s a perfectly made Coconut Cream Pie. This classic American dessert features a buttery, flaky crust filled with luscious coconut custard, topped with clouds of freshly whipped cream, and finished with a generous sprinkle of toasted coconut. It’s the kind of pie that looks stunning on a dessert table and tastes even better than it looks.
What makes Coconut Cream Pie so special is the harmony of textures and flavors. You get the crunch of the crust, the silky-smooth custard that melts on your tongue, the light airiness of whipped cream, and the nutty sweetness of coconut in every bite. It’s decadent without being overly heavy, sweet without being cloying, and surprisingly easier to make than most people think.
This pie is perfect for holidays like Thanksgiving, Easter, and Christmas, but it’s also wonderful for summer potlucks, birthday celebrations, or simply as a weekend baking project. Whether you’re a coconut enthusiast or just looking for an impressive dessert that’ll have everyone asking for the recipe, this Coconut Cream Pie delivers every single time. Let me show you how to make this show-stopping dessert in your own kitchen.
History / Background
Coconut Cream Pie has deep roots in American culinary history, though its story begins with the coconut itself. Coconuts were introduced to the Americas through Spanish and Portuguese explorers in the 16th century, but they didn’t become widely popular in American desserts until the late 1800s when improved transportation made fresh coconuts more accessible to mainland households.
The cream pie as we know it emerged in the mid-19th century, with coconut becoming one of the most beloved variations alongside chocolate, banana, and lemon. These custard-based pies became staples of American home baking, particularly in the South where coconuts could be more easily obtained through Gulf Coast ports. By the early 1900s, coconut cream pie had become a fixture at church socials, community gatherings, and family dinners across the country.
The invention of packaged shredded coconut in the early 20th century was a game-changer. Before this, home bakers had to crack open whole coconuts and laboriously grate the flesh by hand—a time-consuming and sometimes dangerous task. Once Baker’s and other companies began selling pre-shredded coconut, the pie became accessible to every home baker, cementing its place in the American dessert canon.
During the 1950s and 60s, Coconut Cream Pie enjoyed its heyday as part of the golden age of American home baking. It appeared in countless community cookbooks, church fundraiser recipe collections, and women’s magazines. Diners and truck stops across America became famous for their towering slices of coconut cream pie, often served with a cup of black coffee.
Today, this pie represents nostalgic Americana at its finest. It’s the kind of dessert that grandmothers made from scratch, that won blue ribbons at county fairs, and that still has the power to transport people back to simpler times with just one bite.
Why You’ll Love This Recipe
This Coconut Cream Pie recipe strikes the perfect balance between classic technique and modern convenience. It delivers that old-fashioned, from-scratch taste without requiring you to spend all day in the kitchen. The custard filling is luxuriously creamy with true coconut flavor, the crust is perfectly crisp and buttery, and the whipped cream topping is light as air.
Here’s what makes this recipe a keeper:
- Impressive but achievable – Looks like you ordered it from a fancy bakery, but it’s totally doable for home bakers
- Rich coconut flavor – Uses both coconut milk and shredded coconut for maximum coconut taste
- Make-ahead friendly – The components can be prepared separately and assembled later
- Crowd-pleaser – Even people who think they don’t like coconut often become converts
- Customizable sweetness – You control the sugar level to suit your taste preferences
- No bake filling option – The custard sets on the stovetop, no need to bake it separately
- Perfect texture – Smooth, creamy filling that slices beautifully without being runny
- Uses simple ingredients – Nothing exotic or hard to find, just pantry staples and coconut
- Great for celebrations – Elegant enough for special occasions, comforting enough for regular dessert
- Freezer-friendly – Can be made well in advance for stress-free entertaining
Ingredient Notes
Let me break down the key ingredients and why each one matters for creating the perfect coconut cream pie.
Pie Crust – You can use homemade, store-bought, or a graham cracker crust. A traditional pastry crust provides the best texture contrast with the creamy filling, but graham cracker crusts are wonderful too and require no baking. If making homemade pastry, a blind-baked crust is essential to prevent sogginess.
Coconut Milk (Full-Fat) – This is the secret to incredible coconut flavor. Full-fat canned coconut milk (not the refrigerated beverage kind) provides richness and authentic coconut taste. Don’t substitute light coconut milk, as the fat content is crucial for proper custard texture. Brands like Thai Kitchen or Chaokoh work beautifully.
Whole Milk – Combined with coconut milk, whole milk creates a custard that’s rich but not overwhelmingly heavy. You can substitute with 2% milk if needed, but whole milk provides the best mouthfeel. Don’t use skim milk, as you need the fat content.
Sweetened Shredded Coconut – This goes into the filling and is used for toasting as garnish. Sweetened coconut adds both flavor and a subtle sweetness. If you prefer less sweet pie, use unsweetened coconut and adjust the sugar accordingly. Baker’s brand is widely available and works perfectly.
Granulated Sugar – Sweetens the custard filling. The amount listed creates a dessert that’s sweet but balanced. Coconut has natural sweetness, so you don’t need excessive sugar.
Cornstarch – This is what thickens your custard. Cornstarch creates a smooth, sliceable filling without any starchy flavor when cooked properly. Don’t substitute flour, as it won’t give you the same silky texture. Make sure to cook the custard long enough to eliminate any raw cornstarch taste.
Egg Yolks – These enrich the custard and help it set properly. The yolks add color, flavor, and luxurious texture. Save the egg whites for making meringue topping if you prefer that over whipped cream, or use them in another recipe.
Butter – A couple tablespoons stirred into the hot custard adds richness and gives the filling a glossy, professional appearance. Use unsalted butter so you can control the salt level.
Vanilla Extract – Pure vanilla extract enhances all the other flavors. It rounds out the sweetness and adds depth. Don’t skip it even though the pie is coconut-flavored.
Salt – Just a pinch balances the sweetness and makes all the flavors pop. It’s especially important in cream pies to prevent them from tasting one-dimensional.
Heavy Whipping Cream – For the classic whipped cream topping. Make sure it’s fresh and very cold for the best results. Heavy cream whips better than whipping cream because of its higher fat content (36% vs 30%).
Powdered Sugar – Used to sweeten the whipped cream. It dissolves more easily than granulated sugar and helps stabilize the whipped cream slightly.
Equipment Needed
You don’t need any specialty equipment to make this pie. Here’s what you’ll need:
- 9-inch pie pan – Standard size for this recipe
- Medium heavy-bottomed saucepan – For cooking the custard filling
- Whisk – Essential for smooth custard without lumps
- Mixing bowls (various sizes) – For combining ingredients
- Fine-mesh strainer – Optional but recommended for ultra-smooth custard
- Rubber spatula – For stirring and scraping
- Measuring cups and spoons – For accurate measurements
- Electric mixer or whisk – For whipping cream (hand mixer works great)
- Baking sheet – For toasting coconut
- Plastic wrap – To cover custard while it cools
- Cutting board and knife – For slicing and serving
- Pie weights or dried beans (if blind-baking) – To prevent crust from puffing
Print

Classic Coconut Cream Pie Recipe
A classic American dessert featuring a flaky pie crust filled with silky coconut custard, topped with billowy whipped cream and toasted coconut. This show-stopping pie is creamy, dreamy, and absolutely delicious.
- Total Time: 4 hours 55 minutes
- Yield: 8-10 servings 1x
Ingredients
ScaleFor the Crust:
- 1 pre-made 9-inch pie crust (or homemade), blind-baked and cooled
- OR 1½ cups graham cracker crumbs + 5 tablespoons melted butter + 3 tablespoons sugar (for graham crust)
For the Coconut Custard Filling:
- 1 cup (240ml) full-fat coconut milk (well-stirred)
- 2 cups (480ml) whole milk
- ¾ cup (150g) granulated sugar
- ⅓ cup (43g) cornstarch
- ¼ teaspoon salt
- 4 large egg yolks
- 2 tablespoons unsalted butter
- 1½ teaspoons pure vanilla extract
- 1 cup (80g) sweetened shredded coconut
For the Whipped Cream Topping:
- 1½ cups (360ml) heavy whipping cream, cold
- 3 tablespoons powdered sugar
- 1 teaspoon vanilla extract
For Garnish:
- ¾ cup (60g) sweetened shredded coconut, toasted
Instructions
Step 1: Prepare the Pie Crust
If using a store-bought crust, blind-bake according to package directions until golden brown. Let cool completely. If making a graham cracker crust, combine graham cracker crumbs, melted butter, and sugar. Press firmly into a 9-inch pie pan and refrigerate while making the filling.Step 2: Toast the Coconut for Garnish
Preheat your oven to 325°F (165°C). Spread ¾ cup shredded coconut on a baking sheet in an even layer. Toast for 8-10 minutes, stirring every 2-3 minutes, until golden brown and fragrant. Watch carefully as coconut can burn quickly. Remove from oven and let cool completely. Set aside for topping.Step 3: Make the Custard Base
In your medium saucepan, whisk together the coconut milk, whole milk, sugar, cornstarch, and salt until completely smooth with no lumps. This is important—you want the cornstarch fully dissolved before heating.Step 4: Temper the Egg Yolks
In a separate bowl, whisk the egg yolks until smooth. Place the saucepan over medium heat and cook the milk mixture, whisking constantly, until it begins to thicken and bubble, about 8-10 minutes. Once it’s bubbling and thick, remove from heat.Step 5: Combine Eggs and Hot Mixture
Slowly pour about 1 cup of the hot milk mixture into the egg yolks while whisking constantly. This gradually raises the temperature of the eggs without scrambling them (a process called tempering). Once combined, pour the egg mixture back into the saucepan with the remaining hot milk mixture, whisking constantly.Step 6: Finish Cooking the Custard
Return the saucepan to medium heat and cook, whisking constantly, for another 2-3 minutes until the mixture is very thick and bubbling. It should coat the back of a spoon and hold its shape when you run your finger through it. Remove from heat.Step 7: Add Final Flavorings
Stir in the butter and vanilla extract until the butter is completely melted and incorporated. Then fold in 1 cup of shredded coconut. For the smoothest possible filling, you can strain the custard through a fine-mesh sieve at this point to remove any lumps (optional but recommended).Step 8: Fill the Pie Crust
Pour the hot custard into your cooled pie crust, spreading it evenly with a spatula. Place a piece of plastic wrap directly on the surface of the custard (this prevents a skin from forming). Refrigerate for at least 4 hours, or until completely set and chilled through. Overnight is even better.Step 9: Make the Whipped Cream
When ready to serve, combine the cold heavy cream, powdered sugar, and vanilla in a large bowl. Using an electric mixer (or a whisk and some arm power), beat on medium-high speed until stiff peaks form, about 3-4 minutes. Don’t overbeat or you’ll end up with butter.Step 10: Assemble and Garnish
Remove the plastic wrap from the chilled pie. Spread or pipe the whipped cream over the entire surface of the custard. Sprinkle generously with the toasted coconut. Slice with a sharp knife, wiping the blade clean between cuts for neat slices.Notes
- For the cleanest slices, dip your knife in hot water and wipe it dry between each cut.
- The custard must be completely chilled before adding whipped cream, or the heat will cause the cream to melt.
- If you prefer meringue topping instead of whipped cream, use the 4 egg whites left from the custard to make a Swiss or Italian meringue, spread over the filling, and brown with a kitchen torch or under the broiler.
- This pie is best served within 24 hours of assembly for optimal texture, though the filling can be made 2 days ahead.
- Prep Time: 30 minutes
- Cook Time: 25 minutes
- Category: Desert
- Method: Stovetop & Baking
- Cuisine: American
- Diet: Vegetarian
Nutrition
- Serving Size: 1 slice (1/8 of pie)
- Calories: 485
- Sugar: 32g
- Sodium: 220mg
- Fat: 32g
- Saturated Fat: 22g
- Unsaturated Fat: 8g
- Trans Fat: 0g
- Carbohydrates: 45g
- Fiber: 2g
- Protein: 6g
- Cholesterol: 155mg
Tips & Variations
Flavor Variations:
- Chocolate Coconut Cream Pie: Add ¼ cup cocoa powder to the custard mixture and fold in ½ cup mini chocolate chips after cooking
- Lime Coconut Cream Pie: Add zest of 2 limes to the custard and 2 tablespoons lime juice for a tropical twist
- Rum Coconut Cream Pie: Replace vanilla extract with 2 tablespoons dark rum for an adults-only version
- Banana Coconut Cream Pie: Layer sliced bananas on the bottom of the crust before adding custard
- Pineapple Coconut Cream Pie: Fold in ½ cup crushed, well-drained pineapple to the finished custard
Crust Variations:
- Use a chocolate cookie crust for chocolate lovers
- Try a macadamia nut crust for extra tropical flavor
- Make a coconut crust by adding ½ cup shredded coconut to your pastry dough
Topping Options:
- Swap whipped cream for toasted meringue for a classic diner-style presentation
- Add chocolate shavings or drizzle with chocolate sauce
- Top with fresh tropical fruit like mango or passion fruit
- Create a layered look with alternating whipped cream and toasted coconut
Dietary Adaptations:
- Dairy-Free/Vegan: Use coconut milk exclusively (no dairy milk), vegan butter, aquafaba whipped cream, and a vegan crust
- Lower Sugar: Reduce sugar to ½ cup and use sugar-free whipped topping
- Gluten-Free: Use a gluten-free pie crust or make one with almond flour
Pro Chef Tips
Cook the Custard Fully: One of the biggest mistakes is undercooking the custard. It needs to reach a full boil and bubble for 2-3 minutes after adding the eggs back in. This ensures the cornstarch is fully activated and the custard will set properly. Undercooked custard will be runny and may taste starchy.
Tempering is Non-Negotiable: Never skip the tempering step when adding hot liquid to eggs. Adding cold eggs directly to a hot mixture will give you sweet scrambled eggs, not smooth custard. Take your time with this step—it only takes an extra minute and makes all the difference.
Plastic Wrap on the Surface: Always press plastic wrap directly onto the surface of hot custard while it cools. This prevents a thick skin from forming on top, which would create an unpleasant texture in your finished pie. The wrap should touch the entire surface with no air pockets.
Chill Thoroughly: Patience is key here. The custard needs at least 4 hours to set completely, but overnight is ideal. A warm or partially set filling will be too soft to slice cleanly and will make your whipped cream slide off or melt.
Toast Coconut Carefully: Coconut goes from perfect to burned in seconds. Stay in the kitchen and stir it frequently while toasting. The moment it turns golden brown and smells nutty, remove it from the oven—it will continue to darken slightly as it cools.
Stabilize Your Whipped Cream: For whipped cream that holds up longer, add 1 teaspoon of unflavored gelatin (bloomed in 1 tablespoon cold water) to your cream before whipping, or use 2 tablespoons of instant vanilla pudding mix. This helps it maintain its structure, especially important if you’re serving the pie at a party.
Common Mistakes to Avoid
1. Not Blind-Baking the Crust Thoroughly
A pale, undercooked crust will become soggy when filled with custard. Your crust should be golden brown all over, including the bottom, before adding filling. Use pie weights and bake it until it’s actually done—not just partially baked. If the edges brown too quickly, cover them with foil or a pie crust shield.2. Lumpy Custard from Poor Whisking
Lumps in custard come from not whisking constantly while cooking. The moment you stop whisking, the cornstarch can clump or the eggs can scramble. Keep that whisk moving continuously, especially once the mixture starts to thicken. If you do get lumps, strain the custard through a fine-mesh sieve while it’s still hot.3. Adding Whipped Cream to Warm Custard
This is a rookie mistake that results in melted, sad-looking cream. The custard must be completely cold—not just room temperature, but refrigerator-cold—before you add whipped cream. If you’re impatient, you’ll end up with soup instead of a beautiful pie.4. Using the Wrong Type of Coconut Milk
Coconut milk beverages in cartons are not the same as canned coconut milk. The beverage is mostly water with minimal coconut fat, and it won’t give you the rich flavor or proper texture you need. You must use full-fat canned coconut milk from the international or baking aisle.5. Overwhipping the Cream
Watch your whipped cream carefully. It should hold stiff peaks but still look smooth and glossy. If you keep beating past this point, the cream will become grainy and eventually turn to butter. Stop as soon as you achieve stiff peaks—when you lift the beaters, the peaks should stand straight up without drooping.Storage & Meal Prep
Refrigerator Storage:
Store the finished pie covered loosely with plastic wrap or aluminum foil in the refrigerator for up to 3 days. The whipped cream will begin to weep and deflate after 24 hours, so this pie is best enjoyed within a day of adding the topping. If you need to store it longer, wait to add the whipped cream until closer to serving time.Storing Components Separately:
The smartest approach for make-ahead prep is storing the components separately. Keep the filled crust (without whipped cream) tightly covered in the fridge for up to 3 days. The whipped cream can be made a few hours ahead and kept covered in the refrigerator. Assemble just before serving for the best presentation.Room Temperature:
This pie should not sit at room temperature for more than 2 hours due to the dairy-based custard filling. If serving at a party or potluck, keep it refrigerated until just before serving time. On hot days, consider placing it on a bed of ice or returning it to the fridge between servings.Protecting the Presentation:
To store a decorated pie without crushing the whipped cream, insert toothpicks into the top at intervals, then drape plastic wrap over them to create a tent. This keeps the wrap from touching and deflating your beautiful topping.Make-Ahead & Freezer Notes
Make-Ahead Timeline:
This pie is excellent for advance preparation. Blind-bake your crust up to 2 days ahead and store at room temperature wrapped in plastic. Make the custard filling and fill the crust up to 2 days before serving—just keep it covered tightly in the fridge. Toast your coconut up to 1 week ahead and store in an airtight container. Add whipped cream and toasted coconut garnish within 2-3 hours of serving for the best appearance.Freezing the Whole Pie:
You can freeze coconut cream pie, though the texture will change slightly. Freeze without the whipped cream topping. Wrap the filled pie tightly in plastic wrap, then aluminum foil, and freeze for up to 1 month. Thaw overnight in the refrigerator, then add fresh whipped cream and toasted coconut before serving. The custard may be slightly less silky after freezing but will still taste delicious.Freezing Components:
The baked pie crust freezes beautifully for up to 3 months. Wrap it well and freeze, then thaw at room temperature before filling. The custard filling can also be frozen separately in an airtight container for up to 2 months. Thaw in the fridge overnight and stir well before using. Whipped cream doesn’t freeze well, so always make this fresh.Best Reheating Method:
This pie is meant to be served cold, so there’s no reheating involved. If anything, you want to ensure it stays chilled. Remove from the refrigerator about 10-15 minutes before serving just to take the chill off, which helps the flavors come forward. The pie should still be cold, just not ice-cold from the fridge.Serving Suggestions
Coconut Cream Pie is a statement dessert that stands beautifully on its own, but there are lovely ways to enhance the serving experience.
Classic Accompaniments:
Serve each slice with a cup of hot black coffee or espresso. The bitterness of coffee perfectly balances the sweet, creamy pie. For non-coffee drinkers, hot tea (especially Earl Grey or jasmine tea) pairs wonderfully with coconut flavors.Beverage Pairings:
For special occasions, try serving with dessert wines like Moscato d’Asti, late-harvest Riesling, or a sweet Sauternes. The wine’s sweetness complements the pie without overwhelming it. For a non-alcoholic option, coconut milk-based chai tea lattes or vanilla rooibos tea are excellent choices.Complementary Desserts:
If you’re serving a dessert buffet, coconut cream pie pairs well with fruit-based desserts like berry tarts, lemon bars, or fresh fruit salads. The tropical flavor also complements pineapple upside-down cake or key lime pie for a vacation-inspired dessert spread.Plating Suggestions:
For an elegant presentation, place each slice on a white plate and drizzle with chocolate or caramel sauce. Add a few fresh raspberries or a small cluster of tropical fruit (mango, pineapple, or kiwi) on the side. A small mint sprig adds a pop of color and freshness.Holiday Serving:
For Thanksgiving or Christmas, serve alongside traditional pies like pumpkin and pecan for variety. The coconut cream’s light, creamy texture provides a nice contrast to denser, spicier pies. For Easter, garnish the top with pastel-colored candy eggs or edible flowers for a festive touch.Casual Gatherings:
For backyard barbecues or casual dinners, this pie is perfect as-is. Cut generous slices and serve on paper plates—this is comfort food at its finest. Consider setting up a DIY topping bar with extra whipped cream, chocolate shavings, and toasted coconut so guests can customize their slices.FAQs Section
Q: Can I use coconut cream instead of coconut milk?
A: Coconut cream is thicker and richer than coconut milk because it has less water. You can use it, but thin it out with a bit of regular milk or water to achieve the right consistency. Otherwise, your custard may be too thick and rich. A good ratio is ¾ cup coconut cream mixed with ¼ cup water or milk to replace 1 cup coconut milk.Q: Why is my custard runny even after chilling?
A: This usually happens for one of three reasons: the custard wasn’t cooked long enough (it needs to bubble for 2-3 minutes after adding the eggs), you didn’t use enough cornstarch, or you didn’t let it chill long enough. Make sure you cook the custard until it’s very thick before removing from heat, and give it at least 4 hours (preferably overnight) to set in the refrigerator.Q: Can I make this pie without eggs?
A: While eggs are traditional and provide the best texture, you can make an egg-free version by increasing the cornstarch to ½ cup and using only coconut milk (no regular milk). The texture will be slightly different—more like a pudding consistency—but it will still be delicious. Just make sure to cook it thoroughly to eliminate any starchy taste.Q: How do I prevent the crust from getting soggy?
A: First, make sure your crust is thoroughly blind-baked until golden brown. Second, you can brush the hot baked crust with a thin layer of melted white chocolate or egg white and let it dry before filling—this creates a moisture barrier. Third, make sure your custard is completely cool before adding it to the crust. Hot filling will create steam that makes the crust soggy.Q: Can I use Cool Whip instead of homemade whipped cream?
A: Absolutely! Cool Whip or other frozen whipped toppings work great and are actually more stable than homemade whipped cream. Use about 8 ounces (one standard container) of thawed Cool Whip. Spread it over the chilled custard and sprinkle with toasted coconut. This is a great time-saver and the pie will hold up better for longer storage.Q: My coconut burned when I tried to toast it. What did I do wrong?
A: Coconut has a high sugar content and can go from perfectly toasted to burned in less than a minute. The keys are: use a lower oven temperature (325°F, not 350°F or higher), spread it in a thin, even layer, watch it constantly, and stir every 2-3 minutes. Remove it from the oven the moment it turns golden brown—it will continue to darken as it cools on the hot pan.Q: What’s the difference between a cream pie and a custard pie?
A: Great question! A cream pie has a cooked custard filling that’s poured into a pre-baked crust and chilled, then topped with whipped cream. A custard pie (like pumpkin pie) has eggs mixed into the filling which then bakes in the oven in an unbaked crust. Coconut cream pie is definitely a cream pie—the custard is cooked on the stovetop, not baked.Conclusion
There’s something absolutely magical about slicing into a perfect Coconut Cream Pie. That moment when your fork glides through the billowy whipped cream, through the silky custard, and into the buttery crust—it’s pure dessert bliss. This pie represents the best of American home baking: comforting, nostalgic, impressive, and absolutely delicious.
The beauty of this recipe is that it looks and tastes like something you’d pay premium prices for at a bakery, but you made it yourself with simple ingredients and straightforward techniques. Yes, it requires a bit of patience while the custard chills, but the actual hands-on work is totally manageable, even if you’re not an experienced baker.
Whether you’re making this for a holiday gathering, a special celebration, or just because you’re craving something spectacular, this Coconut Cream Pie will not disappoint. The combination of textures and flavors is simply unbeatable, and the joy on people’s faces when they take that first bite makes every minute of preparation worthwhile.
Ready to make this stunning pie? I’d absolutely love to hear how it turns out for you! Drop a comment below with your experience, any creative variations you tried, or questions you have. Did you go with whipped cream or meringue? Did you toast your coconut to perfection? I want to hear all about it!
If you loved this recipe, please save it to your Pinterest boards and share it with your fellow dessert lovers. Your support means the world and helps keep these detailed, tested recipes coming. Now grab your whisk and let’s make some pie magic! 🥥🥧✨