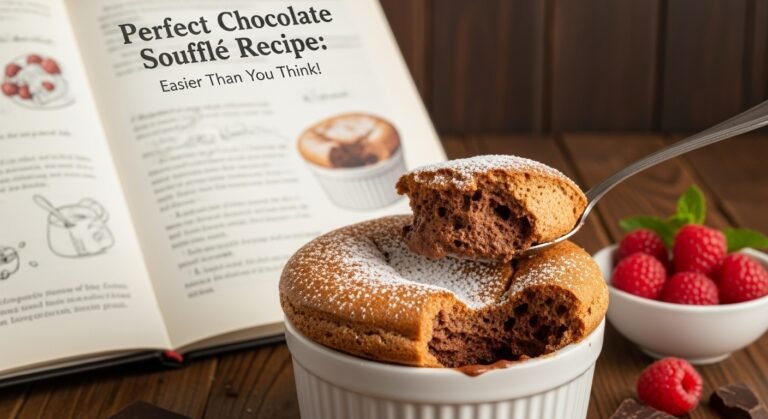
Perfect Chocolate Soufflé Recipe: Easier Than You Think!

Let me tell you a secret: chocolate soufflé isn’t nearly as intimidating as its fancy French reputation suggests! This show-stopping dessert features a crispy, sugary outer crust that gives way to an airy, cloud-like interior with intense chocolate flavor. When you break into that risen, golden-topped soufflé with your spoon and discover the warm, molten center inside, it’s pure magic on a plate.
Chocolate soufflé has long been considered the ultimate test of a baker’s skill, but I’m here to demystify this classic French dessert and show you that with the right technique and a little confidence, you can absolutely master it at home. The key is understanding a few fundamental principles about egg whites and having everything prepped before you start—then it’s surprisingly straightforward!
This elegant dessert is perfect for special occasions like Valentine’s Day, anniversary dinners, or any time you want to seriously impress your dinner guests. There’s something undeniably romantic and luxurious about serving individual soufflés straight from the oven, watching them rise dramatically above their ramekins. And here’s the best part: despite their impressive appearance, soufflés come together in about 30 minutes from start to finish. They’re the perfect grand finale to an intimate dinner party or a sophisticated date night at home!
History / Background
The soufflé has a fascinating history that begins in early 18th century France, though its exact origins are somewhat debated among culinary historians. The word “soufflé” comes from the French verb “souffler,” meaning “to blow” or “to puff up”—a perfect description of what happens to this magical dessert in the oven.
Most food historians credit French chef Vincent La Chapelle with creating an early version of the soufflé around 1742, but it was the legendary chef Marie-Antoine Carême who truly refined and popularized the dish in the early 1800s. Carême, often called the “king of chefs and chef of kings,” elevated French cuisine to an art form and established many of the techniques we still use today. He understood the science behind egg whites and how whipping them to the perfect consistency could create dishes that seemed to defy gravity.
The soufflé became a staple of haute cuisine throughout the 19th century, served in the finest restaurants and aristocratic homes across France. It represented the pinnacle of culinary technique—a dish that required precision, timing, and skill. French chefs guarded their soufflé secrets carefully, and the dessert developed an almost mystical reputation as something impossibly difficult to master.
Chocolate soufflé specifically gained prominence in the mid-1800s as chocolate became more widely available and affordable in Europe. The combination of rich, bittersweet chocolate with the ethereal texture of whipped egg whites created a dessert that was both decadent and surprisingly light. It became the signature dessert at prestigious Parisian restaurants and eventually spread throughout the culinary world.
By the 20th century, the soufflé had become synonymous with French fine dining, and its reputation for difficulty actually grew. Stories circulated about soufflés falling at the slightest noise or vibration, adding to the mystique. While there’s some truth to the delicate nature of soufflés, modern understanding of the science behind them has made them much more approachable for home cooks. Today, chocolate soufflé represents both tradition and triumph—a connection to classical French technique that still has the power to impress and delight diners around the world.
Why You’ll Love This Recipe
I know what you’re thinking: “Soufflé sounds way too complicated for me!” But I promise you, this recipe breaks down every single step into manageable, confidence-building instructions that will have you creating restaurant-quality soufflés in your own kitchen. Once you understand the basic technique, you’ll find yourself making these impressive desserts far more often than you’d expect.
Here’s what makes this recipe absolutely irresistible:
- Impressive yet achievable – Looks like a million bucks but uses straightforward techniques any home cook can master
- Rich chocolate flavor – Intense, bittersweet chocolate taste that’s pure indulgence
- Incredibly light texture – Airy and cloud-like, almost melting on your tongue
- Perfect for special occasions – The ultimate romantic dessert for date nights and celebrations
- Surprisingly quick – Comes together in about 30 minutes from start to finish
- Individual servings – Portion control built right in, and each person gets their own dramatic presentation
- Minimal ingredients – Uses simple pantry staples you probably already have
- Gluten-free option – Naturally gluten-free when made with pure cocoa powder
- Lower in fat than many desserts – The airy texture means less butter than cakes or mousses
- Restaurant-quality at home – Save money by creating upscale desserts yourself
- Impressive “wow factor” – Guests will be absolutely amazed when you serve these beauties
Ingredient Notes
Understanding your ingredients is crucial for soufflé success, so let’s break down what you’ll need and why each component matters.
High-Quality Dark Chocolate: This is your flavor foundation, so use the best chocolate you can afford. I recommend chocolate with 60-70% cacao content—it provides rich, complex flavor without being too bitter. Bittersweet or semisweet chocolate chips work, but bar chocolate that you chop yourself generally melts more smoothly. Avoid milk chocolate, which is too sweet and doesn’t provide enough chocolate intensity. Brands like Ghirardelli, Lindt, or Valrhona work beautifully.
Unsweetened Cocoa Powder: This intensifies the chocolate flavor and adds depth. Use Dutch-process cocoa if possible—it’s been treated to neutralize acidity and has a smoother, more mellow flavor that works perfectly in soufflés. Regular cocoa powder works too, but Dutch-process gives slightly better results. Make sure it’s fresh and not clumpy.
Eggs: You’ll need to separate eggs into whites and yolks, so have extra on hand in case of breakage. Use large eggs at room temperature—they whip to greater volume than cold eggs. The yolks add richness and help bind the chocolate base, while the whites provide all that dramatic lift and airy texture. Even a tiny bit of yolk in your whites will prevent proper whipping, so separate carefully!
Granulated Sugar: Sugar serves multiple purposes here. It sweetens the soufflé, stabilizes the egg whites, and helps create that beautiful crispy exterior. Part of the sugar goes into the chocolate base while the rest is gradually beaten into the egg whites. The sugar you use to coat the ramekins creates a caramelized crust that’s absolutely delicious.
Unsalted Butter: You’ll need butter for greasing the ramekins (which helps the soufflé climb up the sides) and a small amount in the chocolate base for richness. Unsalted allows you to control the exact salt level. The butter must be soft enough to spread easily in the ramekins.
All-Purpose Flour: Just a tablespoon helps thicken and stabilize the chocolate base slightly, giving your soufflé structure. If you need gluten-free soufflés, you can substitute with cornstarch or even omit it entirely—the soufflé will be slightly more delicate but still delicious.
Whole Milk or Heavy Cream: Provides moisture and richness to the chocolate base. Whole milk creates a lighter soufflé, while heavy cream makes it richer and more decadent. Don’t use skim or low-fat milk—you need the fat content for proper texture and flavor.
Vanilla Extract: Enhances all the other flavors and adds warmth. Pure vanilla extract is always worth it in desserts where you can really taste the difference.
Salt: Just a pinch enhances the chocolate flavor and balances sweetness. Don’t skip it—salt is crucial for bringing out the best in chocolate desserts.
Cream of Tartar (optional but recommended): This helps stabilize egg whites and makes them easier to whip to stiff peaks. If you don’t have it, a tiny splash of lemon juice works similarly.
Equipment Needed
Having the right tools makes soufflé-making so much easier and sets you up for success. Here’s what you’ll need:
- Six 6-ounce ramekins or soufflé dishes – Individual ceramic dishes are essential; metal tins don’t work as well
- Pastry brush – For brushing butter evenly on ramekins
- Medium heavy-bottomed saucepan – For making the chocolate base
- Large mixing bowl (metal or glass) – For whipping egg whites; must be completely clean and dry
- Stand mixer or hand mixer – Electric mixer is highly recommended for egg whites, though you can whisk by hand
- Rubber spatula – For folding egg whites gently into the chocolate base
- Whisk – For mixing the chocolate base smoothly
- Fine-mesh strainer or sifter – For sifting cocoa powder and flour
- Measuring cups and spoons – Accurate measurements are crucial in baking
- Small bowl – For separating and holding egg yolks
- Baking sheet or large tray – For holding the ramekins in the oven
- Offset spatula or butter knife – For leveling the soufflé tops
- Kitchen towel – For ensuring bowls and beaters are completely dry
- Oven thermometer (optional but helpful) – To verify your oven temperature is accurate
Print

Perfect Chocolate Soufflé Recipe: Easier Than You Think!
These classic French Chocolate Soufflés are surprisingly easy to make at home! They feature an intensely chocolatey, airy interior with a slightly crispy top, rising dramatically in the oven. Perfect for impressing dinner guests or celebrating special occasions with an elegant, restaurant-quality dessert.
- Total Time: 35 minutes
- Yield: 6 individual soufflés 1x
Ingredients
ScaleFor Preparing the Ramekins:
- 1 tablespoon soft unsalted butter (for greasing)
- 2 tablespoons granulated sugar (for coating)
For the Chocolate Base:
- 4 ounces (115g) high-quality dark chocolate (60-70% cacao), chopped
- 3 tablespoons unsalted butter
- ¼ cup whole milk or heavy cream
- 1 tablespoon all-purpose flour (or cornstarch for gluten-free)
- 2 tablespoons unsweetened cocoa powder
- 4 large egg yolks
- ¼ cup granulated sugar
- 1 teaspoon pure vanilla extract
- Pinch of salt
For the Meringue:
- 6 large egg whites, room temperature
- ¼ teaspoon cream of tartar (optional but recommended)
- ¼ cup granulated sugar
- Pinch of salt
For Serving:
- Powdered sugar for dusting
- Whipped cream or vanilla ice cream (optional)
Instructions
Step 1: Prepare Ramekins and Preheat Oven
Position your oven rack in the lower third of the oven and preheat to 400°F (200°C). Using a pastry brush, generously butter six 6-ounce ramekins, brushing upward from the bottom in vertical strokes—this helps the soufflés climb straight up the sides. Coat the buttered ramekins with granulated sugar, tapping out any excess. Place the prepared ramekins on a baking sheet and set aside. This preparation is crucial for proper rising!Step 2: Make the Chocolate Base
In a medium saucepan over low heat, combine the chopped chocolate, butter, and milk (or cream). Stir constantly with a whisk until completely melted and smooth, about 3-4 minutes. Remove from heat. Sift the flour and cocoa powder directly into the chocolate mixture, whisking constantly to prevent lumps. The mixture will thicken slightly—this is perfect.Step 3: Add Egg Yolks and Sugar
In a small bowl, whisk together the egg yolks and ¼ cup sugar until slightly lightened in color. Gradually whisk about ⅓ of the warm chocolate mixture into the yolks (this tempers them so they don’t scramble). Then pour the yolk mixture back into the saucepan with the remaining chocolate, whisking constantly. Stir in the vanilla and salt. Transfer this chocolate base to a large mixing bowl and let it cool slightly while you prepare the egg whites. It should be warm but not hot.Step 4: Whip the Egg Whites
This is the crucial step! In a completely clean, dry metal or glass bowl, add the egg whites and cream of tartar. Using a stand mixer or hand mixer, beat on medium speed until foamy, about 1 minute. Add a pinch of salt. Gradually add the ¼ cup sugar, about 1 tablespoon at a time, beating continuously. Increase speed to medium-high and continue beating until the egg whites form stiff, glossy peaks—when you lift the beaters, the peaks should stand straight up without drooping. This takes about 4-5 minutes total. Don’t underbeat (too soft) or overbeat (dry and grainy).Step 5: Fold the Mixtures Together
This folding technique is key to maintaining the airiness! Using a rubber spatula, stir about ¼ of the whipped egg whites into the chocolate base to lighten it. Then gently fold in the remaining egg whites in two additions. Use a folding motion: cut down through the center of the mixture, sweep along the bottom, and bring the spatula up the side, turning the bowl as you go. Fold just until no white streaks remain—some small white flecks are fine. Don’t overmix or you’ll deflate the air bubbles!Step 6: Fill the Ramekins
Divide the soufflé mixture evenly among the prepared ramekins, filling them about ¾ full (they’ll rise above the rim as they bake). Use a spoon or small ladle for even distribution. Once filled, run your thumb or an offset spatula around the inside rim of each ramekin to create a small groove—this helps the soufflé rise straight up with that classic “top hat” appearance.Step 7: Bake Immediately
Place the baking sheet with ramekins in the preheated oven right away (soufflés can’t wait!). Bake for 12-15 minutes without opening the oven door. The soufflés are done when they’ve risen about 2 inches above the ramekin, the tops are set and slightly crispy, and they jiggle just slightly in the center when gently shaken. Smaller soufflés may take 12 minutes; larger ones closer to 15 minutes.Step 8: Serve Immediately
Soufflés begin deflating as soon as they come out of the oven, so serve them immediately! Dust with powdered sugar, place on serving plates, and bring to the table right away. Instruct your guests to break into the center with a spoon to reveal the creamy, molten interior. Some people like to pour a little cream into the center—delicious!Notes
- Timing is everything – Have your diners seated and ready before the soufflés come out
- Don’t open the oven – Opening the door causes temperature drops that can make soufflés fall
- Room temperature eggs – They whip to much greater volume than cold eggs
- Clean bowl for egg whites – Any fat or grease prevents proper whipping
- Fold gently – Overmixing deflates the air bubbles that make soufflés rise
- Serve immediately – Soufflés wait for no one! They begin falling within minutes
- Make-ahead option – You can prepare filled ramekins up to 2 hours ahead and refrigerate, adding 2-3 minutes to baking time
- Prep Time: 20 minutes
- Cook Time: 12-15 minutes
- Category: Dessert
- Method: Baking
- Cuisine: French
- Diet: Gluten Free
Nutrition
- Serving Size: 1 soufflé
- Calories: 285
- Sugar: 24g
- Sodium: 125mg
- Fat: 16g
- Saturated Fat: 9g
- Unsaturated Fat: 6g
- Trans Fat: 0g
- Carbohydrates: 30g
- Fiber: 2g
- Protein: 8g
- Cholesterol: 155mg
-
Tips & Variations
Flavor Variations:
- Mocha Soufflé: Add 1 tablespoon instant espresso powder to the chocolate base for coffee-enhanced flavor
- Orange Chocolate: Add 1 tablespoon orange zest and ½ teaspoon orange extract to the chocolate base
- Mint Chocolate: Add ½ teaspoon peppermint extract to the chocolate base
- Mexican Chocolate: Add ½ teaspoon cinnamon and a tiny pinch of cayenne pepper
- White Chocolate: Substitute white chocolate for dark chocolate (reduce sugar slightly)
Mix-In Options:
- Chocolate Chips: Fold ⅓ cup mini chocolate chips into the finished batter for extra chocolate pockets
- Liqueur Enhancement: Add 2 tablespoons Grand Marnier, Chambord, or Kahlúa to the chocolate base
- Hazelnut: Replace vanilla with hazelnut extract and fold in 2 tablespoons finely chopped toasted hazelnuts
Dietary Modifications:
- Gluten-Free: Replace flour with cornstarch or omit entirely for naturally gluten-free soufflés
- Dairy-Free: Use coconut cream and dairy-free chocolate; brush ramekins with coconut oil
- Reduced Sugar: You can reduce sugar by 2 tablespoons total, though texture will be slightly affected
Size Variations:
- Large Soufflé: Use one 1.5-quart soufflé dish; bake for 25-30 minutes
- Mini Soufflés: Use 3-ounce ramekins; bake for 8-10 minutes—perfect for parties
- Soufflé for Two: Halve the recipe and use two ramekins
Presentation Ideas:
- Molten Center: Slightly underbake (11 minutes) for an extra-gooey center
- Sauce Accompaniment: Serve with crème anglaise, raspberry coulis, or caramel sauce
- Elegant Dusting: Use a stencil and powdered sugar for decorative patterns on top
Pro Chef Tips
The Clean Bowl Rule: Professional pastry chefs are obsessive about this because it truly matters. Any trace of fat—oil, egg yolk, or even residue from soap—will prevent egg whites from whipping properly. Wipe your bowl and beaters with a bit of white vinegar or lemon juice on a paper towel, then dry completely. Metal or glass bowls work best; plastic can harbor invisible fat residue even after washing.
Temperature Timing Strategy: Here’s an insider secret: bring your egg whites to room temperature, but make sure your chocolate base is only slightly warm (not hot) when folding them together. If the chocolate base is too hot, it will cook and deflate the egg whites. Let it cool for 5-10 minutes after making it—you want it about body temperature or slightly warmer, which you can test by touching the bowl.
The Perfect Peak Test: When whipping egg whites, you’re looking for “stiff peaks”—this means when you lift the beaters, the peaks stand completely upright like mountain peaks without drooping at all. However, stop before they become dry and grainy (overbeaten). The mixture should still look glossy and smooth. A perfectly beaten egg white mixture will slide cleanly out of the bowl in one piece if you tip it.
The Folding Technique Mastery: Professional chefs use a specific folding motion that preserves maximum air. Cut straight down through the center of the mixture with your spatula, sweep along the bottom of the bowl, bring the spatula up the side, and fold over the top. Rotate the bowl a quarter turn and repeat. Work confidently but gently—timid folding takes too long and causes deflation, while aggressive stirring destroys air bubbles. Aim for 25-30 folds maximum.
The Rim Cleaning Trick: After filling your ramekins, run your thumb around the inside rim to remove any batter stuck to the edge and create a small groove. This breaks the connection between the soufflé and the rim, allowing it to rise straight up instead of clinging to the sides and rising unevenly. This one small step is the difference between a beautifully risen soufflé and a lopsided one.
Oven Position Matters: Always bake soufflés in the lower third of your oven, not the middle or top. The bottom heat helps them rise properly, while too much top heat can over-brown the surface before the interior cooks through. Also, make sure your oven is fully preheated—a not-quite-hot-enough oven is one of the main causes of fallen soufflés.
Common Mistakes to Avoid
Opening the Oven Door During Baking: This is the classic soufflé mistake! When you open the oven door, you release a rush of hot air and create a temperature drop that can cause your soufflés to collapse. The dramatic temperature change makes the air bubbles contract. Resist the temptation to peek—set your timer and trust the process. If you absolutely must check, do so only in the last minute or two of baking, opening the door just slightly and quickly.
Overbeating or Underbeating Egg Whites: Both extremes cause problems. Underbeaten egg whites (soft peaks that droop) don’t provide enough structure, resulting in soufflés that don’t rise properly. Overbeaten egg whites become dry, grainy, and actually lose volume—they’ll also make your soufflé texture coarse and cause uneven rising. Stop beating when peaks stand straight up and the mixture is glossy and smooth.
Greasing Ramekins Incorrectly: If you don’t butter the ramekins properly, the soufflé can’t climb up the sides and will rise unevenly or stick. Butter must be brushed upward in vertical strokes, coating every inch including the rim. The sugar coating provides additional “grip” and creates that delicious caramelized crust. Don’t skimp on either the butter or sugar—this step is crucial for dramatic height.
Overmixing When Folding: Once you start folding the egg whites into the chocolate base, handle the mixture as little as possible. Overmixing deflates all those precious air bubbles you worked so hard to create. It’s okay if you see a few small white streaks remaining—they’ll blend in during baking. Stop folding as soon as the mixture looks mostly uniform. Twenty-five to thirty gentle folds is usually plenty.
Using Cold Ingredients: Cold egg whites whip to less than half the volume of room-temperature whites, and cold chocolate base will cause the egg whites to deflate when mixed together. Plan ahead and let your eggs sit at room temperature for at least 30 minutes before starting. If you’re in a hurry, place eggs (still in shells) in a bowl of warm water for 10 minutes.
Storage & Meal Prep
The Reality of Soufflé Storage: I’ll be honest with you—baked soufflés don’t store well at all. They’re designed to be served immediately when they’re at their peak: dramatically risen, hot from the oven, with that perfect contrast between the crispy top and creamy interior. Within minutes of leaving the oven, they begin deflating as the air bubbles cool and contract. A fallen soufflé still tastes delicious but loses all that magical visual impact.
If You Must Store Baked Soufflés: If you have leftover baked soufflés (which rarely happens!), you can refrigerate them covered for up to 2 days. They’ll be completely deflated and dense, more like chocolate cake than soufflé. To revive them somewhat, warm gently in a 325°F oven for 5-7 minutes—they won’t rise again, but they’ll be warm and the texture will soften. Honestly, think of leftover soufflé as a different dessert: a rich, dense chocolate pudding cake that’s delicious in its own right.
Unbaked Batter Storage: Unfortunately, you can’t store the mixed soufflé batter. Once the egg whites are folded in, the air bubbles begin deflating immediately, and the mixture will separate. However, you CAN prepare components separately: make the chocolate base up to 2 days ahead and store it covered in the refrigerator (bring to room temperature before using), and prep your ramekins a day ahead.
Make-Ahead & Freezer Notes
The Best Make-Ahead Strategy: Here’s a game-changer for dinner parties: you can prepare filled, unbaked soufflé ramekins up to 2 hours ahead! Fill the prepared ramekins with the soufflé mixture, cover each one loosely with plastic wrap, and refrigerate. When ready to bake, remove the plastic wrap and add 2-3 extra minutes to the baking time to account for the cold start. This technique allows you to enjoy your dinner guests without last-minute kitchen stress.
Longer Make-Ahead (4-24 Hours): Some brave bakers successfully refrigerate prepared soufflés for up to 24 hours before baking, though results become less predictable the longer they sit. The soufflés will still rise but may not achieve quite the same dramatic height. Add 3-5 extra minutes to baking time for refrigerated soufflés. Let them sit at room temperature for 10 minutes before baking for best results.
Freezing Unbaked Soufflés: Yes, you can freeze prepared soufflés! Fill the ramekins as directed, wrap each one tightly with plastic wrap and then aluminum foil, and freeze for up to 1 month. Bake directly from frozen (do not thaw) at 375°F for 20-25 minutes. The texture won’t be quite as perfect as fresh, but it’s remarkably close and incredibly convenient for special occasions.
Component Prep: The chocolate base can be made 2-3 days ahead and refrigerated. Bring it to room temperature (or warm gently) before folding in egg whites. You can also prep and sugar your ramekins up to 24 hours ahead—just cover them loosely so the sugar coating doesn’t get damp.
Reheating Strategy: If you’ve baked soufflés ahead (not ideal but sometimes necessary), you can attempt to revive them. Place fallen soufflés in a 350°F oven for 5-8 minutes to warm through. They won’t re-rise, but they’ll be warm and comforting. Alternatively, embrace the fallen texture and serve them as chocolate pudding cakes with ice cream!
Serving Suggestions
Chocolate soufflé is undoubtedly the star of the show, but the right accompaniments can elevate it from impressive to absolutely unforgettable.
Classic Crème Anglaise: This is the traditional French accompaniment—a silky vanilla custard sauce that you pour into the center of the soufflé. The warm, molten chocolate mingles with the cool, creamy sauce for an incredible contrast. Make it while the soufflés bake and serve it in a small pitcher so guests can pour their own.
Whipped Cream: Lightly sweetened whipped cream (add a splash of vanilla or a liqueur like Grand Marnier) provides cool, airy contrast to the warm, rich chocolate. Some people like to dollop it on top, while others prefer to poke a hole in the center of the soufflé and spoon cream inside. Both methods are delicious!
Ice Cream Pairing: A small scoop of vanilla bean, coffee, mint, or salted caramel ice cream alongside (or inside!) your soufflé creates an incredible hot-and-cold experience. The ice cream begins melting into the warm chocolate, creating a sauce naturally. Alternatively, try a sophisticated pairing like lavender or earl grey ice cream.
Berry Accompaniments: Fresh raspberries, strawberries, or a quick berry compote provide tart contrast that cuts through the richness. The acidity of berries balances the sweet chocolate perfectly. You can also serve raspberry or strawberry coulis (puréed and strained berries) drizzled artistically on the plate.
Coffee or Espresso: The classic French way to end a meal—a small cup of strong espresso or coffee alongside your soufflé. The slight bitterness of coffee complements chocolate beautifully and provides a sophisticated counterpoint to the sweetness.
Dessert Wine Pairing: For an elegant adult pairing, serve chocolate soufflé with a glass of Port, late-harvest Zinfandel, Banyuls, or Vin Santo. These sweet, fortified wines have enough body and sweetness to stand up to rich chocolate without being overwhelmed.
Elegant Plating: For restaurant-style presentation, dust the rim of each serving plate with powdered sugar using a stencil, place the soufflé slightly off-center, add a quenelle of whipped cream or a small scoop of ice cream, arrange a few fresh berries, and finish with a sprig of fresh mint. A drizzle of sauce (chocolate, caramel, or berry) adds professional polish.
FAQs Section
Will my soufflé fall if I open the oven door?
Opening the oven in the last minute or two of baking (very briefly and gently) usually won’t cause disaster, but opening it earlier definitely can. The dramatic temperature drop causes the air bubbles to contract before the soufflé has set. If you must check doneness, open the door just slightly and quickly. Better yet, use your oven light and look through the window. Some soufflé falling after removing from the oven is completely normal—they’re meant to be served immediately while still risen.Can I make soufflés ahead of time?
Yes! You can prepare filled, unbaked ramekins up to 2 hours ahead (refrigerate until ready to bake). For longer make-ahead, you can refrigerate them up to 24 hours or even freeze them for up to 1 month, though the rise may be slightly less dramatic. Add 2-3 extra minutes for refrigerated soufflés or 8-10 minutes for frozen ones. The chocolate base can also be made 2-3 days ahead and refrigerated separately.My egg whites won’t whip to stiff peaks—what’s wrong?
The most common culprit is fat contamination. Even a tiny speck of egg yolk or a trace of oil in your bowl will prevent proper whipping. Make sure your bowl and beaters are completely clean and dry—wipe them with vinegar and dry thoroughly. Also check that your egg whites don’t contain any yolk. Old eggs with thin whites also don’t whip as well. Fresh, room-temperature eggs in a spotlessly clean bowl should whip beautifully in 4-5 minutes.Can I use milk chocolate instead of dark chocolate?
While you can technically use milk chocolate, I don’t recommend it for soufflés. Milk chocolate is much sweeter and has less intense chocolate flavor, resulting in a cloyingly sweet soufflé without enough chocolate depth. It also has more milk solids which can affect texture. Stick with bittersweet or semisweet chocolate (60-70% cacao) for best results. If you prefer less bitter chocolate, use semisweet (around 60%) rather than jumping to milk chocolate.How do I know when the soufflé is done?
A properly baked soufflé should have risen 1.5-2 inches above the rim, the top should be set and slightly cracked with a golden-brown color, and the soufflé should jiggle just slightly (not dramatically) when you gently shake the ramekin. If it jiggles a lot, it needs more time. If it doesn’t jiggle at all, it may be slightly overbaked (though still delicious). The center should be creamy and soft, not completely set—that’s the appeal of soufflé!Why did my soufflé not rise properly?
Several factors can prevent proper rising: underbeaten egg whites (not stiff enough), overbeaten egg whites (dry and grainy), overmixing when folding (deflated air bubbles), oven not hot enough, not properly greased ramekins, or egg whites sitting too long before folding. Make sure your egg whites reach stiff, glossy peaks, fold gently and minimally, and bake immediately in a fully preheated oven.Can I double this recipe?
Absolutely! The recipe scales up beautifully. Just make sure you have a bowl large enough for whisking all those egg whites (they increase dramatically in volume), and you may want to fold the meringue into the chocolate base in two batches for easier handling. All other instructions remain the same.Conclusion
Congratulations! You now have all the knowledge you need to create these spectacular French Chocolate Soufflés that will absolutely wow everyone who tries them. I hope I’ve convinced you that while soufflés have a fancy reputation, they’re truly achievable for home cooks who understand a few key techniques. The combination of that crispy, caramelized exterior giving way to an airy, molten chocolate interior is pure magic—and now you can create that magic in your own kitchen!
Remember, the key to soufflé success is confidence. Trust your technique, don’t overthink it, and most importantly, serve them immediately with pride. Even if your first attempt isn’t perfect, I guarantee it will still taste absolutely delicious. And with practice, you’ll be turning out picture-perfect soufflés that rise dramatically and impress every single time.
I’d absolutely love to hear about your soufflé adventures! Did yours rise beautifully on the first try? What accompaniments did you serve alongside? Do you have questions or tips to share? Drop a comment below—I read every single one and love connecting with fellow home bakers!