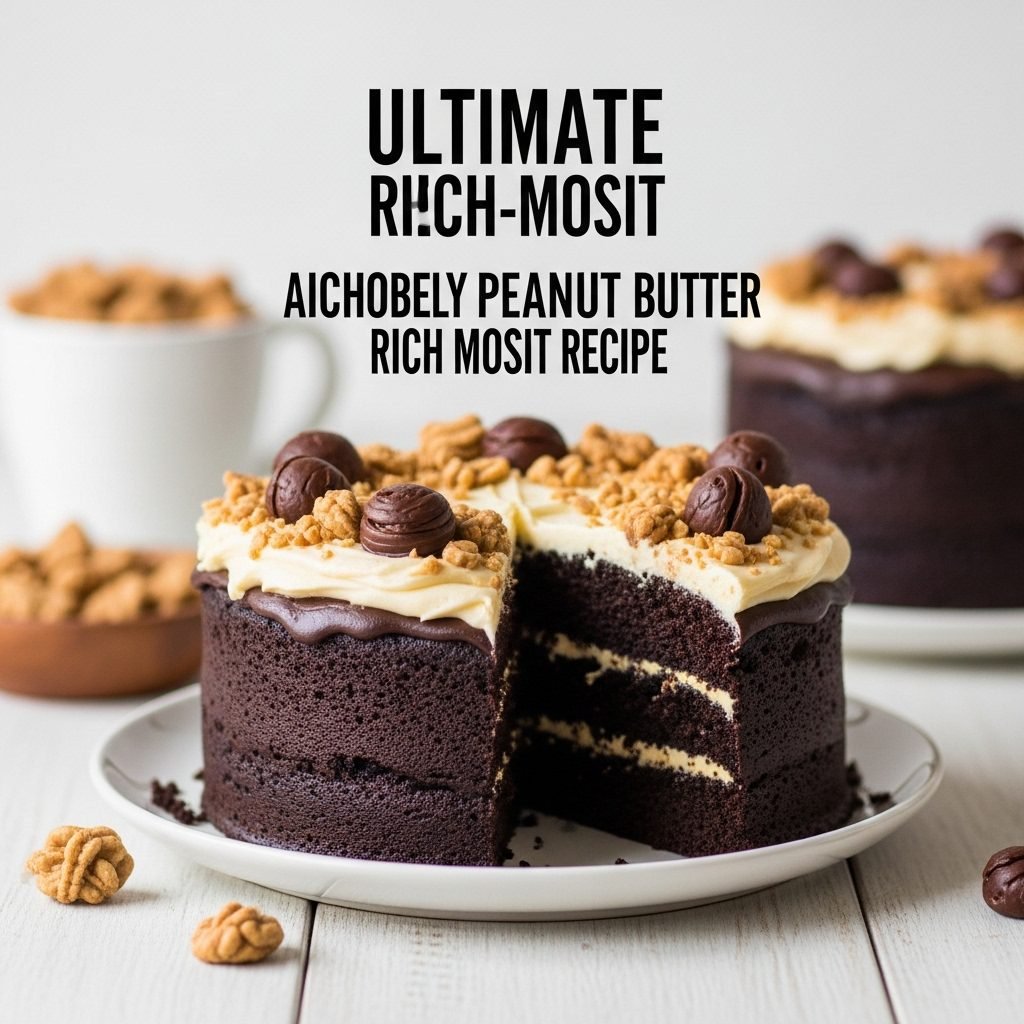
Ultimate Chocolate Peanut Butter Cake Recipe: Rich, Moist, Absolutely Decadent
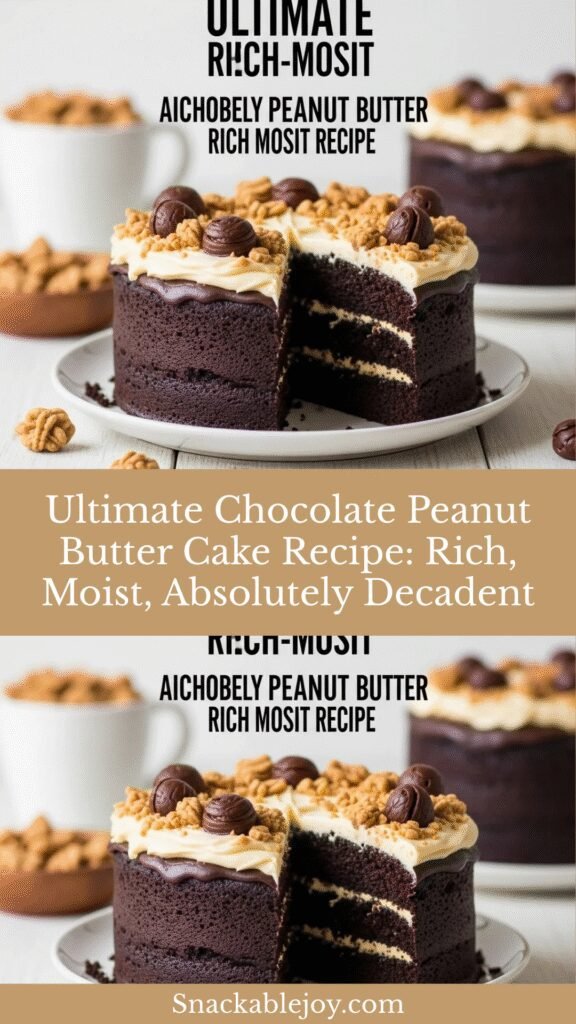
If you’ve ever dreamed of combining two of the most beloved flavors in the dessert universe—rich chocolate and creamy peanut butter—then this Chocolate Peanut Butter Cake is about to become your new obsession. This show-stopping layer cake features moist, tender chocolate cake layers filled and frosted with silky peanut butter buttercream, then finished with a glossy chocolate ganache drip and crowned with peanut butter cups, Reese’s Pieces, or chopped peanuts.
This isn’t just any cake—it’s the kind of dessert that makes birthdays unforgettable, turns ordinary celebrations into extraordinary memories, and has people asking for seconds (and thirds). The chocolate cake is incredibly moist with a deep cocoa flavor, while the peanut butter frosting is smooth, not-too-sweet, and perfectly balanced. Together, they create that iconic chocolate-peanut butter combination that’s been making taste buds happy for generations.
Perfect for birthdays, anniversaries, potlucks, bake sales, or any time you want to seriously impress your guests, this cake looks like it came from a fancy bakery but is completely achievable in your home kitchen. Whether you’re a chocolate lover, a peanut butter fanatic, or someone who believes these two flavors are simply better together, this recipe will exceed your expectations every single time.
History / Background
The love affair between chocolate and peanut butter is a distinctly American phenomenon that dates back to the early 20th century. While peanut butter was invented in the late 1800s and popularized by figures like George Washington Carver and Dr. John Harvey Kellogg, it wasn’t until 1928 that the magical combination with chocolate was born—when H.B. Reese, a former dairy farmer and employee of Milton Hershey, created the Reese’s Peanut Butter Cup.
Reese’s innovation transformed peanut butter from a health food and sandwich spread into a legitimate dessert ingredient. The combination was revolutionary because the saltiness of peanut butter perfectly balanced chocolate’s sweetness and bitterness, while the creamy texture contrasted beautifully with chocolate’s smoothness. This complementary pairing created something greater than the sum of its parts.
By the 1950s and 60s, chocolate peanut butter desserts had become staples of American home baking. Church cookbooks, community recipe collections, and women’s magazines featured countless variations: chocolate peanut butter cookies, brownies, pies, and of course, cakes. The combination represented post-war abundance and the joy of indulgent home baking.
The layered chocolate cake with peanut butter frosting specifically gained popularity in the 1970s and 80s, coinciding with the rise of elaborate celebration cakes. Home bakers discovered that peanut butter buttercream was not only delicious but also structurally sound—it held up well between layers, piped beautifully, and didn’t require refrigeration like cream cheese frosting.
Today, chocolate peanut butter cake represents comfort, nostalgia, and pure indulgence. It’s the cake that satisfies cravings, wins baking competitions, and creates the kind of food memories that last a lifetime. From simple sheet cakes to towering layer cakes, this flavor combination continues to be one of America’s most beloved dessert traditions.
Why You’ll Love This Recipe
This Chocolate Peanut Butter Cake delivers everything you want in a celebration cake: stunning appearance, incredible flavor, perfect texture, and surprisingly straightforward preparation. The chocolate cake layers are tender and moist with a rich cocoa flavor that’s deep but not bitter, while the peanut butter frosting is creamy, sweet-salty perfection that spreads like a dream.
Here’s why this recipe deserves a permanent spot in your collection:
- Crowd-pleasing flavors – The chocolate-peanut butter combo is universally loved by kids and adults alike
- Bakery-quality results – Looks and tastes professional without requiring advanced decorating skills
- Incredibly moist cake – The addition of coffee and buttermilk creates tender, never-dry cake layers
- Stable frosting – Peanut butter buttercream holds up beautifully at room temperature and pipes perfectly
- Customizable decorations – Top with anything from Reese’s cups to chocolate shavings to chopped peanuts
- Make-ahead friendly – Components can be baked and assembled in stages to reduce stress
- Feeds a crowd – One cake serves 12-16 people, perfect for parties and gatherings
- Budget-friendly luxury – Uses pantry staples to create an impressive dessert that won’t break the bank
- Versatile sizing – Can be made as a two-layer cake, three-layer cake, sheet cake, or cupcakes
- Freezer-friendly – Cake layers freeze beautifully for up to 3 months
Ingredient Notes
Let me walk you through each key ingredient and why it matters for creating the perfect chocolate peanut butter cake.
All-Purpose Flour – The foundation of your cake structure. All-purpose flour provides the right balance of protein for tender yet stable cake layers. Measure by spooning into your measuring cup and leveling off—don’t pack it down or you’ll end up with dense cake.
Cocoa Powder – Use good-quality unsweetened cocoa powder for the best chocolate flavor. Dutch-process cocoa (like Hershey’s Special Dark) creates a darker, more mellow chocolate flavor, while natural cocoa (like Hershey’s regular) has a more acidic, intense chocolate taste. Either works beautifully, but don’t use hot chocolate mix.
Granulated Sugar – Sweetens the cake and helps create moisture and tenderness. Sugar also helps achieve that beautiful golden-brown crust on the outside of your cake layers.
Baking Powder & Baking Soda – These leavening agents work together to help your cake rise properly. Baking soda reacts with the acidic buttermilk and coffee, while baking powder provides additional lift. Make sure both are fresh for the best results.
Salt – Essential for balancing sweetness and enhancing all the other flavors. Don’t skip it even though the cake is sweet—it’s what prevents one-dimensional flavor.
Eggs – Provide structure, richness, and moisture. Room temperature eggs incorporate more easily into the batter. If you forgot to take them out ahead, place cold eggs in a bowl of warm water for 5 minutes.
Buttermilk – The secret ingredient for tender, moist cake with a slight tang that balances the sweetness. The acidity also reacts with baking soda for better rise. No buttermilk? Make your own by adding 1 tablespoon lemon juice or white vinegar to 1 cup of regular milk; let sit 5 minutes before using.
Vegetable Oil – Creates a moister cake than butter because oil stays liquid at room temperature. This means your cake won’t dry out or become dense as it cools. Canola, corn, or other neutral oils work perfectly.
Vanilla Extract – Pure vanilla enhances all the other flavors. It’s especially important in chocolate desserts where it brings out the complexity of the cocoa.
Hot Coffee or Hot Water – This might seem unusual, but hot liquid “blooms” the cocoa powder, intensifying the chocolate flavor dramatically. If you don’t drink coffee, just use hot water—you won’t taste coffee in the finished cake, just deeper chocolate flavor.
Creamy Peanut Butter – Use regular store-brand peanut butter like Jif, Skippy, or Peter Pan. Natural peanut butter (the kind that separates) doesn’t work well in frosting because the oils separate and the texture becomes grainy. Stick with conventional peanut butter for best results.
Unsalted Butter (for frosting) – Must be softened to room temperature for smooth, fluffy buttercream. Cold butter won’t cream properly, and melted butter will make your frosting too thin. Plan ahead and leave it on the counter for 1-2 hours before making frosting.
Powdered Sugar – Also called confectioners’ sugar or icing sugar. This is what gives buttercream its sweetness and structure. Sift it if it’s lumpy to avoid lumps in your frosting.
Heavy Cream – Used in both the frosting (for consistency) and the chocolate ganache. Make sure it’s cold for whipping and room temperature for ganache.
Semi-Sweet Chocolate Chips – For the ganache drip. Good quality chocolate makes a difference here. Ghirardelli, Guittard, or even Nestle Toll House work great.
Equipment Needed
Having the right tools makes cake baking so much easier. Here’s what you’ll need:
- Two 9-inch round cake pans – For layer cake (or three 8-inch pans for taller layers)
- Parchment paper – To line pan bottoms for easy cake release
- Large mixing bowls – For wet and dry ingredients
- Electric mixer (stand or hand) – Essential for fluffy frosting
- Whisk and rubber spatula – For mixing and folding
- Measuring cups and spoons – Accuracy matters in baking
- Cooling racks – So cakes cool evenly and don’t get soggy bottoms
- Offset spatula – Makes frosting and smoothing cakes much easier
- Cake turntable (optional but helpful) – For easier frosting and decorating
- Piping bags and tips (optional) – If you want to pipe decorative borders
- Toothpicks – For testing cake doneness
- Small saucepan – For making ganache
- Serrated knife – For leveling cake layers if needed
Print

Chocolate Peanut Butter Cake Recipe
A show-stopping layer cake featuring moist chocolate cake layers, creamy peanut butter buttercream frosting, and a glossy chocolate ganache drip. This is the ultimate dessert for chocolate and peanut butter lovers.
- Total Time: 2 hours 30 minutes
- Yield: 12-16 servings 1x
Ingredients
ScaleFor the Chocolate Cake:
- 2 cups (250g) all-purpose flour
- 2 cups (400g) granulated sugar
- ¾ cup (75g) unsweetened cocoa powder
- 2 teaspoons baking soda
- 1 teaspoon baking powder
- 1 teaspoon salt
- 2 large eggs, room temperature
- 1 cup (240ml) buttermilk, room temperature
- 1 cup (240ml) hot strong coffee (or hot water)
- ½ cup (120ml) vegetable oil
- 2 teaspoons pure vanilla extract
For the Peanut Butter Buttercream:
- 1 cup (240g) creamy peanut butter (not natural)
- ¾ cup (170g) unsalted butter, softened
- 3 cups (360g) powdered sugar, sifted
- ⅓ cup (80ml) heavy cream
- 1 teaspoon vanilla extract
- ¼ teaspoon salt
For the Chocolate Ganache:
- 1 cup (170g) semi-sweet chocolate chips
- ½ cup (120ml) heavy cream
For Decoration:
- Reese’s Peanut Butter Cups, chopped
- Reese’s Pieces candies
- Chopped roasted peanuts
- Chocolate shavings
Instructions
Step 1: Prepare Pans and Preheat
Preheat your oven to 350°F (175°C). Grease two 9-inch round cake pans with butter or cooking spray, line the bottoms with parchment paper circles, then grease the parchment. Lightly dust with cocoa powder, tapping out excess. This ensures easy cake release.Step 2: Mix Dry Ingredients
In a large bowl, whisk together the flour, sugar, cocoa powder, baking soda, baking powder, and salt. Whisk for at least 30 seconds to ensure everything is evenly distributed and the cocoa has no lumps.Step 3: Combine Wet Ingredients
In a separate large bowl, whisk together the eggs, buttermilk, oil, and vanilla extract until well combined and slightly frothy.Step 4: Make the Batter
Pour the wet ingredients into the dry ingredients and whisk until just combined. The batter will be thick. Now, carefully stir in the hot coffee. The batter will become very thin—this is normal and correct! Don’t panic. This thin batter is what creates the incredibly moist cake texture.Step 5: Bake the Cakes
Divide the batter evenly between your prepared pans (they’ll be about halfway full). Bake for 28-32 minutes, or until a toothpick inserted in the center comes out with just a few moist crumbs (not wet batter). The tops should spring back when lightly touched.Step 6: Cool Completely
Remove cakes from oven and let them cool in the pans on wire racks for 10 minutes. Then, carefully run a knife around the edges and invert the cakes onto the racks. Remove the parchment paper and let cool completely, about 1 hour. Do not attempt to frost warm cakes—they’ll fall apart and melt your frosting.Step 7: Make Peanut Butter Buttercream
In a large bowl using an electric mixer, beat the peanut butter and softened butter together on medium speed for 2-3 minutes until creamy and well combined. Reduce speed to low and gradually add the powdered sugar, 1 cup at a time, beating until combined. Add the heavy cream, vanilla, and salt. Increase speed to medium-high and beat for 3-4 minutes until light, fluffy, and spreadable. If too thick, add more cream 1 tablespoon at a time. If too thin, add more powdered sugar.Step 8: Assemble the Cake Layers
Place one completely cooled cake layer on your serving plate or cake stand. If the top is domed, use a serrated knife to level it for easier stacking. Spread about 1½ cups of peanut butter buttercream evenly over the top, leaving a small border around the edge (the weight of the second layer will push it out slightly). Place the second cake layer on top, bottom side up for a flat top. Apply a thin “crumb coat” of frosting all over the cake—this is a thin layer that seals in crumbs. Refrigerate for 15 minutes to set.Step 9: Final Frosting
After the crumb coat has set, spread the remaining peanut butter buttercream generously over the top and sides of the cake, using an offset spatula to create a smooth finish. You can make it perfectly smooth or leave it slightly textured—both look beautiful.Step 10: Make Chocolate Ganache
Place chocolate chips in a heatproof bowl. In a small saucepan, heat the heavy cream until it just begins to simmer (don’t boil). Pour the hot cream over the chocolate and let sit undisturbed for 2 minutes, then whisk until smooth and glossy. Let cool for 5-10 minutes until slightly thickened but still pourable.Step 11: Create Ganache Drips
Transfer ganache to a piping bag or squeeze bottle (or carefully pour from a spoon). Working around the top edge of the cake, create drips by letting ganache slowly drip down the sides. You can make short drips or long dramatic ones—it’s your choice. Once you’ve gone around the edge, pour remaining ganache on top and spread it to the edges with an offset spatula.Step 12: Decorate and Serve
While the ganache is still slightly soft, add your decorations on top—chopped Reese’s cups, Reese’s Pieces, chopped peanuts, or chocolate shavings. Refrigerate the cake for 30 minutes to set the ganache, then bring to room temperature 30 minutes before serving for the best flavor and texture.Notes
Notes
- This cake tastes even better the next day after flavors have melded together.
- Room temperature ingredients are crucial for proper mixing and texture—don’t skip this step.
- The batter will be very thin—this is correct and creates the moist texture.
- If making cupcakes instead, fill liners ⅔ full and bake for 18-22 minutes.
- For best slicing, use a long, sharp knife and wipe it clean between each cut.
- Prep Time: 30 minutes
- Cook Time: 30 minutes
- Category: Desert
- Method: Baking
- Cuisine: American
- Diet: Vegetarian
Nutrition
- Serving Size: 1 slice (1/14 of cake)
- Calories: 645
- Sugar: 58g
- Sodium: 385mg
- Fat: 32g
- Saturated Fat: 12g
- Unsaturated Fat: 18g
- Trans Fat: 0g
- Carbohydrates: 82g
- Fiber: g
- Protein: 10g
- Cholesterol: 65mg
Tips & Variations
Flavor Variations:
- Chocolate Almond Butter Cake: Substitute almond butter for peanut butter in the frosting for a sophisticated twist
- Triple Chocolate: Use chocolate buttercream instead of peanut butter for pure chocolate decadence
- Salted Caramel Peanut Butter: Drizzle salted caramel sauce between layers along with the frosting
- Chocolate Hazelnut: Replace half the peanut butter with Nutella for a chocolate-hazelnut version
- Banana Chocolate Peanut Butter: Add mashed ripe bananas between cake layers
Size Variations:
- Sheet Cake: Pour batter into a greased 9×13-inch pan and bake 35-40 minutes. Frost with a single layer of buttercream.
- Three-Layer Cake: Divide batter among three 8-inch pans, bake 22-25 minutes
- Cupcakes: Make 24 cupcakes, bake 18-22 minutes, and pipe frosting on top
- Mini Cakes: Use 4-inch pans for individual serving cakes
Dietary Adaptations:
- Gluten-Free: Use a 1:1 gluten-free baking flour blend (Bob’s Red Mill works well)
- Dairy-Free: Use dairy-free milk with vinegar instead of buttermilk, dairy-free butter alternative, and coconut cream
- Reduced Sugar: Cut sugar in cake to 1½ cups (will be less sweet but still good)
Decoration Ideas:
- Create a naked cake look by leaving sides partially unfrosted
- Pipe peanut butter buttercream rosettes on top instead of spreading
- Add a peanut butter drip along with the chocolate drip
- Top with fresh strawberries for a PB&J-inspired look
- Sprinkle with sea salt flakes for sweet-salty contrast
Pro Chef Tips
Room Temperature Matters: Cold ingredients don’t incorporate properly and can cause your cake to be dense or your frosting to be lumpy. Take eggs, buttermilk, and butter out of the fridge 1-2 hours before baking. If you’re in a rush, place eggs in warm water for 5 minutes and microwave buttermilk for 10-15 seconds.
Don’t Overmix: Once you add wet ingredients to dry, mix just until combined. Overmixing develops gluten, which makes cake tough and dense. A few small lumps are okay—they’ll disappear during baking.
Use Hot Coffee: The hot liquid blooms the cocoa powder, intensifying the chocolate flavor significantly. You won’t taste coffee in the final cake, just deeper, richer chocolate. If you absolutely don’t want to use coffee, hot water works but with slightly less chocolate intensity.
Test for Doneness Properly: Insert a toothpick into the center of the cake. It should come out with a few moist crumbs clinging to it—not wet batter, but not completely clean either. Overbaking is the #1 cause of dry cake. Start checking at 28 minutes even if your recipe says 30-32 minutes.
Level Your Layers: Professional-looking cakes have flat, even layers. If your cakes dome on top (which is common), use a long serrated knife or cake leveler to trim off the dome before assembling. This creates stable, professional-looking layers that won’t slide.
Crumb Coat is Essential: Don’t skip this step! A thin first layer of frosting seals in all the loose crumbs. After refrigerating the crumb coat for 15 minutes, your final frosting layer will go on smoothly and look clean and professional without chocolate cake crumbs showing through.
Ganache Temperature: For perfect drips, your ganache needs to be the right consistency. Too hot and it will run right off the cake; too thick and it won’t drip at all. Let it cool until it slowly falls from a spoon, not quickly streams off. Test a drip on the side of the cake first.
Common Mistakes to Avoid
1. Using Natural Peanut Butter in Frosting
Natural peanut butter (the kind with oil on top) doesn’t work in buttercream because the oils separate and create a greasy, grainy texture. You need conventional peanut butter with stabilizers like Jif, Skippy, or Peter Pan. These brands are specifically formulated to hold together in baking applications.2. Not Measuring Flour Correctly
Scooping flour directly with your measuring cup packs it down, giving you too much flour and resulting in dry, dense cake. Always spoon flour lightly into your measuring cup and level it off with a knife. Or better yet, weigh it—2 cups flour should weigh 250 grams.3. Opening the Oven Door Too Early
Every time you open the oven door, the temperature drops dramatically. Don’t open it until at least 25 minutes have passed, and then only open it briefly to test for doneness. Sudden temperature changes can cause cakes to sink in the middle.4. Frosting a Warm Cake
This is probably the most common cake disaster. If your cake isn’t completely cool, the frosting will melt, slide off, and turn into a soupy mess. Be patient and let cakes cool for at least 1 hour on racks. Touch the bottom of the cake—if it’s even slightly warm, keep waiting.5. Making Frosting with Cold Butter
Cold butter won’t cream properly with peanut butter and will leave you with lumpy frosting. If you forgot to soften your butter, cut it into small cubes and microwave it for 5 seconds at a time until softened but not melted. It should dent easily when pressed but still hold its shape.Storage & Meal Prep
Room Temperature Storage:
This cake can stay at room temperature for up to 2 days if your kitchen isn’t too warm. Store under a cake dome or cover loosely with foil (don’t wrap tightly or the decorations will get smashed). Peanut butter frosting is stable at room temperature, unlike cream cheese frosting which must be refrigerated.Refrigerator Storage:
For longer storage or in hot weather, refrigerate the cake covered for up to 5 days. The cold will firm up the frosting and ganache. Before serving, let the cake sit at room temperature for 30-45 minutes—cold cake doesn’t have as much flavor, and the frosting will be hard.Protecting Your Decorations:
If you need to cover the cake but don’t want to mess up the decorations, insert toothpicks into the top of the cake to create “tent poles,” then drape plastic wrap or foil over them. This keeps the covering from touching and ruining your beautiful work.Leftover Slices:
Individual slices can be wrapped in plastic wrap and stored in an airtight container in the refrigerator for up to 5 days. Let come to room temperature before eating for best flavor and texture.Make-Ahead & Freezer Notes
Component Preparation:
This cake is excellent for advance preparation. Bake the cake layers up to 2 days ahead, wrap them tightly in plastic wrap while still slightly warm (this locks in moisture), and store at room temperature. Make the frosting up to 3 days ahead and refrigerate; bring to room temperature and re-whip before using.Freezing Cake Layers:
Unfrosted cake layers freeze beautifully for up to 3 months. Wrap each cooled layer tightly in plastic wrap, then aluminum foil. Freeze flat. Thaw overnight in the refrigerator or for 2-3 hours at room temperature before assembling and frosting. They’ll taste just-baked fresh.Freezing Frosted Cake:
You can freeze the fully assembled and frosted cake. Place it uncovered in the freezer for 1 hour to firm up the frosting, then wrap carefully in plastic wrap and foil. Freeze for up to 2 months. Thaw overnight in the refrigerator, then bring to room temperature before serving. The texture will be almost identical to fresh.Frosting Storage:
Leftover peanut butter buttercream can be refrigerated in an airtight container for up to 1 week or frozen for up to 3 months. When ready to use, bring to room temperature and beat with a mixer for 1-2 minutes to restore the fluffy texture.Best Assembly Timeline:
For special occasions, bake the cakes 1-2 days ahead and store wrapped at room temperature. Make frosting the day before and refrigerate. On the day of serving, assemble and frost the cake, make ganache, and decorate. This spreads out the work and reduces stress while ensuring maximum freshness.Serving Suggestions
This Chocolate Peanut Butter Cake is a statement dessert that needs little accompaniment, but here are ways to elevate the experience.
Classic Pairings:
Serve slices with a cold glass of milk—whole milk or even chocolate milk for the ultimate chocolate-peanut butter experience. The milk cuts through the richness and makes every bite more enjoyable. For adults, strong black coffee or espresso provides a perfect bitter contrast to the sweet cake.Ice Cream Accompaniment:
A small scoop of vanilla ice cream alongside each slice adds wonderful temperature contrast and a cool, creamy element. Chocolate ice cream, peanut butter ice cream, or even banana ice cream all pair beautifully. Let the ice cream melt slightly into the cake for extra decadence.Beverage Pairings:
For special celebrations, consider dessert wines like port, cream sherry, or chocolate wine. Non-alcoholic options include chocolate milk, peanut butter milkshakes, hot chocolate, or vanilla chai tea.Fruit Balance:
Fresh raspberries, strawberries, or sliced bananas on the side provide a tart, fresh contrast to the rich cake. The fruit’s acidity cuts through the sweetness and makes the dessert feel less heavy. Arrange a few berries on each plate for a restaurant-style presentation.Birthday Party Serving:
For kids’ parties, serve smaller slices (this cake is rich!) with fun toppings on the side: extra Reese’s Pieces, chocolate chips, or whipped cream. Set up a little “decorate your own slice” station with various toppings for interactive fun.Plating for Photos:
For picture-perfect slices, place each piece on a white plate, add a small scoop of ice cream, drizzle with chocolate sauce, and garnish with a mini Reese’s cup on top. Add a dusting of cocoa powder on the plate for elegance.FAQs Section
Q: Can I make this cake without coffee?
A: Absolutely! Replace the hot coffee with an equal amount of hot water. The cake will still be delicious, though the chocolate flavor will be slightly less intense. Coffee enhances chocolate without making the cake taste like coffee—you won’t detect any coffee flavor in the finished cake, but if you prefer not to use it, hot water works fine.Q: Why is my cake dry?
A: The most common cause is overbaking. Start checking your cake at 28 minutes even if the recipe says 30-32 minutes. Every oven is different. The cake is done when a toothpick comes out with moist crumbs, not completely clean. Other causes include too much flour (measure correctly by spooning and leveling) or not enough liquid (did you add the full cup of coffee?).Q: Can I use chocolate buttercream instead of peanut butter frosting?
A: Of course! This recipe is versatile. For chocolate buttercream, cream 1 cup softened butter with ¾ cup cocoa powder, then gradually add 3-4 cups powdered sugar and ¼ cup heavy cream. Beat until fluffy. You’ll have a double chocolate cake that’s equally delicious.Q: My frosting is too thin/too thick. How do I fix it?
A: If your frosting is too thin, add more powdered sugar ¼ cup at a time until you reach the right consistency. If it’s too thick, add more heavy cream 1 tablespoon at a time. The consistency should be spreadable and hold its shape. Also ensure your butter and peanut butter were at proper room temperature—too warm makes thin frosting, too cold makes lumpy frosting.Q: Can I make this as cupcakes instead?
A: Yes! This recipe makes about 24 cupcakes. Line muffin tins with paper liners and fill each ⅔ full with batter. Bake at 350°F for 18-22 minutes until a toothpick comes out clean. Cool completely, then pipe or spread with peanut butter buttercream and drizzle with ganache.Q: Do I have to use the ganache drip?
A: Not at all! The ganache drip is beautiful but optional. You can simply frost the cake with peanut butter buttercream and decorate with chopped Reese’s cups or peanuts. Or spread a thin layer of ganache on top without creating drips. The cake will be delicious either way.Q: How do I get smooth frosting on my cake?
A: The secret is the crumb coat! Apply a thin layer of frosting all over the cake to seal in crumbs, then refrigerate for 15 minutes. This creates a clean base. For the final coat, use an offset spatula and smooth in one continuous motion around the sides, then smooth the top. A cake turntable makes this much easier. You can also dip your spatula in hot water, wipe it dry, and use it to smooth the frosting for an extra-smooth finish.Conclusion
There’s something truly special about a homemade Chocolate Peanut Butter Cake. It’s not just the incredible taste—though that chocolate-peanut butter combination is undeniably magical—it’s also the joy of creating something this beautiful and delicious with your own hands. This cake has the power to make birthdays more memorable, celebrations more festive, and ordinary days a little more extraordinary.
The best part? While this cake looks like it requires professional pastry skills, it’s actually completely achievable for home bakers. Yes, it involves a few steps and requires some patience while things cool, but none of the techniques are difficult. If you can mix ingredients and spread frosting, you can make this stunning cake.
Whether you’re baking this for someone special or treating yourself (because you deserve it!), I promise this Chocolate Peanut Butter Cake will exceed your expectations. The moist chocolate layers, creamy peanut butter frosting, and glossy ganache drip come together to create pure dessert perfection.
Ready to make this show-stopping cake? I can’t wait to hear how it turns out for you! Drop a comment below and tell me about your experience. Did you add any special decorations? Did your family go crazy for it? What occasion are you making it for? I love hearing from you!
If this recipe made you as excited as I am, please save it to your Pinterest boards and share it with your fellow baking enthusiasts. Every share, save, and comment helps support this blog and keeps these detailed, tested recipes coming your way. Now grab your mixing bowls and let’s bake something amazing! 🍫🥜🎂