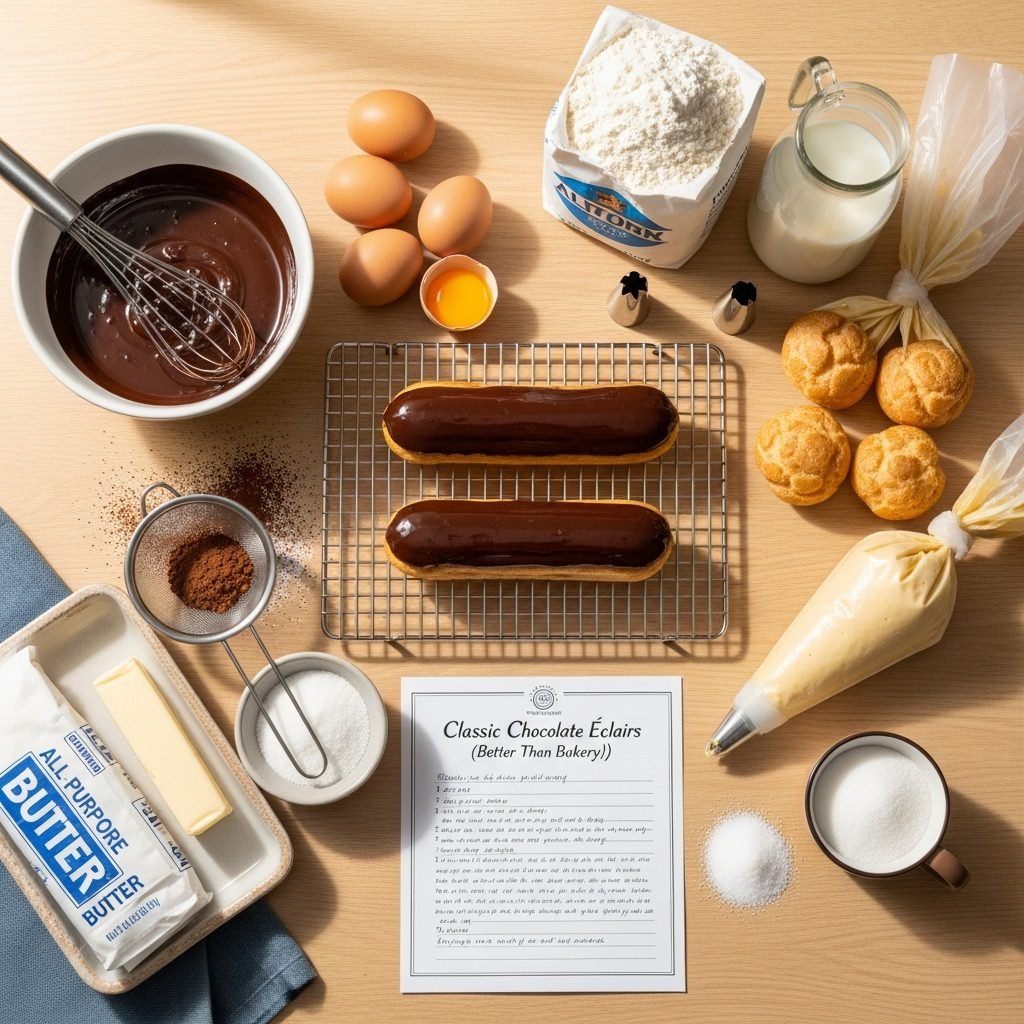
Classic Chocolate Éclairs Recipe (Better Than Bakery!)

Get ready to impress everyone with these show-stopping homemade chocolate éclairs! These elegant French pastries feature crispy choux pastry shells filled with rich vanilla cream and topped with glossy chocolate ganache. While they look incredibly fancy, this step-by-step recipe makes them totally achievable for home bakers. Perfect for special occasions, afternoon tea, or whenever you want to treat yourself to something truly spectacular.
Introduction of Recipe
Chocolate éclairs are one of the most beloved French pastries in the world—delicate oblong choux pastries filled with silky smooth pastry cream and crowned with a luscious chocolate glaze. The name “éclair” actually means “lightning” in French, possibly referring to how quickly these irresistible treats disappear once served! Each bite offers a perfect textural contrast: the light, crispy shell gives way to creamy, vanilla-scented filling, all finished with rich chocolate that melts on your tongue.
These pastries are incredibly versatile for serving occasions. They’re elegant enough for formal celebrations like weddings, anniversaries, and holiday gatherings, yet special enough to make any regular day feel like a celebration. Serve them at bridal showers, afternoon tea parties, birthday celebrations, or simply as an impressive weekend baking project. While they do require some technique and patience, the process is quite forgiving once you understand the basics, and the results are absolutely worth every minute spent in the kitchen.
What makes this recipe particularly wonderful is that it breaks down each component—the choux pastry, the pastry cream, and the chocolate topping—into manageable steps with clear instructions. You’ll learn the techniques that professional pastry chefs use, but adapted for the home kitchen with equipment you likely already own.
History / Background
The éclair has a rich history dating back to 19th-century France, during the golden age of French pastry making. While the exact origin is debated among culinary historians, the éclair as we know it today is generally credited to the legendary French chef Marie-Antoine Carême, often called the “King of Chefs and Chef of Kings,” who served in the early 1800s. Carême was a pioneer in French haute cuisine and is credited with refining many classic French pastries, including the development of choux pastry (pâte à choux) into the delicate, airy form we recognize today.
The éclair first appeared in French cookbooks in the 1850s, though it was initially called “pain à la Duchesse” (Duchess bread) or “petite Duchesse.” The name “éclair” emerged later in the century. There are several theories about why these pastries earned this lightning-quick name: some say it’s because they’re eaten so quickly (in a flash!), others believe it refers to the way the glossy chocolate topping gleams like a lightning bolt, and still others suggest it’s because the pastries were originally meant to be consumed quickly before the delicate pastry became soggy.
By the late 19th and early 20th centuries, éclairs had become a staple in Parisian pâtisseries and cafés, representing the pinnacle of French pastry artistry. The classic éclair became so iconic that it inspired countless variations—coffee éclairs, caramel éclairs, fruit-flavored versions, and more modern interpretations. French pastry chef Auguste Escoffier further codified éclair recipes in his influential 1903 cookbook “Le Guide Culinaire,” cementing their place in classical French cuisine.
The éclair made its way to America and other parts of the world through French immigrants and trained pastry chefs, becoming a beloved bakery item globally. Today, while traditional chocolate éclairs remain the most popular, creative pastry chefs worldwide have reimagined this classic with innovative flavors, fillings, and decorations, though the fundamental technique remains unchanged from Carême’s original vision.
Why You’ll Love This Recipe
This chocolate éclair recipe has been carefully developed to demystify French pastry making and make these elegant desserts accessible to home bakers of all skill levels. While éclairs have a reputation for being difficult, this recipe includes all the tips, tricks, and troubleshooting advice you need for guaranteed success.
Here’s why this recipe is absolutely amazing:
- Impressive but achievable – Looks like you bought them from an expensive French bakery, but they’re surprisingly doable at home
- Detailed step-by-step guidance – Every technique is explained clearly so you understand the “why” behind each step
- Customizable flavors – Easy to adapt with different fillings, toppings, and flavor variations
- Make-ahead friendly – Components can be prepared in advance and assembled when ready to serve
- Lighter than you’d expect – Choux pastry is surprisingly low in fat compared to other pastries, making these less heavy than cake
- Perfect for special occasions – These always steal the show at parties and celebrations
- Authentic French technique – Learn real pastry skills that you’ll use for many other recipes
- Fresher than store-bought – Homemade éclairs taste exponentially better than anything you can buy
- Great for gifting – Package these beautifully for a truly thoughtful homemade gift
- Freezer-friendly components – Make the shells ahead and freeze for quick assembly later
Ingredient Notes
Understanding your ingredients is crucial for pastry success. Here’s what you’ll need and why each component matters:
FOR THE CHOUX PASTRY:
Water & Butter – These create the base liquid for the dough. Butter must be cut into pieces so it melts completely before the flour is added. Some recipes use milk instead of water for a richer flavor, but water creates crisper shells.
All-Purpose Flour – Provides structure. Measure carefully by spooning into the cup and leveling off. Bread flour can be substituted for even crispier shells, but all-purpose works beautifully.
Eggs – The most crucial ingredient! Eggs provide moisture, richness, and structure. They create steam during baking, which makes the pastry puff up. Use large eggs at room temperature for best incorporation.
Salt & Sugar – Just a pinch of each balances flavors. Sugar helps with browning.
FOR THE PASTRY CREAM (CRÈME PÂTISSIÈRE):
Whole Milk – Full-fat milk creates the richest, creamiest filling. Low-fat milk can be used but won’t be as luscious. Some recipes add heavy cream for extra richness.
Egg Yolks – These thicken the cream and add richness. The yolks contain lecithin, which acts as an emulsifier and creates that silky texture.
Sugar – Sweetens the cream. You can adjust to taste, but don’t reduce too much or the texture will be affected.
Cornstarch – This is the thickening agent that transforms liquid milk into creamy custard. Flour can be substituted but cornstarch creates a smoother, more stable cream.
Vanilla Extract or Vanilla Bean – Pure vanilla is essential for authentic flavor. For an extra-special touch, use a real vanilla bean and scrape the seeds into the cream.
Butter – Added at the end for extra richness and glossy sheen. This is optional but highly recommended.
FOR THE CHOCOLATE GANACHE:
Semi-Sweet or Dark Chocolate – Use good quality chocolate (not chocolate chips, which contain stabilizers). The better your chocolate, the better your ganache.
Heavy Cream – Creates the smooth, pourable consistency. The fat content is important—don’t substitute with milk or half-and-half.
Butter – A small amount adds shine and helps the ganache set to the perfect consistency.
Corn Syrup or Honey (Optional) – Just a teaspoon keeps the ganache glossy and prevents it from becoming dull as it sets.
Equipment Needed
Having the right tools makes this recipe much easier. Here’s what you’ll need:
FOR THE CHOUX PASTRY:
- Medium saucepan (2-3 quart capacity)
- Wooden spoon or sturdy silicone spatula (for stirring the dough)
- Stand mixer or hand mixer (or strong arms for mixing by hand)
- Piping bags (disposable or reusable)
- Large round piping tip (½-inch opening, Ateco #806 or similar)
- Baking sheets (two large sheets)
- Parchment paper or silicone baking mats
- Ruler (for marking even éclair sizes)
FOR THE PASTRY CREAM:
- Medium saucepan
- Whisk
- Mixing bowl
- Fine-mesh strainer (crucial for silky-smooth cream)
- Plastic wrap (for preventing skin formation)
FOR ASSEMBLY:
- Small piping tip (for filling, Bismarck tip #230 is ideal)
- Offset spatula or butter knife (for spreading ganache)
- Wire cooling rack
Print

Chocolate Éclairs Recipe
Classic French chocolate éclairs featuring crispy choux pastry shells, smooth vanilla pastry cream filling, and rich chocolate ganache topping. These bakery-style pastries are surprisingly achievable at home with detailed instructions and look absolutely stunning on any dessert table.
- Total Time: 2 hours (including cooling and chilling)
- Yield: 12 éclairs 1x
Ingredients
ScaleFor the Choux Pastry:
- 1 cup (240ml) water
- ½ cup (113g) unsalted butter, cut into pieces
- 1 tablespoon granulated sugar
- ¼ teaspoon salt
- 1 cup (125g) all-purpose flour, sifted
- 4 large eggs, room temperature
For the Pastry Cream:
- 2 cups (480ml) whole milk
- ½ cup (100g) granulated sugar, divided
- 5 large egg yolks
- ¼ cup (32g) cornstarch
- 2 tablespoons unsalted butter
- 2 teaspoons pure vanilla extract
- Pinch of salt
For the Chocolate Ganache:
- 6 ounces (170g) semi-sweet or dark chocolate, finely chopped
- ½ cup (120ml) heavy cream
- 1 tablespoon unsalted butter
- 1 teaspoon light corn syrup (optional, for shine)
Instructions
MAKE THE PASTRY CREAM (Can be done up to 2 days ahead):
- Heat the milk: In a medium saucepan, heat the milk over medium heat until it just begins to simmer. Remove from heat and set aside.
- Whisk egg mixture: In a separate bowl, whisk together the egg yolks and ¼ cup of sugar until pale and slightly thick, about 2 minutes. Add the cornstarch and salt, whisking until completely smooth with no lumps.
- Temper the eggs: Slowly pour about ½ cup of the hot milk into the egg mixture while whisking constantly. This gradually raises the temperature of the eggs without scrambling them. Pour the tempered egg mixture back into the saucepan with the remaining milk, whisking constantly.
- Cook the cream: Place the saucepan back over medium heat. Whisk constantly, making sure to reach all corners of the pan. The mixture will thicken suddenly—keep whisking vigorously for 1-2 minutes after it thickens to cook out the starchy flavor.
- Finish and chill: Remove from heat and whisk in the butter, vanilla, and remaining ¼ cup sugar. Strain through a fine-mesh strainer into a clean bowl to remove any lumps. Press plastic wrap directly onto the surface to prevent a skin from forming. Refrigerate until completely cold, at least 2 hours or overnight.
MAKE THE CHOUX PASTRY:
- Preheat and prepare: Preheat your oven to 425°F (220°C). Line two baking sheets with parchment paper. Optionally, use a ruler to draw 4-inch lines spaced 2 inches apart as guides for piping.
- Make the dough: In a medium saucepan, combine water, butter, sugar, and salt. Bring to a full rolling boil over medium-high heat, ensuring the butter is completely melted.
- Add flour: Remove from heat and immediately add all the flour at once. Stir vigorously with a wooden spoon until the mixture forms a cohesive ball and pulls away from the sides of the pan, about 1 minute.
- Cook the dough: Return the pan to medium-low heat and cook, stirring constantly, for 2-3 minutes. This step is crucial—it dries out the dough and cooks the flour, which helps the éclairs puff properly. The dough should leave a thin film on the bottom of the pan.
- Cool slightly: Transfer the dough to the bowl of a stand mixer fitted with the paddle attachment (or use a hand mixer and large bowl). Beat on medium speed for about 1 minute to release some steam and cool the dough slightly. The bowl should feel warm but not hot to the touch.
- Add eggs: With the mixer running on medium speed, add the eggs one at a time, beating well after each addition until fully incorporated. The dough will look broken at first but will come together. After the last egg, beat until the dough is smooth, glossy, and falls from the paddle in a thick ribbon.
- Pipe the éclairs: Transfer the dough to a piping bag fitted with a large round tip (½-inch). Hold the bag at a 45-degree angle and pipe 4-inch long strips onto the prepared baking sheets, spacing them 2 inches apart. Use a wet finger to gently smooth any peaks.
- Bake: Bake at 425°F for 15 minutes without opening the oven. Then reduce the temperature to 375°F (190°C) and continue baking for 15-20 minutes more until golden brown and firm to the touch. The éclairs should feel light and hollow.
- Dry the shells: Turn off the oven. Use a sharp knife to poke a small hole in each end of each éclair to release steam. Return to the warm oven with the door slightly ajar for 10 minutes to dry out the interiors. Transfer to a wire rack to cool completely.
MAKE THE CHOCOLATE GANACHE:
- Heat cream: In a small saucepan, heat the heavy cream over medium heat until it just begins to simmer. Remove from heat.
- Melt chocolate: Place the chopped chocolate in a heatproof bowl. Pour the hot cream over the chocolate and let sit for 2 minutes without stirring.
- Combine: Add the butter and corn syrup (if using), then whisk gently from the center outward until smooth and glossy. Let cool for 5-10 minutes until slightly thickened but still pourable.
ASSEMBLE THE ÉCLAIRS:
- Fill the shells: Transfer the chilled pastry cream to a piping bag fitted with a small round tip (a Bismarck tip works best). Poke three small holes along the bottom of each éclair. Insert the piping tip into each hole and squeeze gently to fill, moving from one end to the other until you feel slight resistance.
- Apply ganache: Dip the top of each filled éclair into the chocolate ganache, allowing excess to drip off. Run your finger along the edges for a clean finish. Alternatively, use an offset spatula to spread ganache on top.
- Set and serve: Place the glazed éclairs on a rack or baking sheet. Let the ganache set at room temperature for 30 minutes, or refrigerate for 10 minutes. Serve immediately or refrigerate until ready to serve (best served within 6-8 hours of assembly).
Notes
- Eggs must be at room temperature for proper incorporation
- Don’t open the oven during the first 15 minutes of baking—this causes the éclairs to collapse
- The dough should be smooth and glossy with a thick, ribbon-like consistency
- Properly baked shells should be golden brown, firm, and feel light and hollow
- If shells are pale or soft, they need more baking time
- Pastry cream can be made 2 days ahead and refrigerated
- Unfilled shells can be frozen for up to 1 month
- Assembled éclairs are best eaten within 24 hours
- For extra insurance against soggy shells, brush the insides with melted chocolate before filling
- Prep Time: 45 minutes (plus cooling time)
- Cook Time: 35 minutes
- Category: Desert
- Method: Baking
- Cuisine: French
- Diet: Vegetarian
Nutrition
- Serving Size: 1 éclair
- Calories: 285
- Sugar: 18g
- Sodium: 85mg
- Fat: 17g
- Saturated Fat: 10g
- Unsaturated Fat: 6g
- Trans Fat: 0g
- Carbohydrates: 28g
- Fiber: 1g
- Protein: 6g
- Cholesterol: 165mg
-
Tips & Variations
Flavor Variations:
- Coffee Éclairs: Add 2 tablespoons instant espresso powder to the pastry cream and use coffee-flavored ganache
- Caramel Éclairs: Replace chocolate ganache with salted caramel sauce and add caramel flavoring to the cream
- Raspberry Éclairs: Fold ½ cup raspberry purée into the pastry cream and top with white chocolate ganache
- Pistachio Éclairs: Add pistachio paste to the cream and garnish with crushed pistachios
- Lemon Éclairs: Replace vanilla with lemon zest in the cream and use white chocolate lemon ganache
Topping Ideas:
- White chocolate ganache with fresh berries
- Milk chocolate ganache with toasted hazelnuts
- Caramelized sugar for a crunchy top
- Fondant icing (traditional French style)
- Chocolate glaze with gold leaf for elegant occasions
Filling Variations:
- Whipped cream lightened pastry cream (crème légère)
- Chocolate pastry cream (add melted chocolate)
- Diplomat cream (pastry cream + whipped cream)
- Flavored buttercream for a different texture
Pro Chef Tips
The perfect choux consistency: The dough should be smooth, glossy, and hold a V-shape when you lift the paddle—it should slowly fall back into the bowl. If too stiff, the éclairs won’t expand properly. If too loose, they’ll spread instead of puffing up. The “right” consistency comes from proper egg incorporation—add eggs gradually and check consistency.
Don’t underbake: The most common mistake is removing éclairs too early. They should be deeply golden brown and feel firm and light. If they’re pale or soft, they’ll collapse as they cool. When in doubt, bake longer—overcooked is better than undercooked.
Steam is your friend (then your enemy): Steam makes the pastry puff, but trapped steam makes them soggy. Always poke holes to release steam after baking, and let them dry in the warm oven. This creates shells that stay crispy for hours.
Temperature control matters: Hot dough will cook the eggs and create scrambled bits. Cool the dough by beating it in the mixer for 1 minute before adding eggs. The bowl should feel warm (not hot) to your hand.
Strain the pastry cream: Always strain to remove any cooked egg bits or lumps. This step is non-negotiable for silky-smooth cream. Press it through with a spatula if needed.
Work with cold cream: Pastry cream should be thoroughly chilled before piping—it firms up and won’t leak out. If it’s too thick to pipe, whisk it briefly to loosen, but keep it cold.
Make a test éclair: If you’re unsure about your dough consistency, pipe and bake one test éclair first. This lets you adjust before committing the whole batch.
Common Mistakes to Avoid
Not cooking the dough enough after adding flour: That crucial 2-3 minutes of stirring over heat isn’t optional—it’s what dries out the dough and allows it to absorb more eggs, which creates steam and puffing. Undercooking this step results in flat, dense éclairs that won’t rise properly.
Opening the oven too early: Don’t open that oven door for at least 15 minutes! The temperature drop causes the delicate structure to collapse before it’s set. Steam escaping too early means flat éclairs. Use your oven light to check progress.
Adding eggs to hot dough: If the dough is too hot when you add eggs, you’ll end up with scrambled egg bits in your pastry. Always cool the dough slightly by beating it first—the bowl should feel warm but not hot to the touch.
Overfilling the shells: It’s tempting to pump lots of cream in, but overfilled éclairs will burst and leak. Fill until you feel slight resistance, then stop. The éclair should feel slightly heavier but not bulging.
Assembling too early: If you fill and glaze éclairs more than a few hours before serving, the crispy shells will become soggy from the moisture in the cream and ganache. For best results, assemble 2-6 hours before serving and keep refrigerated.
Storage & Meal Prep
Assembled Éclairs: Filled and glazed éclairs should be refrigerated in a single layer in an airtight container. They’re best consumed within 24 hours—after that, the shells begin to soften significantly. Never leave cream-filled éclairs at room temperature for more than 2 hours (food safety issue).
Unfilled Shells: Completely cooled, unfilled shells can be stored at room temperature in an airtight container for up to 2 days, though they’re crispest the day they’re baked. Make sure they’re thoroughly dried out and cooled before storing, or they’ll become soggy. If they soften, crisp them in a 300°F oven for 5 minutes.
Pastry Cream: Store pastry cream in an airtight container with plastic wrap pressed directly on the surface (to prevent skin formation) in the refrigerator for up to 3 days. Whisk briefly before using to smooth out any lumps.
Chocolate Ganache: Leftover ganache keeps refrigerated for up to 1 week. Reheat gently in the microwave in 10-second bursts or over a double boiler, stirring until smooth and pourable again.
Refreshing Softened Shells: If stored shells lose their crispness, place them on a baking sheet in a 300°F oven for 5-7 minutes to re-crisp, then cool completely before filling.
Make-Ahead & Freezer Notes
Freezing Unfilled Shells (Highly Recommended!): This is the best make-ahead strategy for éclairs. Bake the shells completely, let them cool, then freeze in a single layer on a baking sheet until solid. Transfer to freezer bags or airtight containers for up to 2 months. To use, place frozen shells on a baking sheet in a 300°F oven for 10 minutes to thaw and re-crisp. Cool completely before filling.
Prepare Components Ahead: The ideal approach is to make components separately over several days:
- 2 days before: Make pastry cream, refrigerate
- 1 day before: Bake shells, store at room temperature or freeze
- Day of serving: Make ganache and assemble 2-6 hours before serving
Freezing Assembled Éclairs: While possible, this isn’t ideal as the shells lose their crispy texture. If you must, freeze assembled éclairs on a baking sheet until solid, then wrap individually in plastic wrap. Freeze for up to 1 month. Thaw in the refrigerator for 2-3 hours before serving. The texture won’t be quite as good as fresh.
Can You Freeze the Dough? Choux pastry dough doesn’t freeze well unbaked—it changes texture. Always bake first, then freeze the shells.
Best Reheating Method: For frozen shells, bake at 300°F for 10 minutes directly from frozen. For refrigerated assembled éclairs, let them come closer to room temperature for 15-20 minutes before serving for the best flavor (but don’t leave out longer than 2 hours).
Serving Suggestions
Éclairs are incredibly versatile and can be served for various occasions:
For Afternoon Tea:
- Arrange on a tiered cake stand with finger sandwiches and scones
- Serve alongside hot tea, coffee, or champagne
- Include fresh fruit and petit fours for variety
- Use small plates and decorative napkins for elegant presentation
For Celebrations:
- Create an éclair tower as a centerpiece (alternative to wedding cake)
- Offer assorted flavors for variety
- Garnish platter with fresh flowers and berries
- Serve with dessert wine or coffee
Beverage Pairings:
- Espresso or strong coffee (cuts the richness beautifully)
- French press coffee
- Earl Grey or English Breakfast tea
- Hot chocolate for double chocolate experience
- Dessert wines like Sauternes or late-harvest Riesling
- Champagne or sparkling wine for celebrations
- Port or sherry for adult gatherings
Plating Ideas:
- Dust with powdered sugar for a sophisticated look
- Drizzle plate with chocolate or caramel sauce
- Add fresh berries and mint leaves as garnish
- Serve with a small scoop of vanilla ice cream
- Create a dessert plate with éclair, fruit, and sauce
Party Presentation:
- Mini éclairs (3 inches) for cocktail parties
- Label different flavors with small cards
- Serve on marble or slate boards for modern appeal
- Use gold foil underneath for luxury presentation
FAQs Section
Why didn’t my éclairs puff up? Several factors cause this: dough that’s too dry (not enough eggs), opening the oven too early (letting steam escape), insufficient baking time, or not cooking the flour mixture long enough initially. Make sure your dough has a glossy, ribbon-like consistency and bake until deeply golden brown without opening the door for at least 15 minutes.
Can I make éclairs without a piping bag? While a piping bag is strongly recommended for best results, you can use a plastic storage bag with the corner snipped off in a pinch. However, getting the classic éclair shape is much harder. For the filling, you could also carefully slice shells lengthwise and spoon in the cream, though piping creates less mess and better distribution.
My pastry cream is lumpy—can I fix it? Yes! Pour the cream through a fine-mesh strainer, pressing it through with a rubber spatula or the back of a spoon. This removes any cooked egg bits or cornstarch lumps. Always strain pastry cream for the smoothest results. If it’s too thick after straining, whisk in a tablespoon of milk to loosen.
Why did my éclairs collapse after baking? This happens when shells are underbaked (still pale or soft), you opened the oven door too early, or you didn’t poke holes to release steam. The structure needs to be fully set and crispy before cooling. If they’re collapsing, they need more time in the oven. Proper éclairs should feel light and hollow.
Can I use milk instead of water in choux pastry? Yes, you can replace some or all of the water with milk for richer flavor, though traditional recipes use water. Milk makes the shells slightly softer and more tender with a richer taste, while water creates crispier shells. Many bakers use a 50/50 combination for the best of both worlds.
How far in advance can I fill éclairs? For optimal texture, fill and glaze éclairs 2-6 hours before serving. Any longer and the shells begin to soften from the moisture in the cream. If you need to prepare further ahead, keep components separate and assemble closer to serving time.
Can I use chocolate chips instead of bar chocolate for ganache? While possible, it’s not ideal. Chocolate chips contain stabilizers that prevent melting smoothly, resulting in a grainy, less glossy ganache. Always use bar chocolate (chopped) or chocolate melting wafers for the silkiest ganache. The quality of chocolate directly affects your final result.
Do éclairs need to be refrigerated? Yes, once filled with pastry cream, éclairs must be refrigerated because cream contains eggs and dairy. Never leave filled éclairs at room temperature for more than 2 hours (1 hour if it’s warm). Unfilled shells can stay at room temperature, but filled éclairs are perishable and must stay cold for food safety.
Conclusion
Congratulations—you now have all the knowledge you need to create stunning, bakery-worthy chocolate éclairs right in your own kitchen! While these French pastries have a reputation for being difficult, I hope this detailed guide has shown you that with the right techniques and a little patience, they’re completely achievable for home bakers. Yes, there are multiple components and steps, but each one is straightforward when broken down, and the results are absolutely spectacular.
There’s something incredibly satisfying about mastering a classic pastry technique like choux pastry. Once you’ve made éclairs successfully, you’ll have the confidence to tackle cream puffs, profiteroles, Paris-Brest, and other impressive French pastries. These skills will serve you well in your baking journey, and you’ll find yourself reaching for this recipe again and again for special occasions.
The beauty of éclairs is that while they look incredibly fancy and professional, they’re actually quite forgiving once you understand the basic principles. Don’t be discouraged if your first batch isn’t perfect—even experienced bakers sometimes have éclairs that don’t puff quite right. Learn from each batch, and remember that even imperfect éclairs taste absolutely delicious!
Now it’s your turn to shine! I’d love to hear about your éclair-making adventures. Did you try a flavor variation? How did your first batch turn out? Share your results, questions, and photos in the comments below—I read every single one and love seeing your creations! Don’t forget to rate this recipe if you try it, and please pin it to your favorite Pinterest boards so you can find it easily for your next baking project. Your friends and family are going to be so impressed when you serve these gorgeous homemade éclairs! Happy baking! 🥐✨