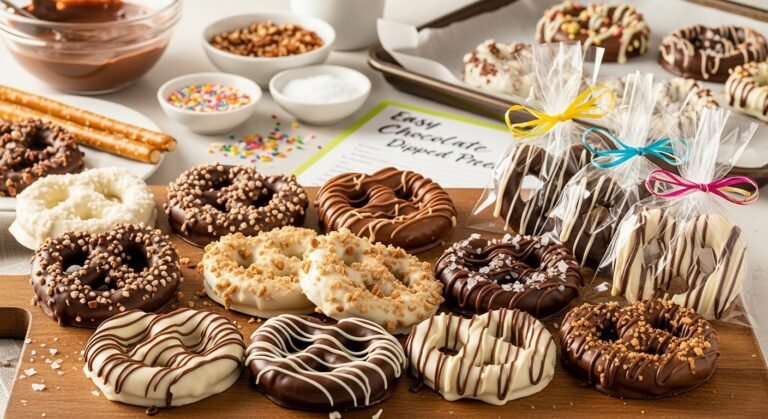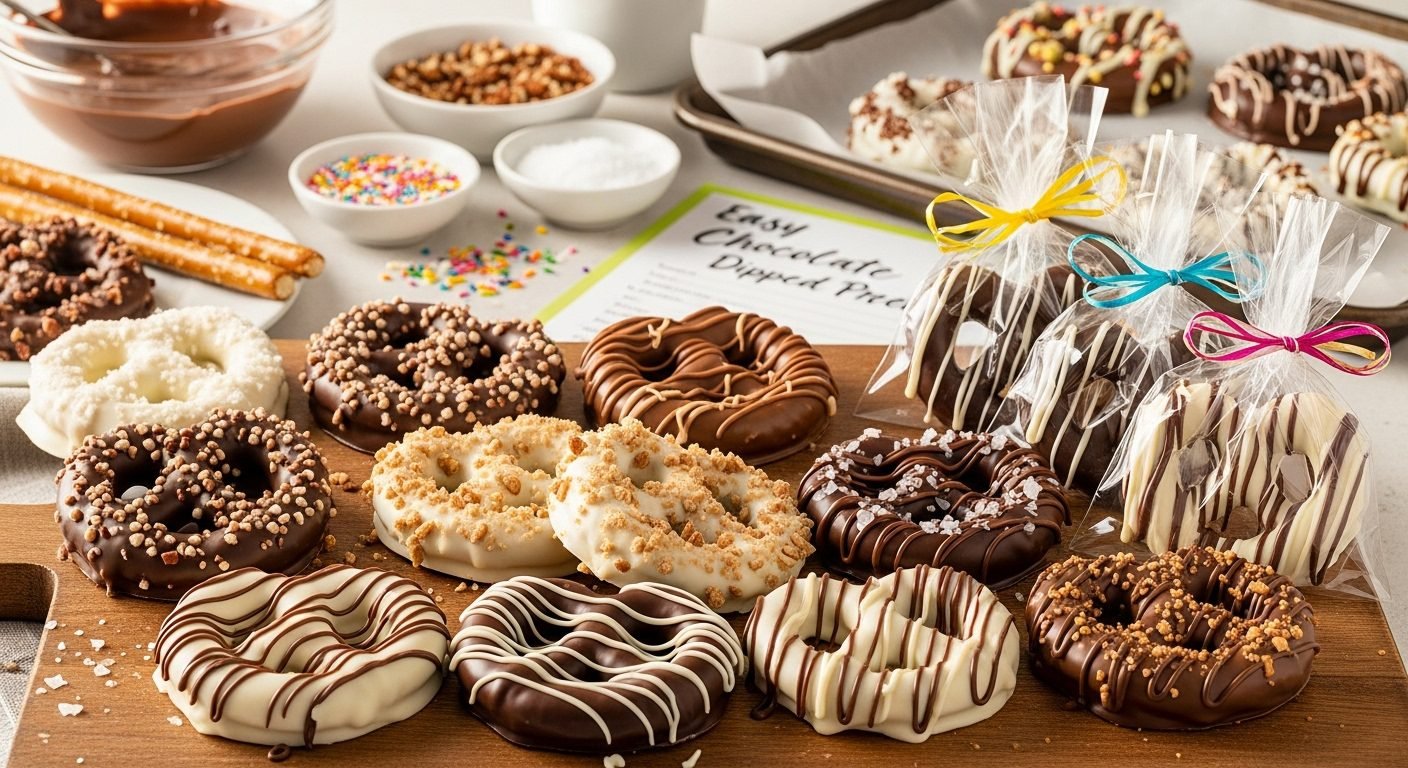
Easy Chocolate Dipped Pretzels Recipe (Perfect for Gifts!)

There’s something absolutely irresistible about the combination of sweet chocolate and salty pretzels. Chocolate dipped pretzels are one of those treats that look incredibly impressive but are surprisingly simple to make at home. Whether you’re preparing them for a holiday party, packaging them as homemade gifts, or simply satisfying a sweet and salty craving, these beautiful confections deliver every single time.
What makes chocolate dipped pretzels so special is their versatility and visual appeal. You can dress them up with colorful sprinkles for birthdays, drizzle them with white chocolate for weddings, or keep them simple and elegant for any occasion. They’re perfect for baby showers, bridal showers, Valentine’s Day, Christmas cookie exchanges, teacher appreciation gifts, or just because. Plus, they require minimal ingredients and no baking, making them an ideal project for beginner cooks or for involving kids in the kitchen. The satisfying crunch of the pretzel combined with smooth, creamy chocolate creates a textural experience that keeps everyone coming back for more.
History / Background
The combination of chocolate and pretzels represents a beautiful marriage of two ancient food traditions. Pretzels themselves have a fascinating history dating back to early Medieval Europe, around 610 AD. According to legend, Italian monks created the first pretzels as rewards for children who learned their prayers. The twisted shape was designed to resemble arms crossed in prayer, and the three holes represented the Holy Trinity. The Latin word “pretiola,” meaning “little reward,” eventually evolved into the word pretzel.
Pretzels made their way to America with German and Swiss immigrants in the 18th and 19th centuries. Pennsylvania, particularly the Lancaster and Reading areas, became the pretzel capital of America. By the early 1900s, pretzel bakeries were flourishing, and the snack became a beloved staple of American snacking culture.
Chocolate, on the other hand, has been cherished for thousands of years, originally consumed as a bitter beverage by ancient Mesoamerican civilizations like the Aztecs and Mayans. European colonization brought chocolate back to Europe, where sugar was added, transforming it into the sweet treat we know today. By the 19th century, solid chocolate bars became widely available thanks to innovations in processing.
The concept of chocolate-covered pretzels emerged in the 20th century as American snack food culture exploded. The exact origin is difficult to pinpoint, but chocolate-covered pretzels gained commercial popularity in the 1990s when specialty candy companies began mass-producing them. However, home cooks had been dipping pretzels in chocolate long before that, recognizing that the sweet-salty combination was pure magic.
The rise of chocolate dipped pretzels as a homemade gift and party favor really took off in the 2000s with the growth of food blogs, Pinterest, and craft culture. Home bakers discovered that chocolate dipped pretzels were not only delicious but also incredibly photogenic and customizable. They became a staple at craft fairs, bake sales, and homemade gift exchanges.
Today, chocolate dipped pretzels have secured their place in American food culture as both a beloved snack and a creative canvas for edible art. They’re popular year-round but especially during the holidays when people are looking for easy, impressive homemade gifts that won’t break the bank.
Why You’ll Love This Recipe
This chocolate dipped pretzels recipe is about to become your go-to treat for every occasion, and here’s why. It’s impossibly easy yet produces results that look like they came from a high-end candy shop. No special skills required – if you can melt chocolate and dip a pretzel, you can make these successfully.
Here’s why this recipe is absolutely fantastic:
- Incredibly simple – Only 2 basic ingredients needed (pretzels and chocolate)
- No baking required – Perfect for hot summer days or when you don’t want to heat up the kitchen
- Ready in 30 minutes – From start to finish, including setting time
- Kid-friendly activity – Children love helping dip and decorate these treats
- Endlessly customizable – Change colors, toppings, and chocolate types for any theme
- Budget-friendly – Makes a large batch for very little money
- Perfect for gifts – Package them beautifully for impressive homemade presents
- Crowd-pleasing flavor – The sweet and salty combo appeals to almost everyone
- Allergy-friendly options – Easy to make gluten-free or dairy-free with simple swaps
- No special equipment – Everything you need is probably already in your kitchen
- Great for parties – Make hundreds quickly for events and celebrations
- Long shelf life – Stays fresh for weeks when stored properly
- Impressive presentation – Looks professional with minimal effort
Ingredient Notes
Let me walk you through the simple ingredients that make these chocolate dipped pretzels absolutely perfect. Understanding your options will help you create exactly the treats you’re envisioning.
Pretzels: The foundation of this recipe! You have several options here. Traditional pretzel rods (the long, thin stick pretzels) are the most popular choice because they’re easy to dip and hold, creating an elegant presentation. They’re perfect for packaging in cellophane bags tied with ribbon. Pretzel twists (the classic twisted shape) are also wonderful and offer more surface area for chocolate coverage. Mini pretzels are adorable for bite-sized treats, and pretzel squares or snaps work well too. I recommend using name-brand pretzels rather than generic ones – they tend to be crunchier and fresher, which makes a big difference in the final product. Make sure your pretzels are fresh and crispy, not stale or soft.
Chocolate: This is where you have the most options and where quality really matters. You can use chocolate chips, chocolate melting wafers (candy melts), or high-quality chocolate bars. Here’s the breakdown:
- Chocolate Chips: Semi-sweet, milk chocolate, or dark chocolate chips work well. For the smoothest coating, add 1 tablespoon of coconut oil or shortening per 12 ounces of chips to thin the chocolate and make it easier to work with.
- Chocolate Melting Wafers (Candy Melts): These are specifically designed for candy-making and come in dozens of colors. They melt smoothly without needing any additions, set quickly, and hold up well at room temperature. They’re available in the baking aisle under brands like Ghirardelli, Wilton, and others. They’re slightly less “chocolatey” in flavor than real chocolate but incredibly convenient.
- High-Quality Chocolate Bars: If you want the richest, most authentic chocolate flavor, use high-quality baking chocolate or chocolate bars (like Ghirardelli, Callebaut, or Guittard). Chop it into small, uniform pieces for even melting. You’ll want to temper this chocolate for the best results, though it’s not absolutely necessary for home use.
Optional Toppings: This is where the fun begins! Sprinkles (jimmies, nonpareils, sanding sugar), crushed candy canes, mini chocolate chips, chopped nuts (almonds, pecans, peanuts), shredded coconut, sea salt flakes, crushed cookies (Oreos, graham crackers), edible glitter, or freeze-dried fruit pieces all work beautifully. Apply toppings while the chocolate is still wet so they stick properly.
White Chocolate (for drizzling): If you want to create those beautiful drizzle patterns, keep white chocolate melting wafers or chips on hand. The contrast between dark and white chocolate (or vice versa) creates stunning visual appeal.
Equipment Needed
The beauty of this recipe is that you don’t need any specialized equipment. Here’s what you’ll need to gather:
- Microwave-safe bowls – For melting chocolate (glass or ceramic work best)
- Baking sheets – To set the dipped pretzels on while they dry
- Parchment paper or wax paper – Lines the baking sheets for easy release
- Spoon or rubber spatula – For stirring the chocolate while melting
- Fork or dipping tool – Helps with dipping and allows excess chocolate to drip off
- Piping bag or zip-top bag – For drizzling contrasting chocolate (optional)
- Small bowls – To hold your toppings within easy reach
- Cooling rack – Optional, but helps air circulate around dipped pretzels
Nice to Have:
- Double boiler – If you prefer to melt chocolate on the stovetop rather than microwave
- Candy dipping tools – Special forks designed for candy making (but a regular fork works fine)
- Candy thermometer – Only if you’re tempering chocolate
Print

Chocolate Dipped Pretzels Recipe
These easy chocolate dipped pretzels combine sweet chocolate with salty pretzels for the perfect sweet and salty treat. Customize them with sprinkles, drizzles, and toppings for any occasion. Perfect for gifts, parties, or everyday snacking!
- Total Time: 30 minutes (including setting time)
- Yield: About 24 pretzel rods (or 48 pretzel twists) 1x
Ingredients
ScaleBasic Recipe:
- 24 pretzel rods (or 48 pretzel twists)
- 16 ounces chocolate (chocolate chips, melting wafers, or chopped chocolate bars)
- 1 tablespoon coconut oil or shortening (optional, only if using chocolate chips)
Optional Decorations:
- 4 ounces white chocolate or contrasting color melting wafers (for drizzling)
- 1/2 cup sprinkles, chopped nuts, or other toppings of choice
- Pinch of flaky sea salt
Instructions
Step 1: Prepare Your Workspace
Line two large baking sheets with parchment paper or wax paper and set them aside. This is crucial because you’ll need somewhere to place the dipped pretzels immediately, and once you start dipping, you won’t have time to stop and prepare. Arrange your pretzels on the counter within easy reach. If using toppings, pour them into small bowls and have them ready nearby.
Step 2: Melt the Chocolate
For microwave method: Place the chocolate (and coconut oil if using chocolate chips) in a microwave-safe bowl. Microwave on 50% power for 30 seconds, then stir. Continue microwaving in 15-20 second intervals at 50% power, stirring thoroughly between each interval, until the chocolate is completely melted and smooth. Don’t rush this process by using high power – chocolate can easily burn and become grainy. The entire melting process typically takes 2-3 minutes total.
For stovetop method: Fill a medium saucepan with about 2 inches of water and bring to a gentle simmer. Place the chocolate in a heat-safe bowl that fits over the saucepan without touching the water (double boiler). Stir constantly until the chocolate is completely melted and smooth. Remove from heat.
The chocolate should be glossy, smooth, and warm (not hot). If the chocolate seems too thick, stir in a small amount of coconut oil, one teaspoon at a time, until you reach a good dipping consistency.
Step 3: Dip the Pretzels
Hold a pretzel by the end that you want to keep clean (usually about 1-2 inches from the top). Dip the pretzel into the melted chocolate, tilting the bowl if necessary to coat the pretzel about two-thirds of the way up. You want to leave some of the plain pretzel showing at the top for holding.
Lift the pretzel out and hold it over the bowl for a few seconds, allowing excess chocolate to drip back into the bowl. You can gently tap the pretzel against the edge of the bowl to help remove excess. Some people like to use a fork to help guide the pretzel and allow more chocolate to drip through the tines.
Step 4: Add Toppings
While the chocolate is still wet, add your desired toppings. Work quickly – the chocolate begins to set within a minute or two. You can sprinkle toppings over the pretzel, roll it in toppings, or carefully press toppings onto the chocolate. If using sea salt, just a small pinch on each pretzel is perfect.
Step 5: Set the Pretzels
Carefully place the dipped pretzel onto your prepared baking sheet. Make sure pretzels don’t touch each other, or they’ll stick together as they dry. Repeat the dipping process with remaining pretzels, working in batches if necessary. If your chocolate starts to thicken as you work, reheat it briefly in 10-15 second intervals.
Step 6: Add Drizzle (Optional)
If you want to add a contrasting chocolate drizzle, melt your white chocolate or contrasting color using the same method as before. Transfer the melted chocolate to a piping bag or a zip-top plastic bag with a tiny corner snipped off. Drizzle the chocolate over the dipped pretzels in zigzag patterns, swirls, or straight lines. You can also use a fork to create thin, delicate drizzle lines.
Step 7: Let Set
Allow the chocolate to set completely at room temperature for about 15-20 minutes. If you’re in a hurry, you can place the baking sheets in the refrigerator for 10 minutes to speed up the process. However, room temperature setting creates a better finish with less chance of chocolate bloom (white streaks).
Step 8: Store or Package
Once completely set, the pretzels can be served immediately or stored in an airtight container. If packaging as gifts, place them in cellophane bags, decorative tins, or gift boxes.
Notes
- Chocolate Quality: Higher quality chocolate tastes better but costs more. For everyday treats, chocolate chips with coconut oil work great. For gifts, consider splurging on premium chocolate.
- Thin vs. Thick Coating: If you prefer a thinner chocolate coating, use a fork to help more chocolate drip off. For a thicker coating, allow less dripping time.
- Humid Days: Just like with any chocolate work, humidity can affect setting time and may cause chocolate bloom. Choose a dry day for best results.
- Portion Control: These are rich! One pretzel rod is usually enough for one serving.
- Gluten-Free Option: Use certified gluten-free pretzels to make this treat gluten-free.
- Vegan Option: Use dairy-free chocolate chips or vegan chocolate and dairy-free pretzels.
- Prep Time: 15 minutes
- Cook Time: 5 minutes (melting chocolate)
- Category: Dessert, Snack, Candy
- Method: No-Bake
- Cuisine: American
- Diet: Vegetarian
Nutrition
- Serving Size: 1 chocolate-dipped pretzel rod
- Calories: 145
- Sugar: 12g
- Sodium: 180mg
- Fat: 6g
- Saturated Fat: 3.5g
- Unsaturated Fat: 2g
- Trans Fat: 0g
- Carbohydrates: 21g
- Fiber: 1g
- Protein: 2g
- Cholesterol: 2mg
Tips & Variations
Once you’ve mastered the basic technique, the creative possibilities are endless! Here are some fun ways to customize your chocolate dipped pretzels for different occasions and tastes.
Holiday Variations:
- Christmas: Use red and green sprinkles, crushed candy canes, or drizzle with white chocolate and dust with edible gold glitter
- Valentine’s Day: Dip in pink or red melting wafers, add heart-shaped sprinkles, or drizzle with white chocolate
- Easter: Use pastel-colored melting wafers and spring-themed sprinkles
- Halloween: Orange and black sprinkles, or dip in orange chocolate with black drizzle
- Fourth of July: Red, white, and blue sprinkles or layers of colored chocolate
Flavor Combinations:
- Peanut Butter Lover: Dip in chocolate and immediately roll in crushed peanut butter cups or chopped peanuts
- S’mores Style: Use milk chocolate, roll in crushed graham crackers, and add mini marshmallows
- Cookies and Cream: Dip in white chocolate and roll in crushed Oreo cookies
- Salted Caramel: Drizzle with caramel sauce and sprinkle with flaky sea salt
- Mint Chocolate: Add 1/4 teaspoon peppermint extract to melted chocolate, or crush candy canes on top
- Espresso: Add 1 teaspoon instant espresso powder to melted chocolate for a coffee kick
- Coconut Almond: Dip in dark chocolate and roll in toasted coconut and sliced almonds
Different Chocolate Types:
- Dark Chocolate: For a more sophisticated, less sweet version
- White Chocolate: Sweet and creamy, perfect for spring occasions
- Ruby Chocolate: Beautiful pink color with a unique berry-like flavor
- Peanut Butter Chips: For peanut butter lovers
- Butterscotch Chips: Old-fashioned and delicious
Pretzel Varieties:
- Mini Pretzels: Perfect bite-sized treats for parties
- Pretzel Squares: Easy to package and serve
- Gluten-Free Pretzels: For those with gluten sensitivities
- Sourdough Pretzels: For a tangier flavor base
Pro Chef Tips
Want to take your chocolate dipped pretzels from good to absolutely stunning? Here are professional techniques that will elevate your candy-making game.
Use High-Quality Chocolate: This is the single most important factor in how your pretzels taste. Premium chocolate contains more cocoa butter, which creates a smoother melt and better snap when set. Brands like Ghirardelli, Guittard, or Callebaut are worth the extra cost when you want impressive results.
Control the Temperature: Chocolate is temperature-sensitive. For melting wafers or chips, aim for 85-90°F for dark chocolate or 80-85°F for milk and white chocolate. Too hot and the chocolate will be thin and can scorch; too cool and it will be thick and hard to work with. If you overheat chocolate, it can seize (become grainy and clumpy), which is nearly impossible to fix.
Thin Chocolate Properly: If your chocolate seems too thick for smooth dipping, thin it correctly. For real chocolate, add coconut oil or cocoa butter (never water or milk, which will cause seizing). For melting wafers, add paramount crystals or a small amount of vegetable shortening. Start with 1 teaspoon per 12 ounces of chocolate and add more as needed.
Tap Away Excess: Professional candy makers always tap their dipping fork or the pretzel itself against the side of the bowl to remove excess chocolate. This creates a thinner, more elegant coating and prevents chocolate from pooling at the bottom of your pretzel. Three gentle taps is usually perfect.
Work in Small Batches: Don’t melt all your chocolate at once. Working with smaller amounts (12 ounces at a time) keeps the chocolate at the right temperature longer. You can always melt more – it’s much harder to rescue chocolate that’s been sitting too long and started to thicken.
Create a Smooth Finish: For the smoothest, most professional finish, gently swirl the pretzel as you lift it from the chocolate. This distributes the coating evenly and prevents lines or drips.
Room Temperature Setting: While refrigerating is tempting for faster setting, room temperature produces the best finish. Rapid cooling can cause chocolate bloom (whitish streaks or spots), which doesn’t affect taste but looks less professional. If you must refrigerate, let pretzels come to room temperature before packaging.
Drizzle Like a Pro: For beautiful, delicate drizzle lines, use a piping bag or plastic bag with just a tiny opening. Hold it 6-8 inches above the pretzels and move in quick, confident motions. Less is more – restraint creates elegance.
Fresh Pretzels Are Key: Stale pretzels will make the entire treat disappointing. Buy fresh pretzels and use them within a few days for maximum crunch. You can tell pretzels are fresh if they snap cleanly when broken rather than bending.
Common Mistakes to Avoid
Even though chocolate dipped pretzels are simple, there are a few common pitfalls that can derail your candy-making. Here’s how to avoid them.
Chocolate Seizing (Becoming Grainy and Clumpy): This is the most common chocolate disaster and it’s usually caused by water or moisture coming into contact with the chocolate. Even a few drops of water can cause the entire batch to seize. Make sure all your bowls, spoons, and tools are completely dry. Don’t cover chocolate while melting (steam can drip back down). If your chocolate does seize, you can sometimes save it by stirring in coconut oil, one tablespoon at a time, until it smooths out again, but prevention is much easier.
Burned or Scorched Chocolate: Chocolate burns easily, especially in the microwave. Always use 50% power and short intervals, stirring thoroughly between each heating. If your chocolate smells burned or tastes bitter, it’s ruined and needs to be thrown out. Start over with fresh chocolate and lower power settings.
Chocolate Too Thick for Dipping: If your melted chocolate is thick and gloppy rather than smooth and pourable, it’s either not warm enough or needs thinning. Reheat briefly if it’s cooled down, or add coconut oil or shortening (for chocolate chips) or paramount crystals (for melting wafers) to thin it to the right consistency. Add just a little at a time – you can always add more but you can’t take it away.
Toppings Don’t Stick: Toppings must be applied while the chocolate is still wet and tacky. If you wait too long and the chocolate has started to set, toppings won’t adhere. Work quickly after dipping, or dip fewer pretzels at a time so you have time to add toppings before the chocolate sets.
Pretzels Stick Together: This happens when you place dipped pretzels too close together on the baking sheet. Make sure there’s at least 1/2 inch of space between each pretzel. If they do stick together, you can usually gently separate them without damage, but the chocolate will look messy where they touched.
White Streaks on Chocolate (Bloom): Chocolate bloom happens when chocolate is exposed to temperature changes or moisture. It’s caused by sugar or fat crystals rising to the surface. While harmless and doesn’t affect taste, it looks unappealing. Prevent bloom by: storing pretzels in a cool, dry place (not the refrigerator after they’re set), avoiding humid conditions, and allowing pretzels to set at room temperature rather than in the fridge.
Storage & Meal Prep
Proper storage ensures your chocolate dipped pretzels stay fresh, crispy, and delicious for as long as possible. Here’s everything you need to know.
Room Temperature Storage: Store chocolate dipped pretzels in an airtight container at room temperature in a cool, dry place. Layer them between sheets of wax paper or parchment paper to prevent sticking. When stored properly, they’ll stay fresh and crispy for up to 3 weeks. A plastic container with a tight-fitting lid or a tin works perfectly. Avoid storing them in warm areas like near the stove or in direct sunlight, as the chocolate can melt.
Avoiding Humidity: Like all chocolate treats, dipped pretzels are sensitive to moisture. Don’t store them in the refrigerator for long-term storage (though short refrigeration to help them set is fine). The cold environment can cause condensation when you remove them, making the pretzels soggy and the chocolate streaky. If you live in a very humid climate, consider adding a food-safe silica gel packet to your storage container.
Layering Properly: If you need to stack pretzels in your container, place wax paper or parchment paper between layers. This prevents them from sticking together and damaging the chocolate coating. For pretzel rods, you can stand them upright in a tall container with the chocolate ends not touching.
Gift Packaging Storage: If you’ve packaged pretzels in cellophane bags for gifts, they’ll stay fresh for about 2 weeks. If giving as gifts, include a small note suggesting the recipient store them in a cool, dry place and consume within 2 weeks for best quality.
Signs They’ve Gone Bad: Pretzels can go stale and chocolate can develop bloom, but these treats rarely spoil in a dangerous way. If the pretzels taste soft or stale instead of crispy, or if the chocolate has developed a white film (bloom), they’re past their prime but still safe to eat. True spoilage is rare with this treat.
Make-Ahead & Freezer Notes
Chocolate dipped pretzels are fantastic for making ahead, which is one reason they’re so popular for holiday preparation and gift-giving. Here’s how to plan ahead successfully.
Making Ahead for Events: You can make chocolate dipped pretzels up to 3 weeks before you need them. Store them in an airtight container at room temperature. This makes them perfect for holiday baking marathons – make several batches over a few weekends and you’ll have plenty for gifts and parties.
Batch Preparation: If you’re making large quantities, work in assembly-line fashion. Melt chocolate, dip a whole tray of pretzels, add toppings, let them set, then repeat. You can easily make 100+ pretzels in an afternoon. Many people dedicate one day to making all their Christmas or holiday treats.
Freezing Chocolate Dipped Pretzels: Yes, you can freeze these! While not necessary for most situations, freezing can extend their life up to 3 months. Place them in a single layer on a baking sheet and freeze until solid (about 30 minutes), then transfer to a freezer-safe container or bag, layering with wax paper. This flash-freezing prevents them from sticking together.
Thawing: Remove frozen pretzels from the freezer and let them thaw at room temperature in their sealed container. This usually takes about 30 minutes. Don’t unwrap or open the container until they’ve come to room temperature, as condensation can form and make the pretzels soggy. Once thawed, they’ll taste just as fresh as when you made them.
Pre-Melting Chocolate: While you can’t really prep these partially, you can save time by having everything measured and organized ahead. Pre-portion your chocolate, set up your workspace, and have all decorations ready so when you’re ready to make them, the process is quick and efficient.
Gifting Timeline: For the freshest gifts, make chocolate dipped pretzels no more than 1 week before giving. Package them 1-2 days before the event or holiday. If giving for Christmas, early-to-mid December is perfect timing.
Serving Suggestions
While chocolate dipped pretzels are wonderful on their own, there are many creative ways to serve and present these treats that make them even more special.
Dessert Boards: Include chocolate dipped pretzels on a dessert charcuterie board alongside cookies, brownies, chocolate truffles, and fresh fruit. They add height, texture, and visual interest to the display.
Party Platters: Arrange different varieties of dipped pretzels on a large platter – some with dark chocolate, some with white chocolate, different colors and toppings. The variety is visually stunning and gives guests options.
With Ice Cream: Serve pretzel rods alongside or stuck into scoops of ice cream as an edible “spoon.” The sweet-salty combo with cold ice cream is incredible.
Coffee Bar Addition: Set out chocolate dipped pretzels at your coffee bar for guests to enjoy with their morning coffee or afternoon latte. The sweet and salty combination complements coffee beautifully.
Kids’ Party Favor: Package 2-3 pretzels in small cellophane bags tied with colorful ribbons as party favors. Kids love them, and they’re nut-free (if you skip nut toppings), making them safe for most school environments.
Wedding and Shower Favors: Chocolate dipped pretzels make elegant, budget-friendly favors. Customize the colors to match your event theme. Package them in small boxes or bags with personalized tags.
Holiday Cookie Plates: Include these on your holiday cookie platters alongside traditional cookies. They add variety in both texture and appearance.
Movie Night Snack: Serve them in a large bowl during movie nights. They’re perfect for munching and pair wonderfully with popcorn.
Gift Baskets: Include chocolate dipped pretzels in homemade gift baskets along with other treats like cookies, hot cocoa mix, or specialty coffees.
Bake Sale Items: These are perfect for bake sales because they’re attractive, individually wrapped, and don’t require refrigeration. Price them at $1-2 each for fundraising.
FAQs Section
Can I use white chocolate instead of regular chocolate?
Absolutely! White chocolate creates a beautiful, creamy coating that’s perfect for spring events like Easter or bridal showers. Keep in mind that white chocolate is more temperature-sensitive than dark or milk chocolate, so be extra careful when melting it. Use lower heat and stir frequently. White chocolate pairs especially well with pastel sprinkles, dried berries, or a drizzle of dark chocolate for contrast.
Why is my chocolate so thick and difficult to dip with?
Thick chocolate is usually caused by one of two things: it’s not warm enough, or it needs to be thinned. First, try reheating it briefly in 10-15 second intervals, stirring between each. If it’s still thick after warming, add a thinning agent. For chocolate chips, add coconut oil or shortening (start with 1 teaspoon per 12 ounces). For melting wafers, add paramount crystals or vegetable shortening. Add small amounts and stir thoroughly until you reach the right consistency.
How long do chocolate dipped pretzels take to set?
At room temperature, chocolate dipped pretzels typically set in 15-20 minutes. If you’re in a hurry, you can refrigerate them for 10 minutes to speed up the process. However, room temperature setting produces a better finish. The chocolate should be completely hard and no longer shiny or tacky when fully set. If it’s still soft after 30 minutes at room temperature, the room may be too warm – try a cooler location.
Can I make these without a microwave?
Yes! Use the double boiler method instead. Fill a saucepan with about 2 inches of water and bring it to a gentle simmer. Place your chocolate in a heat-safe bowl that sits over the pan without touching the water. Stir constantly until melted and smooth. This method actually gives you more control over the temperature and is preferred by professional candy makers, though it takes a few minutes longer than the microwave.
My chocolate has white spots or streaks – what happened?
Those white spots or streaks are called chocolate bloom, and they happen when chocolate is exposed to temperature fluctuations or moisture. Sugar bloom is caused by moisture, while fat bloom is caused by temperature changes. While it looks unappetizing, bloom doesn’t affect food safety or taste much. Prevent it by storing pretzels at consistent room temperature, keeping them away from moisture, and avoiding the refrigerator after they’ve set. If bloom develops, the pretzels are still safe to eat.
Can I use candy melts instead of real chocolate?
Definitely! Candy melts (chocolate melting wafers) are actually easier to work with than real chocolate for this recipe. They’re specifically designed for candy making, melt smoothly without needing additions, come in many colors, set quickly, and hold up well at room temperature. The trade-off is that they don’t taste quite as rich and chocolatey as real chocolate, but they’re incredibly convenient and produce beautiful results. Many people actually prefer candy melts for decorated pretzels.
How do I prevent my toppings from falling off?
Toppings must be applied while the chocolate is still wet – this is crucial. Work quickly after dipping each pretzel. If you’re working slowly and the chocolate is starting to set before you add toppings, dip fewer pretzels at a time. You can also gently press toppings into the chocolate to help them adhere better. For sprinkles, hold the pretzel over a bowl and sprinkle liberally so the sprinkles fall onto the wet chocolate and stick.
Conclusion
There you have it – everything you need to create absolutely gorgeous chocolate dipped pretzels that taste as amazing as they look! This simple treat is truly one of those magical recipes that delivers maximum impact with minimal effort. Whether you’re making them for gifts, parties, or just for yourself, these chocolate dipped pretzels are sure to bring smiles.
I hope you’re feeling excited and confident to make your own batch of these beautiful treats. Remember, there’s no wrong way to decorate them – let your creativity shine! Some of my favorite memories involve making these with my kids during the holidays, each of us creating our own unique designs with different toppings and colors.
Don’t forget to pin this recipe to your Pinterest boards so you can find it easily whenever you need an impressive homemade treat! And when you make these chocolate dipped pretzels, I’d love to hear about your experience. What toppings did you use? Who did you share them with? Did they disappear as quickly as they do at my house?
Happy dipping, and enjoy every sweet, salty, crunchy, chocolate-covered bite!