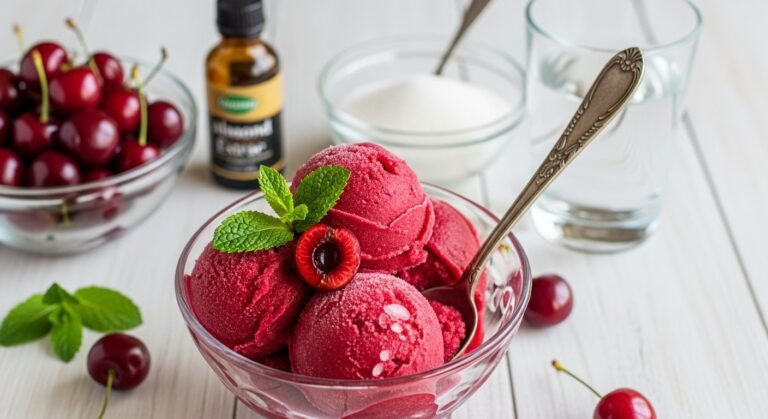
Easy Homemade Cherry Sorbet Recipe (Just 4 Ingredients!)
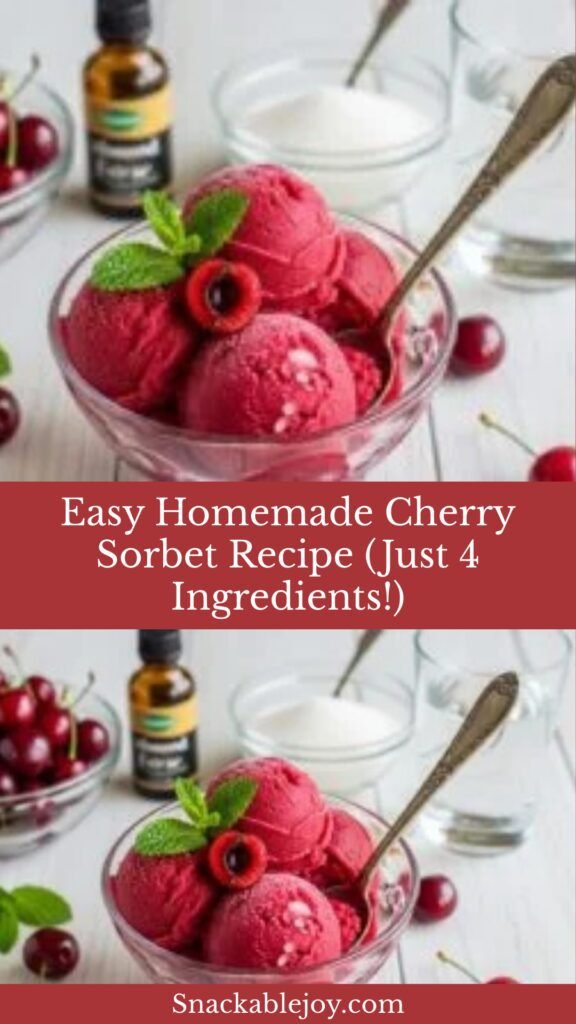
Cherry sorbet is a delightfully refreshing frozen dessert that captures the sweet-tart essence of fresh cherries in every spoonful. Unlike ice cream, sorbet is completely dairy-free, making it a lighter option that’s perfect for hot summer days, elegant dinner parties, or whenever you’re craving something cool and fruity. This homemade cherry sorbet requires just four simple ingredients and delivers a vibrant, intensely flavored treat that tastes like you’re biting into freshly picked cherries.
Whether you’re serving it as a palate cleanser between courses at a dinner party, offering it as a guilt-free dessert option, or simply treating yourself on a warm afternoon, cherry sorbet is versatile enough for any occasion. It’s naturally vegan, gluten-free, and can be made with fresh or frozen cherries, making it accessible year-round. The beautiful deep red color makes it particularly stunning for holidays, celebrations, or romantic dinners, and it’s sophisticated enough to impress guests while being simple enough for everyday enjoyment.
History / Background
Sorbet has ancient roots dating back thousands of years, with origins often traced to the Persian Empire where they created frozen desserts using snow from the mountains mixed with fruit juices and honey. The word “sorbet” itself comes from the Turkish “şerbet” and Arabic “sharbat,” which referred to sweet, chilled drinks. These icy treats traveled along the Silk Road, evolving as they spread through the Mediterranean and eventually reaching Europe.
In France, sorbet became refined into the elegant frozen dessert we know today, traditionally served between courses at formal dinners to cleanse the palate. The French elevated sorbet-making to an art form, and it became a staple in haute cuisine. Italian gelato makers also perfected their versions, called “sorbetto,” creating smooth, intensely flavored frozen treats.
Cherry sorbet specifically gained popularity in regions where cherry cultivation thrived, particularly in France’s Provence region, Italy, and later in the cherry-growing states of America like Michigan, Washington, and Oregon. Cherries have been cultivated for thousands of years, with sweet cherries originating near the Black and Caspian seas. When European settlers brought cherry trees to North America in the 1600s, a new tradition of cherry desserts was born.
Today, cherry sorbet represents the perfect marriage of Old World elegance and modern simplicity. It honors the traditional art of sorbet-making while embracing contemporary desires for lighter, healthier, naturally plant-based desserts that don’t compromise on flavor or satisfaction.
Why You’ll Love This Recipe
This cherry sorbet recipe is an absolute game-changer for home cooks who want restaurant-quality results without complicated techniques or expensive equipment. The natural sweetness and vibrant color of cherries shine through in every bite, creating a dessert that’s both impressive and incredibly satisfying.
Here’s why this recipe will become your go-to frozen treat:
- Incredibly Simple – Just four ingredients and minimal hands-on time create a sophisticated dessert
- Naturally Dairy-Free – Perfect for those with lactose intolerance or following a vegan lifestyle
- Budget-Friendly – Uses affordable ingredients without sacrificing flavor or quality
- Make-Ahead Friendly – Prepare days in advance for stress-free entertaining
- Healthier Dessert Option – Lower in calories and fat compared to ice cream, with real fruit
- Stunning Presentation – The jewel-toned color impresses guests every single time
- Customizable Sweetness – Easily adjust sugar levels to match your taste preferences
- No Ice Cream Maker Required – Can be made with just a blender and freezer (though an ice cream maker helps)
- Kid-Approved – Children love the sweet-tart flavor and fun, scoopable texture
- Year-Round Accessible – Works beautifully with both fresh and frozen cherries
Ingredient Notes
Understanding your ingredients is key to creating the perfect cherry sorbet. Each component plays a specific role in achieving that smooth, scoopable texture and vibrant flavor.
Cherries (Fresh or Frozen): The star ingredient! Sweet cherries like Bing, Rainier, or Chelan work wonderfully, providing natural sweetness and that gorgeous deep color. Tart cherries can also be used for a more pronounced tangy flavor, though you’ll want to increase the sugar slightly. Frozen cherries are perfectly acceptable and often more economical, plus they’re available year-round. If using fresh, you’ll need to pit them first, which takes a bit of time but results in incredible flavor. About 2 pounds of fresh cherries yields roughly 3 cups pitted.
Granulated Sugar: Essential for both sweetness and texture. Sugar doesn’t just add flavor; it lowers the freezing point of the mixture, preventing it from becoming rock-hard ice. The amount can be adjusted based on your cherries’ natural sweetness and personal preference. You can substitute with honey, maple syrup, or agave nectar, though these will slightly alter the flavor profile.
Fresh Lemon Juice: This brightens the cherry flavor and prevents the sorbet from tasting one-dimensional or overly sweet. The acidity balances the sugar and enhances the natural tartness of the cherries. Always use fresh lemon juice rather than bottled for the best flavor. You’ll need about 1-2 lemons.
Water: Helps create the right consistency for blending and churning. Some recipes use simple syrup (sugar dissolved in water), which can create a smoother texture. The water content affects how easily the sorbet scoops, so don’t skip it or reduce it too much.
Equipment Needed
Having the right tools makes creating smooth, professional cherry sorbet much easier. Here’s what you’ll need:
- High-Powered Blender or Food Processor – Essential for pureeing cherries into a smooth mixture; a Vitamix, Blendtec, or similar blender works best
- Fine-Mesh Strainer or Sieve – For removing cherry skins and creating an ultra-smooth texture (optional but recommended)
- Ice Cream Maker – Makes the smoothest sorbet with the best texture, though not absolutely necessary
- Freezer-Safe Container with Lid – A loaf pan or shallow container works well for storing sorbet
- Cherry Pitter – If using fresh cherries, this tool saves tremendous time and effort
- Measuring Cups and Spoons – For accurate ingredient proportions
- Large Mixing Bowl – For combining ingredients
- Spatula or Wooden Spoon – For stirring and scraping
- Ice Cream Scoop – For serving beautiful scoops
Print

Cherry Sorbet Recipe
Bright, refreshing homemade cherry sorbet made with just four simple ingredients. This naturally vegan frozen dessert is incredibly smooth, intensely flavored, and perfect for hot summer days or elegant dinner parties.
- Total Time: 4 hours 15 minutes
- Yield: 6 servings (about 1 quart) 1x
Ingredients
Scale- 2 pounds fresh sweet cherries, pitted (or 4 cups frozen cherries, thawed)
- ¾ cup granulated sugar (adjust to taste)
- ½ cup water
- 3 tablespoons fresh lemon juice (about 1-2 lemons)
- Pinch of salt (optional, enhances flavor)
Instructions
Step 1: Prepare the Cherries
If using fresh cherries, wash them thoroughly and remove all pits using a cherry pitter or sharp knife. If using frozen cherries, allow them to thaw completely at room temperature or in the refrigerator. Reserve any juices that accumulate during thawing.Step 2: Blend the Mixture
Add the pitted cherries, sugar, water, and lemon juice to a high-powered blender or food processor. Blend on high speed for 60-90 seconds until completely smooth with no visible chunks. The mixture should be vibrant and silky.Step 3: Strain for Smoothness (Optional)
For an ultra-smooth, professional texture, pour the blended mixture through a fine-mesh strainer set over a large bowl. Use a spatula or wooden spoon to press the mixture through, leaving behind any skins or pulp. This step is optional but highly recommended for the smoothest result.Step 4: Taste and Adjust
Taste the mixture and adjust sweetness if needed. Remember that frozen desserts taste less sweet when frozen, so it should taste slightly too sweet at room temperature. Add more lemon juice if it tastes flat or more sugar if it’s too tart.Step 5: Chill the Base
Cover the bowl with plastic wrap and refrigerate for at least 2 hours or until very cold. This step is crucial for proper texture, as churning cold mixture produces better results.Step 6: Churn the Sorbet (Ice Cream Maker Method)
Pour the chilled mixture into your ice cream maker and churn according to manufacturer’s instructions, typically 20-25 minutes, until it reaches a soft-serve consistency. The sorbet should be thick, creamy, and smooth.Step 7: Freeze Until Firm
Transfer the churned sorbet to a freezer-safe container with a lid. Press a piece of parchment paper directly onto the surface to prevent ice crystals. Freeze for at least 4 hours or until firm and scoopable.Step 8: Alternative No-Churn Method
If you don’t have an ice cream maker, pour the chilled mixture into a shallow freezer-safe container. Freeze for 30-45 minutes, then vigorously stir with a fork to break up ice crystals. Repeat this process every 30 minutes for 3-4 hours until the sorbet is smooth and frozen. This method requires more effort but produces good results.Step 9: Serve and Enjoy
Let the sorbet sit at room temperature for 5-10 minutes before scooping for easier serving. Scoop into bowls or cones and serve immediately for the best texture and flavor.Notes
- Sweetness Adjustment: Start with ¾ cup sugar and add more to taste. Very sweet cherries may need less; tart cherries may need up to 1 cup.
- Texture Tip: The more often you stir during freezing (no-churn method), the smoother your sorbet will be.
- Storage: Homemade sorbet is best within 1 week but can be stored for up to 1 month. It may become harder over time; let it soften before serving.
- Alcohol Trick: Adding 1-2 tablespoons of vodka or cherry liqueur keeps sorbet softer and more scoopable (alcohol doesn’t freeze).
- Color Enhancement: A tiny drop of red food coloring enhances the vibrant hue if desired, though it’s completely optional.
- Prep Time: 15 minutes
- Cook Time: 0 minutes (no cooking required)
- Category: Desert
- Method: Frozen
- Cuisine: French/American
- Diet: Gluten Free
Nutrition
- Serving Size: ⅔ cup (approximately 150g)
- Calories: 145
- Sugar: 32g
- Sodium: 2mg
- Fat: 0.5g
- Saturated Fat: 0g
- Unsaturated Fat: 0.3g
- Trans Fat: 0g
- Carbohydrates: 37g
- Fiber: 2g
- Protein: 1g
- Cholesterol: 0mg
-
Tips & Variations
Flavor Variations:
- Cherry Vanilla: Add 1-2 teaspoons pure vanilla extract for a classic combination
- Cherry Almond: Stir in ½ teaspoon almond extract for a delightful twist
- Cherry Chocolate Chip: Fold in ½ cup mini chocolate chips after churning
- Cherry Lime: Substitute lime juice for lemon for a tropical flair
- Spiced Cherry: Add ¼ teaspoon cinnamon or a pinch of cardamom for warmth
- Cherry Mint: Blend in 10-12 fresh mint leaves for a refreshing herbal note
- Cherry Champagne: Replace ¼ cup water with champagne or prosecco for adults
- Mixed Berry: Use 3 cups cherries plus 1 cup raspberries or strawberries
Texture Customizations:
- For creamier sorbet, add 2 tablespoons light corn syrup to prevent crystallization
- For a softer, sherbet-like consistency, fold in ¼ cup coconut cream before freezing
- Make it granite-style by scraping with a fork throughout freezing for a flaky, icy texture
Dietary Adaptations:
- Sugar-Free: Use erythritol, monk fruit sweetener, or stevia (adjust amounts based on sweetness)
- Lower Sugar: Reduce to ½ cup sugar; the sorbet will be tangier and slightly icier
- Paleo-Friendly: Substitute coconut sugar or date syrup for refined sugar
Pro Chef Tips
Tip #1: Achieve Perfect Sweetness Balance
Professional pastry chefs use a trick called the “egg test” to check sugar concentration. Place a clean, raw egg in your sorbet mixture before freezing. If a quarter-sized circle of shell floats above the surface, your sugar ratio is perfect. Too little shows less egg; too much shows more. This ensures ideal texture and sweetness.Tip #2: Prevent Ice Crystals Like a Pro
The enemy of smooth sorbet is large ice crystals. Keep your sorbet base as cold as possible before churning, and churn it quickly. Store sorbet in a shallow container rather than a deep one for faster, more even freezing. Press plastic wrap or parchment directly on the surface before covering with a lid to prevent freezer burn and ice crystal formation.Tip #3: Master the Scooping Temperature
Restaurant-quality scoops require the right serving temperature. Remove sorbet from the freezer 5-10 minutes before serving, letting it temper slightly. Run your ice cream scoop under hot water, dry it quickly, then scoop immediately. This creates those beautiful, professional rounded scoops you see in restaurants.Tip #4: Elevate with Strategic Layering
Create restaurant-worthy presentations by layering sorbet with complementary textures. Alternate scoops with whipped coconut cream, crushed amaretti cookies, or fresh fruit compote in a clear glass. The contrast makes each bite more interesting and visually stunning.Tip #5: Maximize Fresh Cherry Flavor
When using fresh cherries, don’t waste the pits! Simmer them in your water for 10 minutes before blending to extract additional cherry flavor and natural almond-like compounds. Strain out the pits, use the infused water in your recipe for noticeably deeper, more complex cherry taste.Common Mistakes to Avoid
Mistake #1: Not Sweetening Enough
Many first-time sorbet makers don’t add enough sugar, thinking it will be too sweet. Remember that cold temperatures dull sweetness perception, so sorbet needs more sugar than you’d expect. Your mixture should taste almost too sweet at room temperature. If it tastes perfectly sweet before freezing, it’ll taste bland when frozen.Mistake #2: Skipping the Chill Time
Pouring warm or room-temperature mixture directly into the ice cream maker results in grainy, icy sorbet. The base must be thoroughly chilled (40°F or below) before churning. This ensures proper freezing and creates that smooth, creamy texture everyone loves. Plan ahead and refrigerate for at least 2 hours.Mistake #3: Over-Churning or Under-Churning
Stop churning when the sorbet reaches soft-serve consistency. Over-churning incorporates too much air and can cause butter-like texture, while under-churning leaves it too liquid. Watch carefully during the last few minutes and stop when it holds its shape but is still soft.Mistake #4: Using the Wrong Storage Container
Deep, narrow containers make sorbet freeze too slowly and create large ice crystals. Use shallow, wide containers that allow for faster, more even freezing. This is especially important for no-churn sorbet. Loaf pans work perfectly for home batches.Mistake #5: Forgetting to Account for Texture Changes
Homemade sorbet without stabilizers gets harder the longer it freezes. Unlike commercial products with added gums and stabilizers, yours will be rock-solid after several days. This isn’t a failure! Simply plan to let it soften 10-15 minutes before serving, or add a tablespoon of alcohol to the base to keep it scoopable longer.Storage & Meal Prep
Refrigerator Storage:
The sorbet base (before freezing) can be prepared and refrigerated for up to 2 days. Keep it covered tightly in an airtight container. This actually improves flavor as the ingredients meld together. Give it a good stir before churning or freezing.Freezer Storage:
Store finished sorbet in an airtight, freezer-safe container for optimal freshness. Properly stored, homemade cherry sorbet maintains best quality for 1-2 weeks but remains safe to eat for up to 1 month. Press parchment paper or plastic wrap directly onto the surface before sealing with the lid to minimize ice crystal formation and freezer burn. Label containers with the date to track freshness.Texture Preservation:
Homemade sorbet naturally hardens more than store-bought versions due to lack of commercial stabilizers. This is completely normal. If your sorbet becomes too hard, transfer it from the freezer to the refrigerator 15-20 minutes before serving. Alternatively, let it sit on the counter for 5-10 minutes. You can also microwave it for 5-10 second intervals on low power, checking frequently, though this risks melting it unevenly.Preventing Freezer Burn:
Always use containers with tight-fitting lids and fill them as full as possible to minimize air exposure. The less air space, the less opportunity for ice crystals and freezer burn. For longer storage, wrap the entire container in plastic wrap before putting the lid on for an extra protective barrier.Reheating Notes:
Sorbet doesn’t require reheating, but it does need tempering. Remove from freezer and let stand at room temperature until it reaches the perfect scooping consistency. The exact time depends on your freezer’s temperature and how long the sorbet has been frozen. Older sorbet requires longer softening time.Make-Ahead & Freezer Notes
Advance Preparation Timeline:
Cherry sorbet is the ultimate make-ahead dessert, perfect for stress-free entertaining. You can prepare the entire recipe up to 1 month before serving, though it’s best within the first week. For parties, make your sorbet 2-3 days in advance for optimal texture and flavor. This gives you time to adjust consistency if needed and ensures it’s properly frozen but not overly hardened.Step-by-Step Make-Ahead Strategy:
- 3 Days Before: Prepare and churn/freeze sorbet completely
- Day Before: Check consistency; if too hard, note to remove from freezer earlier
- 2 Hours Before Serving: Transfer to refrigerator for gradual softening
- 30 Minutes Before: Move to counter if still too firm
- At Serving Time: Scoop and enjoy perfect texture
Freezer-Friendly Details:
This sorbet is completely freezer-friendly and actually requires freezing for proper texture. The recipe freezes beautifully because fruit-based sorbets are naturally designed for frozen storage. Unlike dairy-based desserts that can separate or become grainy, sorbet maintains its integrity through freezing and thawing cycles.Best Reheating Method:
Since this is a frozen dessert, you won’t “reheat” it, but rather temper it to the ideal serving temperature. The best method is gradual tempering: move from freezer to refrigerator 15-20 minutes before serving. This prevents melting on the outside while the center stays frozen. Room temperature softening works too but requires more attention. Never microwave unless absolutely necessary, as it creates uneven texture.Batch Freezing for Large Groups:
Making sorbet for a crowd? Double or triple the recipe and freeze in multiple smaller containers rather than one large one. Smaller portions freeze faster and more evenly, and you can remove just what you need while keeping the rest perfectly frozen. This also allows you to offer different flavor combinations if you make multiple batches.Pre-Scooped Individual Servings:
For extra convenience during parties, pre-scoop sorbet onto a parchment-lined baking sheet 2-3 hours before guests arrive. Freeze the individual scoops, then quickly transfer them to a chilled serving platter just before serving. This creates beautiful presentation and eliminates scooping during the event.Serving Suggestions
Cherry sorbet is incredibly versatile and can be served in numerous ways to suit any occasion or preference.
Classic Presentations:
- Simple Elegance: Serve 2-3 scoops in chilled glass bowls with a fresh mint sprig
- Waffle Cone: Classic ice cream cone presentation perfect for casual summer gatherings
- Coupe Glass: Restaurant-style presentation in stemmed dessert glasses
- Martini Glass: Sophisticated option for dinner parties, garnished with a fresh cherry
Perfect Pairings:
- Fresh Fruit: Serve alongside sliced peaches, strawberries, or mixed berries
- Whipped Cream: Top with coconut whipped cream or traditional dairy whipped cream
- Chocolate Sauce: Drizzle with warm dark chocolate or hot fudge for contrast
- Biscotti or Pizzelles: Crispy Italian cookies for textural contrast
- Pound Cake: Place a scoop atop a slice of vanilla or lemon pound cake
- Prosecco Float: Add a scoop to sparkling wine for an elegant adult dessert
- Shortbread Cookies: Sandwich sorbet between two buttery cookies
- Granola: Sprinkle with crunchy granola for a breakfast-inspired dessert
Beverage Companions:
- Iced Tea: Unsweetened or lightly sweetened complements the sweet sorbet
- Sparkling Water: Refreshing, cleansing palate between bites
- Coffee or Espresso: Bold, bitter notes contrast beautifully with sweet cherry
- Dessert Wine: Late-harvest Riesling or Moscato d’Asti pairs wonderfully
- Cherry Liqueur: Kirsch or cherry brandy for an adults-only enhancement
Seasonal Serving Ideas:
- Summer: Serve in frozen lemon or orange halves for a fun, rustic presentation
- Fall: Pair with warm apple crisp or pear tart
- Winter: Serve alongside chocolate desserts or peppermint treats
- Spring: Combine with fresh berries and edible flowers for garden party elegance
Kids’ Party Ideas:
- Create sorbet “sundaes” with fun toppings like sprinkles, gummy bears, and fresh fruit
- Serve in colorful cups with fun straws and umbrellas
- Make sorbet floats with lemon-lime soda or ginger ale
- Offer a DIY topping bar where kids customize their own bowls
FAQs Section
Q: Can I make cherry sorbet without an ice cream maker?
A: Absolutely! While an ice cream maker produces the smoothest texture, you can make excellent sorbet without one. Pour your chilled mixture into a shallow, freezer-safe container and freeze for 45 minutes. Remove and vigorously stir with a fork or whisk to break up ice crystals. Repeat this process every 30 minutes for 3-4 hours until you achieve a smooth, frozen consistency. This manual method requires patience but delivers delicious results. The key is frequent stirring to prevent large ice crystals from forming.Q: Why is my sorbet too icy or hard?
A: Icy or rock-hard sorbet usually results from insufficient sugar, which acts as an antifreeze. Sugar prevents water from freezing into large crystals. Try increasing sugar by 2-4 tablespoons in your next batch. Another solution is adding 1-2 tablespoons of corn syrup, honey, or alcohol, which all lower the freezing point. Also, ensure you’re stirring frequently during freezing (if not using an ice cream maker) and storing in shallow containers for even freezing. If your sorbet is already made, simply let it soften at room temperature longer before serving.Q: Can I use frozen cherries instead of fresh?
A: Yes, frozen cherries work wonderfully and are often more economical and convenient. Use 4 cups of frozen cherries, thawed completely, and include any juices that accumulate during thawing for maximum flavor. Frozen cherries are picked at peak ripeness and flash-frozen, so they often deliver excellent flavor. There’s no need to adjust other ingredients. Both sweet and tart frozen cherries work well; just adjust sugar to taste based on the variety you choose.Q: How long does homemade cherry sorbet last in the freezer?
A: Properly stored in an airtight container with plastic wrap pressed directly on the surface, cherry sorbet maintains best quality for 1-2 weeks. It remains safe to eat for up to 1 month, though texture may become slightly icier over time. Unlike commercial sorbet with stabilizers, homemade versions naturally harden more with extended freezing. The flavor remains excellent throughout the month; you’ll just need to allow extra softening time before serving older batches.Q: My sorbet turned out too sweet/not sweet enough. What can I do?
A: If it’s too sweet, you can’t reduce sugar after it’s made, but you can serve it with unsweetened whipped cream, tart fresh fruit, or a squeeze of lemon juice on top to balance flavors. For next time, reduce sugar by 2-4 tablespoons. If it’s not sweet enough and already frozen, let it soften slightly and blend in simple syrup (equal parts sugar and water, dissolved), then refreeze. Prevention is easier: always taste your mixture before freezing and remember it should taste slightly too sweet at room temperature since cold dulls sweetness perception.Q: Can I make this sorbet sugar-free or with alternative sweeteners?
A: Yes, but with considerations. Sugar substitutes like erythritol, monk fruit sweetener, or stevia can work, though they may affect texture since sugar provides more than just sweetness—it creates smooth texture and prevents excessive freezing. Use a 1:1 sugar replacement and add 2 tablespoons of corn syrup or honey to maintain proper texture. Be aware that some sugar substitutes have cooling effects (like erythritol) that may enhance the icy sensation. Experiment with ratios to find your preferred balance of sweetness and texture.Q: What’s the difference between sorbet, sherbet, and gelato?
A: Great question! Sorbet is dairy-free, made only with fruit, sugar, and water, resulting in a light, intensely fruity frozen dessert. Sherbet contains 1-2% dairy (milk or cream), making it slightly creamier than sorbet but lighter than ice cream. Gelato is an Italian ice cream with less air and less fat than American ice cream, served at a slightly warmer temperature for a dense, creamy texture. Sorbet is the only one that’s completely vegan and dairy-free, making it perfect for those with dietary restrictions.Conclusion
There’s something absolutely magical about homemade cherry sorbet—the way it captures summer’s sweetness in every spoonful, the vibrant color that brightens any table, and the refreshing coolness that makes every bite feel like a celebration. This recipe proves that you don’t need fancy equipment or professional training to create a dessert that tastes like it came from an upscale restaurant.
Whether you’re serving it at an elegant dinner party, treating your family on a hot afternoon, or meal-prepping healthy desserts for the week, this cherry sorbet delivers every single time. The best part? You know exactly what’s in it—real fruit, simple ingredients, and nothing artificial. It’s wholesome enough to feel good about serving to your loved ones, yet indulgent enough to satisfy any sweet tooth.
I hope this recipe becomes a staple in your dessert rotation, especially during cherry season. Don’t forget to experiment with the variations, try those pro chef tips, and make it your own. And please, share your beautiful cherry sorbet creations with me! Leave a comment below telling me how yours turned out, tag me on social media with your photos, and pin this recipe to your favorite Pinterest board so you can find it whenever those cherry cravings hit.
Happy scooping, and here’s to many delicious frozen treats in your future! 🍒