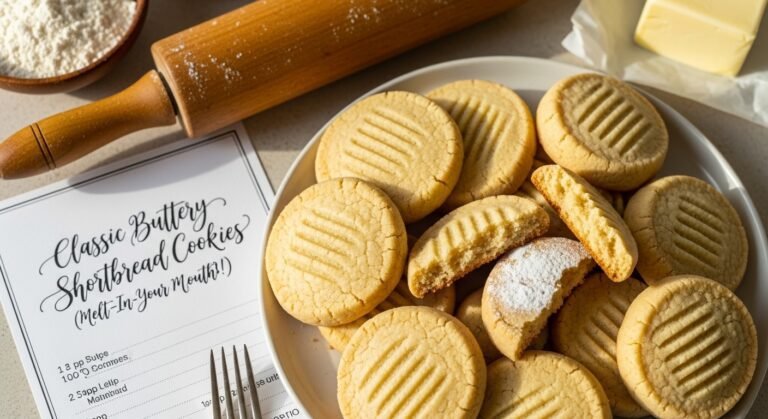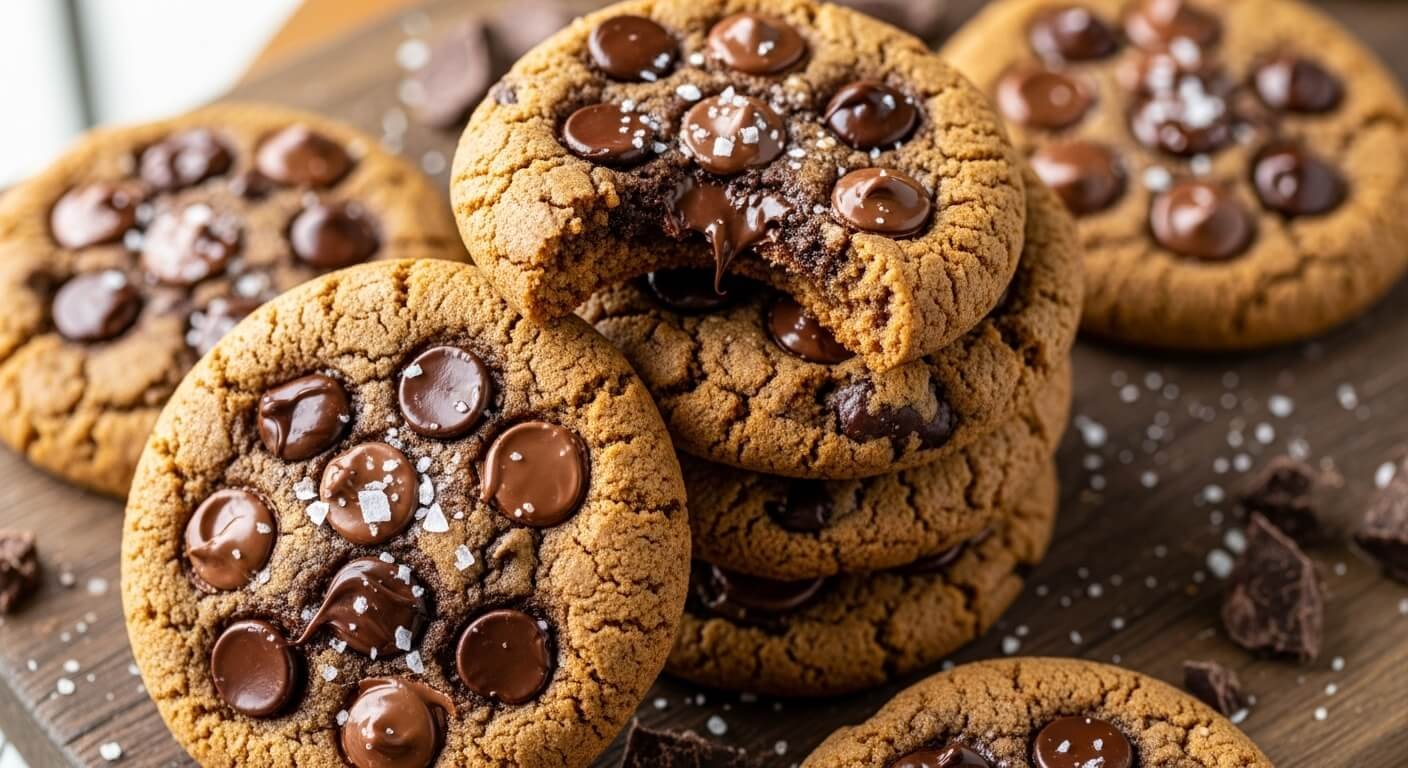
The Best Brown Butter Chocolate Chip Cookies Recipe: Nutty, Chewy Perfection

Get ready to meet your new cookie obsession! These Brown Butter Chocolate Chip Cookies take the classic chocolate chip cookie you know and love and elevate it to an entirely new level of deliciousness. By browning the butter before mixing your dough, you unlock deep, nutty, caramel-like flavors that transform an ordinary cookie into something truly extraordinary.
If you’ve never experienced the magic of brown butter, prepare to have your mind blown. This simple technique—gently cooking butter until the milk solids turn golden brown—adds incredible depth and complexity that makes these cookies taste like they came from a gourmet bakery. The result? Cookies with crispy, caramelized edges, soft and chewy centers, and a rich, toasty flavor that’s absolutely irresistible.
These cookies are perfect for any occasion—weekend baking sessions, holiday cookie exchanges, impromptu treats for unexpected guests, or simply because it’s Tuesday and you deserve something amazing. They’re also fantastic for gift-giving, bake sales, or anytime you want to seriously impress people with your baking prowess. Fair warning: once you master brown butter cookies, you might never go back to regular chocolate chip cookies again. The depth of flavor is simply that good, and honestly, the technique is much easier than you’d think!
History / Background
The chocolate chip cookie itself has a fascinating origin story that begins in 1938 at the Toll House Inn in Whitman, Massachusetts. Ruth Wakefield, who owned the inn with her husband, was preparing her famous Butter Drop Do cookies when she decided to chop up a Nestlé semi-sweet chocolate bar and add the chunks to her dough, expecting them to melt and create chocolate cookies. Instead, the chocolate pieces held their shape, and the iconic chocolate chip cookie was born—completely by accident!
The original Toll House Cookie recipe quickly became an American classic, appearing on the back of Nestlé chocolate chip bags and in kitchens across the country. For decades, home bakers perfected their techniques, debating the merits of butter versus shortening, white sugar versus brown, and the perfect baking time for achieving that ideal texture.
But the brown butter variation is a more recent innovation, emerging from the modern artisanal baking movement of the 2010s. As home bakers and professional pastry chefs alike began exploring European techniques and flavor-building methods, brown butter (known as “beurre noisette” in French cooking, meaning “hazelnut butter” for its nutty aroma) found its way into American cookies.
The technique of browning butter has been used in French cuisine for centuries, particularly in sauces and pastries. French pastry chefs understood that cooking butter past its melting point until the milk solids caramelize creates an incredibly complex flavor profile—notes of toffee, hazelnuts, and caramel all develop naturally through this simple process. When creative American bakers started applying this technique to chocolate chip cookies, it sparked a revolution in cookie baking.
Food bloggers and pastry chefs began sharing their brown butter cookie recipes online, and the technique quickly went viral. What makes this variation so special is that it adds gourmet flavor without requiring exotic ingredients or complicated methods—just a few extra minutes of attention while you cook your butter. It’s become a signature move for serious home bakers who want to elevate their cookies from good to absolutely unforgettable, and it represents the beautiful marriage of classic American baking with refined French technique.
Why You’ll Love This Recipe
These Brown Butter Chocolate Chip Cookies have completely ruined regular chocolate chip cookies for me, and I mean that in the best possible way. Once you taste that deep, nutty, caramelized flavor that brown butter brings to the table, there’s simply no going back. But beyond the incredible taste, this recipe has so many things going for it that make it absolutely perfect for home bakers.
Here’s what makes this recipe absolutely irresistible:
- Next-level flavor – The brown butter adds incredible depth with notes of toffee, caramel, and toasted nuts
- Crispy edges, chewy centers – The perfect texture combination that everyone craves in a cookie
- Impressive but achievable – Tastes gourmet and sophisticated but uses simple, accessible techniques
- Uses pantry staples – No special ingredients needed beyond what you probably already have
- Makes your kitchen smell amazing – That toasted butter aroma is absolutely heavenly
- Freezer-friendly dough – Make a big batch and bake fresh cookies whenever the craving hits
- Crowd-pleaser guaranteed – I’ve never met anyone who didn’t absolutely love these cookies
- Great for gifting – Package them up for the most impressive homemade gift
- Customizable mix-ins – Works beautifully with different chocolates, nuts, or additions
- Perfect every time – The recipe is foolproof once you master the simple brown butter technique
- Bakery-quality at home – Seriously rivals anything you’d buy from an expensive bakery
Ingredient Notes
Understanding your ingredients is the key to baking success, so let’s break down what goes into these incredible cookies and why each component matters.
Unsalted Butter: This is your star ingredient! You’ll need high-quality unsalted butter since you’re browning it and really showcasing its flavor. Unsalted allows you to control the exact salt level in your cookies. The butter needs to be browning-ready (not straight from the fridge), so have it at cool room temperature. European-style butter with higher fat content works beautifully here and creates even richer flavor.
Granulated Sugar + Brown Sugar: The combination is crucial for texture and flavor. Granulated sugar creates crispy edges and helps cookies spread, while brown sugar (which contains molasses) adds moisture, chewiness, and deeper caramel notes that complement the brown butter perfectly. Use light or dark brown sugar—dark will give you even more molasses flavor. Make sure your brown sugar is soft and fresh, not hardened.
Eggs: Large eggs at room temperature incorporate more smoothly and create better structure. The egg yolks add richness while the whites provide structure and lift. Room temperature eggs (let them sit out for 30 minutes) blend more evenly and help create that perfect chewy texture.
All-Purpose Flour: This provides the structure for your cookies. I recommend measuring by weight if possible (spooning and leveling if using cups) for consistent results. Bread flour can be substituted for an even chewier texture, while cake flour creates a more tender, delicate cookie.
Baking Soda: This is your leavening agent, helping the cookies rise and spread properly while also contributing to browning. Make sure it’s fresh (test it by mixing a bit with vinegar—it should fizz vigorously). Don’t substitute with baking powder, as they work differently.
Salt: Essential for balancing sweetness and enhancing all the other flavors. Don’t skip it! If using salted butter, reduce the added salt by half. Flaky sea salt for finishing is optional but highly recommended.
Vanilla Extract: Pure vanilla extract is worth the investment—it adds warmth and depth that artificial vanilla can’t match. The vanilla beautifully complements the toasted, nutty notes from the brown butter.
Chocolate Chips: Use high-quality chocolate chips or chopped chocolate bars for best results. Semi-sweet chocolate chips are classic, but dark chocolate (60-70% cacao) creates a more sophisticated flavor that pairs beautifully with brown butter. Milk chocolate works too if you prefer sweeter cookies. I love using a mix of sizes—some chips and some chopped chunks for varied chocolate distribution.
Equipment Needed
Having the right tools makes this recipe even easier and more enjoyable. Here’s everything you’ll need:
- Medium saucepan or skillet – For browning the butter; light-colored is ideal so you can see the color change
- Heat-resistant spatula or wooden spoon – For stirring the butter while it browns
- Large mixing bowl – For combining all your cookie dough ingredients
- Stand mixer or hand mixer – Makes mixing much easier, though you can do it by hand if needed
- Whisk – For mixing dry ingredients together evenly
- Measuring cups and spoons – Accurate measurements are crucial in baking
- Kitchen scale (optional but recommended) – For the most precise measurements
- Baking sheets (at least 2) – For baking multiple batches efficiently
- Parchment paper or silicone baking mats – Prevents sticking and ensures even baking
- Cookie scoop or spoons – For portioning uniform cookie dough balls
- Wire cooling racks – Allow cookies to cool properly and maintain texture
- Small bowl – For the egg if you’re beating it before adding
- Timer – Essential for not burning your brown butter or overbaking cookies
Print

Brown Butter Chocolate Chip Cookies Recipe
These Brown Butter Chocolate Chip Cookies feature crispy edges, chewy centers, and incredible depth of flavor from nutty brown butter. The simple technique of browning butter transforms classic chocolate chip cookies into something truly extraordinary and bakery-worthy.
- Total Time: 1 hour 2 minutes
- Yield: 24 large cookies 1x
Ingredients
ScaleFor the Cookies:
- 1 cup (2 sticks or 226g) unsalted butter
- 1 cup (200g) light brown sugar, packed
- ½ cup (100g) granulated sugar
- 2 large eggs, room temperature
- 2 teaspoons pure vanilla extract
- 2¼ cups (280g) all-purpose flour
- 1 teaspoon baking soda
- 1 teaspoon fine sea salt
- 2 cups (340g) chocolate chips (semi-sweet or dark chocolate)
- Flaky sea salt for topping (optional but recommended)
Instructions
Step 1: Brown the Butter
Place the butter in a medium light-colored saucepan over medium heat. Stir occasionally as the butter melts, foams, and begins to sizzle. Keep stirring frequently and watch carefully—the butter will foam up, then the foam will subside, and golden brown specks will appear at the bottom. When the butter smells nutty and toasty and has turned a rich amber color with brown bits at the bottom (about 5-7 minutes total), immediately remove from heat. Pour the brown butter into a large heatproof mixing bowl, making sure to scrape all those precious brown bits from the bottom—that’s where the flavor is! Let it cool for about 10-15 minutes until it’s warm but not hot.Step 2: Mix Sugars with Brown Butter
Add both the brown sugar and granulated sugar to the still-warm (but not hot) brown butter. Using your mixer or a wooden spoon, beat together for 2-3 minutes until well combined and slightly lighter in color. The mixture will be grainy and that’s perfectly fine. The warmth of the butter helps dissolve the sugars slightly, creating that beautiful texture.Step 3: Add Eggs and Vanilla
Beat in the eggs one at a time, mixing well after each addition. Add the vanilla extract and mix until fully incorporated. The mixture should look smooth and cohesive at this point. If the butter was too warm, the mixture might look a bit separated—that’s okay, it will come together when you add the flour.Step 4: Combine Dry Ingredients
In a separate medium bowl, whisk together the flour, baking soda, and salt. This ensures even distribution of the leavening and salt throughout your cookies, which is crucial for consistent results.Step 5: Mix Dry into Wet Ingredients
With your mixer on low speed (or stirring gently by hand), add the flour mixture to the butter mixture. Mix just until no dry streaks of flour remain and the dough comes together. Don’t overmix or your cookies will be tough—stop as soon as everything is combined. The dough will be thick and slightly sticky.Step 6: Fold in Chocolate Chips
Using a spatula or wooden spoon, gently fold in the chocolate chips until they’re evenly distributed throughout the dough. Reserve a handful of chips to press into the tops of the cookies before baking for that bakery-style look with chocolate showing on top.Step 7: Chill the Dough
This step is crucial for the best texture! Cover the bowl with plastic wrap or transfer the dough to an airtight container. Refrigerate for at least 30 minutes (or up to 72 hours). Chilling solidifies the butter, which prevents excessive spreading and creates thicker cookies with better texture. Cold dough also allows the flour to hydrate fully, improving the final texture.Step 8: Preheat and Prepare
When ready to bake, preheat your oven to 350°F (175°C). Line your baking sheets with parchment paper or silicone baking mats. Don’t skip this step—it ensures even baking and easy cleanup.Step 9: Shape the Cookies
Using a cookie scoop or spoons, portion the dough into balls about 2 tablespoons each (about 1.5 ounces or 45g for large cookies). Place them on your prepared baking sheets, spacing them about 3 inches apart to allow for spreading. If desired, press a few extra chocolate chips into the top of each dough ball for a gorgeous appearance.Step 10: Bake to Perfection
Bake for 11-13 minutes, until the edges are golden brown and set but the centers still look slightly underdone and puffy. The cookies will look a bit undercooked in the middle—that’s exactly what you want! They’ll continue cooking on the hot pan after you remove them from the oven.Step 11: The Crucial Pan Cooling
Let the cookies cool on the baking sheet for 5-10 minutes. This is when they finish cooking and set up properly. If you try to move them too soon, they’ll fall apart. After 5-10 minutes, transfer them to a wire cooling rack using a spatula.Step 12: Finishing Touch
While the cookies are still slightly warm, sprinkle them with a tiny pinch of flaky sea salt if desired. This enhances all the flavors and adds a sophisticated sweet-salty contrast that’s absolutely addictive.Notes
- Don’t skip browning the butter – This is what makes these cookies special; regular melted butter won’t give the same flavor
- Watch the butter carefully – It goes from perfect to burnt very quickly, so don’t walk away
- Chill the dough – This step is essential for thick, chewy cookies with the best texture
- Underbake slightly – Cookies continue cooking on the hot pan after removing from oven
- Room temperature eggs – They incorporate better and create superior texture
- Measure flour correctly – Spoon flour into measuring cups and level off; don’t pack it down
- Fresh baking soda – Check that it’s not expired for proper rise and spread
- Prep Time: 20 minutes (plus 30 minutes chilling time)
- Cook Time: 12 minutes per batch
- Category: Dessert
- Method: Baking
- Cuisine: American
- Diet: Vegetarian
Nutrition
- Serving Size: 1 cookie
- Calories: 215
- Sugar: 18g
- Sodium: 170mg
- Fat: 11g
- Saturated Fat: 7g
- Unsaturated Fat: 3.5g
- Trans Fat: 0g
- Carbohydrates: 28g
- Fiber: 1g
- Protein: 2.5g
- Cholesterol: 35mg
Tips & Variations
Chocolate Variations:
- Triple Chocolate: Use a mix of dark, milk, and white chocolate chips for varied chocolate experience
- Dark Chocolate Sea Salt: Use 70% dark chocolate chips and top with flaky sea salt for sophisticated flavor
- Chocolate Chunks: Chop a high-quality chocolate bar into irregular chunks for melty chocolate pools
- Add Cocoa: Replace 2 tablespoons flour with cocoa powder for double chocolate brown butter cookies
Mix-In Ideas:
- Nutty Addition: Add 1 cup toasted, chopped pecans, walnuts, or hazelnuts for extra crunch and flavor
- Toffee Bits: Mix in ½ cup toffee bits for incredible caramel notes that complement brown butter
- Espresso Enhancement: Add 1 tablespoon instant espresso powder to intensify chocolate flavor
- Butterscotch Twist: Swap half the chocolate chips for butterscotch chips
Size and Shape Options:
- Giant Cookies: Make 12 extra-large cookies (¼ cup dough each) and bake for 14-16 minutes
- Mini Cookies: Use 1 tablespoon dough per cookie, bake for 8-10 minutes—perfect for parties
- Cookie Bars: Press all dough into a 9×13″ pan and bake for 25-30 minutes, then cut into squares
Dietary Modifications:
- Gluten-Free: Use 1:1 gluten-free flour blend (add ½ teaspoon xanthan gum if your blend doesn’t include it)
- Reduced Sugar: You can reduce sugar by ¼ cup total, though cookies will be slightly less sweet and spread less
- Vegan Brown Butter: Use plant-based butter and vegan chocolate chips; technique works the same way
Flavor Twists:
- Browned Butter Snickerdoodles: Skip chocolate chips, roll dough in cinnamon sugar before baking
- Maple Brown Butter: Replace vanilla with maple extract for fall-inspired cookies
- Orange Zest: Add 1 tablespoon orange zest to the dough for bright citrus notes with chocolate
Pro Chef Tips
The Perfect Brown Butter: Professional pastry chefs know that controlling your brown butter is the difference between magical and burnt. Use a light-colored pan (stainless steel or white enamel) so you can clearly see the color change—it’s nearly impossible in a dark pan. The butter will foam dramatically twice: once when it first melts and starts releasing moisture, and again just before it browns. After the second foam subsides, watch like a hawk because it goes from perfectly golden to burnt in mere seconds. Your nose is your best guide—when it smells like toasted hazelnuts and has a rich, nutty aroma, it’s ready. Immediately transfer to a bowl to stop the cooking.
Temperature Control for Perfect Texture: Here’s a pro secret: the temperature of your brown butter when you add the sugar significantly impacts your final texture. If it’s too hot, it can partially cook the eggs, creating a cakey texture. If it’s too cold, the sugars won’t dissolve properly. Aim for warm to the touch (about 90-100°F)—warm enough that you can comfortably hold your hand against the bowl, but not hot. This temperature allows the sugars to partially dissolve, creating that signature crispy-chewy texture.
The Overnight Rest Technique: While 30 minutes of chilling is the minimum, serious bakers chill their dough for 24-72 hours for even better results. During this extended rest, the flour fully hydrates, flavors meld and deepen, and the cookies develop more complex taste. The result is cookies with even better texture and more pronounced caramelized flavor. If you have the patience, this waiting period pays off tremendously.
Strategic Chocolate Placement: For those picture-perfect cookies with chocolate showing on top, press extra chocolate chips into the tops of your dough balls just before baking. But here’s the key: press them in at an angle, not flat. This creates dimension and ensures the chocolate is visible in the finished cookie, giving you that professional bakery appearance.
The Pan Bang Method: Borrowed from professional bakeries, this technique creates those beautiful ripples and crinkles on top. At the 8-minute mark, open your oven and firmly bang the baking sheet on the oven rack (lift it an inch and drop it). This deflates the cookies slightly and creates texture. Repeat once or twice more before they’re done. The cookies will look wrinkled and gorgeous.
Weighing Your Dough: Professional bakers always weigh their cookie dough portions for absolute consistency. Using a scale to measure 45g (about 1.5 ounces) per cookie ensures every single cookie bakes at the same rate and comes out looking identical. This is especially helpful if you’re gifting or serving these at an event where presentation matters.
Common Mistakes to Avoid
Burning the Butter: This is the most common pitfall! Brown butter can go from perfectly toasted to acrid and burnt in literally 10-15 seconds. Once you smell that nutty aroma and see golden brown color with brown specks, immediately remove it from heat. Don’t try to get it “extra brown”—burnt butter tastes bitter and will ruin your cookies. When in doubt, err on the side of slightly less brown rather than risk burning it.
Not Chilling the Dough: I know you’re excited to bake right away, but skipping or shortening the chilling time leads to flat, greasy cookies that spread too much. The butter in brown butter cookies is already in a liquid state (unlike traditional creamed butter), so chilling is absolutely essential to prevent excessive spreading. Those 30 minutes minimum in the fridge are non-negotiable for the best results.
Overbaking: Brown butter cookies should look slightly underdone when you pull them from the oven—the centers will appear puffy and soft. Many bakers make the mistake of waiting until the centers look “done,” but cookies continue baking on the hot sheet after removal. If they look completely done in the oven, they’ll be overbaked and dry once cooled. Pull them when edges are golden but centers still look a bit raw.
Using Cold Eggs: Cold eggs don’t incorporate smoothly into the warm brown butter mixture and can cause the butter to resolidify into lumps, creating a grainy, separated dough. Always let your eggs sit at room temperature for 30 minutes before baking, or place them in a bowl of warm water for 5-10 minutes to quickly bring them to temperature.
Moving Cookies Too Soon: Fresh-from-the-oven cookies are extremely fragile and will fall apart or lose their shape if you try to transfer them immediately. That 5-10 minute rest on the baking sheet is when they set up and firm sufficiently for moving. Be patient—I know they smell amazing, but rushing this step leads to broken cookies and heartbreak!
Storage & Meal Prep
Room Temperature Storage: Store completely cooled cookies in an airtight container at room temperature for up to 5 days. To keep them at peak freshness, place a piece of bread in the container—the cookies will absorb moisture from the bread, keeping them soft and chewy. Replace the bread every couple of days. Layer cookies between sheets of parchment paper to prevent them from sticking together.
Maintaining Perfect Texture: If your cookies lose their crispy edges and become uniformly soft after storage (which some people love!), you can restore the texture by warming them in a 300°F oven for 3-5 minutes. This re-crisps the edges while keeping centers soft. Let them cool for a few minutes before enjoying.
Refrigerator Storage: While not necessary, refrigerating cookies in an airtight container extends their life to about 2 weeks. The cold temperature can make them quite firm, so let them sit at room temperature for 10-15 minutes before eating, or warm briefly in the microwave (10-15 seconds) for that fresh-baked texture.
Preventing Staleness: Cookie staleness comes from moisture loss, so proper storage is crucial. Make sure your container truly seals airtight—clip-top containers or mason jars work better than containers with loose-fitting lids. If you live in a humid climate, you might skip the bread trick and instead add a packet of food-safe silica gel to prevent excess moisture.
Warming for Fresh-Baked Taste: To revive day-old cookies and make them taste freshly baked, warm them in a 325°F oven for 5-7 minutes, or microwave individual cookies for 10-15 seconds. The chocolate will soften and the cookies will taste like they just came out of the oven!
Make-Ahead & Freezer Notes
Freezing Cookie Dough (Best Method): Brown butter cookie dough freezes exceptionally well, which means you can have fresh-baked cookies anytime! After chilling the dough, scoop it into individual cookie balls, place them on a parchment-lined baking sheet, and freeze until solid (about 2 hours). Transfer the frozen dough balls to a freezer-safe zip-top bag or container. They’ll keep for up to 3 months. Bake directly from frozen—no thawing needed!—just add 1-2 extra minutes to the baking time.
Freezing Baked Cookies: Completely cooled cookies freeze beautifully for up to 3 months. Layer them between sheets of parchment paper in an airtight container or freezer bag, removing as much air as possible. Thaw at room temperature for 15-20 minutes, or warm them in a 325°F oven for 5-7 minutes for that fresh-baked texture and taste.
Pre-Making Brown Butter: You can brown the butter up to 5 days in advance! Store it covered in the refrigerator where it will solidify. When ready to make cookies, let it come to room temperature until soft enough to mix (or gently warm it in the microwave in 10-second bursts until it reaches that warm-but-not-hot ideal mixing temperature). This is perfect for meal prep!
Dough Storage Before Baking: The raw cookie dough can be kept in the refrigerator for up to 72 hours before baking—and honestly, cookies made from dough that’s rested for 1-3 days taste even better than same-day cookies. The extended resting time allows flavors to develop and deepen beautifully. Just cover the bowl tightly with plastic wrap or store in an airtight container.
Baking from Frozen Dough: When baking frozen cookie dough balls, place them on your prepared baking sheet still frozen (no thawing required), space them normally, and add just 1-2 extra minutes to your baking time. They’ll spread and bake perfectly, giving you fresh, warm cookies in under 15 minutes total—the ultimate convenience!
Emergency Cookie Strategy: I always keep a bag of frozen cookie dough balls in my freezer for unexpected guests, sudden cravings, or last-minute bake sale needs. It’s like having a secret weapon—fresh, warm, impressive brown butter cookies with almost zero notice!
Serving Suggestions
These Brown Butter Chocolate Chip Cookies are absolutely perfect on their own, but pairing them with complementary flavors and textures can create an even more memorable dessert experience.
Ice Cream Sandwiches: Sandwich a scoop of your favorite ice cream between two cookies for an elevated ice cream sandwich experience. Vanilla bean, salted caramel, coffee, or brown butter ice cream all pair beautifully with these cookies. For extra indulgence, roll the ice cream edges in mini chocolate chips or crushed toffee bits.
Milk Pairings: The classic combination of cookies and milk reaches new heights with brown butter cookies. Try them with cold whole milk, chocolate milk, or even oat milk for a dairy-free option. The nutty flavor of the brown butter pairs surprisingly well with the slight sweetness of oat or almond milk.
Coffee and Espresso: The toasted, nutty notes in brown butter have a natural affinity for coffee. Serve these cookies alongside your afternoon coffee or espresso for a café-style experience. The slight bitterness of coffee perfectly balances the sweetness of the cookies.
Ice Cream Topping: Crumble warm cookies over vanilla ice cream and drizzle with caramel or chocolate sauce for an incredible sundae. The temperature contrast between warm cookies and cold ice cream is absolutely divine.
Cookie Crumble Desserts: Crush these cookies and use them as a crust for cheesecake, layer them in parfaits with whipped cream and fruit, or sprinkle them over pudding or mousse for added texture and flavor.
Dessert Plating: For an elegant plated dessert, serve one warm cookie on a plate with a small scoop of ice cream, a drizzle of caramel or chocolate sauce, and a sprinkle of flaky sea salt. Garnish with a mint sprig for a restaurant-worthy presentation.
S’mores Variation: Use these cookies instead of graham crackers for gourmet s’mores. The brown butter flavor pairs beautifully with toasted marshmallows and melted chocolate. You can even do oven s’mores by placing cookies on a baking sheet, topping with chocolate and marshmallows, and broiling for 1-2 minutes.
FAQs Section
Can I use salted butter instead of unsalted?
Yes, you can use salted butter, but reduce the added salt in the recipe by half (to ½ teaspoon instead of 1 teaspoon). Different brands have varying salt levels, so your cookies might taste slightly more or less salty. For most consistent results, unsalted butter is preferable since it lets you control the exact salt content.Why do my cookies spread too much and come out flat?
Excessive spreading usually happens when the dough isn’t chilled long enough or the butter was too warm when mixed. Other causes include using too much butter, measuring flour incorrectly (scooping instead of spooning), or an oven that’s not hot enough. Make sure to chill your dough for at least 30 minutes and verify your oven temperature with an oven thermometer.Can I skip the chilling step if I’m in a hurry?
Technically yes, but I strongly discourage it. You can reduce the chilling time to 15 minutes in the freezer as an absolute minimum, but you’ll get flatter cookies with less ideal texture. The chilling step is really crucial for brown butter cookies specifically because the butter is already melted, making chilling even more important than in traditional cookie recipes.My brown butter solidified—can I still use it?
Absolutely! If your brown butter cooled too much and solidified before you could mix it with the sugar, simply warm it gently in the microwave in 10-second bursts or place the bowl in a warm water bath until it softens to a thick but mixable consistency. You want it soft and warm (not hot) when adding the sugar.How do I know when the butter is perfectly browned?
Your nose and eyes are your best guides. The butter will smell intensely nutty and toasty—almost like hazelnuts or toffee. Visually, it should be a rich amber/golden brown color with brown specks settled at the bottom of the pan. If you’re nervous, it’s better to pull it slightly early than risk burning. Once it smells right and looks golden brown, immediately remove from heat.Can I make these cookies without a mixer?
Yes! While a mixer makes things easier, you can absolutely make these by hand. Use a wooden spoon or sturdy whisk to beat the brown butter and sugars together vigorously for 2-3 minutes, then mix in eggs and vanilla. When adding flour, fold gently with a spatula just until combined. Your arm will get a workout, but the cookies will be just as delicious!Why are my cookies cakey instead of chewy?
Cakey cookies usually result from too much flour (measuring incorrectly), overbaking, or over-mixing the dough once the flour is added. Make sure to spoon flour into your measuring cups and level off rather than scooping, which compacts the flour and adds extra. Also, mix just until the flour is incorporated—overmixing develops gluten, which creates a more cake-like texture.Conclusion
There you have it—everything you need to know to create these absolutely incredible Brown Butter Chocolate Chip Cookies that will have everyone convinced you’re a professional baker! The simple technique of browning butter transforms these from ordinary cookies into something truly extraordinary, with complex, nutty, caramelized flavor that you just can’t get any other way.
Once you master the brown butter technique, a whole world of elevated baking opens up to you. But fair warning: these cookies are dangerously addictive, and you might find yourself making them weekly (or even more often if you keep frozen dough balls on hand like I do!). The combination of crispy edges, chewy centers, melty chocolate, and that incredible toasted butter flavor is simply irresistible.
I’d absolutely love to hear how your Brown Butter Chocolate Chip Cookies turn out! Did you try any of the variations? Add any creative mix-ins? Or do you have questions as you’re making them? Drop a comment below and let me know—I read every single comment and love hearing about your baking adventures!
Please save this recipe to your Pinterest dessert board so you can find it easily whenever that cookie craving hits (which, let’s be honest, is probably going to be often after you make these once!). And if you snap a photo of your gorgeous cookies, tag me on social media—I absolutely love seeing your beautiful baking creations!
Now go grab that butter and get ready to brown it. Your kitchen is about to smell absolutely amazing, and you’re about to bake the best chocolate chip cookies of your life. Happy baking, friends! 🍪✨