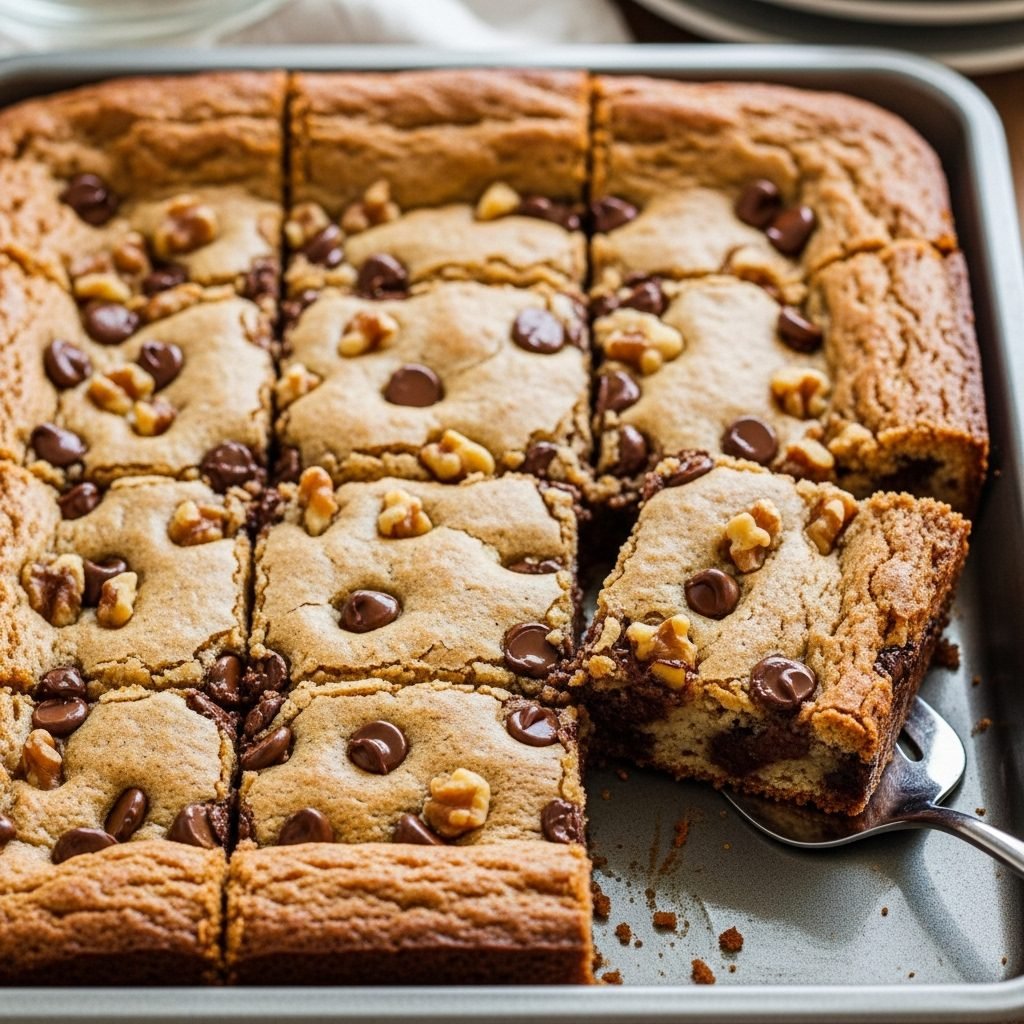
Perfect Chewy Blondies Recipe: Easy, Buttery, and Absolutely Irresistible
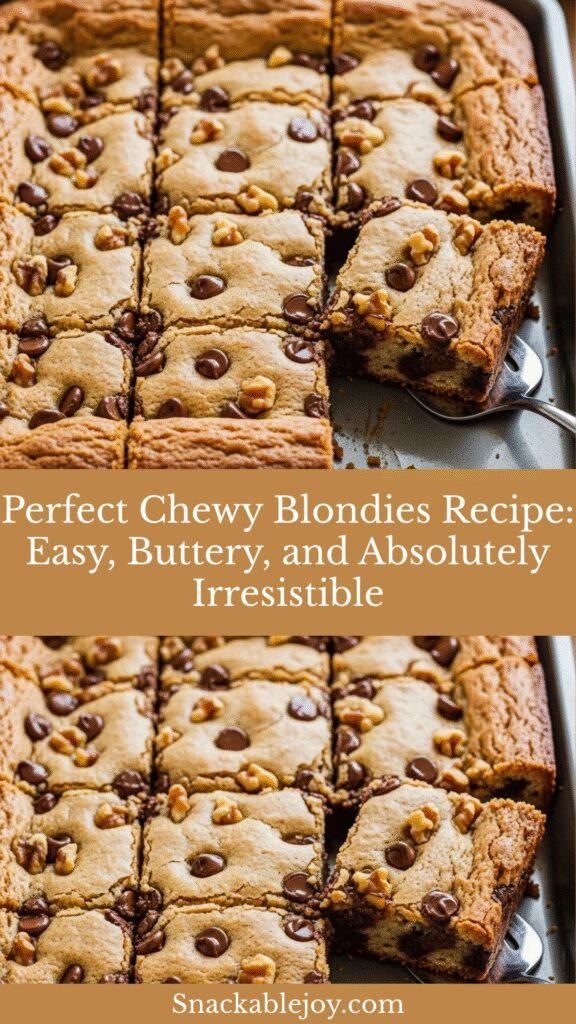
If you’ve ever wondered what happens when you take everything you love about chocolate chip cookies—that buttery, brown sugar sweetness, those pockets of melted chocolate, that perfect chewy texture—and transform it into a simple, sliceable bar, you’ve just discovered the magic of blondies. These golden-hued beauties are the vanilla-loving cousin of brownies, delivering dense, chewy, butterscotch-flavored perfection in every single bite. Unlike their chocolate counterparts, blondies let the rich, caramel notes of brown sugar and butter take center stage, creating a dessert that’s both comforting and utterly addictive.
Blondies are the ultimate crowd-pleasing dessert that works for virtually any occasion you can imagine. Pack them in lunchboxes for a midday treat that’ll make you the office hero. Bring them to potlucks where they’ll disappear faster than you can say “recipe, please!” Bake them for bake sales where they’ll sell out before the brownies. Serve them warm with vanilla ice cream for an impressive yet effortless dinner party dessert. Or simply whip up a batch on a lazy weekend when you need something sweet without the fuss of rolling cookie dough or decorating elaborate cakes.
What makes blondies truly special is their incredible versatility and foolproof nature. The basic recipe is endlessly adaptable—fold in chocolate chips, white chocolate chunks, butterscotch chips, chopped nuts, or dried fruit to create your signature version. They’re easier than cookies (no chilling, no rolling, no baking in batches), more forgiving than cakes (slightly under or overbaked, they’re still delicious), and they transport beautifully without crumbling. Best of all, they come together in one bowl with ingredients you probably already have in your pantry, making them the perfect solution when you need something homemade and impressive without a lot of planning or effort.
History / Background
The origin story of blondies is somewhat mysterious and debated among food historians, but most evidence points to their emergence in American home kitchens during the late 19th and early 20th centuries. Unlike brownies, which have a more documented history, blondies evolved more organically as American bakers experimented with bar cookie recipes that didn’t include chocolate.
The earliest known published recipe resembling modern blondies appeared in the 1896 edition of the Boston Cooking-School Cook Book by Fannie Farmer, though it wasn’t called a “blondie” at the time. These early recipes were often referred to as “blonde brownies” or simply “butterscotch bars,” emphasizing their golden color and the prominence of brown sugar’s butterscotch-like flavor. Some food historians believe blondies may actually predate chocolate brownies, suggesting that the original “brownie” might have been blonde before bakers started adding chocolate.
The name “blondie” itself didn’t become widely used until the mid-20th century, likely gaining popularity in the 1950s and 1960s as American home baking culture flourished. During this post-war era, convenience and simplicity became prized qualities in home cooking, and blondies fit perfectly into this ethos—they required minimal ingredients, came together quickly, and didn’t need any special equipment or techniques.
Blondies represent quintessentially American baking ingenuity. They emerged from a tradition of resourceful home bakers who wanted to create something special with simple pantry staples. In regions where chocolate was expensive or hard to come by, blondies offered an equally satisfying alternative that celebrated the rich flavors of butter, brown sugar, and vanilla. The addition of chocolate chips to blondie recipes became popular in the 1930s after Toll House cookies made chocolate chips a household staple, creating the classic combination we know and love today.
Throughout the decades, blondies have maintained their status as a beloved American dessert, appearing at county fairs, church bake sales, school functions, and family gatherings across the country. They’ve evolved with regional and personal variations—some recipes include nuts (particularly popular in the South), others feature white chocolate or butterscotch chips, and creative bakers continue to invent new flavor combinations. Despite these variations, the essential character of blondies remains unchanged: a dense, chewy, butterscotch-flavored bar that’s as comforting as it is delicious.
Why You’ll Love This Recipe
This blondies recipe has earned its place as an absolute favorite among home bakers, and once you make it, you’ll understand why it generates so much enthusiasm. These bars strike that perfect balance between a dense, fudgy texture and a slightly crispy edge, with a flavor profile that’s rich without being overwhelmingly sweet.
Here’s why this recipe deserves permanent status in your baking repertoire:
- One-bowl simplicity – No stand mixer required! Everything comes together in a single bowl with just a wooden spoon or whisk, making cleanup a breeze
- Beginner-friendly technique – If you can stir ingredients together, you can make perfect blondies. There’s no creaming, no folding, no complicated steps
- Pantry-friendly ingredients – Uses basic baking staples you likely already have: butter, brown sugar, eggs, flour, and vanilla. No specialty ingredients needed
- Faster than cookies – No chilling dough, no rolling, no baking multiple batches. Mix, spread, bake, and you’re done in under an hour
- Foolproof consistency – The recipe is incredibly forgiving and produces reliably excellent results every single time, even for novice bakers
- Perfectly chewy texture – That ideal combination of crispy edges and a dense, chewy center that melts in your mouth
- Endlessly customizable – The neutral base welcomes any add-ins you love: chocolate chips, nuts, dried fruit, or candy pieces
- Budget-friendly treat – Makes 16 generous servings for just a few dollars, much cheaper than bakery bars or cookies
- Kid-approved classic – The sweet, vanilla-butterscotch flavor appeals to children and adults alike, making these perfect for family baking
- Transport beautifully – These bars are sturdy enough to travel well to potlucks, picnics, and bake sales without falling apart
- Room temperature perfection – Unlike some desserts that must be served warm or cold, blondies taste amazing at room temperature
Ingredient Notes
Understanding the role each ingredient plays helps you achieve perfect results and make smart substitutions when needed. Here’s what you need to know about the components of exceptional blondies:
Unsalted Butter – The foundation of rich, buttery flavor and tender texture. Melted butter creates the characteristic dense, chewy texture of blondies. Always use unsalted so you can control the salt level precisely. If you only have salted butter, reduce the added salt to ¼ teaspoon. The butter should be melted but not hot when you add the other ingredients—let it cool for about 5 minutes after melting.
Light Brown Sugar – The star ingredient that gives blondies their signature butterscotch flavor and golden color. Brown sugar contains molasses, which adds moisture, chewiness, and that distinctive caramel-like taste. Light brown sugar is preferred for a milder flavor, though dark brown sugar can be used for a more intense molasses taste. Don’t substitute white sugar, as you’ll lose the essential blondie character.
Granulated White Sugar – Works with brown sugar to create the right balance of sweetness and texture. White sugar contributes to the slightly crispy edges and helps create structure.
Large Eggs – Provide structure, richness, and help bind everything together. Room temperature eggs incorporate more smoothly into the batter. The eggs in this recipe create the perfect dense-yet-tender texture that defines great blondies. Too many eggs make cakey blondies; too few make crumbly ones.
Pure Vanilla Extract – Essential for enhancing all the other flavors. Use real vanilla extract, not imitation, for the best taste. The vanilla amplifies the butterscotch notes and adds aromatic depth. Some bakers use vanilla bean paste for extra visual appeal and intense vanilla flavor.
All-Purpose Flour – Provides structure without making the bars cakey. The relatively modest amount of flour (compared to cake recipes) keeps blondies dense and chewy. Measure carefully by spooning into your measuring cup and leveling—don’t scoop directly from the bag, which packs in too much flour.
Baking Powder – A small amount gives the blondies a slight lift without making them cakey. It creates a tender crumb and prevents the bars from being too dense or gummy.
Salt – Absolutely essential for balancing sweetness and enhancing all the flavors. Don’t skip it! Salt makes the butterscotch flavor more pronounced and prevents the blondies from tasting one-dimensionally sweet.
Semi-Sweet Chocolate Chips – The classic add-in that creates pockets of melted chocolate throughout. You can use milk chocolate for sweeter blondies, dark chocolate for more sophisticated flavor, or white chocolate chips for a different twist. About 1-1½ cups is standard, but adjust to your preference.
Optional Add-ins – Chopped walnuts or pecans (¾ cup), butterscotch chips, white chocolate chunks, toffee bits, or chopped candy bars all work beautifully. Add-ins should total no more than 2 cups to maintain proper texture.
Equipment Needed
Having the right tools makes baking blondies even easier and ensures beautiful results. Here’s what you’ll need:
- 9×9-inch square baking pan – The standard size for this recipe, creating perfectly thick blondies with ideal texture. Metal pans work better than glass for even baking.
- Parchment paper – Line your pan with parchment paper extending over two sides to create handles. This makes removing blondies effortless and ensures perfect cleanup.
- Large mixing bowl – For combining all your ingredients. A medium-sized bowl works too, as long as it comfortably holds the batter without overflowing when stirring.
- Medium saucepan or microwave-safe bowl – For melting the butter. Either stovetop or microwave method works perfectly.
- Wooden spoon or sturdy whisk – For mixing the batter by hand. No electric mixer needed! A wooden spoon gives you better control to avoid overmixing.
- Rubber spatula – For scraping down bowl sides and spreading the batter evenly in the pan.
- Measuring cups and spoons – Accurate measurements are important in baking. Use dry measuring cups for flour and sugar, liquid measures for wet ingredients.
- Toothpick or cake tester – For checking doneness. The toothpick should come out with a few moist crumbs, not wet batter.
- Cooling rack – Allows air circulation for even cooling and prevents soggy bottoms.
- Sharp knife – For cutting clean squares. A plastic knife actually works wonderfully for cutting bar cookies without creating crumbs.
Print

Blondies Recipe
These classic chewy blondies feature rich butterscotch flavor from brown sugar and butter, studded with chocolate chips for the perfect combination. Dense, chewy, and absolutely irresistible, they’re easier than cookies and just as delicious!
- Total Time: 43 minutes
- Yield: 16 blondies 1x
Ingredients
Scale- ½ cup (1 stick) unsalted butter
- 1 cup packed light brown sugar
- ¼ cup granulated white sugar
- 1 large egg plus 1 egg yolk, room temperature
- 2 teaspoons pure vanilla extract
- 1½ cups all-purpose flour
- ½ teaspoon baking powder
- ½ teaspoon salt
- 1 cup semi-sweet chocolate chips
- ½ cup chopped walnuts or pecans (optional)
Instructions
Prepare Your Pan and Oven:
- Position your oven rack in the center of the oven and preheat to 350°F (175°C). Line a 9×9-inch baking pan with parchment paper, leaving about 2 inches of overhang on two opposite sides to act as handles for easy removal later. Lightly grease the parchment paper with butter or non-stick spray—this extra insurance prevents any sticking.
Melt the Butter: 2. Cut the butter into tablespoon-sized pieces and place in a medium saucepan over medium-low heat. Stir occasionally as the butter melts completely, then immediately remove from heat. Alternatively, melt in a microwave-safe bowl in 20-second intervals, stirring between each interval until completely melted. Let the melted butter cool for about 5 minutes—it should be warm but not hot enough to scramble the eggs.
Mix Wet Ingredients: 3. Transfer the melted butter to a large mixing bowl (or use the same bowl if you melted butter in the microwave). Add both the brown sugar and white sugar to the warm butter. Using a wooden spoon or whisk, stir vigorously for about 1 minute until the mixture is smooth, glossy, and well combined. The sugars won’t dissolve completely, but they should be thoroughly mixed with no dry spots or butter streaks visible.
Add Eggs and Vanilla: 4. Add the whole egg, egg yolk, and vanilla extract to the butter-sugar mixture. Whisk or stir vigorously for about 30-45 seconds until the mixture becomes lighter in color, slightly thickened, and completely smooth. The mixture should look glossy and emulsified. This step is crucial for creating that signature dense, chewy texture, so don’t rush it.
Combine Dry Ingredients: 5. In a separate small bowl, whisk together the flour, baking powder, and salt. This ensures the leavening and salt are evenly distributed throughout the flour, preventing pockets of salty or flat-tasting blondies.
Mix Batter: 6. Pour the flour mixture into the wet ingredients all at once. Using a rubber spatula or wooden spoon, gently fold and stir the mixture together. Mix just until no flour streaks remain and you have a thick, smooth, uniform batter—this should take about 20-30 seconds of gentle stirring. The batter will be quite thick, similar to cookie dough consistency. Be careful not to overmix, which can develop gluten and create tough, cakey blondies instead of chewy ones.
Add Mix-ins: 7. Reserve about 2 tablespoons of chocolate chips for topping, then fold the remaining chocolate chips (and nuts if using) into the batter. Use a gentle folding motion to distribute them evenly throughout without overmixing the batter.
Spread in Pan: 8. Scrape the thick batter into your prepared pan. Use your spatula to spread it evenly into all corners—the batter is quite thick, so you’ll need to work it into an even layer. Don’t worry about it looking perfect; it will spread and level during baking. Smooth the top as best you can, then sprinkle the reserved chocolate chips over the surface for a pretty presentation.
Bake to Perfection: 9. Place the pan in your preheated oven and bake for 25-30 minutes. The blondies are done when the edges are set and lightly golden brown, the center looks just barely set (it may jiggle very slightly when you gently shake the pan), and a toothpick inserted into the center comes out with a few moist crumbs attached—not wet batter, but definitely not clean. Start checking at 25 minutes, as overbaking is the enemy of chewy blondies.
Cool Completely: 10. Remove the pan from the oven and place it on a cooling rack. Let the blondies cool completely in the pan—this is absolutely essential and takes about 1-2 hours. Blondies are very soft and fragile when warm and need time to set up properly. For the cleanest cuts and best texture, many bakers actually refrigerate the cooled blondies for 30 minutes before slicing.
Cut and Serve: 11. Once completely cool, use the parchment paper overhang to lift the entire blondie slab out of the pan onto a cutting board. Use a sharp knife (or even a plastic knife, which cuts beautifully without creating crumbs) to cut into 16 squares (4×4 grid). For the cleanest cuts, wipe your knife clean with a damp paper towel between each cut. Alternatively, run your knife under hot water, dry it, then slice—the warm blade cuts through more cleanly.
Notes
- Don’t overbake – Slightly underbaked blondies are infinitely better than overbaked ones. They continue to cook from residual heat after removing from the oven. When the toothpick has moist crumbs (not wet batter), they’re perfect.
- Room temperature eggs are important – Cold eggs don’t incorporate as smoothly and can cause the melted butter to seize and create a grainy texture. Place eggs in warm water for 10 minutes if you forgot to bring them to room temperature.
- Brown sugar measuring matters – Pack the brown sugar firmly into your measuring cup, then level it off. Loosely measured brown sugar will throw off the recipe’s sweetness and moisture balance.
- Customize your add-ins – The basic recipe is a blank canvas. Use any combination of chocolate chips, white chocolate, butterscotch chips, nuts, or candy pieces, keeping the total around 1½ cups.
- Pan size is crucial – An 8×8-inch pan makes thicker blondies that need 5-8 minutes longer baking time. A 9×13-inch pan creates thinner blondies that bake in just 18-22 minutes.
- Prep Time: 15 minutes
- Cook Time: 28 minutes
- Category: Desert
- Method: Baking
- Cuisine: American
- Diet: Vegetarian
Nutrition
- Serving Size: 1 blondie (1/16 of recipe)
- Calories: 215
- Sugar: 20g
- Sodium: 95mg
- Fat: 9g
- Saturated Fat: 5g
- Unsaturated Fat: 3g
- Trans Fat: 0g
- Carbohydrates: 32g
- Fiber: 1g
- Protein: 2g
- Cholesterol: 35mg
Tips & Variations
Brown Butter Blondies: For next-level flavor, brown the butter before using. Melt butter in a light-colored saucepan over medium heat, stirring constantly until it turns golden brown and smells nutty (about 5-7 minutes). Let cool completely before using. This adds incredible depth and nuttiness.
White Chocolate Macadamia: Replace chocolate chips with white chocolate chips and add ½ cup chopped macadamia nuts for a sophisticated tropical twist.
Peanut Butter Swirl: Drop spoonfuls of peanut butter over the batter and swirl with a knife before baking for gorgeous marbled peanut butter blondies.
Salted Caramel Blondies: Fold in ½ cup caramel bits or chopped soft caramels, and sprinkle the top with flaky sea salt before baking for sweet-salty perfection.
Chocolate Chunk Version: Use chopped chocolate bars instead of chips for larger, more dramatic chocolate pockets that create beautiful textural contrast.
Gluten-Free Adaptation: Replace all-purpose flour with a 1:1 gluten-free baking flour blend. The texture will be very slightly different but still delicious.
Vegan Blondies: Use vegan butter, replace eggs with flax eggs (2 tablespoons ground flaxseed mixed with 5 tablespoons water, let sit 5 minutes), and use dairy-free chocolate chips.
Espresso Enhancement: Add 1 tablespoon instant espresso powder to the dry ingredients to deepen the butterscotch flavor without making them taste like coffee.
Fruit and Nut: Add ½ cup dried cranberries or cherries along with ½ cup chopped pecans for a festive variation perfect for holidays.
Pro Chef Tips
Weigh your flour for perfection: If you have a kitchen scale, weigh your flour (1½ cups = 180-190g). Weight measurements are more accurate than volume, eliminating the most common cause of dry or cakey blondies.
Use parchment paper, not foil: While aluminum foil works in a pinch, parchment paper is superior because it doesn’t react with the ingredients and prevents any metallic taste. It also releases more easily.
The vigorous stirring matters: When combining the butter and sugars, and again when adding the eggs, stir vigorously for the full recommended time. This creates an emulsification that’s key to achieving that dense, fudgy texture.
Avoid dark-colored pans: Dark pans absorb more heat and can cause the edges and bottom to overbake before the center is done. Light-colored aluminum or stainless steel pans work best.
Create a water bath for even baking: For the most evenly baked blondies, place your baking pan inside a larger pan and add about ½ inch of hot water to the outer pan. This moderates temperature and prevents edges from overbaking.
The refrigerator is your cutting friend: After blondies are completely cool, refrigerate them for 30 minutes before cutting. They’ll be much firmer and cut into clean, professional-looking squares.
Rest the batter: For even chewier blondies with more developed flavor, let the mixed batter rest at room temperature for 15-20 minutes before spreading in the pan and baking. This allows the flour to hydrate fully.
Test in multiple spots: Ovens have hot spots, so insert your toothpick in 2-3 different places when testing for doneness. If one spot seems more done than others, rotate the pan and bake another 2-3 minutes.
Common Mistakes to Avoid
Overbaking ruins the texture: The single biggest mistake is baking too long. Blondies should look barely set in the center when you remove them from the oven. They’ll seem slightly underdone, but they continue baking from residual heat as they cool. If the toothpick comes out completely clean, they’re already overbaked.
Using melted butter that’s too hot: If your butter is still very hot when you add the eggs, it can partially cook them, creating a grainy texture and preventing proper emulsification. Always let melted butter cool for 5 minutes until it’s warm but not hot.
Cutting before completely cool: I know it’s tempting, but warm blondies are structurally fragile and will fall apart or look messy when cut. The cooling time allows them to set up properly. Patience here makes all the difference between neat squares and crumbly chunks.
Overmixing after adding flour: Once flour meets liquid, gluten development begins. Stirring too much or too vigorously after adding flour creates tough, cakey blondies instead of tender, chewy ones. Mix just until the flour disappears.
Forgetting to pack the brown sugar: Loosely measured brown sugar means less sugar and less moisture, resulting in dry, crumbly blondies. Always pack brown sugar firmly into your measuring cup, then level it off.
Storage & Meal Prep
Room Temperature Storage: Store blondies in an airtight container at room temperature for up to 5 days. Place parchment paper or wax paper between layers if stacking to prevent sticking. They actually taste even better on day two as the flavors meld and the texture becomes more uniform.
Refrigerator Storage: In warm weather or humid climates, refrigerate blondies in an airtight container for up to 1 week. Let them sit at room temperature for 15-20 minutes before serving for the best texture and flavor. Cold blondies are more fudgy and dense, while room temperature blondies are softer with more pronounced butterscotch flavor.
Individual Wrapping: For grab-and-go convenience or lunchbox treats, wrap individual blondies tightly in plastic wrap, then store all wrapped pieces in a larger container or freezer bag. This keeps them fresh and makes portion control easy.
Maintaining Moisture: To keep blondies soft and chewy, place a piece of bread in the storage container with them. The blondies will absorb moisture from the bread as it dries out, staying perfectly moist. Replace the bread slice every 2-3 days.
Make-Ahead & Freezer Notes
Bake Ahead: Blondies are actually better the day after baking as the texture becomes more uniform and the flavors develop. Bake up to 3 days ahead, let cool completely, then store tightly wrapped at room temperature.
Freeze Whole or Sliced: Blondies freeze exceptionally well for up to 3 months. For whole pan freezing: let cool completely, wrap the entire pan (or removed slab) tightly in plastic wrap, then again in aluminum foil. For individual freezing: wrap each blondie square in plastic wrap, then store all wrapped pieces in a freezer-safe bag or container.
Thawing Instructions: For whole pan, thaw overnight in the refrigerator still wrapped, then bring to room temperature (about 1 hour). For individual blondies, thaw at room temperature for 30-45 minutes, or microwave frozen blondies for 15-20 seconds for a warm, gooey treat.
Flash Freezing for Individual Portions: For the easiest individual storage, place unwrapped blondies on a parchment-lined baking sheet and freeze for 1-2 hours until solid. Then wrap individually in plastic wrap—this prevents them from sticking together or getting squished during storage.
Freezing Unbaked Batter: You can also freeze the batter before baking! Prepare the batter as directed, spread in your pan lined with parchment, wrap tightly, and freeze for up to 2 months. Bake directly from frozen, adding 8-12 minutes to the baking time.
Best Reheating Method: For that fresh-baked experience, microwave individual blondies for 10-15 seconds (not longer, or they’ll become tough). For whole pan, warm in a 300°F oven for 5-8 minutes. Warm blondies with a scoop of vanilla ice cream are heavenly!
Serving Suggestions
These versatile blondies shine in countless serving scenarios:
Classic Dessert Pairings:
- Vanilla ice cream or butter pecan ice cream for an indulgent sundae
- Fresh whipped cream and a sprinkle of cinnamon
- Cold glass of milk for dunking (especially popular with kids)
- Hot fudge sauce drizzled over warm blondies
Coffee Shop Style:
- Strong hot coffee or cappuccino to balance the sweetness
- Iced latte for a refreshing contrast
- Hot chai tea for complementary spice notes
- Caramel macchiato for double caramel flavor
Elegant Presentations:
- Cut into small squares and serve on a dessert platter with brownies and cookies
- Top with a dollop of salted caramel sauce and a pinch of flaky sea salt
- Serve warm with butter pecan ice cream and toasted pecans
- Layer with vanilla pudding and whipped cream for a trifle-style dessert
Casual Gatherings:
- Pack in cellophane bags tied with ribbon for party favors
- Cut into bite-sized pieces for dessert buffets
- Serve alongside fresh fruit and cheese for contrast
- Offer with hot apple cider in fall or lemonade in summer
Special Occasion Ideas:
- Birthday parties: Add candles and use as a dessert “cake”
- Bake sales: Package individually with ingredient labels
- Game day: Cut into small squares for easy snacking
- Picnics: Transport in the pan and cut on-site for maximum freshness
FAQs Section
What’s the difference between blondies and brownies? Blondies are essentially “blonde brownies” made without cocoa powder or melted chocolate. Instead of chocolate flavor, blondies highlight the rich, caramel-like taste of brown sugar and butter, creating a butterscotch flavor profile. The texture is similar to brownies—dense and chewy—but the flavor is completely different. Blondies often include chocolate chips as an add-in, while brownies have chocolate as their base flavor.
Why did my blondies turn out cakey instead of chewy? Several factors cause cakey blondies: too much flour (always measure carefully by spooning and leveling), too many eggs, too much baking powder, overbaking, or overmixing after adding flour. This recipe is specifically formulated for dense, chewy texture. If you follow the measurements precisely, don’t overmix, and avoid overbaking, you should get perfect chewy results every time.
Can I make blondies without brown sugar? While you technically can use all white sugar, I strongly don’t recommend it. Brown sugar is what gives blondies their signature butterscotch flavor and chewy texture. The molasses in brown sugar adds moisture and that distinctive taste that defines blondies. Without it, you’ll essentially have a very bland bar cookie that’s nothing like authentic blondies.
My blondies are gooey in the middle. Are they undercooked? Blondies should be slightly gooey and fudgy in the center—that’s their appeal! However, if they’re genuinely wet and raw in the middle, they’re undercooked. The toothpick test should show moist crumbs, not wet batter. If your blondies seem too gooey even when fully cooled, return them to the oven for another 3-5 minutes. Remember that they set up significantly as they cool, so what seems too soft when warm will firm up perfectly at room temperature.
Can I double this recipe? Yes! Double all ingredients and bake in a 9×13-inch pan for 28-35 minutes. Watch carefully as the larger surface area can cause edges to overbake while the center cooks. Alternatively, make two separate 9×9-inch pans for more even baking and easier cutting.
Why are my blondies dry and crumbly? Dry blondies result from overbaking (the most common cause), too much flour, not enough butter or eggs, or not packing the brown sugar properly when measuring. Make sure you’re measuring flour correctly (spoon and level, don’t scoop), pack brown sugar firmly, and remove blondies from the oven when the toothpick shows moist crumbs rather than coming out clean.
How do I know when blondies are done? Look for these signs: edges are set and lightly golden brown, the center looks barely set and may jiggle very slightly when you gently shake the pan, and a toothpick inserted in the center comes out with moist crumbs (not wet batter, but not clean). The top should look slightly matte rather than shiny-wet. When in doubt, slightly underbake rather than overbake—they continue cooking from residual heat.
Can I make blondies in a different pan size? Yes, but adjust baking time accordingly. An 8×8-inch pan creates thicker blondies that need 33-38 minutes. A 9×13-inch pan makes thinner blondies that bake in 20-25 minutes. A 9-inch round pan works but creates triangular pieces when cut like a pie. Always use the toothpick test rather than relying solely on time, as all ovens vary.
Conclusion
Congratulations—you now have the ultimate guide to baking perfect, chewy blondies that’ll have everyone asking for seconds and your secret recipe! These golden beauties prove that sometimes the simplest recipes create the most memorable treats. With just one bowl, basic pantry ingredients, and about 45 minutes from start to finish, you can create something that tastes like it came from an expensive bakery.
The magic of blondies lies in their versatility and crowd-pleasing appeal. That rich butterscotch flavor from brown sugar, the pockets of melted chocolate, and the perfect dense-yet-tender texture make these bars universally loved by kids and adults alike. Whether you’re a seasoned baker or just starting out, this recipe is forgiving enough to deliver excellent results every time while still producing a dessert that looks and tastes absolutely professional.
Remember the golden rules for success: measure your flour carefully, don’t overmix after adding the flour, and resist overbaking (moist crumbs on the toothpick are your goal!). Most importantly, exercise patience during that crucial cooling time—I know waiting is hard, but it’s the difference between perfect squares and a crumbly mess.
I truly love hearing about your baking adventures! Did these blondies become an instant family favorite? Did you try any creative variations? What occasion did you make them for? Drop a comment below sharing your experience, upload a photo of your beautiful bars, and please rate this recipe—your feedback helps other home bakers and guides me in creating more recipes you’ll love.
Ready to preheat that oven? Pin this recipe to your Pinterest boards so you’ll always have it when a dessert craving strikes (and trust me, once you’ve tried these, you’ll be making them regularly!). Share this recipe with friends and family who appreciate simple, delicious homemade treats. And when you bake them, I’d be absolutely thrilled to see your creations—tag me on Instagram or Facebook so I can admire your blondie masterpieces!
Now grab that mixing bowl, dig into your pantry, and get ready to bake the blondies that’ll earn you a reputation as an amazing baker. Happy baking, and here’s to creating sweet memories one chewy, buttery, butterscotch-flavored bar at a time! 🧈✨