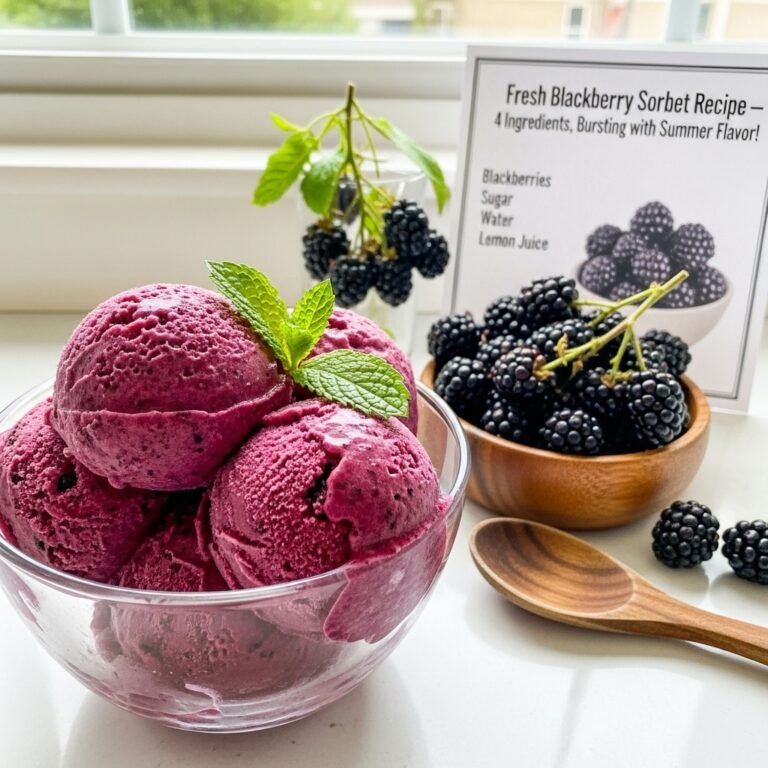
Fresh Blackberry Sorbet Recipe – 4 Ingredients, Bursting with Summer Flavor!
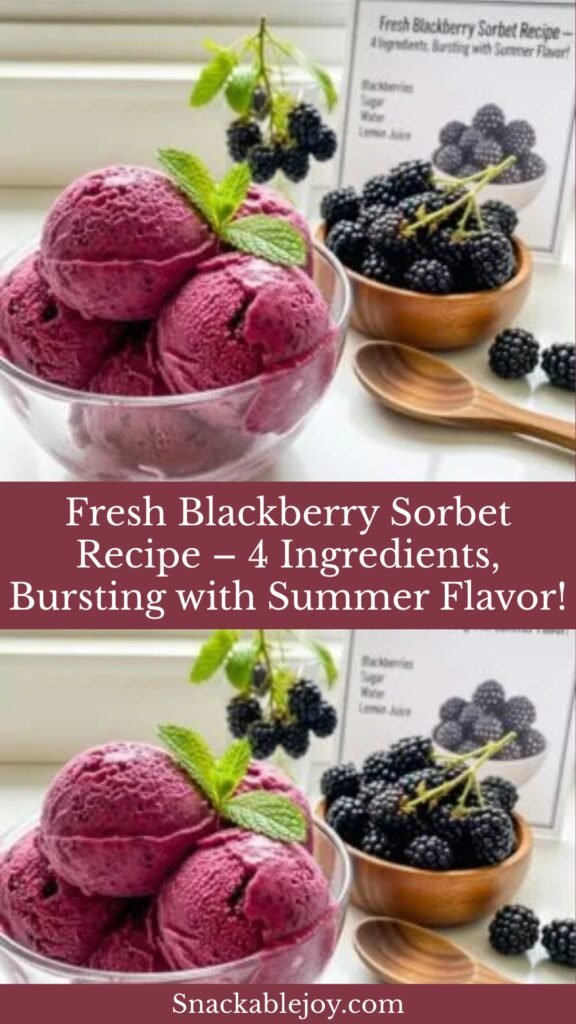
If you’re looking for a frozen dessert that captures the pure, intense essence of summer blackberries, this Blackberry Sorbet is about to become your new obsession! This stunning deep purple treat delivers bold berry flavor in every spoonful, with just the right balance of sweetness and tartness. Made with fresh or frozen blackberries, a touch of sugar, lemon juice, and water, this sorbet is incredibly simple yet tastes absolutely luxurious.
Blackberry Sorbet is perfect for late summer gatherings when blackberries are at their peak, elegant dinner parties where you want to impress guests, or any time you’re craving a refreshing, dairy-free frozen treat. The gorgeous jewel-toned color makes it naturally stunning—no food coloring needed! It’s sophisticated enough for special occasions yet easy enough to make any weekend. Plus, since it’s naturally vegan, gluten-free, and dairy-free, it’s perfect for serving to guests with dietary restrictions. Whether you’re a berry lover, a sorbet enthusiast, or simply someone who appreciates a beautiful dessert that tastes as good as it looks, this recipe is calling your name!
History / Background
Blackberries have been enjoyed by humans for thousands of years, with archaeological evidence showing they were gathered and eaten in prehistoric times. These wild bramble fruits grow abundantly throughout Europe, North America, and parts of Asia, and have long been valued not just for their delicious flavor but also for their medicinal properties. Ancient Greeks used blackberries to treat gout, and various cultures have used different parts of the blackberry plant for healing purposes throughout history.
The tradition of making fruit-based frozen desserts dates back to ancient Persia and Rome, where elite classes enjoyed mixtures of fruit juices and mountain snow. The word “sorbet” itself comes from the Turkish “şerbet” and Arabic “sharba,” meaning “to drink,” referring to a sweetened fruit drink that eventually evolved into frozen desserts. As ice preservation techniques improved through the Middle Ages and Renaissance, sorbet became increasingly refined, particularly in Italy and France.
Blackberry sorbet specifically emerged as fruit sorbets became popular in European aristocratic circles during the 17th and 18th centuries. The French, in particular, elevated sorbet-making to an art form, creating elaborate frozen desserts for royal banquets. Blackberries, being abundant and flavorful, were a natural choice for these elegant frozen treats.
In America, blackberries hold a special place in culinary tradition. Wild blackberries grow prolifically throughout much of the United States, and picking wild blackberries became a cherished summer tradition for many families. Blackberry cobbler, pie, and jam are iconic American desserts, but blackberry sorbet represents a more refined, European-influenced preparation that showcases the fruit’s pure flavor without heavy creams or pastry.
Today, blackberry sorbet is enjoyed worldwide as a sophisticated yet simple frozen dessert. It represents the perfect intersection of rustic berry-picking tradition and elegant frozen dessert craft. Making it at home connects us to both the ancient tradition of preserving summer’s bounty and the refined art of French and Italian dessert-making.
Why You’ll Love This Recipe
This Blackberry Sorbet recipe is a game-changer for anyone who loves fresh, fruit-forward desserts that don’t require complicated techniques or hard-to-find ingredients. I’ve perfected this recipe to deliver maximum blackberry flavor with a silky-smooth texture that rivals any professional gelateria!
Here’s why this recipe deserves a spot in your summer dessert rotation:
- Intense berry flavor – Tastes like the essence of fresh blackberries, concentrated and perfected in frozen form
- Just 4 simple ingredients – Fresh or frozen blackberries, sugar, lemon juice, and water—that’s all you need!
- No ice cream maker required – You can make perfect sorbet with just a blender and freezer
- Naturally vegan and dairy-free – Perfect for anyone avoiding dairy, lactose-intolerant guests, or plant-based eaters
- Stunning natural color – That gorgeous deep purple hue is 100% from the berries with zero artificial coloring
- Lower calorie than ice cream – Enjoy a guilt-free frozen treat that’s naturally lighter
- Uses frozen berries beautifully – Don’t worry if blackberries aren’t in season—frozen berries work perfectly and are often more budget-friendly
- Sophisticated yet approachable – Looks and tastes elegant but uses simple home cooking techniques
- Rich in antioxidants – Blackberries are packed with beneficial compounds, making this a healthier dessert choice
- Make-ahead perfection – Prepare days in advance and have an impressive dessert ready when you need it
- Kid-approved – Children love the sweet-tart berry flavor and fun purple color
- Customizable intensity – Easily adjust sweetness and tartness to your preference
Ingredient Notes
Let’s break down each ingredient and understand why it’s essential for creating the perfect Blackberry Sorbet:
Fresh or Frozen Blackberries: You’ll need about 4-5 cups (approximately 1.5 to 2 pounds) of blackberries. Fresh berries at peak ripeness deliver the most intense flavor, but frozen blackberries work beautifully and are often more economical. When buying fresh blackberries, look for plump, deeply colored berries with a slight shine—avoid any that are mushy, leaking, or have white or green patches. If using frozen, buy unsweetened berries with no added sugar or syrup. The beauty of frozen berries is they’re picked at peak ripeness and flash-frozen, locking in flavor and nutrients. Plus, they’re already cold, which can actually make blending easier! Wild blackberries, if you’re lucky enough to forage them, have an even more intense, complex flavor than cultivated varieties.
Granulated Sugar: You’ll need about ¾ to 1 cup, depending on the sweetness of your berries and personal preference. Sugar serves multiple purposes in sorbet: it sweetens, prevents the mixture from freezing rock-solid (by lowering the freezing point), and contributes to that smooth, scoopable texture. Blackberries are naturally tart, so they need more sugar than sweeter fruits. However, you want to taste the berries, not just sweetness! Start with ¾ cup and adjust up if needed. You can substitute with honey, agave nectar, or maple syrup for a different flavor profile, though the texture may be slightly different. For a lower-sugar version, you can use sugar substitutes like erythritol, though the sorbet will freeze harder and may be icier.
Fresh Lemon Juice: About 2-3 tablespoons of freshly squeezed lemon juice is crucial! This isn’t just for tartness—lemon juice brightens the blackberry flavor, balances the sweetness, prevents the sorbet from tasting flat, and actually makes the berries taste MORE like themselves. It’s like turning up the volume on blackberry flavor! Fresh lemon juice is vastly superior to bottled—it has a bright, clean acidity that bottled juice can’t match. The citric acid in lemon juice also helps prevent the sorbet from becoming too icy by improving the texture.
Water: You’ll need about ½ to ¾ cup of water to create the simple syrup and adjust the consistency. Water helps dissolve the sugar, creates the right texture for churning or blending, and prevents the sorbet from being too thick or dense. Don’t be tempted to skip it or use too little—water is essential for proper texture!
Optional Add-Ins:
- Vanilla extract (½ teaspoon) – Adds depth and rounds out the flavor
- A pinch of salt – Enhances all the flavors and balances sweetness
- Cassis or blackberry liqueur (2 tablespoons) – For adults; adds complexity and keeps sorbet softer
- Fresh basil or mint (a few leaves) – Creates an herbal dimension that’s surprisingly delicious with berries
Equipment Needed
You don’t need professional equipment to make stunning Blackberry Sorbet at home! Here’s what you’ll need:
- Blender or food processor – A high-powered blender (Vitamix, Blendtec) creates the smoothest texture, but any blender or food processor works. The more powerful, the smoother your sorbet will be.
- Fine-mesh strainer or sieve – Essential for removing the seeds! Blackberry seeds can be unpleasant in sorbet, so straining is highly recommended.
- Medium saucepan – For making the simple syrup if you choose that method
- Measuring cups and spoons – For accurate measurements
- Mixing bowls – Various sizes for mixing and straining
- Silicone spatula or wooden spoon – For stirring and scraping
- Shallow freezer-safe container – A loaf pan, 9×9-inch baking dish, or similar container works perfectly
- Ice cream maker (optional) – Creates the smoothest texture but is absolutely not necessary
- Citrus juicer (optional) – Makes squeezing lemons easier
- Ice cream scoop – For serving your beautiful sorbet
Print

Blackberry Sorbet Recipe
This vibrant Blackberry Sorbet bursts with fresh berry flavor and has a silky-smooth texture that rivals any professional sorbet. Made with just 4 ingredients, it’s naturally vegan, dairy-free, and absolutely delicious!
- Total Time: 5-7 hours
- Yield: 1 quart (about 6-8 servings) 1x
Ingredients
ScaleMethod 1 – No-Cook Method (Easiest):
- 4-5 cups fresh or frozen blackberries (about 1.5-2 lbs)
- ¾ to 1 cup granulated sugar
- 2-3 tablespoons fresh lemon juice
- ½ cup cold water
- Pinch of salt (optional)
Method 2 – Simple Syrup Method (Smoothest texture):
- 4-5 cups fresh or frozen blackberries (about 1.5-2 lbs)
- ¾ cup granulated sugar
- ¾ cup water (divided: ½ cup for syrup, ¼ cup for blending)
- 2-3 tablespoons fresh lemon juice
- Pinch of salt (optional)
Instructions
Method 1 – No-Cook Method (Quick & Easy):
Step 1: Prepare the Berries If using fresh blackberries, rinse them gently and pat dry. If using frozen, you can use them straight from the freezer—no need to thaw.
Step 2: Blend Everything Add the blackberries, sugar (start with ¾ cup), lemon juice, water, and a pinch of salt to your blender or food processor. Blend on high speed for 2-3 minutes until completely smooth and the sugar is fully dissolved. Stop and scrape down the sides as needed. The mixture should be completely liquified with no visible berry pieces.
Step 3: Strain Out Seeds Place a fine-mesh strainer over a large bowl. Pour the blackberry mixture through the strainer, using a silicone spatula or the back of a spoon to press the mixture through, extracting as much liquid as possible. This removes the seeds and any pulp, leaving you with smooth, silky sorbet base. Discard the seeds and pulp. You should have about 3-4 cups of strained mixture.
Step 4: Taste and Adjust Taste the mixture. It should taste slightly sweeter than you want the final sorbet to be, since frozen desserts taste less sweet when frozen. If it’s too tart, stir in 2-4 tablespoons more sugar until dissolved. If it’s too sweet or thick, add a splash more water or lemon juice.
Step 5: Chill Cover the bowl and refrigerate the mixture for at least 30 minutes, or up to 24 hours. It must be completely cold before freezing.
Step 6: Freeze Pour the chilled mixture into a shallow, freezer-safe container (like a loaf pan or 9×9-inch baking dish). Cover tightly and freeze. For the smoothest texture, stir vigorously with a fork every 45 minutes for the first 3-4 hours, breaking up ice crystals as they form. Alternatively, freeze completely (4-6 hours), then break into chunks and re-blend in your food processor until smooth, then refreeze for 1-2 hours.
Step 7: Serve Let the sorbet sit at room temperature for 5-10 minutes to soften slightly before scooping. Scoop into bowls or cones and serve immediately, garnished with fresh blackberries and mint if desired.
Method 2 – Simple Syrup Method (Professional Texture):
Step 1: Make Simple Syrup In a medium saucepan, combine ¾ cup sugar and ½ cup water. Heat over medium heat, stirring occasionally, until the sugar completely dissolves (about 3-5 minutes). Don’t let it boil heavily—just heat until clear. Remove from heat and let cool to room temperature, then refrigerate until cold.
Step 2: Blend Berries Add the blackberries, cold simple syrup, lemon juice, remaining ¼ cup water, and a pinch of salt to your blender. Blend on high speed for 2-3 minutes until completely smooth.
Step 3: Strain Strain the mixture through a fine-mesh strainer into a bowl, pressing to extract all the liquid and remove seeds.
Step 4: Taste and Chill Taste and adjust sweetness if needed. Cover and refrigerate until completely cold, at least 30 minutes or up to 24 hours.
Step 5: Churn or Freeze If using an ice cream maker, churn according to manufacturer’s instructions (usually 20-25 minutes) until it reaches soft-serve consistency. Transfer to a freezer-safe container and freeze for 3-4 hours until firm.
If not using an ice cream maker, follow Step 6 from Method 1, stirring every 45 minutes for smoothest texture.
Step 6: Serve Let soften for 5-10 minutes at room temperature before scooping. Enjoy!
Notes
- Seed removal is key: Don’t skip straining! Blackberry seeds are hard and can make sorbet unpleasant to eat.
- Sweetness varies: Blackberries’ tartness varies by variety and ripeness. Always taste before freezing and adjust sugar accordingly.
- Texture tip: The more you stir during freezing, the smoother your sorbet will be. For ultra-smooth results, freeze completely then re-blend before final freeze.
- Ice cream maker advantage: Using an ice cream maker creates the smoothest, most professional texture, but it’s not necessary for great results.
- Storage: Best eaten within 1-2 weeks. If ice crystals form after extended storage, simply re-blend to restore smooth texture.
- Color note: The sorbet may darken slightly as it freezes—this is completely normal!
- Prep Time: 20 minutes
- Cook Time: 5 minutes (for simple syrup method)
- Category: Desert
- Method: Freezing/Blending
- Cuisine: American/French
- Diet: Gluten Free
Nutrition
- Serving Size: ½ cup (1/8 of recipe)
- Calories: 110
- Sugar: 24g
- Sodium: 2mg
- Fat: 0.5g
- Saturated Fat: 0g
- Unsaturated Fat: 0.5g
- Trans Fat: 0g
- Carbohydrates: 27g
- Fiber: 4g
- Protein: 1g
- Cholesterol: 0mg
Tips & Variations
Flavor Variations:
- Blackberry Lemon Sorbet: Increase lemon juice to ¼ cup and add 1 tablespoon lemon zest for extra citrus brightness
- Blackberry Mint Sorbet: Add 8-10 fresh mint leaves when blending for a refreshing herbal note
- Blackberry Basil Sorbet: Blend in 6-8 fresh basil leaves for a sophisticated, slightly peppery flavor
- Blackberry Lavender Sorbet: Steep 1 teaspoon dried culinary lavender in the warm simple syrup, strain before using
- Mixed Berry Sorbet: Replace 1-2 cups of blackberries with raspberries, blueberries, or strawberries
- Blackberry Lime Sorbet: Use lime juice instead of lemon for a different citrus profile
- Blackberry Rosé Sorbet: Replace ¼ cup water with rosé wine for an elegant adult version
Add-Ins and Mix-Ins:
- Swirl in seedless blackberry jam for concentrated fruit pockets
- Fold in fresh blackberry pieces during the last minute of churning for texture
- Add white chocolate chips for unexpected sweetness and crunch
- Swirl in raspberry coulis for a beautiful marbled effect
Sweetener Alternatives:
- Honey: Use ¾ cup honey for a floral sweetness (may darken the color slightly)
- Agave nectar: ¾ cup creates a neutral sweet flavor
- Maple syrup: Adds a subtle earthy note that complements berries
- Coconut sugar: Creates a slight caramel undertone
Lower Sugar/Healthier Versions:
- Reduce sugar to ½ cup and add a ripe banana for natural sweetness
- Use sugar-free sweetener (texture will be icier)
- Add a few pitted dates when blending for natural sweetness and fiber
Serving Style Variations:
- Paletas: Pour into popsicle molds for homemade blackberry ice pops
- Granita: Freeze without stirring, then scrape with a fork for Italian ice texture
- Sorbet float: Add a scoop to sparkling water or lemon-lime soda
- Affogato style: Pour hot espresso over a scoop for a sophisticated coffee-berry combo
Pro Chef Tips
Choose the Right Berries: Whether using fresh or frozen, berry quality matters immensely. Fresh berries should be deeply colored, plump, and fragrant—pale or hard berries lack flavor. When buying frozen, check the ingredient list: it should say only “blackberries” with no added sugar or syrup. Frozen berries are flash-frozen at peak ripeness, so they often have more consistent flavor than out-of-season fresh berries. If foraging wild blackberries, they’ll have the most intense, complex flavor of all!
The Power of Straining: This step is non-negotiable for professional results. Blackberry seeds are notoriously hard and crunchy—leaving them in creates an unpleasant texture that distracts from the luxurious smoothness of sorbet. Take your time pressing the mixture through the strainer to extract every bit of flavorful liquid. You should get 3-4 cups of smooth, seed-free puree. The pulp and seeds left behind might seem like waste, but they contain less flavor than you’d think.
Master the Sweet-Tart Balance: Blackberries are naturally quite tart, so they need adequate sugar. However, the goal is balanced flavor, not candy-sweetness. Your sorbet base should taste slightly sweeter than you want the final product—frozen desserts taste about 20-30% less sweet when frozen. Always taste before freezing! If it tastes perfect at room temperature, it will taste under-sweetened when frozen. Adjust with more sugar or honey, dissolving it completely before freezing.
The Simple Syrup Advantage: While the no-cook method is quicker, making a simple syrup creates superior texture. When sugar is dissolved in heated water, it creates an invert sugar that prevents crystallization and keeps sorbet smoother. The syrup also blends more evenly throughout the mixture. If you have time, the simple syrup method produces noticeably smoother, more professional results.
Temperature Control Matters: Your sorbet base must be completely cold before freezing. Room temperature or warm mixtures take much longer to freeze, during which time large ice crystals form, creating a grainy texture. Chilling for at least 30 minutes (or overnight) ensures rapid, even freezing and smooth texture. If you’re in a hurry, use an ice bath to speed cooling.
The Stirring Technique: For ultra-smooth sorbet without an ice cream maker, use this professional technique: freeze in a shallow pan, and stir vigorously with a fork every 30-45 minutes for the first 3-4 hours. This breaks up ice crystals as they form, incorporating air and creating a smooth, scoopable texture. It requires attention but produces results comparable to churned sorbet. Set a timer so you don’t forget!
The Re-Blend Method: Here’s a shortcut that works brilliantly: freeze the sorbet base completely without stirring (4-6 hours), then break it into chunks and pulse in your food processor until smooth and creamy. Immediately transfer back to your container and freeze for 1-2 hours to firm up. This creates incredibly smooth sorbet with minimal effort!
Serve at Optimal Temperature: Like all frozen desserts, sorbet is best served slightly softened. Remove from the freezer 5-10 minutes before serving—it should be soft enough to scoop easily but still very cold. At this temperature, the flavors are most pronounced and the texture is at its creamy best. Sorbet served rock-hard loses its silky texture and muted flavors.
Common Mistakes to Avoid
Mistake #1: Not Straining Out the Seeds
This is the biggest mistake home cooks make with blackberry sorbet! Those little seeds might seem harmless, but they’re hard, crunchy, and create an unpleasant texture that ruins the otherwise silky-smooth sorbet. Always strain your mixture through a fine-mesh sieve, pressing firmly to extract all the liquid. Yes, it takes a few extra minutes, but the difference is dramatic. Professional sorbets are always perfectly smooth—and now yours will be too!Mistake #2: Using Berries That Aren’t Sweet Enough
Not all blackberries are created equal. Out-of-season or underripe berries lack the intense sweetness and flavor needed for great sorbet. While you can add more sugar, you can’t add berry flavor. If your berries taste bland or overly tart when fresh, they’ll make bland or overly tart sorbet. Always taste your berries first! If they’re not delicious fresh, wait until you find better quality berries or use high-quality frozen berries instead.Mistake #3: Not Tasting Before Freezing
Every batch of berries has different sweetness levels, so you must taste your mixture before freezing and adjust accordingly. The mixture should taste slightly sweeter than your target, since freezing dulls sweetness. It’s much easier to add more sugar before freezing than to try to fix under-sweetened sorbet later. Don’t skip this crucial quality control step!Mistake #4: Skipping the Chilling Step
It’s tempting to blend your mixture and immediately start freezing, but this is a mistake. Warm or room-temperature mixtures freeze too slowly, allowing large ice crystals to form that create a grainy, icy texture. Always chill your base until it’s completely cold (below 40°F) before freezing. This ensures rapid freezing and smooth texture. Even 30 minutes of chilling makes a significant difference!Mistake #5: Storing in a Deep Container
Deep containers cause sorbet to freeze very hard in the center, making it difficult to scoop and often resulting in an icy texture. Always use shallow, wide containers (like loaf pans or square baking dishes) for even freezing. Shallow containers also make it easier to stir if using that technique. Plus, sorbet in shallow containers softens faster when you remove it from the freezer before serving.Mistake #6: Giving Up on Icy Sorbet
If your sorbet has been in the freezer for a while and becomes icy or hard, don’t despair! Simply break it into chunks, pulse in your food processor until smooth and creamy, then refreeze for 1-2 hours. This instantly restores perfect texture and can be done multiple times. Homemade sorbet lacks the stabilizers of commercial products, so texture changes are normal—but they’re also easily fixable!Storage & Meal Prep
Freezer Storage:
Store your Blackberry Sorbet in an airtight, freezer-safe container with a tight-fitting lid. For the smoothest texture and best flavor, press a piece of parchment paper or plastic wrap directly onto the surface of the sorbet before sealing—this prevents ice crystals from forming on top and protects against freezer burn. Properly stored, homemade blackberry sorbet will keep in the freezer for up to 2-3 weeks at peak quality. It remains safe to eat for up to 1 month, though the texture may become slightly icier over time.Preventing Ice Crystals:
Homemade sorbet is more susceptible to ice crystal formation than commercial varieties because it lacks stabilizers and emulsifiers. To minimize this issue:- Store in the coldest, most stable part of your freezer (usually the back, away from the door)
- Use shallow containers rather than deep ones
- Press plastic wrap directly on the surface before sealing
- Minimize temperature fluctuations—don’t let it sit out and refreeze repeatedly
- Consume within 1-2 weeks for optimal texture
Restoring Texture:
After 5-7 days in the freezer, you may notice your sorbet becoming harder or developing small ice crystals. This is completely normal! The simple fix: remove from freezer, break into chunks, pulse in your food processor or blender until smooth, then immediately return to the freezer for 1-2 hours to firm up. This technique works like magic and can be repeated as needed.Scooping Tips:
For easy scooping and best flavor, remove sorbet from the freezer 5-10 minutes before serving. The ideal serving temperature for sorbet is around 15-20°F—soft enough to scoop easily but still very cold. Dip your ice cream scoop in warm water between scoops for cleaner, rounder scoops. If serving a crowd, you can pre-scoop balls onto a parchment-lined baking sheet, freeze until solid, then serve directly from the sheet.Portioning for Convenience:
Consider portioning sorbet into individual serving containers (small Mason jars or cups) for grab-and-go treats. This minimizes air exposure to the main batch and makes portion control easy. Cover each container with plastic wrap pressed directly on the surface, then seal with a lid.Make-Ahead & Freezer Notes
Perfect Make-Ahead Timeline:
Up to 1 Week Before: This is actually the ideal timeline! Make your sorbet, freeze it completely, and it will be at peak texture and flavor for 5-7 days. This is perfect for dinner party planning—make it early in the week, then simply let it soften and scoop when guests arrive.
2-3 Days Before: An excellent time frame. The sorbet will have fully frozen and “matured,” with flavors melding beautifully. The texture is usually at its absolute best on days 2-3 after making.
Same Day: You can definitely make sorbet the same day you plan to serve it, but give yourself at least 5-6 hours for proper freezing time. If you’re in a rush, you can serve it at the soft-serve stage after churning (or after the first hour of freezing with the no-churn method), but it won’t have that classic firm sorbet texture.
Longer Storage: Sorbet can be stored for up to 1 month in the freezer, though texture quality gradually declines after 2 weeks. For longer storage, press plastic wrap directly on the surface, seal in an airtight container, and store in the coldest part of your freezer. You can always restore texture by re-blending before serving.
Freezer-Friendly Details:
Blackberry sorbet is inherently freezer-friendly since it’s designed to be frozen! Unlike many desserts that don’t freeze well, sorbet thrives in the freezer. The main consideration is preventing ice crystal formation, which is easily managed with proper storage techniques (airtight containers, surface protection with plastic wrap, stable freezer temperature).No Defrosting Required:
Since sorbet is meant to be served frozen, there’s no defrosting needed. Simply remove from the freezer 5-10 minutes before serving to slightly soften for optimal scooping and flavor. Never microwave sorbet to soften it—this creates uneven melting and ruins the texture.Batch Making:
This recipe easily doubles or triples if you want to stock your freezer or make multiple flavors for a party. Just blend in batches if your equipment isn’t large enough, and store in separate containers. Having homemade sorbet ready in your freezer means you always have an impressive dessert on hand!Serving Suggestions
Blackberry Sorbet is stunning on its own, but here are some wonderful ways to elevate your presentation:
Classic Presentations:
- In Elegant Coupes: Serve in stemmed dessert glasses for sophisticated presentation
- Chilled Bowls: Pre-chill ceramic or glass bowls in the freezer for serving
- Waffle Cones: Scoop into homemade or store-bought waffle cones for a casual treat
- Tulip Cups: Edible cookie cups add elegance and crunch
Garnishes and Toppings:
- Fresh blackberries – A handful of fresh berries reinforces the flavor and adds visual appeal
- Mint or basil leaves – Fresh herbs add color and aromatic complexity
- Lemon zest – Brightens the presentation and echoes the citrus in the sorbet
- Edible flowers – Violas, pansies, or borage flowers create an Instagram-worthy look
- White chocolate shavings – The contrast of flavors and colors is stunning
- Crushed freeze-dried berries – Adds intense berry flavor and beautiful color
- Toasted sliced almonds – Adds nutty crunch
- Shortbread cookies – Serve alongside for textural contrast
Creative Serving Ideas:
- Sorbet float: Add a scoop to sparkling wine (Prosecco or champagne) for an elegant cocktail
- Berry parfait: Layer with Greek yogurt and granola for breakfast or brunch
- Between meringues: Sandwich between crispy meringue cookies for a sophisticated dessert
- On pound cake: Serve over vanilla or lemon pound cake with fresh berries
- Affogato style: Pour a shot of espresso or hot chocolate over a scoop for temperature contrast
- In lemon halves: Hollow out lemon halves and fill with sorbet for individual servings
Beverage Pairings:
- Sparkling water with lemon – Keeps it refreshing and light
- Iced herbal tea – Mint or berry teas complement the fruit flavor
- Champagne or Prosecco – The bubbles and acidity balance the sweetness perfectly
- Sweet dessert wine – Late harvest Riesling or Moscato d’Asti pairs beautifully
- Coffee or espresso – The bitter notes contrast nicely with sweet berry flavor
- Blackberry lemonade – Doubles down on berry flavor
Sauce and Accompaniment Ideas:
- Drizzle with balsamic reduction for sophisticated depth
- Serve with lemon curd on the side for citrus lovers
- Add a dollop of whipped coconut cream for richness
- Drizzle with honey or agave nectar for extra sweetness
- Serve with fresh berry compote for concentrated fruit flavor
Occasion Ideas:
- Summer dinner parties and barbecues
- Bridal and baby showers
- Garden parties and outdoor entertaining
- Palate cleanser between courses at formal dinners
- Elegant brunch gatherings
- Fourth of July and patriotic celebrations (pair with red and white elements)
- Birthday parties (kids love the color!)
FAQs Section
Q: Can I make this without straining out the seeds?
A: While you technically can skip straining, I strongly don’t recommend it. Blackberry seeds are quite hard and crunchy, and they significantly detract from the smooth, luxurious texture that makes sorbet special. If you absolutely must skip straining (maybe you like the fiber or texture), be aware that the sorbet will have a noticeably grainier mouthfeel. For the best experience that rivals professional sorbets, always strain!Q: My sorbet is too icy/hard. How do I fix it?
A: There are several solutions! First, let it sit at room temperature for 10-15 minutes before scooping—it should be served softer than ice cream. If it’s still too hard, you likely need more sugar (which prevents freezing rock-solid). For immediate relief, break the frozen sorbet into chunks and pulse in your food processor until smooth and creamy, then refreeze for 1-2 hours. For future batches, try adding 1-2 tablespoons of vodka or corn syrup, which lowers the freezing point and keeps sorbet softer.Q: Can I use an ice cream maker for this recipe?
A: Absolutely! An ice cream maker creates the smoothest, most professional texture. After straining your mixture and chilling it completely, pour it into your ice cream maker and churn according to manufacturer’s instructions (usually 20-25 minutes) until it reaches a soft-serve consistency. Then transfer to a container and freeze for 3-4 hours until firm. The constant churning incorporates minimal air while breaking up ice crystals, creating incredibly smooth sorbet.Q: How do I know if my blackberries are sweet enough?
A: Simple—taste them! Fresh blackberries should taste sweet with a pleasant tartness, not mouth-puckeringly sour or bland. If eating a fresh berry makes you wince, you’ll need to add extra sugar to the sorbet. Look for deeply colored, plump berries with a slight shine. Frozen berries are usually picked at peak ripeness, so they’re often more reliably sweet than out-of-season fresh berries. When in doubt, start with the full cup of sugar and adjust from there.Q: Can I make this with other berries?
A: Yes! This recipe works beautifully with raspberries, blueberries, strawberries, or mixed berries. Raspberries also have seeds that should be strained out. Blueberries and strawberries don’t need straining. Each berry has a different natural sweetness level, so always taste and adjust sugar accordingly. You can also create custom blends—blackberry-raspberry is particularly delicious!Q: Why is my sorbet grainy instead of smooth?
A: Graininess usually means one of three things: (1) The sugar didn’t fully dissolve—make sure to blend thoroughly or use the simple syrup method; (2) You didn’t strain out the seeds; or (3) Large ice crystals formed during freezing. To fix: re-blend the frozen sorbet in your food processor until smooth, which breaks up crystals and creates a silky texture. For future batches, ensure the base is completely cold before freezing and consider stirring every 45 minutes during the first few hours of freezing.Q: Is sorbet healthier than ice cream?
A: Generally yes, sorbet is lighter and lower in calories than ice cream because it contains no dairy, cream, or egg yolks. This blackberry sorbet has about 110 calories per serving compared to 200-300+ for most ice creams. Blackberries are also rich in fiber, vitamin C, vitamin K, and powerful antioxidants called anthocyanins. However, sorbet does contain sugar, so while it’s a lighter choice, it’s still a treat to be enjoyed in moderation as part of a balanced diet.Q: Can I reduce the sugar to make it healthier?
A: You can reduce the sugar somewhat, but be aware that sugar serves multiple purposes in sorbet beyond sweetness—it prevents the mixture from freezing rock-solid and contributes to smooth texture. If you use less than ½ cup sugar, the sorbet will likely freeze very hard and icy. For a healthier version, try using ½ to ⅔ cup sugar plus adding a ripe banana or some honey for natural sweetness. Sugar substitutes like erythritol work but will produce a harder, icier texture than regular sugar.Conclusion
And there you have it—everything you need to create spectacular Blackberry Sorbet that tastes like it came from a fancy French patisserie! This recipe proves that you don’t need complicated techniques, expensive equipment, or hard-to-find ingredients to make an absolutely stunning frozen dessert. With just four simple ingredients and a little patience, you can transform fresh blackberries into a sophisticated treat that will wow everyone who tries it.
The deep purple color, intense berry flavor, and silky-smooth texture make this sorbet a showstopper at any gathering. Whether you’re serving it at an elegant dinner party, enjoying it poolside on a hot afternoon, or simply treating yourself to a guilt-free dessert, this blackberry sorbet delivers pure summer bliss in every spoonful.
I love that this recipe is so versatile—use fresh berries when they’re in season and abundant, or reach for frozen berries year-round for consistent results. Play with the variations, try different garnishes, and make it your own! The beauty of sorbet is that once you master the basic technique, you can apply it to countless other fruits.
Remember the keys to success: strain out those seeds for silky smoothness, taste and adjust sweetness before freezing, chill the mixture completely, and let it soften slightly before serving. Follow these simple guidelines, and you’ll create sorbet perfection every single time!