Ingredients
For the Cake Base:
- 1 (8 or 9-inch) round sponge cake, pound cake, or brownie layer (about 1-inch thick)
- Or use store-bought cake/brownies
For the Ice Cream Layer:
- 1.5 to 2 quarts ice cream (your choice of flavor—vanilla, chocolate, strawberry, or combination)
For the Meringue:
- 6-8 large egg whites (room temperature)
- 1 to 1½ cups granulated sugar
- ½ teaspoon cream of tartar
- 1½ teaspoons pure vanilla extract
- Pinch of salt
Instructions
Step 1: Prepare the Ice Cream Dome Line a 2-quart metal or glass mixing bowl with plastic wrap, leaving plenty of overhang. Let your ice cream soften at room temperature for about 10-15 minutes until it’s spreadable but not melted. Pack the ice cream firmly into the bowl, smoothing the bottom (which will become the top of your dome) as flat as possible. Cover completely with the plastic wrap overhang and freeze for at least 4 hours or overnight until rock solid.
Step 2: Prepare the Cake Base If using homemade cake, bake and cool completely. Once cooled, use your mixing bowl as a guide to trace a circle slightly smaller than the ice cream dome (about ½-inch smaller all around). Cut out this circle—this will be your base. Place the cake round on a freezer-safe serving plate or baking sheet lined with parchment paper. Set aside.
Step 3: Assemble the Base Layer Remove the ice cream dome from the freezer and unwrap the plastic wrap. Quickly invert the ice cream dome onto the cake base, centering it carefully. Peel away the plastic wrap and immediately return the assembled dessert to the freezer while you prepare the meringue. This needs to stay frozen solid!
Step 4: Make the Meringue In a completely clean, grease-free bowl, combine room-temperature egg whites, cream of tartar, and a pinch of salt. Using an electric mixer, beat on medium speed until soft peaks form (about 2-3 minutes). Gradually add the sugar, one tablespoon at a time, while continuing to beat. Once all sugar is added, increase to high speed and beat until stiff, glossy peaks form (about 5-7 minutes). The meringue should be thick, shiny, and hold its shape when you lift the beaters. Beat in vanilla extract.
Step 5: Cover with Meringue Remove your assembled cake and ice cream from the freezer. Working quickly but carefully, spread the meringue all over the ice cream and cake, starting from the bottom and working your way up. Use an offset spatula to create swirls, peaks, and decorative patterns—this is where you can get creative! Make sure to completely seal the ice cream with meringue, covering it entirely with no gaps. The meringue acts as insulation to protect the ice cream from melting.
Step 6: Freeze Again Return the meringue-covered Baked Alaska to the freezer for at least 2-3 hours, or up to 3 days if making ahead. This ensures everything is frozen solid before the final torching step.
Step 7: Torch or Broil Just before serving, remove from freezer. If using a kitchen torch, use sweeping motions to lightly brown the meringue peaks until golden brown all over. If using the broiler, preheat your broiler to high and position the rack about 3-4 inches from the heat. Watch very carefully—broil for 1-3 minutes, rotating as needed, until the meringue is golden brown. The key is to work quickly so the ice cream stays frozen!
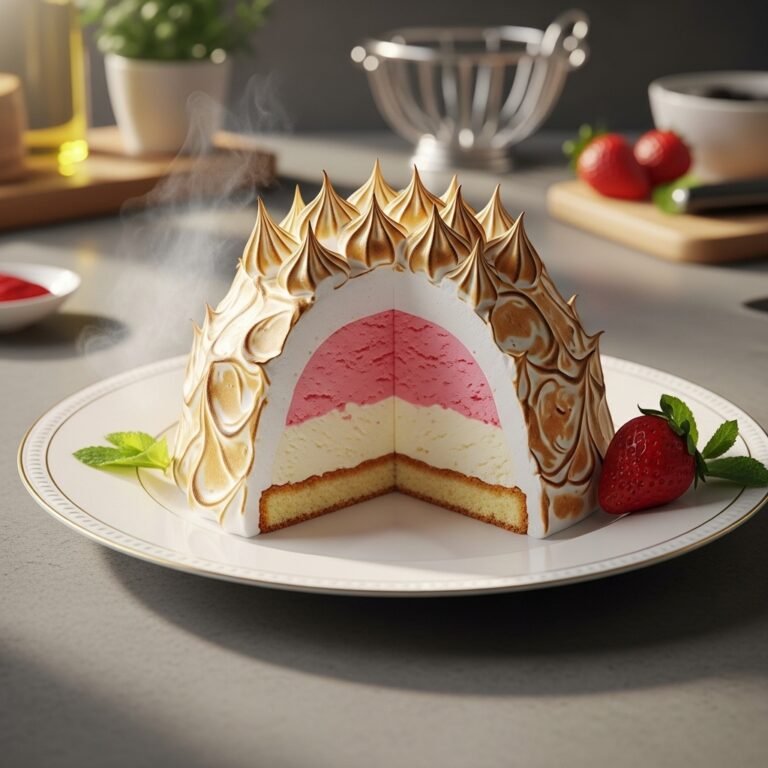
Step 8: Serve Immediately Once torched, slice with a sharp knife (dipping it in hot water between cuts helps) and serve immediately. Each slice should reveal beautiful layers of cake, ice cream, and golden meringue!
Notes
- Make-ahead tip: Complete through Step 6 up to 3 days ahead. Torch just before serving.
- No torch? The oven broiler works great—just watch it like a hawk so it doesn’t burn!
- Meringue stability: For the most stable meringue, use Swiss or Italian meringue methods, though this recipe’s French meringue works beautifully when torched immediately.
- Ice cream firmness: The colder and firmer your ice cream, the less likely it is to melt during torching.
- Serving size: This recipe serves 8-10, but can easily be doubled for larger gatherings.
- Prep Time: 45 minutes
- Cook Time: 5 minutes (torching/broiling)
- Category: Desert
- Method: Freezing, Baking/Torching
- Cuisine: American/French
- Diet: Gluten Free
Nutrition
- Serving Size: 1 slice (1/10 of recipe)
- Calories: 320
- Sugar: 38g
- Sodium: 95mg
- Fat: 12g
- Saturated Fat: 7g
- Unsaturated Fat: 4g
- Carbohydrates: 41g
- Fiber: 1g
- Protein: 6g
- Cholesterol: 45mg