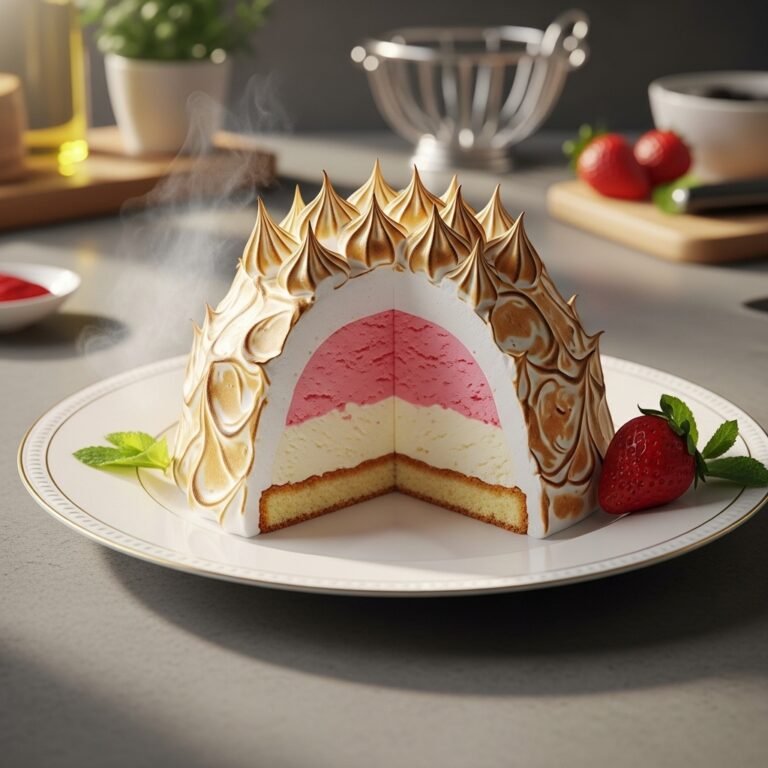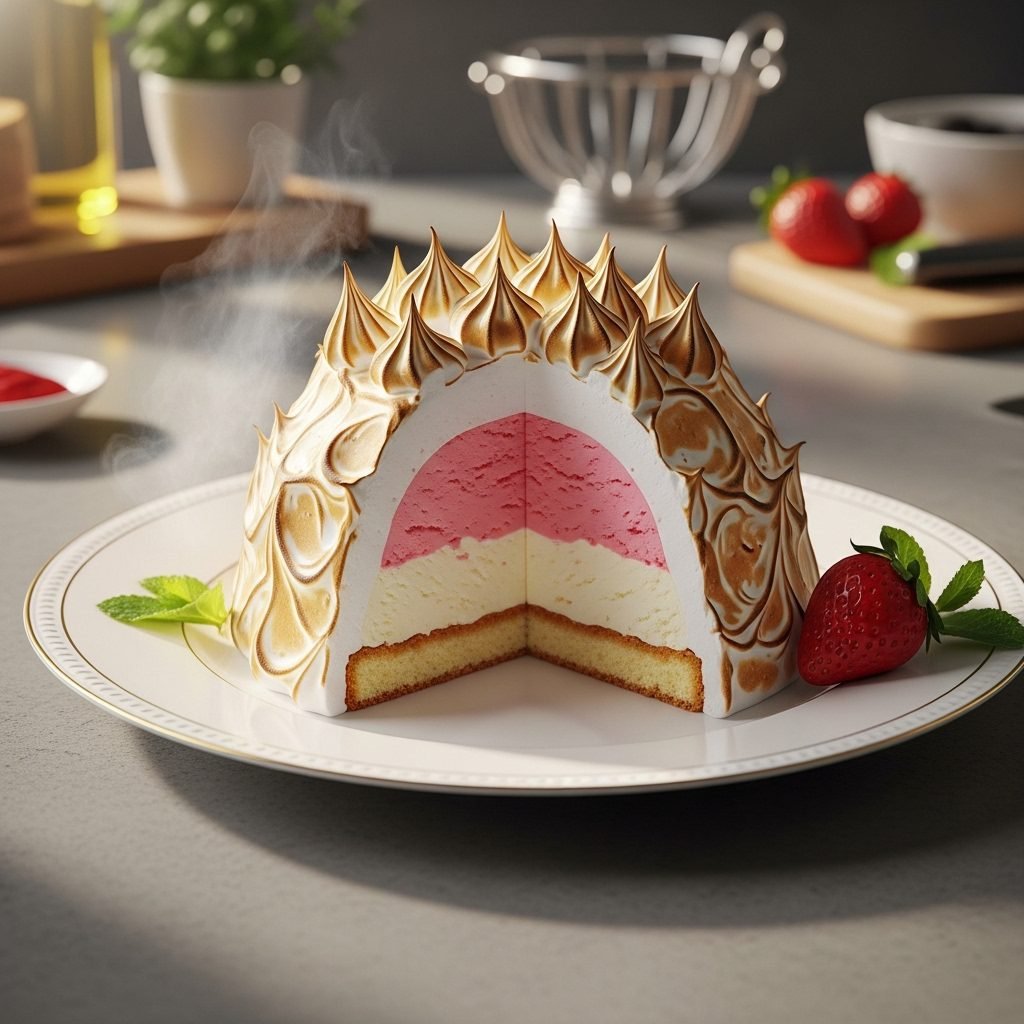
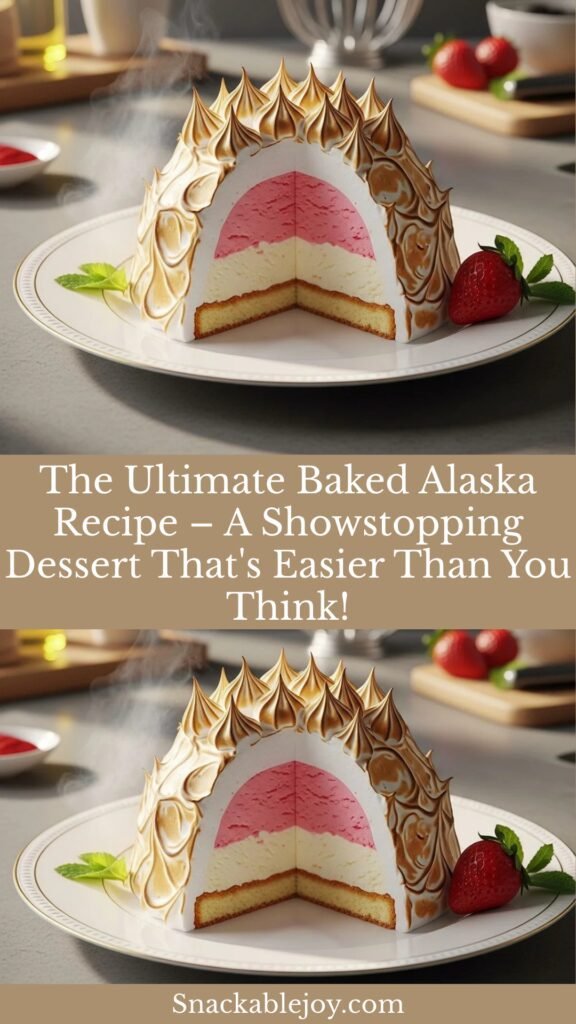
The Ultimate Baked Alaska Recipe – A Showstopping Dessert That’s Easier Than You Think!
If you’ve ever wanted to impress your dinner guests with a dessert that looks like it came straight from a five-star restaurant, Baked Alaska is your answer! This stunning frozen dessert combines layers of cake, ice cream, and fluffy meringue that’s torched or baked to golden perfection. The contrast of warm, toasted meringue with cold, creamy ice cream creates an unforgettable experience that’s sure to wow everyone at your table.
Baked Alaska is perfect for special occasions like birthdays, anniversaries, holiday gatherings, or any time you want to create a memorable “wow” moment. Despite its impressive appearance, this classic dessert is surprisingly achievable for home cooks. Yes, it requires some planning and a few steps, but trust me—the reactions you’ll get are absolutely worth it! Plus, you can customize the cake and ice cream flavors to suit any occasion or preference, making it a versatile showstopper that never goes out of style.
History / Background
Baked Alaska has a fascinating history that’s as dramatic as the dessert itself! The origins of this iconic treat date back to the 1800s, though its exact creation story is debated among food historians. The most popular tale credits the dessert’s invention to Delmonico’s Restaurant in New York City in 1867, where chef Charles Ranhofer created it to commemorate the United States’ purchase of Alaska from Russia. He originally called it “Alaska Florida” to highlight the contrast between the frozen territory and the hot meringue.
However, some food historians trace similar desserts back even further to physicist Benjamin Thompson (Count Rumford), who discovered in the late 1700s that beaten egg whites could insulate ice cream from heat. French chef Antoine Beauvilliers is also sometimes credited with creating an early version called “omelette norvégienne” (Norwegian omelette) in the early 1800s.
Regardless of who truly invented it, Baked Alaska became a symbol of culinary innovation and theatrical dining. It was particularly popular during the Victorian era when elaborate desserts were all the rage at formal dinners. The dessert experienced a resurgence in the mid-20th century and has remained a classic showpiece ever since. Today, it’s making a comeback on modern menus and home tables, proving that some culinary wonders never truly go out of style!
Why You’ll Love This Recipe
This Baked Alaska recipe is designed specifically for home cooks who want restaurant-quality results without culinary school training. I’ve broken down every step so you can approach this impressive dessert with confidence, and the end result will have everyone thinking you’re a professional pastry chef!
Here’s why this recipe is a must-try:
- Impressive presentation – Nothing says “special occasion” like a towering dome of golden meringue with creamy ice cream hiding inside
- Make-ahead friendly – You can prepare this dessert up to several days in advance, with only the final torching done just before serving
- Customizable flavors – Choose any cake and ice cream combination you love—from classic vanilla and chocolate to creative pairings like strawberry shortcake or coffee and brownie
- Surprisingly doable – While it looks complicated, the individual components are actually quite simple; it’s just about assembly and timing
- Conversation starter – Your guests will be talking about this dessert long after the party ends
- Science in action – The meringue acts as insulation, keeping the ice cream frozen while the outside gets torched—it’s like a delicious science experiment!
- No special equipment needed – Just basic kitchen tools and an optional kitchen torch (though your oven works perfectly fine too)
Ingredient Notes
Let’s break down the key ingredients that make Baked Alaska so spectacular:
Cake Layer: You’ll need either a homemade or store-bought sponge cake, pound cake, or brownie base. Sponge cake is traditional because its light texture doesn’t compete with the ice cream. You can also use brownies for a richer base or even cookie dough. The key is that it should be about 1-inch thick and slightly smaller than your ice cream dome. Day-old cake actually works better because it’s firmer and easier to handle!
Ice Cream: This is where you can really personalize your Baked Alaska! Classic choices include vanilla, strawberry, or Neapolitan, but feel free to use your favorite flavor or even multiple flavors layered together. You’ll need about 1.5 to 2 quarts total. Make sure it’s slightly softened for easy shaping but not melted. Premium ice cream with higher fat content holds up better than low-fat varieties.
Egg Whites: Fresh egg whites are essential for creating that fluffy, stable meringue. You’ll need 6-8 large egg whites at room temperature—they whip up much better when they’re not cold. Make sure there’s absolutely no yolk in your whites, as even a tiny bit of fat will prevent proper whipping.
Sugar: Granulated white sugar is traditional for Swiss or French meringue. You’ll need about 1 to 1.5 cups. The sugar stabilizes the egg whites and gives you that gorgeous glossy finish. Some recipes use superfine sugar, which dissolves more easily, but regular granulated works perfectly fine.
Cream of Tartar: This acidic powder (about ½ teaspoon) helps stabilize the egg whites and gives you a more voluminous, longer-lasting meringue. If you don’t have it, you can substitute with a tiny bit of lemon juice or white vinegar.
Vanilla Extract: A teaspoon or two of pure vanilla extract enhances the flavor of your meringue and ties all the components together beautifully.
Salt: Just a pinch balances the sweetness and enhances all the other flavors.
Equipment Needed
You don’t need a professional kitchen to make Baked Alaska! Here’s what you’ll need:
- Mixing bowls – One large bowl for whipping egg whites, plus smaller bowls for prep
- Electric mixer – A stand mixer or hand mixer makes whipping egg whites much easier and faster
- Round cake pan (8 or 9-inch) – For baking your cake layer if making from scratch
- Mixing bowls (various sizes) – For shaping the ice cream dome; a metal or glass bowl works great
- Plastic wrap – Essential for lining your bowl and shaping the ice cream
- Offset spatula or butter knife – For spreading and sculpting the meringue
- Baking sheet or serving platter – Something flat and oven-safe to assemble and torch your Baked Alaska
- Kitchen torch (optional but recommended) – For achieving that beautiful golden-brown meringue. If you don’t have one, your oven’s broiler works too
- Freezer space – You’ll need room to store your assembled dessert until serving time
- Sharp knife – For slicing and serving
Print

Baked Alaska Recipe
This classic Baked Alaska features layers of moist cake and your favorite ice cream, all encased in a cloud of golden, torched meringue. It’s a stunning dessert that’s perfect for celebrations and guaranteed to impress!
- Total Time: 5 hours (including freezing)
- Yield: 8-10 servings 1x
Ingredients
ScaleFor the Cake Base:
- 1 (8 or 9-inch) round sponge cake, pound cake, or brownie layer (about 1-inch thick)
- Or use store-bought cake/brownies
For the Ice Cream Layer:
- 1.5 to 2 quarts ice cream (your choice of flavor—vanilla, chocolate, strawberry, or combination)
For the Meringue:
- 6-8 large egg whites (room temperature)
- 1 to 1½ cups granulated sugar
- ½ teaspoon cream of tartar
- 1½ teaspoons pure vanilla extract
- Pinch of salt
Instructions
Step 1: Prepare the Ice Cream Dome Line a 2-quart metal or glass mixing bowl with plastic wrap, leaving plenty of overhang. Let your ice cream soften at room temperature for about 10-15 minutes until it’s spreadable but not melted. Pack the ice cream firmly into the bowl, smoothing the bottom (which will become the top of your dome) as flat as possible. Cover completely with the plastic wrap overhang and freeze for at least 4 hours or overnight until rock solid.
Step 2: Prepare the Cake Base If using homemade cake, bake and cool completely. Once cooled, use your mixing bowl as a guide to trace a circle slightly smaller than the ice cream dome (about ½-inch smaller all around). Cut out this circle—this will be your base. Place the cake round on a freezer-safe serving plate or baking sheet lined with parchment paper. Set aside.
Step 3: Assemble the Base Layer Remove the ice cream dome from the freezer and unwrap the plastic wrap. Quickly invert the ice cream dome onto the cake base, centering it carefully. Peel away the plastic wrap and immediately return the assembled dessert to the freezer while you prepare the meringue. This needs to stay frozen solid!
Step 4: Make the Meringue In a completely clean, grease-free bowl, combine room-temperature egg whites, cream of tartar, and a pinch of salt. Using an electric mixer, beat on medium speed until soft peaks form (about 2-3 minutes). Gradually add the sugar, one tablespoon at a time, while continuing to beat. Once all sugar is added, increase to high speed and beat until stiff, glossy peaks form (about 5-7 minutes). The meringue should be thick, shiny, and hold its shape when you lift the beaters. Beat in vanilla extract.
Step 5: Cover with Meringue Remove your assembled cake and ice cream from the freezer. Working quickly but carefully, spread the meringue all over the ice cream and cake, starting from the bottom and working your way up. Use an offset spatula to create swirls, peaks, and decorative patterns—this is where you can get creative! Make sure to completely seal the ice cream with meringue, covering it entirely with no gaps. The meringue acts as insulation to protect the ice cream from melting.
Step 6: Freeze Again Return the meringue-covered Baked Alaska to the freezer for at least 2-3 hours, or up to 3 days if making ahead. This ensures everything is frozen solid before the final torching step.
Step 7: Torch or Broil Just before serving, remove from freezer. If using a kitchen torch, use sweeping motions to lightly brown the meringue peaks until golden brown all over. If using the broiler, preheat your broiler to high and position the rack about 3-4 inches from the heat. Watch very carefully—broil for 1-3 minutes, rotating as needed, until the meringue is golden brown. The key is to work quickly so the ice cream stays frozen!
Step 8: Serve Immediately Once torched, slice with a sharp knife (dipping it in hot water between cuts helps) and serve immediately. Each slice should reveal beautiful layers of cake, ice cream, and golden meringue!
Notes
- Make-ahead tip: Complete through Step 6 up to 3 days ahead. Torch just before serving.
- No torch? The oven broiler works great—just watch it like a hawk so it doesn’t burn!
- Meringue stability: For the most stable meringue, use Swiss or Italian meringue methods, though this recipe’s French meringue works beautifully when torched immediately.
- Ice cream firmness: The colder and firmer your ice cream, the less likely it is to melt during torching.
- Serving size: This recipe serves 8-10, but can easily be doubled for larger gatherings.
- Prep Time: 45 minutes
- Cook Time: 5 minutes (torching/broiling)
- Category: Desert
- Method: Freezing, Baking/Torching
- Cuisine: American/French
- Diet: Gluten Free
Nutrition
- Serving Size: 1 slice (1/10 of recipe)
- Calories: 320
- Sugar: 38g
- Sodium: 95mg
- Fat: 12g
- Saturated Fat: 7g
- Unsaturated Fat: 4g
- Carbohydrates: 41g
- Fiber: 1g
- Protein: 6g
- Cholesterol: 45mg
Tips & Variations
Flavor Combinations to Try:
- Classic Neapolitan: Vanilla, chocolate, and strawberry ice cream with vanilla cake
- Chocolate Lovers: Brownie base with chocolate and coffee ice cream
- Berry Bliss: Pound cake with strawberry and vanilla ice cream, add fresh berries between layers
- Tropical Paradise: Coconut cake with mango and passion fruit sorbet
- Mint Chocolate: Chocolate cake with mint chocolate chip and vanilla ice cream
- S’mores Style: Graham cracker cake base with chocolate and marshmallow ice cream
Creative Twists:
- Add a layer of jam, fruit compote, or chocolate sauce between the cake and ice cream
- Fold mini chocolate chips, crushed cookies, or nuts into softened ice cream before freezing
- Use flavored extracts in your meringue (almond, peppermint, or coconut)
- Create a “hidden center” by hollowing out the ice cream and filling with sorbet or another flavor
- Make individual servings using muffin tins instead of one large dome
Dietary Modifications:
- Gluten-free: Use gluten-free cake or brownies
- Dairy-free: Substitute with coconut or oat milk-based ice cream
- Lower sugar: Use sugar-free ice cream (though the meringue requires real sugar for structure)
Pro Chef Tips
Temperature Control is Everything: The success of Baked Alaska hinges on temperature management. Your ice cream needs to be rock-solid frozen when you apply the meringue, and again before torching. If it’s even slightly soft, it will melt when you apply heat. Pro tip: Place your assembled dessert in the coldest part of your freezer.
Room Temperature Egg Whites: This is crucial for achieving maximum volume. Take eggs out of the fridge 30-60 minutes before whipping. Room temperature egg whites can increase in volume by up to 8 times! Cold eggs only expand about 4-5 times.
Separate Eggs When Cold: While you want room-temperature whites for whipping, eggs separate much more easily when they’re cold. So separate them straight from the fridge, then let the whites come to room temperature.
The Bowl Matters: Use a copper, stainless steel, or glass bowl for whipping egg whites—never plastic. Plastic can retain grease residue that prevents proper whipping. Wipe your bowl with white vinegar or lemon juice before starting to ensure it’s completely grease-free.
Gradual Sugar Addition: Adding sugar too quickly can deflate your egg whites. Add it slowly, one tablespoon at a time, once soft peaks form. This creates the most stable, glossy meringue that won’t weep or deflate.
Test Your Peaks: Stiff peaks should stand straight up when you lift the beaters, with just a tiny curl at the very tip. If the peaks flop over, keep beating. Under-whipped meringue will slide off your dessert.
Seal Completely: Make sure your meringue completely covers the ice cream with no gaps, and that it touches the serving plate all around. This creates an insulating barrier that protects the ice cream during torching.
Torch Technique: Keep your torch moving in continuous sweeping motions. Don’t hold it in one spot or you’ll burn the meringue before you’ve browned it all. Start at the top and work your way around and down.
Common Mistakes to Avoid
Mistake #1: Ice Cream Too Soft
If your ice cream isn’t frozen solid, it will melt during the torching process, creating a soupy mess. Always freeze your ice cream dome and assembled dessert for at least 4 hours, and again for 2-3 hours after applying meringue.Mistake #2: Fat Contamination in Egg Whites
Even the tiniest bit of egg yolk or grease will prevent your egg whites from whipping properly. Make absolutely sure your bowl, beaters, and eggs are completely clean and free of any fat or oil.Mistake #3: Rushing the Meringue
Under-whipped meringue will be runny and slide off your dessert. Over-whipped meringue will be grainy and may break. Beat just until you achieve stiff, glossy peaks that hold their shape. This usually takes 7-10 minutes total.Mistake #4: Leaving Gaps in Meringue Coverage
Any exposed ice cream will melt immediately when heat is applied. Take your time to completely seal the ice cream with meringue, making sure it extends all the way down to the plate with no gaps.Mistake #5: Torching Too Long
It’s tempting to keep torching for that perfect golden brown, but remember—you’re working against the clock before the ice cream melts. A light golden color is plenty. The brief exposure to heat should brown the meringue without melting the interior.Mistake #6: Not Serving Immediately
Once torched, serve within minutes. The heat from browning will start to soften the ice cream, and meringue can begin to weep. This is a dessert that demands immediate attention after its final flourish!Storage & Meal Prep
Freezer Storage:
The beauty of Baked Alaska is that it stores beautifully in the freezer! Once assembled with meringue (before torching), wrap the entire dessert carefully in plastic wrap, then aluminum foil. It will keep in the freezer for up to 3 days. The meringue may lose a tiny bit of its fluffiness, but it will still look and taste fantastic.After Torching:
Once torched, Baked Alaska should be served immediately. Any leftovers can be returned to the freezer, but the meringue will lose its crisp texture and may weep slightly. Leftover slices will still taste delicious for 2-3 days in the freezer, though the presentation won’t be quite as pristine.Individual Portions:
If you’re making individual Baked Alaskas, you can store them wrapped individually in the freezer for up to 5 days. This is perfect for having single portions ready to torch and serve anytime!Reheating Note:
There’s no reheating with this dessert—it’s meant to be enjoyed frozen with the contrast of the warm, toasted meringue exterior. If your meringue has lost its color after storage, you can re-torch it lightly just before serving.Make-Ahead & Freezer Notes
Timeline for Make-Ahead Success:
3-5 Days Before: Bake your cake layer and freeze it wrapped tightly in plastic wrap. This actually makes it easier to work with!
2-3 Days Before: Shape your ice cream dome in the bowl and freeze solid. Once frozen, you can leave it in the bowl covered with plastic wrap.
1 Day Before (Recommended): Assemble the cake base and ice cream dome. Cover completely with meringue and return to freezer. This is the ideal timeline—everything is ready except the final torching.
Day Of: Remove from freezer and torch 5-10 minutes before serving. That’s it!
Freezer-Friendly Components:
- Cake base: Freezes perfectly for up to 3 months when wrapped well
- Ice cream dome: Can stay in the freezer indefinitely (it’s already ice cream!)
- Assembled but un-torched Baked Alaska: Keeps beautifully for up to 3 days
- Meringue: Do not make meringue ahead of time and try to store it separately—it won’t hold up
Best Reheating Method:
Since this is a frozen dessert, there’s no traditional “reheating.” However, if you’ve stored your torched Baked Alaska and want to refresh the meringue, you can lightly re-torch the exterior just before serving. Use quick, gentle passes with your torch to restore the golden color without melting the interior.Serving Suggestions
Baked Alaska is such a showstopper that it honestly doesn’t need much accompaniment, but here are some beautiful ways to elevate your presentation:
Sauce Drizzles:
- Raspberry or strawberry coulis – The bright berry flavor cuts through the richness beautifully
- Hot fudge or chocolate sauce – Especially perfect if you used vanilla ice cream
- Caramel sauce – Adds a sophisticated, buttery sweetness
- Passion fruit or mango sauce – For a tropical twist
Fresh Accompaniments:
- Fresh berries – Strawberries, raspberries, or blueberries arranged around the base
- Whipped cream rosettes – Pipe small dollops around the serving plate
- Candied citrus peels – Adds elegance and a pop of color
- Edible flowers – For a truly Instagram-worthy presentation
- Chocolate shavings – Sprinkle over the plate just before serving
Beverage Pairings:
- Champagne or Prosecco – The bubbles and acidity balance the sweetness
- Dessert wine – Moscato d’Asti or a sweet Riesling works wonderfully
- Coffee or espresso – A classic pairing that never fails
- Hot chocolate – For a decadent winter celebration
- Raspberry or berry liqueur – A small cordial glass adds sophistication
Presentation Ideas:
- Serve on a large white platter with the sauces drizzled artistically around the base
- Use a cake stand to elevate it and make it the centerpiece
- Dim the lights when you bring it out if you’re doing the torching tableside
- Garnish with sparklers (unlit, for safety!) for birthday celebrations
- Place on a mirrored surface to create a dramatic reflection
FAQs Section
Q: Can I make Baked Alaska without a kitchen torch?
A: Absolutely! Your oven’s broiler works perfectly. Just preheat it to high, position your oven rack 3-4 inches from the heat source, and broil for 1-3 minutes, watching very carefully and rotating as needed. The key is working quickly—the meringue browns fast under a broiler, and you want to avoid melting the ice cream.Q: Why is my meringue weeping or becoming watery?
A: Meringue weeps when it’s not whipped to stiff enough peaks, when sugar is added too quickly, or when it sits too long before torching. Make sure you beat the egg whites to stiff, glossy peaks and add sugar gradually. Also, humidity can affect meringue—it’s harder to make on very humid days. For best results, torch and serve promptly after removing from the freezer.Q: Can I use store-bought cake and ice cream?
A: Definitely! That’s one of the beauties of Baked Alaska—you can take shortcuts without sacrificing the wow factor. A good-quality store-bought pound cake or bakery cake works great. Just trim it to fit your ice cream dome. Premium store-bought ice cream actually works better than homemade in some ways because it has stabilizers that help it hold its shape.Q: How do I prevent the ice cream from melting during torching?
A: The secret is threefold: (1) Make sure your ice cream is frozen rock-solid before torching, (2) Completely seal it with a thick layer of meringue with no gaps—the meringue acts as insulation, and (3) Work quickly when torching, using continuous sweeping motions rather than holding the flame in one spot. If you’re nervous, you can even place your Baked Alaska on a baking sheet over a larger bowl of ice while torching.Q: Can I make individual Baked Alaskas?
A: Yes! Use muffin tins or small bowls to create individual portions. Cut cake rounds to fit the bottom, add a scoop or two of ice cream, freeze solid, then cover with meringue. Individual portions are actually easier to torch and perfect for dinner parties where you want to plate each guest’s dessert. They also freeze beautifully for up to a week.Q: What’s the difference between French, Swiss, and Italian meringue for Baked Alaska?
A: French meringue (used in this recipe) is the simplest—just egg whites and sugar beaten together. It’s light and fluffy but less stable. Swiss meringue involves heating the egg whites and sugar over a double boiler before whipping, creating a denser, more stable result. Italian meringue uses a hot sugar syrup poured into whipping egg whites, creating the most stable meringue that’s less likely to weep. Any of these work for Baked Alaska, but French is easiest for beginners.Q: My cake base keeps sliding around. How do I keep it stable?
A: Place a small dab of meringue or a thin smear of corn syrup on your serving plate before placing the cake—this acts as “glue.” You can also use a cake board or cardboard circle under the cake for extra stability. Make sure your serving plate or baking sheet is completely flat, and freeze the assembly thoroughly so everything firms up together.Q: Can I add alcohol to my Baked Alaska?
A: You can! Some traditional recipes brush the cake layer with liqueur like Grand Marnier, rum, or amaretto before adding the ice cream. This adds sophistication and flavor. Just don’t oversaturate the cake or it will become soggy. You can also fold a tablespoon or two of liqueur into your softened ice cream before shaping the dome.Conclusion
There you have it—everything you need to create a spectacular Baked Alaska that will absolutely steal the show at your next gathering! While this dessert has a reputation for being intimidating, I hope this guide has shown you that with the right preparation and a little planning, it’s totally achievable for home cooks.
The magic of Baked Alaska isn’t just in its stunning appearance or the delightful contrast of warm and cold, sweet and creamy—it’s in the joy and amazement it brings to everyone who experiences it. There’s something truly special about presenting a beautiful dome of golden meringue, then slicing into it to reveal those perfect layers of cake and ice cream. The “oohs” and “aahs” from your guests will make every step worth it!
Remember, the key is not to rush. Take your time with each component, make sure everything is frozen solid when it needs to be, and don’t stress about making the meringue perfectly smooth—those rustic peaks and swirls add character and actually look more impressive than a perfectly smooth dome!
Now it’s your turn! Have you tried making Baked Alaska before? What flavor combinations are you dreaming up? I’d love to hear about your experience! Drop a comment below with your thoughts, questions, or photos of your creation.
Don’t forget to:
- Pin this recipe to your Pinterest boards for your next special occasion
- Share with friends who love impressive desserts
- Subscribe to the blog for more showstopping recipes
- Rate this recipe below and let me know how it turned out!
Happy baking (and torching!), and here’s to creating delicious memories, one spectacular dessert at a time! 🍰🔥