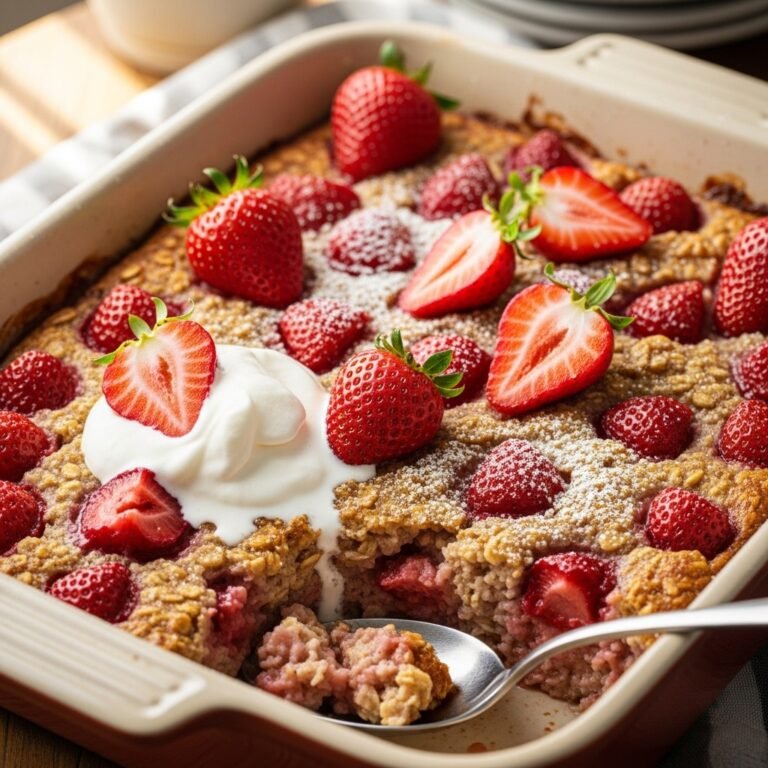
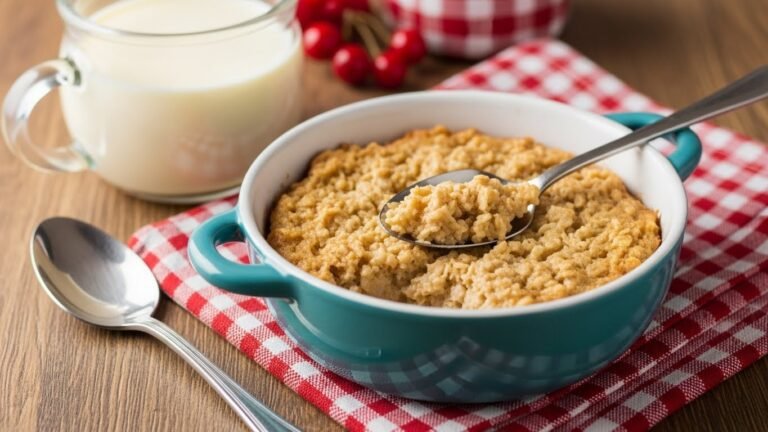
Cozy Apple Cinnamon Baked Oatmeal – Perfect Make-Ahead Breakfast!
If you’re looking for a breakfast that fills your kitchen with the most incredible warm, cozy aromas while being healthy, filling, and absolutely delicious, this Apple Cinnamon Baked Oatmeal is about to become your new weekend morning tradition! Imagine tender, cake-like oatmeal studded with sweet apple chunks and warming cinnamon spice, baked until golden on top and perfectly soft inside. It’s like having apple pie for breakfast—except it’s actually good for you and keeps you satisfied for hours.
This recipe is incredibly popular among families who want to meal prep breakfast for the entire week, busy parents who need something they can make ahead and just reheat on school mornings, and anyone who loves the comforting combination of apples and cinnamon that screams fall (though honestly, it’s delicious year-round!). Unlike stovetop oatmeal that requires constant stirring and immediate eating, baked oatmeal is hands-off—you simply mix everything together, pour it into a baking dish, and let your oven do all the work while you enjoy your coffee or get ready for the day.
Serve this for cozy weekend brunches with family, make it Sunday night for easy weekday breakfasts, bring it to potlucks where it always disappears first, or even enjoy it as a healthier dessert option. It’s naturally sweetened with maple syrup and apples, packed with fiber from the oats, and can easily be made gluten-free, dairy-free, or vegan. Plus, it reheats beautifully, making it the ultimate meal prep breakfast that tastes just as good on day five as it does fresh from the oven. Get ready for your house to smell like a bakery and your mornings to get a whole lot easier and more delicious!
History / Background
Baked oatmeal is a relatively modern invention in the grand scheme of breakfast history, though oats themselves have been a breakfast staple for centuries. Traditional Scottish porridge and overnight oats have existed for generations, but the concept of baking oatmeal in a casserole dish didn’t become popular until the mid-20th century in America, when convenience and make-ahead meals started becoming more important to busy families.
The rise of baked oatmeal can be traced back to Amish and Pennsylvania Dutch communities, where hearty, filling breakfasts that could feed large families were essential. These communities were known for their simple, wholesome cooking that made use of pantry staples and seasonal ingredients. Baked oatmeal fit perfectly into this philosophy—it used affordable rolled oats, eggs, milk, and whatever fruit was in season, and it could be prepared ahead for busy farm mornings when there was no time to stand at the stove stirring porridge.
The apple cinnamon variation specifically gained popularity in the 1980s and 1990s when the health food movement was encouraging Americans to eat more whole grains and fiber. Oats became celebrated as heart-healthy superfoods, and home cooks were looking for ways to make oatmeal more appealing, especially to children who found traditional stovetop oatmeal boring or mushy. By adding apples (often abundant in American orchards during fall harvest), warming cinnamon, and baking the mixture until it had a pleasant, cake-like texture with slightly crispy edges, baked oatmeal became a breakfast that everyone could get excited about.
The real explosion of baked oatmeal’s popularity came with the rise of food blogs and Pinterest in the 2010s. Home cooks started sharing their versions, adding creative mix-ins, and photographing beautifully styled squares topped with fresh fruit and maple syrup drizzle. The meal prep movement made baked oatmeal even more relevant—suddenly, busy professionals and parents realized they could bake one pan on Sunday and have healthy, delicious breakfasts ready all week long. Apple cinnamon remained the most beloved flavor combination because it evokes comfort, home, and the cozy feelings of autumn mornings.
Today, baked oatmeal represents the perfect intersection of wholesome nutrition, convenience, and nostalgic comfort food. This recipe honors that tradition while being simple enough for beginner cooks and delicious enough to convert anyone who thinks they don’t like oatmeal!
Why You’ll Love This Recipe
This Apple Cinnamon Baked Oatmeal is about to solve so many of your breakfast challenges while delivering on flavor, nutrition, and that cozy comfort food feeling we all crave. Unlike fussy breakfast recipes that require your full attention on busy mornings, this one practically makes itself.
The genius of baked oatmeal is its incredible versatility and convenience. You can enjoy it warm straight from the oven for a special weekend breakfast, or make it ahead and portion it out for grab-and-go weekday mornings. The texture is delightfully unique—not mushy like stovetop oatmeal can sometimes be, but tender, moist, and almost cake-like with slightly crispy edges that add textural interest. The apple chunks stay soft but distinct, and the cinnamon creates that unmistakable warmth that makes you want to curl up with a cozy blanket and a good book.
Here’s what makes this recipe absolutely irresistible:
- Incredible make-ahead breakfast – Bake once, eat all week; perfect for meal preppers and busy families
- Tastes like apple pie for breakfast – Satisfies your sweet tooth while being genuinely nutritious and wholesome
- Naturally sweetened – Uses maple syrup and the natural sweetness of apples instead of refined sugar
- Keeps you full for hours – The fiber from oats and protein from eggs creates lasting satiety
- Kid-approved and picky-eater friendly – Even kids who claim to hate oatmeal devour this version
- Easily customizable – Swap in different fruits, nuts, or spices based on what you have on hand
- Budget-friendly ingredients – Uses pantry staples and affordable ingredients you probably already own
- Freezer-friendly for long-term meal prep – Make double batches and freeze individual portions
- Adaptable to dietary needs – Easily made gluten-free, dairy-free, or vegan with simple swaps
- Gorgeous presentation – Looks impressive enough to serve guests but simple enough for everyday
- Fills your house with amazing aromas – The smell of baking apples and cinnamon is better than any candle
- No standing and stirring required – Mix, pour, bake, and walk away while it does its thing
Whether you’re looking for a healthier breakfast option that doesn’t feel like a sacrifice, need meal prep solutions for crazy mornings, want to use up apples from your orchard visit, or simply crave the comforting flavors of fall year-round, this baked oatmeal delivers on every level. It’s proof that healthy eating can be delicious, convenient, and genuinely satisfying!
Ingredient Notes
Let me break down each ingredient and explain why it matters for creating the perfect apple cinnamon baked oatmeal. Understanding your ingredients helps you make smart substitutions and achieve consistently delicious results.
Rolled Oats (Old-Fashioned Oats) – This is your base ingredient and it’s crucial to use the right type. Old-fashioned rolled oats (not quick oats, not steel-cut oats) are perfect because they hold their texture during baking, creating that tender but distinct bite. Quick oats become too mushy and turn your baked oatmeal into a dense, heavy brick. Steel-cut oats don’t soften enough and remain too chewy. If you need gluten-free, use certified gluten-free rolled oats. Do not substitute with instant oatmeal packets—they contain added ingredients and won’t work.
Apples – Fresh apples provide natural sweetness, moisture, and that classic fall flavor we all love. The best varieties for baking are Honeycrisp, Granny Smith (if you like tart), Fuji, Gala, or Golden Delicious because they hold their shape and don’t turn to complete mush. Avoid Red Delicious which get mealy when baked. You’ll need about 2 medium apples, peeled and diced into small chunks (about 1/2-inch pieces). Leaving the peel on is fine if you prefer more fiber and rustic texture. In a pinch, you could substitute with pears, but apples are traditional and work best.
Cinnamon – This warming spice is what gives the dish its signature cozy flavor. Use ground cinnamon, and make sure yours is fresh (not something that’s been sitting in your spice cabinet for five years). Good quality cinnamon makes a noticeable difference. You can use Ceylon cinnamon for a more delicate, sweet flavor, or standard Cassia cinnamon which is bolder. For extra warmth, add a pinch of nutmeg or apple pie spice.
Milk – You need liquid to help the oats soften and create moisture throughout the bake. Regular dairy milk works beautifully, but you can absolutely use any plant-based milk you prefer—almond milk, oat milk, soy milk, or coconut milk all work great. Full-fat milk creates a richer, creamier result, while low-fat or skim milk makes it lighter. Avoid using water alone as it lacks the richness and body that milk provides.
Eggs – These act as the binder that holds everything together and gives baked oatmeal its structure. The eggs also add protein, making this more satisfying than regular oatmeal. For best results, use large eggs at room temperature (they incorporate more smoothly). If you need an egg-free version, you can use flax eggs (1 tablespoon ground flaxseed + 3 tablespoons water per egg, let sit 5 minutes) though the texture will be slightly different.
Maple Syrup or Honey – Natural sweeteners that add just enough sweetness without making this taste like dessert. Pure maple syrup adds a lovely depth of flavor that complements the apples beautifully. Honey works too and adds floral notes. You can adjust the sweetness based on preference—start with less and add more if needed. Avoid artificial sweeteners here as they don’t provide the same flavor or moisture.
Baking Powder – This gives your baked oatmeal a slight lift and lighter, fluffier texture rather than being dense and heavy. Make sure your baking powder is fresh (test it by dropping a bit in water—it should fizz) or your oatmeal won’t rise properly.
Vanilla Extract – Enhances all the other flavors and adds warmth. Use pure vanilla extract, not imitation, for the best flavor. This is a small but mighty ingredient that makes everything taste more delicious.
Salt – Don’t skip this! A pinch of salt enhances sweetness and brings out all the flavors. Without it, your baked oatmeal might taste flat or one-dimensional.
Optional Mix-Ins – Chopped walnuts or pecans add crunch and healthy fats, raisins or dried cranberries add extra sweetness and texture, and a handful of chocolate chips makes it extra special for kids (or chocolate-loving adults!).
Equipment Needed
You don’t need any fancy equipment to make this apple cinnamon baked oatmeal—just basic kitchen tools that most home cooks already have:
- 8×8-inch Baking Dish or 9×9-inch Pan – This is the standard size for baked oatmeal that serves 6-9 people. Glass, ceramic, or metal all work fine. If using metal, reduce baking temperature by 25°F as metal conducts heat more efficiently. You can also use a 9×13-inch pan if you want thinner pieces (reduce baking time by 5-10 minutes), or make individual portions in a muffin tin (baking time about 20-25 minutes).
- Large Mixing Bowl – For combining all your ingredients. A bowl large enough to comfortably stir everything without ingredients flying out is important.
- Medium Mixing Bowl – For mixing the wet ingredients separately before combining with the dry. This ensures even distribution.
- Whisk – For beating the eggs and combining liquids smoothly. A fork works in a pinch but a whisk incorporates more air.
- Measuring Cups and Spoons – Accurate measurements matter in baking, so have both dry measuring cups and liquid measuring cups, plus a set of measuring spoons.
- Cutting Board and Sharp Knife – For peeling and dicing your apples into even pieces.
- Wooden Spoon or Rubber Spatula – For stirring ingredients and scraping down the sides of bowls.
- Cooking Spray or Butter – For greasing your baking dish so the oatmeal doesn’t stick.
- Oven Mitts – Because safety first when handling hot baking dishes!
Optional but helpful: a vegetable peeler for quickly peeling apples (though you can leave peels on if preferred), a pastry brush for spreading melted butter if using instead of spray, and a cooling rack for letting your baked oatmeal cool slightly before serving.
Print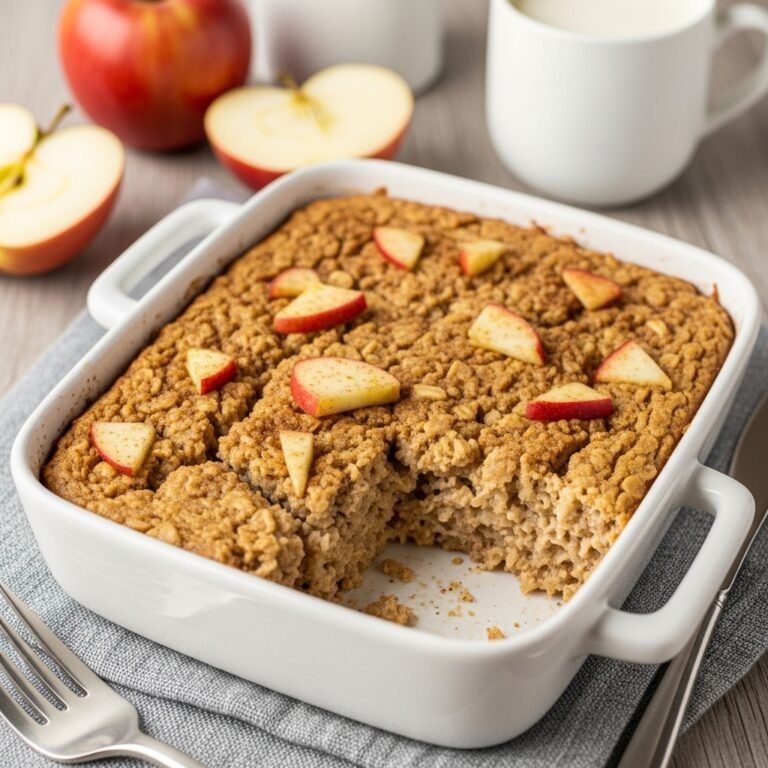
Apple Cinnamon Baked Oatmeal
Wholesome, hearty Apple Cinnamon Baked Oatmeal that’s tender, naturally sweetened, and bursting with warm fall flavors! This easy make-ahead breakfast is studded with fresh apple chunks and aromatic cinnamon, baked until golden. Perfect for meal prep, family brunches, or cozy weekend mornings. Easily customizable, freezer-friendly, and keeps you satisfied all morning long!
- Total Time: 55 minutes
- Yield: 6-9 servings 1x
Ingredients
For the Baked Oatmeal:
- 2 cups old-fashioned rolled oats (certified gluten-free if needed)
- 1 teaspoon baking powder
- 1 1/2 teaspoons ground cinnamon
- 1/4 teaspoon salt
- 1/4 teaspoon ground nutmeg (optional)
- 2 large eggs
- 1 3/4 cups milk (dairy or non-dairy)
- 1/3 cup pure maple syrup (or honey)
- 3 tablespoons melted butter or coconut oil
- 2 teaspoons vanilla extract
- 2 medium apples, peeled and diced (about 2 cups)
- 1/2 cup chopped walnuts or pecans (optional)
- 1/4 cup raisins or dried cranberries (optional)
For Serving (Optional):
- Additional fresh apple slices
- Extra maple syrup or honey drizzle
- Greek yogurt or whipped cream
- Chopped nuts
- Fresh berries
Instructions
- Preheat and Prepare – Preheat your oven to 350°F (175°C). Generously grease an 8×8-inch baking dish with butter or cooking spray, making sure to get the corners and sides well coated to prevent sticking. Set aside while you prepare the ingredients.
- Mix Dry Ingredients – In a large mixing bowl, combine the rolled oats, baking powder, cinnamon, salt, and nutmeg (if using). Whisk together until everything is evenly distributed and there are no clumps of baking powder. The spices should be thoroughly mixed throughout the oats so every bite has flavor.
- Combine Wet Ingredients – In a separate medium bowl, whisk together the eggs until slightly frothy. Add the milk, maple syrup, melted butter (make sure it’s melted but not hot or it will cook the eggs), and vanilla extract. Whisk vigorously until everything is well combined and the mixture looks smooth and uniform, about 30 seconds of whisking.
- Dice Your Apples – While you’re preparing other ingredients, peel your apples (or leave skins on if preferred) and dice them into small, uniform pieces about 1/2-inch in size. Smaller pieces distribute better throughout the oatmeal, while larger chunks create more defined apple bites. Your choice! Pat them dry with a paper towel to remove excess moisture.
- Combine Everything – Pour the wet ingredient mixture over the dry oat mixture. Using a wooden spoon or rubber spatula, stir gently until all the oats are moistened and coated with the liquid. There should be no dry oats remaining. Fold in the diced apples, and any optional mix-ins like nuts or raisins. Stir just until evenly distributed—don’t overmix.
- Transfer to Baking Dish – Pour the oatmeal mixture into your prepared baking dish. Use your spatula to spread it evenly into all corners and smooth the top. Gently press down with the back of your spatula so everything is level and there are no air pockets. The mixture will look quite wet and liquidy—this is normal! The oats will absorb the liquid as they bake.
- Optional Topping – If you want extra visual appeal and texture, arrange a few thin apple slices on top in a decorative pattern, or sprinkle with a tablespoon of brown sugar and extra cinnamon, or add a handful of chopped nuts across the surface. These toppings will create a lovely golden, slightly crispy top layer.
- Bake – Place the baking dish in the center of your preheated oven. Bake for 35-40 minutes, until the top is golden brown and set, the edges are slightly pulling away from the pan, and a toothpick inserted in the center comes out mostly clean (a few moist crumbs are fine, but it shouldn’t be liquid). The center should look firm when you gently shake the pan, not jiggly like liquid.
- Cool Slightly – Remove from the oven and let the baked oatmeal cool in the pan for 10 minutes. This cooling time allows it to set up fully and makes cutting and serving much easier. If you try to serve immediately, it might be too soft and fall apart.
- Serve and Enjoy – Cut into squares or scoop out portions with a large spoon. Serve warm with your favorite toppings—a drizzle of maple syrup, a dollop of Greek yogurt, extra diced apples, or a splash of cold milk. Leftovers can be stored in the refrigerator for easy reheating throughout the week!
Notes
- Apple Varieties: Best apples for baking are Honeycrisp, Fuji, Gala, Granny Smith (for tart), or Golden Delicious. Avoid Red Delicious which become mealy.
- Texture Preference: For a denser, more filling texture, use less milk (1 1/2 cups instead of 1 3/4). For a lighter, more custard-like texture, use the full amount or even add 2 tablespoons more.
- Sweetness Level: The recipe as written is moderately sweet. If you prefer less sweet, reduce maple syrup to 1/4 cup. For sweeter (more dessert-like), increase to 1/2 cup.
- Make It Vegan: Use non-dairy milk, replace eggs with 2 flax eggs (2 tablespoons ground flaxseed + 6 tablespoons water, let sit 5 minutes), use coconut oil instead of butter, and maple syrup instead of honey.
- Storage: Store covered in the refrigerator for up to 5 days. Reheat individual portions in the microwave for 60-90 seconds or in a 350°F oven for 10-15 minutes.
- Freezing: This freezes beautifully! Cut into portions, wrap individually in plastic wrap, place in a freezer bag, and freeze up to 3 months. Thaw overnight in fridge or reheat from frozen.
- Prep Time: 15 minutes
- Cook Time: 40 minutes
- Category: Breakfast
- Method: Baking
- Cuisine: American
- Diet: Gluten Free
Nutrition
- Serving Size: 1 square (1/9 of recipe)
- Calories: 245
- Sugar: 16g
- Sodium: 165mg
- Fat: 9g
- Saturated Fat: 3g
- Unsaturated Fat: 5g
- Trans Fat: 0g
- Carbohydrates: 36g
- Fiber: 4g
- Protein: 7g
- Cholesterol: 50mg
Tips & Variations
Let’s explore all the delicious ways you can customize this apple cinnamon baked oatmeal to suit your preferences, dietary needs, and what you have in your pantry!
Flavor Variations:
- Blueberry Apple: Add 1 cup fresh or frozen blueberries along with the apples for a beautiful berry twist. The berries burst while baking and create pockets of jammy sweetness.
- Banana Nut: Replace one of the apples with 1 mashed ripe banana and increase walnuts to 3/4 cup. Reduce maple syrup slightly since bananas add natural sweetness.
- Pumpkin Spice Apple: Replace 1/2 cup of the milk with pumpkin puree and add 1/2 teaspoon pumpkin pie spice along with the cinnamon for ultimate fall flavor.
- Apple Pie: Add 1/4 teaspoon each of nutmeg, ginger, and allspice along with the cinnamon. Top with a crumble topping (mix 2 tablespoons butter, 2 tablespoons brown sugar, 2 tablespoons flour) before baking.
- Maple Pecan: Replace apples with diced pears, use 1/2 cup pecans instead of walnuts, and add a splash of maple extract for intensified maple flavor.
- Chocolate Chip Apple: Fold in 1/3 cup mini chocolate chips with the apples. Kids especially love this version that feels like a treat!
Dietary Modifications:
- Vegan: Use plant-based milk (oat, almond, soy), replace eggs with flax eggs (2 tablespoons ground flaxseed + 6 tablespoons water), use coconut oil instead of butter, and maple syrup instead of honey. Results are nearly identical!
- Dairy-Free: Simply use your favorite non-dairy milk and coconut oil or vegan butter. Everything else remains the same.
- Sugar-Free/Lower Sugar: Reduce maple syrup to 2 tablespoons and add mashed banana for natural sweetness, or use a sugar-free sweetener like monk fruit or stevia (adjust amount according to brand’s conversion chart).
- Higher Protein: Add 1/4 cup vanilla protein powder to the dry ingredients (reduce oats by 1/4 cup to compensate), or mix in 1/2 cup Greek yogurt with the wet ingredients.
Texture and Consistency Adjustments:
For a denser, more solid texture like granola bars, reduce milk to 1 1/2 cups and add an extra egg. For a creamier, more custard-like texture similar to bread pudding, increase milk to 2 cups. For extra moisture, add 1/2 cup applesauce with the wet ingredients.
Add-In Ideas:
Mix in 1/4 cup chia seeds or ground flaxseed for extra omega-3s and fiber, dried cranberries or raisins for chewy sweetness, shredded coconut for tropical flair, or a swirl of almond butter or peanut butter on top before baking (creates beautiful marbled effect).
Pro Chef Tips
Ready to take your baked oatmeal from good to absolutely restaurant-quality? Here are professional-level tips that make all the difference:
Toast Your Oats First – For deeper, nuttier flavor, spread your rolled oats on a baking sheet and toast them in a 350°F oven for 8-10 minutes until fragrant and lightly golden before using them in the recipe. This extra step adds incredible depth of flavor that makes people wonder what your secret ingredient is. Professional bakeries often do this with grains and nuts to enhance their natural flavors.
Macerate Your Apples – Toss your diced apples with 1 tablespoon of lemon juice and 1 tablespoon of sugar 10 minutes before using them. This draws out their juices, prevents browning, and intensifies their flavor. The sugar-lemon mixture also caramelizes slightly during baking, creating more complex flavors. Drain excess liquid before adding to your oatmeal mixture.
Room Temperature Ingredients – Bring your eggs and milk to room temperature before mixing (let them sit out 20-30 minutes). Cold ingredients don’t combine as smoothly and can create an uneven texture. Room temperature ingredients also help the oats hydrate more evenly, resulting in better consistency throughout the bake.
Layer for Visual Appeal – For stunning presentation, spread half your oatmeal mixture in the pan, arrange a layer of apple slices in the middle, then top with the remaining oatmeal. When you cut into it, you’ll see a beautiful apple layer running through the center. This technique is used in professional bakeries for visual wow factor.
The Toothpick Test – Just like with cakes, test doneness with a toothpick inserted in the center. It should come out with a few moist crumbs but no liquid batter. The center should also feel firm to a gentle touch, not jiggly. Overbaking makes it dry and crumbly, underbaking leaves it mushy and liquid-y.
Let It Rest – This is crucial! Allowing the baked oatmeal to rest for 10-15 minutes after baking lets the residual heat finish cooking the center, allows the structure to set so it cuts cleanly, and makes the texture perfect. Professional bakers always build resting time into their process. Cut too early and you get a messy, falling-apart result.
Enhance with Citrus Zest – Add the zest of one lemon or orange to your wet ingredients. The citrus brightens all the flavors and adds complexity without making it taste citrusy. This is a trick pastry chefs use to make flavors “pop” without adding extra ingredients.
Browned Butter Magic – Instead of just melting your butter, brown it in a small saucepan until it smells nutty and has golden-brown bits at the bottom (about 5 minutes over medium heat). Let it cool slightly before adding to your mixture. Browned butter adds an incredible nutty, caramel-like depth that elevates this from everyday breakfast to something truly special.
Common Mistakes to Avoid
Let me help you avoid the pitfalls that can turn your baked oatmeal from perfect to disappointing:
Mistake #1: Using Quick Oats or Instant Oats – This is the most common mistake! Quick oats are thinner and more processed than old-fashioned rolled oats, so they absorb liquid too quickly and turn your baked oatmeal into a dense, gummy, paste-like texture instead of having distinct, tender oat pieces with good chew. Quick oats essentially dissolve during baking and you lose all the texture that makes baked oatmeal appealing. Always use old-fashioned rolled oats (sometimes called whole rolled oats). Steel-cut oats are the opposite problem—they won’t soften enough during baking and will be too chewy and crunchy. If you only have quick oats, the recipe won’t work properly, so it’s worth making a trip to the store for the right kind.
Mistake #2: Not Greasing the Pan Well Enough – Baked oatmeal is notorious for sticking to pans, especially in the corners where it gets extra crispy. If you don’t grease your pan thoroughly (including sides and corners), you’ll struggle to get clean pieces out and the first serving will be a mangled mess. Use butter or cooking spray liberally, or line your pan with parchment paper with overhang on two sides that acts as “handles” for easy lifting and perfect portions every time. Professional bakers always line their pans for foolproof release.
Mistake #3: Cutting It Too Soon – I know it smells amazing and you’re hungry, but cutting into your baked oatmeal immediately after removing it from the oven is a recipe for disaster. The interior is still very soft and liquid-y, and it needs that 10-15 minute rest time to firm up and set. If you cut too early, the pieces will fall apart, stick to your spatula, and look messy instead of clean and appealing. The residual heat continues cooking the center during this rest period. Be patient—it’ll still be warm after resting, but it’ll hold together beautifully.
Mistake #4: Overmixing the Batter – Once you combine wet and dry ingredients, stir just until everything is moistened and combined. Overmixing develops the proteins in the eggs and can make your baked oatmeal tough and dense instead of tender. Think of it like muffin batter—a few lumps are fine, and gentle folding is better than aggressive stirring. Mix until you don’t see dry oats anymore, then stop. The folding-in of apples and nuts should be gentle, not vigorous.
Mistake #5: Misjudging Doneness – Underbaked oatmeal will be soupy and unpleasant in the center, while overbaked oatmeal becomes dry and crumbly. The perfect doneness indicators are: the edges should be golden brown and slightly pulling away from the pan, the top should be set and not jiggly when you gently shake the pan, a toothpick inserted in the center should come out with moist crumbs (not wet batter), and the center should spring back lightly when touched. Every oven is different, so check at 35 minutes and add time as needed rather than assuming exactly 40 minutes is right for your oven.
Mistake #6: Using the Wrong Type of Apples – Apples like Red Delicious become mealy and mushy when baked, creating an unpleasant texture and no distinct apple pieces. They also tend to be less sweet and flavorful. Use apples that hold their shape and have good sweet-tart balance: Honeycrisp, Granny Smith, Fuji, Gala, or Golden Delicious. These varieties stay firm enough to provide texture while becoming tender and sweet during baking.
Storage & Meal Prep
One of the absolute best things about this apple cinnamon baked oatmeal is how brilliantly it stores and reheats, making it perfect for meal prep:
Refrigerator Storage:
Once your baked oatmeal has cooled completely to room temperature (very important—never refrigerate while still warm as it creates condensation and sogginess), cover the baking dish tightly with plastic wrap or aluminum foil, or cut it into individual portions and store them in airtight containers. Properly stored, baked oatmeal keeps beautifully in the refrigerator for 5-6 days without losing quality. The flavors actually develop and meld together even more after a day or two, so many people think it tastes even better as leftovers!
Best Reheating Methods:
For individual portions, microwave on high for 60-90 seconds (depending on portion size) until heated through. Add a splash of milk before reheating to prevent dryness and restore moisture. For larger portions or the whole pan, reheat covered in a 350°F oven for 15-20 minutes until warmed through. The oven method is best if you want to maintain that slightly crispy top layer. You can also reheat in a toaster oven, which is perfect for single servings and gives you crispy edges.
Meal Prep Strategy:
The smartest way to use this recipe is to bake it on Sunday (or your meal prep day), let it cool completely, then cut it into individual portions. Store each portion in a separate container or wrap in plastic wrap, then place all portions in a large container or bag. In the morning, grab one portion, microwave for 90 seconds, add your toppings, and you have a hot, delicious, nutritious breakfast in under 2 minutes. This is especially perfect for busy families with school mornings or professionals who need to eat breakfast at their desk.
Topping Storage:
If you want to meal prep your toppings too, store them separately from the oatmeal. Keep fresh fruit in separate containers, portion out nuts and seeds, and have your maple syrup or yogurt ready in the fridge. Adding toppings fresh keeps them from getting soggy and maintains textural contrast.
Preventing Dryness:
Baked oatmeal can dry out slightly when stored, especially around the edges. To prevent this, make sure your storage container is truly airtight, add a splash of milk before reheating, or store with a slightly damp paper towel placed on top (not touching the oatmeal directly—lay plastic wrap between them) to maintain moisture.
Portioning Tips:
Use a sharp knife to cut clean squares, or use a bench scraper for perfectly even portions. An 8×8 pan typically yields 6 generous portions or 9 more moderate portions. For meal prep, I recommend 9 portions as they’re the perfect size for a satisfying breakfast without being too heavy.
Make-Ahead & Freezer Notes
Baked oatmeal is one of the most freezer-friendly breakfast options, making it perfect for long-term meal prep and batch cooking:
Freezing Baked Oatmeal:
This recipe freezes exceptionally well for up to 3 months with virtually no loss in quality or texture. Here’s the best method: After baking and cooling completely, cut the oatmeal into individual portions. Wrap each portion tightly in plastic wrap, making sure there are no exposed areas (double wrap for extra protection against freezer burn). Place all wrapped portions in a large freezer-safe ziplock bag or airtight container. Label with the date and contents. The individual wrapping prevents pieces from freezing together and allows you to grab just one serving at a time.
Freezing in the Baking Dish:
Alternatively, you can freeze the entire uncut pan if you plan to serve it all at once later. Wrap the entire cooled baking dish very tightly in plastic wrap, then aluminum foil. This works great if you’re making it for a specific event or want to have a complete breakfast ready for guests.
Thawing Methods:
The easiest method is to transfer a frozen portion from the freezer to the refrigerator the night before you plan to eat it. By morning, it will be completely thawed and you can reheat it normally. For faster thawing, you can reheat directly from frozen in the microwave—it will take about 2-3 minutes instead of 90 seconds, and you should stop halfway through to stir or flip it for even heating. You can also reheat from frozen in a 350°F oven covered with foil for about 25-30 minutes.
Best Reheating After Freezing:
From refrigerator-thawed: Microwave for 60-90 seconds or bake at 350°F for 10-15 minutes. From frozen: Microwave for 2-3 minutes (stopping to stir halfway), or bake covered at 350°F for 25-30 minutes, then uncover and bake 5 more minutes to crisp the top. Adding a splash of milk before reheating helps restore moisture and makes it taste freshly baked.
Make-Ahead Assembly (Unbaked):
Here’s a brilliant make-ahead trick for busy mornings or holidays: You can assemble the entire recipe the night before without baking it. Mix everything according to the recipe, pour into your greased baking dish, cover tightly with plastic wrap, and refrigerate overnight (up to 12 hours). In the morning, remove from the fridge while you preheat the oven (letting it come closer to room temperature), then bake as directed. You may need to add 5 extra minutes to the baking time since it’s starting cold. This method means you can wake up to the smell of fresh-baked oatmeal without any morning work!
Batch Cooking:
Consider doubling or tripling this recipe and freezing multiple portions. You can use multiple baking dishes or make it in a large 9×13 pan (adjust baking time to 45-50 minutes). Having 2-3 weeks worth of breakfasts in your freezer is incredibly valuable for busy seasons of life. Professional meal preppers often dedicate one afternoon to baking several pans of different flavors for variety.
Freezer Timeline:
- Frozen baked oatmeal: 3 months for best quality
- Unbaked assembled oatmeal: Refrigerate up to 12 hours before baking
- Thawed in refrigerator: Use within 24 hours
Serving Suggestions
While apple cinnamon baked oatmeal is absolutely delicious on its own, here are wonderful ways to serve it and complementary sides that make it even more special:
Classic Breakfast Plate:
Serve a warm square of baked oatmeal with a side of crispy turkey bacon or breakfast sausage for protein, and fresh fruit like orange slices or mixed berries for brightness and vitamin C. This creates a balanced, complete breakfast that covers all your nutritional bases while satisfying different taste preferences.
Brunch Spread:
When hosting weekend brunch, present your baked oatmeal in the baking dish on a trivet, surrounded by bowls of toppings so guests can customize their portions. Offer toppings like: pure maple syrup, honey, Greek yogurt or whipped cream, fresh berries, banana slices, chopped nuts (pecans, walnuts, almonds), coconut flakes, chia seeds, hemp hearts, nut butter drizzles, and cinnamon sugar. Set out small bowls with spoons for each topping for an impressive DIY breakfast bar.
Traditional Toppings:
- Maple Syrup or Honey Drizzle – The classic choice that enhances sweetness and adds moisture
- Greek Yogurt or Vanilla Yogurt – Adds protein, creaminess, and tangy contrast to the sweet oatmeal
- Milk or Cream – Pour a little cold milk over your warm portion for a temperature and texture contrast
- Fresh Fruit – Sliced apples, berries, banana slices, or diced pears add freshness and color
- Chopped Nuts – Pecans, walnuts, or almonds add crunch and healthy fats
- Nut Butter Drizzle – Warm almond butter or peanut butter for extra richness
- Whipped Cream – For special occasions or when you want to feel extra indulgent
Beverage Pairings:
This pairs beautifully with hot coffee (the slight bitterness complements the sweet oatmeal), chai tea or spiced tea (echoes the cinnamon flavors), apple cider (especially in fall), cold milk or non-dairy milk, or fresh-squeezed orange juice for a vitamin C boost.
Make It a Complete Meal:
For those needing more protein, serve alongside scrambled eggs, a veggie omelet, or cottage cheese. For kids or those with big appetites, add a slice of whole grain toast with butter. For a lighter option, serve with just fresh fruit salad on the side.
Special Occasion Presentation:
For holidays or guests, cut the baked oatmeal into squares and plate individually. Top each square with a dollop of whipped cream, a sprinkle of cinnamon, and a fresh apple slice fanned on top. Drizzle with caramel sauce for extra decadence. Garnish the plate with a mint sprig for color. This restaurant-style plating elevates the humble baked oatmeal to something truly impressive.
Dessert Option:
Yes, this can absolutely work as a healthier dessert! Serve it warm with a scoop of vanilla ice cream or frozen yogurt, drizzle with caramel sauce, and top with chopped pecans. It’s reminiscent of apple crisp or cobbler but with whole grains and less sugar.
FAQs Section
Q: Can I use quick oats or steel-cut oats instead of old-fashioned oats?
A: Unfortunately, no—the type of oats really matters in this recipe! Quick oats are too finely processed and will absorb too much liquid, creating a gummy, dense, paste-like texture instead of the tender but distinct oat pieces we want. Your baked oatmeal will turn out more like a dense brick than the nice cake-like texture. Steel-cut oats are the opposite problem—they’re too thick and chewy to soften properly in the baking time, and you’ll end up with hard, crunchy oats that are unpleasant to eat. Old-fashioned rolled oats (sometimes labeled “whole rolled oats”) are the perfect middle ground that creates the ideal texture. If you need gluten-free, make sure to buy certified gluten-free rolled oats, which are available at most grocery stores. This is one substitution I strongly recommend not making—it’s worth buying the right kind of oats!
Q: Can I make this recipe dairy-free and vegan?
A: Absolutely! This recipe adapts beautifully to dairy-free and vegan diets with simple swaps. For dairy-free: Use any plant-based milk you like—oat milk, almond milk, soy milk, or coconut milk all work perfectly. Replace the butter with melted coconut oil or vegan butter. Everything else stays the same. For fully vegan: Make the dairy-free swaps above, plus replace the 2 eggs with flax eggs (mix 2 tablespoons ground flaxseed with 6 tablespoons water, let sit 5 minutes until thickened), and use maple syrup instead of honey. The texture will be slightly different—a bit denser and less fluffy without real eggs—but it’s still absolutely delicious and holds together well. I’ve made both versions many times and my vegan friends can’t tell the difference!
Q: Why is my baked oatmeal too wet/soggy in the middle?
A: A wet, soggy center usually means the oatmeal is underbaked. Since all ovens are slightly different, yours might run cooler than mine, meaning it needs more time. Check for these doneness indicators: the edges should be golden brown and slightly pulling away from the pan sides, the top should look set and matte (not shiny/wet), the center should not jiggle when you gently shake the pan, and a toothpick inserted in the very center should come out with just a few moist crumbs, not wet batter. If you’re seeing these signs but it’s still wet inside, increase baking time by 5-minute increments until done. Also make sure you measured ingredients accurately—too much liquid or not enough oats will make it soupy. Finally, did you let it rest for 10-15 minutes after baking? That rest time allows the center to finish setting up and absorb remaining moisture.
Q: Can I prepare this the night before and bake it in the morning?
A: Yes, this is one of my favorite tricks for easy holiday or special occasion breakfasts! Mix everything according to the recipe instructions, pour into your greased baking dish, cover tightly with plastic wrap, and refrigerate overnight (up to 12 hours). In the morning, remove from the refrigerator while you preheat your oven—letting it sit at room temperature for 15-20 minutes helps it bake more evenly. Remove the plastic wrap and bake as directed, adding about 5-10 extra minutes to the baking time since it’s starting from cold. You’ll wake up to the amazing smell of cinnamon apples baking without having to do any morning prep work. This is perfect for Christmas morning, Mother’s Day brunch, or any time you want a special breakfast without the morning stress!
Q: How do I prevent my baked oatmeal from sticking to the pan?
A: Sticking is frustrating but totally preventable! Here are your best options: Method 1 (most reliable): Line your baking dish with parchment paper, leaving overhang on two opposite sides that act as “handles.” Grease the parchment paper lightly. After baking and cooling, you can lift the entire thing out using the parchment handles and cut perfect portions on a cutting board with zero sticking. Method 2: Grease your pan very thoroughly with butter or cooking spray, making absolutely sure you get into the corners and up the sides. Don’t just spray lightly—really coat it. Method 3: Use a non-stick baking dish if you have one. Also, make sure you let the oatmeal cool for at least 10-15 minutes before trying to cut it—cutting while hot makes it stick and fall apart. Use a thin, flexible spatula to release the edges before scooping out portions.
Q: Can I freeze baked oatmeal?
A: Yes, baked oatmeal freezes beautifully and is perfect for long-term meal prep! After baking and cooling completely, cut into individual portions. Wrap each portion tightly in plastic wrap (double wrap for best protection), then place all wrapped pieces in a large freezer-safe ziplock bag or airtight container. Freeze for up to 3 months. To reheat from frozen, you have two options: 1) Thaw overnight in the refrigerator, then microwave for 60-90 seconds until heated through, or 2) Microwave directly from frozen for 2-3 minutes, stopping halfway through to flip or stir for even heating. Add a splash of milk before reheating to restore moisture. The texture holds up remarkably well and you’d never know it had been frozen. This is one of my top meal prep breakfast hacks for having healthy, homemade breakfasts ready in under 3 minutes on busy mornings!
Q: What are the best apples to use for baked oatmeal?
A: The best apples for baking are ones that hold their shape, have good sweet-tart balance, and don’t turn to complete mush. My top recommendations are Honeycrisp (sweet, crisp, holds shape beautifully), Granny Smith (tart, firm, classic baking apple), Fuji or Gala (sweet, reliable, widely available), and Golden Delicious (sweet, soft but not mushy). You can also mix varieties—half Granny Smith and half Honeycrisp creates a nice sweet-tart balance. Avoid Red Delicious which become mealy and flavorless when baked, and avoid very soft apples like McIntosh which turn to applesauce texture. For best results, dice your apples into uniform 1/2-inch pieces so they cook evenly. You can leave the peels on if you want more fiber and rustic texture, or peel them for a softer, more refined result—both work great!
Q: My baked oatmeal turned out dry and crumbly. What went wrong?
A: A dry, crumbly texture usually happens from overbaking or incorrect ingredient ratios. Here’s how to fix it: 1) Check your oven temperature with an oven thermometer—if it runs hot, your oatmeal is baking at a higher temperature than intended and drying out. 2) Don’t bake longer than needed. Check for doneness at 35 minutes; if the edges are golden and a toothpick comes out with moist crumbs, it’s done even if the recipe says 40 minutes. Overbaking dries it out. 3) Make sure you measured ingredients accurately, especially the liquid. Too little milk makes it dry. 4) Did you use the right type of oats? Some store brands are drier than others. 5) For next time, you can add an extra 1/4 cup of milk to the recipe if you prefer a moister result, or stir in 1/4 cup applesauce for extra moisture. If your batch turned out too dry, you can rescue it by pouring a little milk over each portion before reheating!
Conclusion
There you have it—everything you need to create the most delicious, comforting, wholesome apple cinnamon baked oatmeal that will transform your breakfast routine! This recipe is so much more than just a healthy breakfast option; it’s a warm hug in a bowl, the smell of home and comfort, and the secret weapon for busy mornings when you need something nutritious but don’t have time to cook.
The magic of baked oatmeal is that it checks every single box: it’s genuinely healthy with whole grains, natural sweetness, and real fruit; it’s incredibly convenient with make-ahead and meal prep capabilities; it’s budget-friendly using simple, affordable ingredients; it’s family-friendly enough that even picky eaters devour it; and most importantly, it tastes absolutely amazing—like having apple pie for breakfast but without any guilt. The warm cinnamon, tender apple chunks, and that perfect cake-like texture make every bite satisfying and delicious.
Whether you’re meal prepping for your week ahead, looking for a special weekend brunch dish, need a healthier breakfast option that doesn’t feel like a sacrifice, or simply want your house to smell like a cozy bakery on a chilly morning—this apple cinnamon baked oatmeal is your answer. It’s forgiving for beginners, impressive enough for guests, and versatile enough to adapt to any dietary need or flavor preference.
I absolutely love seeing your baked oatmeal creations! Snap a photo of your gorgeous golden-brown pan straight from the oven, or style a beautiful plated portion with your favorite toppings, and share it on Pinterest. Tag me so I can see your delicious results and topping combinations! Don’t forget to save this recipe to your Pinterest boards—file it under breakfast recipes, meal prep, healthy recipes, or apple recipes so you can find it easily whenever you need it.
Have you tried this recipe yet? I’d love to hear all about it! Drop a comment below telling me what you thought, what variations you tried, whether your family loved it, and what toppings were your favorite. Did you meal prep it for the week? Did your kids request seconds? What fruit combinations are you planning to try next? Your feedback and reviews help other home cooks and give me wonderful ideas for new recipes to create and share.
Freezing in the Baking Dish:If this recipe has simplified your mornings, brought comfort to your breakfast table, or helped you eat healthier without feeling deprived, please share it with friends and family who would love it too! Everyone deserves to start their day with something delicious and nourishing.
Now go preheat that oven, dice those apples, and get ready for your kitchen to smell absolutely incredible. Your future self will thank you for having healthy, delicious breakfasts ready to grab all week long. Happy baking! 🍎🥄