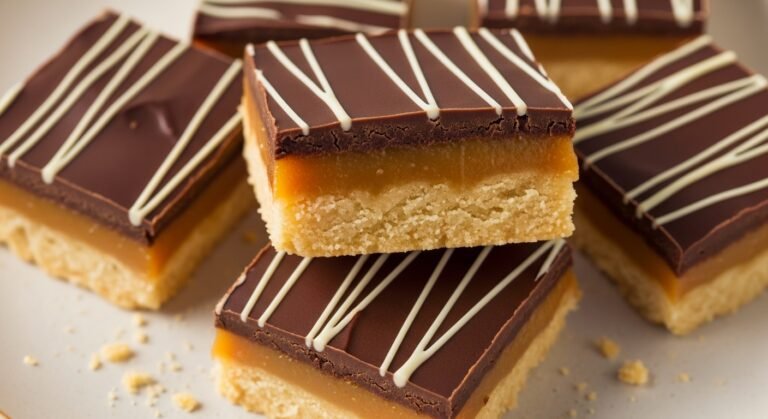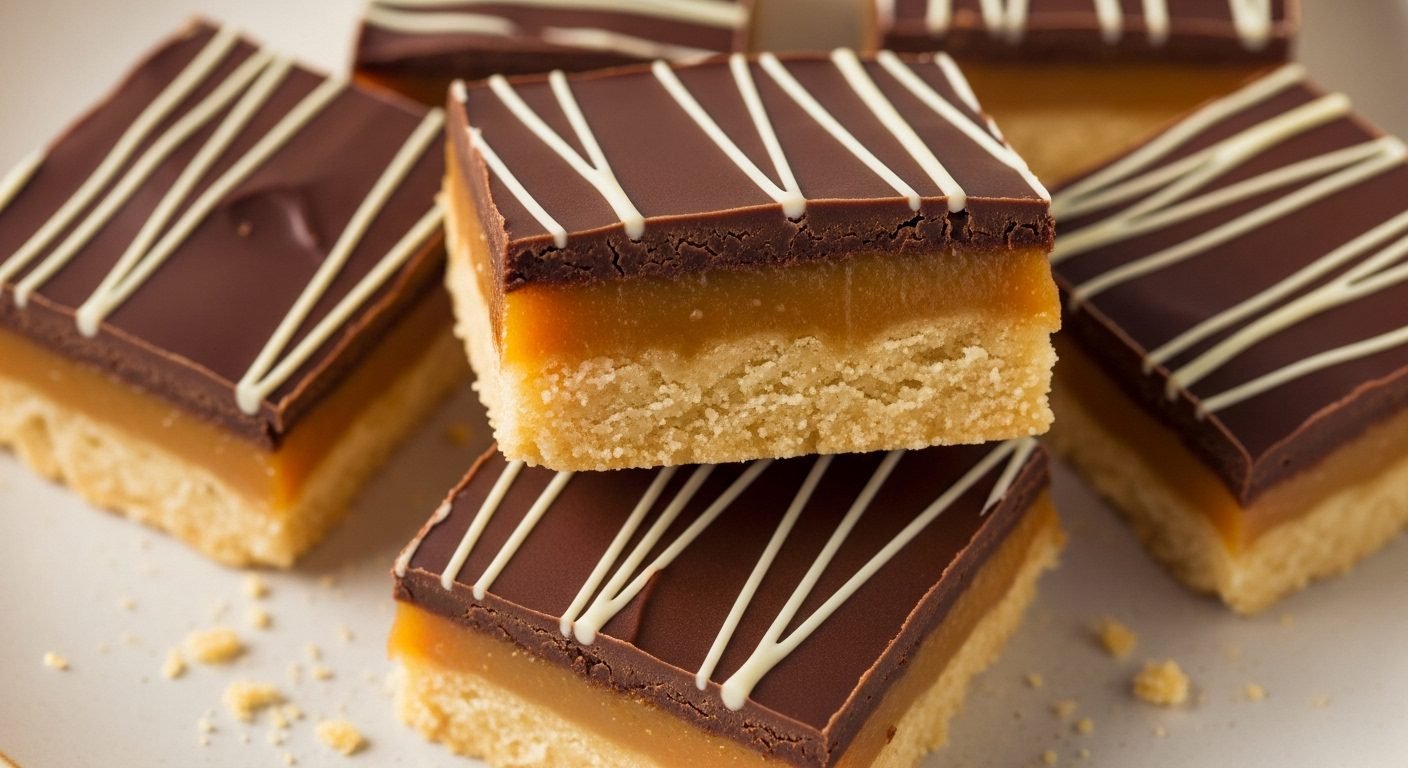
Chocolate Caramel Bars Recipe (Millionaire’s Shortbread – Decadent!)
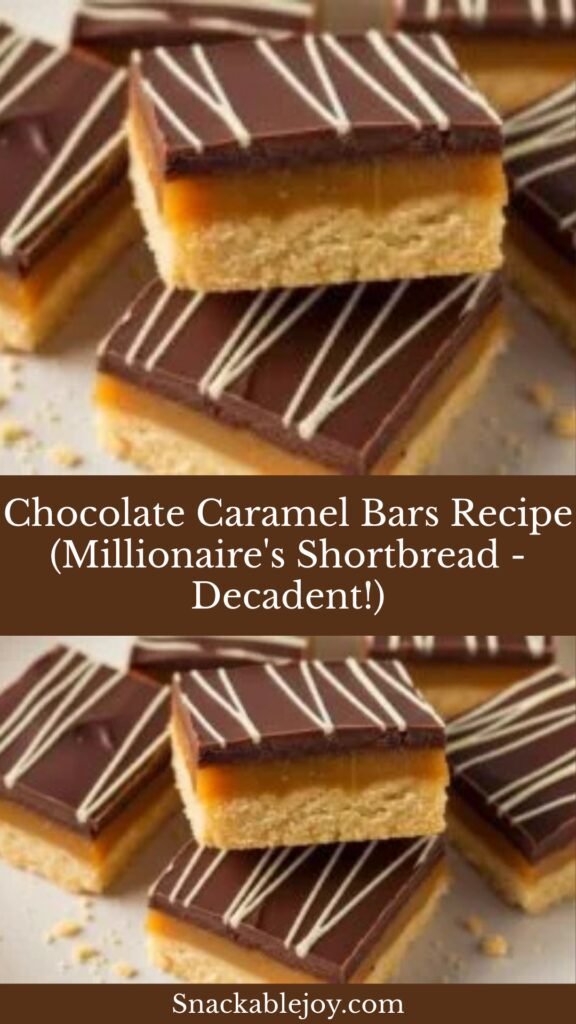
Get ready to experience pure indulgence with these incredible Chocolate Caramel Bars! Also known as Millionaire’s Shortbread or Twix Bars, these decadent treats feature three irresistible layers: a buttery shortbread base, a thick layer of creamy caramel, and a smooth chocolate topping. Each bite delivers the perfect combination of crispy, chewy, and rich flavors that will have everyone asking for the recipe.
These bars are the ultimate crowd-pleaser and look absolutely stunning on any dessert table. Despite their sophisticated appearance and gourmet taste, they’re surprisingly straightforward to make at home. The buttery shortbread provides the perfect sturdy foundation, the homemade caramel layer is smooth and chewy (not too hard, not too soft), and the chocolate topping adds that final touch of luxury that makes these bars truly special.
Perfect for holiday cookie exchanges, bake sales, special celebrations, or anytime you want to treat yourself to something extraordinary, these Chocolate Caramel Bars are guaranteed to impress. They’re rich enough to satisfy the most intense sweet tooth, travel beautifully for potlucks and parties, and store well for days (if they last that long!). Once you master this recipe, you’ll have a go-to dessert that never fails to wow!
History / Background
Chocolate Caramel Bars are most famously known as Millionaire’s Shortbread in the United Kingdom, where they originated. This iconic British treat is believed to have been created in Scotland, though the exact origins are somewhat debated. The name “Millionaire’s Shortbread” reflects how decadent and rich these bars are—they’re called “millionaire’s” because they contain luxurious ingredients and taste like something only the wealthy could afford, though in reality, they use simple, accessible ingredients.
Traditional Scottish shortbread has been enjoyed since at least the 12th century, but the addition of caramel and chocolate is a much more modern innovation, likely emerging in the early 20th century as chocolate became more widely available and affordable to home bakers. By the 1950s and 1960s, Millionaire’s Shortbread had become a staple in British tea rooms, bakeries, and home kitchens.
The dessert gained international popularity through British expatriates and travelers who shared the recipe around the world. In Australia and New Zealand, similar treats are sometimes called “Caramel Slice” or “Caramel Shortbread.” American bakers embraced the recipe enthusiastically, often calling them simply “Chocolate Caramel Bars” or comparing them to Twix candy bars due to the similar flavor profile and layered structure.
The genius of this dessert lies in its perfect balance of textures and flavors. The crisp, buttery shortbread base provides structural support and a slight saltiness that balances the sweet caramel. The caramel layer—traditionally made by slowly cooking sweetened condensed milk—offers chewy richness without being tooth-achingly hard like some caramels. The chocolate topping adds smooth decadence and helps seal in the caramel layer, making these bars portable and perfect for gifting.
Over the decades, countless variations have emerged. Some recipes use dulce de leche instead of homemade caramel, others add sea salt for a salted caramel version, and creative bakers have experimented with white chocolate, dark chocolate, or even peanut butter additions. However, the classic three-layer formula remains the most beloved and enduring version.
Today, Millionaire’s Shortbread continues to be a fixture in British cafes and bakeries, while American home bakers have fully embraced the recipe for its impressive presentation and foolproof deliciousness. It represents the best of British baking tradition—simple ingredients transformed through technique into something truly special.
Why You’ll Love This Recipe
These Chocolate Caramel Bars are about to become your most-requested dessert, and once you make them, you’ll completely understand why they’re called Millionaire’s Shortbread. They taste like pure luxury in every single bite, combining three beloved flavors—butter, caramel, and chocolate—into one unforgettable treat that’s impossible to resist.
Here’s why this recipe is absolutely amazing:
- Three perfect layers – Buttery shortbread, creamy caramel, and smooth chocolate create the ultimate texture and flavor combination
- Tastes like expensive candy – These have serious Twix bar vibes, but homemade and infinitely better
- Impressive presentation – The neat, clean layers look bakery-professional and always wow guests
- Easier than you think – Despite looking fancy, each component is straightforward with my detailed instructions
- Make-ahead friendly – These bars actually benefit from overnight chilling, making party prep stress-free
- Feeds a crowd – One 9×13 pan yields 24-36 bars depending on how you cut them
- Travels beautifully – The firm layers make these perfect for transport to parties, bake sales, and gift giving
- Customizable – Add sea salt, swap chocolates, or include nuts—the basic formula works with endless variations
- No special skills required – If you can stir, bake, and spread, you can make these successfully
- Keeps for days – Properly stored, these bars stay fresh and delicious for up to a week
- Perfect for gifting – Package them in pretty boxes or tins for impressive homemade gifts
- Worth every calorie – These are rich and indulgent, so a little goes a long way in satisfying your sweet tooth
Ingredient Notes
Let’s break down what makes each layer spectacular:
For the Shortbread Base:
Butter – Use unsalted butter at room temperature for the shortbread. The butter provides that signature rich, crumbly texture. Don’t substitute with margarine or oil—real butter is essential for authentic shortbread flavor and texture.
Granulated Sugar – Sweetens the shortbread without making it overly sweet. The relatively small amount lets the butter flavor shine through.
All-Purpose Flour – Creates the structure of the shortbread. All-purpose flour gives you that perfect crumbly-yet-sturdy texture that holds up under the caramel layer.
Salt – Just a pinch balances the sweetness and enhances the butter flavor.
For the Caramel Layer:
Butter – Adds richness and helps create that smooth, creamy caramel texture. Use unsalted so you can control the salt level.
Brown Sugar – The molasses in brown sugar contributes to the caramel’s deep flavor and color. Light or dark brown sugar both work—dark gives a more intense molasses flavor.
Sweetened Condensed Milk – The secret to easy, foolproof caramel! The condensed milk creates that perfect chewy texture without the fussiness of traditional caramel making. Make sure you use sweetened condensed milk, not evaporated milk.
Corn Syrup – Prevents the caramel from crystallizing and helps achieve that smooth, glossy texture. You can substitute with golden syrup (British) or honey in a pinch.
Vanilla Extract – Enhances the caramel’s flavor and adds warmth and depth.
For the Chocolate Topping:
Chocolate Chips – Semi-sweet chocolate chips create a perfectly balanced chocolate layer that’s not too bitter or too sweet. You can use milk chocolate for sweeter bars, dark chocolate (60-70% cacao) for a more sophisticated flavor, or a combination.
Coconut Oil or Butter – Adding a small amount of fat helps the chocolate melt smoothly and creates a glossy finish. Coconut oil gives a shinier result, while butter adds richness.
Equipment Needed
Here’s what you’ll need to create these beautiful bars:
- 9×13-inch baking pan – Metal works best for even heat distribution
- Parchment paper or aluminum foil – For lining the pan and easy removal
- Mixing bowls (medium and large) – For preparing each layer
- Hand mixer or stand mixer – For creaming the shortbread base
- Medium saucepan – For cooking the caramel
- Wooden spoon or heat-resistant spatula – For stirring the caramel
- Whisk – For mixing caramel ingredients
- Offset spatula or butter knife – For spreading the chocolate
- Sharp knife – For cutting the bars cleanly
- Measuring cups and spoons – For accurate measurements
- Candy thermometer (optional but helpful) – For monitoring caramel temperature
Print

Chocolate Caramel Bars Recipe
These decadent Chocolate Caramel Bars (Millionaire’s Shortbread) feature three perfect layers: buttery shortbread, creamy homemade caramel, and smooth chocolate topping. Rich, impressive, and irresistibly delicious—perfect for special occasions or anytime you want to treat yourself!
- Total Time: 1 hour 5 minutes (plus chilling time)
- Yield: 24-36 bars 1x
Ingredients
ScaleShortbread Base:
- 1 cup (2 sticks) unsalted butter, softened
- ½ cup granulated sugar
- 2 cups all-purpose flour
- ¼ teaspoon salt
Caramel Layer:
- ½ cup (1 stick) unsalted butter
- ½ cup packed light or dark brown sugar
- 1 (14-ounce) can sweetened condensed milk
- 2 tablespoons light corn syrup
- 1 teaspoon vanilla extract
Chocolate Topping:
- 2 cups semi-sweet chocolate chips
- 2 tablespoons coconut oil or butter
- Flaky sea salt for topping (optional)
Instructions
Make the Shortbread Base:
- Preheat and Prep: Preheat your oven to 350°F (175°C). Line a 9×13-inch baking pan with parchment paper, leaving an overhang on two sides for easy removal later. Lightly grease the parchment.
- Cream Butter and Sugar: In a large bowl, beat the softened butter and sugar together with a hand mixer or stand mixer on medium speed until light and fluffy, about 2-3 minutes.
- Add Dry Ingredients: Add the flour and salt. Mix on low speed until the mixture comes together into a soft dough. It will look crumbly at first but will eventually form a cohesive dough.
- Press and Bake: Press the dough evenly into the bottom of the prepared pan. Use your hands or the bottom of a measuring cup to create an even, compact layer. Prick the surface all over with a fork (this prevents bubbling).
- Bake: Bake for 20-25 minutes, until the edges are lightly golden brown. The center may look slightly underdone, but it will continue to firm up. Remove from oven and let cool slightly while you prepare the caramel.
Make the Caramel Layer:
- Combine Caramel Ingredients: In a medium saucepan, combine the butter, brown sugar, sweetened condensed milk, and corn syrup. Place over medium heat.
- Cook the Caramel: Stir constantly with a wooden spoon or heat-resistant spatula. Bring the mixture to a gentle boil, then reduce heat to medium-low. Continue cooking, stirring constantly, for 5-7 minutes until the mixture thickens, darkens slightly in color, and reaches 225°F on a candy thermometer (soft ball stage). The caramel should coat the back of your spoon thickly.
- Add Vanilla: Remove from heat and stir in the vanilla extract. Be careful—it may bubble up!
- Pour and Spread: Immediately pour the hot caramel over the baked shortbread base. Use an offset spatula to spread it evenly into all corners. Let cool at room temperature for about 30 minutes, then refrigerate for at least 1 hour until firm.
Add the Chocolate Layer:
- Melt Chocolate: Place the chocolate chips and coconut oil (or butter) in a microwave-safe bowl. Microwave in 30-second intervals, stirring between each, until completely melted and smooth (usually 1-2 minutes total). Alternatively, melt in a double boiler.
- Spread Chocolate: Pour the melted chocolate over the cooled caramel layer. Use an offset spatula or the back of a spoon to spread it evenly to the edges.
- Optional Salt: If desired, sprinkle flaky sea salt over the chocolate while it’s still wet.
- Chill: Refrigerate for at least 2 hours, or until the chocolate is completely set and firm.
Cut and Serve:
- Remove and Cut: Using the parchment overhang, lift the entire block out of the pan and place on a cutting board. Use a sharp knife to cut into squares or bars. For the cleanest cuts, run your knife under hot water and wipe dry between each cut, or let the bars sit at room temperature for 10 minutes before cutting.
Notes
- Don’t rush the caramel cooking time—constant stirring and patience ensure smooth, non-grainy caramel.
- The caramel MUST be completely cool and firm before adding the chocolate, or the layers will mix.
- For ultra-clean cuts, freeze the bars for 20 minutes before slicing.
- Store in an airtight container with parchment between layers to prevent sticking.
- These bars are rich—consider cutting them into smaller pieces!
- Prep Time: 30 minutes
- Cook Time: 35 minutes
- Category: Dessert, Bars & Cookies
- Method: Baking, Stovetop
- Cuisine: British, American
- Diet: Vegetarian
Nutrition
- Serving Size: 1 bar (1/24 of recipe)
- Calories: 285
- Sugar: 26g
- Sodium: 95mg
- Fat: 16g
- Saturated Fat: 10g
- Unsaturated Fat: 5g
- Trans Fat: 0g
- Carbohydrates: 35g
- Fiber: 1g
- Protein: 3g
- Cholesterol: 35mg
Tips & Variations
Flavor Variations:
- Salted Caramel Millionaire’s Shortbread: Add ½ teaspoon salt to the caramel and sprinkle flaky sea salt generously on top of the chocolate
- Dark Chocolate Version: Use 60-70% dark chocolate for a more sophisticated, less sweet bar
- White Chocolate Caramel Bars: Replace the chocolate layer with melted white chocolate
- Peanut Butter Layer: Add a thin layer of smooth peanut butter between the caramel and chocolate
- Triple Chocolate: Use dark chocolate for the base layer and milk chocolate drizzled on top
- Espresso Chocolate: Add 1 tablespoon instant espresso powder to the melted chocolate
- Coconut Caramel: Add ½ cup toasted coconut to the caramel layer
Mix-In Ideas:
- Chopped pecans or walnuts pressed into the shortbread before baking
- Crushed pretzels for sweet and salty contrast
- Mini chocolate chips mixed into the caramel layer
- Toffee bits sprinkled on top of the chocolate
- Crushed candy canes for a holiday version
Dietary Modifications:
- Gluten-Free: Use a 1:1 gluten-free flour blend for the shortbread base
- Dairy-Free: Use vegan butter and coconut condensed milk (harder to find but available), plus dairy-free chocolate chips
- Lower Sugar: This recipe is inherently sweet and sugar is essential to the structure, so significant reductions aren’t recommended
Presentation Ideas:
- Cut into small squares for elegant bite-sized treats
- Drizzle with white chocolate in a zigzag pattern for contrast
- Cut into rectangles to mimic Twix bars
- Package in clear bags tied with ribbon for beautiful gifts
- Arrange in decorative tins lined with parchment paper
Pro Chef Tips
Nail the Shortbread Texture: The key to perfect shortbread is not overworking the dough. Mix just until the ingredients come together—overmixing develops gluten and creates tough rather than tender shortbread. The dough should be crumbly but hold together when pressed. Pricking the surface with a fork prevents bubbling during baking and creates a flat surface for the caramel layer.
Stir, Stir, Stir That Caramel: The most critical step in this recipe is cooking the caramel properly. Stir constantly—and I mean constantly—the entire time it’s cooking. Stopping even for 30 seconds can cause the bottom to burn. The caramel is ready when it’s thickened noticeably, has darkened to a rich golden-tan color, and reaches 225°F (soft ball stage). Under-cooked caramel will be too soft and may not set properly; over-cooked caramel becomes grainy or hard.
Cool Completely Between Layers: This cannot be stressed enough! The shortbread must cool for at least 10 minutes before adding hot caramel, and the caramel must be completely firm (at least 1 hour in the fridge) before adding chocolate. If you add chocolate to soft caramel, the layers will mix together and you’ll lose those beautiful defined layers. Patience here is everything.
The Hot Knife Method for Clean Cuts: Professional bakers cut these bars with a large, sharp knife that’s been warmed under hot running water, then wiped dry. Make one cut, wipe the knife clean, rewarm it, and repeat. This method prevents the chocolate from cracking and creates those pristine, bakery-quality edges. It takes a few extra minutes but makes a huge visual difference.
Add Oil to the Chocolate for Shine: Adding coconut oil or a small amount of butter to the melted chocolate does two things: it helps the chocolate spread more smoothly and creates a glossy, professional-looking finish. The oil also prevents the chocolate from becoming too hard, making the bars easier to bite through. Use refined coconut oil if you don’t want any coconut flavor.
Press That Shortbread Firmly: When pressing the shortbread dough into the pan, really compact it with your hands or the bottom of a measuring cup. A firmly pressed shortbread base is sturdy enough to support the heavy caramel layer without crumbling when you cut the bars. Loose, lightly pressed shortbread will be too crumbly and the bars will fall apart.
Temperature Control is Everything: Use medium to medium-low heat for the caramel. High heat causes the mixture to cook too quickly, leading to grainy texture or burnt flavor. Gentle, steady heat with constant stirring produces the smoothest, creamiest caramel every time.
Common Mistakes to Avoid
Mistake #1: Not Cooking the Caramel Long Enough
Under-cooked caramel won’t set properly and will remain too soft, oozing out when you cut the bars and making a sticky mess. The caramel needs to cook for the full 5-7 minutes, thickening considerably and darkening in color. It should coat the back of a spoon thickly and reach 225°F if you’re using a thermometer. When in doubt, cook it a minute longer rather than pulling it off too early.Mistake #2: Adding Chocolate to Warm Caramel
If the caramel layer isn’t completely cool and firm, the warm chocolate will cause it to soften and the layers will blend together instead of remaining distinct. Always refrigerate the caramel layer for at least 1 hour (preferably 2) until it’s firm to the touch before adding the chocolate topping. This patience ensures those beautiful, Instagram-worthy layers.Mistake #3: Using Cold Butter for the Shortbread
Cold butter won’t cream properly with the sugar, resulting in a dense, hard shortbread base instead of that tender, crumbly texture you’re after. Make sure your butter is at room temperature—it should be soft enough that you can easily press your finger into it, but not melted or greasy. Set it out 30-60 minutes before you start baking.Mistake #4: Not Lining the Pan
Trying to cut these bars while they’re still in the pan is frustrating and messy, and you’ll likely mangle the edges. Always line your pan with parchment paper with overhang on two sides. This allows you to lift the entire block out of the pan and cut clean, beautiful bars on a cutting board. It’s a game-changer!Mistake #5: Cutting While the Chocolate is Too Soft or Too Hard
Cutting when the chocolate is still soft creates smears and messy edges. Cutting when everything is rock-hard from extended refrigeration causes the chocolate to crack and shatter. The sweet spot is letting refrigerated bars sit at room temperature for about 10 minutes before cutting, or using the hot knife method. This way, you get clean cuts without cracking or smearing.Storage & Meal Prep
Room Temperature Storage:
Once fully set and cut, Chocolate Caramel Bars can be stored at room temperature for 2-3 days in an airtight container, especially in cooler weather (below 70°F). Place parchment or wax paper between layers to prevent sticking. However, because of the caramel layer, these bars are best stored in the refrigerator in warm weather to prevent the caramel from becoming too soft.Refrigerator Storage:
For best results and longer storage, keep these bars refrigerated in an airtight container with parchment paper between layers. They’ll stay fresh for up to 7-10 days. The chocolate will be firmer when cold, so let them sit at room temperature for 10-15 minutes before serving if you prefer a softer texture. Cold bars are actually delicious—they have a nice firm texture that makes them easy to eat.Preventing Sticking:
The caramel layer can be sticky, so it’s essential to separate layers with parchment or wax paper when stacking bars in your storage container. You can also wrap individual bars in plastic wrap or place them in small zip-top bags for easy grabbing and portion control.Serving Temperature:
These bars are delicious at various temperatures! Room temperature offers the best flavor and texture balance—the chocolate is firm but not hard, and the caramel is perfectly chewy. Chilled bars have a nice firm bite and are less messy to eat. Let personal preference guide you, but most people prefer them slightly cool or at room temperature.Make-Ahead & Freezer Notes
Perfect Make-Ahead Timeline:
These bars are actually ideal for making ahead, as the layers benefit from time to fully set. Here’s your game plan:2-3 Days Before: Bake the entire recipe through all three layers. Once completely set, cut into bars and store refrigerated in an airtight container with parchment between layers. This makes them perfect for parties and holiday baking when you need to spread out the work.
1 Week Before: You can even make these a full week ahead! The flavors continue to meld and they taste even better after a few days. Keep refrigerated and bring to room temperature before serving.
Freezing for Long-Term Storage:
These bars freeze exceptionally well for up to 3 months! Once fully set and cut, wrap individual bars tightly in plastic wrap, then place all wrapped bars in a freezer-safe zip-top bag or airtight container. Label with the date.Freezing the Whole Pan:
Alternatively, freeze the entire uncut block. Once all layers are completely set, wrap the whole pan (or the lifted block on a piece of cardboard) tightly in plastic wrap, then cover with aluminum foil. Freeze for up to 3 months.Thawing Instructions:
For individual bars, remove from the freezer and unwrap. Let thaw in the refrigerator overnight, or at room temperature for 1-2 hours. They’re also surprisingly good eaten straight from the freezer for a different texture experience—the caramel becomes almost like firm candy.For a whole pan, thaw in the refrigerator overnight, then let sit at room temperature for 20-30 minutes before cutting (if uncut) or serving (if pre-cut).
Partial Freezing for Clean Cuts:
Here’s a pro trick: if you’re struggling to get clean cuts, place the entire uncut block in the freezer for just 15-20 minutes (not fully frozen, just very cold). This firms everything up just enough to make cutting much easier and cleaner. Let the cut bars come to room temperature before serving.Serving Suggestions
These Chocolate Caramel Bars are luxurious enough to stand alone, but here are ways to make them even more special:
Classic Presentations:
- Serve at room temperature on a decorative platter for parties
- Cut into small squares and arrange on dessert platters with other treats
- Place in colorful cupcake liners for an elegant presentation
- Serve with espresso or strong coffee to balance the sweetness
- Arrange in gift boxes lined with tissue paper for homemade gifts
Elevated Dessert Ideas:
- Warm slightly and serve with vanilla ice cream for an indulgent sundae
- Create a dessert board with fresh berries, whipped cream, and these bars
- Serve alongside after-dinner coffee at dinner parties
- Pair with sharp cheddar cheese for a sweet-savory combination (trust me on this!)
- Drizzle plates with caramel sauce and place a bar on top for restaurant-style plating
Beverage Pairings:
- Hot coffee or espresso (the bitterness perfectly balances the sweetness)
- Cold milk (classic and comforting)
- Hot chocolate for an all-out chocolate experience
- Black tea or chai for afternoon tea service
- Port wine or dessert wine for elegant dinner parties
- Salted caramel hot chocolate for maximum decadence
Special Occasion Serving:
- Holiday cookie platters—these are stunning with other Christmas cookies
- Wedding or bridal shower dessert tables
- Birthday party treat tables
- Corporate gifts and office parties
- Valentine’s Day sweets (package individually with pretty ribbons)
- Mother’s Day or Father’s Day homemade gifts
British Tea Service: Cut into small squares and serve as part of a traditional afternoon tea spread alongside scones, finger sandwiches, and other petit fours. Serve with hot tea (Earl Grey or English Breakfast) for an authentic experience.
Casual Gatherings:
- Potluck desserts (they travel beautifully)
- Bake sale star attraction (always a top seller!)
- Game day treats (cut into larger bars for hearty portions)
- Movie night indulgence
- Coffee date accompaniment
FAQs Section
Q: Can I use store-bought caramel instead of making it from scratch?
A: While homemade is always best, you can use jarred caramel sauce in a pinch. You’ll need about 1½ cups. Warm it slightly to make it pourable, spread it over the cooled shortbread, then refrigerate until firm before adding chocolate. The texture will be slightly different (softer), but it’ll still taste delicious and saves significant time.Q: Why is my caramel grainy instead of smooth?
A: Grainy caramel usually results from cooking at too high heat or not stirring constantly. The sugar crystallizes when exposed to high heat without enough agitation. Always use medium to medium-low heat and stir constantly—never stop stirring! If your caramel does become grainy, you can try whisking vigorously off the heat to smooth it out, or starting over with fresh ingredients.Q: My chocolate cracked when I cut the bars. How can I prevent this?
A: Chocolate cracks when it’s too cold and brittle. Let refrigerated bars sit at room temperature for 10-15 minutes before cutting. Also, use the hot knife method: run your knife under hot water, wipe it dry, then make one cut. Rewarm and wipe between each cut. This keeps the knife warm enough to slice through the chocolate cleanly without cracking.Q: Can I make these without corn syrup?
A: Yes! You can substitute corn syrup with golden syrup (if you can find it—it’s British), honey, or agave nectar. Each will slightly alter the flavor, but all work to prevent crystallization. You could also omit it entirely, though the caramel may be slightly more prone to graininess. Stir constantly if omitting.Q: How do I know when the caramel is done cooking?
A: Look for these signs: the mixture will have darkened to a rich golden tan color, it will have thickened noticeably (coating the spoon heavily), and it will be bubbling slowly. If using a candy thermometer, it should reach 225°F (soft ball stage). The texture should resemble thick honey. When you drag your spoon through it, you should see the bottom of the pan briefly before the caramel flows back.Q: Why did my shortbread turn out hard instead of tender?
A: Hard shortbread usually comes from overmixing the dough, which develops gluten and creates toughness. Mix just until the ingredients come together into a dough—no longer. Another cause is overbaking. Pull the shortbread from the oven when the edges are just golden and the center still looks slightly underdone. It will firm up as it cools.Q: Can I cut these into different shapes?
A: Absolutely! While squares and rectangles are traditional, you can cut them into triangles for a different look, use cookie cutters on the cooled block for special shapes (circles, hearts, etc.), cut into long thin bars to mimic Twix, or even use a pizza cutter for quicker cutting. Just remember to use the hot knife method for the cleanest cuts regardless of shape.Conclusion
Congratulations! You now have everything you need to make perfect, bakery-quality Chocolate Caramel Bars (Millionaire’s Shortbread) right in your own kitchen. These show-stopping treats prove that with a little patience and attention to detail, you can create something truly extraordinary from simple, everyday ingredients.
The combination of buttery shortbread, homemade caramel, and smooth chocolate creates a flavor experience that’s nothing short of magical. Yes, there are three separate components, but each one is straightforward, and the results are so impressive that you’ll feel like a professional baker. These bars have serious wow-factor, whether you’re serving them at a holiday party, gifting them to friends and family, or simply treating yourself to something special.
The best part? Once you master this basic formula, you can customize it endlessly—add sea salt, swap the chocolate, include nuts, or keep it classic. Every variation is delicious, and you’ll love having this recipe in your arsenal for whenever you need an impressive, crowd-pleasing dessert that never fails to get rave reviews.
So gather your ingredients, set aside a couple of hours (mostly hands-off time for chilling), and get ready to create some pure decadence. Your kitchen is about to produce something truly spectacular, and once people taste these bars, you’ll be making them over and over by popular demand. Don’t forget to save this recipe to your Pinterest boards so you can easily find it whenever the craving strikes! Happy baking! 🍫