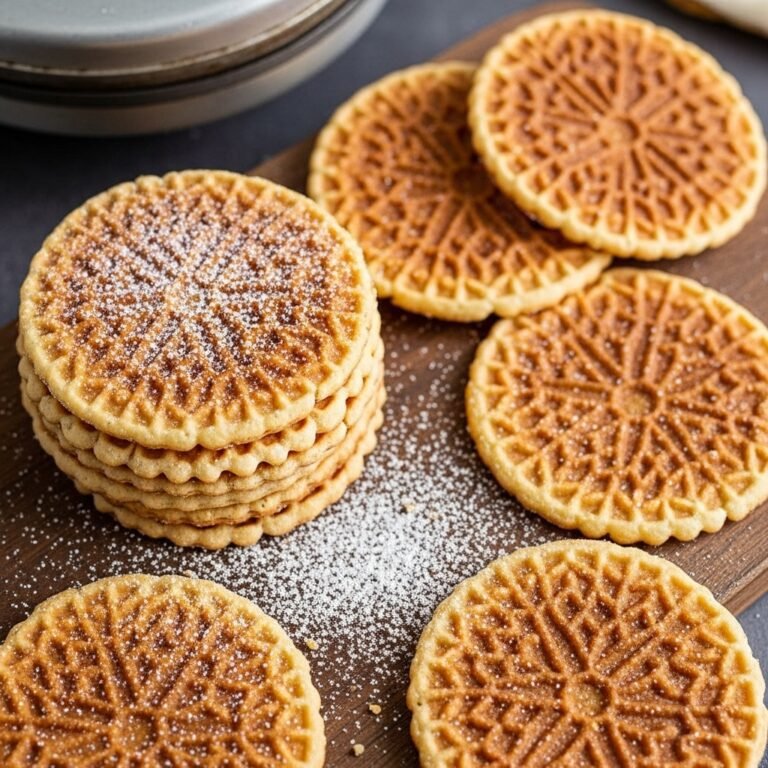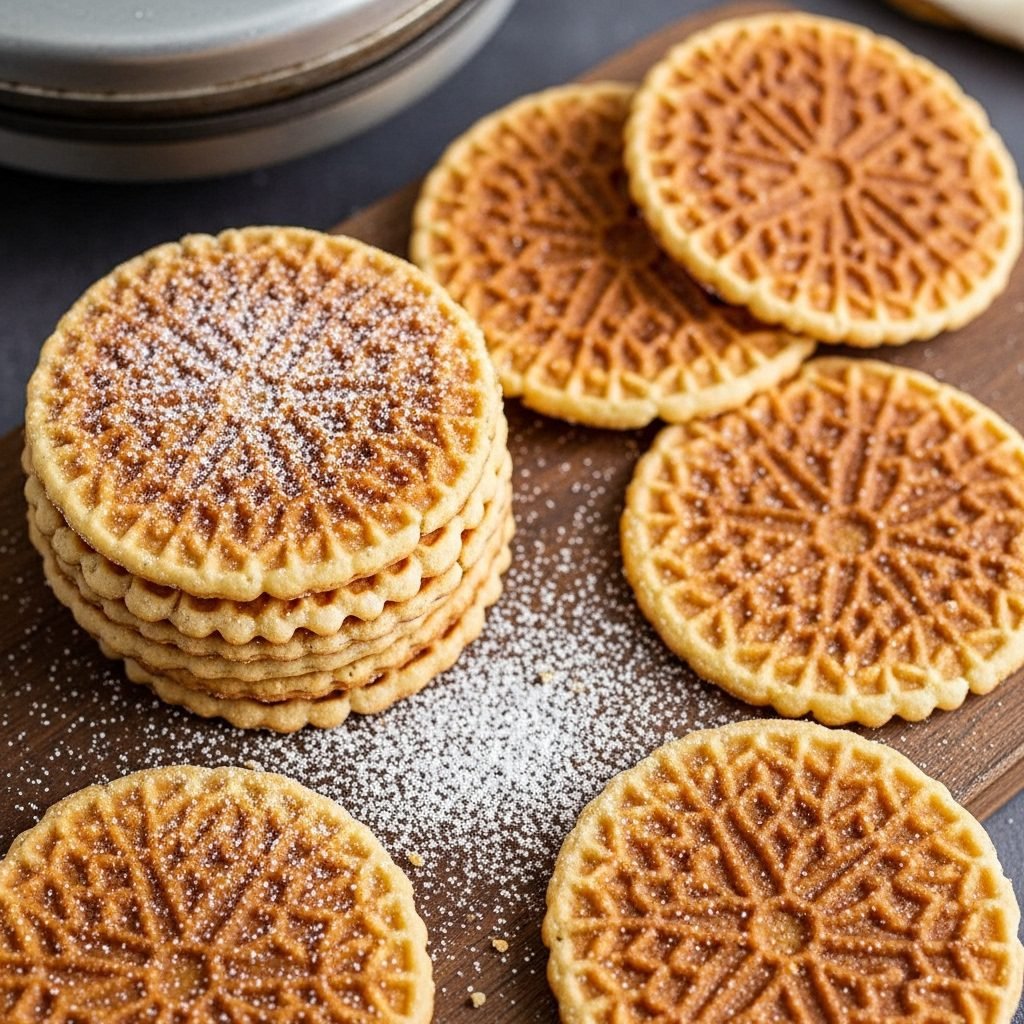
Classic Italian Pizzelle Recipe – Crispy, Delicate Waffle Cookies
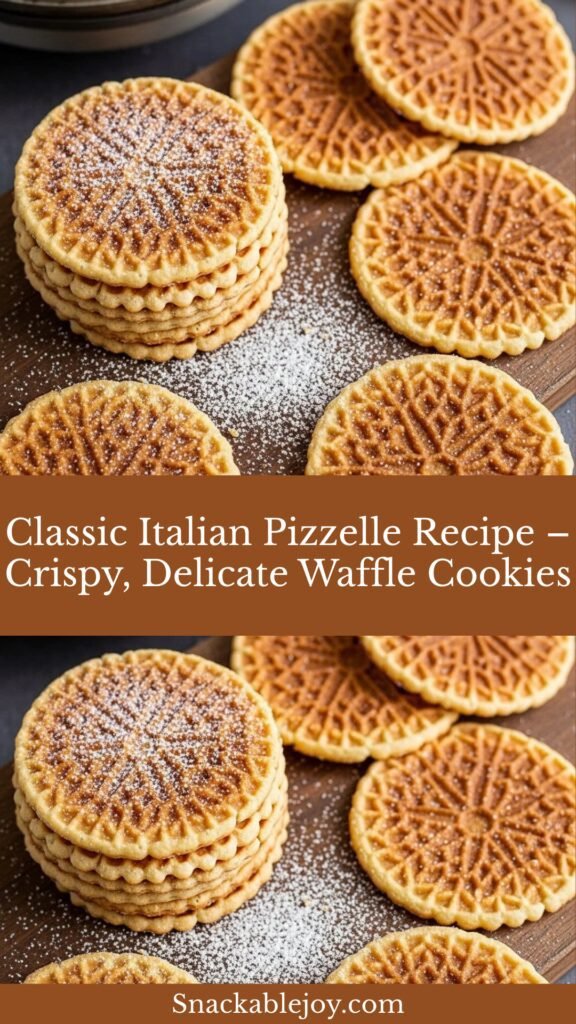
Pizzelle are traditional Italian waffle cookies that are wonderfully crispy, delicately thin, and beautifully embossed with intricate patterns. These light, crispy treats are made from a simple batter of eggs, flour, sugar, and butter, then pressed in a special pizzelle iron that creates their signature decorative design. Pronounced “peet-SELL-eh,” these delightful cookies are flavored with anise or vanilla and have a satisfying crunch that pairs perfectly with coffee, tea, or a glass of sweet wine.
Pizzelle are incredibly versatile and can be served at any occasion. They’re a staple at Italian weddings, Christmas celebrations, Easter gatherings, and baptisms. Many families enjoy them as an everyday treat with their morning espresso or afternoon tea. They also make wonderful edible ice cream cones when shaped while still warm, or can be rolled into cannoli shells. Their elegant appearance and delicious taste make them perfect for holiday cookie trays, bake sales, or as thoughtful homemade gifts. Whether you’re honoring your Italian heritage or simply discovering these delightful cookies for the first time, pizzelle are sure to become a cherished favorite in your home.
History / Background
Pizzelle hold a special place in Italian culinary history as one of the oldest known cookies, with origins dating back to the Roman Empire. The name “pizzelle” comes from the Italian word “pizze,” meaning round and flat, though they’re also known as “ferratelle” in some regions of Italy. These beloved cookies have been a symbol of celebration and family tradition for centuries, particularly in the Abruzzo region of south-central Italy, where they’re considered a point of regional pride.
Historically, pizzelle were made using irons that were heated over an open fire, requiring skill and patience to achieve the perfect golden color and crispy texture. The decorative patterns pressed into each cookie often featured family crests, religious symbols, or intricate floral designs, making each pizzelle iron a treasured family heirloom passed down through generations. In medieval times, these cookies were so valued that villages would compete to create the most beautiful and delicious versions.
Italian immigrants brought their pizzelle traditions to America in the late 1800s and early 1900s, particularly settling in regions with large Italian-American communities like New Jersey, New York, and Pennsylvania. The tradition continued to thrive, with families gathering to make hundreds of pizzelle during the Christmas season. The process became a social event, with multiple generations working together—one person pouring the batter, another operating the iron, and others carefully removing and cooling the delicate cookies. Today, modern electric pizzelle irons have made the process easier, but the tradition remains strong in Italian-American households, where making pizzelle is still considered an essential part of holiday celebrations and family gatherings.
Why You’ll Love This Recipe
This classic pizzelle recipe creates perfectly crispy, delicately flavored cookies that are both impressive and surprisingly easy to make. While they may look intricate and complex, the batter comes together in just minutes with simple pantry ingredients, and the pizzelle iron does all the decorative work for you. The result is a cookie that looks bakery-worthy but costs just pennies per batch to make at home.
Here’s why this recipe will become your new favorite:
- Simple ingredients – Made with basic pantry staples: eggs, flour, sugar, butter, and vanilla or anise extract
- Quick preparation – Batter mixes in under 10 minutes with no chilling required
- Impressive presentation – Beautiful embossed patterns make them look professionally made
- Incredibly versatile – Enjoy them flat, shape them into cones or cannoli shells, or sandwich them with filling
- Perfect texture – Crispy, light, and never too sweet, with a satisfying crunch
- Customizable flavor – Easily adapt with different extracts, citrus zest, or spices
- Make-ahead friendly – Bake in advance and store for weeks without losing quality
- Budget-friendly – Makes dozens of cookies for just a few dollars
- Crowd-pleaser – Appeals to all ages and dietary preferences (easily made dairy-free)
- Family tradition – Creates lasting memories and carries on beautiful Italian heritage
Ingredient Notes
Eggs – The foundation of pizzelle batter, eggs provide structure and help create the crispy texture. Room temperature eggs blend more easily and create a smoother batter. You’ll need them whole, as both the whites and yolks are essential for proper texture.
Granulated Sugar – Provides sweetness and helps achieve the characteristic golden color and crispy texture. The sugar also helps the pizzelle release easily from the iron. You can reduce the sugar slightly if you prefer a less sweet cookie, but don’t eliminate it entirely.
Unsalted Butter – Adds richness and flavor while keeping the batter tender. Melted and slightly cooled butter incorporates easily. You can substitute with coconut oil for a dairy-free version, or use vegetable oil, though butter provides the best flavor.
All-Purpose Flour – The structure-building ingredient that creates the cookie’s body. Be sure to measure accurately using the spoon-and-level method to avoid dense, heavy pizzelle. For gluten-free pizzelle, use a 1:1 gluten-free baking flour blend.
Baking Powder – Provides just a touch of lift, creating a lighter, crispier texture rather than a dense, flat cookie. Don’t skip this ingredient or substitute with baking soda.
Pure Vanilla Extract or Anise Extract – The traditional flavoring for pizzelle. Vanilla creates a universally loved, sweet flavor, while anise provides the authentic Italian black licorice-like taste. Anise is traditional, but many American home cooks prefer vanilla or use a combination of both.
Salt – A small amount enhances all the other flavors and balances the sweetness. Even in sweet recipes, salt is essential for a well-rounded taste.
Equipment Needed
- Pizzelle Iron (electric or stovetop) – The essential tool for making pizzelle; creates the embossed pattern and cooks the cookies
- Large Mixing Bowl – For combining the batter
- Whisk or Electric Mixer – To beat eggs and incorporate ingredients smoothly
- Measuring Cups and Spoons – For accurate ingredient measurements
- Small Saucepan – To melt the butter
- Spatula – A thin, flat spatula or butter knife works best for removing pizzelle from the iron
- Wire Cooling Rack – Essential for cooling pizzelle so they stay crispy
- Cookie Scoop or Tablespoon – For portioning batter consistently (a small cookie scoop works perfectly)
- Kitchen Towel – To wipe the pizzelle iron between batches if needed
- Airtight Container – For storing finished pizzelle
Print

Italian Pizzelle Recipe
Classic Italian pizzelle are delicate, crispy waffle cookies with beautiful embossed patterns. These light, crunchy treats are traditionally flavored with anise or vanilla and are perfect for holidays, special occasions, or everyday indulgence with coffee or tea.
- Total Time: 40 minutes
- Yield: 36-40 cookies 1x
Ingredients
Scale- 6 large eggs, room temperature
- 1½ cups granulated sugar
- ¾ cup (1½ sticks) unsalted butter, melted and slightly cooled
- 2 teaspoons pure vanilla extract (or 1 tablespoon anise extract for traditional flavor)
- 3½ cups all-purpose flour
- 4 teaspoons baking powder
- ¼ teaspoon salt
Instructions
- Preheat your pizzelle iron according to manufacturer’s instructions. Most electric irons need about 5 minutes to heat properly. If you’re using a stovetop iron, heat it over medium heat.
- Beat the eggs in a large mixing bowl using a whisk or electric mixer until they’re light yellow and slightly frothy, about 2 minutes.
- Add the sugar to the beaten eggs and continue mixing until well combined and slightly thickened, about 1-2 minutes more.
- Pour in the melted butter (make sure it’s cooled slightly so it doesn’t cook the eggs) and vanilla or anise extract. Mix until completely incorporated.
- Combine the dry ingredients in a separate bowl by whisking together the flour, baking powder, and salt.
- Gradually add the dry ingredients to the wet mixture, stirring with a wooden spoon or using the mixer on low speed. Mix just until a smooth, thick batter forms with no lumps. The consistency should be like a thick cake batter.
- Test your iron temperature by dropping a tiny bit of water on it – it should sizzle immediately. If your iron has temperature settings, use medium-high heat.
- Scoop the batter using about 1-1½ tablespoons (or follow your pizzelle iron’s instructions for the amount). Place it in the center of the pizzelle iron.
- Close the iron and press down firmly for 1-2 seconds if using a top-hinged iron. Cook for 30-45 seconds, or until golden brown. The exact time depends on your iron and preferred crispiness level.
- Remove the pizzelle carefully using a thin spatula or butter knife. The cookies will be soft when first removed but will crisp up as they cool.
- Place on a wire cooling rack immediately to cool completely. Don’t stack them while warm or they’ll stick together and lose their crispiness.
- Repeat with remaining batter, wiping the iron with a dry towel between batches if any residue builds up. Most irons don’t need to be re-greased between cookies.
- Cool completely before storing. The pizzelle should be crispy and snap easily when broken.
Notes
- If pizzelle are sticking to your iron, lightly spray with non-stick cooking spray before the first cookie, though most modern irons have non-stick surfaces that don’t require this.
- For perfectly round pizzelle, place the batter slightly forward of center since the batter spreads backward when you close the iron.
- Don’t overfill your iron – it’s better to start with less batter and add more if needed. Overfilled irons create messy edges.
- Pizzelle continue to crisp as they cool, so don’t worry if they seem slightly soft when first removed from the iron.
- For shaped pizzelle (cones or cannoli shells), shape them while still warm and pliable, within 10-15 seconds of removing from the iron.
- The first few cookies often need adjustment as you learn your iron’s timing and temperature. Don’t be discouraged if your first batch isn’t perfect.
- Prep Time: 10 minutes
- Cook Time: 30 minutes
- Category: Dessert, Cookies
- Method: Pizzelle Iron
- Cuisine: Italian
- Diet: Vegetarian
Nutrition
- Serving Size: 2 cookies
- Calories: 145
- Sugar: 12g
- Sodium: 85mg
- Fat: 6g
- Saturated Fat: 3.5g
- Unsaturated Fat: 2g
- Trans Fat: 0g
- Carbohydrates: 20g
- Fiber: 0.5g
- Protein: 3g
- Cholesterol: 65mg
Tips & Variations
Flavor Variations:
- Lemon Pizzelle – Add 1 tablespoon lemon zest and substitute 1 teaspoon lemon extract for half the vanilla
- Almond Pizzelle – Replace vanilla with almond extract for a delicate, nutty flavor
- Chocolate Pizzelle – Add ¼ cup cocoa powder to the dry ingredients and reduce flour by ¼ cup
- Orange Pizzelle – Add 2 tablespoons orange zest and 1 teaspoon orange extract
- Spiced Pizzelle – Add ½ teaspoon cinnamon, ¼ teaspoon nutmeg, and a pinch of cloves for a warm, spiced version
Texture Variations:
- For extra crispy pizzelle, cook them a few seconds longer until they’re a deeper golden brown
- For softer pizzelle, reduce cooking time by 5-10 seconds and store in an airtight container immediately
- For chewy pizzelle, add 2 tablespoons of honey or corn syrup to the batter
Dietary Adaptations:
- Gluten-Free – Use a 1:1 gluten-free all-purpose flour blend (add ½ teaspoon xanthan gum if your blend doesn’t include it)
- Dairy-Free – Replace butter with melted coconut oil or a plant-based butter substitute
- Lower Sugar – Reduce sugar to 1 cup, though they won’t brown as deeply
Creative Serving Ideas:
- Dust with powdered sugar for an elegant presentation
- Dip half of each cookie in melted chocolate and let set
- Sandwich two pizzelle together with Nutella, frosting, or whipped cream
- Crumble over ice cream as a crunchy topping
- Serve alongside Italian dessert wines or coffee drinks
Pro Chef Tips
Temperature Control is Everything – The key to perfect pizzelle is maintaining consistent iron temperature. If your iron has adjustable heat, start at medium-high. If pizzelle are browning too quickly on the outside but still soft inside, reduce the heat. If they’re taking too long and staying pale, increase the temperature. Each iron is different, so expect a learning curve for the first few cookies.
Don’t Skip the Resting – Let your finished batter rest for 5 minutes before starting to cook. This allows the flour to fully hydrate and the baking powder to activate, resulting in better texture. The batter will thicken slightly, which actually helps it spread more evenly in the iron.
Master the Pour – Consistency in batter amount is crucial for uniform cookies. Use the same measuring tool every time—a small cookie scoop or tablespoon works perfectly. Place the batter slightly toward the front of the iron (closer to the hinge), as it will naturally spread backward when you close the lid.
Watch for Steam – When the steam stops escaping from your pizzelle iron, your cookie is usually done. This visual cue is often more reliable than timing, as humidity, batter temperature, and iron variations all affect cooking time.
Embrace the First Pancake Rule – Just like pancakes, your first few pizzelle are test cookies while your iron reaches optimal temperature and you dial in the perfect amount of batter. Don’t get discouraged—even professional bakers expect this. Consider these “chef’s treat” and adjust as needed.
Create Assembly Line Efficiency – Set up a station with your batter, scoop, cooling rack, and a damp towel for wiping the iron. Having everything within reach makes the process smooth and enjoyable rather than stressful. If making large batches, consider having a helper remove cookies while you add new batter—this speeds up production considerably.
Common Mistakes to Avoid
Overmixing the Batter – Once you add the flour, mix just until combined. Overworking develops gluten, which makes pizzelle tough and chewy instead of crisp and delicate. Stir gently until no flour streaks remain, then stop.
Opening the Iron Too Early – Resist the urge to peek! Opening the iron before the pizzelle is set causes it to tear and stick. Wait until steam subsides or follow your timer. If a pizzelle does tear, let the iron reheat fully before trying again.
Stacking Warm Pizzelle – This is the number one mistake that ruins texture. Pizzelle must cool completely on a wire rack in a single layer. Stacking them while warm traps steam, making them soft and chewy instead of crispy. Be patient and give them space.
Using Cold Eggs – Cold eggs don’t emulsify properly with the other ingredients, creating a separated, lumpy batter that produces dense cookies. Always bring eggs to room temperature—set them in warm water for 5 minutes if you forgot to take them out in advance.
Inconsistent Batter Amounts – Using different amounts of batter for each cookie results in uneven thickness, irregular shapes, and varying cooking times. Some will burn while others stay underdone. Measure carefully every time for professional results.
Not Adjusting for Humidity – On humid days, your pizzelle may need 5-10 seconds longer to cook, and they should be stored immediately after cooling to prevent them from absorbing moisture and becoming soft. In dry climates, they’ll crisp faster and stay crispy longer.
Neglecting to Wipe the Iron – While pizzelle don’t usually stick badly, small bits of batter or caramelized sugar can build up over time. Wipe with a dry cloth between batches to prevent residue from burning and affecting flavor.
Storage & Meal Prep
Room Temperature Storage: Once completely cooled, pizzelle should be stored in an airtight container at room temperature. Layer them between sheets of parchment or wax paper to prevent sticking. Properly stored, they’ll stay crispy for 2-3 weeks. If they do soften slightly, you can re-crisp them in a 300°F oven for 3-5 minutes.
Avoiding Moisture: The enemy of crispy pizzelle is humidity. Never store them in the refrigerator, as the moisture will make them soft and chewy. In humid climates, consider adding a food-safe silica packet to your storage container to absorb excess moisture. Always ensure pizzelle are completely cool before storing—any residual warmth creates condensation that leads to sogginess.
Layering Technique: For best results, place a sheet of parchment paper between each layer of pizzelle in your storage container. This prevents them from sticking together and makes it easy to remove just a few at a time without disturbing the entire batch.
Containers Matter: Use rigid containers rather than plastic bags to prevent your delicate pizzelle from breaking. Metal tins work beautifully and also protect from light. Glass jars with tight-sealing lids are another excellent option.
Reviving Soft Pizzelle: If your pizzelle have lost their crispiness, don’t worry—they can be rescued! Spread them in a single layer on a baking sheet and place in a 300°F oven for 3-5 minutes. Let them cool completely on the baking sheet before storing again. They’ll be as crispy as the day you made them.
Make-Ahead & Freezer Notes
Batter Preparation: Pizzelle batter can be made up to 24 hours in advance and stored in the refrigerator in an airtight container. Bring it back to room temperature and give it a good stir before using, as it may thicken slightly. You may need to add a tablespoon or two of milk if it’s become too thick to pour easily.
Freezing Baked Pizzelle: Pizzelle freeze exceptionally well, making them perfect for holiday prep. Once completely cooled, layer them between sheets of parchment paper in a freezer-safe container or freezer bag. They’ll maintain quality for up to 3 months in the freezer. The key is protecting them from freezer burn and preventing breakage.
Thawing Method: Remove pizzelle from the freezer and let them thaw at room temperature in their container for about 30 minutes. Don’t unwrap them until they’ve reached room temperature to prevent condensation from forming on the cookies. If they seem slightly soft after thawing, crisp them in a 300°F oven for 3-5 minutes.
Freezing Unbaked Batter: While you can freeze the batter, it’s generally better to freeze finished pizzelle since they cook so quickly. However, if you choose to freeze batter, store it in an airtight container for up to 2 months. Thaw overnight in the refrigerator and bring to room temperature before using.
Holiday Prep Strategy: Many Italian families make pizzelle 2-3 weeks before Christmas and store them in airtight containers, or make them a month ahead and freeze them. This spreads out the work and actually allows the flavors to mellow and develop. For weddings and large events, pizzelle can be made up to a month in advance if properly stored or frozen.
Shaped Pizzelle Considerations: If you plan to shape your pizzelle into cones or cannoli shells, it’s best to shape them fresh rather than shaping, freezing, and thawing. The shaped versions are more delicate and can crack during freezing. Instead, freeze them flat and shape them after reheating.
Serving Suggestions
Pizzelle are wonderfully versatile and can be served in countless delicious ways. The classic presentation is simply arranged on a decorative platter, perhaps dusted with powdered sugar, alongside espresso or cappuccino for dipping. The crispy texture holds up beautifully when briefly dunked in hot coffee or tea, softening just slightly while releasing their delicate flavor.
For dessert service, pizzelle make an elegant accompaniment to gelato or ice cream. Serve them as crispy cookies on the side, or get creative and shape warm pizzelle into cones to create edible ice cream bowls. They also pair beautifully with panna cotta, tiramisu, or cannoli—creating an all-Italian dessert spread that’s sure to impress.
Perfect Pairings:
- Beverages: Espresso, cappuccino, caffe latte, Italian hot chocolate, dessert wines (Vin Santo, Moscato d’Asti), tea, or even mulled wine during holidays
- Ice Cream & Gelato: Vanilla, chocolate, stracciatella, pistachio, or hazelnut gelato served alongside or sandwiched between two pizzelle
- Sweet Dips: Nutella, chocolate ganache, lemon curd, whipped cream, mascarpone cream, or sweetened ricotta
- Fruit: Fresh strawberries, raspberries, or sliced peaches; compotes or fruit preserves
- Other Italian Desserts: Serve on a cookie platter with biscotti, amaretti, and sfogliatelle for an authentic Italian dessert table
Presentation Ideas:
- Arrange standing upright in a decorative glass or vase for a dramatic centerpiece
- Stack three pizzelle with layers of whipped cream and berries for an elegant layered dessert
- Break into rustic pieces and serve over yogurt parfaits for breakfast
- Package individually in clear cellophane bags tied with ribbon for party favors or gifts
- Create a dessert charcuterie board with pizzelle alongside chocolate, nuts, fruit, and cheese
FAQs Section
Can I make pizzelle without a pizzelle iron? Unfortunately, no. A pizzelle iron is essential for making authentic pizzelle. The specialized iron creates the thin, crispy texture and decorative pattern that defines these cookies. A waffle maker produces too thick a cookie with different texture. However, pizzelle irons are relatively affordable (starting around $25-40) and last for generations, making them a worthwhile investment if you plan to make pizzelle regularly.
Why are my pizzelle sticking to the iron? Sticking usually happens for a few reasons: the iron isn’t hot enough, you’re opening it too early, or there’s residue from previous batches. Make sure your iron is fully preheated before starting. Let each pizzelle cook until steam stops escaping before opening. If sticking persists, very lightly spray the iron with non-stick cooking spray before the first cookie only—most modern non-stick irons don’t require greasing between batches.
Should I use anise or vanilla flavoring? This is purely personal preference! Traditional Italian pizzelle are flavored with anise, which gives a distinctive black licorice taste. However, many American home cooks prefer vanilla for a more universally appealing flavor. You can also use half of each for a balanced flavor profile, or experiment with almond, lemon, or other extracts. There’s no wrong choice—make them the way your family will enjoy them most!
How do I know when my pizzelle are done? Visual cues are your best guide. Pizzelle are done when they’re golden brown (not pale yellow) and steam has stopped escaping from the iron. They should take 30-45 seconds in most irons. The cookies will seem slightly soft when first removed but will crisp up within 30 seconds to a minute as they cool. If they remain soft after cooling completely, they needed a few more seconds in the iron.
Can I make pizzelle in advance for a party or holiday? Absolutely! Pizzelle are an excellent make-ahead cookie. They stay fresh in an airtight container for 2-3 weeks at room temperature, or can be frozen for up to 3 months. Many Italian families make them weeks before holidays. Just make sure they’re completely cool before storing, and layer them with parchment paper to prevent sticking.
Why did my pizzelle turn out thick and cake-like instead of thin and crispy? This usually means you used too much batter per cookie. Start with less—about 1-1½ tablespoons depending on your iron’s size—and adjust from there. Also, make sure you’re closing the iron fully and pressing down if it’s a top-hinged model. Another possibility is your batter is too thick; it should be pourable but thick, similar to cake batter consistency.
Can I shape pizzelle into cones or shells? Yes! This is a traditional way to serve them. You must work quickly while they’re still hot and pliable, within 10-15 seconds of removing from the iron. For cones, wrap the hot pizzelle around a metal cone-shaped form. For cannoli shells, wrap around a cannoli tube or dowel. They’ll hold their shape as they cool and crisp up. Wear heat-resistant gloves or work carefully to avoid burning your fingers.
Conclusion
There’s something truly magical about making pizzelle—the sweet aroma filling your kitchen, the satisfying sizzle as batter hits the hot iron, and the beautiful embossed pattern revealed when you lift the lid. These delicate Italian cookies connect us to generations of bakers who have made them before us, carrying on a tradition that spans centuries. Whether you’re honoring your Italian heritage, starting a new family tradition, or simply treating yourself to something delicious and homemade, pizzelle are sure to bring joy to your kitchen.
The beauty of this recipe is its simplicity. With just a handful of basic ingredients and a pizzelle iron, you can create dozens of impressive, bakery-worthy cookies that look like they came from an Italian pasticceria. They’re perfect for holidays, special occasions, or any time you want to share something special with the people you love. And once you’ve mastered the basic recipe, you can have fun experimenting with different flavors and serving styles.
I’d love to hear how your pizzelle turn out! Leave a comment below sharing your experience, any creative flavor variations you tried, or family traditions you’re carrying on. And if you loved this recipe, please save it to your Pinterest boards so you can find it easily next time—and help other home cooks discover the joy of making pizzelle too. Don’t forget to share photos of your beautiful cookies on social media and tag me so I can see your creations!
Happy baking, and may your pizzelle always be crispy, golden, and absolutely delicious!