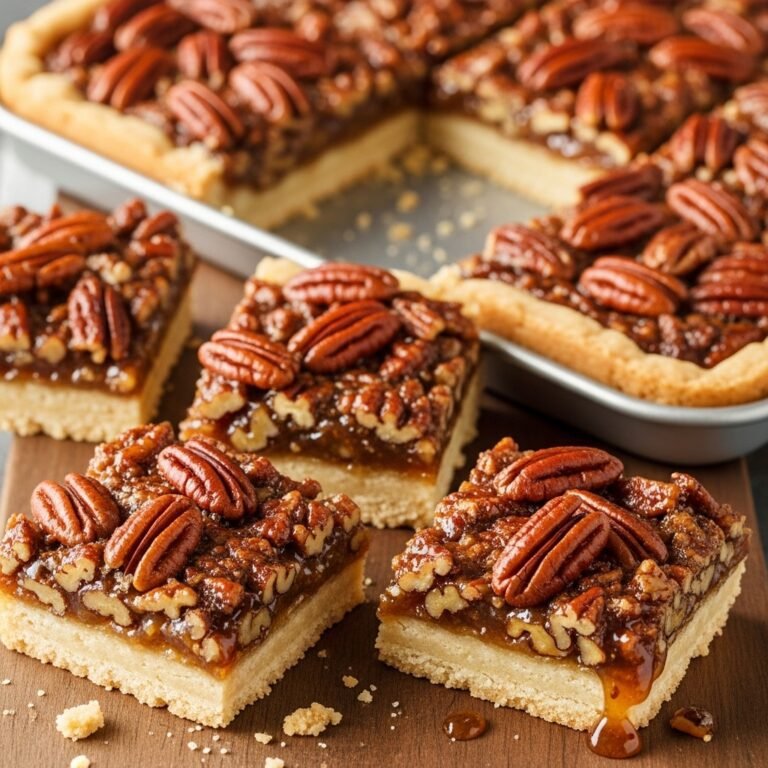
Pecan Pie Bars Recipe: Easy Shortbread Crust with Gooey Pecan Filling
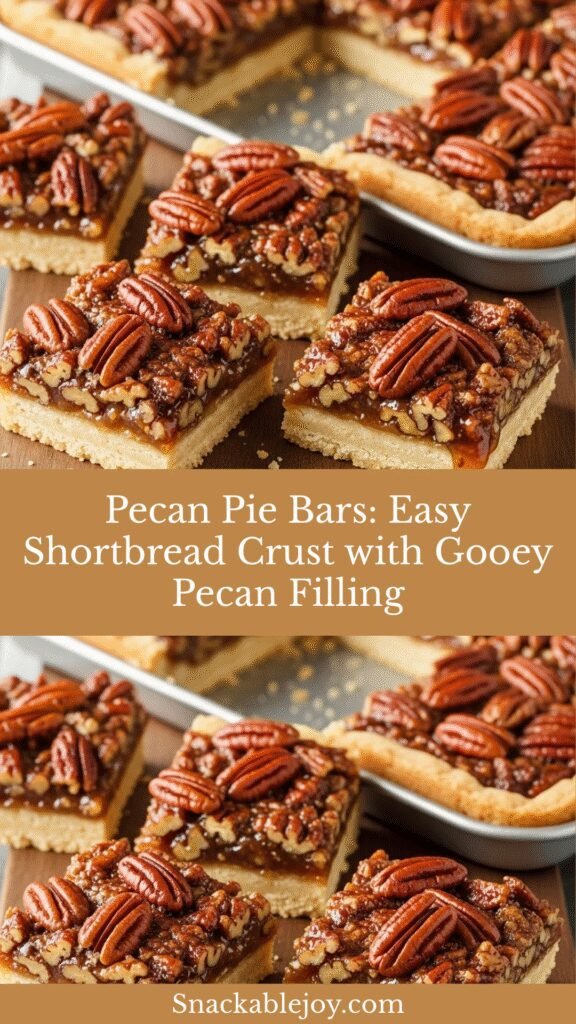
Pecan pie bars are the genius solution for everyone who loves classic pecan pie but wants something easier to make, transport, and serve. These handheld treats feature a buttery shortbread crust topped with a rich, gooey pecan filling that’s loaded with toasted pecans and sweet caramel-like goodness. Think of them as pecan pie’s more practical, party-friendly cousin!
These bars are perfect for any gathering where you need a dessert that feeds a crowd without the fuss of slicing a pie. They’re ideal for Thanksgiving dinner, Christmas cookie exchanges, potlucks, bake sales, or afternoon coffee dates. The best part? No pie crust rolling required, and you get way more servings than a traditional pie. Plus, they’re just as delicious and way easier to eat with your hands—no fork needed!
History / Background
Pecan pie itself has deep roots in Southern American cuisine, with the earliest known recipe appearing in the 1920s after corn syrup became widely available for home use. The Karo syrup company is often credited with popularizing pecan pie through recipe booklets they distributed during the 1930s and 1940s. However, pecans have been a staple in Southern cooking for centuries, long before European settlers arrived.
Native Americans in what is now the Southern United States were harvesting wild pecans for over 8,000 years. The name “pecan” comes from an Algonquin word meaning “a nut requiring a stone to crack.” Early Native American tribes used pecans as a primary food source and even made a fermented pecan milk beverage. When French and Spanish settlers arrived in Louisiana and Texas, they quickly adopted pecans into their baking traditions.
Traditional pecan pie became a Thanksgiving staple across the South, particularly in states like Georgia, Texas, and Louisiana—the heart of pecan country. The bar cookie adaptation is a more modern innovation, likely emerging in the 1970s and 1980s when home bakers began transforming beloved pie recipes into easier-to-serve bar formats. This clever adaptation maintained all the flavors of the classic pie while solving the common problems of soggy crusts and difficult slicing. Today, pecan pie bars are beloved across America, especially during the holiday season, and they’ve become just as traditional as the pie that inspired them.
Why You’ll Love This Recipe
Pecan pie bars deliver all the flavors you crave from traditional pecan pie, but they’re so much easier to pull together and serve. The shortbread crust is simple and foolproof—no chilling dough or blind baking required—and the filling comes together in one saucepan in minutes.
Here’s why this recipe will become your new holiday favorite:
- Much easier than pie – No rolling dough, crimping edges, or worrying about soggy bottoms
- Feeds a crowd – One 9×13 pan makes 24 generous bars, way more than a single pie
- Portable and party-friendly – These travel beautifully and are easy to eat with your hands
- Make-ahead friendly – Bake them up to 3 days in advance; they actually improve with time
- Less expensive – More servings per batch means better value than making multiple pies
- Consistent results – The flat pan ensures even baking every time
- Perfect for gifting – Wrap in cellophane bags with a ribbon for beautiful homemade gifts
- Shortbread crust – That buttery, cookie-like base is arguably better than traditional pie crust
- Kid-friendly baking – Simple enough for young bakers to help with
- Stores well – Keeps at room temperature for days without getting soggy
Ingredient Notes
For the Shortbread Crust:
All-Purpose Flour: Creates the structure for your shortbread base. The key is not to overmix once you add the flour, or your crust will be tough instead of tender and crumbly.
Unsalted Butter: The star of shortbread! Butter should be softened to room temperature so it creams smoothly with the sugar. Don’t use margarine—real butter is essential for that rich, melt-in-your-mouth texture.
Granulated Sugar: Sweetens the crust while helping create that perfect sandy, shortbread texture. Don’t substitute powdered sugar here, as granulated works better for the structure.
Salt: Enhances the butter flavor and balances the sweetness. Even though we’re using unsalted butter, a pinch of salt is crucial.
For the Pecan Filling:
Pecan Halves: The star ingredient! Use fresh, high-quality pecans if possible. Toast them lightly before using to enhance their nutty flavor and add extra crunch. You can also roughly chop some for texture variation.
Light Corn Syrup: This is traditional in pecan pie and creates that signature glossy, gooey consistency. You can substitute with golden syrup or even pure maple syrup for a different flavor profile, though the texture may be slightly less thick.
Brown Sugar: Adds deep caramel notes and molasses undertones that complement the pecans beautifully. Dark brown sugar will give you a more intense flavor, while light brown sugar is more subtle.
Unsalted Butter: Adds richness to the filling and helps it set properly as it cools. Melted butter incorporates seamlessly into the syrup mixture.
Eggs: These bind the filling together and help it set into that perfect sliceable consistency. Room temperature eggs mix more evenly into the filling.
Vanilla Extract: A must for bringing warmth and depth to the filling. Pure vanilla is worth it here—the flavor really shines through.
Salt: Just a pinch balances all the sweetness and makes the pecan flavor pop.
Equipment Needed
- 9×13-inch metal baking pan
- Parchment paper or aluminum foil (for easy removal)
- Large mixing bowl
- Electric hand mixer or stand mixer
- Medium saucepan
- Whisk
- Rubber spatula
- Measuring cups and spoons
- Cooling rack
- Sharp knife for cutting
- Small bowl for egg mixture
Print

Pecan Pie Bars
Classic pecan pie bars with a buttery shortbread crust and rich, gooey pecan filling. Easier than pie with all the same delicious flavors—perfect for holidays and potlucks!
- Total Time: 1 hour 5 minutes (plus cooling)
- Yield: 24 bars 1x
Ingredients
ScaleFor the Shortbread Crust:
- 2 cups all-purpose flour
- 1/2 cup granulated sugar
- 3/4 teaspoon salt
- 3/4 cup (1½ sticks) unsalted butter, softened
For the Pecan Filling:
- 3 cups pecan halves (about 12 oz)
- 3 large eggs, room temperature
- 1 cup light corn syrup
- 1 cup packed light brown sugar
- 6 tablespoons unsalted butter, melted
- 1 tablespoon vanilla extract
- 1/2 teaspoon salt
Instructions
- Preheat and prep: Preheat your oven to 350°F (175°C). Line a 9×13-inch baking pan with parchment paper, leaving a 2-inch overhang on two opposite sides for easy removal. This creates handles for lifting out the bars.
- Make the crust: In a large bowl, combine the flour, granulated sugar, and salt. Add the softened butter and mix with an electric mixer on medium-low speed (or use your hands) until the mixture resembles coarse crumbs and starts to clump together, about 2-3 minutes.
- Press crust into pan: Transfer the crust mixture to your prepared pan. Using your hands or the bottom of a measuring cup, press the mixture firmly and evenly into the bottom of the pan, making sure to get into the corners. The crust should be compact and level.
- Pre-bake the crust: Bake the crust for 18-20 minutes, until it’s lightly golden around the edges and set in the center. It should look dry and slightly puffed. Remove from the oven and set aside while you prepare the filling.
- Toast the pecans (optional but recommended): While the crust is baking, spread pecans on a separate baking sheet and toast in the oven for 5-7 minutes until fragrant. This enhances their flavor significantly.
- Prepare the filling: In a medium bowl, whisk together the eggs until well beaten. Add the corn syrup, brown sugar, melted butter, vanilla extract, and salt. Whisk until smooth and the sugar is dissolved, about 1 minute.
- Assemble: Arrange the toasted pecans evenly over the warm pre-baked crust. Pour the filling mixture over the pecans, making sure they’re evenly covered. Use a spatula to gently spread if needed, ensuring the filling reaches all corners.
- Bake: Return the pan to the oven and bake for 25-30 minutes. The filling should be set around the edges but still have a slight jiggle in the center (it will firm up as it cools). Don’t overbake, or the filling will become hard instead of gooey.
- Cool completely: Remove from the oven and place the pan on a wire rack. Let the bars cool completely in the pan, about 2-3 hours. This is crucial—cutting them while warm will result in a messy, oozing disaster!
- Cut and serve: Once completely cooled, use the parchment overhang to lift the entire slab out of the pan onto a cutting board. Use a large, sharp knife to cut into 24 bars (6 rows by 4 rows). Wipe the knife clean between cuts for neat edges.
Notes
- For cleaner cuts, refrigerate the bars for 30 minutes before slicing, then bring to room temperature before serving.
- Don’t skip the parchment paper overhang—it makes removal from the pan effortless!
- The filling will seem underdone when you remove it from the oven, but it sets as it cools. Trust the process!
- Store in an airtight container at room temperature for up to 5 days.
- These bars actually taste better the next day after the flavors have melded together.
- If you prefer darker, more caramelized pecans, add an extra 5 minutes to the baking time.
- Prep Time: 20 minutes
- Cook Time: 45 minutes
- Category: Desert
- Method: Baking
- Cuisine: American
- Diet: Vegetarian
Nutrition
- Serving Size: 1 bar (1/24 of recipe)
- Calories: 285
- Sugar: 24g
- Sodium: 145mg
- Fat: 17g
- Saturated Fat: 6g
- Unsaturated Fat: 10g
- Trans Fat: 0g
- Carbohydrates: 32g
- Fiber: 6g
- Protein: 3g
- Cholesterol: 45mg
Tips & Variations
Chocolate pecan pie bars: Add 1 cup of semi-sweet chocolate chips to the filling before pouring over the crust, or drizzle melted chocolate over the cooled bars.
Bourbon pecan bars: Replace 2 tablespoons of the corn syrup with bourbon for a sophisticated adult twist. The alcohol cooks off, leaving just the flavor.
Maple pecan bars: Substitute half of the corn syrup with pure maple syrup for a deeper, more complex flavor with less artificial sweetness.
Salted caramel version: Sprinkle flaky sea salt over the filling before baking, or drizzle with salted caramel sauce after cooling.
Mixed nuts: Replace half the pecans with walnuts, cashews, or a combination for a different nutty profile.
Gluten-free option: Use a 1:1 gluten-free flour blend in place of all-purpose flour. Bob’s Red Mill works great!
Reduce sweetness: Cut the brown sugar down to 3/4 cup if you prefer less sweet desserts. The bars will still be delicious, just less candy-like.
Add spices: Mix 1/2 teaspoon cinnamon and 1/4 teaspoon nutmeg into the filling for a spiced version perfect for fall.
Mini bars: Use a 9×9-inch pan and reduce all ingredients by half for 16 smaller bars. Adjust baking times slightly (15 minutes for crust, 20-25 for filling).
Pro Chef Tips
Room temperature matters: Softened butter (not melted!) is key for the perfect shortbread crust. It should leave a slight indent when pressed but not be greasy. If your butter is too cold, the crust will be tough; too warm, and it’ll be greasy.
Don’t overmix the crust: Once the mixture comes together and resembles coarse sand, stop mixing. Overworking shortbread develops gluten, making it tough instead of tender and crumbly.
Press the crust firmly: Use real pressure when pressing the crust into the pan. A firmly packed crust holds together better and creates a solid base that won’t crumble when you cut the bars.
Pre-bake is essential: The crust MUST be pre-baked until golden. This creates a barrier that prevents the filling from making it soggy. A pale, underbaked crust will never set properly.
Beat those eggs well: Thoroughly whisking the eggs before adding other filling ingredients ensures a smooth, lump-free filling and helps everything emulsify properly.
Work with a warm crust: Pour the filling over the crust while it’s still warm from pre-baking. The heat helps the filling spread evenly and adhere to the crust better.
The jiggle test: The filling should look set around the edges with just a slight jiggle in the center when you remove it from the oven. It continues to set as it cools, so slightly underdone is better than overbaked and hard.
Patience with cooling: This is the hardest part, but non-negotiable. Warm bars will fall apart. Let them cool completely (2-3 hours) or chill in the fridge for faster setting.
Clean knife cuts: For bakery-perfect bars, dip your knife in hot water and wipe it dry between each cut. This melts through the sticky filling for smooth, clean edges.
Common Mistakes to Avoid
Cutting the bars too soon: This is the #1 mistake! Even if the bars look set, they need at least 2 hours to cool and firm up. Cutting them warm results in oozing filling and crumbled edges. Be patient—it’s worth the wait.
Using cold butter in the crust: Cold butter won’t incorporate properly and will leave you with a tough, uneven crust. Let your butter sit at room temperature for 30-45 minutes until it’s soft enough to leave an indent when pressed.
Overbaking the filling: The filling should still have a slight wobble in the center when you take it out. Overbaking makes the filling hard and candy-like instead of that perfect gooey texture. Remember, it sets as it cools!
Skipping the parchment paper: Without a parchment sling, you’ll struggle to remove bars from the pan cleanly, and you’ll likely lose the bottom layer. Always line your pan with overhang for easy removal.
Not toasting the pecans: While optional, skipping this step means missing out on maximum pecan flavor. Just 5-7 minutes of toasting brings out the natural oils and adds incredible depth and crunch.
Using a glass baking dish: Metal pans conduct heat better and more evenly than glass. Glass can cause uneven baking and makes it harder to achieve that perfect texture. Stick with metal if possible.
Storage & Meal Prep
Room temperature storage: Store completely cooled pecan pie bars in an airtight container at room temperature for up to 5 days. Place parchment paper between layers if stacking to prevent sticking.
Refrigerator storage: While not necessary, you can refrigerate these bars for up to 2 weeks in an airtight container. The texture becomes slightly firmer when chilled, which some people prefer for cleaner cutting.
Bringing to room temperature: If you’ve refrigerated the bars, let them sit at room temperature for 20-30 minutes before serving. This allows the filling to soften to its ideal gooey texture.
Packaging for transport: These bars are excellent travelers! Wrap individual bars in plastic wrap or place in small cellophane bags tied with ribbon for gift-giving. They won’t leak or get messy in transport.
Maintaining freshness: To keep bars from drying out, add a piece of bread to your storage container (just like with cookies). The bars will pull moisture from the bread, staying soft and chewy.
Serving warm: If you prefer warm bars, microwave individual servings for 10-15 seconds. Don’t overdo it—you want them warm, not hot.
Make-Ahead & Freezer Notes
Bake ahead: These bars are actually better the next day! The flavors meld together beautifully, and the texture improves. Bake up to 3 days in advance, let cool completely, then store covered at room temperature.
Prepare components separately: You can make and bake the crust up to 2 days ahead. Store at room temperature wrapped tightly in plastic wrap, then add the filling and bake when ready.
Freezer friendly: Pecan pie bars freeze exceptionally well for up to 3 months! For best results, freeze the whole uncut slab. Wrap tightly in plastic wrap, then in aluminum foil. Label with the date.
Freezing individual bars: You can also cut into bars, wrap each one individually in plastic wrap, then place in a freezer bag. This makes it easy to thaw just what you need for portion control or unexpected guests.
Thawing instructions: For the whole slab, thaw overnight in the refrigerator still wrapped, then bring to room temperature before cutting. Individual bars can thaw at room temperature in 30-45 minutes, or microwave from frozen for 20-30 seconds.
Flash freezing: If freezing cut bars, place them on a baking sheet and freeze uncovered for 30 minutes until firm, then wrap individually. This prevents the bars from sticking together.
Holiday prep strategy: Make and freeze these bars 2-3 weeks before Thanksgiving or Christmas. On the day of your gathering, thaw and serve—one less thing to worry about!
Best reheating method: Thawed bars are delicious at room temperature, but if you want that fresh-baked experience, warm them in a 300°F oven for 5-8 minutes or microwave individual bars for 10-15 seconds.
Serving Suggestions
Pecan pie bars are delicious on their own, but here are some creative ways to take them to the next level:
Classic style: Serve at room temperature with a dusting of powdered sugar for an elegant presentation that doesn’t overpower the pecan flavor.
With whipped cream: Top with a dollop of freshly whipped cream or a swirl of Cool Whip for a lighter contrast to the rich, sweet filling.
Ice cream pairing: Serve slightly warm with a scoop of vanilla ice cream melting over the top—it’s like pecan pie à la mode in bar form!
Coffee companion: These bars are phenomenal with a hot cup of coffee or espresso. The bitter notes of coffee perfectly balance the sweet pecan filling.
Dessert platter: Arrange on a platter with other fall desserts like pumpkin squares, apple crisp bites, and chocolate chip cookies for a beautiful dessert spread.
Holiday presentation: Stack bars on a tiered serving stand, garnish with fresh rosemary sprigs and sugared cranberries for a festive Thanksgiving or Christmas dessert display.
Caramel drizzle: Warm store-bought caramel sauce and drizzle over the bars just before serving for extra indulgence.
With sharp cheddar: In the South, it’s traditional to serve pecan pie with sharp cheddar cheese. Try a small cube of aged white cheddar alongside your bar for a surprisingly delicious sweet-savory combination!
FAQs Section
Q: Can I use maple syrup instead of corn syrup?
A: Yes! You can replace the corn syrup with pure maple syrup for a more natural sweetness and deeper flavor. Keep in mind that maple syrup creates a slightly less thick, more pourable filling, but it’s absolutely delicious. The bars may be a bit softer when cut.Q: Why is my crust soggy?
A: This usually happens when the crust isn’t pre-baked long enough. The crust should be lightly golden and fully set before adding the filling. Make sure to bake it for the full 18-20 minutes. Also, don’t pour the filling over a completely cooled crust—slightly warm is ideal.Q: Can I use pecan pieces instead of halves?
A: Absolutely! Pecan pieces or chopped pecans work perfectly and are often more budget-friendly. You’ll get more even distribution throughout the bars, though halves create a prettier top. You can also use a combination of both.Q: How do I know when the filling is done?
A: The edges should look set and slightly puffed, while the center should have just a slight jiggle (about the size of a quarter) when you gently shake the pan. The filling will seem underdone, but it sets as it cools. If it’s completely firm when hot, it’ll be too hard when cooled.Q: Can I make these bars in a different pan size?
A: Yes, but you’ll need to adjust quantities and baking times. For an 8×8-inch pan, halve the recipe; for a 9×9-inch pan, use 2/3 of the recipe. For thinner bars in a larger pan, keep the recipe as is. Adjust baking times by checking for doneness early.Q: Do I have to toast the pecans first?
A: It’s not required, but highly recommended! Toasting brings out the natural oils and intensifies the nutty flavor dramatically. It only takes 5-7 minutes and makes a noticeable difference in the final taste. Don’t skip it if you have the time!Q: Why did my filling crystallize or turn grainy?
A: This can happen if the filling mixture gets too hot before baking or if it’s overcooked. Make sure to let the melted butter cool slightly before whisking it into the egg mixture, and remove the bars from the oven when they still have that slight jiggle in the center.Q: Can I add chocolate to these bars?
A: Definitely! Sprinkle 1 cup of chocolate chips over the crust before adding the pecans, or drizzle melted chocolate over the cooled bars. Dark chocolate pairs especially well with the caramel-like filling.Conclusion
Pecan pie bars are the ultimate crowd-pleasing dessert that delivers all the flavors of traditional pecan pie with half the effort. Whether you’re preparing for a holiday feast, contributing to a potluck, or just craving something sweet and nutty, these bars are your answer. That buttery shortbread crust combined with the gooey, caramel-like filling studded with toasted pecans is simply irresistible.
The best part about this recipe is how forgiving it is—even beginner bakers can achieve beautiful, delicious results. Plus, they make your kitchen smell absolutely amazing while they’re baking!
I hope you love these pecan pie bars as much as my family does! They’ve become our go-to dessert for Thanksgiving, and I always make a double batch because they disappear so fast. If you try this recipe, I’d love to see how yours turn out! Snap a photo and share it on Pinterest—tag me so I can admire your beautiful bars.
Don’t forget to leave a comment below and let me know what you think. Did you add any fun variations? Serve them warm or cold? Your feedback helps me create more recipes you’ll love, and it helps other home bakers too!
Now go grab those pecans and get baking—your kitchen is about to smell like pure autumn happiness! 🥧🍂