Decadent Irish Cream Cheesecake Recipe – Baileys-Infused Perfection
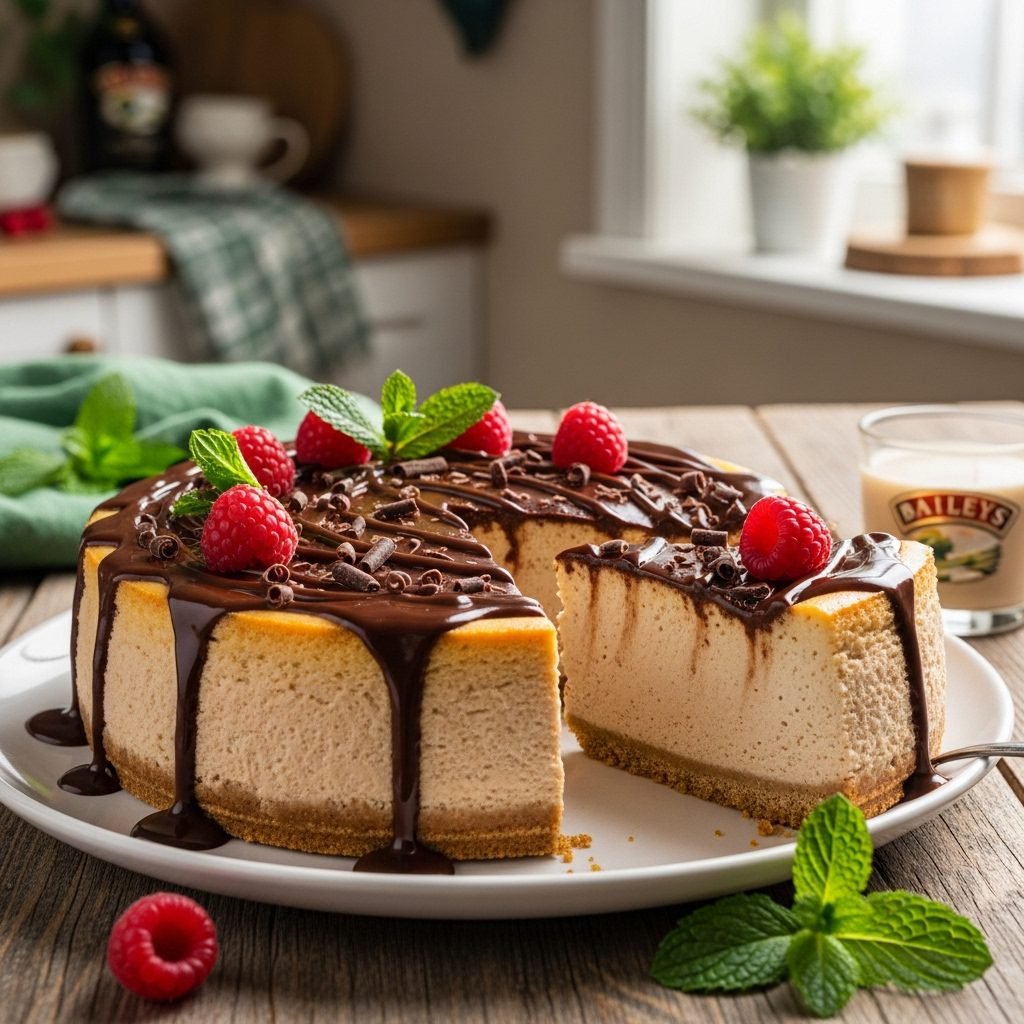
If you’re looking for a dessert that combines creamy indulgence with a touch of grown-up sophistication, this Irish Cream Cheesecake is about to become your new favorite showstopper. Imagine the silky, rich texture of classic New York cheesecake elevated with the smooth, velvety flavor of Irish cream liqueur, all nestled on a chocolate cookie crust and topped with whipped cream and chocolate shavings. It’s pure decadence in every single bite.
This Irish Cream Cheesecake is the perfect choice for St. Patrick’s Day celebrations, holiday gatherings, dinner parties, or any time you want to serve something truly memorable. The subtle notes of cream, chocolate, and whiskey from the Irish cream liqueur create a sophisticated flavor profile that feels special without being overly boozy. Adults absolutely love this dessert because it tastes luxurious and refined, while the familiar cheesecake format keeps it approachable and crowd-pleasing. Best of all, while it looks and tastes like something from a fancy restaurant, it’s surprisingly manageable to make at home with ingredients you can find at any grocery store.
History / Background
Irish cream liqueur, most famously represented by Baileys Irish Cream, was invented in 1974 by a team working for the Irish distiller Gilbeys. The creation was almost accidental—the team was tasked with developing a product that could capitalize on Ireland’s two most famous exports: whiskey and dairy cream. What they created was revolutionary: a smooth, creamy liqueur that blended Irish whiskey with fresh cream, cocoa, and vanilla. It became an instant international sensation and remains one of the world’s best-selling liqueurs.
The marriage of Irish cream with cheesecake came about as creative pastry chefs and home bakers began experimenting with incorporating this beloved liqueur into desserts during the 1980s and 1990s. Cheesecake, with its rich cream cheese base, was the perfect canvas for the flavors of Irish cream—the tang of the cream cheese balanced beautifully with the sweet, slightly boozy liqueur, while the chocolate notes complemented traditional cheesecake additions.
While Irish cream liqueur is enjoyed year-round, Irish Cream Cheesecake has become particularly associated with St. Patrick’s Day celebrations in the United States. It offers a more elegant alternative to green-dyed desserts while still honoring Irish culinary traditions. The dessert represents a beautiful fusion of Irish ingredients with American cheesecake culture, creating something that’s both festive and sophisticated.
Today, Irish Cream Cheesecake has earned its place as a Pinterest favorite and special occasion dessert. Food bloggers and home bakers love it because it photographs beautifully, tastes incredible, and offers that perfect balance of familiar comfort and special-occasion luxury. It’s proof that sometimes the best recipes come from taking two beloved things—cheesecake and Irish cream—and bringing them together in perfect harmony.
Why You’ll Love This Recipe
This Irish Cream Cheesecake isn’t just another dessert recipe—it’s the kind of show-stopping creation that will have your guests raving and asking for the recipe before they’ve even finished their first slice. The luxurious combination of creamy cheesecake infused with Irish cream liqueur creates an unforgettable flavor experience that’s both comforting and sophisticated.
Here’s why this recipe deserves a place in your dessert repertoire:
- Restaurant-quality results at home – This tastes like something from an upscale bakery but uses straightforward techniques any confident home baker can master
- Perfect for adults – The Irish cream adds sophisticated flavor without being overwhelmingly boozy, making it ideal for grown-up celebrations
- Make-ahead friendly – Cheesecake actually needs to chill overnight, so you can prepare it a day or two before your event and have one less thing to worry about
- Impressive presentation – The chocolate cookie crust, creamy filling, and elegant toppings create a stunning visual that photographs beautifully
- Versatile for occasions – Perfect for St. Patrick’s Day, Christmas, New Year’s Eve, birthdays, or any time you want to serve something special
- No-bake option available – While this recipe includes baking, you can adapt it to a no-bake version if preferred
- Crowd-pleaser – Even people who aren’t huge cheesecake fans often love this version because the Irish cream adds such incredible depth
- Customizable toppings – Dress it up with chocolate ganache, caramel sauce, whipped cream, or keep it simple—it’s delicious any way
Ingredient Notes
Understanding your ingredients is the foundation of cheesecake success. Here’s everything you need to know about each component:
Cream Cheese: Use full-fat, brick-style cream cheese (not the spreadable tub variety). Philadelphia brand is reliable and consistent. The absolute most important thing is that it’s completely softened to room temperature—leave it out for at least an hour. Cold cream cheese will create lumps no matter how long you mix.
Irish Cream Liqueur: Baileys Original Irish Cream is the most popular choice and what we recommend, but other Irish cream brands work beautifully too. The liqueur provides that signature cream, chocolate, and whiskey flavor that defines this cheesecake. For an alcohol-free version, use Irish cream-flavored coffee creamer, though the flavor won’t be quite as complex.
Chocolate Cookies: Oreos (with the filling) or chocolate graham crackers make an excellent crust. The chocolate complements the Irish cream perfectly. You’ll need about 24 Oreo cookies or 10-12 chocolate graham cracker sheets.
Sour Cream: This adds tanginess and helps create that ultra-creamy texture. Full-fat sour cream is essential—low-fat versions contain more water and can make the cheesecake watery.
Granulated Sugar: Sweetens the filling and helps create the proper texture. Don’t reduce it significantly—sugar plays a structural role in cheesecake, not just a flavor one.
Eggs: Use large eggs at room temperature. They incorporate more easily into room-temperature cream cheese and create a smoother filling. Take them out of the fridge 30 minutes before baking, or place in warm water for 5 minutes.
Heavy Cream: A small amount in the filling makes it extra luxurious and smooth. Use the real stuff—half-and-half won’t give you the same richness.
Vanilla Extract: Pure vanilla extract rounds out all the flavors. Even though Irish cream is the star, vanilla is essential to prevent flatness.
Butter: Unsalted butter for the crust gives you control over the salt content. It should be melted and slightly cooled before mixing with the cookie crumbs.
Cocoa Powder: Unsweetened cocoa powder for dusting or garnishing. Dutch-process gives a darker, more sophisticated look, but natural cocoa works fine too.
Chocolate for Garnish: Semi-sweet or dark chocolate for shavings or curls adds visual appeal and reinforces the chocolate notes in the Irish cream.
Equipment Needed
Having the right tools makes this recipe so much easier and ensures better results:
- 9-inch springform pan – Absolutely essential for cheesecakes since the removable sides let you unmold without destroying your creation
- Food processor or plastic bag with rolling pin – For crushing cookies into fine, even crumbs
- Large roasting pan – To create the water bath that prevents cracks and ensures even baking
- Heavy-duty aluminum foil – For wrapping the springform pan to keep water from seeping in during the water bath
- Electric mixer (stand or hand) – Makes beating the cream cheese smooth and lump-free effortless
- Large mixing bowls – For preparing the filling and other components
- Rubber spatula – For scraping down bowl sides and smoothing the top of the cheesecake
- Measuring cups and spoons – Accurate measurements are crucial for cheesecake success
- Fine-mesh sieve – For dusting cocoa powder evenly over the finished cheesecake
- Vegetable peeler or sharp knife – For creating chocolate shavings or curls for garnish
- Wire cooling rack – Allows air circulation for even cooling
Print

Irish Cream Cheesecake Recipe
This luscious Irish Cream Cheesecake features a chocolate cookie crust, ultra-creamy Baileys-infused filling, and elegant chocolate garnishes. It’s the perfect sophisticated dessert for St. Patrick’s Day, holidays, or any special occasion where you want to impress with restaurant-quality flavor.
- Total Time: 9 hours 30 minutes
- Yield: 12 servings 1x
Ingredients
ScaleFor the Chocolate Cookie Crust:
- 24 Oreo cookies (with filling) or 2 cups chocolate graham cracker crumbs
- 5 tablespoons unsalted butter, melted
- 2 tablespoons granulated sugar
- Pinch of salt
For the Irish Cream Cheesecake Filling:
- 32 ounces cream cheese, softened to room temperature (four 8-ounce packages)
- 1 cup granulated sugar
- 3 tablespoons all-purpose flour
- 4 large eggs, at room temperature
- 2/3 cup Irish cream liqueur (Baileys)
- 1/2 cup sour cream, at room temperature
- 1/4 cup heavy cream
- 2 teaspoons vanilla extract
For Topping and Garnish:
- 1 cup heavy whipping cream, cold
- 3 tablespoons powdered sugar
- 2 tablespoons Irish cream liqueur
- Chocolate shavings or curls
- Unsweetened cocoa powder for dusting
- Mini chocolate chips (optional)
Instructions
Step 1: Prepare Your Springform Pan
Preheat your oven to 325°F (165°C). Wrap the outside of a 9-inch springform pan with two layers of heavy-duty aluminum foil, extending it up the sides. This creates a waterproof barrier for the water bath. Grease the inside of the pan with butter or cooking spray, paying special attention to the sides.Step 2: Make the Chocolate Cookie Crust
In a food processor, pulse the Oreo cookies (including the cream filling) until they form fine crumbs. If using chocolate graham crackers, crush them the same way. Transfer to a bowl and mix with melted butter, sugar, and a pinch of salt until the mixture resembles wet sand and holds together when pressed. Press firmly and evenly into the bottom of the prepared springform pan, creating a compact layer. Use the bottom of a measuring cup or glass to pack it down firmly. Bake the crust for 10 minutes, then remove and let cool while you prepare the filling. This pre-baking helps it stay crispy.Step 3: Prepare the Cheesecake Filling
In a large mixing bowl, beat the softened cream cheese with an electric mixer on medium speed for about 3-4 minutes until completely smooth, fluffy, and lump-free. Stop and scrape down the sides of the bowl several times. Add the sugar and flour, then beat for another 2 minutes until well incorporated and creamy.Step 4: Add Eggs and Liquid Ingredients
Reduce mixer speed to low. Add eggs one at a time, mixing just until each egg is incorporated before adding the next. Don’t overmix once eggs are added—this can create too much air and cause cracks. Add the Irish cream liqueur, sour cream, heavy cream, and vanilla extract. Mix on low speed just until combined and smooth, about 30 seconds. Scrape down the sides and give it a final gentle stir with a rubber spatula to ensure everything is evenly mixed.Step 5: Pour and Prepare for Water Bath
Pour the cheesecake filling over the cooled crust, smoothing the top with a spatula. Gently tap the pan on the counter a few times to release any air bubbles. Place the springform pan inside a large roasting pan. Create a water bath by carefully pouring hot water into the roasting pan until it reaches about halfway up the sides of the springform pan. The water bath ensures gentle, even cooking and helps prevent cracks.Step 6: Bake the Cheesecake
Carefully transfer the roasting pan with the water bath to the oven. Bake for 55-65 minutes. The cheesecake is done when the edges are set and slightly puffed, but the center still has a slight jiggle when you gently shake the pan—about a 2-3 inch circle in the middle should wobble like Jell-O. The surface may look slightly underdone, but it will firm up as it cools. Do not overbake or the texture will become grainy and dry.Step 7: Cool Gradually to Prevent Cracks
Turn off the oven and crack the oven door open about 2 inches. Let the cheesecake cool in the oven for 1 hour—this gradual temperature change is crucial for preventing cracks. After an hour, remove from the oven and the water bath. Carefully remove the aluminum foil. Run a thin knife around the edges of the cheesecake to loosen it from the pan (this prevents it from cracking as it contracts while cooling). Let cool to room temperature on a wire rack, about 2 hours. Once at room temperature, cover with plastic wrap and refrigerate for at least 8 hours or overnight.Step 8: Make the Irish Cream Whipped Cream Topping
When ready to serve, make the topping. In a chilled bowl with chilled beaters, whip the cold heavy cream on medium-high speed until soft peaks form. Add powdered sugar and Irish cream liqueur, then continue whipping to stiff peaks. Be careful not to overwhip or it will become grainy.Step 9: Release and Decorate
Remove the cheesecake from the refrigerator. Run a knife around the edges one more time, then carefully release and remove the springform pan sides. Use an offset spatula to smooth any imperfections on the sides if needed. Spread or pipe the Irish cream whipped cream on top of the chilled cheesecake. Using a vegetable peeler, create chocolate curls from a chocolate bar and arrange on top. Dust lightly with cocoa powder using a fine-mesh sieve. Add mini chocolate chips if desired.Step 10: Serve and Enjoy
For the cleanest slices, use a sharp knife dipped in hot water and wiped clean between each cut. Serve chilled and savor every creamy, Irish cream-infused bite!Notes
- All dairy ingredients MUST be at room temperature for smooth, lump-free filling
- The cheesecake must chill overnight for best texture and easier slicing
- For alcohol-free version, substitute Irish cream with Irish cream-flavored coffee creamer
- The water bath is essential—don’t skip it or you’ll likely get cracks and uneven texture
- Store covered in refrigerator for up to 5 days
- The center should jiggle slightly when done—it firms up during cooling
- Prep Time: 30 minutes
- Cook Time: 1 hour
- Category: Desert
- Method: Baking
- Cuisine: Irish-American Fusion
- Diet: Vegetarian
Nutrition
- Serving Size: 1 slice (1/12 of cheesecake)
- Calories: 515
- Sugar: 32g
- Sodium: 310mg
- Fat: 38g
- Saturated Fat: 28g
- Unsaturated Fat: 13g
- Trans Fat: 0g
- Carbohydrates: 35g
- Fiber: 1g
- Protein: 18g
- Cholesterol: 165mg
Tips & Variations
Chocolate Ganache Topping: Skip the whipped cream and pour a rich chocolate ganache over the chilled cheesecake instead. Melt 8 ounces of chopped semi-sweet chocolate with 1/2 cup heavy cream, cool slightly, and pour over the cheesecake, letting it drip down the sides for a dramatic effect.
Salted Caramel Irish Cream: Drizzle salted caramel sauce over each slice before serving. The sweet-salty combination with the Irish cream is absolutely divine.
Mint Irish Cream Version: Add 1/2 teaspoon peppermint extract along with the Irish cream for a mint chocolate variation that’s perfect for the holidays.
No-Bake Option: For a no-bake version, use a no-bake cheesecake base with gelatin to set the filling. Skip the baking step and chill for at least 6 hours until firm.
Individual Mini Cheesecakes: Make these in a muffin tin lined with cupcake papers for personal-sized servings. Reduce baking time to 20-25 minutes.
Coffee Enhancement: Add 2 tablespoons of instant espresso powder to the filling for a mocha-Irish cream flavor combination that coffee lovers will adore.
Oreo Chunk Addition: Fold in 1 cup of chopped Oreo cookies into the filling before baking for extra texture and chocolate throughout.
White Chocolate Irish Cream: Fold 6 ounces of melted and cooled white chocolate into the cream cheese mixture for an even more decadent version.
Pro Chef Tips
Room Temperature is Non-Negotiable: This cannot be emphasized enough—room temperature cream cheese, eggs, and sour cream are absolutely essential for smooth, lump-free cheesecake. Cold ingredients will not blend properly no matter how long you mix them. Plan ahead and leave everything out for at least an hour, or up to two hours in a cool kitchen.
Mix on Low Speed After Adding Eggs: Once eggs go into the batter, always mix on the lowest speed and only until just combined. Overmixing incorporates too much air, which expands during baking and then collapses, causing cracks and a dense, heavy texture.
The Jiggle Test is Your Friend: Your cheesecake is perfectly done when the outer 3-4 inches are set but the center still jiggles like Jell-O when you gently shake the pan. It will look slightly underdone—that’s exactly right. The residual heat continues cooking it, and it will firm up completely as it chills. If the entire surface is firm when you take it out, you’ve overbaked it.
Don’t Skip the Gradual Cooling: Sudden temperature changes are the number one cause of cracked cheesecakes. The hour of cooling in the turned-off oven with the door cracked allows the cheesecake to adjust gradually, preventing those stress cracks from forming.
Use Quality Irish Cream: Since it’s a featured flavor, use good quality Irish cream liqueur. Baileys Original is the gold standard, but other premium brands work wonderfully. Cheap knock-offs often have artificial flavors that won’t taste as good in the finished cheesecake.
Prevent Soggy Crust: Pre-baking the crust for 10 minutes before adding the filling helps it stay crisp and prevents it from becoming soggy from the moisture in the filling.
Hot Water Bath Technique: Pour the hot water for the bath AFTER you’ve placed the roasting pan in the oven. This prevents spills and makes it much easier and safer than trying to carry a heavy pan full of water.
Common Mistakes to Avoid
Using Cold Ingredients: This is the most common mistake and the one that causes the most problems. Cold cream cheese will never fully incorporate, leaving you with lumps no matter how long you beat it. Cold eggs don’t blend smoothly either. Always, always bring everything to room temperature first—it’s worth the wait.
Overmixing After Adding Eggs: Once eggs are in the batter, mix as little as possible. Every second of mixing incorporates more air, and too much air causes the cheesecake to puff up dramatically in the oven and then collapse and crack as it cools. Mix on low speed just until you can’t see any egg streaks.
Skipping the Water Bath: Some people think they can skip this step to save time, but the water bath is crucial. It creates a humid environment that prevents the cheesecake from drying out and cracking, and it ensures even, gentle heat distribution. Without it, your cheesecake will likely have a dry, cracked top and uneven texture.
Overbaking: Cheesecake continues to cook and firm up from residual heat even after it’s out of the oven. If the entire surface is firm when you remove it, you’ve gone too far and the texture will be grainy and dry. Remove it when the center still has a good wobble—trust the process.
Cutting While Warm or Not Chilled Enough: Trying to slice a warm or insufficiently chilled cheesecake results in a messy disaster. The filling needs that full overnight chill to set properly and become firm enough to slice cleanly. Be patient—good things come to those who wait!
Storage & Meal Prep
Refrigerator Storage: Keep your Irish Cream Cheesecake covered tightly with plastic wrap or aluminum foil in the refrigerator. It will stay fresh and delicious for up to 5 days. The flavors actually deepen and improve after the first day or two as the Irish cream permeates throughout the cheesecake.
Covering Without Ruining Toppings: If you’ve already added the whipped cream and chocolate garnishes, tent the plastic wrap so it doesn’t touch the surface and ruin your beautiful decorations. Alternatively, use a cake dome if you have one, which is perfect for protecting decorated cakes.
Individual Slice Storage: Once you’ve cut into the cheesecake, wrap individual slices tightly in plastic wrap and store in an airtight container. This way you can grab a slice whenever you want a treat without exposing the entire cheesecake to air repeatedly, which can dry it out.
Best Serving Temperature: Cheesecake tastes best when it’s cold but not ice-cold. Remove it from the refrigerator about 20-30 minutes before serving to take the edge off the chill. This allows the flavors to fully bloom and makes the texture even creamier.
Leftover Whipped Cream: If you have leftover Irish cream whipped cream, store it in an airtight container in the refrigerator for up to 2 days. It may separate slightly—just give it a quick whisk to bring it back together.
Make-Ahead & Freezer Notes
Perfect Make-Ahead Dessert: This is actually an ideal make-ahead dessert because it requires overnight chilling anyway. You can bake the cheesecake up to 3 days before you need it. Just wait to add the whipped cream topping and chocolate garnishes until a few hours before serving.
Freezing the Whole Cheesecake: Irish Cream Cheesecake freezes beautifully. After it’s completely chilled, wrap it tightly (while still in the springform pan base or after removing—your choice) in plastic wrap, then wrap again with heavy-duty aluminum foil. Freeze for up to 2 months. Don’t add the whipped cream topping before freezing.
Proper Thawing Method: Transfer the frozen cheesecake to the refrigerator and let it thaw slowly overnight, keeping it wrapped. Never thaw at room temperature or in the microwave, as this creates condensation that makes the surface wet and can ruin the texture. Once fully thawed, add the fresh whipped cream topping.
Freezing Individual Slices: Cut the cheesecake into slices and wrap each one individually in plastic wrap, then place in a freezer bag or airtight container. This is perfect for portion control—you can pull out just one or two servings at a time. Thaw in the refrigerator for 4-6 hours before serving.
Don’t Freeze the Topping: The whipped cream topping doesn’t freeze well—it will become watery and separate when thawed. Always make the topping fresh when you’re ready to serve. Since it only takes 5 minutes to whip up, this isn’t a burden.
Make the Crust Ahead: You can make and bake the crust up to 2 days ahead. Wrap it well and store at room temperature, then proceed with the filling when ready.
Serving Suggestions
Irish Coffee Pairing: Serve slices alongside small cups of Irish coffee (hot coffee with Irish cream and whiskey, topped with whipped cream). The flavors complement each other perfectly and create a complete Irish-inspired dessert experience.
Fresh Berries: Arrange a handful of fresh raspberries, strawberries, or blackberries on the plate next to each slice. The tartness of the berries cuts through the rich, creamy cheesecake and adds a beautiful pop of color.
Caramel Drizzle: Drizzle each plate with salted caramel sauce before placing the cheesecake slice on top. The sweet-salty caramel pairs beautifully with the Irish cream flavor.
After-Dinner Drinks: This pairs wonderfully with coffee, espresso, or even a glass of Irish cream liqueur over ice. For wine lovers, try it with a sweet dessert wine like Moscato or a tawny port.
Chocolate Sauce: Serve with warm chocolate sauce or fudge on the side for extra decadence. Dark chocolate sauce works especially well because it’s not too sweet and complements the Irish cream perfectly.
Mint Garnish: Add a fresh mint sprig to each plate for a pop of color and a hint of freshness that complements the creamy richness.
Holiday Presentation: For St. Patrick’s Day, dust the plate with green-tinted powdered sugar or add a small shamrock-shaped chocolate on top. For Christmas, add a dusting of powdered “snow” and a sprig of fresh rosemary as a festive tree.
FAQs Section
Can I make this without alcohol?
Absolutely! Replace the Irish cream liqueur with Irish cream-flavored coffee creamer (available in most grocery stores). The flavor won’t be quite as complex since you’ll miss the subtle whiskey notes, but it will still be delicious and creamy. You can also use 1/2 cup heavy cream plus 2 tablespoons chocolate syrup and 1 teaspoon vanilla as a substitute.Why did my cheesecake crack?
The most common causes are overbaking, sudden temperature changes, or too much air in the batter from overmixing. Make sure to remove the cheesecake when the center still jiggles, cool it gradually in the turned-off oven, and mix on low speed after adding eggs. Also, running a knife around the edge before cooling helps prevent cracking as the cheesecake contracts.Can I use a regular cake pan instead of a springform pan?
Springform pans are really ideal for cheesecake because removing the sides is so much easier. However, if you only have a regular 9-inch cake pan, line it with parchment paper with long overhangs that you can use as handles to lift the cheesecake out. You’ll need to be very careful when removing it, and the sides won’t look as neat.My cheesecake is grainy—what happened?
This usually means it was overbaked. When cheesecake gets too hot, the proteins in the eggs tighten excessively, creating a grainy, dry texture. Always remove the cheesecake when the center still jiggles. Another cause can be cold ingredients that didn’t mix smoothly—make sure everything is truly room temperature before starting.How do I prevent water from seeping into the pan during the water bath?
Use heavy-duty aluminum foil (not regular thin foil) and wrap the pan in two complete layers, pressing the foil up the sides of the pan. Make sure there are no tears or holes in the foil. Some bakers also place the wrapped springform pan inside a large oven bag for double protection.Can I make this in advance for a party?
Yes! This is actually a perfect make-ahead dessert. Bake it 1-3 days before your event and keep it refrigerated. Just wait to add the whipped cream topping and chocolate garnishes until a few hours before serving. The flavor actually improves as it sits.Do I have to use the water bath?
While you technically can bake cheesecake without a water bath, I strongly recommend using one. The water bath creates gentle, even heat and adds humidity to the oven, which prevents cracks and creates that ultra-creamy texture. Without it, you’ll likely end up with a cracked top and drier, less silky texture.Conclusion
This Irish Cream Cheesecake truly is the ultimate special occasion dessert—luxurious, sophisticated, and absolutely delicious. The creamy, velvety texture combined with the subtle notes of Irish cream, chocolate, and whiskey creates something truly memorable that tastes like it came from an expensive bakery. Whether you’re celebrating St. Patrick’s Day, hosting a dinner party, or just treating yourself to something special, this cheesecake delivers on every level.
The beauty of this recipe is that while it looks and tastes impressive, the technique is actually quite straightforward. As long as you follow the key principles—room temperature ingredients, gentle mixing, proper baking time, and patient chilling—you’ll end up with a gorgeous, crack-free cheesecake that tastes incredible. The make-ahead nature also makes it perfect for entertaining, since you can prepare it days in advance and just add the finishing touches before serving.
So grab that springform pan, pick up a bottle of Irish cream, and get ready to create a dessert that will have everyone asking for seconds. Don’t forget to snap some photos before slicing—that chocolate-garnished top is absolutely Pinterest-worthy!
I’d love to hear how your Irish Cream Cheesecake turns out! Leave a comment below with your experience, share your photos, and let me know if you tried any of the variations. And please, if you loved this recipe, pin it to your favorite Pinterest board and share it with fellow dessert lovers. Happy baking, friends!