No-Bake Nutella Cheesecake Recipe: Creamy, Decadent Chocolate
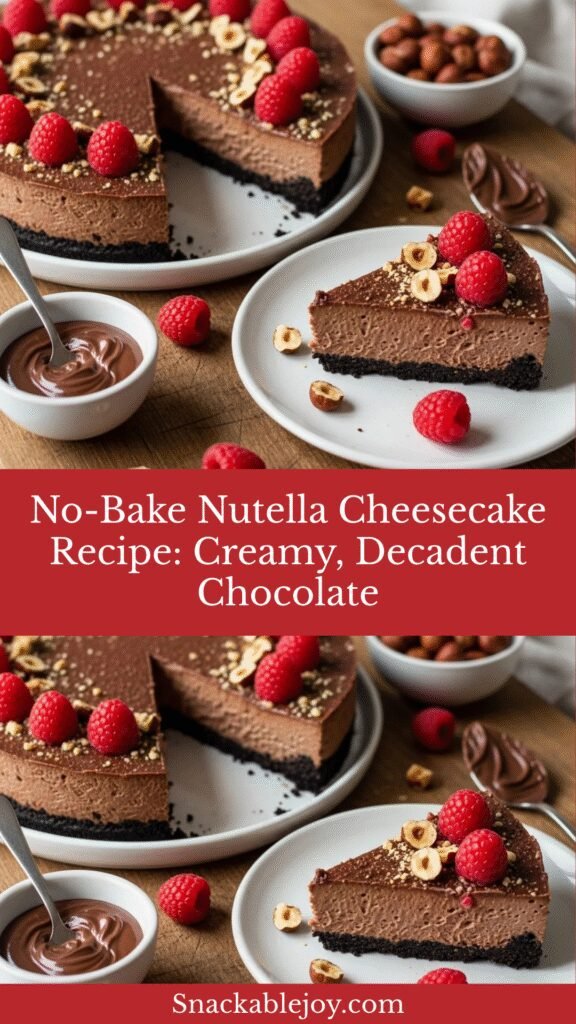
Get ready to fall completely in love with the most indulgent, creamy, and absolutely irresistible dessert you’ll ever make! This No-Bake Nutella Cheesecake combines the rich, chocolatey-hazelnut flavor of everyone’s favorite spread with the smooth, tangy richness of classic cheesecake—and the best part? You don’t even need to turn on your oven! Every slice reveals a beautiful marbled pattern of chocolate and cream cheese that’s as stunning to look at as it is delicious to eat.
What makes this Nutella cheesecake truly special is its incredible texture—impossibly smooth, mousse-like, and so creamy it practically melts on your tongue. The combination of tangy cream cheese and sweet Nutella creates a perfectly balanced flavor that’s neither too rich nor too sweet. Nestled on a crunchy chocolate cookie crust and topped with chocolate ganache and hazelnuts, this dessert is the definition of chocolate decadence.
This show-stopping cheesecake is perfect for birthday celebrations, dinner parties, holiday gatherings, potlucks, or any time you want to seriously impress without spending hours in the kitchen. It’s also ideal for summer entertaining when you don’t want to heat up your house with the oven. The no-bake aspect means it’s foolproof—no worrying about cracks, water baths, or oven temperatures. Just mix, chill, and prepare yourself for the compliments that’ll come flooding in when you serve this gorgeous dessert!
History / Background
To understand this cheesecake, we need to appreciate the fascinating history of its star ingredient. Nutella was created in 1946 by Pietro Ferrero, a pastry maker from Piedmont, Italy, during a time of great hardship following World War II. Cocoa was in short supply and extremely expensive, so Ferrero had the brilliant idea to extend his limited chocolate supply by blending it with abundant hazelnuts from the Piedmont region, creating a sweet paste called “Gianduja.”
Initially sold in solid blocks that could be sliced and spread on bread, the product evolved into the creamy spread we know today in 1964, when Pietro’s son Michele Ferrero perfected the recipe and named it “Nutella” (derived from “nut” and the Latin suffix “ella” meaning sweet). The product became an instant sensation in Italy, where it was positioned as a breakfast staple—Italian children still eat Nutella on bread as a morning treat.
Nutella expanded internationally throughout the 1960s and 70s, reaching the United States in 1983. American consumers, initially unfamiliar with hazelnut-chocolate spreads, gradually embraced Nutella, and by the 2000s, it had achieved cult status. The rise of food blogs and social media in the 2010s created a “Nutella craze,” with home bakers incorporating it into everything from cookies to cakes to cheesecakes.
No-bake cheesecake itself has an interesting history, becoming popular in America during the 1960s and 70s as home cooks sought easier alternatives to traditional baked cheesecake. The combination of Nutella and no-bake cheesecake is a more recent innovation, emerging from the creative home baking community in the late 2000s and early 2010s. Food bloggers discovered that Nutella’s creamy consistency made it perfect for no-bake cheesecakes—it incorporated smoothly without weighing down the mousse-like texture.
Today, Nutella cheesecake represents the perfect fusion of Italian tradition and American dessert innovation. It combines the beloved flavors of an Italian pantry staple with the creamy richness of American-style cheesecake, all made accessible through the foolproof no-bake method. It’s become a favorite for home bakers who want impressive results without complicated techniques!
Why You’ll Love This Recipe
This Nutella cheesecake recipe has been tested and perfected to deliver consistent, gorgeous results every single time. I’ve made this for countless birthday parties, dinner parties, and family gatherings, and it never fails to be the star of the dessert table—people literally ask for the recipe after the first bite!
Here’s what makes this recipe absolutely irresistible:
- No baking required – Perfect for summer or when you don’t want to heat up the kitchen
- Foolproof method – No worries about cracks, water baths, or tricky techniques
- Incredibly creamy texture – Smooth, mousse-like consistency that melts on your tongue
- Stunning presentation – Beautiful marbled appearance looks professionally made
- Chocolate lover’s dream – Rich Nutella flavor with chocolate crust and ganache topping
- Make-ahead friendly – Actually needs to chill overnight, perfect for party planning
- Feeds a crowd – One cheesecake serves 12-16 people generously
- Easy to customize – Can add different toppings and decorations
- Impressive but simple – Tastes and looks gourmet but uses straightforward techniques
- Budget-friendly luxury – Costs less than bakery cheesecake but tastes even better
- Stable and transportable – Perfect for bringing to parties and potlucks
Ingredient Notes
Understanding your ingredients helps you create the best possible Nutella cheesecake. Let’s explore what makes this dessert so special.
Cream Cheese: This is the foundation of any cheesecake! Use full-fat, brick-style cream cheese (not spreadable or whipped varieties). It must be at room temperature—leave it out for at least 2 hours before starting. Room temperature cream cheese mixes smoothly without lumps, creating that signature silky texture. Never use reduced-fat cream cheese for this recipe; you need the full fat content for proper structure and richness.
Nutella: The star ingredient! Use genuine Nutella hazelnut spread for authentic flavor, though other chocolate-hazelnut spreads can work. The Nutella should be at room temperature for easy mixing. If it’s cold and thick, microwave it for 10-15 seconds to soften. Don’t substitute with peanut butter or other nut butters—the unique chocolate-hazelnut flavor is what makes this cheesecake special.
Heavy Whipping Cream: This creates the light, mousse-like texture that makes no-bake cheesecake so special. The cream must be cold from the refrigerator to whip properly. Use heavy whipping cream (at least 36% fat), not light cream or half-and-half. The high fat content is essential for stable whipped cream that holds its structure.
Powdered Sugar: Also called confectioners’ sugar, this sweetens the cheesecake and dissolves smoothly without grittiness. Always sift powdered sugar before using to remove lumps. Don’t substitute with granulated sugar, which won’t dissolve properly and will create a grainy texture.
Vanilla Extract: Pure vanilla extract adds warmth and depth that enhances both the cream cheese and Nutella flavors. It’s worth using real vanilla extract rather than imitation for the best flavor.
Chocolate Cookies: For the crust, use chocolate sandwich cookies like Oreos (you can leave the filling in or scrape it out—both work!), chocolate graham crackers, or chocolate wafer cookies. The chocolate crust complements the Nutella perfectly. You’ll need about 24-30 cookies depending on their size.
Butter: Unsalted butter binds the cookie crumbs together to create a firm, sturdy crust. Melted butter should be cooled slightly before mixing with crumbs—if it’s too hot, it can make the crust greasy.
Chocolate (for ganache): Use good quality chocolate—semisweet or dark chocolate (60-70% cacao) works beautifully. Chocolate chips can work but bar chocolate melts more smoothly. The ganache topping is optional but highly recommended for that extra layer of chocolate luxury!
Hazelnuts: Toasted hazelnuts for garnish add crunch and reinforce the Nutella flavor. They’re optional but make the presentation stunning and provide textural contrast.
Equipment Needed
Having the right tools makes this no-bake cheesecake even easier to create. Here’s what you’ll need:
- 9-inch springform pan – Essential for easy removal and beautiful presentation
- Food processor or plastic bag + rolling pin – For crushing cookie crumbs
- Stand mixer or hand mixer – Makes whipping cream and mixing filling much easier
- Large mixing bowls (at least 2) – One for crust, one for filling
- Rubber spatula – For scraping bowls and folding ingredients
- Measuring cups and spoons – Accurate measurements ensure consistent results
- Offset spatula or butter knife – For smoothing the filling and creating swirls
- Plastic wrap or aluminum foil – For covering the cheesecake while it chills
- Microwave-safe bowl – For melting butter and making ganache
- Whisk – For making smooth ganache
- Small saucepan (alternative to microwave) – For making ganache on stovetop
- Knife – For releasing cheesecake from springform pan
- Cutting board – For chopping hazelnuts
Print

Nutella Cheesecake Recipe
This No-Bake Nutella Cheesecake features an incredibly creamy chocolate-hazelnut filling on a chocolate cookie crust, topped with chocolate ganache and toasted hazelnuts. It’s the ultimate dessert for chocolate lovers and requires no oven!
- Total Time: 6 hours 30 minutes (includes chilling)
- Yield: 12-16 servings 1x
Ingredients
ScaleFor the Chocolate Cookie Crust:
- 24-30 chocolate sandwich cookies (like Oreos), about 300g
- 5 tablespoons (70g) unsalted butter, melted
- Pinch of salt
For the Nutella Cheesecake Filling:
- 24 ounces (680g or 3 packages) cream cheese, room temperature
- 1 cup (280g) Nutella, room temperature
- ¾ cup (90g) powdered sugar, sifted
- 2 teaspoons pure vanilla extract
- ¼ teaspoon salt
- 1½ cups (360ml) heavy whipping cream, cold
- 2 tablespoons powdered sugar (for whipping cream)
For the Chocolate Ganache Topping (optional but recommended):
- ½ cup (120ml) heavy whipping cream
- 6 ounces (170g) semisweet or dark chocolate, chopped
- ½ cup (60g) toasted hazelnuts, chopped (for garnish)
- Extra Nutella for drizzling (optional)
Instructions
Step 1: Prepare the Springform Pan
Line the bottom of a 9-inch springform pan with parchment paper for easy removal. Lightly grease the sides with butter or cooking spray. This preparation ensures your cheesecake releases perfectly when serving. Set aside.Step 2: Make the Chocolate Cookie Crust
Add chocolate cookies to your food processor and pulse until you have fine, even crumbs (they should resemble coarse sand). If you don’t have a food processor, place cookies in a sealed plastic bag and crush with a rolling pin until finely ground. Transfer crumbs to a medium bowl, add melted butter and pinch of salt, and mix thoroughly with a fork until all crumbs are evenly moistened. The mixture should hold together when squeezed.Step 3: Press and Chill the Crust
Pour the cookie mixture into your prepared springform pan. Using the bottom of a flat measuring cup or glass, press the crumbs firmly and evenly across the bottom and about 1 inch up the sides of the pan. Pack it down well—this creates a sturdy crust that won’t crumble when sliced. Place the pan in the refrigerator to chill while you make the filling (at least 15 minutes).Step 4: Beat Cream Cheese Until Smooth
In a large bowl using your stand mixer or hand mixer, beat the room-temperature cream cheese on medium speed for 2-3 minutes until completely smooth, fluffy, and no lumps remain. Scrape down the bowl sides frequently. This step is crucial—any lumps in the cream cheese will remain in the finished cheesecake!Step 5: Add Nutella and Flavorings
Add the Nutella (make sure it’s at room temperature), ¾ cup powdered sugar, vanilla extract, and salt to the cream cheese. Beat on medium speed for 1-2 minutes until everything is completely combined and smooth. The mixture will be thick and creamy with a beautiful chocolate-hazelnut color. Scrape down the bowl again to ensure everything is mixed.Step 6: Whip the Heavy Cream
In a separate clean, cold bowl, beat the cold heavy whipping cream with 2 tablespoons powdered sugar on high speed until stiff peaks form—this takes about 3-4 minutes. You’ll know it’s ready when you lift the beaters and the cream stands up in peaks that hold their shape without drooping. Don’t overwhip or you’ll end up with butter!Step 7: Fold Cream into Nutella Mixture
Using a rubber spatula, gently fold about one-third of the whipped cream into the Nutella-cream cheese mixture to lighten it. Use broad, sweeping folding motions (cutting down through the center, along the bottom, and up the side). Once incorporated, gently fold in the remaining whipped cream in two additions until no white streaks remain. Be patient and gentle—this folding technique preserves the airiness that creates that signature mousse-like texture.Step 8: Create the Marbled Effect (Optional)
For a beautiful marbled look, reserve about ½ cup of the plain cream cheese mixture before adding Nutella (beat the cream cheese, then remove ½ cup, then proceed with adding Nutella to the rest). After folding in whipped cream, dollop the reserved plain mixture on top of the Nutella filling and use a knife or skewer to swirl it through, creating marble patterns. Or simply pour all the Nutella filling into the crust for uniform chocolate flavor.Step 9: Fill and Smooth
Pour the cheesecake filling into the chilled crust, smoothing the top with an offset spatula or the back of a spoon. Tap the pan gently on the counter a few times to release any air bubbles. The filling should come to just below the rim of the pan.Step 10: Chill Overnight
Cover the cheesecake carefully with plastic wrap or aluminum foil (make sure it doesn’t touch the surface of the filling). Refrigerate for at least 6 hours, but overnight (8-12 hours) is ideal. The cheesecake needs this time to set properly and for all flavors to meld together beautifully. Patience is key!Step 11: Make Chocolate Ganache (Optional)
When ready to serve, make the ganache topping: Heat ½ cup heavy cream in the microwave or in a small saucepan until it just begins to simmer. Pour over chopped chocolate in a bowl and let sit for 2 minutes. Whisk until smooth and glossy. Let cool for 10-15 minutes until slightly thickened but still pourable, then pour over the chilled cheesecake, spreading to the edges.Step 12: Garnish and Serve
Before the ganache sets, sprinkle with toasted chopped hazelnuts. You can also drizzle extra Nutella over the top for dramatic effect (warm it for 10 seconds in microwave to make it pourable). Refrigerate for 15-20 minutes to set the ganache, then release the springform sides, slice with a sharp knife dipped in hot water (wipe clean between cuts), and serve!Notes
- Room temperature cream cheese is crucial – Cold cream cheese creates lumps that won’t smooth out
- Don’t skip chilling time – Cheesecake needs at least 6 hours, overnight is better
- Fold gently – Overmixing deflates the whipped cream and creates dense texture
- Cover carefully – Prevent condensation from dripping onto the cheesecake surface
- For clean slices – Use a sharp knife dipped in hot water, wiped clean between cuts
- Make ahead – This cheesecake is perfect made 1-2 days in advance
- Prep Time: 30 minutes
- Cook Time: 0 minutes (no-bake)
- Category: Desert
- Method: No-Bake, Chilled
- Cuisine: Italian-American Fusion
- Diet: Vegetarian
Nutrition
- Serving Size: 1 slice (1/14 of cheesecake)
- Calories: 445
- Sugar: 28g
- Sodium: 245mg
- Fat: 32g
- Saturated Fat: 18g
- Unsaturated Fat: 13g
- Trans Fat: 0g
- Carbohydrates: 35g
- Fiber: 1.5g
- Protein: 6g
- Cholesterol: 85mg
Tips & Variations
Flavor Variations:
- White Chocolate Nutella: Mix ½ cup melted white chocolate into the filling for extra richness
- Nutella Swirl: Create dramatic swirls by not fully mixing Nutella into cream cheese
- Hazelnut Liqueur: Add 2-3 tablespoons Frangelico for adult version
- Peanut Butter Nutella: Swirl in ½ cup peanut butter for flavor combination
- Triple Chocolate: Add ¼ cup cocoa powder to filling for intense chocolate flavor
Crust Variations:
- Graham Cracker: Use chocolate or regular graham crackers instead of sandwich cookies
- Hazelnut Crust: Replace half the cookies with ground toasted hazelnuts
- Brownie Crust: Use crumbled brownies mixed with melted butter
- Gluten-Free: Use gluten-free chocolate cookies or almond flour
Topping Ideas:
- Fresh Berries: Strawberries or raspberries provide tart contrast
- Whipped Cream: Pipe rosettes of whipped cream around the edge
- Chocolate Shavings: Use a vegetable peeler on a chocolate bar
- Caramel Drizzle: Add salted caramel sauce for sweet-salty combination
- Mini Ferrero Rocher: Top with whole Ferrero Rocher chocolates for elegance
Dietary Modifications:
- Lighter Version: Use ⅓-less-fat cream cheese (texture will be slightly different)
- Dairy-Free: Use dairy-free cream cheese and coconut cream (chilled overnight)
- Reduced Sugar: Reduce powdered sugar by ¼ cup
Pro Chef Tips
Room Temperature Ingredients Create Smooth Filling: Professional pastry chefs know that room temperature cream cheese is absolutely non-negotiable for lump-free cheesecake. Cold cream cheese will never fully smooth out, no matter how long you beat it, creating an unpleasant grainy texture. Plan ahead and let cream cheese sit at room temperature for 2-3 hours, or carefully microwave for 10-15 seconds if you’re in a hurry (be careful not to melt it!).
The Folding Technique Preserves Airiness: When incorporating whipped cream into the Nutella mixture, always fold gently rather than stirring or beating. Use broad, sweeping motions with a rubber spatula, cutting down through the center, sweeping along the bottom, and bringing the spatula up the side. Rotate the bowl as you work. This technique preserves the air bubbles that create that signature light, mousse-like texture. Vigorous mixing deflates the cream and creates dense, heavy cheesecake.
Lightening the Base First Makes Folding Easier: Professional bakers always fold in about one-third of the whipped cream first to “lighten” the dense cream cheese mixture. This creates a looser consistency that’s closer to the whipped cream, making it much easier to fold in the remaining cream without deflating it. Trying to fold whipped cream directly into thick cream cheese mixture requires more aggressive mixing that destroys airiness.
Overnight Chilling Develops Flavor and Texture: While the minimum chilling time is 6 hours, pastry chefs know that no-bake cheesecakes taste significantly better after sitting overnight. The flavors meld and deepen, the texture becomes even more refined and creamy, and everything sets to perfection. If you can resist, always make no-bake cheesecake at least one day before serving for optimal results.
The Hot Knife Technique Creates Clean Slices: For picture-perfect slices worthy of a professional bakery, use this method: Dip your knife in very hot water, wipe it completely dry with a towel, then make one smooth cut through the cheesecake. Wipe the knife clean, dip in hot water again, dry, and make the next cut. The warm blade melts through each layer cleanly without dragging or smearing. It takes an extra minute but makes a dramatic difference in presentation.
Ganache Temperature Matters for Perfect Coating: If ganache is too hot when poured, it will be too thin and run off the sides in an uncontrolled mess. If too cool, it will be too thick to spread smoothly. Let ganache cool for 10-15 minutes after mixing until it’s slightly thickened but still pourable—it should coat the back of a spoon but still drip off slowly. This consistency creates a perfect, glossy coating.
Common Mistakes to Avoid
Using Cold Cream Cheese: This is the number one mistake! Cold cream cheese will not blend smoothly no matter how long you beat it. You’ll end up with lumps throughout your cheesecake that ruin the silky texture. Always let cream cheese sit at room temperature for at least 2 hours before starting. If you’re in a hurry, cut it into smaller chunks to speed softening, or microwave very carefully in short bursts.
Overwhipping or Underwhipping the Cream: Whipped cream should reach stiff peaks—when you lift the beaters, peaks should stand straight up without drooping. If you stop too early (soft peaks that flop over), the cream won’t provide enough structure and your cheesecake will be too soft. If you beat too long past stiff peaks, the cream becomes grainy and eventually turns to butter. Watch carefully and stop as soon as you see stiff peaks.
Vigorous Mixing Instead of Gentle Folding: Once you add whipped cream to the Nutella mixture, your beating days are done! Mixing with a spoon or (heaven forbid) using the electric mixer will deflate all those precious air bubbles, creating dense, heavy cheesecake instead of light, mousse-like texture. Always fold gently with a rubber spatula using broad, sweeping motions, and stop as soon as no white streaks remain.
Not Chilling Long Enough: I know it’s tempting to cut into that gorgeous cheesecake as soon as possible, but patience is essential! A cheesecake that hasn’t chilled for at least 6 hours (preferably overnight) will be too soft to slice cleanly, may not hold its shape when you release the springform, and won’t have developed its full flavor. The chilling time is not optional—it’s when the magic happens!
Covering Carelessly and Creating Condensation Damage: If plastic wrap or foil touches the surface of your cheesecake, it will stick and mar that beautiful smooth top when you remove it. If you don’t cover tightly enough, condensation can form in the refrigerator and drip onto the surface, creating water spots. Cover loosely or use toothpicks inserted around the edge to hold the wrap up off the surface, creating a tent.
Storage & Meal Prep
Refrigerator Storage: No-bake cheesecake must always be stored in the refrigerator. Keep it covered loosely with plastic wrap or under a cake dome for up to 5 days. The cheesecake actually tastes better after a day or two as flavors continue to develop and meld. Make sure it’s well-covered to prevent it from absorbing refrigerator odors (cream cheese is notorious for this!).
Preventing Odor Absorption: Cream cheese readily absorbs surrounding odors, which can affect your cheesecake’s delicate flavor. If storing for more than 2 days, double-wrap it or place it in an airtight cake container. Keep it away from strongly scented foods like onions, garlic, or anything pungent.
Maintaining the Ganache Topping: If you’ve topped your cheesecake with chocolate ganache, it will firm up beautifully in the refrigerator but may develop slight condensation when brought back to room temperature. This is normal and doesn’t affect flavor. For best presentation, add the ganache topping the day you plan to serve the cheesecake.
Individual Slice Storage: If you’ve already sliced the cheesecake, wrap individual slices tightly in plastic wrap and store in an airtight container in the refrigerator for up to 5 days. This is perfect for portion control or taking slices to work for lunch!
Make-Ahead & Freezer Notes
The Ultimate Make-Ahead Dessert: No-bake Nutella cheesecake is not just make-ahead friendly—it’s actually required to chill overnight, making it perfect for party planning! Make it 1-2 days before your event, keep it covered in the refrigerator, and simply add ganache topping and garnishes a few hours before serving. This frees you up to focus on other dishes on the day of your gathering.
Freezing the Whole Cheesecake: You can freeze an unfrosted no-bake cheesecake for up to 2 months! Once fully chilled and set, wrap the entire cheesecake (still in the springform pan or transferred to a plate) tightly in plastic wrap, then again in aluminum foil. Freeze flat. To thaw, unwrap and transfer to the refrigerator for 12-24 hours. Add ganache topping after thawing. The texture remains remarkably good!
Freezing Individual Slices: Slice the cheesecake, wrap each slice individually in plastic wrap, then place all wrapped slices in a freezer-safe container or bag. Freeze for up to 2 months. Thaw individual slices in the refrigerator for 3-4 hours or at room temperature for 1-2 hours. This is perfect for having dessert on hand whenever the craving strikes!
Ganache and Garnish Strategy: If you plan to freeze the cheesecake, do NOT add the ganache topping or hazelnut garnish before freezing. Freeze the plain cheesecake, then add these finishing touches after thawing for the freshest appearance and best texture.
Optimal Make-Ahead Timeline: For best flavor and texture, make the cheesecake 1-2 days before serving. It needs at least 6 hours to set, but 24-48 hours allows flavors to fully develop. Add ganache and garnishes 2-4 hours before serving for optimal presentation.
Serving Suggestions
Nutella cheesecake is incredibly rich and decadent, so thoughtful pairings can enhance the experience and provide balance.
Beverage Pairings:
- Espresso or Strong Coffee: The slight bitterness perfectly cuts through the sweet richness
- Hot Chocolate: For the ultimate chocolate lover’s experience
- Hazelnut Liqueur: Frangelico or other hazelnut liqueur for adult gatherings
- Dessert Wine: Vin Santo or sweet Moscato complement the chocolate-hazelnut flavors
- Cold Milk: Classic pairing that never disappoints
Fresh Fruit Accompaniments: Balance the richness with fresh berries—strawberries, raspberries, or blackberries provide tart contrast that refreshes the palate. Sliced bananas also pair beautifully with chocolate-hazelnut flavors. Arrange fruit on the plate beside each slice or on top of the cheesecake itself.
Whipped Cream: A dollop of lightly sweetened whipped cream adds lightness and provides textural contrast to the dense, creamy cheesecake. For extra indulgence, fold a tablespoon of Nutella into the whipped cream!
Ice Cream: Serve slices with a small scoop of vanilla bean, hazelnut, or chocolate ice cream on the side. The cold ice cream melting into the cheesecake creates an irresistible combination.
Sauce Drizzles: Drizzle individual slices with caramel sauce, raspberry coulis, or extra warm Nutella for dramatic plating and additional flavor dimensions.
Plating Ideas: For elegant presentation, place each slice on a white plate, add a few fresh raspberries, dust the plate rim lightly with cocoa powder, add a mint sprig, and drizzle with raspberry or chocolate sauce. This restaurant-style plating makes the dessert feel even more special.
FAQs Section
Can I make this cheesecake without a springform pan?
While a springform pan makes removal much easier, you can use a regular 9-inch cake pan or pie dish. Line it completely with parchment paper or aluminum foil with long overhangs that you can use as handles to lift the cheesecake out. Alternatively, serve it directly from the pan (like a pie) rather than unmolding. The presentation won’t be quite as elegant, but it will taste just as delicious!Why is my cheesecake too soft and won’t hold its shape?
The most common causes are: not chilling long enough (needs minimum 6 hours, preferably overnight), underwhipped cream that didn’t reach stiff peaks (cream needs to stand up straight when you lift beaters), or too much Nutella that made the filling too heavy. Make sure to follow measurements precisely and chill thoroughly. If it’s still soft after overnight chilling, pop it in the freezer for 1-2 hours to firm up.Can I use a different nut butter instead of Nutella?
While you can technically use other nut butters, the flavor will be completely different and won’t be “Nutella cheesecake” anymore. Peanut butter, almond butter, or other spreads don’t have that signature chocolate-hazelnut flavor. If you want to use them, consider it a different recipe entirely. For authentic Nutella flavor, you really need Nutella or another chocolate-hazelnut spread.My cream cheese has lumps—how do I fix it?
If you started with cold cream cheese, lumps are very difficult to remove once they form. Your best bet is to press the mixture through a fine-mesh strainer to break up lumps, though this is tedious. For future batches, always start with room-temperature cream cheese and beat it thoroughly before adding other ingredients. Prevention is much easier than trying to fix lumps after the fact!Can I make this cheesecake ahead of time?
Absolutely! In fact, no-bake cheesecake is one of the best make-ahead desserts. Make it 1-2 days before your event and store it covered in the refrigerator. The cheesecake actually improves after sitting as flavors meld. Just add the ganache topping and garnishes within a few hours of serving for the freshest presentation.How do I get clean, professional-looking slices?
Use a sharp knife dipped in very hot water and wiped completely dry before each cut. Make smooth, confident cuts straight down without sawing back and forth. Clean and reheat the knife between every single slice. This technique creates those beautiful, clean slices you see in professional bakeries. Cold cheesecake also slices more cleanly than room-temperature cheesecake.Can I freeze Nutella cheesecake?
Yes! Freeze the unfrosted cheesecake wrapped tightly in plastic wrap and foil for up to 2 months. Thaw overnight in the refrigerator, then add ganache topping. Individual slices can also be frozen wrapped separately. While the texture may be very slightly different after freezing, it’s still delicious and makes a great option for long-term storage.Conclusion
There you have it—everything you need to create the most incredible, show-stopping Nutella Cheesecake that will have everyone convinced you’re a professional pastry chef! This no-bake wonder combines the beloved flavors of chocolate and hazelnut with that signature creamy cheesecake texture, all without ever turning on your oven. It’s the perfect dessert for impressing guests while keeping your stress levels at zero.
The beauty of this recipe is that it looks and tastes like something from an upscale bakery but comes together with simple techniques that any home cook can master. Once you’ve made it successfully (and you will!), you’ll find yourself making it again and again for birthdays, holidays, dinner parties, and any time you need a guaranteed crowd-pleaser. It’s the kind of dessert that creates memories and has people asking for the recipe before they’ve finished their first slice!
I’d absolutely love to hear how your Nutella Cheesecake turns out! Are you making it for a special occasion or just treating yourself to something amazing? Did you try any of the variations or toppings? Drop a comment below and share your cheesecake adventures—I read every comment and genuinely love connecting with fellow dessert lovers!
Please save this recipe to your Pinterest dessert board so you’ll have it ready whenever that chocolate craving hits (and let’s be honest, it hits often!). And if you snap a photo of your gorgeous Nutella creation with that beautiful marbled filling and chocolate ganache, tag me on social media—I absolutely love seeing your stunning desserts!
Now grab that jar of Nutella and get ready to make some no-bake magic. Your refrigerator is about to hold the most amazing dessert, and you’re about to become everyone’s favorite person for making it. Happy dessert-making, friends! 🍫✨