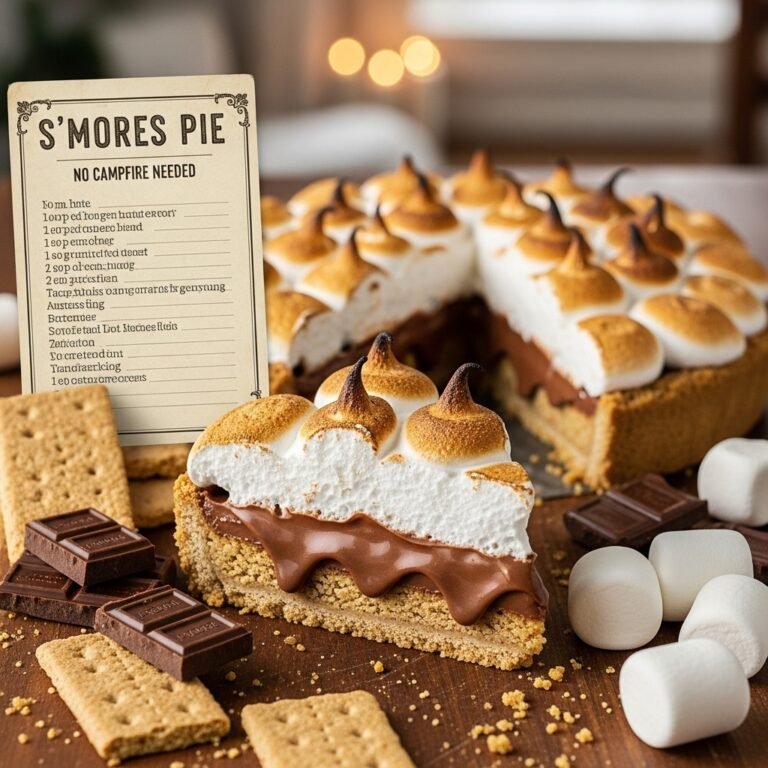
S’mores Pie Recipe: No Campfire Needed for This Dreamy Dessert

Imagine capturing all the magic of a campfire s’more—the gooey toasted marshmallows, rich melted chocolate, and crunchy graham crackers—and transforming it into a stunning pie that you can make right in your own kitchen. That’s exactly what this S’mores Pie delivers. This show-stopping dessert features a buttery graham cracker crust, a layer of smooth chocolate ganache, and a towering meringue topping that’s torched to golden perfection, creating those signature charred spots that make s’mores so irresistible.
Perfect for summer gatherings, backyard barbecues, Fourth of July celebrations, or any time you’re craving that nostalgic campfire flavor, this pie is guaranteed to disappear fast. It’s also wonderful for birthday parties, potlucks, or simply as a weekend baking project that’ll have your family asking for seconds. The best part? You don’t need a campfire, camping gear, or even perfect weather—just your oven and a kitchen torch (or your broiler) to create this memorable dessert.
This S’mores Pie takes the beloved flavors we all grew up with and elevates them into something truly spectacular. It’s the kind of dessert that makes people’s eyes light up when they see it, and the taste delivers on every bit of that visual promise. Whether you’re a s’mores purist or someone who’s never been camping, this pie will transport you straight to those cozy summer nights under the stars.
History / Background
The s’more as we know it has been an American tradition since the 1920s, with the first recorded recipe appearing in the 1927 Girl Scouts guidebook “Tramping and Trailing with the Girl Scouts.” The name “s’more” comes from the phrase “some more”—because once you had one, you always wanted some more. These campfire treats became synonymous with summer camps, family camping trips, and backyard fire pits across America.
The genius combination of graham crackers, chocolate, and marshmallows was revolutionary in its simplicity. Graham crackers themselves have an interesting history—they were invented in 1829 by Presbyterian minister Sylvester Graham as a health food meant to be part of a vegetarian diet. By the early 1900s, they’d become a popular snack, especially for children. When paired with Hershey’s chocolate bars (mass-produced starting in 1900) and marshmallows (which became commercially available in the late 1800s), the perfect trinity was born.
The evolution from campfire s’mores to s’mores pie is a testament to American home bakers’ creativity. As indoor baking became more sophisticated in the mid-20th century, creative cooks began adapting beloved outdoor treats for the kitchen. S’mores pies, cakes, and other variations started appearing in community cookbooks and food magazines throughout the 1960s and 70s, allowing people to enjoy these flavors year-round, regardless of weather or access to a campfire.
The kitchen torch revolution of the 1990s and 2000s made it even easier to replicate that signature toasted marshmallow top at home. What was once a restaurant-only tool became accessible to home cooks, and s’mores desserts exploded in popularity. Today, s’mores pie represents the perfect marriage of nostalgia and sophistication—childhood memories elevated into an elegant, shareable dessert that captures hearts at every gathering.
Why You’ll Love This Recipe
This S’mores Pie is everything you love about traditional s’mores, but better. It’s easier to eat (no sticky fingers or melted chocolate running down your hands), serves a crowd beautifully, and looks absolutely stunning on a dessert table. The graham cracker crust is sturdy yet buttery, the chocolate layer is rich and silky, and the meringue topping is light as air with those gorgeously toasted peaks.
Here’s why this recipe will become your new favorite:
- No campfire required – Make this anytime, anywhere, in any weather
- Feeds a crowd – One pie serves 8-10 people, perfect for gatherings
- Impressive presentation – Looks like it came from a fancy bakery
- Kid-approved – Children absolutely love this nostalgic flavor combination
- Interactive fun – Torching the meringue is exciting and satisfying
- No-bake option available – The filling doesn’t require baking if you prefer
- Make-ahead friendly – Components can be prepared separately in advance
- Customizable sweetness – Control the chocolate type and meringue sweetness to your taste
- Uses simple ingredients – Nothing exotic, just pantry staples and classic s’mores components
- Perfect texture contrast – Crunchy crust, smooth chocolate, fluffy meringue in every bite
- Year-round enjoyment – Capture summer camp memories any season
Ingredient Notes
Let me break down each component and why it’s essential for creating the perfect s’mores pie.
Graham Crackers – The foundation of any s’more. You’ll need about 1½ sleeves (around 10-12 full cracker sheets) to make the crust. Regular honey graham crackers work perfectly, but cinnamon or chocolate graham crackers add an interesting twist. Make sure they’re fresh—stale crackers make a crumbly, less flavorful crust.
Butter (for crust) – Binds the graham cracker crumbs together and adds rich flavor. Use unsalted butter so you can control the salt level. The butter should be melted but not too hot, or it will make the crust greasy. Let it cool slightly after melting.
Sugar (for crust) – Just a couple tablespoons sweetens the crust and helps it brown beautifully. Some graham crackers are sweeter than others, so you can adjust this to taste.
Semi-Sweet or Dark Chocolate – This is your chocolate layer, so quality matters. Use good chocolate bars or chips—Ghirardelli, Lindt, or Guittard are excellent choices. Semi-sweet chocolate (around 60% cacao) provides classic s’mores flavor, while dark chocolate (70% cacao) offers a more sophisticated, less sweet taste. Avoid milk chocolate as it’s too sweet and doesn’t set well.
Heavy Cream – Creates the ganache that becomes your chocolate filling. The high fat content (36% minimum) is crucial for proper texture. Don’t substitute with half-and-half or milk—you need the fat to create silky, smooth ganache.
Egg Whites – The base of your meringue topping. Room temperature egg whites whip better and create more volume than cold eggs. You’ll need 4-5 large egg whites depending on your preference for meringue height. Save those yolks for making custard, carbonara, or lemon curd!
Cream of Tartar – This acidic powder stabilizes egg whites and helps create stiff, glossy peaks that hold their shape. If you don’t have cream of tartar, substitute ½ teaspoon lemon juice or white vinegar per egg white, though cream of tartar works best.
Granulated Sugar (for meringue) – Sweetens and stabilizes the meringue. The sugar dissolves into the egg whites as you beat them, creating that glossy, marshmallow-like texture. Don’t skip or reduce it—the sugar is structural, not just for sweetness.
Vanilla Extract – Adds depth and rounds out the flavors in the meringue. Pure vanilla is always better than imitation.
Salt – Just a pinch in both the crust and meringue balances sweetness and enhances all the other flavors.
Equipment Needed
This recipe doesn’t require any unusual equipment. Here’s what you’ll need:
- 9-inch pie pan – Standard glass or ceramic pie dish
- Food processor or rolling pin and ziplock bag – For crushing graham crackers
- Mixing bowls (various sizes) – For different components
- Medium saucepan – For heating cream for ganache
- Electric mixer (stand or hand) – Essential for making stable meringue
- Rubber spatula – For folding and spreading
- Whisk – For mixing
- Measuring cups and spoons – Accuracy matters in baking
- Kitchen torch – For toasting the meringue (or you can use your broiler)
- Offset spatula (optional) – Makes spreading ganache and creating meringue peaks easier
- Piping bag with large star tip (optional) – For decorative meringue swirls
Print

S’mores Pie Recipe
A spectacular no-campfire-needed dessert featuring a graham cracker crust, silky chocolate ganache filling, and towering toasted meringue topping. This pie captures all the magic of s’mores in elegant, shareable form.
- Total Time: 2 hours 40 minutes
- Yield: 8-10 servings 1x
Ingredients
ScaleFor the Graham Cracker Crust:
- 1½ cups (180g) graham cracker crumbs (about 10-12 full cracker sheets)
- ⅓ cup (65g) granulated sugar
- 6 tablespoons (85g) unsalted butter, melted
- ¼ teaspoon salt
For the Chocolate Ganache Filling:
- 12 ounces (340g) semi-sweet or dark chocolate, chopped (or chips)
- 1 cup (240ml) heavy cream
- 1 teaspoon vanilla extract
- Pinch of salt
For the Marshmallow Meringue:
- 4 large egg whites, room temperature
- 1 cup (200g) granulated sugar
- ½ teaspoon cream of tartar
- 1 teaspoon vanilla extract
- ¼ teaspoon salt
Instructions
Step 1: Make the Graham Cracker Crust
Preheat your oven to 350°F (175°C). In a food processor, pulse graham crackers until they become fine crumbs. Alternatively, place them in a ziplock bag and crush with a rolling pin. You should have about 1½ cups of crumbs. In a medium bowl, combine the graham cracker crumbs, sugar, melted butter, and salt. Mix with a fork until the mixture resembles wet sand and holds together when pressed.Step 2: Press and Bake the Crust
Pour the graham cracker mixture into your 9-inch pie pan. Using the bottom of a measuring cup or your fingers, press the crumbs firmly and evenly into the bottom and up the sides of the pan. Make sure there are no thin spots, especially where the bottom meets the sides. Bake for 10 minutes until lightly golden and fragrant. Remove from oven and let cool completely while you make the filling.Step 3: Prepare the Chocolate Ganache
Place chopped chocolate in a heatproof bowl. In a medium saucepan, heat the heavy cream over medium heat until it just begins to simmer—you’ll see small bubbles forming around the edges. Don’t let it boil. Remove from heat and immediately pour the hot cream over the chocolate. Let sit undisturbed for 2 minutes to allow the heat to melt the chocolate.Step 4: Finish and Pour the Ganache
After 2 minutes, add vanilla and salt, then whisk the chocolate mixture from the center outward in a circular motion until completely smooth, glossy, and emulsified. Pour the ganache into your cooled graham cracker crust, spreading it evenly with a spatula. Tap the pan gently on the counter to release any air bubbles. Refrigerate for at least 2 hours, or until the ganache is completely set and firm to the touch.Step 5: Make the Meringue
When ready to serve (or within a few hours of serving), make your meringue topping. In a completely clean, dry mixing bowl (any trace of grease will prevent proper whipping), combine room temperature egg whites and cream of tartar. Using an electric mixer, beat on medium speed until foamy, about 1 minute.Step 6: Add Sugar and Beat to Stiff Peaks
With the mixer running, gradually add the sugar 1 tablespoon at a time, waiting about 10 seconds between additions. Once all sugar is incorporated, increase speed to medium-high and continue beating for 5-7 minutes until stiff, glossy peaks form. The meringue should stand straight up when you lift the beaters, and the sugar should be completely dissolved (rub a bit between your fingers—it shouldn’t feel grainy). Beat in vanilla and salt for the final 10 seconds.Step 7: Top the Pie with Meringue
Remove the chilled pie from the refrigerator. Dollop large spoonfuls of meringue over the chocolate layer, or pipe it decoratively using a piping bag with a large star tip. Use an offset spatula or the back of a spoon to create peaks and swirls all over the surface. Make sure the meringue touches the crust edges all around—this prevents it from shrinking.Step 8: Toast the Meringue
Using a kitchen torch, carefully toast the meringue peaks until golden brown with some darker charred spots, just like toasted marshmallows. Work in sections, moving the torch constantly to avoid burning. If you don’t have a torch, place the pie under the broiler for 1-2 minutes, watching constantly—broilers are hot and can burn the meringue quickly. Rotate the pie as needed for even browning.Step 9: Serve
The pie can be served immediately after toasting, or refrigerated for up to 4 hours. For the cleanest slices, dip your knife in hot water and wipe it clean between each cut. The contrast of textures—crunchy crust, smooth chocolate, fluffy meringue—is perfection in every bite.Notes
- Meringue is best made and served the same day. It will weep and deflate if left too long.
- Make sure your mixing bowl and beaters are completely clean and grease-free for successful meringue.
- The chocolate layer can be made up to 3 days ahead and kept refrigerated.
- Room temperature egg whites whip to greater volume than cold eggs.
- For easier separation, separate eggs while cold, then let whites come to room temperature.
- Prep Time: 30 minutes
- Cook Time: 10 minutes
- Category: Desert
- Method: Baking, No-Bake Filling
- Cuisine: American
- Diet: Vegetarian
Nutrition
- Serving Size: 1 slice (1/10 of pie)
- Calories: 425
- Sugar: 42g
- Sodium: 180mg
- Fat: 24g
- Saturated Fat: 14g
- Unsaturated Fat: 8g
- Trans Fat: 0g
- Carbohydrates: 51g
- Fiber: 2g
- Protein: 5g
- Cholesterol: 45mg
Tips & Variations
Flavor Variations:
- Peanut Butter S’mores Pie: Add ½ cup creamy peanut butter to the warm ganache before pouring into crust
- Mint Chocolate S’mores: Add ½ teaspoon peppermint extract to the ganache for a minty twist
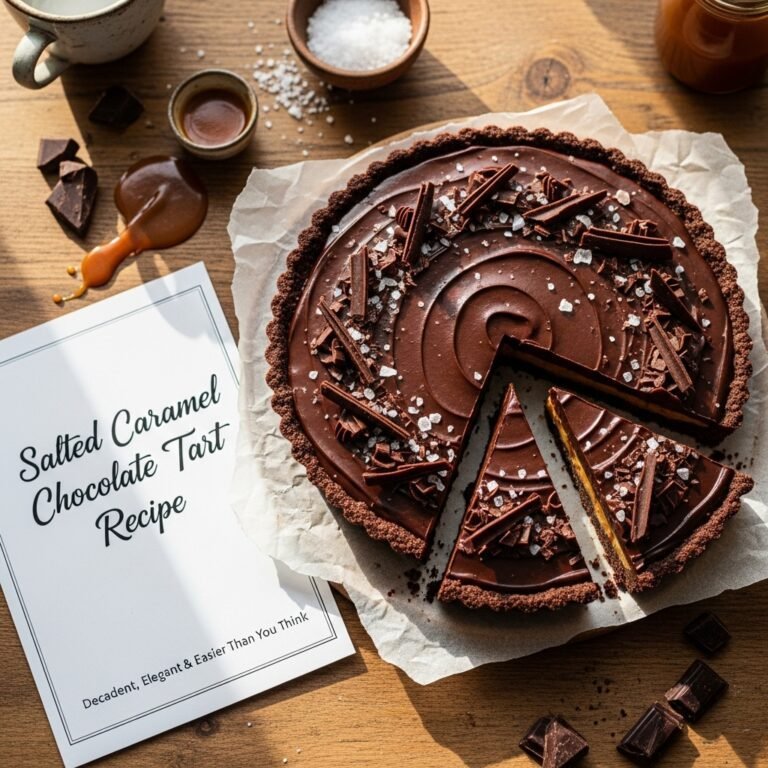
- Salted Caramel S’mores: Drizzle salted caramel sauce over the chocolate layer before adding meringue
- Cookies and Cream: Use chocolate sandwich cookies instead of graham crackers for the crust
- Nutella S’mores: Replace half the chocolate with Nutella for hazelnut flavor
Crust Variations:
- Use chocolate graham crackers for extra chocolate intensity
- Add 2 tablespoons cocoa powder to regular graham cracker crust
- Mix in ¼ cup mini chocolate chips to the crust for texture
- Try Biscoff cookies or vanilla wafers instead of graham crackers
Chocolate Options:
- Use all dark chocolate (70% cacao) for a more sophisticated, less sweet pie
- Mix milk chocolate with semi-sweet for sweeter, creamier filling
- Add a layer of marshmallow fluff under the ganache for extra marshmallow flavor
- Sprinkle mini chocolate chips over the ganache before it sets
Meringue Alternatives:
- Top with marshmallow fluff and toast it for easier preparation
- Use Swiss meringue (cooked) for more stability
- Make Italian meringue with hot sugar syrup for professional results
- Top with regular marshmallows and torch them for ultra-traditional look
Pro Chef Tips
Perfect Crust Every Time: The key to a non-soggy crust is packing it firmly and baking it until golden. Don’t skip the baking step—it sets the crust and prevents it from becoming soggy when filled. Use the bottom of a flat measuring cup to press crumbs firmly and evenly, paying special attention to where the bottom meets the sides.
Ganache Temperature Control: For the smoothest ganache, make sure your chocolate is finely chopped so it melts evenly. After pouring hot cream over chocolate, resist the urge to stir immediately—let it sit for 2 full minutes so the heat can work its magic. When you do whisk, start from the center and work outward in circles to create a perfect emulsion.
Egg White Success: Room temperature egg whites whip faster and achieve greater volume than cold ones. For food safety and easier separation, separate eggs while cold (yolks break less easily), then let the whites sit at room temperature for 30 minutes before whipping. Make absolutely certain your bowl and beaters are spotlessly clean—even a tiny bit of grease or egg yolk will prevent proper whipping.
Testing Meringue Doneness: Your meringue is ready when it forms stiff peaks that stand straight up without drooping, appears glossy (not dull or curdled), and the sugar is completely dissolved. Test by rubbing a bit between your fingers—it should feel completely smooth with no graininess. Underbeaten meringue will weep and deflate; overbeaten will look dry and clumpy.
Torching Technique: Keep your kitchen torch moving constantly in small circular motions about 3-4 inches from the meringue surface. Don’t hold it in one spot or you’ll burn through to the chocolate layer. You want golden brown peaks with some darker charred spots—that’s what creates authentic s’mores flavor. If using a broiler instead, watch it like a hawk; broilers vary wildly and can go from perfect to burned in seconds.
Sealing the Edges: When spreading meringue on your pie, make sure it touches the crust edges all the way around. This seals the meringue to the crust and prevents it from shrinking as it cools. Any gaps will cause the meringue to pull away from the edges, creating an unprofessional look.
Common Mistakes to Avoid
1. Skipping the Crust Baking Step
Raw graham cracker crusts become soggy and fall apart when filled. Even though the filling doesn’t require baking, the crust needs those 10 minutes in the oven to set properly and develop flavor. A pre-baked crust stays crisp and sturdy, making the pie much easier to slice and serve.2. Adding Meringue to Warm Chocolate
The chocolate ganache layer must be completely cold and set before adding meringue, or the heat will cause the meringue to melt and weep. Be patient and give the ganache a full 2 hours to chill. Touch it—if it’s even slightly warm or soft, keep waiting. Cold, firm ganache provides the stable base meringue needs.3. Getting Grease in Your Egg Whites
This is the #1 reason meringue fails. Even a tiny bit of egg yolk, butter, or grease prevents egg whites from whipping properly. Wash your bowl and beaters with hot soapy water, rinse well, and dry completely. Some bakers even wipe the bowl with vinegar or lemon juice to ensure it’s grease-free. Glass or metal bowls work best—plastic can retain grease in its pores.4. Adding Sugar Too Quickly
If you dump all the sugar into egg whites at once, it weighs them down and prevents proper whipping. Add sugar gradually—1 tablespoon at a time—while the mixer runs, allowing each addition to dissolve before adding more. This creates stable, glossy meringue that holds its shape beautifully. Patience here makes all the difference.5. Making Meringue Too Far in Advance
Meringue is temperamental and starts to weep (release liquid) and deflate after a few hours, especially in humid conditions. For best results, make and torch the meringue within 2-4 hours of serving. The crust and chocolate layer can be made days ahead, but save the meringue for the day you’re serving the pie.Storage & Meal Prep
Refrigerator Storage:
This pie must be refrigerated due to the cream in the ganache. Store loosely covered (don’t let the covering touch the meringue) for up to 2 days, though the meringue will begin to weep after 4-6 hours. The chocolate and crust components hold up beautifully; it’s only the meringue that’s time-sensitive.Best Storage Method:
To protect the meringue peaks, insert toothpicks around the surface of the pie at intervals, then drape plastic wrap over them to create a tent. This keeps the wrap from touching and crushing your beautiful toasted meringue. Alternatively, store the pie in a cake carrier with a domed lid.Meringue Weeping:
All meringues eventually release liquid, especially in humid conditions. This is normal and doesn’t mean you did anything wrong. The liquid that collects between the meringue and chocolate layer is just moisture being released. For the prettiest presentation, make and serve the pie within 4 hours of adding meringue.Component Storage:
The smart way to handle this pie for entertaining is storing components separately. Keep the filled crust (chocolate layer) covered in the fridge for up to 3 days. Make and toast the meringue within a few hours of serving. This ensures maximum freshness and best appearance.Make-Ahead & Freezer Notes
Make-Ahead Timeline:
This pie is perfect for advance preparation with the right strategy. Make the graham cracker crust up to 3 days ahead; cool completely, wrap tightly in plastic wrap, and store at room temperature or refrigerate. Make the chocolate ganache layer up to 3 days ahead and keep the filled crust refrigerated. Add the meringue topping on the day of serving, within 2-4 hours of when you plan to serve it.Freezing the Filled Crust:
The crust with chocolate ganache filling freezes beautifully for up to 2 months. Wrap the whole pie (without meringue) tightly in plastic wrap, then aluminum foil. Freeze flat. Thaw overnight in the refrigerator, then add fresh meringue before serving. The chocolate texture will be virtually identical to freshly made.Don’t Freeze Meringue:
Meringue does not freeze well—it becomes weepy and deflated when thawed. Always add meringue fresh to a thawed or refrigerated pie base. This is why component storage is so effective for this recipe.Emergency Shortcut:
If you need dessert in a hurry, you can buy a pre-made graham cracker crust. The homemade version tastes better, but store-bought works in a pinch. Just brush it with melted butter and bake for 5 minutes before filling for better flavor and texture.Bringing to Parties:
If transporting this pie, add the meringue at your destination if possible. Transport the filled crust in a pie carrier, then whip up the meringue and torch it on-site. This ensures the meringue looks fresh and beautiful. Most people have an electric mixer, or you can bring a hand mixer along.Serving Suggestions
This S’mores Pie is truly a star dessert that needs little accompaniment, but here are ways to make the experience even better.
Classic Pairings:
Serve slices with cold milk—the classic beverage for anything s’mores-related. For adults, hot coffee or espresso provides a wonderful bitter contrast to the sweet pie. Hot chocolate is also delightful, creating a total chocolate immersion experience.Ice Cream Accompaniment:
A small scoop of vanilla ice cream or vanilla bean ice cream alongside each slice adds wonderful temperature contrast and creamy richness. The cold ice cream melting into the warm-ish meringue (if freshly torched) creates an amazing texture experience. Toasted marshmallow ice cream or chocolate ice cream are also excellent choices.Whipped Cream Option:
For those who find meringue too sweet, serve slices with a dollop of lightly sweetened whipped cream instead of (or in addition to) the meringue topping. The cream’s mild flavor lets the chocolate shine.Campfire Theme:
For parties, embrace the campfire theme. Serve the pie on rustic wooden boards, use red-checked napkins, and create a s’mores bar nearby with graham crackers, chocolate bars, and marshmallows for traditional s’mores. String lights create that outdoor campfire ambiance.Beverage Pairings:
For special occasions, dessert wines like port, cream sherry, or chocolate wine pair beautifully. Non-alcoholic options include chocolate milk, vanilla malts, root beer floats, or hot chocolate with marshmallows.Individual Servings:
For elegant plating, place each slice on a white dessert plate, add a small pile of graham cracker crumbs on the side, drizzle with chocolate sauce, and add a perfect toasted marshmallow as garnish. This restaurant-style presentation elevates the humble s’more into fine dining.FAQs Section
Q: Can I use a store-bought graham cracker crust?
A: Absolutely! While homemade crust tastes better and is more sturdy, store-bought works in a pinch. Choose the standard 9-inch size. Before filling, brush the crust with melted butter and bake at 350°F for 5 minutes to improve flavor and texture. Let it cool before adding the ganache.Q: I don’t have a kitchen torch. Can I still make this pie?
A: Yes! Use your oven’s broiler instead. Position an oven rack about 6 inches from the broiler element and preheat the broiler. Place your meringue-topped pie under the broiler for 1-2 minutes, watching constantly and rotating as needed for even browning. Broilers vary in intensity, so don’t walk away—it can go from perfect to burned very quickly.Q: Why is my meringue weeping (releasing liquid)?
A: Meringue weeping happens for several reasons: adding meringue to a warm filling, high humidity, undissolved sugar, or storing too long. Make sure your chocolate layer is completely cold before adding meringue. Beat meringue until sugar is fully dissolved (test by rubbing between fingers—should feel smooth, not grainy). Make and serve the pie within 4-6 hours for best results.Q: Can I make this pie with milk chocolate instead?
A: You can, but milk chocolate is very sweet and doesn’t set as firmly as dark or semi-sweet chocolate. If using milk chocolate, reduce the heavy cream to ¾ cup instead of 1 cup, and refrigerate the pie for at least 3 hours to ensure proper setting. The flavor will be sweeter and more reminiscent of a Hershey’s bar.Q: My egg whites won’t form stiff peaks. What went wrong?
A: Several culprits: grease in the bowl or on beaters (even a tiny bit prevents whipping), egg yolk contamination, old eggs, or cold eggs. Make sure your bowl and beaters are spotlessly clean. Use room temperature egg whites. If any yolk got into the whites, start over—you can’t remove it once it’s mixed in. Also ensure you’re beating long enough—proper meringue takes 5-7 minutes after all sugar is added.Q: Can I add actual marshmallows to this pie?
A: Definitely! For a different approach, skip the meringue and top the chilled chocolate layer with large marshmallows placed close together. Toast them with a kitchen torch or under the broiler until golden. This creates a more rustic, truly authentic s’mores look. Regular-size marshmallows or jumbo marshmallows both work great.Q: How do I get clean slices?
A: The secret is a sharp knife dipped in hot water. Keep a tall glass of very hot water nearby. Dip your knife in the hot water, wipe it completely dry with a towel, then make one cut. Wipe the knife clean, dip again in hot water, dry, and make the next cut. This technique gives you bakery-perfect slices with clean edges.Conclusion
There’s something absolutely magical about S’mores Pie—it takes us back to childhood summers, camping trips, and the simple joy of toasting marshmallows around a fire, but presents those beloved flavors in a sophisticated, shareable form that’s perfect for any occasion. The combination of crunchy graham cracker crust, silky chocolate ganache, and fluffy toasted meringue creates a symphony of textures and flavors that’s simply irresistible.
The beauty of this recipe is that it looks incredibly impressive—like something from a high-end bakery—but it’s completely achievable for home bakers of all skill levels. Yes, making meringue might seem intimidating if you’ve never done it before, but follow the instructions carefully and you’ll be amazed at how straightforward it actually is. And that moment when you torch the meringue and watch it turn golden brown? Pure kitchen magic.
Whether you’re making this for a summer celebration, a special birthday, or just because you’re craving those nostalgic s’mores flavors, this pie will deliver beyond your expectations. It’s guaranteed to be the dessert everyone remembers and requests again.
Ready to make this show-stopping pie? I’d absolutely love to hear about your experience! Drop a comment below and tell me how it turned out. Did you use a kitchen torch or the broiler? What did your family think? Did you try any fun variations? I’m always excited to hear from fellow bakers!
If this recipe sparked your interest, please save it to your Pinterest boards and share it with friends who love s’mores as much as you do. Every save, share, and comment helps support this blog and keeps these detailed recipes coming. Now grab your graham crackers and let’s make some pie! 🔥🍫🥧