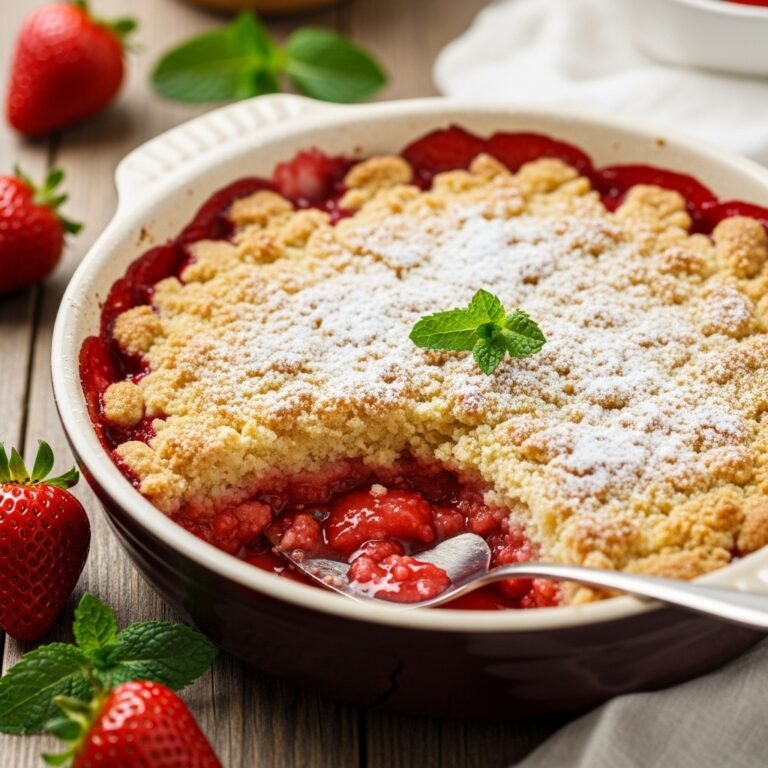
Easy Strawberry Crumble Recipe: Sweet, Buttery, and Absolutely Irresistible
Is th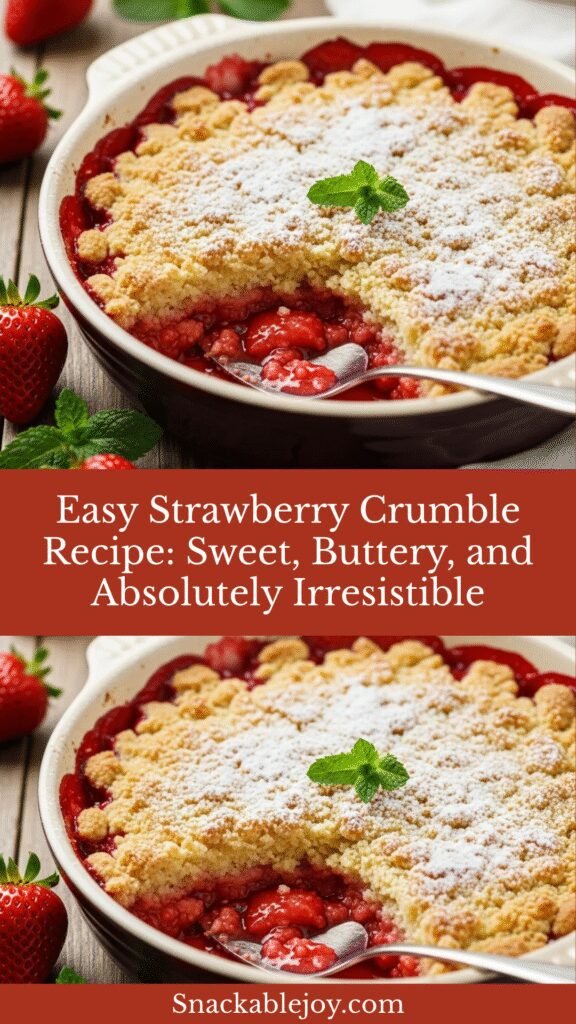 ere anything more delightful than a warm strawberry crumble fresh from the oven? Picture this: tender, juicy strawberries bubbling in their own sweet syrup, topped with a golden, buttery crumble that’s perfectly crisp on the outside and delicately soft underneath. This strawberry crumble is pure comfort in a dish—simple, elegant, and bursting with fresh berry flavor that screams summer (even if you’re making it in the middle of winter with frozen strawberries!).
This classic dessert is the perfect answer when you’re craving something sweet but don’t want to spend hours in the kitchen. It comes together in about 15 minutes of hands-on prep time, requires no fancy techniques, and uses ingredients you probably already have in your pantry. Whether you’re hosting a backyard barbecue, looking for a crowd-pleasing potluck dessert, celebrating a special occasion, or simply treating yourself on a Tuesday night, this strawberry crumble delivers every single time. Serve it warm with a generous scoop of vanilla ice cream melting into those strawberry juices, and prepare for everyone to ask for seconds. This is the kind of dessert that creates memories and becomes a family favorite for generations.
History / Background
The crumble has a fascinating history that begins in Britain during World War II. When rationing made traditional ingredients for pies scarce—butter, flour, and sugar were all strictly limited—British home cooks needed to get creative. The crumble was born out of necessity as a simpler, more economical alternative to fruit pies that required significantly less fat and effort than making traditional pastry. Without the need for rolling dough, crimping edges, or blind-baking crusts, the crumble became a practical solution that could stretch limited ingredients further while still satisfying the nation’s sweet tooth.
The original British crumbles typically featured apples, rhubarb, or blackberries—fruits that were readily available in British gardens and countryside. The name “crumble” comes from the texture of the topping, which literally crumbles between your fingers before baking and develops a delightfully crunchy texture in the oven. In some parts of America, this dessert is also called a “crisp,” though the terms are often used interchangeably.
As British immigrants brought their culinary traditions to America, the crumble crossed the Atlantic and evolved to incorporate American ingredients and tastes. Strawberries, which are native to the Americas and have been cultivated for centuries, became a natural choice for this adaptable dessert. Native Americans had been consuming wild strawberries long before European colonization, and they introduced these berries to early settlers. The combination of British baking tradition with quintessentially American strawberries represents a beautiful culinary fusion.
Today, strawberry crumble holds a special place in American home baking, particularly during strawberry season from late spring through early summer. There’s something magical about transforming fresh, ruby-red strawberries into a warm, comforting dessert that celebrates the fruit at its peak. The crumble’s enduring popularity speaks to its versatility, simplicity, and the universal appeal of sweet, buttery toppings paired with fruit. It’s a dessert that transcends skill levels—anyone can make it, and everyone loves it.
Why You’ll Love This Recipe
This strawberry crumble recipe is about to become your go-to dessert, and I’m not exaggerating. It’s the perfect combination of effortless preparation and impressive results. The strawberries soften and release their natural juices, creating a luscious, jammy filling that tastes like the essence of summer, while the buttery crumble topping bakes into golden perfection with those coveted crispy clusters that everyone fights over.
Here’s why this recipe will steal your heart:
- Ridiculously Easy – No complicated steps, no pastry skills required. If you can mix ingredients in a bowl, you can make this crumble!
- Lightning-Fast Prep – Ready for the oven in just 15 minutes with minimal cleanup
- Budget-Friendly – Uses simple, affordable ingredients without any fancy additions
- Naturally Impressive – Looks like you spent hours baking, but it’s secretly effortless
- Perfect Texture Balance – Sweet-tart strawberries meet buttery, crispy-crunchy topping in perfect harmony
- Flexible with Fresh or Frozen – Works beautifully year-round with either fresh or frozen strawberries
- Crowd-Pleaser – Kids and adults universally love this comforting dessert
- Easily Customizable – Adapt with different fruits, add-ins, or topping variations to suit your taste
- Make-Ahead Friendly – Can be assembled hours ahead and popped in the oven when ready
- Freezer-Friendly – Both unbaked and baked versions freeze beautifully for future cravings
- Allergy-Adaptable – Easy to make gluten-free, dairy-free, or vegan with simple swaps
- Versatile Serving Options – Perfect for breakfast, brunch, dessert, or even an afternoon snack with tea
Ingredient Notes
Let’s break down exactly what goes into this spectacular strawberry crumble and why each ingredient matters. Understanding your ingredients helps you make smart substitutions and adjustments.
For the Strawberry Filling:
Fresh or Frozen Strawberries – The star of the show! Fresh strawberries are absolutely gorgeous when they’re in season—sweet, juicy, and vibrant. However, frozen strawberries work equally well and are available year-round, making this a dessert you can enjoy anytime. You’ll need about 5-6 cups. If using frozen, don’t thaw them first; just add a few extra minutes to the baking time and possibly an extra tablespoon of cornstarch to handle the extra liquid.
Granulated Sugar – Sweetens the naturally tart strawberries and helps draw out their juices to create that gorgeous syrupy filling. The amount can be adjusted based on how sweet your berries are. Strawberries can vary significantly in sweetness depending on variety and ripeness, so taste first and adjust accordingly.
Cornstarch – This is your secret weapon for achieving the perfect consistency. Cornstarch thickens the strawberry juices as they’re released during baking, transforming them from watery to beautifully jammy. Without it, you’ll end up with strawberry soup instead of a luscious filling. Tapioca starch works as a substitute and is naturally gluten-free.
Fresh Lemon Juice – Brightens the strawberry flavor and adds a subtle tang that prevents the dessert from being cloyingly sweet. The acidity also helps the strawberries maintain their vibrant color during baking. Fresh lemon juice is always best, but bottled will work if that’s what you have.
Vanilla Extract – Enhances all the other flavors and adds warmth and depth to the filling. Pure vanilla extract is preferred, but imitation vanilla will work in a pinch.
Salt – Just a tiny pinch does wonders to enhance the sweetness and bring out the strawberry flavor. Never skip salt in desserts!
For the Crumble Topping:
All-Purpose Flour – Creates the base structure of the crumble. For gluten-free needs, use a 1:1 gluten-free flour blend. Almond flour also works beautifully and adds a lovely nutty flavor.
Old-Fashioned Rolled Oats – These are essential for creating that signature texture with crispy clusters. Use old-fashioned oats, not quick oats or instant oatmeal, which will turn mushy. The oats add wonderful texture, a subtle nutty flavor, and make the topping feel more substantial and wholesome.
Light Brown Sugar – Provides moisture and a deeper, more complex sweetness with caramel undertones that complement the butter beautifully. You can use dark brown sugar for a more pronounced molasses flavor, or substitute granulated sugar if needed (though you’ll lose some of that rich depth).
Cold Unsalted Butter – The MVP ingredient for achieving that perfect crumbly texture! The butter must be cold so it doesn’t fully incorporate into the dry ingredients—this creates steam pockets during baking that result in a light, crispy topping. Cut it into small cubes before using. Unsalted butter lets you control the salt level precisely.
Ground Cinnamon – Adds warmth and a subtle spice note that pairs beautifully with strawberries. You can adjust the amount or omit it entirely if you prefer a more straightforward strawberry flavor.
Salt – Balances the sweetness and enhances all the other flavors. A proper pinch of salt in the topping makes all the difference.
Equipment Needed
You won’t need any specialized or expensive equipment for this recipe—just basic kitchen tools that most home cooks already have on hand:
- 9×13-inch Baking Dish – A standard glass or ceramic baking dish is perfect. You can also use a deep 9-inch or 10-inch pie dish, a cast-iron skillet, or individual ramekins for single servings.
- Large Mixing Bowl – For preparing the strawberry filling.
- Medium Mixing Bowl – For making the crumble topping.
- Measuring Cups and Spoons – Essential for accurate measurements that ensure consistent results.
- Sharp Knife and Cutting Board – For hulling and slicing the strawberries if using fresh.
- Pastry Cutter, Fork, or Your Fingers – To cut the cold butter into the dry ingredients. A food processor also works but requires a light touch to avoid overprocessing.
- Wooden Spoon or Rubber Spatula – For stirring the filling mixture.
- Rimmed Baking Sheet – To place under your baking dish to catch any drips during baking and protect your oven.
- Cooling Rack – Allows air to circulate under the hot dish for even cooling.
Print

Strawberry Crumble Recipe
This easy strawberry crumble features tender, juicy strawberries in a sweet, jammy filling topped with a golden, buttery oat crumble. It’s the perfect combination of textures and flavors—ready in under an hour and absolutely divine served warm with vanilla ice cream.
- Total Time: 55-60 minutes
- Yield: 8-10 servings 1x
Ingredients
ScaleFor the Strawberry Filling:
- 6 cups fresh strawberries, hulled and halved (or quartered if large) OR frozen strawberries
- ⅓ cup granulated sugar
- 3 tablespoons cornstarch
- 2 tablespoons fresh lemon juice
- 1 teaspoon vanilla extract
- Pinch of salt
For the Crumble Topping:
- 1 cup all-purpose flour
- 1 cup old-fashioned rolled oats
- ¾ cup packed light brown sugar
- ½ teaspoon ground cinnamon
- ½ teaspoon salt
- ½ cup (1 stick) cold unsalted butter, cut into small cubes
Instructions
- Preheat your oven to 375°F (190°C). Lightly grease a 9×13-inch baking dish with butter or non-stick cooking spray, or line it with parchment paper for easy cleanup.
- Prepare the strawberry filling: If using fresh strawberries, hull them and cut larger berries in half or quarters so all pieces are roughly the same size for even cooking. In a large mixing bowl, combine the strawberries, granulated sugar, cornstarch, lemon juice, vanilla extract, and a pinch of salt. Gently toss everything together until the strawberries are evenly coated. Let this mixture sit for about 5-10 minutes while you prepare the topping—this allows the sugar to start drawing out the strawberry juices.
- Make the crumble topping: In a medium bowl, whisk together the flour, oats, brown sugar, cinnamon, and salt until everything is evenly distributed and no lumps of brown sugar remain.
- Cut in the butter: Add the cold butter cubes to the flour-oat mixture. Using a pastry cutter, two forks, or your fingertips, work the butter into the dry ingredients until the mixture resembles coarse crumbs with some pea-sized butter pieces still visible. You want a crumbly, sandy texture with visible butter chunks—these create those delicious crispy clusters during baking. Don’t overmix or the butter will warm up and you’ll lose that perfect texture.
- Assemble the crumble: Give the strawberry mixture one final stir, then pour it into your prepared baking dish, spreading it out into an even layer. Sprinkle the crumble topping evenly over the strawberries, making sure to cover the entire surface. Use your hands to squeeze some of the mixture together to create larger clumps if you want extra-crispy clusters (highly recommended!).
- Bake: Place the baking dish on a rimmed baking sheet to catch any drips, then transfer to the preheated oven. Bake for 40-45 minutes, or until the topping is deeply golden brown and the strawberry filling is bubbling vigorously around the edges and through some gaps in the topping. If the topping is browning too quickly but the filling isn’t bubbling yet, loosely tent the dish with aluminum foil for the last 10-15 minutes of baking.
- Cool and serve: Remove the crumble from the oven and let it cool on a wire rack for at least 15-20 minutes before serving. This cooling time is crucial—it allows the filling to thicken properly and makes serving much easier. Serve warm or at room temperature with vanilla ice cream, whipped cream, or a drizzle of heavy cream.
Notes
- Fresh vs. Frozen Strawberries: If using frozen strawberries, use them straight from the freezer without thawing. Add an extra tablespoon of cornstarch and expect to add 5-10 minutes to the baking time to account for the extra moisture.
- Adjusting Sweetness: Strawberry sweetness varies dramatically by season and variety. Taste your berries first! If they’re very tart, add an extra 2-3 tablespoons of sugar to the filling. If they’re super sweet, you can reduce the sugar slightly.
- Size Matters: Cut your strawberries into uniform pieces so they cook evenly. Very large berries should be quartered; medium berries can be halved.
- Extra Crispy Topping: For maximum crispiness, add ¼ cup of chopped pecans or sliced almonds to the crumble topping.
- Preventing a Soggy Bottom: Don’t skip the resting time for the filling, and make sure your oven is fully preheated before baking.
- Prep Time: 15 minutes
- Cook Time: 40-45 minutes
- Category: Desert
- Method: Baking
- Cuisine: American
- Diet: Vegetarian
Nutrition
- Serving Size: 1 piece (based on 10 servings)
- Calories: 268
- Sugar: 28g
- Sodium: 170mg
- Fat: 10g
- Saturated Fat: 6g
- Unsaturated Fat: 3g
- Trans Fat: 0g
- Carbohydrates: 44g
- Fiber: 3g
- Protein: 3g
- Cholesterol: 24mg
Tips & Variations
Fruit Combinations:
- Strawberry-Rhubarb: Replace 2 cups of strawberries with diced rhubarb for a classic spring combination. Add an extra 2-3 tablespoons of sugar since rhubarb is quite tart.
- Mixed Berry: Combine strawberries with raspberries, blackberries, or blueberries for a mixed berry crumble.
- Strawberry-Peach: Use 3 cups strawberries and 3 cups sliced peaches for a summer stone fruit twist.
- Strawberry-Apple: Mix strawberries with diced apples for a fruit combination that works year-round.
Flavor Enhancements:
- Add ½ teaspoon of ground ginger or cardamom to the topping for warm spice notes.
- Stir 1 teaspoon of balsamic vinegar into the strawberry filling to intensify the berry flavor.
- Mix in the zest of one orange to both the filling and topping for a citrusy brightness.
- Add 2 tablespoons of strawberry jam to the filling for extra strawberry intensity.
Dietary Modifications:
- Gluten-Free: Use a 1:1 gluten-free flour blend and certified gluten-free oats.
- Dairy-Free/Vegan: Replace butter with cold coconut oil or vegan butter sticks.
- Lower Sugar: Reduce the sugar in the filling by half and use a sugar substitute in the topping.
- Paleo-Friendly: Use almond flour instead of all-purpose flour, coconut sugar instead of brown sugar, and skip the oats (or use grain-free granola as topping).
Texture Variations:
- Add ½ cup chopped pecans, walnuts, or almonds to the topping for extra crunch and nutty flavor.
- Mix in ¼ cup shredded coconut for tropical flair.
- Substitute half the oats with granola for extra texture and flavor.
- Add 2 tablespoons of chia seeds or flaxseeds to the filling for added nutrition and thickening power.
Pro Chef Tips
1. Cold Butter is Non-Negotiable: This is the most critical factor in achieving that perfect, crumbly texture with crispy clusters. Cold butter creates steam pockets as it melts during baking, resulting in a light, flaky topping rather than a dense, greasy one. If your kitchen is warm or you have warm hands, put the butter cubes in the freezer for 5-10 minutes before incorporating them. Work quickly and stop mixing as soon as you have a crumbly texture.
2. Macerate Your Strawberries: Letting the strawberries sit with the sugar, cornstarch, and lemon juice for 5-10 minutes before baking isn’t just busywork—it’s crucial. This process, called maceration, draws out the natural juices from the berries and allows the cornstarch to begin hydrating. This head start means your filling will thicken properly and won’t be watery.
3. Create Intentional Clusters: Don’t just sprinkle the topping evenly like you’re spreading sand. Use your hands to squeeze portions of the crumble mixture into clumps before sprinkling them over the fruit. These intentional clusters will bake into those irresistible, extra-crispy bits that everyone loves. Aim for a mix of smaller crumbles and larger clusters for the best texture variety.
4. Listen for the Bubble: Your crumble is truly done when you can see and hear the filling actively bubbling around the edges and through gaps in the topping. This vigorous bubbling indicates that the cornstarch has fully activated and thickened the juices. If you pull it out before this happens, your filling will be too runny once it cools.
5. Size Your Strawberries Correctly: Cut your strawberries into pieces that are roughly ¾ to 1 inch in size. If they’re too small, they’ll turn to mush; if they’re too large, they won’t cook through properly and will still be firm when the topping is done. Uniformity is key for even cooking.
6. Don’t Skip the Cooling Time: I know it’s torture to wait when it smells so amazing, but letting the crumble cool for 15-20 minutes is essential. The filling is literally boiling hot straight from the oven and needs time to set and thicken as it cools. Cut into it too soon and you’ll have a runny mess instead of perfect, scoopable slices.
7. Use the Right Baking Dish: A ceramic or glass baking dish distributes heat more evenly than metal, which can cause the bottom to brown too quickly. If you only have a metal pan, reduce the oven temperature by 25°F and keep a close eye on it.
Common Mistakes to Avoid
1. Using Room Temperature or Warm Butter: This is the single biggest mistake that results in a dense, greasy topping instead of light and crumbly. The butter must be cold—straight from the refrigerator—to create the proper texture. If you accidentally let your butter soften, pop it back in the fridge for 15 minutes before proceeding.
2. Over-Mixing the Topping: Once you add the cold butter to your dry ingredients, mix only until you have a crumbly texture with visible butter pieces. Over-mixing will warm the butter, create a paste, and result in a dense, uniform topping instead of those coveted crispy clusters. Use a light hand!
3. Cutting Strawberries Too Large or Too Small: Strawberry pieces that are too large won’t cook through by the time the topping is golden. Pieces that are too small will turn into mush. Aim for uniform ¾-inch to 1-inch pieces. When in doubt, err on the side of slightly larger rather than smaller.
4. Not Adjusting for Frozen Strawberries: Frozen berries release significantly more liquid than fresh berries, so if you use frozen strawberries with the exact same amount of cornstarch as fresh, you’ll end up with a watery disaster. Always add an extra tablespoon of cornstarch when using frozen fruit, and don’t be tempted to thaw them first—this releases even more liquid.
5. Cutting and Serving Too Soon: This is so tempting but resist! If you cut into the crumble before it’s had adequate cooling time, the filling will be too liquid and will run all over your plate. The cooling period allows the cornstarch to finish setting up. Wait at least 15-20 minutes—your patience will be rewarded with beautiful, neat servings.
Storage & Meal Prep
Refrigerator Storage:
Once your strawberry crumble has cooled completely, cover it tightly with plastic wrap, aluminum foil, or transfer portions to airtight containers. It will keep in the refrigerator for up to 4-5 days. Keep in mind that the topping will soften somewhat in the fridge, but it’s still absolutely delicious. The filling actually gets even better after a day as the flavors meld.Reheating Instructions:
To restore that crispy topping, always reheat in the oven rather than the microwave when possible. For individual portions, reheat uncovered at 350°F for 10-12 minutes. For a whole pan, cover with foil and reheat at 350°F for 20-25 minutes, then remove the foil for the last 5 minutes to re-crisp the topping. In a pinch, you can microwave individual servings for 45-60 seconds, though the topping won’t be crispy.Room Temperature Storage:
If you plan to eat the entire crumble within 24 hours and your kitchen isn’t excessively hot, you can keep it covered at room temperature. Beyond that, refrigeration is recommended to prevent the strawberries from spoiling.Portioning for Later:
For easy weekday desserts, slice the cooled crumble into individual portions and store in separate containers. This makes it simple to grab a single serving for a quick treat without reheating the entire pan.Make-Ahead & Freezer Notes
Assemble Ahead:
You can prepare the entire crumble (both filling and topping) up to 24 hours before baking. Assemble everything in your baking dish, cover tightly with plastic wrap, and refrigerate. When ready to bake, let it sit at room temperature for about 15-20 minutes to take the chill off, then bake as directed. You may need to add 5-10 extra minutes to the baking time since it’s starting cold.Freezing Unbaked Crumble:
This is fantastic for having a dessert ready to go! Assemble the crumble in a freezer-safe dish (or a disposable aluminum pan for gifting), cover tightly with plastic wrap and then a layer of aluminum foil, and freeze for up to 3 months. When ready to bake, you can bake it directly from frozen (add 25-35 minutes to the baking time and cover with foil if the top browns too quickly) or thaw overnight in the refrigerator first and bake as directed.Freezing Baked Crumble:
Let the baked crumble cool completely, then cover extremely well with plastic wrap and aluminum foil, or slice into portions and store in freezer-safe containers or bags. Freeze for up to 3 months. Thaw overnight in the refrigerator before reheating.Best Reheating Method from Frozen:
For best results with frozen crumble, thaw it overnight in the refrigerator, then reheat covered with foil at 350°F for 25-30 minutes, removing the foil for the last 5-10 minutes to crisp up the topping. If reheating from frozen, cover tightly with foil and bake at 350°F for 40-50 minutes, then uncover for the last 10 minutes.Freezing Tips:
Use high-quality freezer bags or containers to prevent freezer burn. Label everything with the date and reheating instructions. If using a glass dish, remember to let it come to room temperature before putting it in a hot oven to prevent cracking.Serving Suggestions
Strawberry crumble is wonderfully versatile and can be dressed up or down depending on the occasion. Here are some delicious ways to serve it:
Classic Pairings:
- Vanilla Ice Cream: The all-time classic pairing! The cold, creamy vanilla contrasts beautifully with the warm, fruity filling and creates little puddles of melted deliciousness.
- Fresh Whipped Cream: Light, airy, and not too sweet—homemade whipped cream is elegant and lets the strawberry flavor shine.
- Heavy Cream Drizzle: For a British-style serving, simply pour cold heavy cream over a warm slice. It’s simple but absolutely divine.
- Vanilla Custard: Rich and silky custard (or even store-bought vanilla pudding) makes this extra indulgent.
Breakfast or Brunch:
- Serve at room temperature with Greek yogurt and a drizzle of honey for a protein-packed breakfast
- Pair with scrambled eggs and bacon for a sweet-savory brunch spread
- Top with granola and fresh berries for a breakfast parfait-style presentation
- Enjoy alongside your morning coffee or tea as a special weekend treat
Elevated Presentations:
- Serve in individual ramekins or mason jars for a charming, rustic presentation
- Add a scoop of strawberry or lemon sorbet instead of ice cream for a refreshing twist
- Drizzle with salted caramel or chocolate sauce for extra decadence
- Garnish with fresh mint leaves, edible flowers, or additional fresh strawberries
- Top with a dollop of mascarpone cheese or crème fraîche for sophisticated richness
Beverage Pairings:
- Hot coffee or espresso to balance the sweetness
- English breakfast or Earl Grey tea for an afternoon tea vibe
- Sparkling rosé or Prosecco for a celebratory dessert
- Sweet dessert wines like Moscato d’Asti or late-harvest Riesling
- Cold whole milk for a comforting, nostalgic experience
Complete Meal Ideas: Serve this strawberry crumble after a light dinner of grilled chicken Caesar salad, lemon herb salmon with roasted vegetables, or a summer barbecue feast of burgers and corn on the cob.
FAQs Section
Q: Can I use frozen strawberries instead of fresh?
A: Absolutely! Frozen strawberries work perfectly in this recipe and are often more affordable, especially outside of strawberry season. Use them straight from the freezer without thawing (thawing releases too much liquid). Add an extra tablespoon of cornstarch to account for the additional moisture, and expect to add 5-10 minutes to the baking time. Your crumble will be just as delicious!Q: Why is my strawberry crumble watery?
A: A watery crumble usually results from one of three issues: not enough cornstarch for the amount of liquid released by the berries, cutting into the crumble before it had time to cool and set (the cornstarch needs cooling time to fully thicken), or using frozen berries without adjusting the cornstarch amount. Make sure you’re using the full amount of cornstarch specified, let it cool for at least 15-20 minutes, and add extra thickener if using frozen fruit.Q: Can I make this recipe gluten-free?
A: Yes! Simply substitute the all-purpose flour with a 1:1 gluten-free flour blend and make sure you’re using certified gluten-free oats (regular oats are often cross-contaminated with gluten during processing). Almond flour also works beautifully and adds a lovely nutty flavor. The rest of the recipe stays exactly the same.Q: How do I know when the strawberry crumble is done baking?
A: Your crumble is perfectly done when the topping is deeply golden brown (not just lightly colored) and you can see the strawberry filling bubbling vigorously around the edges and through gaps in the topping. This usually takes 40-45 minutes at 375°F. The bubbling is crucial—it means the cornstarch has activated and thickened the filling. If the topping browns before the filling bubbles, tent loosely with foil and continue baking.Q: Can I make individual servings in ramekins?
A: Definitely! Individual ramekins are perfect for dinner parties or portion control. Divide the filling among 6-8 ramekins (depending on size), top with the crumble mixture, and place them on a baking sheet. Bake at 375°F for 25-30 minutes until the topping is golden and the filling is bubbling. Individual portions also freeze beautifully.Q: What other fruits work well in this crumble recipe?
A: This crumble recipe is extremely versatile! Try it with mixed berries (raspberries, blackberries, blueberries), sliced peaches or nectarines, pitted cherries, apples, pears, or plums. You can also do combination like strawberry-rhubarb, strawberry-peach, or strawberry-apple. Adjust the sugar based on your fruit’s sweetness and the cornstarch based on how juicy your fruit is.Q: Why does my crumble topping come out dense instead of crumbly?
A: This happens when the butter is too warm when you mix it into the flour mixture, or if you overmix the topping. The butter must be cold—straight from the refrigerator—and you should stop mixing as soon as you achieve a crumbly texture with visible butter pieces. Overworking the mixture warms the butter and causes it to blend too thoroughly with the flour, resulting in a dense, uniform topping.Q: Can I reduce the sugar in this recipe?
A: You can reduce the sugar somewhat, but keep in mind that sugar isn’t just for sweetness—it also draws out the juices from the strawberries to create that luscious filling. Start by reducing the filling sugar by 2-3 tablespoons and taste your berries first. Very sweet strawberries need less sugar than tart ones. The topping sugar is harder to reduce without affecting texture, but you can try cutting it by ¼ cup if you prefer less sweet desserts.Conclusion
This strawberry crumble recipe is pure magic in a baking dish—simple enough for a Tuesday night but special enough for company. It’s the kind of dessert that makes your whole house smell incredible, brings everyone running to the kitchen, and gets devoured faster than you can say “save room for dessert.” The combination of sweet-tart strawberries with that buttery, crispy crumble topping is simply unbeatable, and the fact that it comes together so easily makes it even more lovable.
Whether you’re celebrating the arrival of fresh strawberry season, using up frozen berries from your freezer, looking for a crowd-pleasing potluck contribution, or simply craving something sweet and comforting, this crumble has you covered. It’s forgiving enough for beginner bakers but delicious enough to impress the most discerning dessert lovers. Once you master this basic recipe, you’ll find yourself making it again and again, experimenting with different fruits and variations to suit your mood and the season.
The beauty of this recipe lies in its simplicity and versatility—it’s everything a home-baked dessert should be. No fancy equipment, no complicated techniques, no stress—just pure, delicious comfort food that happens to look gorgeous and taste even better.
Now it’s your turn! Have you tried this strawberry crumble recipe? I’d absolutely love to hear how it turned out for you! Did you make any creative variations? What did you serve it with? Drop a comment below and let me know. And if you loved this recipe, please give it a five-star rating and share it on Pinterest so other home cooks can discover it too. Your feedback helps me create more recipes you’ll love, and it helps other people find tried-and-true recipes they can trust.
Don’t forget to snap a photo of your beautiful strawberry crumble and tag me on social media—I love seeing your kitchen creations! Happy baking, friends! 🍓