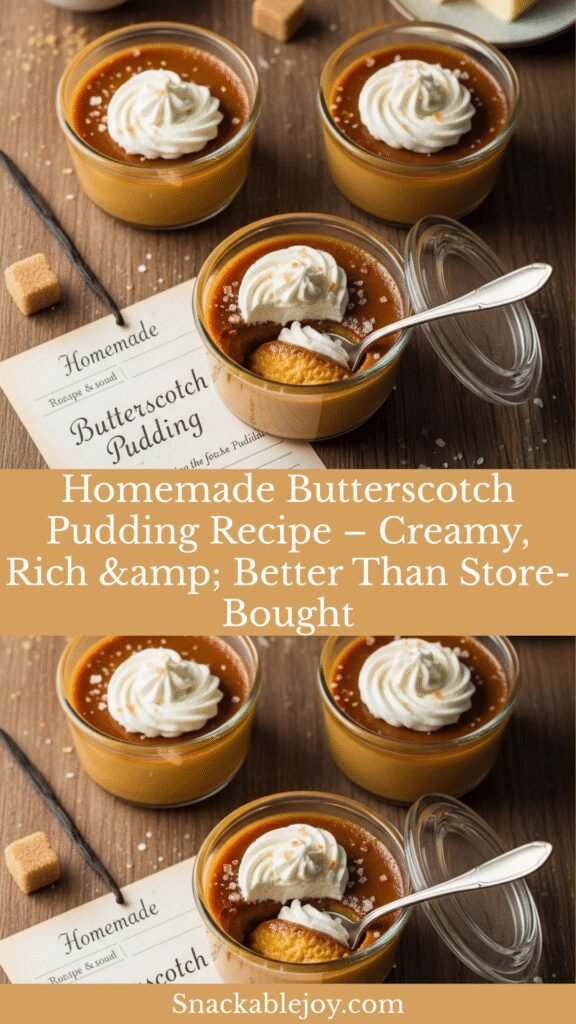
Homemade Butterscotch Pudding Recipe – Creamy, Rich & Better Than Store-Bought
If you’ve only ever experienced butterscotch pudding from a box or a plastic cup, prepare to have your mind completely blown. Homemade butterscotch pudding is an entirely different experience—it’s silky-smooth, deeply caramelized, with complex layers of buttery, toasty sweetness that store-bought versions simply can’t touch. This is comfort food at its finest, the kind of dessert that tastes like a warm hug and brings back childhood memories while somehow feeling sophisticated enough for dinner parties.
This butterscotch pudding recipe is surprisingly simple to make, requiring just a handful of everyday ingredients and about 20 minutes of active cooking time. The result is a luscious, from-scratch dessert that’s perfect for casual weeknight treats, special occasions, potlucks, or anytime you want to impress without spending hours in the kitchen. Serve it in pretty glass jars for a charming presentation, layer it into parfaits with whipped cream, or simply enjoy it straight from a bowl with a generous dollop on top. However you serve it, this pudding delivers pure, nostalgic joy in every spoonful.
History / Background
Butterscotch has a fascinating history that’s somewhat mysterious, with several origin stories competing for authenticity. The most widely accepted theory traces butterscotch back to Yorkshire, England, in the early 19th century. The name likely comes from the process of “scorching” butter and sugar together, though some historians believe “scotch” refers to the act of cutting or scoring the candy into pieces before it fully hardened.
The flavor became enormously popular during the Victorian era when confectioners discovered that slowly caramelizing brown sugar with butter created a distinct taste—different from caramel, which uses white sugar and cream. This unique flavor profile, with its deeper, almost toffee-like notes and hints of molasses, quickly became a favorite in candies, sauces, and eventually, puddings.
Butterscotch pudding as we know it today became an American staple in the early-to-mid 20th century. During the 1950s and 60s, it was a lunchbox favorite and a classic diner dessert, often served in small glass dishes with a swirl of whipped cream. The invention of instant pudding mixes made butterscotch pudding even more accessible to home cooks, cementing its place in American food culture.
While boxed pudding mixes dominated for decades, there’s been a beautiful resurgence of from-scratch butterscotch pudding in recent years as home cooks rediscover the incomparable taste and texture of the real thing. Making butterscotch pudding from scratch honors this classic dessert’s heritage while delivering flavor that simply can’t be replicated by any mix.
Why You’ll Love This Recipe
This homemade butterscotch pudding strikes the perfect balance between nostalgic comfort and elevated homemade quality. Unlike many “from scratch” desserts that require advanced techniques or hard-to-find ingredients, this recipe is genuinely approachable for cooks of all skill levels while delivering results that taste absolutely gourmet.
Here’s what makes this recipe truly special:
- Incredibly rich and buttery – Real butter and brown sugar create deep, complex flavor
- Silky-smooth texture – No lumps, no artificial consistency, just pure creaminess
- Simple pantry ingredients – Everything you need is probably already in your kitchen
- Ready in under 30 minutes – Active cooking time is surprisingly quick
- Make-ahead friendly – Actually tastes better after chilling overnight
- Kid and adult approved – Universally loved across all age groups
- Naturally gluten-free – Perfect for those with gluten sensitivities
- Budget-friendly indulgence – Costs a fraction of bakery desserts
- Versatile presentation – Serve in countless creative ways
- No special equipment needed – Just a saucepan and a whisk
This recipe transforms simple, everyday ingredients into something that feels genuinely special. It’s the kind of dessert that makes people ask for the recipe, and they’re always surprised when you tell them how straightforward it is to make.
Ingredient Notes
Brown Sugar: The star of butterscotch pudding. Dark brown sugar provides deeper molasses flavor and richer color, while light brown sugar creates a more delicate butterscotch taste. I prefer dark brown sugar for its complexity, but either works beautifully. Do not substitute with white sugar—the molasses content is essential to authentic butterscotch flavor.
Unsalted Butter: Real butter is absolutely non-negotiable here. It creates the signature butterscotch richness and that gorgeous glossy finish. Unsalted allows you to control the salt level perfectly. If you only have salted butter, reduce the added salt by half.
Heavy Cream: Adds luxurious richness and mouthfeel. Whole milk can be substituted for a lighter version, but the pudding will be less decadent. Half-and-half is a nice middle ground.
Whole Milk: The liquid base of the pudding. 2% milk works in a pinch, but whole milk provides better flavor and texture. Avoid skim milk—the pudding needs that fat content for proper consistency.
Egg Yolks: The secret to that thick, custardy texture and rich yellow color. Egg yolks act as a natural thickener and emulsifier. Room temperature yolks incorporate more smoothly than cold ones.
Cornstarch: Works with the egg yolks to thicken the pudding to perfect spoonability. All-purpose flour can technically substitute but creates a slightly different texture and cloudier appearance. Stick with cornstarch if possible.
Vanilla Extract: Enhances and rounds out the butterscotch flavor. Pure vanilla extract tastes noticeably better than imitation. Don’t skip this—it’s essential.
Salt: A pinch of salt is crucial for balancing the sweetness and making the butterscotch flavor pop. I often add a tiny bit extra for that trendy salted butterscotch effect.
Optional Whiskey or Bourbon: One tablespoon adds sophisticated depth and emphasizes the caramel notes. The alcohol cooks off, leaving only flavor. Totally optional but absolutely delicious for adult gatherings.
Equipment Needed
- Medium-heavy saucepan – Heavy-bottomed prevents scorching; 2-3 quart capacity is ideal
- Whisk – Essential for smooth, lump-free pudding; a balloon whisk works best
- Mixing bowls – One for egg yolks, one for the finished pudding
- Measuring cups and spoons – Accuracy matters in pudding-making
- Fine-mesh strainer – Ensures ultra-silky texture by catching any cooked egg bits
- Rubber spatula – For stirring and scraping down sides
- Serving dishes – Individual glass jars, ramekins, or small bowls
- Plastic wrap – For preventing skin formation during chilling
- Instant-read thermometer – Optional but helpful for monitoring temperature
Butterscotch Pudding Recipe
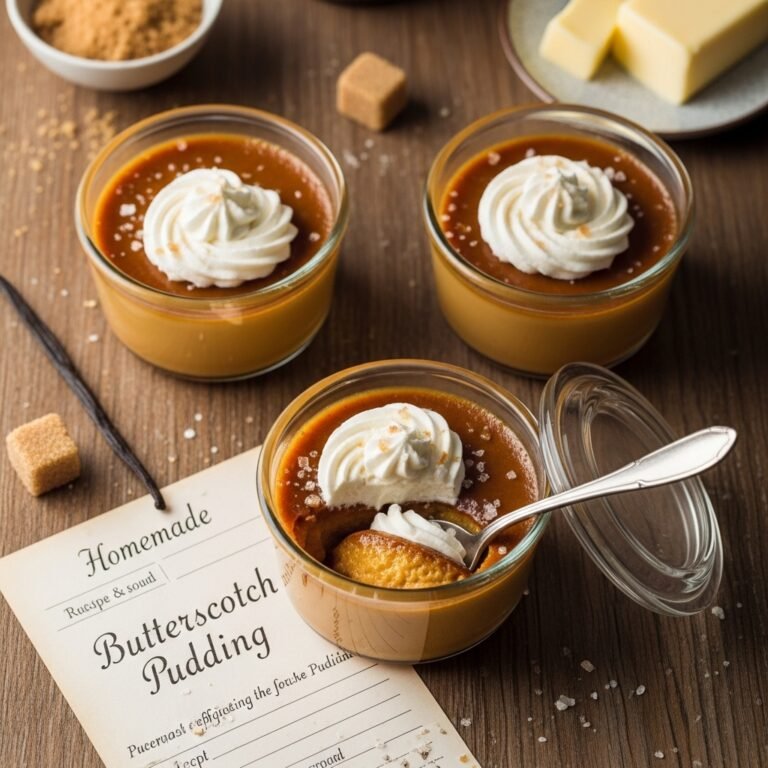
This homemade butterscotch pudding is rich, creamy, and deeply flavored with caramelized brown sugar and butter. It’s a classic comfort dessert that’s surprisingly easy to make from scratch and tastes infinitely better than anything from a box.
- Total Time: 3 hours 25 minutes
- Yield: 6 servings 1x
Ingredients
- 1 cup packed dark brown sugar
- ¼ cup cornstarch
- ½ teaspoon salt
- 2 cups whole milk
- 1 cup heavy cream
- 4 large egg yolks
- 4 tablespoons (½ stick) unsalted butter, cut into pieces
- 2 teaspoons vanilla extract
- 1 tablespoon whiskey or bourbon (optional)
- Whipped cream for serving (optional)
- Flaky sea salt for garnish (optional)
Instructions
Prepare Your Ingredients:
- Set up bowls: Place a fine-mesh strainer over a medium bowl and set aside. In a separate small bowl, whisk the egg yolks until smooth; set near the stove.
Make the Butterscotch Base:
- Combine dry ingredients: In a medium-heavy saucepan, whisk together the brown sugar, cornstarch, and salt until completely combined with no lumps. This step is crucial—break up any brown sugar clumps with your fingers or the back of a spoon.
- Add dairy: Gradually whisk in the milk and heavy cream, ensuring the mixture is completely smooth with no dry ingredients at the bottom. The mixture will look thin at this stage—that’s normal.
- Cook the mixture: Place the saucepan over medium heat. Cook, whisking constantly, until the mixture begins to steam and thicken, about 8-10 minutes. You’ll notice it starting to bubble gently around the edges. Continue cooking and whisking until it reaches a thick, pudding-like consistency that coats the back of a spoon.
Temper the Eggs:
- Temper egg yolks: Once the mixture is thick and gently bubbling, remove from heat. Slowly pour about 1 cup of the hot butterscotch mixture into the bowl with the egg yolks, whisking constantly as you pour. This gradually warms the yolks without scrambling them.
- Combine everything: Pour the tempered egg mixture back into the saucepan, whisking constantly. Return the pan to medium-low heat and cook, whisking constantly, for 2-3 more minutes until the pudding is very thick and coats the back of a spoon thickly. It should maintain gentle bubbles and reach about 170-175°F if you’re using a thermometer.
Finish the Pudding:
- Add butter and vanilla: Remove the saucepan from heat. Add the butter pieces, vanilla extract, and whiskey (if using). Whisk until the butter melts completely and the pudding is glossy and smooth.
- Strain: Pour the pudding through the fine-mesh strainer into the waiting bowl. Use the rubber spatula to press it through, leaving any lumps behind. This step ensures perfectly silky texture.
- Portion into dishes: Divide the pudding among 6 serving dishes—glass jars, ramekins, or small bowls all work beautifully.
Chill:
- Prevent skin formation: Press plastic wrap directly onto the surface of each pudding serving to prevent a skin from forming. Refrigerate for at least 3 hours or until completely chilled and set. Overnight is even better—the flavor develops beautifully.
- Serve: Remove plastic wrap and top with freshly whipped cream and a sprinkle of flaky sea salt if desired. Serve cold and enjoy!
Notes
- The pudding will continue to thicken as it cools, so don’t worry if it seems slightly loose when hot—it will set up perfectly in the refrigerator.
- Straining the pudding is highly recommended for the smoothest texture, even if your pudding looks smooth.
- For bourbon butterscotch, use a good-quality bourbon or whiskey—the flavor really comes through.
- Pressing plastic wrap directly on the surface is essential; suspended wrap won’t prevent skin formation.
- If you prefer a lighter pudding, you can use 3 cups whole milk and omit the heavy cream, though it will be less rich.
- For salted butterscotch pudding, increase the salt to ¾ teaspoon and sprinkle flaky sea salt on top before serving.
- Prep Time: 10 minutes
- Cook Time: 15 minutes
- Category: Desert
- Method: Stovetop
- Cuisine: American
- Diet: Gluten Free
Nutrition
- Serving Size: 1 serving (about ¾ cup)
- Calories: 385
- Sugar: 38g
- Sodium: 245mg
- Fat: 19g
- Saturated Fat: 11g
- Unsaturated Fat: 6g
- Trans Fat: 0g
- Carbohydrates: 48g
- Fiber: 0g
- Protein: 5g
- Cholesterol: 165mg
Tips & Variations
Flavor Variations:
- Salted Butterscotch: Increase the salt to ¾ teaspoon and finish with flaky sea salt on top before serving for trendy salted caramel vibes.
- Bourbon Butterscotch: Add 1-2 tablespoons of bourbon or whiskey for sophisticated, grown-up flavor with deeper caramel notes.
- Maple Butterscotch: Replace ¼ cup of the brown sugar with pure maple syrup for complex sweetness.
- Chocolate Chip Butterscotch: Stir in ½ cup mini chocolate chips while the pudding is still warm.
- Butterscotch Toffee: Fold in ⅓ cup crushed toffee bits or Heath bar pieces just before chilling.
- Spiced Butterscotch: Add ½ teaspoon cinnamon and ¼ teaspoon nutmeg for warm, cozy spice notes.
- Coffee Butterscotch: Dissolve 1 tablespoon instant espresso powder in the milk for sophisticated coffee-butterscotch flavor.
Presentation Ideas:
- Layer in parfait glasses with whipped cream and crushed gingersnap cookies
- Serve in vintage mason jars tied with twine for rustic charm
- Top with candied pecans and a caramel drizzle
- Create a butterscotch trifle by layering with pound cake and whipped cream
- Serve in teacups for an elegant tea-time dessert
- Top with a dollop of crème fraîche instead of whipped cream for tangy contrast
- Garnish with a cinnamon stick for visual appeal
Dietary Adaptations:
- Dairy-Free: Use full-fat coconut milk and coconut cream, plus vegan butter. The flavor will be different but still delicious.
- Lower Sugar: Reduce brown sugar to ¾ cup for a less sweet version; the butterscotch flavor will be more subtle.
- Egg-Free: This is challenging as eggs provide crucial thickening, but you can try using 2 additional tablespoons of cornstarch, though the texture will be more pudding-like and less custardy.
Pro Chef Tips
Master the Temperature: The key to perfect butterscotch pudding is cooking the mixture to exactly the right temperature—around 170-175°F. At this point, the cornstarch is fully activated and the eggs are safely cooked without scrambling. An instant-read thermometer takes the guesswork out. If you don’t have one, look for the pudding to thickly coat the back of a spoon and hold a clear line when you draw your finger through it.
The Constant Whisk is Non-Negotiable: This isn’t a “stir occasionally” situation. Constant whisking serves multiple purposes: it prevents scorching on the bottom, keeps the temperature even throughout, and ensures the starches gelatinize uniformly for silky-smooth texture. Your arm might get tired, but it’s worth it. If you need a break, remove the pan from heat while you rest.
Brown the Butter First: For next-level flavor, brown your butter before adding it to the pudding. Simply melt it in a small pan over medium heat until it turns golden and smells nutty, then proceed with the recipe. This adds incredible depth and complexity to the butterscotch flavor—it’s a restaurant-level technique that’s surprisingly easy.
Room Temperature Eggs Temper Better: Cold egg yolks are more likely to curdle when you add hot liquid. Let your eggs sit at room temperature for 30 minutes before starting, or place them in a bowl of warm water for 5 minutes. Room-temperature yolks create smoother, silkier pudding.
The Dark Brown Sugar Difference: While light brown sugar works, dark brown sugar contains more molasses, which creates deeper, more complex butterscotch flavor with gorgeous amber color. It’s worth seeking out if you want truly spectacular results.
Chill in a Shallow Dish First: If you’re in a hurry, pour the strained pudding into a shallow baking dish and place it in an ice bath, stirring occasionally until it cools to room temperature. Then portion it into serving dishes and refrigerate. This speeds up the process significantly without compromising quality.
Common Mistakes to Avoid
Using Low or Non-Fat Dairy: Butterscotch pudding needs that fat content to achieve its signature richness and smooth texture. Skim milk or low-fat cream creates thin, less flavorful pudding that doesn’t have that luxurious mouthfeel. If you’re watching calories, make smaller portions rather than compromising on the dairy.
Not Breaking Up Brown Sugar Lumps: Brown sugar naturally clumps, and if you don’t break these up thoroughly when mixing with the cornstarch, you’ll end up with lumps in your pudding that won’t dissolve during cooking. Take the time to press out all lumps with the back of a spoon or your fingers before adding any liquid.
Rushing the Tempering Process: If you pour hot butterscotch mixture into the egg yolks too quickly, you’ll scramble the eggs and create an unpleasant, grainy texture with bits of cooked egg throughout. Pour slowly in a thin, steady stream while whisking vigorously. Patience here makes all the difference.
Stopping Too Soon: The pudding needs to cook long enough for the cornstarch to fully activate and the eggs to properly thicken the mixture. If you remove it from heat too early because it looks “thick enough,” it will be thin and watery once chilled. Trust the process and cook until it really thickly coats the spoon.
Skipping the Straining Step: Even if your pudding looks perfectly smooth, straining catches microscopic lumps, any bits of cooked egg, and undissolved sugar granules. This simple step is the difference between homemade-good and professional-quality pudding. Don’t skip it!
Not Covering Properly During Chilling: If you just loosely cover the pudding or don’t press the plastic wrap directly onto the surface, a thick, rubbery skin will form that’s unpleasant to eat and has to be removed (wasting some of your precious pudding). Always press wrap directly against the pudding surface.
Storage & Meal Prep
Refrigerator Storage: Butterscotch pudding must be stored in the refrigerator and will keep beautifully for 4-5 days when properly covered. Individual servings should have plastic wrap pressed directly on the surface, or you can store the whole batch in an airtight container with wrap pressed on top. The pudding actually develops better flavor after a day or two as the butterscotch notes meld and deepen.
Portioning for Storage: For convenience, portion the pudding into individual mason jars or small containers with tight-fitting lids. This makes it easy to grab a serving whenever you want and prevents the whole batch from being exposed to air repeatedly.
Maintaining Texture: If the pudding seems too firm after refrigeration (which can happen if it was cooked especially thick), simply give it a good whisk before serving to loosen it up slightly. The texture should still be thick and spoonable but not stiff.
Preventing Skin Formation: If you’re storing pudding that’s already been topped with whipped cream, be aware that the cream will weep slightly over time. For best results, store pudding plain and add whipped cream just before serving.
Not Freezer-Friendly: Like most custard-based desserts, butterscotch pudding doesn’t freeze well. The texture becomes grainy and separated when thawed. This is definitely a dessert to make fresh and enjoy within the week.
Make-Ahead & Freezer Notes
Perfect Make-Ahead Dessert: Butterscotch pudding is actually an ideal make-ahead dessert. In fact, it tastes even better after chilling overnight as the flavors have time to fully develop and meld. The butterscotch notes become richer and more pronounced with time.
2-3 Days Ahead: You can make the pudding up to 3 days before you plan to serve it. Store covered in the refrigerator with plastic wrap pressed directly on the surface. Add whipped cream and any garnishes just before serving for the freshest presentation.
Day-Before Strategy: For dinner parties or special occasions, make the pudding the evening before. This allows the pudding to chill thoroughly, gives you time to perfect your presentation, and eliminates day-of stress. The pudding will be at peak flavor and texture.
Batch Cooking: This recipe doubles beautifully if you’re feeding a crowd or want to have pudding on hand all week. Just use a larger, heavy-bottomed pot and be prepared to whisk a bit longer as the increased volume takes more time to heat and thicken.
Component Prep: You can measure out all your dry ingredients and whisk your egg yolks in advance. Store the dry mixture in an airtight container at room temperature and keep the whisked yolks covered in the refrigerator for up to 24 hours before making the pudding.
Freezing (Not Recommended): While you technically can freeze butterscotch pudding for up to 2 months, I don’t recommend it. The texture changes significantly—it becomes grainy, the eggs can separate, and the silky smoothness is compromised. This is a dessert best enjoyed fresh or refrigerated, not frozen.
Reheating (If Desired): While butterscotch pudding is traditionally served cold, some people enjoy it slightly warm. To gently rewarm, place the serving in the microwave for 10-15 seconds, stirring halfway through. Don’t overheat or you’ll break the emulsion.
Serving Suggestions
Classic Presentations:
Butterscotch pudding shines with simple, classic accompaniments that complement rather than compete with its rich butterscotch flavor:
- Homemade whipped cream – Lightly sweetened is all you need; the contrast is perfect
- Crumbled gingersnap cookies – The spice complements butterscotch beautifully
- Crushed shortbread cookies – Adds buttery crunch and textural contrast
- Candied pecans or walnuts – Toasted nuts echo the caramelized notes
- Caramel sauce drizzle – Doubles down on the caramel-y goodness
- Fresh banana slices – Classic pairing; the fruit cuts the richness
- Shaved dark chocolate – Bittersweet chocolate contrasts with sweet butterscotch
- Flaky sea salt – Trendy salted caramel effect; brings out deeper flavors
Beverage Pairings:
- Strong coffee or espresso – The bitterness balances the sweet pudding perfectly
- Hot tea – English Breakfast or Earl Grey are particularly nice
- Cold milk – Classic, especially appealing to kids
- Irish coffee – For adult gatherings, the whiskey echoes butterscotch notes
- Dessert wine – A tawny port or cream sherry complements beautifully
- Hot chocolate – Makes for a ultra-indulgent chocolate-butterscotch experience
Creative Serving Ideas:
- Layer into parfaits with whipped cream and crushed cookies
- Serve in vintage teacups for afternoon tea
- Create a butterscotch banana pudding by layering with vanilla wafers and bananas
- Use as a filling for cream puffs or eclairs
- Top warm apple crisp with cold butterscotch pudding
- Serve alongside chocolate cake for a “double dessert” experience
- Create an adult “pudding shot” in small cups with a bourbon drizzle
FAQs Section
Q: Can I use light brown sugar instead of dark brown sugar?
A: Yes! Light brown sugar works perfectly fine and creates a slightly lighter, more delicate butterscotch flavor. Dark brown sugar has more molasses, giving deeper, richer flavor and darker color, but both are delicious. Use whichever you have on hand or prefer.
Q: My pudding has lumps. Can I fix it?
A: Absolutely! If you notice lumps before straining, use an immersion blender to smooth them out, or pour the pudding through a fine-mesh strainer, pressing it through with a spatula. The straining step specifically addresses this issue and should remove any lumps. If lumps remain after straining, blend the pudding in a regular blender for 30 seconds.
Q: Why did my pudding turn out thin and watery?
A: This usually happens if the pudding wasn’t cooked long enough for the cornstarch and eggs to fully thicken it. The mixture needs to reach about 170-175°F and should thickly coat the back of a spoon before you remove it from heat. If your pudding is already chilled and thin, you can’t really fix it, but next time, cook it a bit longer. Remember, it will thicken more as it cools, but it should already be quite thick while hot.
Q: Can I make this without egg yolks?
A: Egg yolks are really important for that rich, custardy texture and gorgeous yellow color. You could try an egg-free version using just cornstarch for thickening (increase to 6 tablespoons), but it will be more like instant pudding consistency—still good, but not as luxurious. There’s no perfect substitute for the eggs in traditional butterscotch pudding.
Q: How can I tell when it’s done cooking?
A: The pudding is ready when it thickly coats the back of a wooden spoon and holds a clear line when you run your finger through it. It should be maintaining gentle, steady bubbles (not a rolling boil). If you have an instant-read thermometer, it should read 170-175°F. The mixture will continue to thicken as it cools, so don’t worry if it seems slightly looser than final pudding consistency while hot.
Q: Can I use a different type of milk?
A: For best results, use whole milk as called for in the recipe. You can use 2% milk, but the pudding will be slightly less rich and creamy. I don’t recommend skim milk—the pudding needs that fat content for proper texture and flavor. For dairy-free options, full-fat coconut milk works surprisingly well, though the flavor will be different.
Q: Why do I need to press plastic wrap directly on the pudding?
A: When pudding cools, the surface proteins can form a thick, rubbery skin when exposed to air. By pressing plastic wrap directly onto the surface, you prevent air contact and skin formation. This isn’t just aesthetic—pudding skin has an unpleasant, chewy texture. The plastic wrap acts as a barrier that keeps your pudding silky-smooth throughout.
Q: Can I double this recipe?
A: Yes! This recipe doubles beautifully. Use a larger, heavy-bottomed saucepan (at least 3-4 quart capacity) and be prepared for the cooking time to increase by a few minutes since you’re heating more volume. Whisking will take a bit more effort, but the results are worth it. Just make sure you have enough serving dishes ready!
Conclusion
There’s something wonderfully satisfying about making butterscotch pudding from scratch—the way your kitchen fills with that incredible buttery, caramel-like aroma, the meditative rhythm of whisking, and that first spoonful of silky, rich pudding that tastes nothing like anything you’ve ever had from a box. This is the kind of dessert that makes you feel like a kitchen rockstar, even though it’s surprisingly simple.
Whether you’re rediscovering a childhood favorite, looking for an easy make-ahead dessert, or simply want something deeply comforting and delicious, this homemade butterscotch pudding delivers on every level. It’s proof that the best desserts don’t have to be complicated—they just need good ingredients, a little patience, and a lot of love.
I’d love to hear about your butterscotch pudding adventures! Did you try any variations? Serve it in creative ways? Have questions about the technique? Drop a comment below—I read every single one and love helping fellow dessert lovers troubleshoot and celebrate their successes. And if this recipe brings you joy (and I’m confident it will!), please save it to Pinterest and share it with your friends and family. Nothing makes me happier than knowing this recipe is bringing smiles to kitchens everywhere!
Now grab your whisk and let’s make some magic! 🥄✨