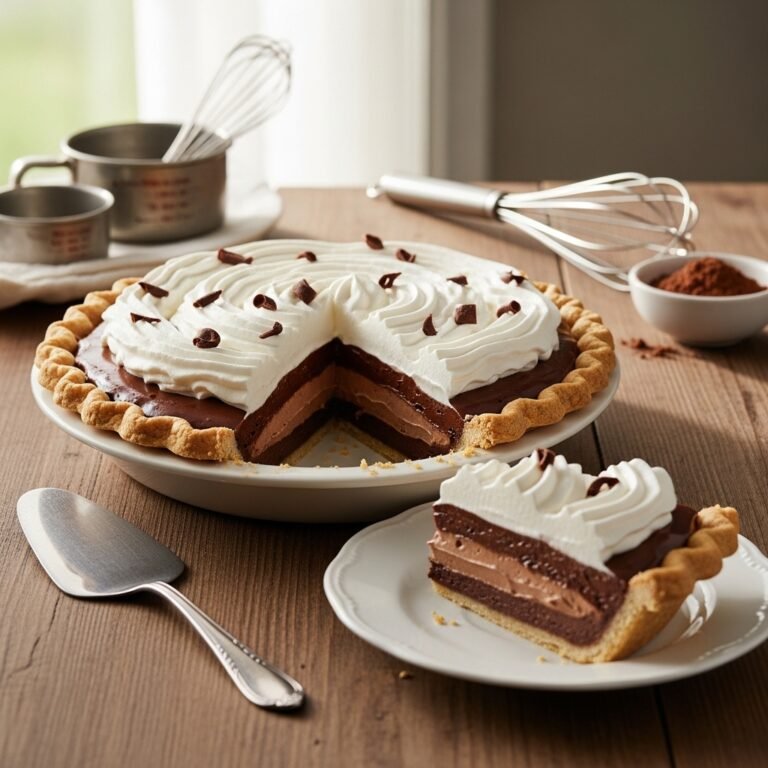
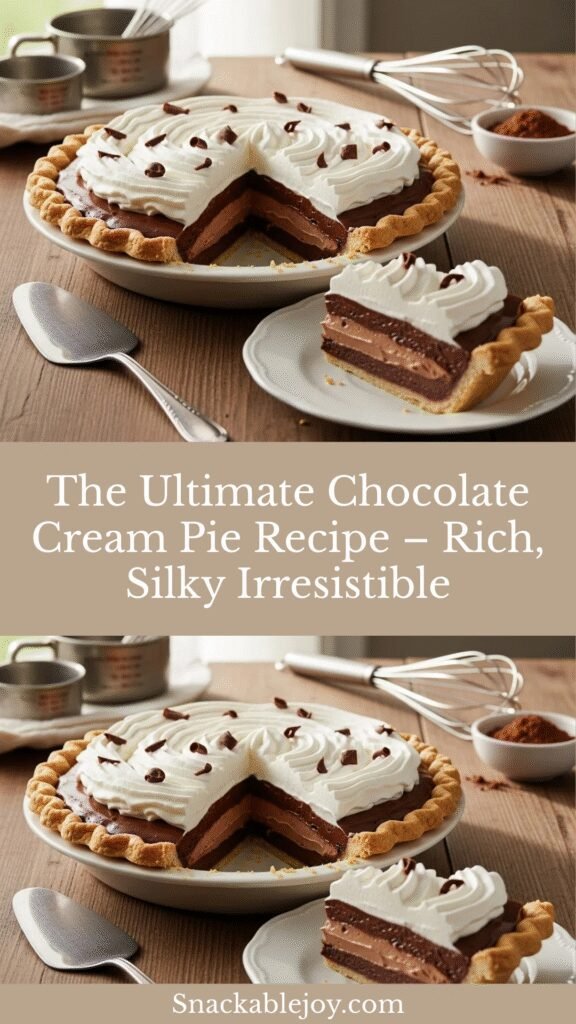
The Ultimate Chocolate Cream Pie Recipe – Rich, Silky Irresistible
There’s something truly magical about a classic chocolate cream pie—the kind with a flaky, buttery crust, a silky-smooth chocolate filling that practically melts on your tongue, and clouds of freshly whipped cream piled high on top. This isn’t just any dessert; it’s the kind of pie that stops conversations at dinner parties, earns you legendary status at potlucks, and makes birthdays feel extra special.
This chocolate cream pie recipe delivers everything you want in a showstopping dessert: it’s rich without being overwhelming, sweet but perfectly balanced, and surprisingly straightforward to make at home. Whether you’re celebrating a special occasion, need an impressive dessert for weekend guests, or simply want to treat yourself to something extraordinary, this pie checks every box. It’s a crowd-pleaser that works beautifully for everything from casual family dinners to elegant holiday gatherings, and it’s guaranteed to have everyone asking for seconds (and the recipe!).
History / Background
Cream pies have been beloved fixtures in American baking since the late 19th century, but chocolate cream pie truly came into its own during the early 20th century when chocolate became more widely available and affordable for home bakers. The pie represents a beautiful marriage of European custard techniques and American pie-making traditions.
The chocolate cream pie we know today likely evolved from the French pâtisserie tradition of crème pâtissière (pastry cream), which French immigrants brought to America. Clever American bakers adapted these custard techniques, lightening them slightly and pairing them with the flaky pie crusts that were already staples in American kitchens. When chocolate—once a luxury ingredient—became more accessible in the early 1900s, bakers began adding it to their cream fillings, creating an instant classic.
By the 1940s and 1950s, chocolate cream pie had secured its place as a diner staple across America, often displayed proudly in rotating pie cases alongside coconut cream and banana cream. It became synonymous with comfort food—the kind of dessert that reminded people of grandmother’s kitchen or a special treat after a long week. Television cooking shows in the 1960s and 70s further popularized cream pies, making them accessible to home cooks nationwide.
Today, chocolate cream pie remains a timeless favorite, bridging generations and representing the very best of American comfort desserts. It’s a recipe that honors tradition while leaving plenty of room for personal touches and modern twists.
Why You’ll Love This Recipe
This chocolate cream pie strikes the perfect balance between impressive presentation and achievable home baking. Unlike many “fancy” desserts that require professional equipment or advanced techniques, this recipe walks you through each step clearly, ensuring success even if you’re new to pie-making or custard preparation.
Here’s what makes this recipe truly special:
- Restaurant-quality results at home – Achieve that silky, professional texture without culinary school
- Make-ahead friendly – Prepare components in advance for stress-free entertaining
- Customizable richness – Adjust the chocolate intensity to suit your preferences
- Crowd-pleasing appeal – Loved by kids and adults alike; no “acquired taste” here
- Budget-friendly elegance – Uses simple, affordable ingredients you probably already have
- Perfect portions – Serves 8-10 people generously, ideal for gatherings
- Foolproof crust options – Use homemade or store-bought—both work beautifully
- Impressive presentation – Looks like you spent hours, even though you didn’t
- Temperature versatility – Delicious served cold or at cool room temperature
Ingredient Notes
For the Crust:
- All-purpose flour – Provides structure; can substitute with 1:1 gluten-free baking flour
- Unsalted butter – Cold butter creates flakiness; salted butter works but reduce added salt
- Ice water – Keeps butter cold for the flakiest texture; must be very cold
- Sugar & salt – Balance flavor in the crust; just a touch sweetens it perfectly
For the Chocolate Filling:
- Whole milk – Creates the creamy base; 2% works but is slightly less rich
- Heavy cream – Adds luxurious mouthfeel; essential for that silky texture
- Granulated sugar – Sweetens and helps set the custard properly
- Egg yolks – The secret to thick, velvety filling; don’t skip these
- Cornstarch – Thickens the filling to perfect sliceability; use cornstarch, not flour
- High-quality cocoa powder – Dutch-process cocoa gives deeper, more sophisticated flavor
- Semi-sweet chocolate – Melts into the filling for intense chocolate taste; use good quality chocolate (at least 50% cacao)
- Vanilla extract – Enhances chocolate flavor; pure extract tastes noticeably better
- Butter – Adds richness and shine; use unsalted
For the Topping:
- Heavy whipping cream – Must be cold for proper whipping; cannot substitute
- Powdered sugar – Sweetens and stabilizes whipped cream better than granulated
- Vanilla extract – Adds depth to the cream
- Chocolate shavings – Optional garnish; use a vegetable peeler on chocolate bar
Equipment Needed
- 9-inch pie dish – Standard glass or ceramic pie pan
- Rolling pin – For rolling out pie dough (if making homemade crust)
- Medium-large saucepan – For cooking the chocolate custard filling
- Whisk – Essential for smooth, lump-free custard
- Mixing bowls – Various sizes for different components
- Fine-mesh strainer – Ensures ultra-smooth filling texture
- Electric mixer or whisk – For whipping cream (stand mixer, hand mixer, or strong arm!)
- Measuring cups and spoons – Accuracy matters in baking
- Plastic wrap – For preventing skin formation on custard
- Pie weights or dried beans – For blind-baking the crust
- Rubber spatula – For stirring and scraping
- Offset spatula – Optional but helpful for spreading whipped cream
Print

Chocolate Cream Pie Recipe
This classic chocolate cream pie features a buttery, flaky crust filled with rich, silky chocolate custard and topped with billows of freshly whipped cream. It’s an elegant, make-ahead dessert that’s perfect for any celebration or when you simply want to indulge in something extraordinary.
- Total Time: 4 hours 55 minutes
- Yield: 8-10 servings 1x
Ingredients
ScaleFor the Pie Crust:
- 1¼ cups all-purpose flour
- ½ teaspoon salt
- 1 tablespoon granulated sugar
- ½ cup (1 stick) unsalted butter, cold and cubed
- 3-4 tablespoons ice water
Alternatively: 1 store-bought 9-inch pie crust
For the Chocolate Filling:
- 2 cups whole milk
- 1 cup heavy cream
- ¾ cup granulated sugar
- ⅓ cup cornstarch
- ¼ teaspoon salt
- 5 large egg yolks
- ¼ cup unsweetened cocoa powder (Dutch-process preferred)
- 6 ounces semi-sweet chocolate, finely chopped
- 2 tablespoons unsalted butter
- 2 teaspoons vanilla extract
For the Whipped Cream Topping:
- 2 cups heavy whipping cream, cold
- ¼ cup powdered sugar
- 1 teaspoon vanilla extract
- Chocolate shavings or cocoa powder for garnish (optional)
Instructions
Prepare the Crust:
- Make the dough: In a large bowl, whisk together flour, salt, and sugar. Add cold, cubed butter and use a pastry cutter or your fingers to work the butter into the flour until the mixture resembles coarse crumbs with some pea-sized butter pieces remaining.
- Add water: Sprinkle 3 tablespoons of ice water over the mixture and stir with a fork until the dough starts to come together. Add the remaining tablespoon of water if needed. The dough should hold together when pressed but not feel wet.
- Chill: Form the dough into a disk, wrap in plastic wrap, and refrigerate for at least 30 minutes (or use store-bought crust to skip steps 1-3).
- Roll and shape: On a lightly floured surface, roll the chilled dough into a 12-inch circle. Transfer to a 9-inch pie dish, trim excess dough leaving a 1-inch overhang, and fold the edges under. Crimp decoratively. Prick the bottom with a fork.
- Blind bake: Preheat oven to 375°F (190°C). Line the crust with parchment paper and fill with pie weights or dried beans. Bake for 15 minutes, remove weights and parchment, and bake another 8-10 minutes until golden brown. Cool completely.
Make the Chocolate Filling:
- Combine dry ingredients: In a medium bowl, whisk together sugar, cornstarch, cocoa powder, and salt until no lumps remain.
- Mix egg yolks: In a separate bowl, whisk the egg yolks until smooth. Set aside.
- Heat milk and cream: In a medium saucepan over medium heat, combine milk and heavy cream. Heat until steaming and small bubbles form around the edges (do not boil).
- Temper eggs: Gradually whisk about 1 cup of the hot milk mixture into the egg yolks to warm them gently. Then whisk the egg mixture back into the saucepan with the remaining milk.
- Cook custard: Add the sugar-cornstarch mixture to the saucepan and whisk constantly over medium heat. Continue whisking as the mixture thickens, about 5-7 minutes. It should coat the back of a spoon and maintain slow bubbles.
- Add chocolate: Remove from heat and immediately add the chopped chocolate, butter, and vanilla extract. Whisk until the chocolate melts completely and the mixture is silky smooth.
- Strain and cool: Pour the filling through a fine-mesh strainer into a bowl to remove any lumps, then pour into the cooled pie crust. Press plastic wrap directly onto the surface of the filling to prevent a skin from forming.
- Chill: Refrigerate the pie for at least 4 hours or overnight until the filling is completely set and cold.
Prepare the Topping:
- Whip cream: When ready to serve, add cold heavy cream, powdered sugar, and vanilla extract to a large mixing bowl. Beat with an electric mixer on medium-high speed until stiff peaks form, about 3-4 minutes.
- Top and garnish: Spread or pipe the whipped cream over the chilled chocolate filling. Garnish with chocolate shavings or a light dusting of cocoa powder if desired.
- Serve: Slice with a sharp knife, wiping it clean between cuts for neat slices. Serve immediately and refrigerate any leftovers.
Notes
Notes
- For the smoothest filling, use a fine-mesh strainer in step 12—this removes any cooked egg bits or lumps.
- The plastic wrap pressed directly on the custard is crucial; it prevents a skin from forming as it cools.
- Make sure the pie filling is completely chilled before adding whipped cream, or the cream will melt.
- For extra stability in the whipped cream, add 1 tablespoon of instant vanilla pudding mix or 1 teaspoon of gelatin (bloomed in 1 tablespoon of water).
- If you prefer a darker, more intense chocolate flavor, use bittersweet chocolate instead of semi-sweet.
- Prep Time: 30 minutes
- Cook Time: 25 minutes
- Category: Desert
- Method: Stovetop & Baking
- Cuisine: American
- Diet: Vegetarian
Nutrition
- Serving Size: 1 slice (based on 10 servings)
- Calories: 485
- Sugar: 32g
- Sodium: 195mg
- Fat: 32g
- Saturated Fat: 19g
- Unsaturated Fat: 10g
- Trans Fat: 0g
- Carbohydrates: 45g
- Fiber: 2g
- Protein: 6g
- Cholesterol: 185mg
Flavor Variations:
- Dark Chocolate Decadence: Use dark chocolate (70% cacao) instead of semi-sweet and reduce sugar by 2 tablespoons for a more sophisticated, less sweet pie.
- Mocha Cream Pie: Add 2 tablespoons of instant espresso powder to the chocolate filling for coffee-chocolate harmony.
- Mexican Chocolate: Add ½ teaspoon cinnamon and a pinch of cayenne pepper to the filling for warmth and complexity.
- Mint Chocolate: Stir in ½ teaspoon peppermint extract with the vanilla for refreshing mint-chocolate flavor.
- White Chocolate Cream Pie: Substitute white chocolate for the semi-sweet and omit the cocoa powder for a completely different but equally delicious pie.
Dietary Adaptations:
- Gluten-Free: Use a gluten-free pie crust and ensure your chocolate and cocoa powder are certified gluten-free.
- Dairy-Free: This is challenging for cream pie, but you can use full-fat coconut cream and coconut milk, though the texture will be slightly different.
Presentation Ideas:
- Pipe the whipped cream using a large star tip for a bakery-style finish
- Create chocolate curls using a vegetable peeler and room-temperature chocolate bar
- Drizzle with chocolate or caramel sauce before serving
- Dust with cocoa powder through a fine-mesh sieve for an elegant look
- Add fresh berries around the edge for color and flavor contrast
Pro Chef Tips
Temperature Control is Everything: The key to silky custard without scrambled eggs is constant whisking and moderate heat. Never let the mixture come to a rolling boil—those gentle bubbles at 170-180°F are perfect. If you have an instant-read thermometer, this takes the guesswork out completely.
Invest in Quality Chocolate: Since chocolate is a star ingredient here, using good-quality chocolate (Ghirardelli, Guittard, or Valrhona) makes a noticeable difference. The filling will taste smoother, richer, and more complex. Avoid chocolate chips as they contain stabilizers that prevent smooth melting.
The Strain is Not Optional: Even experienced bakers strain their custard. This simple step catches any bits of cooked egg, undissolved cornstarch, or chocolate that didn’t melt smoothly. It’s the difference between good and extraordinary texture.
Cold Cream, Cold Bowl, Cold Beaters: For the best whipped cream, chill your mixing bowl and beaters in the freezer for 15 minutes before whipping. This keeps the cream cold as it whips, resulting in more stable, voluminous whipped cream that holds its shape longer.
The Slow Temper: When adding hot liquid to eggs (tempering), pour slowly while whisking constantly. If you go too fast, you’ll cook the eggs. Take your time with this step—it’s the most critical technique in custard-making.
Brown Butter Boost: For next-level flavor, brown the butter before adding it to the chocolate filling. The nutty, caramel notes complement chocolate beautifully and add professional depth.
Common Mistakes to Avoid
Rushing the Chill Time: I know it’s tempting to dig in early, but if the filling hasn’t fully set (at least 4 hours), you’ll end up with a runny pie that won’t slice cleanly. Plan ahead and give it the full chill time—overnight is even better.
Overheating the Custard: If you cook the custard too aggressively, you risk scrambling the eggs. Keep the heat at medium and whisk constantly. If you see any curdling, immediately remove from heat, strain, and proceed. The chocolate and butter will help smooth things out.
Adding Whipped Cream to Warm Pie: Always make sure your pie is completely cold before adding whipped cream. If it’s even slightly warm, the cream will melt and become soupy. Be patient!
Using Pre-Whipped Cream from a Can: While convenient, canned whipped cream doesn’t compare to freshly whipped. It deflates quickly, has a less pleasant mouthfeel, and doesn’t taste nearly as good. The 5 minutes it takes to whip cream is absolutely worth it.
Forgetting the Plastic Wrap: If you skip pressing plastic wrap directly onto the custard surface, you’ll develop a thick skin that affects texture. Don’t skip this step—it matters!
Not Straining the Filling: Some recipes skip the straining step, but it’s truly the secret to restaurant-quality smoothness. Even if your custard looks smooth, straining catches microscopic lumps you can’t see but will definitely feel in the finished pie.
Overbaking the Crust: A golden-brown crust is perfect, but a dark brown crust tastes burnt. Watch it carefully during those final minutes of blind baking.
Storage & Meal Prep
Refrigerator Storage: Chocolate cream pie must be stored in the refrigerator due to the dairy-based custard and whipped cream. Cover loosely with plastic wrap or place in a pie keeper to prevent the whipped cream from absorbing refrigerator odors. The pie will keep for 3-4 days, though it’s best enjoyed within 2 days for optimal whipped cream texture.
Storing Components Separately: For the freshest presentation, you can store the filled pie (without whipped cream) covered tightly in the refrigerator for up to 4 days. Add freshly whipped cream just before serving.
Leftover Slices: If you have individual slices left over, they’re best eaten within 1-2 days. The whipped cream may weep slightly after being cut, but the flavor remains delicious.
Not Freezer-Friendly: Unlike some pies, I don’t recommend freezing this chocolate cream pie. The custard filling can separate and become grainy when thawed, and whipped cream loses its texture completely. This is definitely a “make and eat” dessert rather than a long-term freezer option.
Reheating: Don’t! This pie is meant to be served cold. If it’s been sitting out and the whipped cream has softened, simply pop it back in the refrigerator for 30 minutes to firm up.
Make-Ahead & Freezer Notes
Two-Day Advance Prep: This is actually an ideal make-ahead dessert. Prepare and blind-bake the crust up to 2 days ahead, storing it covered at room temperature. Make the chocolate filling up to 2 days ahead and pour it into the cooled crust. Cover and refrigerate until ready to top and serve.
Day-Before Strategy: The best approach for stress-free entertaining is to fully assemble the pie (crust + filling) the day before your event. Keep it covered in the refrigerator. Add the whipped cream topping 2-4 hours before serving for the freshest presentation.
Crust Freezing: While the complete pie doesn’t freeze well, the unbaked pie dough freezes beautifully for up to 3 months. Wrap the disk tightly in plastic wrap, then in foil. Thaw overnight in the refrigerator before rolling out.
Baked Crust Freezing: You can also freeze the blind-baked crust (cooled completely) wrapped well in plastic and foil for up to 1 month. Thaw at room temperature before filling.
Chocolate Filling Alone: The chocolate custard filling can be made up to 3 days ahead and stored in an airtight container in the refrigerator. Just press plastic wrap directly on the surface. When ready to use, you may need to whisk it smooth before pouring into the crust, as it will firm up considerably.
Whipped Cream Timing: For best results, whip the cream no more than 4 hours before serving. If you need longer stability, add a stabilizer like instant pudding mix or gelatin to the cream.
Serving Suggestions
Complementary Sides & Beverages:
Chocolate cream pie is rich and indulgent, so it pairs beautifully with beverages and accompaniments that provide contrast:
- Fresh berries – Raspberries, strawberries, or cherries cut through the richness with bright acidity
- Hot coffee or espresso – The bitterness balances the sweet chocolate perfectly
- Cold milk – Classic pairing, especially beloved by kids
- Dessert wine – A tawny port or late-harvest Riesling complements chocolate beautifully
- Irish coffee or spiked hot chocolate – For adult gatherings, these boozy beverages elevate the experience
- Vanilla ice cream – A small scoop alongside (not on top of) the pie adds textural contrast
- Salted caramel sauce – Drizzle on the plate for sweet-salty sophistication
Occasion-Specific Serving:
- Holidays: Serve as the chocolate option alongside fruit pies for Thanksgiving, Christmas, or Easter
- Birthday celebrations: Add candles directly to the whipped cream topping
- Dinner parties: Plate individually with a chocolate sauce design and fresh mint leaf
- Potlucks: Transport without whipped cream; bring it separately in a bowl and add on-site
- Summer gatherings: Serve extra cold for a refreshing finish to barbecues
FAQs Section
Q: Can I use milk chocolate instead of semi-sweet chocolate?
A: You can, but the pie will be noticeably sweeter and less complex in flavor. Milk chocolate has a higher sugar content, so I recommend reducing the granulated sugar in the filling by 2-3 tablespoons to compensate. The filling may also be slightly softer due to milk chocolate’s composition.Q: My custard isn’t thickening. What went wrong?
A: This usually happens if the mixture didn’t reach the proper temperature (170-180°F) or if you didn’t whisk constantly. Make sure you’re cooking over medium heat and whisking continuously for 5-7 minutes after adding the egg mixture. The custard should coat the back of a spoon and hold a line when you run your finger through it. If it’s still thin after 10 minutes of cooking and whisking, mix 1 tablespoon of cornstarch with 2 tablespoons of cold milk, whisk it in, and cook another 2-3 minutes.Q: Can I make this pie without eggs?
A: Eggs are essential to traditional chocolate cream pie as they provide the thick, custard-like texture. However, you could make a chocolate pudding pie using an egg-free chocolate pudding recipe thickened entirely with cornstarch, though the texture will be different—more pudding-like and less custardy.Q: How do I prevent my whipped cream from deflating?
A: Use cream with at least 36% fat content, make sure everything is very cold (bowl, beaters, cream), and don’t overbeat—stop as soon as stiff peaks form. For longer stability, add 1 tablespoon of instant vanilla pudding mix or 1 teaspoon of unflavored gelatin (bloomed in 1 tablespoon of cold water and microwaved for 5-10 seconds) to the cream as you whip it.Q: My chocolate filling is grainy. How can I fix it?
A: Graininess usually comes from chocolate that didn’t melt smoothly or from sugar that crystallized. Make sure you’re using high-quality chocolate (not chips) and that you remove the custard from heat before adding the chocolate so it melts gently from residual heat. If it’s already grainy, try blending the warm filling in a blender for 30-60 seconds, which can smooth it out. Straining is also essential—it catches any graininess.Q: Can I use a graham cracker crust instead of pastry crust?
A: Absolutely! A graham cracker crust (or even Oreo cookie crust) works wonderfully with chocolate cream pie and is easier to make. Simply mix 1½ cups of graham cracker crumbs with 6 tablespoons of melted butter and 2 tablespoons of sugar, press into your pie dish, and bake at 350°F for 8-10 minutes. Cool completely before filling.Q: The pie is perfect but hard to slice. Any tips?
A: Use a sharp chef’s knife and dip it in hot water, then wipe dry between each slice. The warm knife glides through the cold filling and whipped cream cleanly. Also, make sure the pie is thoroughly chilled—a warm or room-temperature pie is nearly impossible to slice neatly.Q: How can I tell when the custard is done cooking?
A: The custard is ready when it thickly coats the back of a wooden spoon and holds a clear line when you draw your finger through it. It should be maintaining gentle bubbles (not a rolling boil) and will continue to thicken as it cools. If you have an instant-read thermometer, aim for 170-180°F.Conclusion
There’s something wonderfully satisfying about pulling a homemade chocolate cream pie from your refrigerator—the kind that makes people’s eyes light up the moment they see that gorgeous, cloud-like whipped cream topping. This recipe delivers that “wow” factor every single time, while remaining accessible enough for bakers of all skill levels.
Whether you’re making this chocolate cream pie for a special celebration, bringing it to a potluck where you want to be remembered, or simply treating yourself and your loved ones to something extraordinary, I promise it will not disappoint. The combination of that flaky crust, silky chocolate custard, and billowy fresh whipped cream is absolutely magical.
I’d love to hear how your chocolate cream pie turns out! Did you add any creative touches? Try a flavor variation? Have questions as you bake? Drop a comment below—I read and respond to every single one. And if you love this recipe, please share it on Pinterest so other home bakers can discover it too. There’s nothing better than spreading the joy of homemade pie!
Now go forth and bake something beautiful! 🥧💛