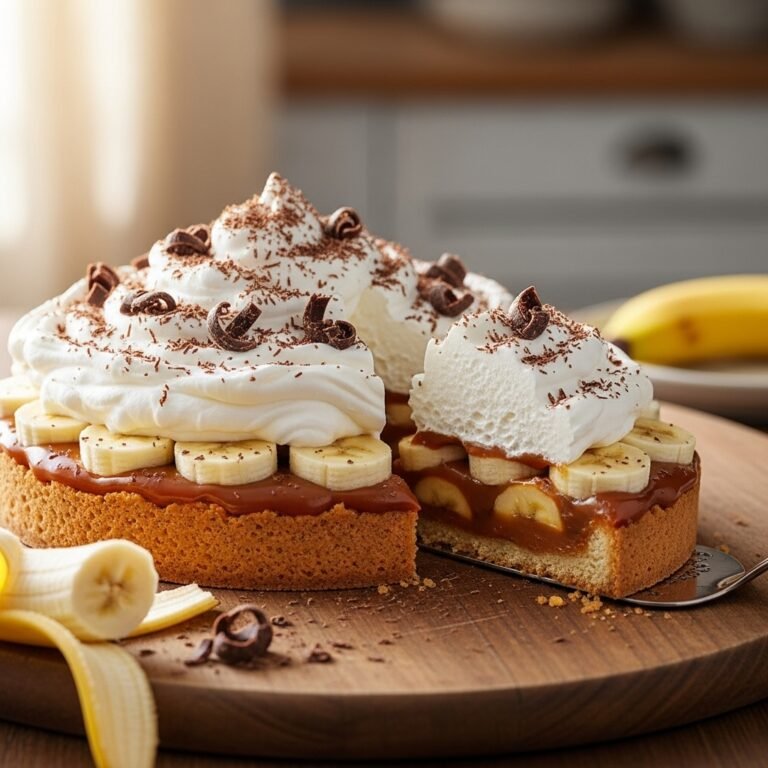
The Ultimate Banoffee Pie Recipe: No-Bake British Dessert Perfection

Get ready to fall head over heels for Banoffee Pie—the irresistibly decadent British dessert that combines a buttery biscuit crust, luscious toffee made from sweetened condensed milk, fresh banana slices, and billowy clouds of whipped cream. This no-bake wonder is what dessert dreams are made of, and once you taste that perfect harmony of sweet toffee, creamy bananas, and crispy crust, you’ll understand why it’s become a beloved classic on both sides of the Atlantic.
The name “Banoffee” is a delightful portmanteau of “banana” and “toffee,” and it perfectly captures the essence of this show-stopping pie. What makes Banoffee Pie so special is the magical transformation of condensed milk into dulce de leche (that thick, golden caramel), which creates an incredibly rich and smooth toffee layer that’s simply addictive. Combined with the fresh sweetness of ripe bananas and the lightness of whipped cream, every bite delivers multiple textures and flavors that somehow work in perfect harmony.
This dessert is perfect for summer gatherings when you don’t want to turn on the oven, holiday celebrations, potlucks, birthday parties, or any time you want to wow your guests with minimal effort. It looks impressive, tastes absolutely divine, and requires no baking skills whatsoever—just assembly! Whether you’re an experienced baker or a complete novice, Banoffee Pie is forgiving, fun to make, and guaranteed to earn you rave reviews from everyone who tries it.
History / Background
Banoffee Pie has a surprisingly recent and well-documented origin story that begins in 1971 at The Hungry Monk restaurant in Jevington, a tiny village in East Sussex, England. The restaurant’s owner, Nigel Mackenzie, and his chef, Ian Dowding, were experimenting with an American recipe for something called “Blum’s Coffee Toffee Pie” when inspiration struck. They decided to substitute bananas for the coffee flavor, and just like that, an iconic dessert was born.
The original Banoffee Pie was first served at The Hungry Monk in 1972, and it quickly became the restaurant’s signature dessert. Word spread rapidly throughout England about this extraordinary combination of flavors and textures. The dessert’s popularity exploded throughout the 1970s and 80s, becoming a staple in British restaurants, cafes, and home kitchens. The Hungry Monk even trademarked the name “Banoffi Pie” (with one ‘e’), though the more common spelling “Banoffee” has since become standard.
What’s particularly fascinating about Banoffee Pie is how it represents the perfect marriage of British ingenuity and international influences. The technique of boiling condensed milk to create caramel (dulce de leche) is a Latin American tradition that had been practiced for generations, particularly in Argentina and throughout South America. British cooks discovered this method and adapted it to create something entirely new and distinctly British.
The dessert crossed the Atlantic in the 1980s and gained popularity in the United States, Australia, and beyond. Today, Banoffee Pie has achieved global recognition as a contemporary classic—a relatively young dessert that has quickly earned its place in the canon of beloved international sweets. The Hungry Monk restaurant sadly closed in 2012, but its legacy lives on in every Banoffee Pie made around the world.
Ian Dowding, the chef who co-created this masterpiece, passed away in 2016, but he lived to see his creation become a worldwide phenomenon. His simple yet brilliant idea to combine bananas with toffee has brought joy to millions of dessert lovers and inspired countless variations. It’s a testament to how sometimes the best recipes come from creative experimentation and a willingness to try something new.
Why You’ll Love This Recipe
Banoffee Pie is one of those magical desserts that looks and tastes like you spent hours in the kitchen, but the reality is wonderfully different. This recipe delivers maximum impact with minimal effort, making it perfect for busy home cooks who still want to serve something truly special and memorable.
Here’s what makes this recipe absolutely irresistible:
- No baking required – Perfect for hot summer days or when you don’t want to heat up the kitchen
- Simple ingredient list – Uses accessible ingredients you can find at any grocery store
- Make-ahead friendly – Most components can be prepared in advance for stress-free entertaining
- Crowd-pleaser guaranteed – I’ve never met anyone who doesn’t love this combination of flavors
- Impressive presentation – Looks like a professional bakery creation with minimal effort
- Perfect texture contrast – Crispy crust, smooth toffee, soft bananas, and fluffy cream create magic
- Customizable – Easy to adapt with different crusts, toppings, or flavor variations
- Budget-friendly – Uses affordable ingredients that don’t break the bank
- Kid-friendly – Children and adults alike go crazy for this sweet treat
- Great for entertaining – Can easily feed 8-10 people with one pie
- No special skills needed – If you can stir and spread, you can make this pie!
Ingredient Notes
Understanding your ingredients and why they matter will help you create the best possible Banoffee Pie. Let’s break down each component and explore what makes them essential.
Graham Crackers or Digestive Biscuits: These form the foundation of your crust. Traditional British Banoffee Pie uses digestive biscuits (similar to graham crackers but slightly less sweet and more wheat-forward in flavor). In the US, graham crackers are the perfect substitute and are more readily available. You’ll need about 2 cups of crumbs, which is roughly 16-18 graham cracker sheets. For a more authentic British flavor, seek out McVitie’s Digestive Biscuits in the international aisle.
Butter: Unsalted butter is best so you can control the salt level in your crust. The melted butter binds the cookie crumbs together to create that perfect pressed crust that holds its shape when sliced. Make sure it’s fully melted but not hot, and use real butter—not margarine—for the best flavor and texture.
Sweetened Condensed Milk: This is the star ingredient that transforms into that gorgeous dulce de leche toffee layer. Do not substitute with evaporated milk—they’re completely different products! Sweetened condensed milk is thick, sweet, and caramelizes beautifully when cooked. You’ll need one 14-ounce can. Some cooks make their own dulce de leche by boiling the unopened can (we’ll discuss safety in the instructions), while others prefer the convenience of store-bought dulce de leche.
Bananas: Choose bananas that are ripe but still firm—yellow with minimal brown spots. Overly ripe, mushy bananas won’t hold their shape when sliced and can make the pie watery. You’ll need 2-3 medium bananas depending on their size. Slice them just before assembling to prevent browning, or toss them in a little lemon juice if you need to prep ahead.
Heavy Whipping Cream: The cream must be cold from the refrigerator to whip properly. Heavy cream (also called heavy whipping cream) with at least 36% fat content is essential—light cream or half-and-half won’t whip. This creates those beautiful, stable peaks of whipped cream that crown your pie. Don’t use pre-made whipped topping like Cool Whip for the best flavor and texture, though it can work in a pinch.
Powdered Sugar: Also called confectioners’ sugar or icing sugar, this sweetens and stabilizes your whipped cream without the grittiness of granulated sugar. The small amount of cornstarch in powdered sugar also helps the whipped cream hold its shape longer.
Vanilla Extract: Pure vanilla extract adds warmth and depth to the whipped cream. It’s a small addition that makes a noticeable difference in flavor. Always use pure extract rather than imitation for the best results.
Chocolate (optional but recommended): Grated or shaved dark chocolate, chocolate curls, or a drizzle of chocolate sauce adds visual appeal and a complementary flavor that elevates the pie. Semi-sweet or dark chocolate works beautifully—milk chocolate can be too sweet.
Equipment Needed
Having the right tools makes assembling Banoffee Pie even easier. Here’s what you’ll need:
- 9-inch pie dish – A standard glass or ceramic pie plate works perfectly
- Food processor or plastic bag + rolling pin – For crushing graham crackers into fine crumbs
- Medium saucepan – For making dulce de leche if cooking your own
- Large mixing bowl – For whipping the cream
- Stand mixer or hand mixer – Makes whipping cream much easier, though you can whisk by hand
- Rubber spatula – For spreading toffee and whipped cream smoothly
- Measuring cups and spoons – For accurate ingredient measurements
- Sharp knife – For slicing bananas evenly
- Whisk – If making dulce de leche on the stovetop
- Plastic wrap or aluminum foil – For covering the pie while it chills
- Cutting board – For banana prep
- Tongs – If using the boiling can method for dulce de leche
- Large pot with lid – If using the traditional can-boiling method
Banoffee Pie Recipe
This classic Banoffee Pie features a buttery graham cracker crust, rich dulce de leche toffee layer, fresh banana slices, and billowy whipped cream. It’s a no-bake British dessert that’s incredibly easy to make yet impressively delicious and perfect for any occasion.
- Total Time: 4 hours (includes chilling time)
- Yield: 8-10 servings 1x
Ingredients
For the Graham Cracker Crust:
- 2 cups (200g) graham cracker crumbs (about 16-18 full graham crackers)
- ½ cup (115g) unsalted butter, melted
- 2 tablespoons granulated sugar
- Pinch of salt
For the Toffee Layer:
- 1 can (14 oz/397g) sweetened condensed milk
- OR 1¼ cups store-bought dulce de leche
For the Banana Layer:
- 2-3 medium ripe but firm bananas
- 1 tablespoon fresh lemon juice (optional, to prevent browning)
For the Whipped Cream Topping:
- 1½ cups (360ml) heavy whipping cream, cold
- 3 tablespoons powdered sugar
- 1 teaspoon pure vanilla extract
For Garnish (optional but recommended):
- Chocolate shavings, grated chocolate, or chocolate curls
- Cocoa powder for dusting
- Extra banana slices
- Toffee bits or crushed cookies
Instructions
Step 1: Make the Dulce de Leche (If Making Your Own)
If using store-bought dulce de leche, skip to Step 2. To make your own: Pour the sweetened condensed milk into a medium saucepan. Cook over medium-low heat, stirring constantly with a whisk or wooden spoon for 20-25 minutes until it thickens and turns a deep golden caramel color. The mixture will darken considerably and become thick enough that you can see the bottom of the pan when you stir. Remove from heat and let it cool completely. Alternatively, use the traditional can method: Remove the label from an unopened can of sweetened condensed milk, place it on its side in a large pot, cover with water by at least 2 inches, bring to a boil, then reduce to a simmer. Simmer for 2-3 hours, checking every 30 minutes to ensure the can remains covered with water. Remove carefully with tongs and let cool completely before opening. Safety note: Never let the water level drop below the can or it could explode!
Step 2: Prepare the Crust
Preheat your oven to 350°F (175°C) if you want to bake the crust for extra crispness (optional but recommended). Add graham crackers to a food processor and pulse until fine crumbs form. Alternatively, place crackers in a sealed plastic bag and crush with a rolling pin until finely ground. Transfer crumbs to a medium bowl, add the melted butter, sugar, and a pinch of salt. Mix with a fork until the mixture resembles wet sand and holds together when squeezed.
Step 3: Press and Bake the Crust
Pour the graham cracker mixture into a 9-inch pie dish. Using the bottom of a flat measuring cup or glass, press the mixture firmly and evenly into the bottom and up the sides of the pie dish. Make sure to pack it tightly so it doesn’t crumble when sliced. For extra stability, bake the crust for 10 minutes until lightly golden and fragrant. Let it cool completely on a wire rack before filling. If you prefer a no-bake crust, simply refrigerate for 30 minutes to firm up instead of baking.
Step 4: Add the Toffee Layer
Once your dulce de leche has cooled completely, spread it evenly over the cooled crust using a rubber spatula or offset spatula. Create a smooth, even layer that reaches all the way to the edges. The toffee layer should be about ½ inch thick. If it’s too thick to spread easily, warm it slightly in the microwave for 10-15 seconds, stir, and try again. Refrigerate the pie for 15-20 minutes to let the toffee layer set slightly.
Step 5: Slice and Layer the Bananas
Just before assembling (bananas brown quickly once sliced), peel your bananas and slice them into ¼-inch thick rounds. If you’re worried about browning, gently toss the banana slices with 1 tablespoon of fresh lemon juice in a bowl—this will keep them looking fresh. Arrange the banana slices in an overlapping pattern over the toffee layer, covering it completely. You can create concentric circles or just scatter them evenly—either way works beautifully!
Step 6: Make the Whipped Cream
In a large, clean mixing bowl (make sure it’s cold—you can even chill it in the freezer for 10 minutes), add the cold heavy whipping cream, powdered sugar, and vanilla extract. Using a hand mixer or stand mixer with the whisk attachment, beat on medium-low speed for 30 seconds, then increase to medium-high. Whip for 2-4 minutes until stiff peaks form—when you lift the beaters, the cream should stand up in peaks that hold their shape without drooping. Be careful not to overwhip or you’ll end up with butter! Stop as soon as you see stiff peaks.
Step 7: Top with Whipped Cream
Spoon or pipe the whipped cream over the banana layer, covering it completely and creating beautiful swirls and peaks. You can use the back of a spoon to create rustic swirls, or transfer the whipped cream to a piping bag fitted with a large star tip for a more elegant presentation. Make sure the cream goes all the way to the edges to seal in the bananas and prevent browning.
Step 8: Garnish and Chill
This is where you can get creative! Use a vegetable peeler to create chocolate curls from a chocolate bar, or simply grate chocolate over the top. Dust with cocoa powder, add a few extra banana slices, scatter toffee bits, or keep it simple. Cover the pie loosely with plastic wrap or a pie cover, being careful not to let it touch the whipped cream. Refrigerate for at least 2-3 hours before serving to allow all the layers to set and flavors to meld. The pie is best served cold!
Step 9: Slice and Serve
When ready to serve, use a sharp knife dipped in hot water and wiped dry between each cut for clean slices. Serve immediately and watch as everyone’s eyes light up when they see those gorgeous layers! The combination of textures and flavors is truly magical.
Notes
- Make dulce de leche ahead – This can be made up to 1 week in advance and stored in the refrigerator
- Banana browning prevention – Assemble the pie within 4-6 hours of serving for the freshest-looking bananas
- Whipped cream stability – For longer-lasting whipped cream, add 1 tablespoon of cornstarch or instant pudding mix
- Crust firmness – Baking the crust makes it sturdier and easier to slice cleanly
- Storage – Best consumed within 24 hours of assembly for optimal texture
- Can method safety – If making dulce de leche by boiling the can, NEVER let the water level drop below the top of the can
- Prep Time: 30 minutes
- Cook Time: 10 minutes (for crust) + 2-3 hours (if making dulce de leche)
- Category: Dessert
- Method: No-Bake
- Cuisine: British
- Diet: Vegetarian
Nutrition
- Serving Size: 1 slice (⅛ of pie)
- Calories: 485
- Sugar: 42g
- Sodium: 195mg
- Fat: 26g
- Saturated Fat: 16g
- Unsaturated Fat: 8g
- Trans Fat: 0g
- Carbohydrates: 58g
- Fiber: 1.5g
- Protein: 6g
- Cholesterol: 75mg
Tips & Variations
Crust Variations:
- Chocolate Cookie Crust: Use Oreos (filling removed) or chocolate graham crackers for a chocolate twist
- Pretzel Crust: Replace graham crackers with crushed pretzels for a sweet-salty combination
- Gingersnap Crust: Use gingersnap cookies for a spiced flavor that complements the toffee
- Gluten-Free: Use gluten-free graham crackers or cookies
- Nut Crust: Mix ½ cup finely ground pecans or walnuts into the graham cracker mixture
Toffee Layer Enhancements:
- Salted Caramel: Sprinkle flaky sea salt over the toffee layer before adding bananas
- Coffee Toffee: Stir 1 tablespoon instant espresso powder into the dulce de leche
- Bourbon Toffee: Add 1-2 tablespoons bourbon to the cooled dulce de leche for adult flavor
Banana Alternatives or Additions:
- Sliced Strawberries: Layer fresh strawberry slices with or instead of bananas
- Mixed Berries: Use raspberries, blueberries, and strawberries for a fruit medley
- Caramelized Bananas: Briefly sauté banana slices in butter and brown sugar before layering
Topping Variations:
- Chocolate Whipped Cream: Add 2 tablespoons cocoa powder to the whipped cream
- Coffee Whipped Cream: Add 1 tablespoon instant espresso powder to the cream
- Stabilized Whipped Cream: Add 1 tablespoon cornstarch or instant vanilla pudding mix for longer-lasting peaks
- Mascarpone Cream: Replace half the whipped cream with mascarpone cheese for richness
Garnish Ideas:
- Chocolate drizzle or ganache
- Caramel sauce drizzle
- Crushed toffee bits or Heath bars
- Toasted coconut flakes
- Chopped nuts (pecans, walnuts, or hazelnuts)
- Fresh mint leaves for color contrast
Pro Chef Tips
The Perfect Dulce de Leche Consistency: Professional pastry chefs know that the ideal dulce de leche for Banoffee Pie should be thick enough to spread but not so thick it’s difficult to work with. If you’re making your own on the stovetop, cook it until it’s a deep amber color and thick enough that when you drag a spoon through it, you can briefly see the bottom of the pan. If it’s too thick after cooling, microwave for 10-15 seconds and stir—it should be spreadable but not runny.
Preventing Soggy Crust: Here’s a pro trick: after baking and cooling your crust, brush the bottom with a thin layer of melted chocolate and let it set before adding the toffee layer. This creates a moisture barrier that keeps the crust crispy for longer. Alternatively, spread a very thin layer of the dulce de leche on the crust, refrigerate until firm (about 15 minutes), then add the main toffee layer. This seals the crust and prevents sogginess.
Banana Selection and Timing: Professional bakers know that timing is everything with bananas in Banoffee Pie. Choose bananas that are yellow with very few brown spots—they should be sweet but still slightly firm. Assemble the pie no more than 4-6 hours before serving for the best appearance and texture. If you must prep further ahead, brush the banana slices generously with lemon juice mixed with a little water (1:1 ratio), which slows browning significantly without making them taste too lemony.
Whipped Cream Stability Secret: For whipped cream that holds its shape for hours without weeping or deflating, pastry chefs use this trick: add 1 tablespoon of instant vanilla pudding mix (dry, not prepared) to your cream before whipping. This stabilizes the cream without affecting flavor, and your pie will look perfect even after sitting in the refrigerator for several hours. Alternatively, bloom 1 teaspoon unflavored gelatin in 2 tablespoons of cold water, heat until dissolved, cool slightly, then drizzle into the cream while whipping.
The Temperature Balance: Everything should be the right temperature for optimal assembly. The crust must be completely cool before adding toffee (warm crust will melt the toffee). The dulce de leche should be at room temperature for easy spreading (too cold and it won’t spread; too warm and it will be runny). The whipping cream must be very cold (35-40°F) to whip properly. Professional kitchens even chill their mixing bowls and beaters in the freezer for 10-15 minutes before whipping cream for maximum volume and stability.
The Clean Slice Technique: For picture-perfect slices worthy of a professional bakery, use this method: dip your knife in very hot water, wipe it completely dry with a towel, then make one smooth cut through the pie. Wipe the knife clean, dip in hot water again, dry, and make the next cut. This technique melts through each layer cleanly without dragging the whipped cream or smearing the layers. It takes an extra minute but makes a dramatic difference in presentation.
Common Mistakes to Avoid
Assembling Too Far in Advance: The biggest mistake home cooks make with Banoffee Pie is assembling it too early. While the crust and toffee layer can (and should) be made ahead, the bananas brown and become mushy if they sit too long, and the crust can become soggy. For best results, add the banana layer and whipped cream topping no more than 4-6 hours before serving. If you need to prep everything in advance, keep the components separate and assemble a few hours before your event.
Using Overly Ripe Bananas: While super-ripe bananas are perfect for banana bread, they’re too soft and sweet for Banoffee Pie. Overripe bananas will turn mushy, release excess moisture that makes everything soggy, and brown much more quickly. Choose bananas that are yellow with minimal brown spotting—ripe enough to be sweet but firm enough to hold their shape when sliced and layered.
Not Letting the Dulce de Leche Cool Completely: Impatience is the enemy here! If you spread warm or even lukewarm dulce de leche onto your crust, it will make the crust soggy and can even cause it to fall apart. The toffee must be completely cooled to room temperature before assembly. If you’re in a hurry, spread it in a thin layer on a plate and refrigerate for faster cooling, then spread it onto your crust once it’s reached room temperature.
Overwhipping the Cream: There’s a fine line between perfect whipped cream and butter, and it’s easy to cross it if you’re not paying attention. Once your cream starts to thicken, watch it carefully. Stop beating as soon as stiff peaks form—when you lift the beaters, the peaks should stand straight up without drooping. If you continue beating past this point, the cream will become grainy, then separate into butter and buttermilk. If this happens, you’ll need to start over with fresh cream.
Using a Wet or Greasy Bowl for Whipping Cream: Even tiny amounts of water, oil, or residue in your bowl or on your beaters will prevent cream from whipping properly. Make sure everything is completely clean and dry before you start. Pastry chefs often wipe their bowls and beaters with a little white vinegar and then dry them thoroughly to ensure no fat residue remains that could interfere with whipping.
Storage & Meal Prep
Refrigerator Storage: Assembled Banoffee Pie should be covered and stored in the refrigerator for up to 24 hours maximum. After that, the bananas will brown significantly, the crust will become quite soft, and the whipped cream may start to weep. For best appearance and texture, plan to serve the pie within 6-8 hours of assembly. Cover loosely with plastic wrap or a pie cover, making sure the wrap doesn’t touch the whipped cream topping.
Component Storage: This is where smart meal prep comes in! You can make and store components separately for much longer: The baked crust can be made 2-3 days ahead, cooled completely, covered tightly, and stored at room temperature. The dulce de leche can be made up to 1 week ahead and stored in an airtight container in the refrigerator (bring to room temperature before using). This strategy allows you to do most of the work in advance and just assemble the fresh bananas and whipped cream on the day of serving.
Leftover Storage: If you have leftover pie, cover it well and refrigerate. It will keep for another day, though the bananas will be quite brown and the crust will be softer. The flavor is still delicious, but the appearance and texture won’t be at their peak. Some people don’t mind this (they say it tastes even better the next day!), while others prefer Banoffee Pie at its freshest.
Whipped Cream Note: Freshly whipped cream begins to deflate and weep after several hours, even when refrigerated. If your pie has been sitting for a while and the cream looks a bit sad, you can scoop it off, whip it briefly to revive it, and re-spread it on the pie. Alternatively, use stabilized whipped cream (see Pro Chef Tips) which holds up much better over time.
Make-Ahead & Freezer Notes
Strategic Make-Ahead Assembly: The secret to stress-free entertaining with Banoffee Pie is strategic component prep. Here’s the ideal timeline: 2-3 days before: Make and bake the crust, cool completely, cover tightly, store at room temperature. 1-7 days before: Make the dulce de leche, cool, store in the refrigerator in an airtight container. Day of serving (4-6 hours before): Spread room-temperature dulce de leche on crust, add banana layer, make and add whipped cream, garnish, and refrigerate until serving time. This approach gives you all the convenience of advance prep without sacrificing freshness.
Freezing the Crust: The graham cracker crust freezes beautifully for up to 3 months! Make the crust, press it into the pie dish, bake it, cool completely, then wrap the entire pie dish tightly in plastic wrap and aluminum foil. Freeze flat. Thaw at room temperature for 1-2 hours before filling. This is a great option if you want to get a head start for holiday baking.
Freezing Dulce de Leche: Homemade or store-bought dulce de leche freezes perfectly for up to 3 months in an airtight container. Thaw overnight in the refrigerator, then bring to room temperature and stir well before using. If it seems too thick after thawing, microwave for 10-15 seconds and stir until spreadable.
Freezing the Assembled Pie (Not Recommended): While technically possible, I don’t recommend freezing assembled Banoffee Pie. The bananas become mushy and brown when thawed, the whipped cream weeps and separates, and the crust can become soggy. The texture and appearance suffer significantly. If you absolutely must freeze it, wrap it very well and freeze for up to 1 month, but expect compromised quality when thawed.
Thawing and Serving: If you’ve frozen just the crust or just the dulce de leche, thaw them completely before assembling. Never try to assemble a pie with frozen components—the temperature differences will cause condensation and sogginess. Always assemble with room-temperature components for best results.
Serving Suggestions
Banoffee Pie is rich and indulgent, so it pairs beautifully with beverages and accompaniments that provide contrast and balance.
Coffee Pairings: The natural partner for Banoffee Pie is a strong cup of coffee or espresso. The slight bitterness of coffee cuts through the sweetness of the toffee and cream perfectly. Try it with a cappuccino, Americano, or even a latte. The warmth of the coffee against the cold pie creates a lovely temperature contrast that enhances both.
Tea Service: For a proper British afternoon tea experience, serve Banoffee Pie with strong black tea like English Breakfast or Earl Grey. The tannins in black tea cleanse your palate between bites of the rich dessert. For something lighter, try it with chai tea—the warm spices complement the caramel flavors beautifully.
Fresh Fruit: Balance the richness with fresh berries on the side—raspberries, strawberries, or blackberries add tartness and freshness that refreshes your palate. The fruit provides both visual appeal and a flavor counterpoint that keeps the dessert from feeling too heavy.
Ice Cream: While Banoffee Pie is already decadent on its own, a small scoop of vanilla ice cream or salted caramel ice cream alongside each slice takes it to the next level. The cold, creamy ice cream melting into the pie creates an amazing texture contrast.
Portion Size Matters: Because Banoffee Pie is so rich, serve smaller slices than you might with other pies. A standard 9-inch pie easily serves 10-12 people when cut into slim slices. This richness is part of its appeal—a little goes a long way, and guests will feel satisfied without feeling overly full.
Presentation Ideas: Serve each slice on a white plate with a light dusting of cocoa powder around the plate rim, a few fresh berries, a small dollop of extra whipped cream, and a sprig of fresh mint. This restaurant-style plating elevates the presentation and makes a special occasion feel even more special.
FAQs Section
Can I use store-bought dulce de leche instead of making my own?
Absolutely! Store-bought dulce de leche (found near the condensed milk in most grocery stores) works perfectly and saves you considerable time. Brands like La Lechera or Nestlé make excellent dulce de leche. You’ll need about 1 to 1¼ cups. The homemade version has a slightly more complex flavor, but store-bought is convenient and delicious. Some people can’t tell the difference!
How do I prevent my bananas from turning brown?
The best strategy is timing—assemble the banana layer no more than 4-6 hours before serving. For extra insurance, toss your banana slices gently in a mixture of lemon juice and water (1 tablespoon lemon juice to 2 tablespoons water) before layering. The acid slows browning significantly. Make sure to cover the bananas completely with whipped cream, as exposure to air causes browning. Some bakers brush the toffee layer with lemon juice before adding bananas for an extra barrier.
Can I make Banoffee Pie without the crust?
Yes! You can make individual no-crust Banoffee Pies in small glasses, jars, or dessert cups. Layer the dulce de leche, bananas, and whipped cream in clear containers for a beautiful presentation. Some people even crumble the graham crackers and layer them like a parfait instead of making a pressed crust. These individual servings are perfect for parties and actually hold up better than traditional pie since there’s no crust to get soggy.
Is there a safe way to make dulce de leche in the can?
Yes, but you must follow safety precautions carefully. Place the unopened, label-removed can on its side in a large pot and cover it with water by at least 2 inches. Bring to a boil, then reduce to a gentle simmer. Simmer for 2-3 hours (2 hours for lighter caramel, 3 hours for darker), checking every 30 minutes to ensure the can remains completely submerged. Add more boiling water as needed. NEVER let the water level drop below the top of the can or it can explode. After cooking, use tongs to remove the can and let it cool completely (at least 2 hours) before opening. Some people prefer the stovetop method for more control and less anxiety.
Why did my whipped cream turn out runny or won’t whip?
Several factors can prevent cream from whipping properly: The cream wasn’t cold enough (it must be 35-40°F from the refrigerator), your bowl or beaters had water or grease residue on them, you used light cream or half-an